Search Results for: app development

How To Customize Shopify Themes with Theme + Asset API

We have a Shopify App Development Course! Be one of the first students!

Are you looking for an in-depth guide on how to create Shopify apps? Click the enroll button !

Building a brand is never an easy task for everyone especially these days. With too many competitors popping out of nowhere, the only way to get your brand well-known is by selling a completely new product that is not yet discovered in the market.

Shopify offers you mostly with everything for selling products but there are further steps that you can do to increase your chances of getting known to the public.

If you are a developer and you own a Shopify store, you are one step ahead of your competitors! You can use your programming skills to develop additional features that your competitors don’t have yet in their store. However, if you don’t know how to write codes then you can always hire Shopify developers to do the job for you.

One of the tricks is to customize Shopify themes that will make your online store stand out from other brands. Building Shopify themes can be also one of the tricks that you can do if you are a developer.

In this tutorial, we’ll guide you on how to customize Shopify themes using Theme API and Asset API from Shopify API version 2021-01.

Getting Started

Before we begin with this tutorial, we’ll assume that you already have your Shopify app installed in your development store. Also, we’ll assume that you are using the same script that we’re using to interact with Shopify API.

If you haven’t setup your Shopify app yet then we highly recommend you to follow WeeklyHow’s YouTube channel and watch our Shopify App Development tutorial series.

Customizing Shopify Themes

Whether it’s a premium Shopify theme or a free Shopify theme, you can customize that using Shopify apps. To start customizing themes you will need an app that has access to themes and its assets. Otherwise, you will see an error such as:

This action requires merchant approval for the read_themes scope error


How can you have access to themes and their assets?

The answer is very easy and simple.

You only need to add additional access scopes to your install script.

Open your install.php file and look for the $scopes variable.

If you have been following our Shopify app development series then you probably have a$scopes variable that looks something like this:

$scopes = "read_orders,write_products";Code language: PHP (php)

To have access to your themes, you will need the following access scopes:

  • read_themes
  • write_themes

You can also use other access scopes such as write_script_tags and read_script_tags to install javascript files to your Shopify store.

With all that being said, your $scopes variable should look something like this:

$scopes = "read_orders,write_products,read_themes,write_themes";Code language: PHP (php)

Keep in mind that you should never add spaces between these scopes otherwise, you will get an error.

Save your install.php file and install the app in your store.

You should see the following page:

Installing Shopify apps to a Shopify store with Theme API

Shopify Theme API

Before you can customize your Shopify theme, you have to list down first all the themes you have in your Shopify store. You can do this using Shopify Theme API.

After getting all the themes available in your Shopify store, that’s the time you can select which theme you want to customize.

There are three types of themes that might be present in your Shopify store.

  • Main theme
  • Unpublished
  • Demo

Main theme is the published theme that is currently viewable by everyone. Whereas unpublished is the theme that is not viewable by everyone. The demo is the theme that you can’t publish unless you purchase the full version of the theme.

With that being said, we’ll be using the main theme and its assets to display a simple text in the homepage.

To do that, we’ll use the following code.

$token = "xxxxxxxxxxxxxxxxxxxxxxxxxxxxxxxxxxxx";
$shop = "weeklyhow";
$theme = shopify_call($token, $shop, "/admin/api/2021-01/themes.json", array(), 'GET');
$theme = json_decode($theme['response'], JSON_PRETTY_PRINT);
Code language: PHP (php)

Replace the value of the $token variable with the token you have generated. Again, if you don’t have an access token you can always read our generating access token guide.

Next, replace the value of the $shop variable with your store subdomain.

For example, we have weeklyhow.myshopify.com.

Then we’ll only get the subdomain which is weeklyhow.

After that, we’ll use the shopify_call() function to get all the themes in our store using the theme API.

Next, we’ll use foreach() functions to get the main theme and then we’ll display which theme we’re currently using.

foreach ($theme as $cur_theme) {
	foreach ($cur_theme as $key => $value) {
		if($value['role'] === 'main') {
			$theme_id = $value['id'];
			$theme_name = $value['name'];

			echo "Theme ID: " . $theme_id . "<br />";
			echo "Theme Name: " . $theme_name . "<br />";
		}
	}
}
Code language: PHP (php)

You should see the following output.

Displaying Shopify themes with Shopify Theme API and PHP

Shopify Asset API

A theme is constructed by its assets. These assets consisted of templates, images, stylesheets, and javascript can be customized using asset API.

Before you can modify asset files, you will need to provide at least one theme ID which can be retrieved using theme API.

We’ll be using the theme ID displayed in our Shopify app (displayed in the screenshot above). This ID could be different from yours so be sure that you copy your own theme ID instead of ours.

Now, we’re going to add a little code inside of the foreach() loop.

Copy and paste the following code underneath the echo statements.

$array = array(
	'asset' => array(
		'key' => 'templates/index.liquid', 
		'value' => '<h1>Hello World from WeeklyHow!</h1>'
	)
);

$assets = shopify_call($token, $shop, "/admin/api/2021-01/themes/".$value['id']."/assets.json", $array, 'PUT');
$assets = json_decode($assets['response'], JSON_PRETTY_PRINT);
Code language: PHP (php)

Your foreach loops should look something like this:

foreach ($theme as $cur_theme) {
	foreach ($cur_theme as $key => $value) {
		if($value['role'] === 'main') {
			echo "Theme ID: " . $value['id'] . "<br />";
			echo "Theme Name: " . $value['name'] . "<br />";

			$array = array(
				'asset' => array(
					'key' => 'templates/index.liquid', 
					'value' => '<h1>Hello World from WeeklyHow!</h1>'
				)
			);

			$assets = shopify_call($token, $shop, "/admin/api/2021-01/themes/".$value['id']."/assets.json", $array, 'PUT');
			$assets = json_decode($assets['response'], JSON_PRETTY_PRINT);
		}
	}
}
Code language: PHP (php)

Save your script and run your app.

Before & After

Before the app is installed, the storefront with the Debut theme installed should look something like this:

Shopify Debut theme Default shopify theme

After installing the Shopify app, and running the app.

Your index.liquid file will be modified and the result will look something like this:

Shopify Debut theme after installing Shopify app with theme API and asset API

It’s important to remember that once you run the app using the code above, all of the code inside the index.liquid file will be replaced.

If you only want to append a snippet code then the best way to do that is to get first the content of templates/index.liquid and then append the code that you want to add.

If you mistakenly replaced the codes, you can always undo your changes using Shopify code editor and change the date from current to a date that you desire.

Shopify theme code editor changing date changes

Conclusion

Customizing your Shopify store is one of the things that you can do to improve your customer’s experience. With Shopify’s Theme and Asset API, you can build additional features that your competitors don’t have yet in their brand.

For example, with Asset API, you can modify the theme.liquid file and add a script where it shows an alert window that you have an event or a promo.

We really hope that you have learned at least the basic usage of theme and asset API.

Let us know what you think in the comments below! If you encountered issues, don’t hesitate to contact us and we’ll do our best to help you.

How To Use Shopify Order API with Examples (ver. 2020-10)

I believe that making Shopify apps is one of the easiest projects any developer can do. With the help of Shopify API, you can build apps that can interact with store owners.

If you are new to Shopify App Development, we have written many articles about it to help you get started.

Here is the list of tutorials that you can use to start building your very first Shopify app:

If you have already built a Shopify app and you’re looking for tutorials to help you with Products API, you may check the following guidelines:

Introduction

In this article, we are going to learn together how to use Shopify Order API to interact with Shopify stores and its recent products that have been purchased by customers.

We’ll be also guiding you through how to properly set up your store to get started with Order API because this API is different from the last API that we have used.

But don’t worry. This is very easy to do and won’t take you much time as long as you understand how to use Shopify API.

Now, to begin.

Go to your Shopify Partner Dashboard, go to your apps, and select the app that you want to use for this project. If you have no apps yet, please refer to the tutorials that I have listed above.

How to Login to Shopify Partners Dashboard

With your app selected, go to App setup highlighted in the image below:

Shopify App Setup Example

Scroll down the page until you see the Orders section. Now, to access the last 60 days of orders of a store. You are required to ask for a request to have access to the store’s full order history.

You will be sending a request to Shopify and they will review your request if it’s actually acceptable. My advice is to be accurate with your answers and tell them your objectives of why you need store orders.
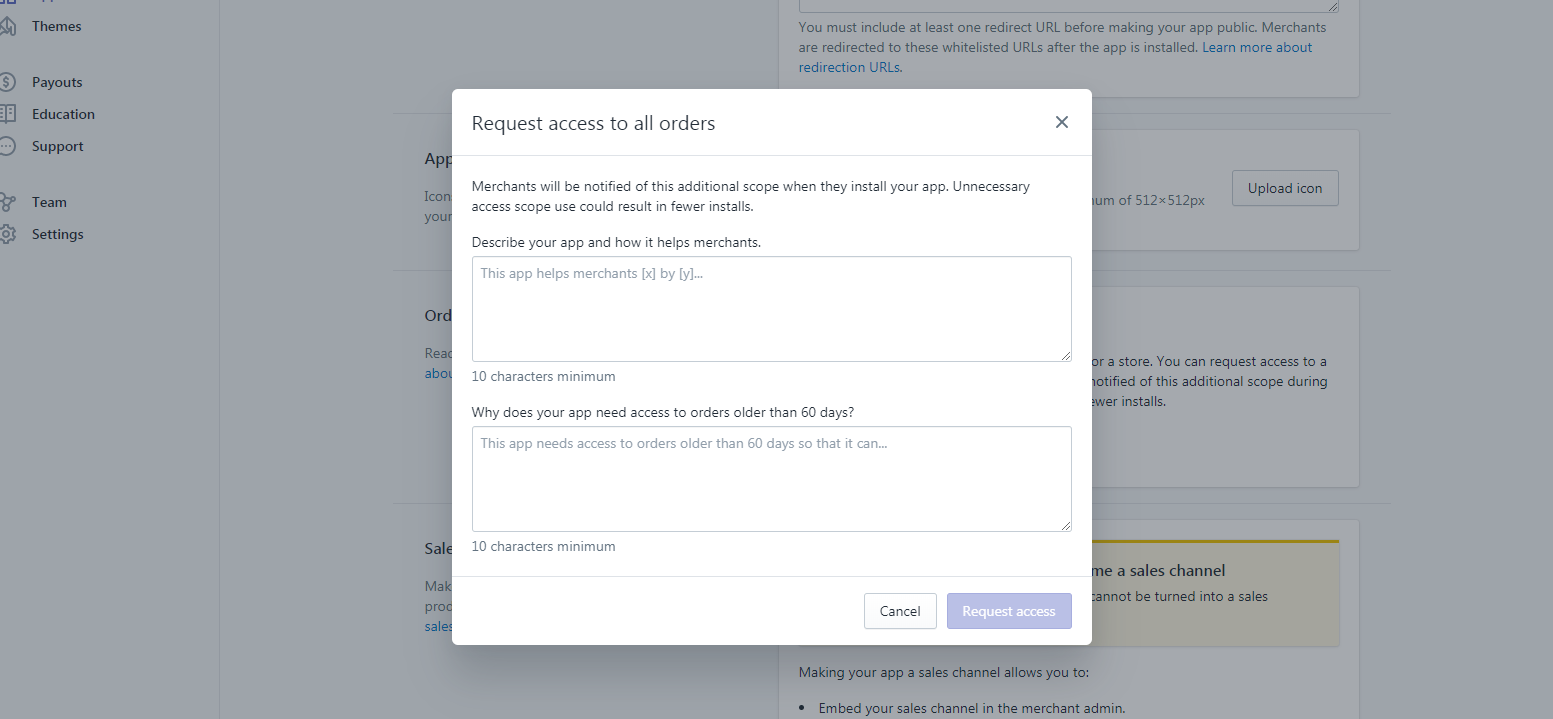
Requesting Access to Shopify Order API

Example Request

Describe your app and how it helps merchants.
This app will help merchants understand where the order is coming from, is it from organic store purchase? or is the order came through this app?

Why does your app need access to orders older than 60 days?
This app required access to orders older than 60 days to allow merchants to see if the purchases are made through this app or not

Once you have sent the request, Shopify will review your app and grant the request for accessing orders. Note that this will take two or three days to be reviewed.

Using Order API

Now you have access to Order API, let’s start with the basics and understand how the API works, and what can we do with the API?

Well, there are many things that you can do with Shopify Order API like listing the products that were purchased by the customer or show how much money they have spent on their shopping or retrieve what discount code they have. Sky is the limit!

Now, let’s start with coding.

We have a Shopify App Development Course! Be one of the first students!

Are you looking for an in-depth guide on how to create Shopify apps? Click the enroll button to get started!

Displaying List of Orders with Shopify Order API

Open your Shopify App project and create a new file and we’ll call it order_list.php. I’m certain that you already know where we’re heading with this.

Open the file with your favorite text editor and copy the code below.

<?php
ini_set("display_errors", 1);
error_reporting(E_ALL);
require_once("inc/functions.php");

$requests = $_GET;
$hmac = $_GET['hmac'];
$serializeArray = serialize($requests);
$requests = array_diff_key($requests, array('hmac' => ''));
ksort($requests);

$token ="PASTE_YOUR_TOKEN_KEY_HERE";
$shop = "PASTE_YOUR_SHOP_SUBDOMAIN_HERE";            //no 'myshopify.com' or 'https'

$storeURL = "https://". $shop . ".myshopify.com";

$array = array();
$orders = shopify_call($token, $shop, "/admin/api/2020-01/orders.json", $array, 'GET');
$orders = json_decode($orders['response'], JSON_PRETTY_PRINT);
Code language: PHP (php)

Make sure you have set the token and shop variables.

In the code above, we used ini_set("display_errors", 1); to see if there’s going to be errors in our code same with error reporting. Then reference the function.php which came from Shopify API Client made by Alex.

Next, we get the requests from $_GET variable and take the HMAC code. Basic stuff… Then, we’ll be using the generated token, and the shop name which the subdomain of your shop URL.

Next, we create a new array then call the shopify_call() function. Make sure we’re using:

/admin/api/2020-01/orders.json

And then we decode the JSON code pulled from Order API. Easy

Now, the next thing that we’re going to do is to actually get the values that we need. There are many parameters that we can pull the values from. Which will take a lot of understanding on how to actually get them.

Let’s start with the basics.

What if we want to list the orders from the last 60 days?

Order API / JSON Example

For example, Order API gave us this:

{
   "orders":[
      {
         "id":1314006663277,
         "email":"",
         "closed_at":null,
         "created_at":"2019-07-25T03:55:36-04:00",
         "updated_at":"2019-07-25T03:55:37-04:00",
         "number":1,
         "note":"",
         "token":"66126433dfba1ee5458a7d8109fc39ab",
         "gateway":"manual",
         "test":false,
         "total_price":"20.00",
         "subtotal_price":"20.00",
         "total_weight":0,
         "total_tax":"0.00",
         "taxes_included":false,
         "currency":"KYD",
         "financial_status":"paid",
         "confirmed":true,
         "total_discounts":"0.00",
         "total_line_items_price":"20.00",
         "cart_token":null,
         "buyer_accepts_marketing":false,
         "name":"#1001",
         "referring_site":null,
         "landing_site":null,
         "cancelled_at":null,
         "cancel_reason":null,
         "total_price_usd":"24.39",
         "checkout_token":null,
         "reference":null,
         "user_id":36034510957,
         "location_id":31541231725,
         "source_identifier":null,
         "source_url":null,
         "processed_at":"2019-07-25T03:55:36-04:00",
         "device_id":null,
         "phone":null,
         "customer_locale":null,
         "app_id":1354745,
         "browser_ip":null,
         "landing_site_ref":null,
         "order_number":1001,
         "discount_applications":[

         ],
         "discount_codes":[

         ],
         "note_attributes":[

         ],
         "payment_gateway_names":[
            "manual"
         ],
         "processing_method":"manual",
         "checkout_id":null,
         "source_name":"shopify_draft_order",
         "fulfillment_status":null,
         "tax_lines":[

         ],
         "tags":"",
         "contact_email":null,
         "order_status_url":"https:\/\/example.myshopify.com\/24705499245\/orders\/66126433dfba1ee5458a7d8109fc39ab\/authenticate?key=c50a543864a3b31d259342c48e7fe361",
         "presentment_currency":"KYD",
         "total_line_items_price_set":{
            "shop_money":{
               "amount":"20.00",
               "currency_code":"KYD"
            },
            "presentment_money":{
               "amount":"20.00",
               "currency_code":"KYD"
            }
         },
         "total_discounts_set":{
            "shop_money":{
               "amount":"0.00",
               "currency_code":"KYD"
            },
            "presentment_money":{
               "amount":"0.00",
               "currency_code":"KYD"
            }
         },
         "total_shipping_price_set":{
            "shop_money":{
               "amount":"0.00",
               "currency_code":"KYD"
            },
            "presentment_money":{
               "amount":"0.00",
               "currency_code":"KYD"
            }
         },
         "subtotal_price_set":{
            "shop_money":{
               "amount":"20.00",
               "currency_code":"KYD"
            },
            "presentment_money":{
               "amount":"20.00",
               "currency_code":"KYD"
            }
         },
         "total_price_set":{
            "shop_money":{
               "amount":"20.00",
               "currency_code":"KYD"
            },
            "presentment_money":{
               "amount":"20.00",
               "currency_code":"KYD"
            }
         },
         "total_tax_set":{
            "shop_money":{
               "amount":"0.00",
               "currency_code":"KYD"
            },
            "presentment_money":{
               "amount":"0.00",
               "currency_code":"KYD"
            }
         },
         "total_tip_received":"0.0",
         "admin_graphql_api_id":"gid:\/\/shopify\/Order\/xxxxxxxx",
         "line_items":[
            {
               "id":2842046857325,
               "variant_id":29366567829613,
               "title":"2019 Fashion Folding Women Big Size Handbag Tote Ladies Casual Flower Printing Canvas Graffiti Shoulder Bag Beach Bolsa Feminina",
               "quantity":1,
               "sku":"16845148-style-11-30cm-max-length-50cm",
               "variant_title":"Style 11 \/ (30cm\u003cMax Length\u003c50cm)",
               "vendor":"WeeklyHow",
               "fulfillment_service":"oberlo",
               "product_id":3922960416877,
               "requires_shipping":true,
               "taxable":false,
               "gift_card":false,
               "name":"2019 Fashion Folding Women Big Size Handbag Tote Ladies Casual Flower Printing Canvas Graffiti Shoulder Bag Beach Bolsa Feminina - Style 11 \/ (30cm\u003cMax Length\u003c50cm)",
               "variant_inventory_management":"shopify",
               "properties":[

               ],
               "product_exists":true,
               "fulfillable_quantity":1,
               "grams":0,
               "price":"20.00",
               "total_discount":"0.00",
               "fulfillment_status":null,
               "price_set":{
                  "shop_money":{
                     "amount":"20.00",
                     "currency_code":"KYD"
                  },
                  "presentment_money":{
                     "amount":"20.00",
                     "currency_code":"KYD"
                  }
               },
               "total_discount_set":{
                  "shop_money":{
                     "amount":"0.00",
                     "currency_code":"KYD"
                  },
                  "presentment_money":{
                     "amount":"0.00",
                     "currency_code":"KYD"
                  }
               },
               "discount_allocations":[

               ],
               "admin_graphql_api_id":"gid:\/\/shopify\/LineItem\/xxxxxxxxxx",
               "tax_lines":[

               ]
            }
         ],
         "shipping_lines":[

         ],
         "fulfillments":[

         ],
         "refunds":[

         ]
      }
   ]
}
Code language: JSON / JSON with Comments (json)

You can see that there is A LOT of data that we can retrieve. We have order ID, email address of the customer, his/her location, number of purchased items, and so on. With the data above, you can basically display everything about the order.

Let’s use that for example to display the order ID.

foreach($orders as $order) { 
    foreach($order as $key => $value){ 
    	echo "<p>Order ID: " . $value['id'] . "</p>";
    }
}
Code language: PHP (php)

Using the above code, you’ll be able to display the list of order IDs that are present in the past 60 days. Now, what if I only want to display the last 10 orders I have received? Simple, just do the count.

foreach($orders as $order) { 
    foreach($order as $key => $value){ 
    	echo $key < 10 ? "<p>Order ID: " . $value['id'] . "</p>" : "";
    }
}
Code language: PHP (php)
Displaying Order ID from Shopify Order API - Shopify App Development

Displaying List of Ordered Items with Shopify Order API

We can display the order ID, email addresses, and locations. But what about the items that were purchased? How can we display them? Easy!

We just need to add another foreach() inside the second foreach().

Right below the ternary conditional statement, copy the following code:

foreach ($value['line_items'] as $key => $item) {
        echo $item['title'] . "<br />";
}
Code language: PHP (php)

In the code above, you see that we accessed another array inside an array. In other words, this API will give you a ton of dimensional arrays and that’s confusing sometimes. But it’s never hard.

Displaying the List of Ordered Items with Shopify Order API

Great! Now we can access the data inside the three-dimensional array. Now, what if I wanted to display the image of the product that was purchased?

Again, that’s very easy. All you needed to do is to call shopify_call() function once again and get the image src by applying the product_id.

What about sorting? by creation date?

Sorting Orders by created_date with Order API

I think this is one of the easiest things to do since this is an array already. Well, all you needed to do is to call shopify_call() function once again but this time, use the following:

/admin/api/2020-01/orders.json?order=created_at asc

And for descending

/admin/api/2020-01/orders.json?order=created_at desc

Conclusion

Understanding Order API is never that hard. It will just get more confusing as soon as you get more items to deal with. But I hope you get the idea of how you can extract the list of recent orders from a store.

If you have questions or if you encountered any errors, please let us know and we’ll get to you as soon as we can. We love interacting with you!

We thank you as well for taking the time to read us and being interest in Shopify Development. We’ll tackle more lessons in the future so keep in touch with us and sign up to our newsletter.

Let’s All Welcome The New WeeklyHow.

I’ve been working on this upgrade for a long while now and finally I have released the new WeeklyHow.

Finally, WeeklyHow is now an eLearning platform where you can learn about Programming, Web Development, App Development, and there’s gonna be more in the future. However, we’re quite taking a small step since we are still improving the platform and making sure that all of your needs will be provided.

As a thank you to all of you supporting us, we’ll be giving a DISCOUNT CODE for all courses available on our platform.

Yes, the courses are not that much for now, that’s why we’re going to keep the discount code until the end of 2020, so you can still use the code after we finish the courses in our platform. Not only that, but you can use it unlimited so take this limited time opportunity!

Another thing that I want to mention is the payment method, we’re currently working with multiple platform and we’re hoping that, in the next two or three weeks, a payment gateway will work with us so you won’t have to deal with just PayPal.

But, anyway, I want to thank you all personally for the support that you all are giving to WeeklyHow.

Cheers!

Bernard

How To Display Product Price Using Shopify REST API (ver 2020-10)

Welcome to another Shopify App Development Tutorial using PHP. In the previous article, we have guided you on how to display products using Shopify API and PHP and if you are interested in learning how to display products, you can read the article here.

I believe that once you know how to display products using Shopify API, you’ll be able to display its other components too. Such as product’s price, images, etc.

So in this article, we’ll be focusing on using variants from the API to display the product’s price.

Create a new index file

Create a new PHP file and name it index.php inside the file paste the following code:

<?php
require_once("inc/functions.php");

$requests = $_GET;
$hmac = $_GET['hmac'];
$serializeArray = serialize($requests);
$requests = array_diff_key($requests, array('hmac' => ''));
ksort($requests);

$token = 'PASTE YOUR GENERATED TOKEN HERE'
$shop = 'PASTE YOUR SHOP URL HERE'
Code language: PHP (php)

If you have noticed, this is the same code that we have used in the previous tutorial.

The first line of the code above includes the function.php file, and inside that script contains a function that allows us to communicate with Shopify API.

Next, the $request variable gets the value from the $_GET variable, and if you want to know where the value is coming from inside of GET then it came from the Shopify store.

When the app is loaded in Shopify. The store will generate variables that we can use to authenticate the connection. That’s why there’s an HMAC variable. This variable is used to make sure that the store is from Shopify and not from somewhere else.

Next, we convert the request variable and turn it into an array by using the serialize function. And then, we remove the HMAC key from that variable and sort the request variable. Pretty easy to understand.

Now next, the token and shop variable. These two variables are important so go ahead and initialize these variables using your token and shop URL sub-domain.

It should look like this:

$token = "xxxxxxxxxxxxxxxxxxxxxxxxxxxxxxxx";
$shop = "my-shop-is-awesome";            //no 'myshopify.com' or 'https://'
Code language: PHP (php)

Get the collections list

$collectionList = shopify_call($token, $shop, "/admin/api/2020-10/custom_collections.json", array(), 'GET');
$collectionList = json_decode($collectionList['response'], JSON_PRETTY_PRINT);
$collection_id = $collectionList['custom_collections'][0]['id'];

$array = array("collection_id" => $collection_id);
$collects = shopify_call($token, $shop, "/admin/api/2020-10/collects.json", $array, 'GET');
$collects = json_decode($collects['response'], JSON_PRETTY_PRINT);
Code language: PHP (php)

Keep in mind that in this tutorial, we’ll be using the latest API and that is the Shopify 2020-10 API. So if you don’t know how to migrate from old to new API. I highly recommend you to read this article how to upgrade the API version with Shopify.

Now, to explain the code above. The code will basically use the function shopify_call() to generate the list of custom collections available from the store. Then we’ll be decoding the response from JSON to array. And then, get the very first collection ID available.

If you want to display product prices from a specific collection, you may use this code instead:

$collection_id = PASTE YOUR COLLECTION ID HERE
$array = array("collection_id" => $collection_id);
$collects = shopify_call($token, $shop, "/admin/api/2020-10/collects.json", $array, 'GET');
$collects = json_decode($collects['response'], JSON_PRETTY_PRINT);
Code language: PHP (php)

Displaying the Prices

To display the prices, you may use this code below:

foreach($collects as $collect){ 
    foreach($collect as $key => $value){ 
		$products = shopify_call($token, $shop, "/admin/api/2020-10/products/".$value['product_id'].".json", array(), 'GET');
		$products = json_decode($products['response'], JSON_PRETTY_PRINT);
		
		$variants = shopify_call($token, $shop, "/admin/api/2020-10/products/".$value['product_id']."/variants.json", array(), 'GET');
		$variants = json_decode($variants['response'], JSON_PRETTY_PRINT);
		
		$originalPrice = $variants['variants'][0]['compare_at_price'];
		$discountedPrice = $variants['variants'][0]['price'];

		echo $products['product']['title'] . " | Now at $" . $discountedPrice . " | Before: <del>$" . $originalPrice . "</del><br />";
    } 
} Code language: PHP (php)

The code above will display all the product’s name available inside the collection ID that we have used. It’ll also display both discounted price and original price.

Test the Shopify app

How To Display Product Price Using Shopify API

Congratulations! Now you have successfully displayed all the products and its variants. If you have concerns or questions, don’t hesitate to ask down in the comments.

What’s next?

The next thing that we are going to do is to display the image of the products. If you are interested, I have written already the full guidelines on how to display Shopify product images using PHP.

Where did we get the shopify_call() function?

Are you wondering where we get the shopify_call function? If so, then I recommend you to read the first article of this series where we set up the Shopify App and downloaded the Shopify API client that we used in this tutorial.

Premium WordPress Theme Tutorial for Beginners 101

Welcome to our new tutorial series here at WeeklyHow. If you have been following us for quite a while then you probably know already that most of our topics are focusing on Shopify app development. However, this time, we will be giving you new lessons which are very different from Shopify.

You have read it from the title already. 🙂

In this tutorial series, we will be teaching you how to create premium WordPress themes from scratch using PHP, HTML5, CSS (Bootstrap 4.3), and JavaScript. We’ll cover all of the possible lessons that we currently know though we are also open for your requests so as we go along in this tutorial series, you can contact us and give us what you want to learn and we’ll cover that in the next lessons.

Getting Started

Before we begin building premium WordPress themes, we highly suggest doing research and planning first before structuring your files as it will be much easier to continue with the project.

We also suggest downloading website design mockups to make it easier for you to follow which design you want to achieve.

For this course, we’ll be following this design mockup created by Freepik. You may download the PSD file here.

Building Premium WordPress themes Tutorial for begineers 101

What is WordPress

First of all, before we get started, we would like to inform you that we are using content management systems (commonly known as CMS) called WordPress.

WordPress is a very popular platform commonly used for blogging purposes although starting from September 27, 2011, WordPress started its partnership with its own plugin called WooCommerce to also support e-commerce for selling products or services.

WordPress is an open-sourced content management system used by over 60 million websites all over the internet. It provides thousands of plugins that could help your website’s performance and traffic. It is free to use though you are required to host a web server to be able to use this CMS.

For this course, we will be using WordPress locally using Local by Flywheel.

Local by Flywheel - Your #1 local development tool for WordPress Theme Development

What is Local by FlyWheel

Local by Flywheel is a simple, super-fast and a completely free local development application designed to simplify the development process of WordPress developers.

Join FlyWheel for FREE and get a free SSL Certificate to keep your site secure!

We’re going to use this application instead, as it is very fast and easy to use. Although, we don’t discourage you to use your favorite local development application. If you want to use XAMPP or WAMPP, feel free to do so.

If you’re using Local by Flywheel too, then follow the steps below as we’ll create a new and fresh WordPress website.

Creating a new WordPress site

Open Local by Flywheel and click on Create a new site button.

Creating a new site using Local by Flywheel - WordPress theme development tutorial for beginners 101

Then enter the name of your site.

Local by FlyWheel - Creating a new website locally for WordPress Theme Development Tutorial

Next, enter your WordPress admin’s credentials. You may leave the advanced options set to no.

Setting Up WordPress using Local by FlyWheel for WordPress theme development tutorials for beginners

Click the Add site button and wait for the application to setup your website. If this is your first time using Local by Flywheel, you may encounter windows security alerts for Nginx and Mailhog.

Just click Allow access.

Local by FlyWheel windows security alerts

You may now access your WordPress site by clicking the view site button.

Viewing Websites made by Local by FlyWheel for WordPress

By default, WordPress will be using the Twenty Nineteen theme.

Later, we’re going to remove all of the themes available on our site and create our own theme.

Develop Premium WordPress Themes Locally using Local by FlyWheel for FREE

Accessing WordPress admin dashboard

To access your WordPress admin dashboard, click the admin button just beside the view site button.

Accessing WordPress admin dashboard using Local by FlyWheel

Enter your admin credentials.

WordPress login page for accessing admin dashboard

Welcome to WordPress! 🙂

WordPress Admin Dashboard created by Local by FlyWheel for WordPress Development

Creating premium WordPress themes

Now that everything is set up, we can now start working on our new theme.
For this course, we’ll be using Sublime as our code editor though we don’t discourage you to use your favorite editor. If you have Visual Studio or Notepad++, feel free to use them.

Accessing WordPress files

To access your WordPress files, go to your Local by Flywheel application and click on the right-arrow just below your site’s name.

You may also access your site’s folder by pressing right-click on your site under Local Sites and select Show Folder.

Accessing WordPress project files on Local by Flywheel

Once you open your site’s folder, you will see three folders such as app, conf, and logs.

Open the app folder.

Next, you will see the public folder, open that.

You should see the following files.

WordPress default files

Open the wp-content folder.

Next, the themes folder.

Once you open the themes folder, you will see folders that have the same name as the themes available in our WordPress website such as twenty-sixteen, twenty-seventeen, twenty-eighteen, and twenty nineteen.

WordPress themes folder

We’re going to create a new folder here so while we’re inside the themes folder, press right-click and select New -> Folder.

Let’s name this folder escuela.

Open the folder that we have just created and let’s create a new CSS file and name it style.css.

The Main Stylesheet (style.css)

The style.css file is the main stylesheet file required for every WordPress theme. It contains all the details about the theme that you’re developing including the name of the theme, the author, the description of the theme, the license, and the tags.

By default, your style.css should look something like below:

/*
Theme Name: Escuela
Theme URI: https://weeklyhow.com/example/dont-browse-this
Author: WeeklyHow
Author URI: https://weeklyhow.com/
Description: Lorem ipsum dolor sit amet, consectetur adipiscing elit, sed do eiusmod tempor incididunt ut labore et dolore magna aliqua. Ut enim ad minim veniam, quis nostrud exercitation ullamco laboris nisi ut aliquip ex ea commodo consequat. Duis aute irure dolor in reprehenderit in voluptate velit esse cillum dolore eu fugiat nulla pariatur. Excepteur sint occaecat cupidatat non proident, sunt in culpa qui officia deserunt mollit anim id est laborum.
License: GNU General Public License v2 or later
License URI: http://www.gnu.org/licenses/gpl-2.0.html
Text Domain: weeklyhow
Tags: responsive, mobile
*/Code language: JSON / JSON with Comments (json)

Feel free to modify the code above.

Save your style.css file and create a new PHP file and name it index.php.

The Main Template (index.php)

The main template is the file where you will call WordPress functions such as get_header() and get_footer().

Feel free to copy the following code in your index.php file.

<?php get_header(); ?>

<?php get_footer(); ?>Code language: HTML, XML (xml)

The Header File (header.php)

The header file (also known as header.php) is a template file used for displaying navigational bars or anything you want to display in most of your pages. This is where you will initialize all of your scripts and stylesheets that are required by your theme.

Inside our escuela folder, let’s create a new PHP file and name it header.php.

Then copy the following code.

<!DOCTYPE html>
<html lang="en">
	<head>
		<!-- Required meta tags -->
		<meta charset="utf-8">
		<meta name="viewport" content="width=device-width, initial-scale=1, shrink-to-fit=no">
		<!-- Bootstrap CSS -->
		<link rel="stylesheet" href="https://stackpath.bootstrapcdn.com/bootstrap/4.3.1/css/bootstrap.min.css">

		<title>Escuela WordPress Theme by WeeklyHow</title>
	</head>
	
	<body>Code language: HTML, XML (xml)

Don’t forget to save your script 🙂

The Footer File (footer.php)

Same with the header file, the footer file is a template file commonly used for displaying the footer section.

Once again, create a new PHP file and name it footer.php.

Then copy the following code.

		<script src="https://code.jquery.com/jquery-3.3.1.slim.min.js"></script>
		<script src="https://cdnjs.cloudflare.com/ajax/libs/popper.js/1.14.7/umd/popper.min.js"></script>
		<script src="https://stackpath.bootstrapcdn.com/bootstrap/4.3.1/js/bootstrap.min.js"></script>
	</body>
</html>Code language: HTML, XML (xml)

The Thumbnail (screenshot.png)

The thumbnail is where you can show the theme design. The thumbnail should be named screenshot.png, and should be placed only in the top-level directory of your theme folder.

The highly recommended image size for the thumbnail is 1200px wide and 900px tall.

For this course, we’ll be using the following thumbnail.

Feel free to download this image.

WordPress screenshot png thumbnail for WordPress Premium theme development

With everything that we have created, your theme files should look something like this.

WordPress basic theme files

Now head back to your WordPress dashboard and open the themes page.

Your theme should be presented there by now like below.

Developing Premium WordPress themes - Managing themes

To start using our premium WordPress theme select the theme and click the Activate button.

Managing WordPress themes

Now let’s browse our site again.

WeeklyHow WordPress Premium Theme Tutorial for Beginners 101

As you can see, our site is displaying nothing anymore. However, if we look at the code in the inspector, you will see that the code written in both header and footer files are being used. Perfect!

Now let’s go back to our main template file (index.php) and add a little message to see if everything actually works.

<?php get_header(); ?>
<h1>Hello World!</h1>
<p>Why do we always use "Hello World"? Too cliché right?</p>
<?php get_footer(); ?>Code language: HTML, XML (xml)

Let’s save it and see the results.

WeeklyHow WordPress Premium Theme Tutorial for Beginners 101 Results

Conclusion

Congratulations! You have successfully set up your WordPress premium theme. But wait! We’re not done yet. In the next post, we’re going to start working on the navigational bar and set up our header file. We’ll also introduce you to more template files that are very important for every WordPress theme.

For now, we would like to thank you for reading this post. If you think you have learned something from us, let us know below in the comments, we really love hearing from you!

If you have questions or maybe a request, contact us or comment below and we’ll reply to you as soon as we can.

How To Display Shopify Products with Laravel & OhMyBrew!

I have been playing around with Laravel and Shopify lately and I’ll admit, it’s much easier to control the Shopify app with Laravel instead of pure PHP.

If you have been following us for a while, you may have noticed already that most of our topic is about Shopify. Well, we treat it like our baby. Full-attention must be provided to it :).

Jokes aside, in this article we’re going to learn together how to display Shopify products using Laravel and OhMyBrew’s laravel-shopify.

Getting Started

Before we start with this tutorial, we’ll assume that you already have created your Laravel Shopify app. If in case not, then you may refer to this tutorial on how to create a Shopify app with Laravel and OhMyBrew!

Let’s begin this tutorial by opening your Shopify app project and serve it with:

php artisan serve

Next, find your ngrok and run it.

Then use the following command:

ngrok.exe authtoken <YOUR_TOKEN_IS_WRITTEN_HERE>Code language: HTML, XML (xml)

You may get your ngrok token from your ngrok account. However, if you already have authenticated your token then you may skip this step.

Connecting Shopify App with ngRok

Next, run the following command to forward your local server to an ngrok URL. Make sure you use the port 8000.

ngrok.exe http 8000Code language: CSS (css)

Now, get the URL generated by ngrok and use it to replace the app URL and whitelisted URL. Like so.

Shopify App Development with ngrok

After that, proceed to your development store and Shopify app.

Displaying Shopify Products

Welcome to another Shopify App Development tutorial! In this article, we’re going to use OhMyBrew’s laravel-shopify package to display the products of our store. Now, before we can do that… we need to create a controller first and then make a route.

Go to your command prompt with your Shopify app project folder selected and run the following command.

php artisan make:controller ShopifyControllerCode language: CSS (css)

The command above will create a new controller named ShopifyController.php. Open that file which is located at app\Http\Controllers.

Shopify Controller

Open ShopifyController.php and replace everything with the following.

<?php
namespace App\Http\Controllers;

use Illuminate\Http\Request;
use OhMyBrew\ShopifyApp\Facades\ShopifyApp;
use Log;

class ShopifyController extends Controller
{
    public function index() {
  
        $shop = ShopifyApp::shop();
	$requests = $shop->api()->rest('GET', '/admin/api/2019-07/products.json');
        return serialize($requests->body);

    }
}
?>Code language: HTML, XML (xml)

Shopify Laravel Router

Next, open your web.php file located at <you_project_folder>/routes/ and copy the following code.

Route::get('/', 'ShopifyController@index')->middleware(['auth.shop']);Code language: PHP (php)

What the code above does is get the response of ShopifyController@index which returns the serialized requests. Why serialize? Well if you don’t know already, serialize will convert an object or an array into a string which is very useful especially if you wanted to know the content of an array.

Now, with that being said. Let’s look at our application and see the results.

Serializing the array from Shopify Product API and display the products

If you have the same results then congratulations! You just made into the basics of getting the data from the REST API.

Show Shopify Items in Laravel View

Now, the next thing that we’re going to do is to actually get this data and pass it into our view files. Because we can’t just do everything in our controllers, we need to manipulate this data in our actual view files.

To do that, we’re going to use the view() function. Views contain the HTML served by your application and separate your controller / application logic from your presentation logic. Views are stored in the resources/views directory.  This is where you can design your app.

Now, before we proceed let’s clean up our code first.

Go to your web.php file located at route folder and change this line:

Route::get('/', 'ShopifyController@index')->middleware(['auth.shop']);Code language: PHP (php)

Into

Route::get('/', 'ShopifyController@index');Code language: PHP (php)

Save your web.php file and open your ShopifyController.php file next and copy the following code.

Make sure you place it above the index() function.

public function __construct() {
    $this->middleware(['auth.shop']);
}Code language: PHP (php)

Next, let’s create a new function just below the index function. And let’s call it products() function. Inside the function we’ll do the same thing, we’ll call the API and get the response code. But this time, we’ll pass it to our view.

public function products() 
{
    $shop = ShopifyApp::shop();
    $requests = $shop->api()->rest('GET', '/admin/api/2019-07/products.json');
    return view("welcome", ["products"=>$requests]);
}Code language: PHP (php)

Go back to web.php and add the following line:

Route::get('/', 'ShopifyController@products');Code language: PHP (php)

Next, open your welcome.blade.php file located at resources/views folder.

Copy the following code:

@extends('layouts.app')

@section('content')
    <h2>Welcome <a href="{{ ShopifyApp::shop()->shopify_domain }}">{{ ShopifyApp::shop()->shopify_domain }}</a></h2>
    <h3>We have new items!</h3>
    @foreach ($products->body->products as $product)
        <p>{{ $product->title }}</p>
    @endforeach
    
@endsection

@section('scripts')
    @parent

    <script type="text/javascript">
        var AppBridge = window['app-bridge'];
        var actions = AppBridge.actions;
        var TitleBar = actions.TitleBar;
        var Button = actions.Button;
        var Redirect = actions.Redirect;
        var titleBarOptions = {
            title: 'Welcome to Shopify Laravel App',
        };
        var myTitleBar = TitleBar.create(app, titleBarOptions);
        console.log('{{ ShopifyApp::shop() }}');
    </script>
@endsectionCode language: PHP (php)

Next, go to your resources/views folder and create a new folder. Make sure you name it layouts.

Inside the layouts folder, create a new view file and make sure it has a filename of app.blade.php.

Laravel Shopify Resources Folder and Layouts

After that, open app.blade.php and copy the following code:

<!DOCTYPE html>
<html lang="{{ str_replace('_', '-', app()->getLocale()) }}">
<head>
    <meta charset="utf-8">
    <meta name="viewport" content="width=device-width, initial-scale=1">
    <!-- CSRF Token -->
    <meta name="csrf-token" content="{{ csrf_token() }}">
    <title>{{ config('app.name', 'Shopify App made with Laravel') }}</title>
    <!-- Scripts -->
    <script src="{{ asset('js/app.js') }}" defer></script>
    <!-- Fonts -->
    <link rel="dns-prefetch" href="//fonts.gstatic.com">
    <link href="https://fonts.googleapis.com/css?family=Nunito" rel="stylesheet">
    <!-- Styles -->
    <link href="{{ asset('css/app.css') }}" rel="stylesheet">
</head>
<body>
    <div id="app">
        <main class="p-4">
            @yield('content')
        </main>
    </div>
</body>
</html>
Code language: HTML, XML (xml)

Final Results

If you encountered no errors at all, you will see the results something like this.

Develop Shopify Apps with Laravel and OhMyBrew Package + Ngrok

Conclusion

That’s it! That’s how easy it is to develop a Shopify app using Laravel. Special thanks to Tyler King for developing the laravel-shopify package.

If somehow you encountered errors, send us a comment below and we’ll respond to you as soon as possible.

We thank you for reading this article until the end. In the next tutorial, I will guide you on how to use Laravel to display product images.

See you next time!

Shopify API – Saving Access Token in the Database (PHP & MySQL)

Before you can start working with Shopify store data using Shopify API, there must be an authentication where the store approves your app for certain permission.

We have done this so many times now. So if you don’t know yet how to set up your first Shopify app then I highly recommend you to read first my article on how to create Shopify apps using PHP.


In this article, we’re going to store and save access tokens in two ways and that is through MySQL/PHP and Cookies/Sessions. I will also explain anything you need to know and which one you should really use.

I have received comments about this recently so I decided to write about it as soon as I can. Now let’s say that you already have built your Shopify app and you’re having issues about access tokens. How can we actually save access tokens that were generated by the stores?

Well, there are…

Two ways to save access tokens

There are two ways to store access tokens and the first option you have is to…

Save access tokens using MySQL Database

This is quite obvious now since MySQL database is your only reliable and secured storage for saving data. Now how can we do this? Well, the first thing you wanna do is to create a database through your web host. If you’re using XAMPP/WAMP server then just go to your localhost URL and browse your phpMyAdmin and create a database. If you have your own web host then just go and proceed to your Dashboard and create a database.

Disclaimer, I can’t pretty much give you instructions on how to navigate to your database since we all don’t have the same dashboard or control panel. All I can tell you is to look for MySQL tab or category, click that, and try to create a new database account.

Keep in mind as well that some host requires you to create a username and password for database while some host does not require you to do so and you can just proceed to phpMyAdmin and get your account details there.

Now let’s proceed to PhpMyAdmin and create a database.

Creating Database for Shopify App API Development Tutorial

I will name my database example_db just for the sake of this tutorial. You can name your database whatever you want.

After that, click on the database that you just have created, and proceed to SQL tab and type in the following SQL query.

CREATE TABLE example_table ( id INT(8) UNSIGNED AUTO_INCREMENT PRIMARY KEY, store_url VARCHAR(255) NOT NULL, access_token VARCHAR(255) NOT NULL, install_date DATETIME )Code language: PHP (php)

Make sure that your database is selected.

How to Create a Database for Shopify App API Development Tutorial

And just click the ‘Go’ button located at the very bottom right corner of the query box.

You should have something like this:

Tutorial on How To Create a Database for Shopify App API Development Tutorial PHP

Now that our database is ready, let’s go back to our Shopify app project and create a new script.

Let’s name it connect_to_mysql.php and copy the following code:

<?php
$servername = "YOUR SERVER NAME";
$username = "YOUR DATABASE USERNAME";
$password = "YOUR DATABASE PASSWORD";
$db = "example_db";

$conn = mysqli_connect($servername, $username, $password, $db);

if (!$conn) {
    die("Connection Error: " . mysqli_connect_error());
}Code language: HTML, XML (xml)

Make sure you replace the value of each variable above before you proceed. Otherwise, you’ll be getting an error once you reference this script in our next code.

To be sure that there will be no errors. Browse this file using your browser. For example, We have https://example.com/connect_to_mysql.php

If it shows no errors then that means you’re good to go.

Now save the script and let’s go back to our generate_token.php or token_generator.php (I have created two tutorials as far as I can remember, so the name of the file doesn’t really matter, as long as it has the same code. 😛)

So far, these are the files I have in our project.

Shopify App Development Tutorial Files (Step by Step Guide for MySQL/PHP)

And this is the code inside our token generator.

Shopify App Development Access Token Generator

Underneath the require_once("inc/functions.php"); type in require_once("connect_to_mysql.php");

Next, locate the line where it says echo $access_token; and comment that out.

After that, add the following code just below the //echo $access_token; line.

$sql = "INSERT INTO example_table (store_url, access_token, install_date)
		VALUES ('".$params['shop']."', '".$access_token."', NOW())";

if (mysqli_query($conn, $sql)) {
	header('Location: https://'.$params['shop'].'/admin/apps');
	die();
} else {
	echo "Error inserting new record: " . mysqli_error($conn);
}Code language: PHP (php)

Make sure you have the same table name. After that, save the file and uninstall your app and re-install again.

After installing the app, check your database and see if it saved the access token. Like this:

Shopify App Development - Saving Access Token with MySQL and PHP

Keep in mind that these tokens are kind of like a password which is important for stores. So you might wanna encrypt these tokens just for the sake of additional security.

Save access tokens using cookies/sessions

The other option that you may use is by saving access tokens using cookies or sessions.

I don’t personally recommend doing this since cookies and sessions are temporary storage. Especially if you usually clear your browser’s data.

Plus, it is also not safe to do this.

However, if you still want to know how to save access tokens using cookies then doing that is very simple. All you need is JavaScript code like this:

document.cookie = "token=" + <?php echo $access_token; ?>;Code language: PHP (php)

See that code above? You’re pretty much displaying the token for the public to see. Yay! free tokens!

Conclusion

Shopify access token is very important for each store. It’s like a password which makes it very critical. So make sure you secure them as much as you can.

If you don’t know about encryption, I highly suggest you search about MD5 or HASH. This will help you secure your important data such as access tokens and passwords.

For now, I thank you for reaching this far. If you have more concerns regarding this series, feel free to share them down in the comments and I swear I respond faster than your internet connection.


Good luck Shopify Developers!

How To Display Product Image Using Shopify API (Ver 2020-01)

Welcome to another Shopify App Development Tutorial using PHP. In the previous article, we have guided you on how to display the product’s name as well as its price using our chosen Shopify API.

In this article, we’ll be displaying not just the name of the product, not just the prices, but also the product’s images.

Product image is one of the most important parts of an online store. This gives your customers an idea about what you’re selling.

If there’s no image… How are they gonna know what the item looks like? Right?

So without wasting any more time, let’s start this tutorial.

Getting Started

Create a new PHP file and name it index.php inside the file paste the following code:

<?php
require_once("inc/functions.php");

$requests = $_GET;
$hmac = $_GET['hmac'];
$serializeArray = serialize($requests);
$requests = array_diff_key($requests, array('hmac' => ''));
ksort($requests);

$token = PASTE YOUR GENERATED TOKEN HERE
$shop = PASTE YOUR SHOP URL HERECode language: HTML, XML (xml)

If you have been reading my previous tutorials on how to display products, then you might already know what the code above does or at least you’re familiar with what it is.

However, if you are not.

Then I’ll summarize it for you so, you won’t have to read the previous tutorial.

Okay so.

The code above is just the initialization of the code, we make variables which is important for Shopify API.

We referenced function.php and the changed header file to be able to read both JSON and HTML languages.

Next, we separated the value of hmac which is generated by Shopify from $_GET variable and then we sort the request variable. Simple.

Next, we declare two variables:

$token = PASTE YOUR GENERATED TOKEN HERE
$shop = PASTE YOUR SHOP URL HERECode language: PHP (php)

These variables needed to have values, so as you can see, it is stated that you need to paste your generated token and your shop URL.

Go ahead and change that to something like this:

$token = "xxxxxxxxxxxxxxxxxxxxxxxxxxxxxxxx";
$shop = "my-shop-is-awesome";            //no 'myshopify.com' or 'https'Code language: PHP (php)

Where do you get Access Token?

Alright, some of you may be wondering where I can get the value of the token.
If you have been following this series for quite a long time, then you probably know already that this comes from generated_token.php.

If you have no idea what is that, then I SUPER recommend you to read my previous article about how to build Shopify apps using PHP. It contains the script of token generation and I explained it there as well.

Using Shopify collections

Copy the code below and paste it into your code.

$collectionList = shopify_call($token, $shop, "/admin/api/2020-01/custom_collections.json", array(), 'GET');
$collectionList = json_decode($collectionList['response'], JSON_PRETTY_PRINT);
$collection_id = $collectionList['custom_collections'][0]['id'];

$array = array("collection_id"=>$collection_id);
$collects = shopify_call($token, $shop, "/admin/api/2020-01/collects.json", $array, 'GET');
$collects = json_decode($collects['response'], JSON_PRETTY_PRINT);Code language: PHP (php)

The code above will get the collection ID from the store’s custom_collection.json and then convert it into an array.

Keep in mind that the code above will most likely get the default collection which is the homepage collection. So if you want to specify the collection ID, you may use this code instead:

$collection_id = PASTE YOUR COLLECTION ID HERE
$array = array("collection_id"=>$collection_id);
$collects = shopify_call($token, $shop, "/admin/api/2020-01/collects.json", $array, 'GET');
$collects = json_decode($collects['response'], JSON_PRETTY_PRINT);Code language: PHP (php)

Displaying the Product Images

Before we get started, make sure there are images attached to your Shopify products. Because if it is empty then it will obviously return an error or an empty space. So make sure you double-check your items first.

Also, keep in mind that you can only upload up to 250 images per item. But obviously, you won’t be uploading that many images per item. Right?

To do that, navigate to All products > Then select one of your available items.

Display Shopify Images using Shopify API and PHP - Shopify App Development Tutorial

Next, let’s use this code below to display the very first image of the products

foreach($collects as $collect){ 
    foreach($collect as $key => $value){ 
    		$products = shopify_call($token, $shop, "/admin/api/2020-01/products/".$value['collection_id'].".json", array(), 'GET');
		$products = json_decode($products['response'], JSON_PRETTY_PRINT);

    		$images = shopify_call($token, $shop, "/admin/api/2020-01/products/".$products['product']['id']."/images.json", array(), 'GET');
		$images = json_decode($images['response'], JSON_PRETTY_PRINT);
		$item_default_image = $images['images'][0]['src'];

		echo '<img src="'.$item_default_image.'" style="width: 200px; height: 230px;"/>';
    } 
}
Code language: PHP (php)

In the code above, we’ll be using the images.json. This file contains all the details available about your item’s images.

Shopify Product API

Shopify API allows us to retrieve images but you may also retrieve its count using the following actions:

GET /admin/api/2020-01/products/{product_id}/images/count.json

But in this tutorial, we’ll be using:

GET /admin/api/2020-01/products/{product_id}/images.json

Shopify Tips

You may check the values of any JSON file by appending these actions with your Shopify store URL. For example:

https://teststore.myshopify.com/admin/api/2020-01/products/632910392/images.jsonCode language: JavaScript (javascript)

By browsing this URL, you will receive values that look something like this:

HTTP/1.1 200 OK
{
  "images": [
    {
      "id": 1001473913,
      "product_id": 632910392,
      "position": 3,
      "created_at": "2019-04-09T10:55:10-04:00",
      "updated_at": "2019-04-09T10:55:10-04:00",
      "alt": null,
      "width": 110,
      "height": 140,
      "src": "https://cdn.shopify.com/s/files/1/0006/9093/3842/products/rails_logo.gif?v=1554821710",
      "variant_ids": [],
      "admin_graphql_api_id": "gid://shopify/ProductImage/1001473913"
    }
  ]
}Code language: JavaScript (javascript)

As you can see. This is a multi-dimensional array. Which is why you need to access the values through several ways like looping statements or direct-accessing.

Like this:

$images['images'][0]['src'];Code language: PHP (php)

The zero between images and src is the very first index of the array. So let’s say you have 5 images. Then you will need to use foreach for that. Kind of like this:

foreach($images['images'] as $image){ 
    foreach($image as $key => $value){ 
		echo '<img src="'.$value['src'].'" />';
    } 
}Code language: PHP (php)

The code above will go through each key available in the array. Which is really convenient especially if you need to display all the images.

This is also pretty much easier to control.

Let’s say you want to display 5 images only then all you needed to do is just put a conditional statement with a variable that increments its value as it loops back and then once it reaches 4 then just exit the looping statement.

Like this:

$index = 0;
foreach($images['images'] as $image){ 
    foreach($image as $key => $value){ 
                if($index == 4) return;
                $index++;
		echo '<img src="'.$value['src'].'" />';
    } 
}Code language: PHP (php)

Full code

I’m never displaying the full code in each of my tutorials since it will make you not read the article and you won’t understand each code. But this time, I will make an exception.

This is the full code of images.php

<?php
require_once("inc/functions.php");

$requests = $_GET;
$hmac = $_GET['hmac'];
$serializeArray = serialize($requests);
$requests = array_diff_key($requests, array('hmac' => ''));
ksort($requests);

$token = "xxxxxxxxxxxxxxxxxxxxxxxxxxxxxxxx";
$shop = "my-shop-is-awesome";            //no 'myshopify.com' or 'https'

$collectionList = shopify_call($token, $shop, "/admin/api/2020-01/custom_collections.json", array(), 'GET');
$collectionList = json_decode($collectionList['response'], JSON_PRETTY_PRINT);
$collection_id = $collectionList['custom_collections'][0]['id'];

$array = array("collection_id"=>$collection_id);
$collects = shopify_call($token, $shop, "/admin/api/2020-01/collects.json", $array, 'GET');
$collects = json_decode($collects['response'], JSON_PRETTY_PRINT);

foreach($collects as $collect){ 
    foreach($collect as $key => $value){ 
                $products = shopify_call($token, $shop, "/admin/api/2020-01/products/".$value['product_id'].".json", array(), 'GET');
		$products = json_decode($products['response'], JSON_PRETTY_PRINT);

    	$images = shopify_call($token, $shop, "/admin/api/2020-01/products/".$products['product']['id']."/images.json", array(), 'GET');
		$images = json_decode($images['response'], JSON_PRETTY_PRINT);
		$item_default_image = $images['images'][0]['src'];

		echo '<img src="'.$item_default_image.'" style="width: 200px; height: 230px;"/>';
    } 
}Code language: HTML, XML (xml)

If you have set up the code properly. The result will look something like this:

Display Shopify Images using Shopify API and PHP - Shopify App Development Tutorial

There you have it, we have finally displayed all the item’s first image.

The next thing we’re going to do is to design the app because no one will like to see your app looking like a gallery. Unless you want it that way. But in our case, no.

Designing the App

To design your app, insert this code at the very top of your script:

<html>
  <head>
     <style>
        .divOut { padding: 5px; display: inline-block; width: 230px;}
        .divLabel { 
               width: 200px;
               white-space: nowrap;
               overflow: hidden;
               text-overflow: ellipsis;
               font-weight: bold;
               font-family: sans-serif;
               margin-top: 5px;
        }
        .prodImg { width: 200px; height: 230px; }
     </style>
  </head>Code language: HTML, XML (xml)

Let’s go back to our PHP script and edit the following code:

echo '<img src="'.$item_default_image.'" class="prodImg"/>';Code language: PHP (php)

Now, instead of echoing (yes that’s a word :P) the image. Let’s wrap it between div tags and then create some text underneath the image so it will look like an actual product with details.

echo '
<div class="divOut">
    <div class="divIn">
        <img src="'.$item_default_image.'" style="width: 200px; height: 230px;"/>
    </div>
    <div class="divLabel">
        '.$products['product']['title'].'
    </div>
    <div class="divLabel">
        $'.$products['product']['variants'][0]['price'].'
    </div>
</div>
';Code language: HTML, XML (xml)

So, in the code above, we have displayed the image, the title of the product, and its price.

Displaying Shopify Products and its title and price using API and PHP - Shopify App Development Tutorial

Now, you might also have noticed that your title may go through the div panel. It’s because, in the CSS, we have added an overflow that is hidden. Then set the text to ellipsis once it overflows in the panel.

Bla bla bla. It’s just a style

Going back to designing.

What if you want to link the image and text to the purchasing page? How can you do that?

Well, since you are now able to display the image, the title, and the price. Then I’m sure you already get the idea on how to get all the components of each product from the API.

But still, let’s do it.

Let’s start with declaring a new variable, and let’s call it storeURL and then give it the value of the shop variable plus myshopify.com.

(and oh put it below the shop variable)

Like this:

$token = "xxxxxxxxxxxxxxxxxxxxxxxxxxxxxxxx";
$shop = "my-shop-is-awesome";            //no 'myshopify.com' or 'https'
$storeURL = "https://". $shop . ".myshopify.com";Code language: PHP (php)

Now let’s wrap the image tag with anchor tag and then get the URL of your store and then concatenate it with “/products/” plus the value of handle from the products variable.

Like this:

echo '
<div class="divOut">
    <div class="divIn">
        <a href="'.$storeURL.'/products/'.$products['product']['handle'].'" target="_blank">
             <img src="'.$item_default_image.'" style="width: 200px; height: 230px;"/>
        </a>
    </div>
    <div class="divLabel">
        '.$products['product']['title'].'
    </div>
    <div class="divLabel">
        $'.$products['product']['variants'][0]['price'].'
    </div>
</div>
';Code language: HTML, XML (xml)
Adding items URL to images and texts using Shopify API and PHP - Shopify App Development Tutorial

With the code above, you may now click the images and it will redirect you to its product page where you can “add to cart” the item.

Shopify Item Purchase - Add to cart page

Awesome right?

Conclusion

Creating Shopify apps is very easy especially if you already know your API. If you are using a different client then doing research about it will help you understand it easier.

I’m hoping that there are no issues with your code but if there is then don’t hesitate to let us know in the comments below and we will respond to you as soon as we can.

I think you deserve congratulation on achieving these results.

So…

Congratulations! 🙂

Can OpenAI’s GPT-5 Build a Shopify Theme? Let’s Put It To The Test

We’ve tried building three (3) apps including a Shopify app using the newest model from OpenAI: GPT-5 but we haven’t really tried making a Shopify theme with this model. And as you probably know, Shopify themes are not like regular apps. In fact it’s not an app.

They’re made up of Liquid templates, sections, snippets, JSON templates, and a bunch of files that need to follow strict Shopify guidelines. So the big question is this: can GPT-5 actually build a Shopify theme?

I decided to put it to the test.

Video tutorial

Shopify Theme Development with GPT-5

If you’ve been following my experiments or my videos, you’ll know I’ve tried building apps with GPT-5 before. But this time, I wanted to see how it handles theme development, which is trickier than apps.

To make this experiment fair, I used the Shopify Dev MCP server. If you’re not familiar, MCP (Model Context Protocol) servers let AI agents interact with external tools and resources. In this case, the Shopify Dev MCP server gives GPT-5 a special tool called validate_theme.

This tool checks if your theme follows Shopify’s guidelines. Think of it as a linter for your entire theme. Without it, AI will happily generate code that looks fine but uses deprecated codes or worse completely breaks your store.

GPT-5 flagship model with Shopify theme development

Debugging With GPT-5

In the video above, I loaded up an old Shopify theme I’ve worked on before and ran validate_theme. Right away, it returned a massive list of issues:

  • CSS links not using preload tags
  • Missing snippet, section, and asset files
  • Unknown objects like scheme_classes
  • Script tags not using defer
  • and many many more

The kind of stuff that Shopify would reject if you tried to ship it.

So how did GPT-5 handle this? 🤔

It started fixing issues — sort of. Instead of solving them directly though, GPT-5 created stubs (placeholders) to bypass errors. This technically “fixed” the theme but didn’t really solve the underlying problems.

Still, the fact that GPT-5 re-ran validate_theme, saw fewer errors, and iterated on fixes is pretty impressive.

Can GPT-5 Build a Product Template From Scratch?

Shopify theme development with GPT-5

Before trying to build a Shopify theme from scratch, I wanted to try if GPT-5 can build a product template since I believe this is the most difficult template to make and surprisingly, it only encountered easy-to-solve issues.

It created a new section called main-product, which is actually consistent with Shopify’s theme naming. The first version only showed images, but after tweaking the blocks in the Theme Editor, we got a working product page with “Add to Cart” and “Buy Now” buttons.

Was it perfect? No. There were translation issues and missing cart logic. But with some prompting (and copy-pasting fixes), we got it working.

Building a Shopify Theme with GPT-5

After trying to make a template, it’s time to build a new Shopify theme from scratch. When building web apps, I try to be very specific and building Shopify themes, I think, is not an exception. So I asked ChatGPT to help me write a perfect prompt for building a Shopify theme and this is what it gave me:

Create a production-ready Shopify Online Store theme inspired by Shopify’s Horizon family (visual language, layout patterns, and theme-block capabilities). Prioritize conversion, speed, accessibility, and SEO. Use the latest theme architecture with theme blocks and JSON templates. Keep code clean, modular, and fully configurable in the Theme Editor.

## Tech + Architecture Requirements
– Online Store (latest architecture with theme blocks): sections everywhere, app blocks, JSON templates, dynamic sources, and theme blocks.
– Liquid + HTML + CSS + JS with minimal dependencies.
Follow Shopify’s docs for the roles of layout, templates, sections, snippets, and assets.

## Design System (Horizon-inspired)
– Look & feel: bold product cards, generous whitespace, modern type, clean grid; works beautifully on mobile; fast-loading.
– Typography: variable font pairing (humanist sans for UI, display for headlines). Adjustable scale in Theme settings.
– Color: 1 primary, 1 accent, 2 neutrals (light/dark modes optional).
– Components: buttons (primary/secondary/ghost), badges, cards, drawers, modals, accordions, tabs.
– Animation: subtle, GPU-friendly (transform/opacity only). Respect prefers-reduced-motion.

Expose global design tokens in settings_schema.json (colors, fonts, radius, shadows, spacing scale).

## Conversion Features (must-haves)
1. Sticky add-to-cart on product pages (mobile + desktop).
2. Cart drawer with inline upsells, shipping threshold progress, and discount code input.
3. Cross-sell & “Recently viewed” sections across PDP/Cart.
4. Merch blocks: USP/benefit bar, social proof (ratings, review count), trust badges, low-stock/fast-selling cues (configurable).
5. Checkout guidance: delivery estimates, returns info, payment icons (theme section/snippets).
6. Collection filters: server-backed faceted filters + sort, with URL params preserved.
7. Predictive search: products + collections + pages, in a drawer with keyboard nav.
8. Mega menu: image slots, featured collections, promo badges.

## SEO & Structured Data
– Semantic HTML with correct headings order per template.
– Meta tags: titles, descriptions, canonical, Open Graph, Twitter Cards from settings/metafields.
– JSON-LD for products, collections, breadcrumbs, articles, organization; render via snippets/json-ld.liquid.
– Images: responsive (srcset, sizes), lazy loading, width/height attributes to prevent CLS.

## Accessibility
– WCAG 2.2 AA targets: focus states, color contrast, landmark roles, ARIA for interactive controls.
– Full keyboard navigation, skip-to-content, semantic labels on forms and buttons.
– Respect prefers-reduced-motion.

## Page Templates (JSON Sections Layouts)

For each template, define a sensible default section composition and expose max flexibility in the Editor.

Home (index.json)
announcement-bar → header → hero → usp-bar → featured-collection (x2) → image-with-text → testimonials → newsletter → footer

Product (product.json)
product-media-gallery (zoom, video, 3D ready), product-info (title, price, rating, variant-picker, buy-buttons, inventory-status, pickup-availability), cross-sell, product-recommendations, rich-text, countdown (optional), recently-viewed

Collection (collection.json)
hero (collection banner), facet-filters, sort-by, collection-grid, usp-bar

Search (search.json)
predictive-search-drawer (component), results grid with facets/sort (works for no-results messaging)

Cart (cart.json)
cart-items, cart-upsell, trust badges, shipping threshold progress

Content pages (page.json)
Rich content via rich-text, image-with-text, contact-form, store-locator

Blog/Article, 404, Account templates: clean, readable layouts with breadcrumbs and SEO best practices.

## Header, Navigation, & Footer
– Announcement bar (free shipping threshold or promo).
– Header with mega menu (desktop) and collapsible drawer (mobile).
– Sticky header on scroll.
– Footer with newsletter, quick links, store policies, and social icons.

## Performance Guardrails
– Keep main thread JS minimal; split into small, route-scoped modules.
– No jQuery; use progressive enhancement.
– Defer non-critical images (lazy), and intersection-observer for below-the-fold sections.
– Lighthouse targets: 90+ Performance, 100 SEO/Best Practices on product & collection pages.

## Theme Settings (config)
– Create robust controls in settings_schema.json:
– Brand: logos (light/dark), favicon, primary/accent colors, typography scale.
– Layout: container widths, grid gaps, corner radius, shadows.
– Header/Footer toggles and menus.
– Product: show/hide swatches, low-stock threshold, badges, share buttons.
– Cart: drawer vs page, upsell source (collection/algorithmic), shipping threshold.
– SEO: default meta patterns, social image, JSON-LD toggles.
– Integrations: review app block placeholder, analytics/consent flags.

## Developer Notes
– Use asset_url and .css.liquid / .js.liquid only where necessary (keep logic in Liquid files otherwise).
– Comment every section/snippet top with purpose + usage.
– Strict schema validation—no orphaned settings.
– Avoid global CSS bloat—use utility classes and component scopes.
– Ship with a small set of presets (e.g., Minimal, Editorial, Bold Commerce) for fast setup.

QA Checklist (pass before delivery)

✅ Theme Editor: all sections movable, hideable, and reusable.
✅ No console errors; network panel shows minimal requests; all third-party scripts gated by consent.
✅ A11y: keyboard-only checkout flow to cart drawer works, ARIA roles valid.
✅ SEO: unique titles, canonicals, JSON-LD renders, no duplicate H1s, breadcrumbs present.
✅ Performance: CLS < 0.05, LCP < 2.5s on mobile test PDP, JS under strict budget.
✅ Internationalization: strings localized; currencies format correctly.

Visual Guidance (Horizon Reference)

Match the sleek, launch-ready minimalism of Horizon: large product cards, confident typography, straightforward navigation, and fast feel. Do not copy code verbatim, but mirror the UX patterns and flexibility.

With this prompt, I really believed that GPT-5 could produce a great output but guess what.

Here’s what it gave me:

That’s right, it’s a whole mess haha!

Final thoughts

So… can GPT-5 build a Shopify theme? Not with just a single prompt.

I think it would need a lot of back and fourth with GPT-5 to make it work.

That said, this is the closest I’ve seen an AI come to “vibe coding” a full Shopify theme and nope, it’s still far from perfect.

How To Create Accordion FAQ Page for Shopify Theme Dawn

So you’ve created a new Shopify online store and you’re using the Shopify theme called Dawn. Now you wanna customize it, but the problem is you don’t know how to do it because it’s a new Shopify theme and it’s using JSON templates which is different from the previous Shopify theme Debut (Oh the good ol’ days 😭).

That’s right, Shopify has rolled out the Online Store 2.0 and new Shopify themes must be using JSON templates for Shopify Theme Development instead of the previous liquid templates. You can still use Liquid templates but they are not very encouraged.

This change made it quite confusing especially to those merchants who are used to the old template system. But don’t worry, I’m going to walk you through how to customize the Shopify theme Dawn.

So, what are we going to add to Dawn, you ask?

In this article, we will be creating an accordion FAQ page for the Shopify theme called Dawn.

Author’s note

I’ve already created a lesson about the same topic but back then we were using Debut. So I personally feel like this needs to be recreated.

Video Tutorials

If you’re still using Debut, and you’re interested to learn how to create an FAQs page without using any apps, feel free to watch the video tutorial below.

Otherwise, you can watch me do what’s written in this article in the video below.

Getting Started

In order for this to work, we’re gonna need three (3) things. The first is the page that will render the FAQs. The second is the JSON template that we will use on our page and the third is the liquid codes and a stylesheet to render the FAQs.

This may sound too much for you but it’s honestly not that difficult.

If I’m gonna be honest with you, there’s a simpler and shorter way to create an FAQs page for Dawn, and that is by using sections and schema settings. However, I would like to guide you on how to create a JSON template so that you understand how JSON templates work.

Okay, I’m talking too much, let’s start and create the FAQs page.

How To Create FAQs Page for Dawn

We’re going to divide this section into three (3) parts:

  1. Creating the JSON template for the FAQs page
  2. Creating the page in the admin
  3. Creating the accordions

Let’s start by creating the JSON template for the FAQs page.

Create the JSON template

Open your Shopify store admin page. Then, access the Online Store’s theme page, and there open the Code Editor by clicking the actions dropdown menu and there select Edit Code.

Shopify themes page

Once you have the Code Editor page loaded, the next thing that you’re going to do is to create the JSON template and the template section for the JSON template. Sounds confusing? Let’s do it step by step.

First, open the Templates folder and click the Add a new template file. Then, for the “Create a new template for” select page. Then, for the “Template type“, make sure you’re using JSON. And lastly, name the template file page.faq.

Creating a new Shopify theme template

Once the file is created, apply the following code:

{
  "sections": {
    "main": {
      "type": "main-page-faq"
    }
  },
  "order": ["main"]
}
Code language: JSON / JSON with Comments (json)

In the JSON template above, we are referencing a section file called main-page-faq, so of course, we’re going to create that file.

So open the Sections folder and click the Add a new section file and name the file main-page-faq.

Creating a Shopify theme section

Once the file is created, we’re going to apply the same code that we have from the main-page.liquid section file. But, you can just copy the following code below:

<link rel="stylesheet" href="{{ 'section-main-page.css' | asset_url }}" media="print" onload="this.media='all'">
<link rel="stylesheet" href="{{ 'component-rte.css' | asset_url }}" media="print" onload="this.media='all'">

<noscript>{{ 'section-main-page.css' | asset_url | stylesheet_tag }}</noscript>
<noscript>{{ 'component-rte.css' | asset_url | stylesheet_tag }}</noscript>

<div class="page-width page-width--narrow">
  <h1 class="main-page-title page-title h0">
    {{ page.title | escape }}
  </h1>
  <div class="rte">
    {{ page.content }}
  </div>
</div>

{% schema %}
{
  "name": "FAQs Page",
  "tag": "section",
  "class": "spaced-section"
}
{% endschema %}

Code language: HTML, XML (xml)

Awesome! Now we have the JSON template and the template section ready. Let’s continue by using them on a new page.

Create a new page called FAQs

Go back to your Shopify admin page and access the Online Store’s “pages” page. Then, create a new page and call it FAQs (or whatever you wish to call it) and make sure that the Theme template it’s using is set to faq.

Creating an FAQ page with custom template

Nice! Now we have the page to render the accordions. The last thing that we need to do is to write the code for these accordions.

Create the accordions for FAQs

Go back to your main-page-faq section file and update its code to the following:

<link rel="stylesheet" href="{{ 'section-main-page.css' | asset_url }}" media="print" onload="this.media='all'">
<link rel="stylesheet" href="{{ 'component-rte.css' | asset_url }}" media="print" onload="this.media='all'">

<noscript>{{ 'section-main-page.css' | asset_url | stylesheet_tag }}</noscript>
<noscript>{{ 'component-rte.css' | asset_url | stylesheet_tag }}</noscript>

<div class="page-width page-width--narrow">
  <h1 class="main-page-title page-title h0">
    {{ page.title | escape }}
  </h1>
  <div class="rte">
    {{ page.content }}
  </div>
  
  <div class="faq-container">
    <div class="tabs">
    	{% for block in section.blocks %}
      		{% assign item = block.settings %}
      		
      		<div class="tab">
      			<input type="checkbox" id="faq_checkbox_{{ forloop.index }}" class="faq-checkbox">
        		<label for="faq_checkbox_{{ forloop.index }}" class="tab-label button button--primary">{{ item.question }}</label>
        		<div class="tab-content">{{ item.answer }}</div>
      		</div>
      	{% endfor %}
    </div>
  </div>
</div>

{% schema %}
{
  "name": "FAQ Page",
  "tag": "section",
  "class": "spaced-section",
	"blocks": [
		{
			"name": "FAQ Item",
			"type": "faq",
			"settings": [
				{
					"type": "text",
					"id": "question",
					"label": "Question",
					"default": "Do you have a question?"
				},
				{
					"type": "richtext",
					"id": "answer",
					"label": "Answer",
					"default": "<p>I have an answer</p>"
				}
			]
		}
	]
}
{% endschema %}

Code language: HTML, XML (xml)

The code that we added above should allow you to add blocks to your FAQs page through the customizer page.

Adding FAQ item in Shopify theme editor

Awesome! Now the last thing that we need to do is to use CSS and make the FAQ items an actual accordion. So go back to the code editor and open the Snippets folder, click the Add a new asset. Then, select the Create a blank file and for its name, call it faq-style and make sure the file extension is set to .css.

Add a new Shopify theme asset in Dawn

Once, the file is created, apply the following code:

.faq-checkbox {
  position: absolute;
  opacity: 0;
  z-index: -1;
}

.tabs {
  border-radius: 10px;
  overflow: hidden;
}

.tab {
  width: 100%;
  color: white;
  overflow: hidden;
}

.tab-label {
  width: 100%;
  display: flex;
  justify-content: space-between;
  padding: 1em;
  font-weight: bold;
  color: white;
}	

.tab-label:after {
  content: "+";
  width: 1em;
  height: 1em;
  text-align: center;
  transition: all 0.5s;
}

.tab-content {
  max-height: 0;
  padding: 0 1em;
  background-color: white;
  transition: all 0.5s;
  color: black;
}

.tab-content p {
  margin: 0; 
}

.faq-checkbox:checked + .tab-label:after {
  content: "-"; 
}

.faq-checkbox:checked ~ .tab-content {
  max-height: 100vh;
  padding: 1em;
}
Code language: CSS (css)

Make sure to save your file.

Last step is to apply that CSS stylesheet to our section file.

<link rel="stylesheet" href="{{ 'section-main-page.css' | asset_url }}" media="print" onload="this.media='all'">
<link rel="stylesheet" href="{{ 'component-rte.css' | asset_url }}" media="print" onload="this.media='all'">
<link rel="stylesheet" href="{{ 'faq-style.css' | asset_url }}" media="print" onload="this.media='all'">

<noscript>{{ 'section-main-page.css' | asset_url | stylesheet_tag }}</noscript>
<noscript>{{ 'component-rte.css' | asset_url | stylesheet_tag }}</noscript>

<div class="page-width page-width--narrow">
  <h1 class="main-page-title page-title h0">
    {{ page.title | escape }}
  </h1>
  <div class="rte">
    {{ page.content }}
  </div>
  
  <div class="faq-container">
    <div class="tabs">
    	{% for block in section.blocks %}
      		{% assign item = block.settings %}
      		
      		<div class="tab">
      			<input type="checkbox" id="faq_checkbox_{{ forloop.index }}" class="faq-checkbox">
        		<label for="faq_checkbox_{{ forloop.index }}" class="tab-label button button--primary">{{ item.question }}</label>
        		<div class="tab-content">{{ item.answer }}</div>
      		</div>
      	{% endfor %}
    </div>
  </div>
</div>

{% schema %}
{
  "name": "FAQ Page",
  "tag": "section",
  "class": "spaced-section",
	"blocks": [
		{
			"name": "FAQ Item",
			"type": "faq",
			"settings": [
				{
					"type": "text",
					"id": "question",
					"label": "Question",
					"default": "Do you have a question?"
				},
				{
					"type": "richtext",
					"id": "answer",
					"label": "Answer",
					"default": "<p>I have an answer</p>"
				}
			]
		}
	]
}
{% endschema %}
Code language: HTML, XML (xml)

Now, if you open your FAQs page, you should have the following:

Conclusion

So there you have it! We have created an FAQs page for the Shopify theme called Dawn without using any Shopify apps. Like I said earlier, there is a faster and more practical way of creating accordions and that is by using sections.

Maybe in the future, I will create a separate lesson discussing this but for now, that’s how you create FAQs or accordions.

If you want to support me or WeeklyHow, feel free to subscribe to our YouTube channel or if you want to learn more about Shopify Theme Development, I have a course about Shopify Theme Development and there you will learn more about Liquid programming and Templates.