
Welcome to another Shopify App Development Tutorial using PHP. In the previous article, we have guided you on how to display the product’s name as well as its price using our chosen Shopify API.
In this article, we’ll be displaying not just the name of the product, not just the prices, but also the product’s images.
Product image is one of the most important parts of an online store. This gives your customers an idea about what you’re selling.
If there’s no image… How are they gonna know what the item looks like? Right?
So without wasting any more time, let’s start this tutorial.
Getting Started
Create a new PHP file and name it index.php inside the file paste the following code:
<?php
require_once("inc/functions.php");

$requests = $_GET;
$hmac = $_GET['hmac'];
$serializeArray = serialize($requests);
$requests = array_diff_key($requests, array('hmac' => ''));
ksort($requests);

$token = PASTE YOUR GENERATED TOKEN HERE
$shop = PASTE YOUR SHOP URL HERECode language: HTML, XML (xml)
If you have been reading my previous tutorials on how to display products, then you might already know what the code above does or at least you’re familiar with what it is.
However, if you are not.
Then I’ll summarize it for you so, you won’t have to read the previous tutorial.
Okay so.
The code above is just the initialization of the code, we make variables which is important for Shopify API.
We referenced function.php and the changed header file to be able to read both JSON and HTML languages.
Next, we separated the value of hmac which is generated by Shopify from $_GET variable and then we sort the request variable. Simple.
Next, we declare two variables:
$token = PASTE YOUR GENERATED TOKEN HERE
$shop = PASTE YOUR SHOP URL HERECode language: PHP (php)
These variables needed to have values, so as you can see, it is stated that you need to paste your generated token and your shop URL.
Go ahead and change that to something like this:
$token = "xxxxxxxxxxxxxxxxxxxxxxxxxxxxxxxx";
$shop = "my-shop-is-awesome";            //no 'myshopify.com' or 'https'Code language: PHP (php)
Where do you get Access Token?
Alright, some of you may be wondering where I can get the value of the token.
If you have been following this series for quite a long time, then you probably know already that this comes from generated_token.php.
If you have no idea what is that, then I SUPER recommend you to read my previous article about how to build Shopify apps using PHP. It contains the script of token generation and I explained it there as well.
Using Shopify collections
Copy the code below and paste it into your code.
$collectionList = shopify_call($token, $shop, "/admin/api/2020-01/custom_collections.json", array(), 'GET');
$collectionList = json_decode($collectionList['response'], JSON_PRETTY_PRINT);
$collection_id = $collectionList['custom_collections'][0]['id'];

$array = array("collection_id"=>$collection_id);
$collects = shopify_call($token, $shop, "/admin/api/2020-01/collects.json", $array, 'GET');
$collects = json_decode($collects['response'], JSON_PRETTY_PRINT);Code language: PHP (php)
The code above will get the collection ID from the store’s custom_collection.json and then convert it into an array.
Keep in mind that the code above will most likely get the default collection which is the homepage collection. So if you want to specify the collection ID, you may use this code instead:
$collection_id = PASTE YOUR COLLECTION ID HERE
$array = array("collection_id"=>$collection_id);
$collects = shopify_call($token, $shop, "/admin/api/2020-01/collects.json", $array, 'GET');
$collects = json_decode($collects['response'], JSON_PRETTY_PRINT);Code language: PHP (php)
Displaying the Product Images
Before we get started, make sure there are images attached to your Shopify products. Because if it is empty then it will obviously return an error or an empty space. So make sure you double-check your items first.
Also, keep in mind that you can only upload up to 250 images per item. But obviously, you won’t be uploading that many images per item. Right?
To do that, navigate to All products > Then select one of your available items.

Next, let’s use this code below to display the very first image of the products
foreach($collects as $collect){
    foreach($collect as $key => $value){
    		$products = shopify_call($token, $shop, "/admin/api/2020-01/products/".$value['collection_id'].".json", array(), 'GET');
		$products = json_decode($products['response'], JSON_PRETTY_PRINT);

    		$images = shopify_call($token, $shop, "/admin/api/2020-01/products/".$products['product']['id']."/images.json", array(), 'GET');
		$images = json_decode($images['response'], JSON_PRETTY_PRINT);
		$item_default_image = $images['images'][0]['src'];

		echo '<img src="'.$item_default_image.'" style="width: 200px; height: 230px;"/>';
    }
}
Code language: PHP (php)
In the code above, we’ll be using the images.json. This file contains all the details available about your item’s images.
Shopify Product API
Shopify API allows us to retrieve images but you may also retrieve its count using the following actions:
GET /admin/api/2020-01/products/{product_id}/images/count.jsonBut in this tutorial, we’ll be using:
GET /admin/api/2020-01/products/{product_id}/images.jsonShopify Tips
You may check the values of any JSON file by appending these actions with your Shopify store URL. For example:
https://teststore.myshopify.com/admin/api/2020-01/products/632910392/images.jsonCode language: JavaScript (javascript)By browsing this URL, you will receive values that look something like this:
HTTP/1.1 200 OK
{
  "images": [
    {
      "id": 1001473913,
      "product_id": 632910392,
      "position": 3,
      "created_at": "2019-04-09T10:55:10-04:00",
      "updated_at": "2019-04-09T10:55:10-04:00",
      "alt": null,
      "width": 110,
      "height": 140,
      "src": "https://cdn.shopify.com/s/files/1/0006/9093/3842/products/rails_logo.gif?v=1554821710",
      "variant_ids": [],
      "admin_graphql_api_id": "gid://shopify/ProductImage/1001473913"
    }
  ]
}Code language: JavaScript (javascript)
As you can see. This is a multi-dimensional array. Which is why you need to access the values through several ways like looping statements or direct-accessing.
Like this:
$images['images'][0]['src'];Code language: PHP (php)The zero between images and src is the very first index of the array. So let’s say you have 5 images. Then you will need to use foreach for that. Kind of like this:
foreach($images['images'] as $image){
    foreach($image as $key => $value){
		echo '<img src="'.$value['src'].'" />';
    }
}Code language: PHP (php)
The code above will go through each key available in the array. Which is really convenient especially if you need to display all the images.
This is also pretty much easier to control.
Let’s say you want to display 5 images only then all you needed to do is just put a conditional statement with a variable that increments its value as it loops back and then once it reaches 4 then just exit the looping statement.
Like this:
$index = 0;
foreach($images['images'] as $image){
    foreach($image as $key => $value){
                if($index == 4) return;
                $index++;
		echo '<img src="'.$value['src'].'" />';
    }
}Code language: PHP (php)
Full code
I’m never displaying the full code in each of my tutorials since it will make you not read the article and you won’t understand each code. But this time, I will make an exception.
This is the full code of images.php
<?php
require_once("inc/functions.php");

$requests = $_GET;
$hmac = $_GET['hmac'];
$serializeArray = serialize($requests);
$requests = array_diff_key($requests, array('hmac' => ''));
ksort($requests);

$token = "xxxxxxxxxxxxxxxxxxxxxxxxxxxxxxxx";
$shop = "my-shop-is-awesome";            //no 'myshopify.com' or 'https'

$collectionList = shopify_call($token, $shop, "/admin/api/2020-01/custom_collections.json", array(), 'GET');
$collectionList = json_decode($collectionList['response'], JSON_PRETTY_PRINT);
$collection_id = $collectionList['custom_collections'][0]['id'];

$array = array("collection_id"=>$collection_id);
$collects = shopify_call($token, $shop, "/admin/api/2020-01/collects.json", $array, 'GET');
$collects = json_decode($collects['response'], JSON_PRETTY_PRINT);

foreach($collects as $collect){
    foreach($collect as $key => $value){
                $products = shopify_call($token, $shop, "/admin/api/2020-01/products/".$value['product_id'].".json", array(), 'GET');
		$products = json_decode($products['response'], JSON_PRETTY_PRINT);

    	$images = shopify_call($token, $shop, "/admin/api/2020-01/products/".$products['product']['id']."/images.json", array(), 'GET');
		$images = json_decode($images['response'], JSON_PRETTY_PRINT);
		$item_default_image = $images['images'][0]['src'];

		echo '<img src="'.$item_default_image.'" style="width: 200px; height: 230px;"/>';
    }
}Code language: HTML, XML (xml)
If you have set up the code properly. The result will look something like this:
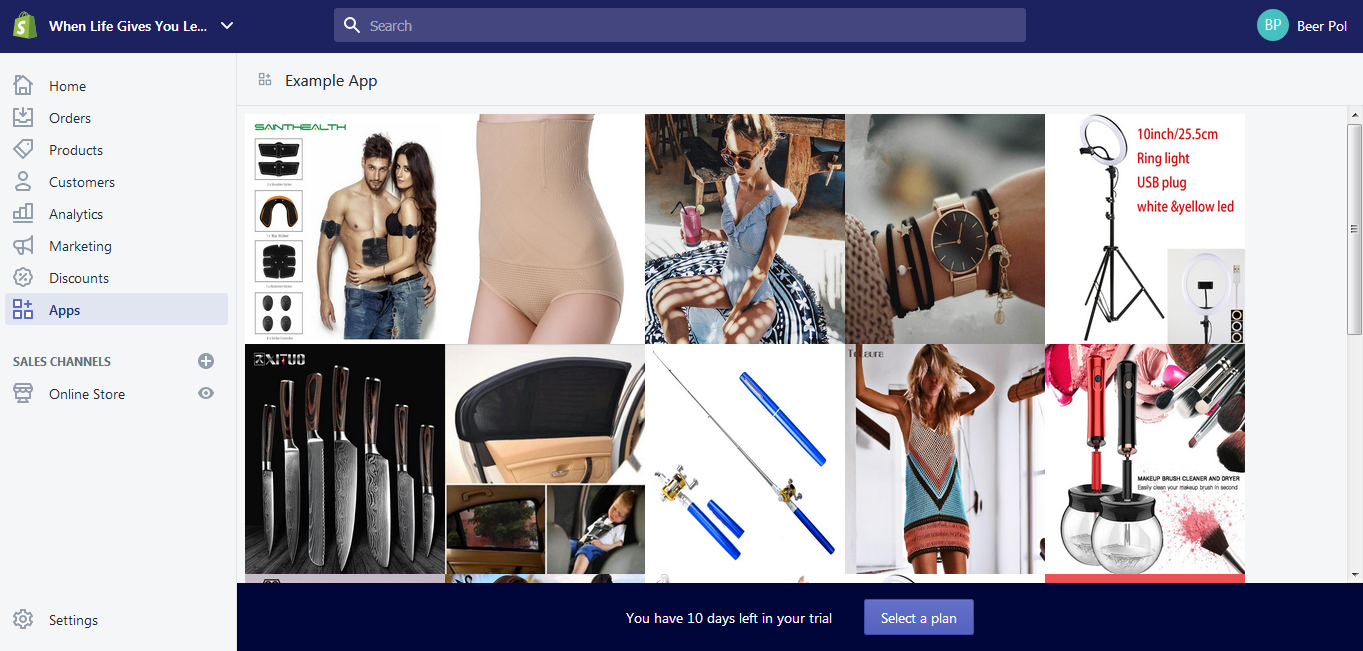
There you have it, we have finally displayed all the item’s first image.
The next thing we’re going to do is to design the app because no one will like to see your app looking like a gallery. Unless you want it that way. But in our case, no.
Designing the App
To design your app, insert this code at the very top of your script:
<html>
  <head>
     <style>
        .divOut { padding: 5px; display: inline-block; width: 230px;}
        .divLabel {
               width: 200px;
               white-space: nowrap;
               overflow: hidden;
               text-overflow: ellipsis;
               font-weight: bold;
               font-family: sans-serif;
               margin-top: 5px;
        }
        .prodImg { width: 200px; height: 230px; }
     </style>
  </head>Code language: HTML, XML (xml)
Let’s go back to our PHP script and edit the following code:
echo '<img src="'.$item_default_image.'" class="prodImg"/>';Code language: PHP (php)Now, instead of echoing (yes that’s a word :P) the image. Let’s wrap it between div tags and then create some text underneath the image so it will look like an actual product with details.
echo '
<div class="divOut">
    <div class="divIn">
        <img src="'.$item_default_image.'" style="width: 200px; height: 230px;"/>
    </div>
    <div class="divLabel">
        '.$products['product']['title'].'
    </div>
    <div class="divLabel">
        $'.$products['product']['variants'][0]['price'].'
    </div>
</div>
';Code language: HTML, XML (xml)
So, in the code above, we have displayed the image, the title of the product, and its price.

Now, you might also have noticed that your title may go through the div panel. It’s because, in the CSS, we have added an overflow that is hidden. Then set the text to ellipsis once it overflows in the panel.
Bla bla bla. It’s just a style
Going back to designing.
What if you want to link the image and text to the purchasing page? How can you do that?
Well, since you are now able to display the image, the title, and the price. Then I’m sure you already get the idea on how to get all the components of each product from the API.
But still, let’s do it.
Let’s start with declaring a new variable, and let’s call it storeURL and then give it the value of the shop variable plus myshopify.com.
(and oh put it below the shop variable)
Like this:
$token = "xxxxxxxxxxxxxxxxxxxxxxxxxxxxxxxx";
$shop = "my-shop-is-awesome";            //no 'myshopify.com' or 'https'
$storeURL = "https://". $shop . ".myshopify.com";Code language: PHP (php)
Now let’s wrap the image tag with anchor tag and then get the URL of your store and then concatenate it with “/products/” plus the value of handle from the products variable.
Like this:
echo '
<div class="divOut">
    <div class="divIn">
        <a href="'.$storeURL.'/products/'.$products['product']['handle'].'" target="_blank">
             <img src="'.$item_default_image.'" style="width: 200px; height: 230px;"/>
        </a>
    </div>
    <div class="divLabel">
        '.$products['product']['title'].'
    </div>
    <div class="divLabel">
        $'.$products['product']['variants'][0]['price'].'
    </div>
</div>
';Code language: HTML, XML (xml)
With the code above, you may now click the images and it will redirect you to its product page where you can “add to cart” the item.

Awesome right?
Conclusion
Creating Shopify apps is very easy especially if you already know your API. If you are using a different client then doing research about it will help you understand it easier.
I’m hoping that there are no issues with your code but if there is then don’t hesitate to let us know in the comments below and we will respond to you as soon as we can.
I think you deserve congratulation on achieving these results.
So…
Congratulations! 🙂
Thank you for your tutorial!
I have a question, how can i set the value of token and shop variable on every shopify store that will use my app? Thanks!
Hi Raff,
Good Question.
I will make a complete tutorial regarding this. But to answer your question, you will need to use database so as soon as the store install your app you need to send the token to your database and there you can just retrieve it.
Best Regards,
Bernard
Thanks! ill be waiting for this tutorial. Thanks again!
Hi! Do you know how can i execute code whenever there’s an order made? Thanks!
Hi Raff,
Thanks for reaching out!
You may execute a script using webhooks. I will create a tutorial for this real soon.
For the meantime, you may refer to Shopify’s documentation.
https://help.shopify.com/en/api/reference/events/webhook
Best regards,
Bernard
Hi, i m trying my first Shopify app but i m getting an error
Notice: Undefined index: custom_collections in C:\xampp\htdocs\ShopifyProject\ShopifyApp\index.php on line 30
can you help me i m following yours code to do so but i m getting it…