
So you’ve created a new Shopify online store and you’re using the Shopify theme called Dawn. Now you wanna customize it, but the problem is you don’t know how to do it because it’s a new Shopify theme and it’s using JSON templates which is different from the previous Shopify theme Debut (Oh the good ol’ days 😭).

That’s right, Shopify has rolled out the Online Store 2.0 and new Shopify themes must be using JSON templates for Shopify Theme Development instead of the previous liquid templates. You can still use Liquid templates but they are not very encouraged.
This change made it quite confusing especially to those merchants who are used to the old template system. But don’t worry, I’m going to walk you through how to customize the Shopify theme Dawn.
So, what are we going to add to Dawn, you ask?
In this article, we will be creating an accordion FAQ page for the Shopify theme called Dawn.
I’ve already created a lesson about the same topic but back then we were using Debut. So I personally feel like this needs to be recreated.
Video Tutorials
If you’re still using Debut, and you’re interested to learn how to create an FAQs page without using any apps, feel free to watch the video tutorial below.
Otherwise, you can watch me do what’s written in this article in the video below.
Getting Started
In order for this to work, we’re gonna need three (3) things. The first is the page that will render the FAQs. The second is the JSON template that we will use on our page and the third is the liquid codes and a stylesheet to render the FAQs.
This may sound too much for you but it’s honestly not that difficult.
If I’m gonna be honest with you, there’s a simpler and shorter way to create an FAQs page for Dawn, and that is by using sections and schema settings. However, I would like to guide you on how to create a JSON template so that you understand how JSON templates work.
Okay, I’m talking too much, let’s start and create the FAQs page.
How To Create FAQs Page for Dawn
We’re going to divide this section into three (3) parts:
- Creating the JSON template for the FAQs page
- Creating the page in the admin
- Creating the accordions
Let’s start by creating the JSON template for the FAQs page.
Create the JSON template
Open your Shopify store admin page. Then, access the Online Store’s theme page, and there open the Code Editor by clicking the actions dropdown menu and there select Edit Code.

Once you have the Code Editor page loaded, the next thing that you’re going to do is to create the JSON template and the template section for the JSON template. Sounds confusing? Let’s do it step by step.
First, open the Templates folder and click the Add a new template file. Then, for the “Create a new template for” select page. Then, for the “Template type“, make sure you’re using JSON. And lastly, name the template file page.faq.

Once the file is created, apply the following code:
{
  "sections": {
    "main": {
      "type": "main-page-faq"
    }
  },
  "order": ["main"]
}
Code language: JSON / JSON with Comments (json)
In the JSON template above, we are referencing a section file called main-page-faq, so of course, we’re going to create that file.
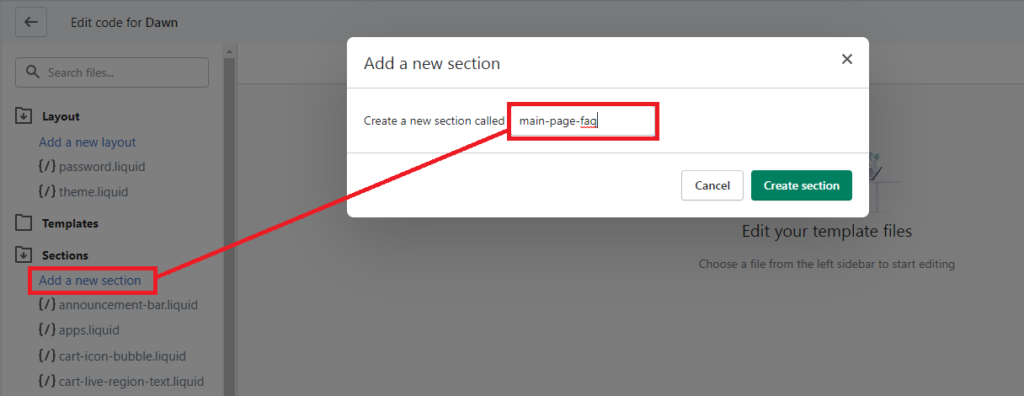
So open the Sections folder and click the Add a new section file and name the file main-page-faq.
Once the file is created, we’re going to apply the same code that we have from the main-page.liquid section file. But, you can just copy the following code below:
<link rel="stylesheet" href="{{ 'section-main-page.css' | asset_url }}" media="print" onload="this.media='all'">
<link rel="stylesheet" href="{{ 'component-rte.css' | asset_url }}" media="print" onload="this.media='all'">

<noscript>{{ 'section-main-page.css' | asset_url | stylesheet_tag }}</noscript>
<noscript>{{ 'component-rte.css' | asset_url | stylesheet_tag }}</noscript>

<div class="page-width page-width--narrow">
  <h1 class="main-page-title page-title h0">
    {{ page.title | escape }}
  </h1>
  <div class="rte">
    {{ page.content }}
  </div>
</div>

{% schema %}
{
  "name": "FAQs Page",
  "tag": "section",
  "class": "spaced-section"
}
{% endschema %}

Code language: HTML, XML (xml)
Awesome! Now we have the JSON template and the template section ready. Let’s continue by using them on a new page.
Create a new page called FAQs
Go back to your Shopify admin page and access the Online Store’s “pages” page. Then, create a new page and call it FAQs (or whatever you wish to call it) and make sure that the Theme template it’s using is set to faq.

Nice! Now we have the page to render the accordions. The last thing that we need to do is to write the code for these accordions.
Create the accordions for FAQs
Go back to your main-page-faq section file and update its code to the following:
<link rel="stylesheet" href="{{ 'section-main-page.css' | asset_url }}" media="print" onload="this.media='all'">
<link rel="stylesheet" href="{{ 'component-rte.css' | asset_url }}" media="print" onload="this.media='all'">

<noscript>{{ 'section-main-page.css' | asset_url | stylesheet_tag }}</noscript>
<noscript>{{ 'component-rte.css' | asset_url | stylesheet_tag }}</noscript>

<div class="page-width page-width--narrow">
  <h1 class="main-page-title page-title h0">
    {{ page.title | escape }}
  </h1>
  <div class="rte">
    {{ page.content }}
  </div>

  <div class="faq-container">
    <div class="tabs">
    	{% for block in section.blocks %}
      		{% assign item = block.settings %}

      		<div class="tab">
      			<input type="checkbox" id="faq_checkbox_{{ forloop.index }}" class="faq-checkbox">
        		<label for="faq_checkbox_{{ forloop.index }}" class="tab-label button button--primary">{{ item.question }}</label>
        		<div class="tab-content">{{ item.answer }}</div>
      		</div>
      	{% endfor %}
    </div>
  </div>
</div>

{% schema %}
{
  "name": "FAQ Page",
  "tag": "section",
  "class": "spaced-section",
	"blocks": [
		{
			"name": "FAQ Item",
			"type": "faq",
			"settings": [
				{
					"type": "text",
					"id": "question",
					"label": "Question",
					"default": "Do you have a question?"
				},
				{
					"type": "richtext",
					"id": "answer",
					"label": "Answer",
					"default": "<p>I have an answer</p>"
				}
			]
		}
	]
}
{% endschema %}

Code language: HTML, XML (xml)
The code that we added above should allow you to add blocks to your FAQs page through the customizer page.

Awesome! Now the last thing that we need to do is to use CSS and make the FAQ items an actual accordion. So go back to the code editor and open the Snippets folder, click the Add a new asset. Then, select the Create a blank file and for its name, call it faq-style and make sure the file extension is set to .css.

Once, the file is created, apply the following code:
.faq-checkbox {
  position: absolute;
  opacity: 0;
  z-index: -1;
}

.tabs {
  border-radius: 10px;
  overflow: hidden;
}

.tab {
  width: 100%;
  color: white;
  overflow: hidden;
}

.tab-label {
  width: 100%;
  display: flex;
  justify-content: space-between;
  padding: 1em;
  font-weight: bold;
  color: white;
}

.tab-label:after {
  content: "+";
  width: 1em;
  height: 1em;
  text-align: center;
  transition: all 0.5s;
}

.tab-content {
  max-height: 0;
  padding: 0 1em;
  background-color: white;
  transition: all 0.5s;
  color: black;
}

.tab-content p {
  margin: 0;
}

.faq-checkbox:checked + .tab-label:after {
  content: "-";
}

.faq-checkbox:checked ~ .tab-content {
  max-height: 100vh;
  padding: 1em;
}
Code language: CSS (css)
Make sure to save your file.
Last step is to apply that CSS stylesheet to our section file.
<link rel="stylesheet" href="{{ 'section-main-page.css' | asset_url }}" media="print" onload="this.media='all'">
<link rel="stylesheet" href="{{ 'component-rte.css' | asset_url }}" media="print" onload="this.media='all'">
<link rel="stylesheet" href="{{ 'faq-style.css' | asset_url }}" media="print" onload="this.media='all'">

<noscript>{{ 'section-main-page.css' | asset_url | stylesheet_tag }}</noscript>
<noscript>{{ 'component-rte.css' | asset_url | stylesheet_tag }}</noscript>

<div class="page-width page-width--narrow">
  <h1 class="main-page-title page-title h0">
    {{ page.title | escape }}
  </h1>
  <div class="rte">
    {{ page.content }}
  </div>

  <div class="faq-container">
    <div class="tabs">
    	{% for block in section.blocks %}
      		{% assign item = block.settings %}

      		<div class="tab">
      			<input type="checkbox" id="faq_checkbox_{{ forloop.index }}" class="faq-checkbox">
        		<label for="faq_checkbox_{{ forloop.index }}" class="tab-label button button--primary">{{ item.question }}</label>
        		<div class="tab-content">{{ item.answer }}</div>
      		</div>
      	{% endfor %}
    </div>
  </div>
</div>

{% schema %}
{
  "name": "FAQ Page",
  "tag": "section",
  "class": "spaced-section",
	"blocks": [
		{
			"name": "FAQ Item",
			"type": "faq",
			"settings": [
				{
					"type": "text",
					"id": "question",
					"label": "Question",
					"default": "Do you have a question?"
				},
				{
					"type": "richtext",
					"id": "answer",
					"label": "Answer",
					"default": "<p>I have an answer</p>"
				}
			]
		}
	]
}
{% endschema %}
Code language: HTML, XML (xml)
Now, if you open your FAQs page, you should have the following:

Conclusion
So there you have it! We have created an FAQs page for the Shopify theme called Dawn without using any Shopify apps. Like I said earlier, there is a faster and more practical way of creating accordions and that is by using sections.
Maybe in the future, I will create a separate lesson discussing this but for now, that’s how you create FAQs or accordions.
If you want to support me or WeeklyHow, feel free to subscribe to our YouTube channel or if you want to learn more about Shopify Theme Development, I have a course about Shopify Theme Development and there you will learn more about Liquid programming and Templates.
This is not working for me. I am getting a something that looks like a button with a checkbox next to it. When you click the button the checkbox is shown as checked and then if you click the button again it is shown as unchecked.
The “answer” copy is never hidden. It is always visible.
Password on the website is 1234.
You need to add the sylesheet link to the main-page-faq.liquid file.
Add this to
the main-page-faq.liquid file. missing code.
I have the same problem like Elise! Can you check and help? Thank a lot!
I’m having the same problem as Elise. The javascript is showing up as a checkbox for the accordion, could you please reply and help me out with the code? That would be greatly appreciated!
Add this code
to the main-page-faq.liquid file. missing code.
You need to add this line underneath the first two lines in main-page-faq.liquid
Thank you so much for your tutorial. It was excellent.
This all worked great. I did tweak some of the config. I found that longer answers were being cutoff so I changed the
faq-style.css: line 43
.faq-checkbox:checked ~ .tab-content {
max-height: 200vh; (original was 100vh)
padding: 1em;
}
Then I noticed it wasn’t giving me good spacing so on the same file I changed
}
.tab-content p {
margin: 1; <– original setting was 0
So my question is, how can I make it so that when I click on a FAQ to reveal the answer and then want to read the next question for another FAQ it automatically closes the previous FAQ answer? that way there are not too many opened at once?