When you run a business, it’s important that you present it the best way you can. That way you’ll be able to make sales and make a major difference for your company.
Take taglines for instance.
Most companies create such taglines to not only represent their brand but to also encourage their customers to purchase their products. Some well-known tagline examples are:
Just Do It. (Nike)
Maybe it’s Maybelline (Maybelline)
I’m Lovin’ It (McDonald’s)
Taglines speak a lot about your company and the products you aim to sell.
If you’re using Shopify to run your eCommerce business, then you’re in luck because Shopify offers a free tool for generating taglines.
If not, then we’re here to provide you some tips to help you write catchy taglines for your business.
Short and sweet
Remember that the taglines should never exceed more than 10 words. When it exceeds, it is no longer a tagline but a statement. People are bored with reading long sentences. That’s why it is important to make it short and sweet.
Sync with the logo
There should be a sync between the logo and the tagline. The logo should depict what your company’s purpose is and the tagline should make those understand who cannot derive from the logo.
The tagline makes a strong projection in itself. Tagline along with the logo has to be crafted carefully for they help in sustaining the image of the company amongst the buyers.
Not bound to time
You need to keep in mind that change is the only constant. What exists today takes a whole new shape tomorrow. You cannot keep changing the tagline of the company. It is much important to choose a tagline that wouldn’t require to be changed for any years to come. These are permanent and need careful rendering.
Target audience
The tagline should also communicate with your audience. Based on the kind of audience you have, be it local, national, or international, you need to frame in the tagline that speaks to your customer base. When it is local, it is better to use the vernacular language. When it is global, then it is better to use simpler and easier to understand English words.
Reflect your uniqueness
Your product’s uniqueness would be given the right kind of attention only when your tagline speaks for itself to the audience. Choose something that hasn’t been used at all in the past. But the main factor that helps them sell is how they aim to sell their products. Even products like vape sell only when they are marketed right by being unique in their way.
Host a tagline contest
You can make use of your social media accounts to get the right tagline for your business. This should be kept as the last resort when you can’t find an apt tagline for your own business. You can encourage the entries by mentioning that they will be awarded prizes and gift hampers.
Look up to the famous brands
It is not a bad thing to look out for inspiration while you try to pen down a tagline. Check the reason behind why the taglines of famous brands have struck a chord with people and try to frame on of your own.
Conclusion
There are a lot of other important things to keep in mind when you frame taglines for your venture. Have severe brainstorming sessions with your team and get their ideas informing the tagline. Maybe vaping in such a situation can help? Check out www.smokingthings.com. They offer vapes with different flavors like candy, fruit, menthol, and more.
Last but not the least, try to instill positivity via your tagline.
Return on ad spend (also known as ROAS) is one of the most important metrics for business owners especially when they do advertisements. Essentially, ROAS will determine if you will have a profit or how much profit you can get with the advertisement you’re investing.
For instance, if you profited a $100 from a $25 of ad spend, that would mean that your ROAS is 4X. (Also referred to as 400% by multiplying it by 100)
Break-Even ROAS, on the other hand, is another concept of determining the minimum Return on Ad Spend. This is where you will find if you’re about to lose money.
How To Calculate Your Break-Even ROAS
To calculate your break-even point, you will need a few things.
Revenue
Cost of goods being sold
Miscellaneous fees (Amazon fees, or Shopify fees)
Profit per sale
Let’s say that you sold something and you profited a $100 of revenue. The cost of the good is $20, and you also have other fees for $21, that would mean that you would have a final profit of $59.
What this means is that each time you sell this product, you will make $59.
Now, you can use this profit as your break-even ad spend.
Meaning if you spend $58, you’re going to have $1 profit and if you spend $60, you’re going to lose a dollar profit.
In conclusion, $59 is your break-even.
Finally, to get your Break-Even ROAS, divide your initial profit per product by your break-even.
BreakEvenROAS = 100 / 59 = 1.69
That would leave you a minimum ROAS of 1.69.
What is a Good Break-Even ROAS?
Of course, when you calculate your ROAS, the first thing that you would want to see is how much you would profit from your ad spend. If you’re profiting from your ad spend that means you’re good to go.
But when it comes to numbers, having a break-even ROAS greater than 2 is what you should be targeting. However, having between 1.2 to 1.9 ROAS can also be a good sign.
Overall, as long as you are profiting, you’re good.
WeeklyHow in 2018WeeklyHow in 2019WeeklyHow in 2020WeeklyHow in 2021
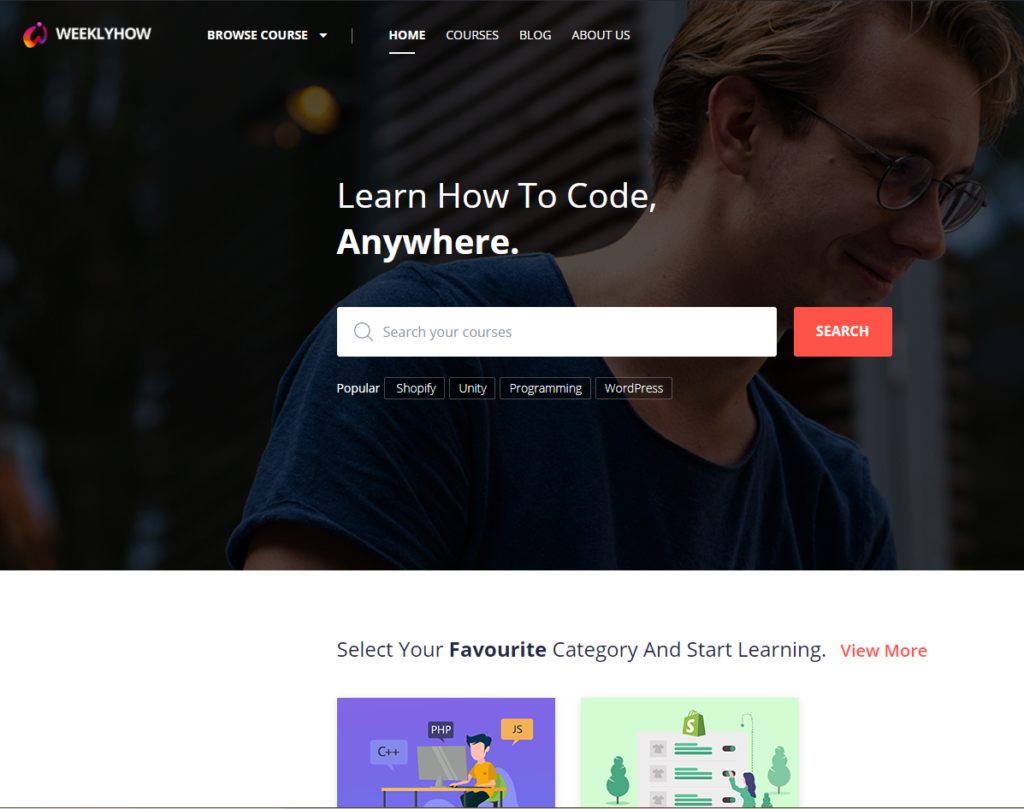
WeeklyHow started as a blog for sharing programming lessons and also a way for Bernard, to get online clients. Somewhere in the middle of 2019, we decided to make our niche focus on Shopify Development, Game Development (a little), and E-Commerce. We started removing all of the content that is not related to our current niche to ensure that readers can find what they need. One of our goals is to give everyone the ability to create extraordinary applications.
The year 2020 is such a challenging year yet we decided to move forward and improve our platform to give lessons to our readers. right now, you’re not just going to read tutorials, you’re going to learn with us through our courses, quizzes, and QnA.
Everyone deserves to have the best experience when it comes to learning and that’s why we’re here to provide you that experience.
For partnership and business development inquiries, please email us at contact@weeklyhow.com
Welcome to our new tutorial series here at WeeklyHow. If you have been following us for quite a while then you probably know already that most of our topics are focusing on Shopify app development. However, this time, we will be giving you new lessons which are very different from Shopify.
You have read it from the title already. 🙂
In this tutorial series, we will be teaching you how to create premium WordPress themes from scratch using PHP, HTML5, CSS (Bootstrap 4.3), and JavaScript. We’ll cover all of the possible lessons that we currently know though we are also open for your requests so as we go along in this tutorial series, you can contact us and give us what you want to learn and we’ll cover that in the next lessons.
Getting Started
Before we begin building premium WordPress themes, we highly suggest doing research and planning first before structuring your files as it will be much easier to continue with the project.
We also suggest downloading website design mockups to make it easier for you to follow which design you want to achieve.
For this course, we’ll be following this design mockup created by Freepik. You may download the PSD file here.
What is WordPress
First of all, before we get started, we would like to inform you that we are using content management systems (commonly known as CMS) called WordPress.
WordPress is a very popular platform commonly used for blogging purposes although starting from September 27, 2011, WordPress started its partnership with its own plugin called WooCommerce to also support e-commerce for selling products or services.
WordPress is an open-sourced content management system used by over 60 million websites all over the internet. It provides thousands of plugins that could help your website’s performance and traffic. It is free to use though you are required to host a web server to be able to use this CMS.
For this course, we will be using WordPress locally using Local by Flywheel.
What is Local by FlyWheel
Local by Flywheel is a simple, super-fast and a completely free local development application designed to simplify the development process of WordPress developers.
Join FlyWheel for FREE and get a free SSL Certificate to keep your site secure!
We’re going to use this application instead, as it is very fast and easy to use. Although, we don’t discourage you to use your favorite local development application. If you want to use XAMPP or WAMPP, feel free to do so.
If you’re using Local by Flywheel too, then follow the steps below as we’ll create a new and fresh WordPress website.
Creating a new WordPress site
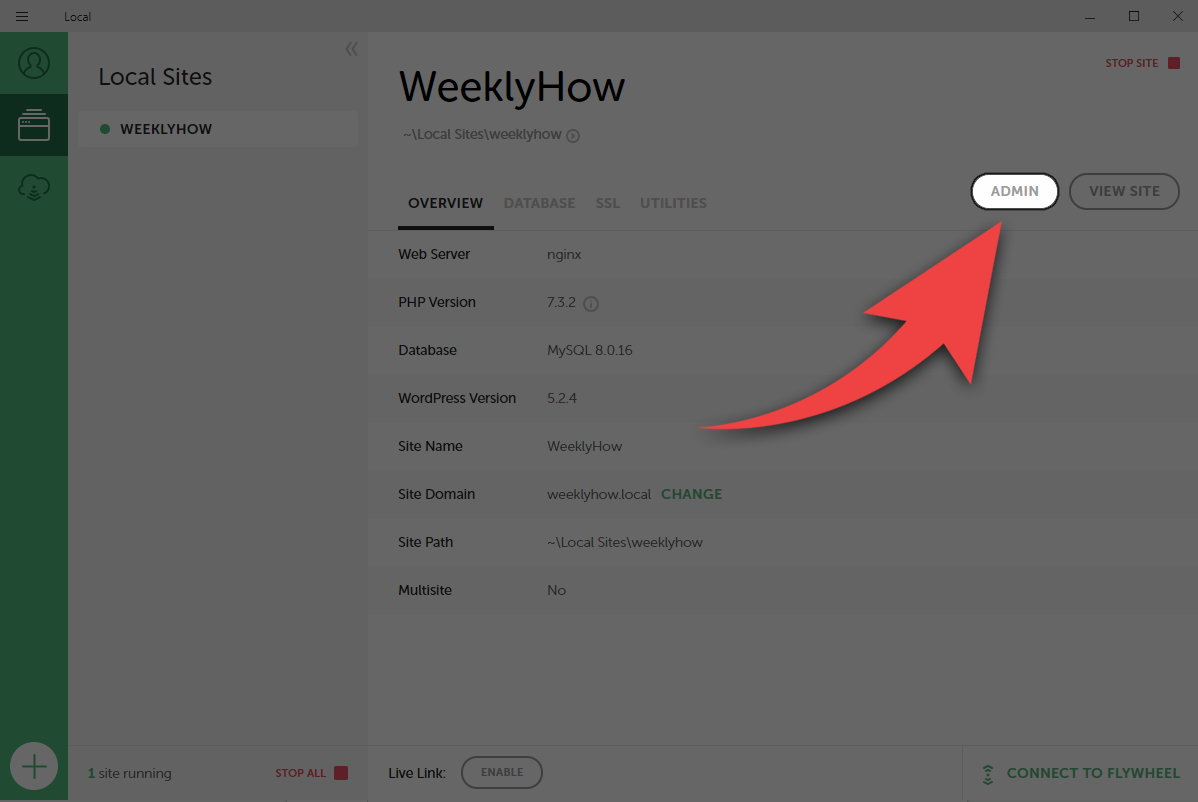
Open Local by Flywheel and click on Create a new site button.
Then enter the name of your site.
Next, enter your WordPress admin’s credentials. You may leave the advanced options set to no.
Click the Add site button and wait for the application to setup your website. If this is your first time using Local by Flywheel, you may encounter windows security alerts for Nginx and Mailhog.
Just click Allow access.
You may now access your WordPress site by clicking the view site button.
By default, WordPress will be using the Twenty Nineteen theme.
Later, we’re going to remove all of the themes available on our site and create our own theme.
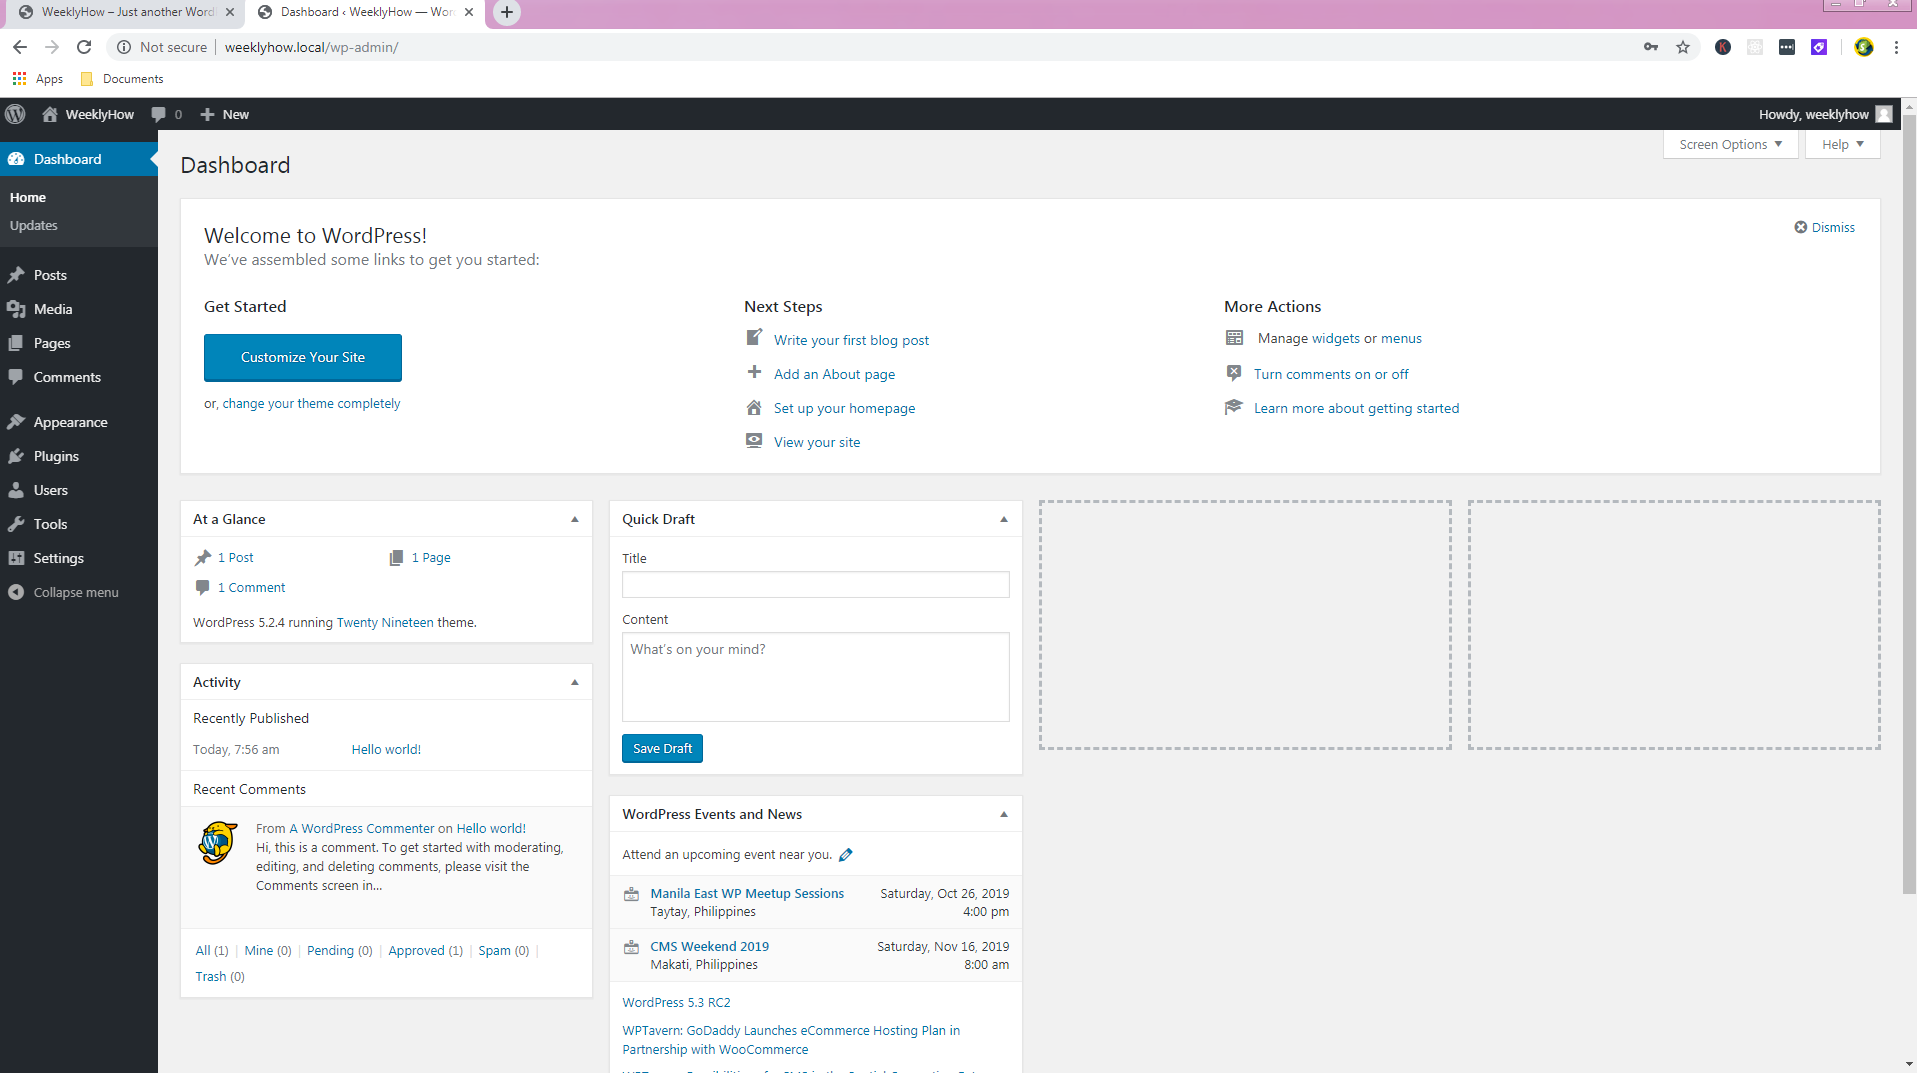
Accessing WordPress admin dashboard
To access your WordPress admin dashboard, click the admin button just beside the view site button.
Enter your admin credentials.
Welcome to WordPress! 🙂
Creating premium WordPress themes
Now that everything is set up, we can now start working on our new theme. For this course, we’ll be using Sublime as our code editor though we don’t discourage you to use your favorite editor. If you have Visual Studio or Notepad++, feel free to use them.
Accessing WordPress files
To access your WordPress files, go to your Local by Flywheel application and click on the right-arrow just below your site’s name.
You may also access your site’s folder by pressing right-click on your site under Local Sites and select Show Folder.
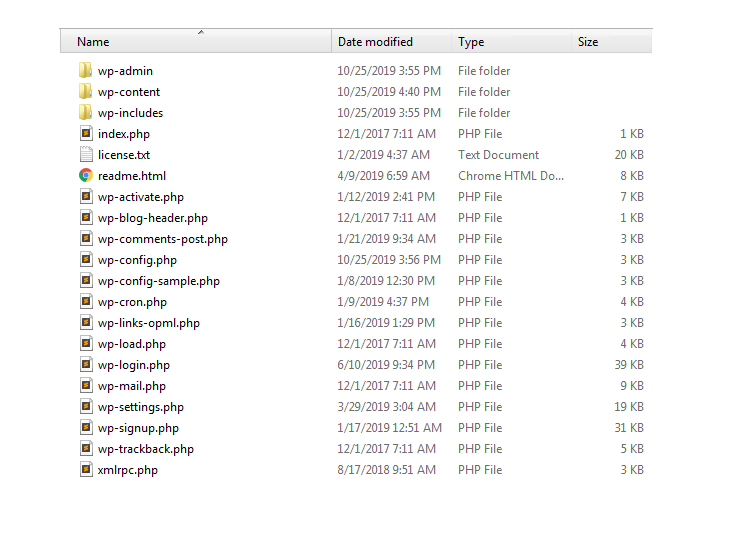
Once you open your site’s folder, you will see three folders such as app, conf, and logs.
Open the app folder.
Next, you will see the public folder, open that.
You should see the following files.
Open the wp-content folder.
Next, the themes folder.
Once you open the themes folder, you will see folders that have the same name as the themes available in our WordPress website such as twenty-sixteen, twenty-seventeen, twenty-eighteen, and twenty nineteen.
We’re going to create a new folder here so while we’re inside the themes folder, press right-click and select New -> Folder.
Let’s name this folder escuela.
Open the folder that we have just created and let’s create a new CSS file and name it style.css.
The Main Stylesheet (style.css)
The style.css file is the main stylesheet file required for every WordPress theme. It contains all the details about the theme that you’re developing including the name of the theme, the author, the description of the theme, the license, and the tags.
By default, your style.css should look something like below:
/*
Theme Name: Escuela
Theme URI: https://weeklyhow.com/example/dont-browse-this
Author: WeeklyHow
Author URI: https://weeklyhow.com/
Description: Lorem ipsum dolor sit amet, consectetur adipiscing elit, sed do eiusmod tempor incididunt ut labore et dolore magna aliqua. Ut enim ad minim veniam, quis nostrud exercitation ullamco laboris nisi ut aliquip ex ea commodo consequat. Duis aute irure dolor in reprehenderit in voluptate velit esse cillum dolore eu fugiat nulla pariatur. Excepteur sint occaecat cupidatat non proident, sunt in culpa qui officia deserunt mollit anim id est laborum.
License: GNU General Public License v2 or later
License URI: http://www.gnu.org/licenses/gpl-2.0.html
Text Domain: weeklyhow
Tags: responsive, mobile
*/Code language:JSON / JSON with Comments(json)
Feel free to modify the code above.
Save your style.css file and create a new PHP file and name it index.php.
The Main Template (index.php)
The main template is the file where you will call WordPress functions such as get_header() and get_footer().
Feel free to copy the following code in your index.php file.
The header file (also known as header.php) is a template file used for displaying navigational bars or anything you want to display in most of your pages. This is where you will initialize all of your scripts and stylesheets that are required by your theme.
Inside our escuela folder, let’s create a new PHP file and name it header.php.
Then copy the following code.
<!DOCTYPE html><htmllang="en"><head><!-- Required meta tags --><metacharset="utf-8"><metaname="viewport"content="width=device-width, initial-scale=1, shrink-to-fit=no"><!-- Bootstrap CSS --><linkrel="stylesheet"href="https://stackpath.bootstrapcdn.com/bootstrap/4.3.1/css/bootstrap.min.css"><title>Escuela WordPress Theme by WeeklyHow</title></head><body>Code language:HTML, XML(xml)
Don’t forget to save your script 🙂
The Footer File (footer.php)
Same with the header file, the footer file is a template file commonly used for displaying the footer section.
Once again, create a new PHP file and name it footer.php.
The thumbnail is where you can show the theme design. The thumbnail should be named screenshot.png, and should be placed only in the top-level directory of your theme folder.
The highly recommended image size for the thumbnail is 1200px wide and 900px tall.
For this course, we’ll be using the following thumbnail.
With everything that we have created, your theme files should look something like this.
Now head back to your WordPress dashboard and open the themes page.
Your theme should be presented there by now like below.
To start using our premium WordPress theme select the theme and click the Activate button.
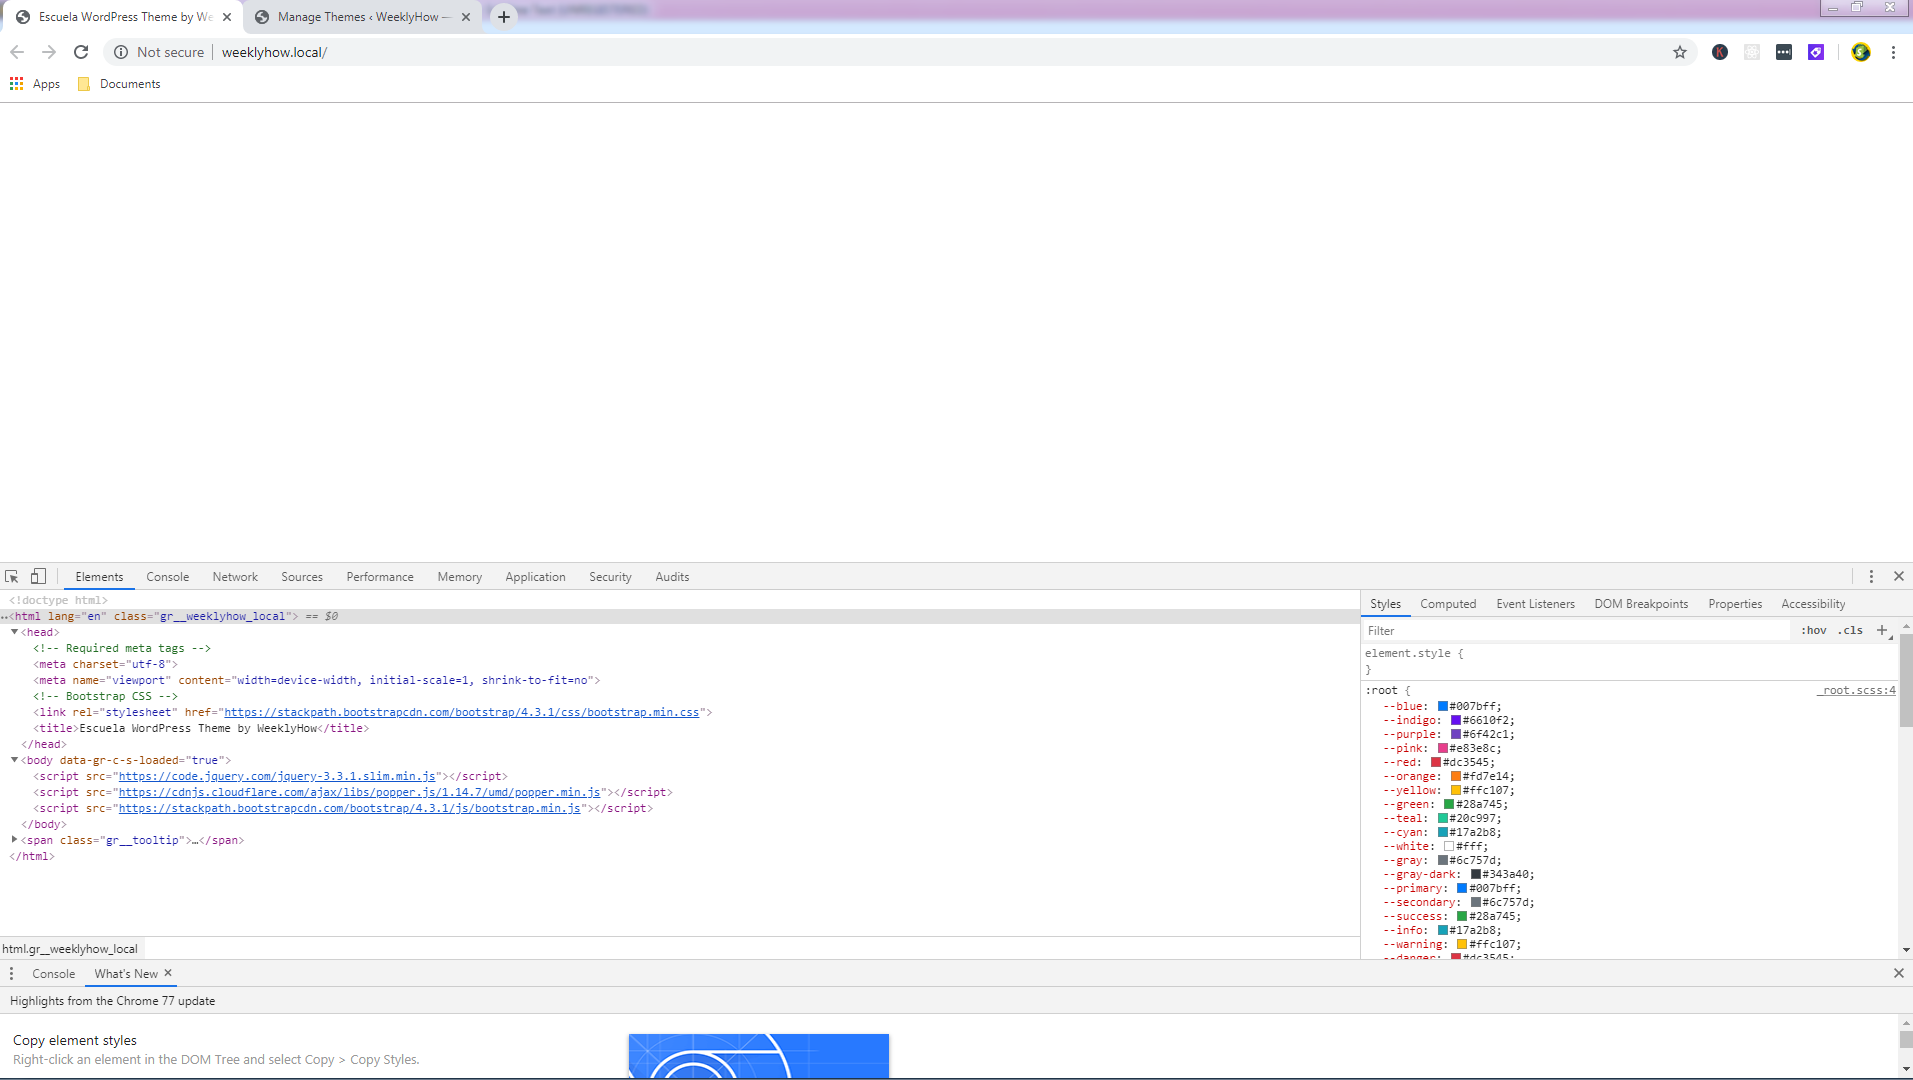
Now let’s browse our site again.
As you can see, our site is displaying nothing anymore. However, if we look at the code in the inspector, you will see that the code written in both header and footer files are being used. Perfect!
Now let’s go back to our main template file (index.php) and add a little message to see if everything actually works.
<?php get_header(); ?><h1>Hello World!</h1><p>Why do we always use "Hello World"? Too cliché right?</p><?php get_footer(); ?>Code language:HTML, XML(xml)
Let’s save it and see the results.
Conclusion
Congratulations! You have successfully set up your WordPress premium theme. But wait! We’re not done yet. In the next post, we’re going to start working on the navigational bar and set up our header file. We’ll also introduce you to more template files that are very important for every WordPress theme.
For now, we would like to thank you for reading this post. If you think you have learned something from us, let us know below in the comments, we really love hearing from you!
If you have questions or maybe a request, contact us or comment below and we’ll reply to you as soon as we can.
If you have been writing codes in JavaScript, chances are you’re already familiar with alert function or confirm function. These functions are built mainly for debugging purposes although there are instances that you can use these functions to warn users from doing certain things.
For example, you want to alert users that you have new products displayed. That could be a reason to use an alert function.
Pretty basic right?
Although if you are familiar with Bootstrap, you can just use Modals or Toasts instead.
But!
What if you don’t want to use any of that, but instead stick to javascript?
Well, luckily, there’s an available framework that you can use to effectively display alert windows, confirmation windows, or even prompt messages and that is AlertifyJS.
What is AlertifyJS
AlertifyJS is a javascript framework used for developing browser dialogs and notifications that are completely pre-designed. Unlike Bootstrap, AlertifyJS is extensible, themeable, and easy to use. You don’t have to worry about HTML and CSS. AlertifyJS will do that just for you!
Features
Responsive for any devices
Themeable (Default theme, Semantic, and Bootstrap)
Extensible, which means you can do pretty much anything you want
Notifications
i18n and RTL Support
Lots more features such as Modal, MVM, Resize, Move, etc.
Usage
Currently, AlertifyJS is offering v1.12.0. If you are looking for a commercial license and want to support the developers of this framework, they also provide that for only $19.
If you prefer to use CDN, then you may copy the following code.
Keep in mind though that you only need alertify.min.js, alertify.min.css, and default.min.css or any theme CSS file you prefer.
Whenever you use JavaScript frameworks, it is important to always include jQuery since most frameworks rely on jQuery.
Now, it’s pretty simple? Right?
With just a few steps, you’ll be able to step up your browser dialog.
Pros and Cons
Using AlertifyJS is very easy and it will make your browser dialogs more user-friendly and browser-friendly. These are the pros that you could expect from this framework.
The only disadvantage that we can see from this framework is that it would increase your file requests. As you can see, to make everything work, you are required to pull three files.
You may think it’s not too much but it is our responsibility to make the request as small as possible for the user’s experience.
Now, you might be thinking…
Is there any way to solve this issue?
Of course! And that is to optimize the files.
You can compress these files into 2 files, one CSS and one JavaScript.
So, let’s say you have style.css and you have alertify.min.css and default.min.css or whatever theme you choose. You can just compile these stylesheets into one file. That way you would save two files!
Same goes with javascript files. If you have script.js, you can just insert the content of alertify.js into your script. Just don’t mix jQuery and alertify.
Components
What’s cool with AlertifyJS is not only you can display alert messages but you can also display confirmation dialogs with Notification at the bottom-right corner of your browser.
Confirm Dialog
<!DOCTYPE html><html><head><metacharset="utf-8"><metaname="viewport"content="width=device-width, initial-scale=1"><scriptsrc="https://ajax.googleapis.com/ajax/libs/jquery/3.4.1/jquery.min.js"></script><scriptsrc="//cdn.jsdelivr.net/npm/alertifyjs@1.12.0/build/alertify.min.js"></script><linkrel="stylesheet"href="//cdn.jsdelivr.net/npm/alertifyjs@1.12.0/build/css/alertify.min.css"/><linkrel="stylesheet"href="//cdn.jsdelivr.net/npm/alertifyjs@1.12.0/build/css/themes/default.min.css"/></head><body></body><script> alertify.confirm('Please confirm this dialog', 'By clicking OK you agree to our terms and conditions', function(){ alertify.success('Accepted! Yay!') } , function(){ alertify.error('You do not agree :(')});</script></html>Code language:HTML, XML(xml)
You may have not noticed this yet but you can actually drag the dialog box. Run the code above and try to drag the dialog. Awesome right!?
Also, if you have noticed the code, you will see that you can actually extend this code into something incredible. For example, if the user clicks the OK button, you can redirect them into a new page. Or, if the user cancels the dialog box, you can display another message saying that they canceled the dialog box.
Prompt
<!DOCTYPE html><html><head><metacharset="utf-8"><metaname="viewport"content="width=device-width, initial-scale=1"><scriptsrc="https://ajax.googleapis.com/ajax/libs/jquery/3.4.1/jquery.min.js"></script><scriptsrc="//cdn.jsdelivr.net/npm/alertifyjs@1.12.0/build/alertify.min.js"></script><linkrel="stylesheet"href="//cdn.jsdelivr.net/npm/alertifyjs@1.12.0/build/css/alertify.min.css"/><linkrel="stylesheet"href="//cdn.jsdelivr.net/npm/alertifyjs@1.12.0/build/css/themes/default.min.css"/></head><body></body><script> alertify.prompt( 'Who are you?', 'Please enter your name', 'Name' , function(evt, value){ alertify.success('Nice to meet you ' + value) } , function(){ alertify.error('Sorry, we love to know who you are') });</script></html>Code language:HTML, XML(xml)
Another thing that makes this framework awesome is that the notifier is stackable. You heard that right! If you try to spam click the run code button above, you will see that the notifier dialog is stacking up.
Isn’t that awesome?
Conclusion
There you have it! You can now display messages in too many ways. Not only it looks cool but it is also very easy to use.
If you have frameworks that you prefer, please don’t hesitate to share it with us. We love to know your thoughts and reactions too!
There are many frameworks out there that you can use to develop web applications. But only a few provide resources and documentation that can help you build your app from scratch.
In this article, we will be talking about Laravel and why it is one of the most used frameworks for developing web applications from start to finish. This Laravel tutorial will also guide you from scratch, step by step, from installing Laravel to deploying your web application online so you will be able to develop more applications in the future.
But before we go straight to Laravel tutorial, let’s understand first what is Laravel.
What is Laravel?
Laravel is a free and open-source PHP web framework that is created by Taylor Otwell back in 2011. It is created for the development of web applications to follow the MVC pattern also known as Model-view-controller which allows for a much-needed separation of concerns in our web applications.
Why you should start using Laravel?
There are many reasons why you should start using Laravel, one of which is that Laravel helps developers to build web systems in a matter of seconds. For example, to develop a Login, Logout, Registration systems, all you needed to do is to install Laravel to your project. In just one line of command instead of manually typing lines of codes and authenticating databases.
There are also cases that I have been thinking of ways to paginate my web applications but with Laravel, all you needed to do is to use a function and list the items. Simple as that!
Now to prepare you for this tutorial, I will be providing you the list of software that we’re going to use in this tutorial. So make sure you have them all installed on your computer.
Requirements:
Laravel framework has a few system requirements. All of these are provided by the Laravel Homestead virtual machine, so it is highly recommended that you use Homestead as your local development environment.
In different cases, you may install the required software separately depending on your projects. For example, you can use Laravel with just PHP installed and Composer.
Here are the following requirements if you are not using homestead:
PHP >= 7.1.3
Composer
Nodejs or Npm
PDO PHP Extension
BCMath PHP Extension
Ctype PHP Extension
JSON PHP Extension
Mbstring PHP Extension
OpenSSL PHP Extension
PDO PHP Extension
Tokenizer PHP Extension
XML PHP Extension
How to Create Web Applications with Laravel?
Building web applications using Laravel is very easy. In fact, even a 12-year old you can do this. To start, obviously, you need to install Laravel and its required applications.
Installing Laravel
Laravel uses Composer to manage its dependencies. So, before you can use Laravel, make sure you have Composer installed on your computer. Keep in mind that we’re not going to use homestead virtual machine in this tutorial. You may follow this link to download the latest version of Composer.
After installing Composer, download the latest version of PHP and make sure it is Non-thread safe. After downloading, extract the PHP zip file into your C: Drive
If you encountered errors as soon as you install PHP. Make sure that you have Visual C++ Redistributable for Visual Studio installed. Otherwise, you’ll encounter more errors such as VCRUNTIME140.DLL was not found, and php commands won’t work.
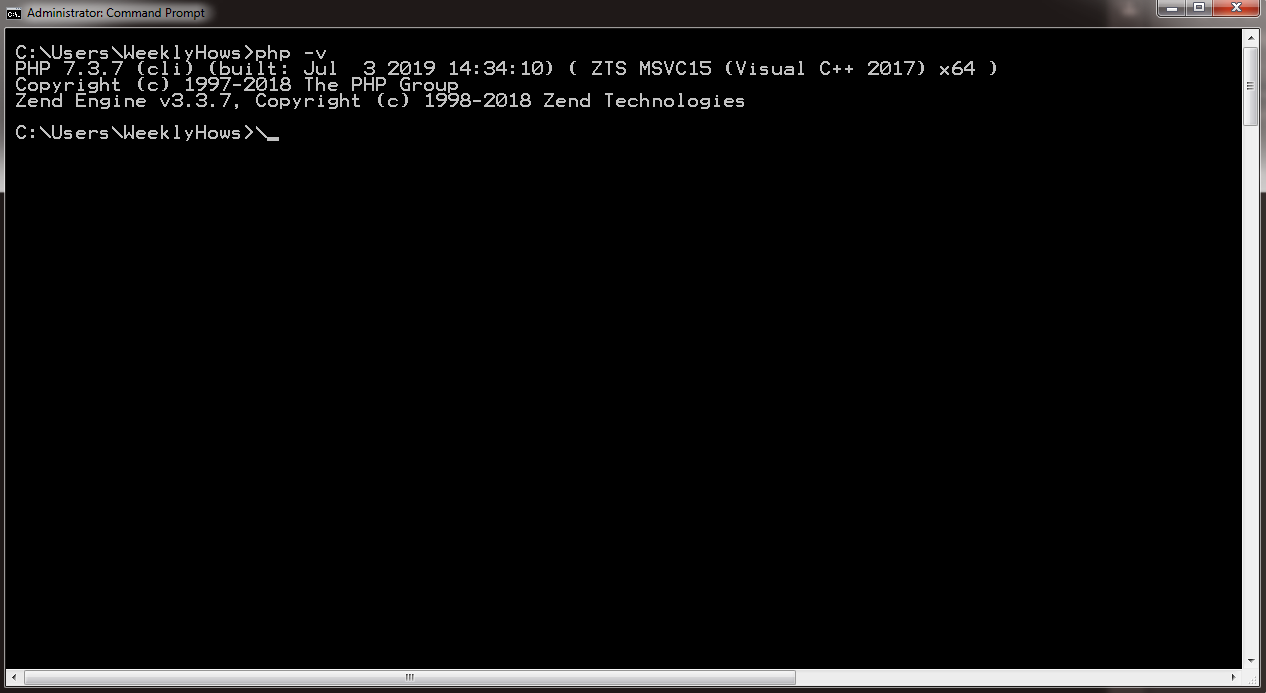
Now, to check if you have installed both Composer and PHP correctly. Open your command prompt and type the following command:
php -v
If you have successfully installed PHP, you should see something like this:
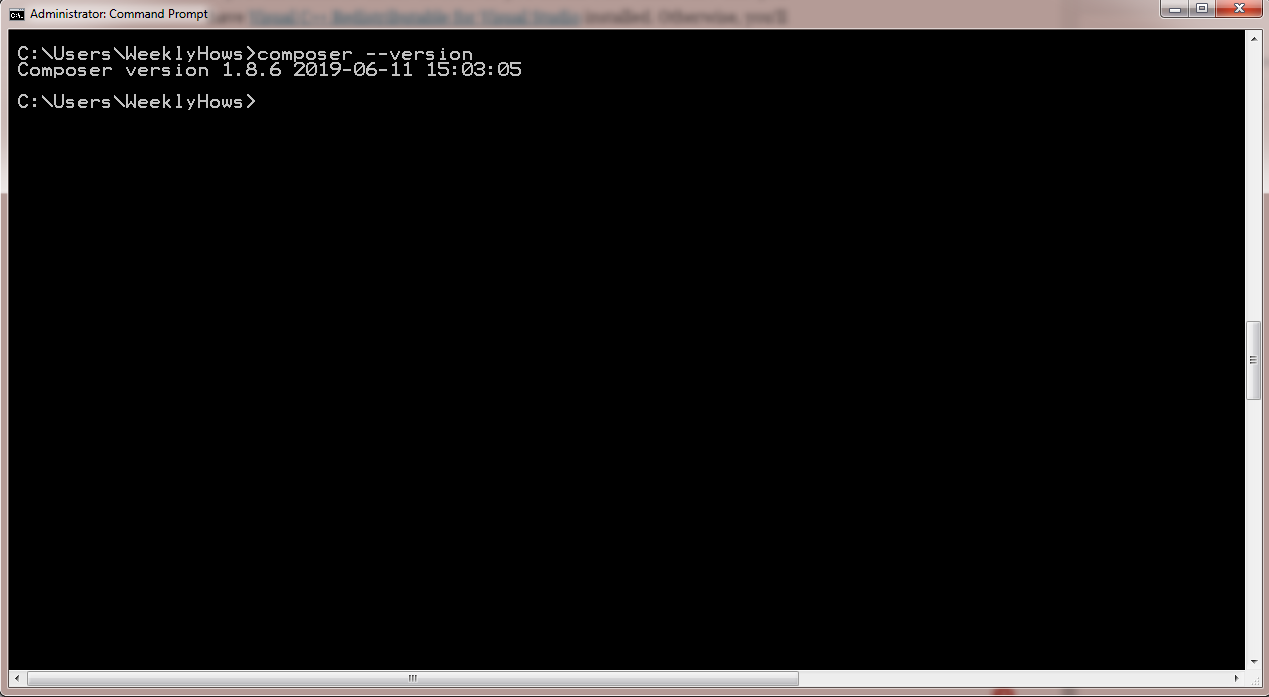
To check if you have installed Composer, type the following in the command prompt:
composer --version
If you have seen both responses. You may now install Laravel by typing the following command in your shell.
Keep in mind that by using the command create-project, a new folder will be created with the name that you have provided in the command. In the code above, the project will be called project-name.
Another thing to keep in mind is that the project that you have created can be located at the directory of your shell. In my case, it’s located in:
C:\Users\WeeklyHows\
Now, after creating the project. You will need to change your directory to the project folder that you just have created. Use the following command:
cd project-name
Now, to view your project in your browser, you will need to use the command artisan. Artisan is the command-line interface included with Laravel. It provides a number of helpful commands that can assist you while you build your application.
Use the following command:
php artisan serve
Now, open your browser and browse http://127.0.0.1:8000 and you should see something like this:
Congratulations! You just created your first Laravel application!
If you are using Windows, you are required to open another command prompt and change your directory back to your project folder.
Keep in mind that you SHOULD not close the previous command prompt as it keeps the localhost from running.
Now I know it’s just a homepage and it is not that fully functional yet but we’ll get into adding more features that will make our application more interesting.
Now, Laravel has a feature called Authentication.
What is Authentication?
Authentication is the process of identifying the user’s credentials. Whenever a user logs in, a web application, for example, will process the input parameters such as username and password, and then if the parameters exist in the Laravel’s database, then the user will be able to sign in.
With Laravel, you are able to create both login forms and registration forms with just one command and that is make:auth.
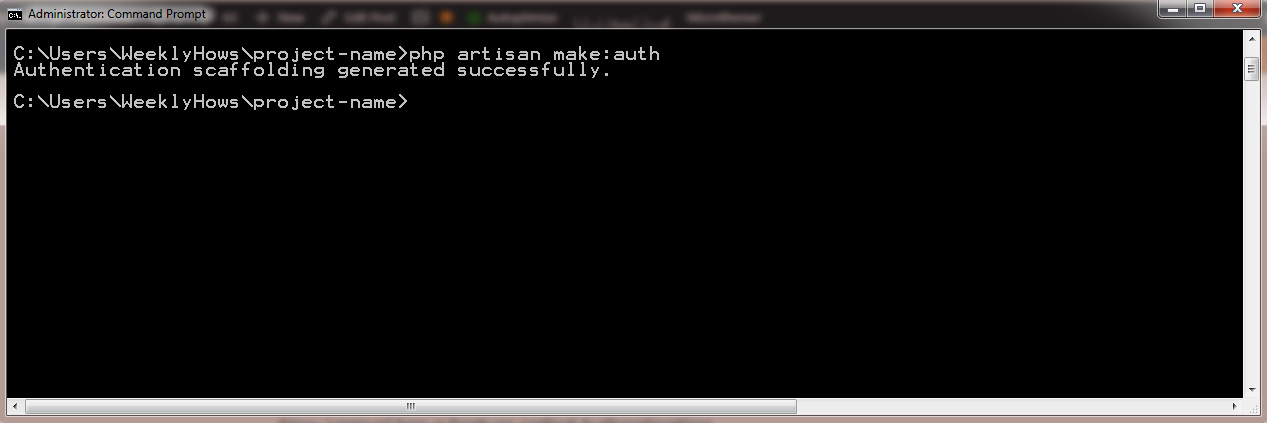
Now go back to command prompt and try using the following command:
phpartisanmake:authCode language:CSS(css)
That should give you the following response:
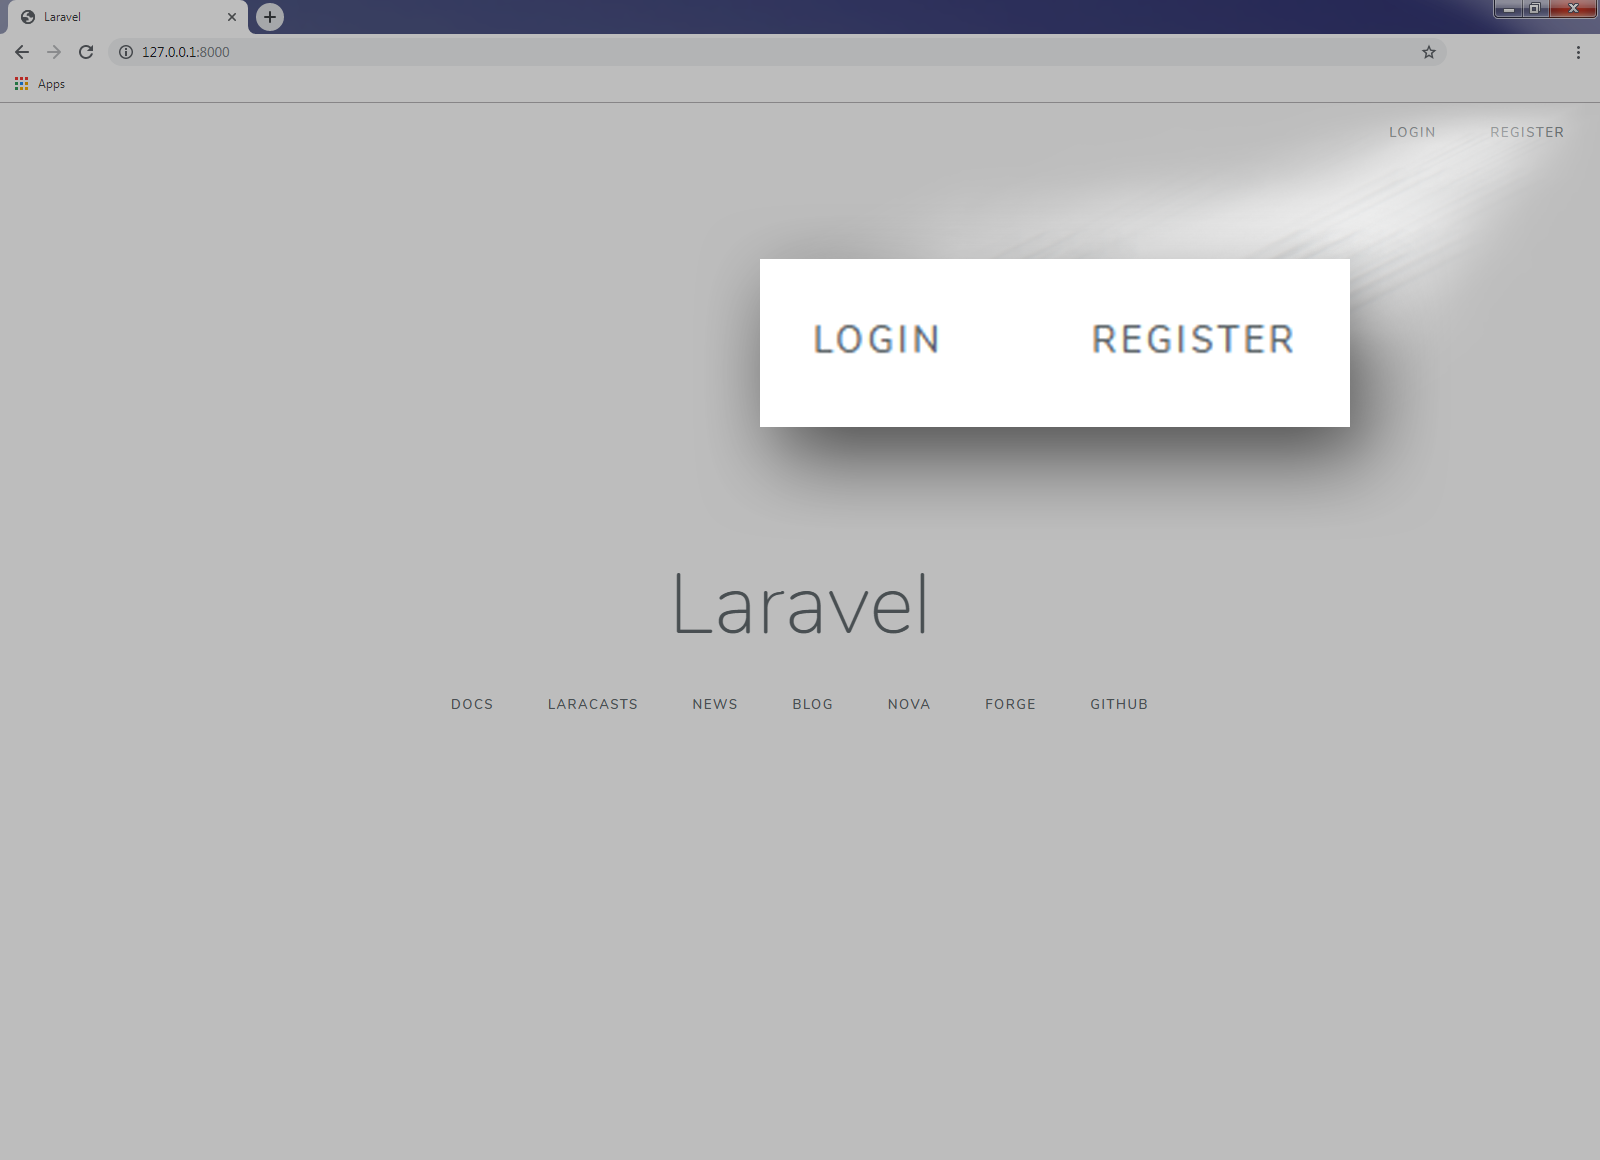
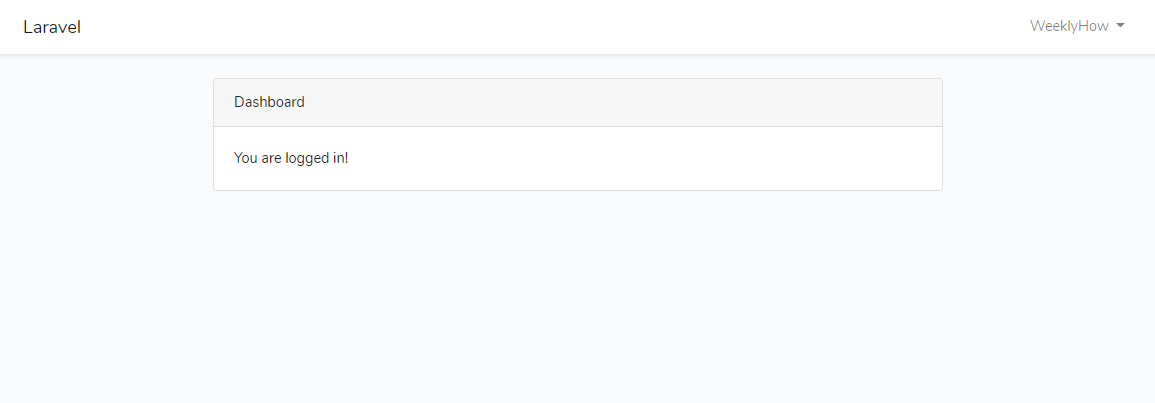
If you refresh your Laravel application, you will see that there are new links added at the right top corner of the application. Those are the menu that was generated by the Laravel Auth.
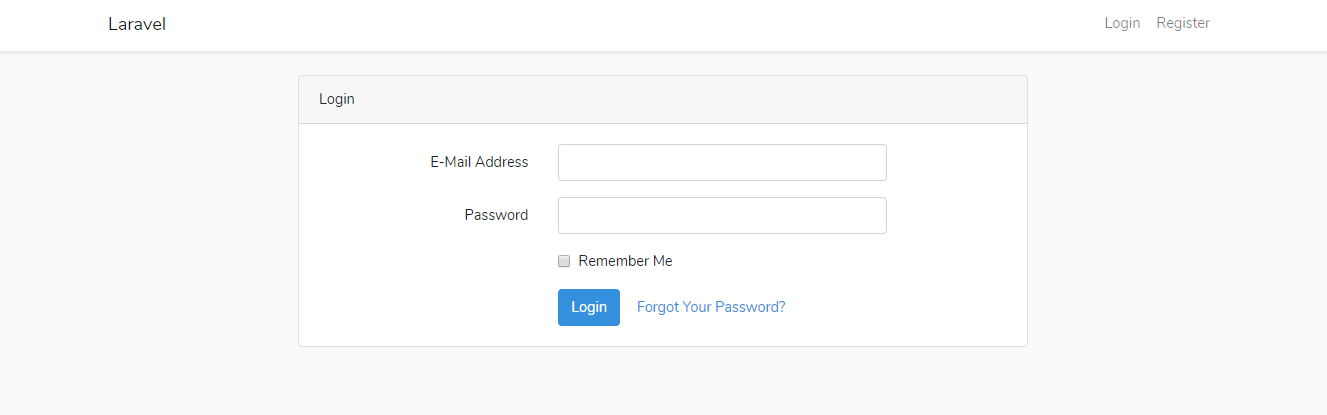
Here’s how it looks like when you click the login menu.
Now, you might be thinking, Wow! That’s how easy it is?
Well, we still have to create and setup our database to make that login page work like an actual login page
How can we do that?
Easy! By using Laravel Migrations.
What is Laravel Migrations?
Laravel Migrations, in a nutshell, are files which contains a class with both up() and down() functions. Both of these functions are executed to apply and revert changes to the database.
Does it help developers? 100% yes! Laravel Migrations, makes it twice easier to maintain database schema. You won’t need to open up, phpMyAdmin or any sort of that just to make updates to your applications.
How can we create a database with Laravel Migrations? Simple, by using the command migrate.
Open your command prompt and type in:
php artisan migrate
PHP artisan migrate: Could not find driver error
Illuminate\Database\QueryException : could not find driver (SQL: select * from information_schema.tables where table_schema = homestead and table_name = mig
rations and table_type = 'BASE TABLE')Code language:JavaScript(javascript)
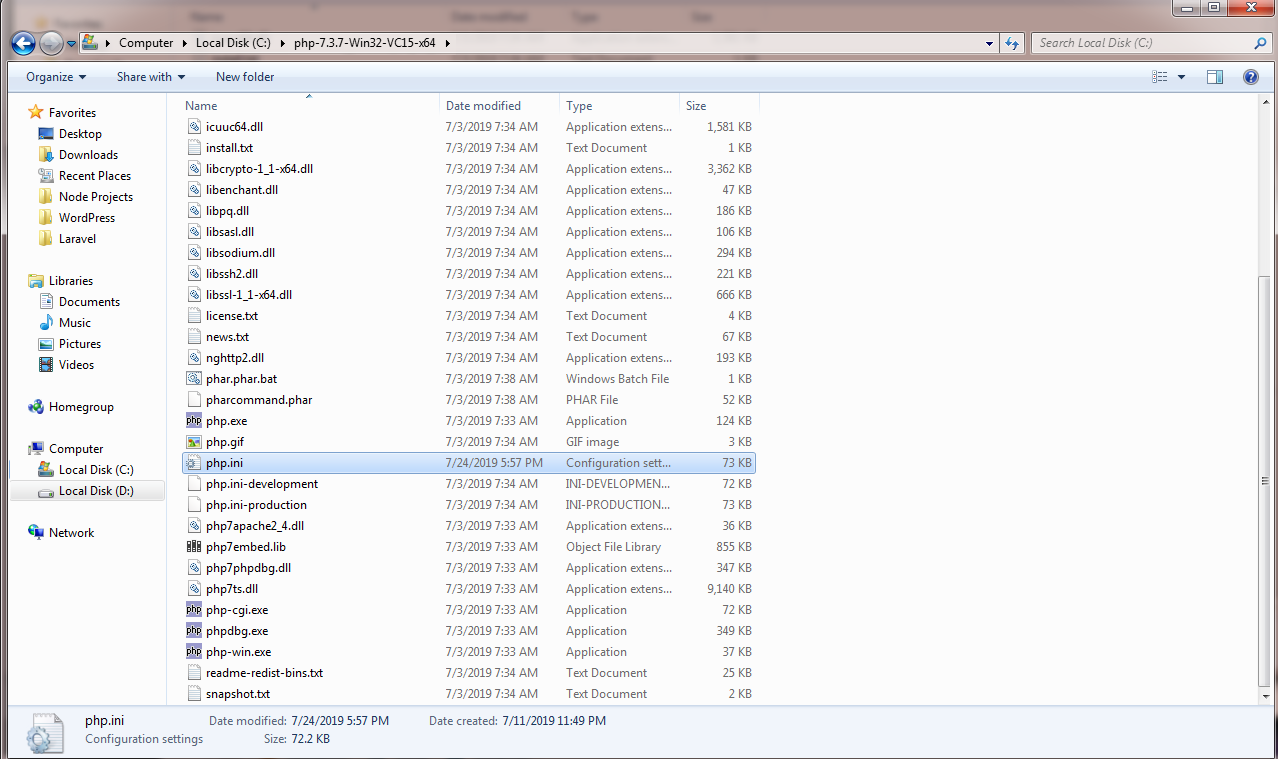
If you have encountered this kind of error, chances are you have not setup both of your .env and php.ini files. To fix this error, proceed to the directory where you installed PHP (In my case, it’s in C:\ drive) and open php.ini file using notepad or any text editor you prefer.
Once you open php.ini, search by pressing CTRL+F and look for the line:
;extension=pdo_sqlite
If there’s a semi-colon at the beginning of the line, remove it (the semi-colon NOT the whole line). That means it is being commented out and not being supported.
If you have noticed, we’re going to use SQLite for our database and not MySQL. Why? Well, there are other extensions that are commented in the ini file and it’s up to you which extension you want to use but in this tutorial we’ll be using SQLite.
Don’t forget to save the php.ini file.
The next file is the .env file.
You may locate this file in your project folder. Go to your project and open the file using your favorite text editor.
Once you opened the .env file, look for lines that start with DB_. Now delete the lines except the DB_CONNECTION=mysql.
Instead of mysql, change the value to sqlite.
It should look something like this.
Now, since we made changes to our .env file, we are required to re-run our application.
Go back to the first command prompt we have created and press CTRL+C to stop the localhost from running. Then, run php artisan serve once again.
Next, we need to create a file for our SQLite database. So in our project folder, look for the folder named database and create a file with a file extension .sqlite.
Just like below.
After all of that, proceed to command prompt and try again the command php artisan migrate
You should see a response like this:
Good job! You have successfully created the database for your Laravel application. You may now register to your application and sign in.
Conclusion
If you are new to Laravel, Congratulations! You have learned and created your very first Laravel application. Not just that, you have also learned what to do when you encounter errors with your database.
Laravel provides more awesome features and we’re going to tackle that in the future. For the meantime, I hope you have actually learned and enjoyed this tutorial. If you have suggestions or request, don’t hesitate to let me know in the comments below.
Search and download free music videos with these online downloaders that are best for downloading mp3 files. You may also convert them to video formats such as mp4, Avi, 3gp, and more!
What is the best site to download free music?
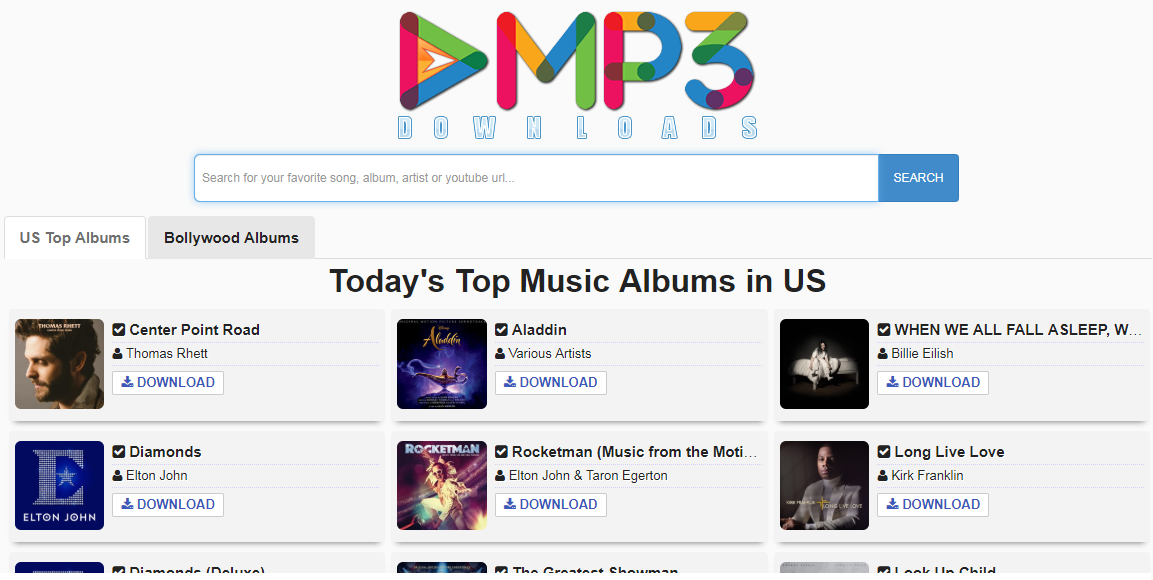
There are hundreds of free sites where you can free download music. All you needed to do is to look around. However, for your convenience, we’ll list our top 7 free websites to download free music.
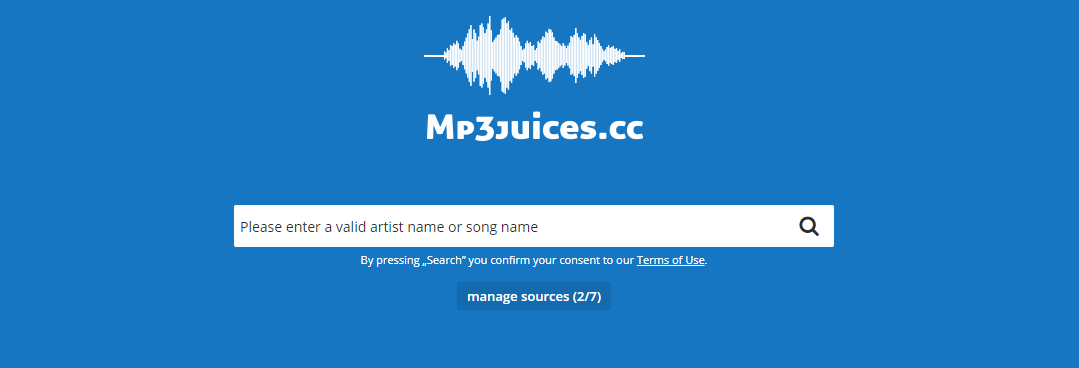
Mp3Juices.cc
Mp3Download.center
FLVto.biz
emp3t.com
BeeMP3
ClanMP3
My Free MP3
Is Mp3 Downloaders Illegal?
As we all know, downloading and selling copyrighted songs are highly illegal. Please do NOT sell any music that you have downloaded using any downloaders online.
Instead, support the artist by purchasing their songs through iTunes, Spotify or any other music streaming services.
Mp3Juices has become one of the most popular and free mp3 search engine and YouTube downloader online that had brought so much convenience when it comes to downloading music and songs. All you needed to do is to type in your search query, choose the sources you would like to search on and click the search button. The search will take only a short while (if you select all sources it may take a bit longer). As soon as they find any results matching your search query – you will get a list of your results. It is that simple.
Alternatively, you can also paste in a video URL and click the search button to convert a video’s audio into an mp3. Once you click the search button the conversion of the video will start. As soon it is ready you will be able to download the converted file.
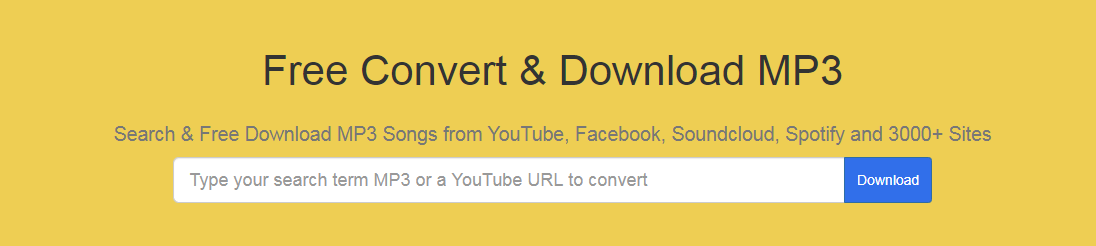
Just like Mp3Juices.cc, MP3Download provides the same features, you search for videos through the search bar, then select which videos you want to download, then select which format and bitrate you want to download, and then click download. So if somehow you can’t browse Mp3Juices.cc then MP3Download.center can be your alternative downloader.
FLVto.biz is one of the fastest-rising free mp3 music download services on the web. However, you can also download not just mp3 songs but also videos in HD quality. Just paste the YouTube URL in the search box and then change the format from mp3 to MP4 HD or AVI HD.
Feel free to use YouTube MP3 converter on any operating system. Whether you have Linux, MacOS, or Windows, you can easily convert your favorite videos from YouTube into the most popular formats with their online MP3 converter.
You can also get music from a number of alternative video-hosting sites including Vimeo, Dailymotion, Metacafe, Facebook, and more! Simply paste the URL from any site and get your video to an MP3 in high quality.
eMP3 Downloads is one of the best websites which provides you free mp3 downloads in just a matter of minute, all results nearly match with your query, they have the world’s biggest mp3 music collection, which can be downloaded any time, they also have mp3 songs from almost all languages.
You may find your songs based on movies name, artist name, song name as well as from album names, they have a very wide and huge database so almost all the latest / fresh / top / popular / featured / top10 / worst / best songs existed in it, they have the most powerful BOT(Crawler) for scanning the whole internet to find you the fresh and working mp3 songs.
BeeMP3 is one of the oldest free video online downloader and converter. They started in year 2013 and became one of the 10,000 most visited sites on the internet.
In 2015 Google started to punish sites like BeeMP3, that used techniques to create so-called “keyword sites” depending on the search of the visitor. Google banned them from the search index and BeeMP3 was not able to recover from that penalty.
Fortunately, they can still be browsed up to this day.
With ClanMP3, you can either listen to music directly to their website or download music as an mp3 file or even save it to your Dropbox account. Also, If you are looking for music from different genres then you can also choose a specific genre listed in the homepage.
If none of the above options worked on you then My Free MP3 is your last option (Though obviously there’s more option online). Just like any other video to mp3 downloader, My Free Mp3 allows you as well to download and listen to music online for free. Just type in the search bar the artist or song you want to listen to. And then, select whether you listen or download it as an Mp3 file.
Conclusion
All the best downloaders listed above are all providing the same features, the only difference between them are their performance, speed and interface.
If any of the best mp3 downloaders above stop working, or if any of the links above won’t work, let us know by writing a comment down below. We’ll do our best to provide you the latest links possible
So you’re planning on building yourself a domain but don’t know if it’s available or not. You’ve come to the right place!
In this article, we’ll be guiding you on how to choose your domain name using these FREE tools available online to check domains’ availability.
Domain Name Search
Choosing the right domain name is one of the steps in creating your website. Unfortunately, it isn’t going to be as easy as it used to be.
At this point, there are millions of domains that are running online and believe me or not, the domain name that you thought of yesterday? It might not be available anymore.
Websites name needs to be short and easy to be remembered, but the most important thing is, your domain name should be related to what your website is going to be.
Or let’s just say, your domain name should properly represent your brand. Thus calling it, brand naming.
Best Domain Name Tools
Below are the tools we highly recommend for checking domain name’s availability. Feel free to choose any of these:
Instant Domain Search is a FREE tool you may try to check the domain name’s availability. With its color coding ability, you will easily find out if the domain name is available or not. The color red means the domain name is taken, color green means the domain is available and blue means the domain is for sale and ready for bidding transactions.
It also has other features like Domain name generator. So if you’re looking for a domain name that is available then use Instant Domain Search.
Name.com is a domain name registrar accredited by ICANN which offers great features such as:
Whois Lookup
Bulk Domain Searching
Domain Transfer
Email forwarding
DNS Management
Social Media Forwarding
If you’re looking for support on how to create your website, name.com offers supports as well to help you build your dream website. Find your perfect domain name. From premium domains to cheap domains, search for and register your domain with Name.com and save.
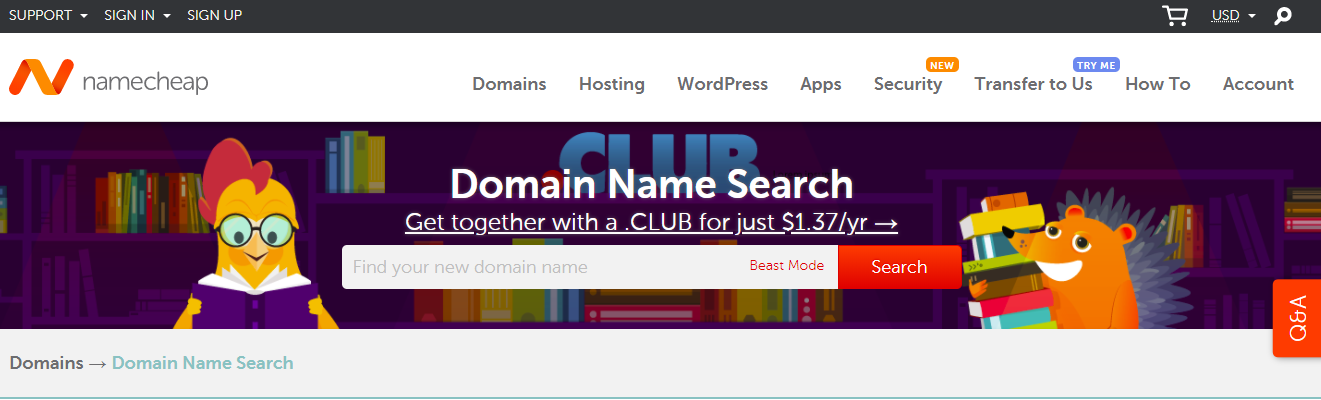
Conduct a domain name check with namecheap.com. This will ensure that the domain name will not appear as a username on major social media sites like Facebook, Twitter, and Instagram.
Namecheap will also suggest some alternative TLDs that you may want to try if your domain name is not available.
How to find good domain names?
There are many ways to find a good domain name. Your first option is to come up with a list of candidate domain names and then use at least one of the tools mentioned above to check is the domain name is available. Another option is to use Domain name generators.
A lot of people believe that it is required to use a .com domain extension to be considered as a premium site. This is not the case anymore, there are lots of domain that uses domain extensions like .biz, .net, and etc.
They also believe that using a .com domain extension will help their SEO and Google rankings. Trust me, all extensions are equal, there’s no need to choose .com just to rank in Google search results.
What I like you to do is to choose the best domain name that is very easy to remember, catchy, and of course, should represent your brand. I would go with names that have two words and not more than 10 characters.
Keep in mind that your goal is to show up in search results as soon as the users search for the word related to your brand.
Free Domain Name Generators
There are hundreds of domain name generators that are free to use and honestly, whenever my domain name ideas are not available, I used them as well.
Below is my list of domain name generators that I recommend you to use:
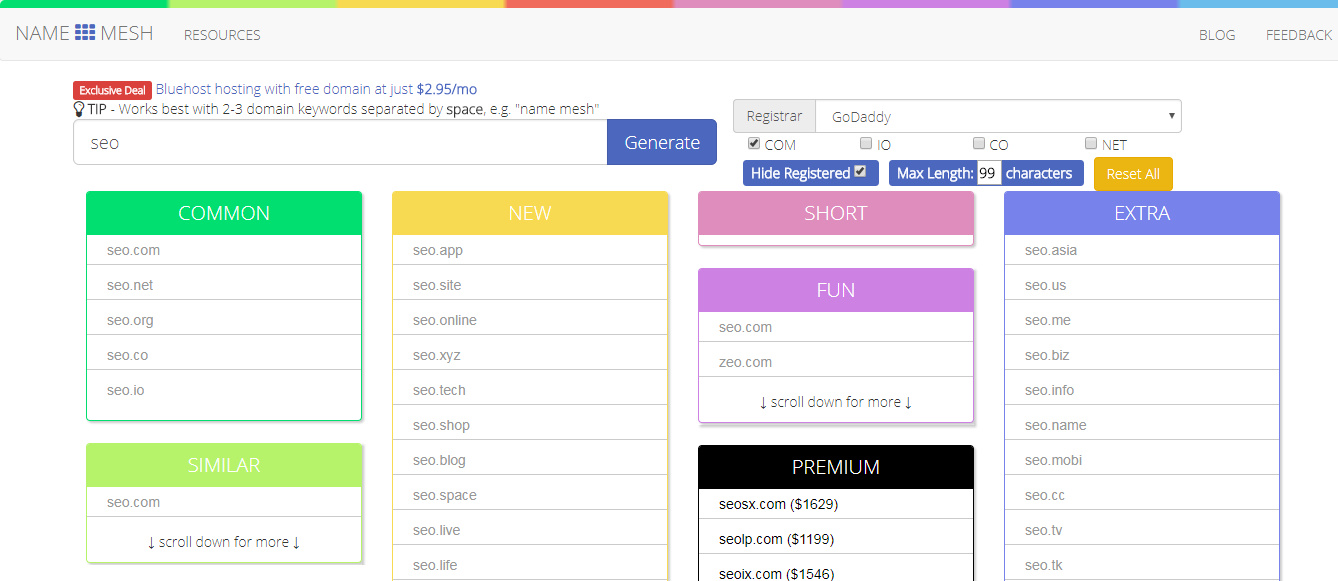
Namemesh.com is one of my favorites, it helps not only check the domain availability but it also provide you lots of options depending on what word you have provided.
Let’s say, you typed SEO in the input box. Namemesh.com will generate many domain name options for you to choose from including domains that are for sale.
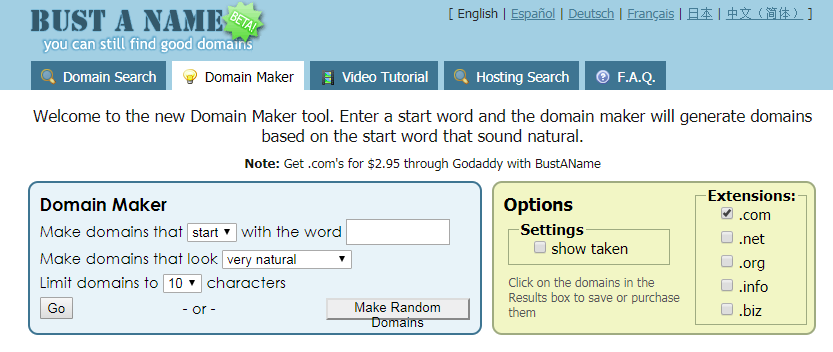
Bust a Name is one of the domain name generators that are very easy to use. It has numerous filtering tools to help you get the domain name that you’re looking for.
You can start by typing the word with the option of “starts with” or “ends with”.
and then choose in the next option if you want the domain to look natural, not natural, or somewhat natural. Lastly, you may adjust the number of characters you want for the domain name.
There are also options for the domain extensions, so if you want to show not only the .com extension but also the .net extensions then you can check the options available.
The results will show up in the red box underneath the Domain Maker..
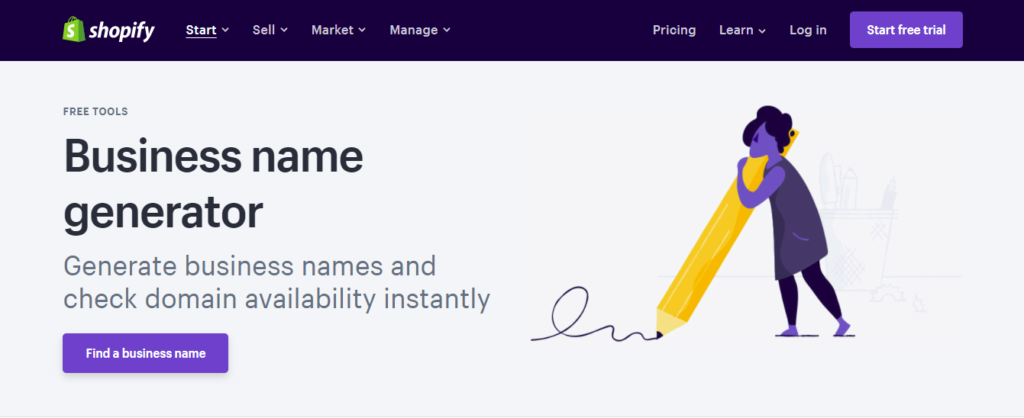
Use Shopify’s business name generator to search for business names and their availability. With Shopify business name generator, you can get the business name that will 100% fit your business and personality.
Keep in mind that this tool only generates names and not domain names. However, you can get the idea with this tool, by using the results you can proceed to host providers and use the name.
To start, type in the textbox your query word. After clicking generate, Shopify business name generator will generate hundreds of option for you to choose from.
Amazingly, they are all available!
How Domain Name Affects SEO
The domain name is one of the most important things you should focus on especially if you really want to improve your SEO. Search engines will depend on your domain name to determine what your website is about. So if you are planning on creating a website, let’s say it’s about health, then obviously your domain name should be related to health, fitness, vitamins, and such.
If your domain name barely represents your brand then expect your ranking to be very low unless you promote your brand and make it to the top somehow.
Can Domain Name & Website Name Be Different?
Absolutely! In fact, it will help your SEO. Especially when you use different keywords in both of your domain name and website name. However, keep in mind that domain name is un-editable once you have bought the name already. Whereas website name is editable through title tags.
Conclusion
Finding the best domain name is hard but with the help of the tools mentioned above, it won’t be as hard as rock anymore. To be successful, your domain name should follow the following criteria:
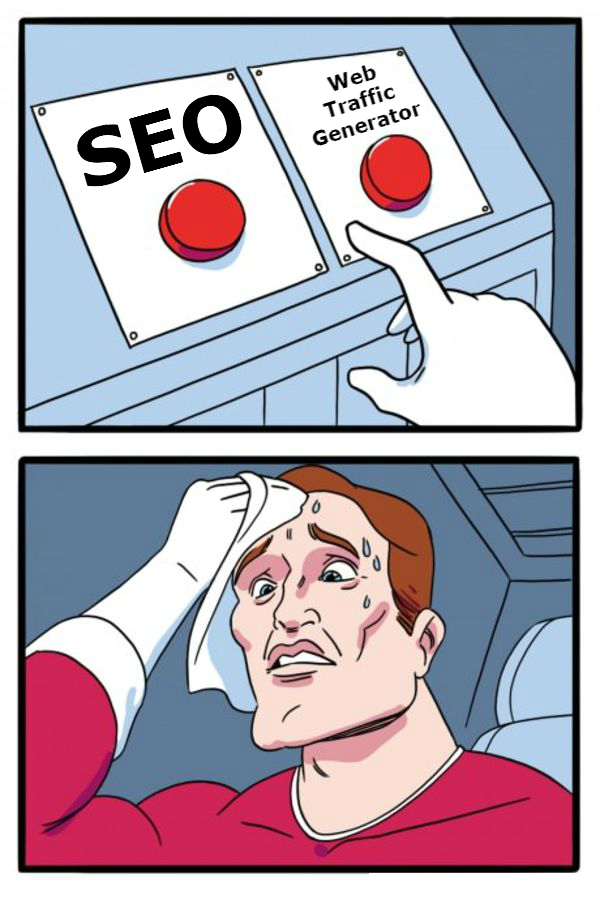
Getting organic traffic is not that hard to do especially nowadays that everything is in front of you. You just need to search online for guidance on how to get web traffic for free and then boom! Millions of articles will pop up in search results to help you get traffic.
But, how can you really get organic traffic in a short amount of time? by SEO? Paid promotion? spamming your website URL to blogs? Sure these could give you web traffic but what if I tell you that doing such things could still lead to a slow process of gaining organic traffic?
In this article, I’ll be helping you on how to increase your website traffic fast and free. Yes free! without spending money on promotions and stuff. All you need to do is to read this article and follow the steps without skipping.
Let’s start!
Why NOT use website traffic generators?
I’ve seen a lot of bloggers who try to use these FREE website traffic generators that promise to give you thousands of web traffic and now I’m here to tell you, stop using them! They won’t do any good for your website.
So yes, to answer your question. No! They are not safe and effective.
Some bloggers think that if they have this type of software to generate traffic then all they needed to do is to push a button that says “Generate Web Traffic!” and then boom! Instant traffic. Now let me tell you, that’s not how it works and you’re just cheating the system plus you’re just wasting not just time but also money.
These free website traffic generators will only give you fake traffic which could lead to being banned to Google services such as Google AdSense and not just that, instead of gaining website authority, you won’t get them because your page views are not organic at all.
I have used Website Traffic Generator, is my website gonna be okay?
If you are worried about the state of your website then don’t be. If you have used a website traffic generator, just stop using it and focus on getting back the trust of search engines by providing quality content, by getting backlinks and authority and by using proper ways of getting traffic like SEO and marketing strategy. Search engines will notice that eventually and will bring your website back to its right track.
How to get web traffic FAST?
You might have read this a lot of times but the only thing that is effective in giving you web traffic fast is by mastering SEO and marketing strategy.
Use keyword research tools like Google Keyword Planner. It’s free and very useful in providing the right keywords for your website. The thing that I will recommend you though is by using keywords with low competition level and high search volume. This will surely boost your website’s impressions and clicks.
I’m sure I know SEO now but I still don’t get traffic, why?
If you think you have mastered SEO yet you still don’t get traffic then there are possible reasons why this happen.
Your website is NEW
If your website is not older than 3 to 6 months old then expect your blog to not get that much traffic. In your first six months, you should only focus on writing high-quality content than focusing on gaining thousands of web traffic. Sure! You’re writing articles to gain traffic but if you focus your mind to that instead to your articles then your article might not end up useful. No one’s going to read that. So focus on writing an informative article.
Your content is not useful
Like I said before, making your content useful will not only help you gain traffic but it’ll also make your website trustworthy of useful information. If you don’t know, Google likes it when you help users online. So as much as possible, give everything you can when you write articles. Answer questions that are related to the topic that you’re writing about. Use google and take a look at related search. It will give you more questions related to the search keyword. If you do it this way, your visitors are more likely to stay and read more.
Your article is short
When you write a blog, do you just answer one question? or do you just tell stories about what happened to you in that topic? or do you combine them to make a very long informative blog? If the answer is no then your blog is probably shorter than a piece of paper.
So what is the recommended length for a blog post?
It is highly recommended to write your blog post with the length of 1600 words. That is equivalent to a 7-minute reading post. So, let me ask you again. Is your blog more than 1600 words? If no then it’s probably one of the reasons why you’re not getting that much traffic.
Okay, don’t get me wrong. I also have articles with less than a thousand words and I know it’s getting web traffic. It’s because I’m using the right keywords and Google finds my article useful so it’s being recommended to users online. BUT, most articles with 15 hundred words are usually getting more traffic. How? Because it’s informative, long, and contains keywords that help search engines.
Too much competition
This is the most common reason why most bloggers are not getting enough traffic. It’s because of the competition. It’s too high that you don’t get a chance to be in at least first top 10 search results.
So how can we defeat the competitors?
The answer is simple, beat their article. If their article is good. Make yours better than theirs. Blogging is a battlefield and your weapon is your content. Write deadly articles that could kill another blogger’s article. That’s the only way.
You want to know exactly how to do it? Go read their article. Look if they’re missing something. Check if they explain their article thoroughly. If not, then that’s your moment to write the same article but with a better explanation. You got it!
You have picked the wrong niche
Have you ever thought that maybe the reason why you’re not getting traffic is that the niche you have chosen is boring and not worth reading? In other words, if your blog is not interesting, even if you feel like it’s useful. No one’s going to read it because they don’t find your blog interesting.
My tip is to always put yourself into your readers’ shoes and try to ask yourself always, is my reader going to love this blog? is this worth reading?
Trust me, this will save you a lot of time of thinking.
You are not promoting your blog properly
It’s really common for bloggers to promote their blog posts through social media like posting on their pages, sharing on Twitter, pinning posts on Pinterest, and so on. Sure that will drive traffic but not that much as long as you do it improperly.
So how do you do it properly?
The best way to promote your blog posts is by including a short introduction about your article and then use the cliffhanger technique. Use words that will catch the reader’s attention and as soon as they’re interested hit them with the cliffhanger and put “Click here to learn more”. This is a very effective way to drive traffic to your website.
Also, use hashtags in your social media posts. This will also help your posts to be featured somewhere around social media.
Conclusion
Personally, I haven’t tried any web traffic generator myself and I’m not planning to try it. I’d rather work hard and earn a few page views than cheat the system with these “free” website traffic generators that are only gonna give you traffic bots which could potentially kill my website’s authority and trust from Google.
Look, gaining web traffic takes time and effort. If you don’t have the patience for it, there’s a little chance for you to survive this battle. As much as possible, try to avoid these temptations and just stay with the normal and effective of gaining web traffic and that is SEO.
If you want to improve your SEO skills, I have written an article specifically about Google Analytics and how it can surely make an impact on your SEO and search ranking. So if you are interested, go and click this link below:
Coming up with new ideas is one of the hardest part of creating a high-quality blog post for a website. Especially if you already have made hundreds of articles related to your niche. However, there are websites or blogs that are able to publish articles day by day without even struggling in coming up with new ideas.
So, how do they really come up with new ideas?
Bloggers with less experience usually rely on their brains and their own abilities to come up with new ideas and to create new content. Personally, I do that as well. But after writing more than 50 articles. I started to run out of ideas of what I should write next and that is frustrating.
Luckily, I’ve found ways to be able to come up with new ideas and in this article, I’m gonna be sharing them to you.
1. Understand your readers
This is the most effective way to come up with new ideas. Always understand your readers and try to ask yourself these questions:
What are the problems of my readers?
What are the topics they’re most interested in?
What information can I give to help my readers solve their problems?
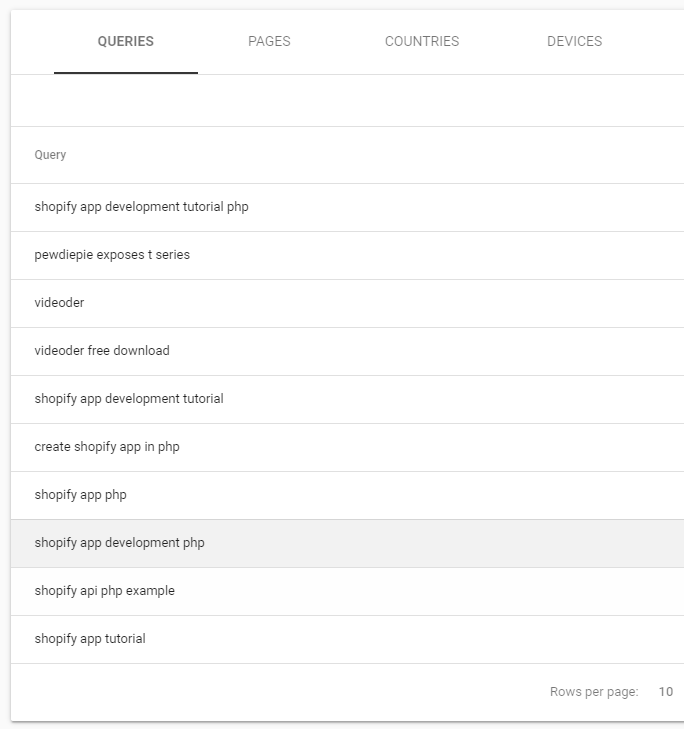
You can always find the answers to these questions by going to Google Search Console. Find which search terms your readers usually type in and understand why do they type that in? Maybe there was no enough information online? Maybe the existing articles weren’t really solving their problems? If that’s the case then you just gave yourself an idea.
So in the image above, my readers usually search for Shopify app tutorial.
Now the next thing that I’m going to be doing is by looking at my blog posts and see if I already have an article for that search query. So since I do have an article for that. I’ll proceed to Google and ask about Shopify app tutorial.
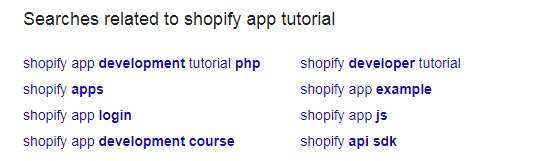
Now here’s the good part, Google will always provide search related in each search you do with Google. You can use that for your blog writing ideas. For example:
The image above provides questions that were usually asked by REAL people, so if you think you haven’t answered those questions yet. Then this is the right time for you to start writing and answer those questions.
You can also use ‘searches related..’ to come up with new ideas. Everything is in Google now. Everything for FREE!
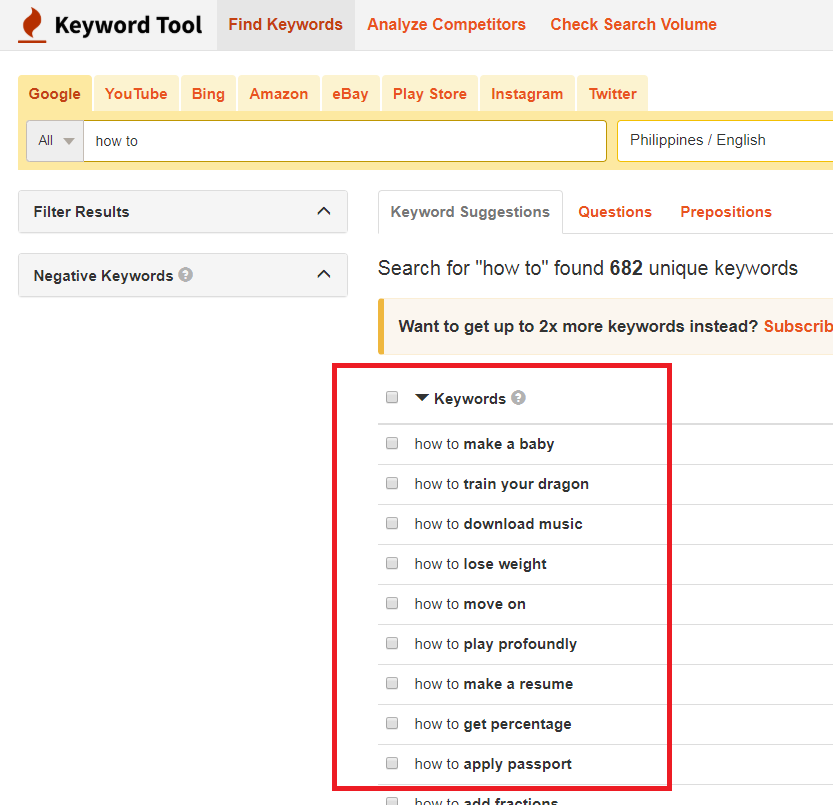
2. Using Keyword Search Tools
If you think the first option didn’t really work for you, then using keyword search tools will help you a ton as well. One of my favorites is KeywordTool.io. It’s very easy to use. Just type in the keyword and it’ll give you related search results that you can use for coming up with new ideas.
It’s not a big secret anymore that reddit is the solution for many content marketing problems.
Reddit is huge, it consists of very specific niche type of communities that you can use for not only publishing your articles but also for getting new ideas about what you can write about next.
Just go to Reddit and search what type of posts you wanted to see. for example, you can use r/AskReddit. This community has almost 23 million members and had always 130k+ members online.
There you will see questions that you can use for coming up with new ideas. Some questions might not that really makes sense for a blog post but this could sometimes help you out. sometimes.
4. See what’s trending
A great way to come up with new ideas is by knowing what is trending at this point in time, also there are many platforms that you can use to find out what people have been searching for online recently. You can use:
To be honest, this option only works if what’s trending is related to your niche. If your blog is about news then this option might work for you. But if you think there’s nothing wrong about knowing what’s trending and if you feel like sharing your opinion as well regarding what’s trending then go ahead. Use the above links and find what’s hot.
5. Ask your readers what they want
If you have a huge amount of readers, then this is the best option for you. Asking them what they want will surely give you a lot of ideas on what to write next.
You can do this by going to your comments section and reply to the comments and ask them what else are they looking for? Are there more issues that they wanted to be fixed? Do they need more information?
These are the type of questions that you should be asking your readers. Not only it’ll help you come up with new ideas, but it will also make your readers feel that you care for them. Thus making them your loyal readers.
You can also use surveys like SurveyMonkey.com to send questions to your readers. But be more careful, asking too many questions could overwhelm your readers. It has been revealed by SurveyMonkey that the minimum questions you should only have in your survey must not be more than 10 questions.
So just keep your questions for fun. The fewer questions, the better.
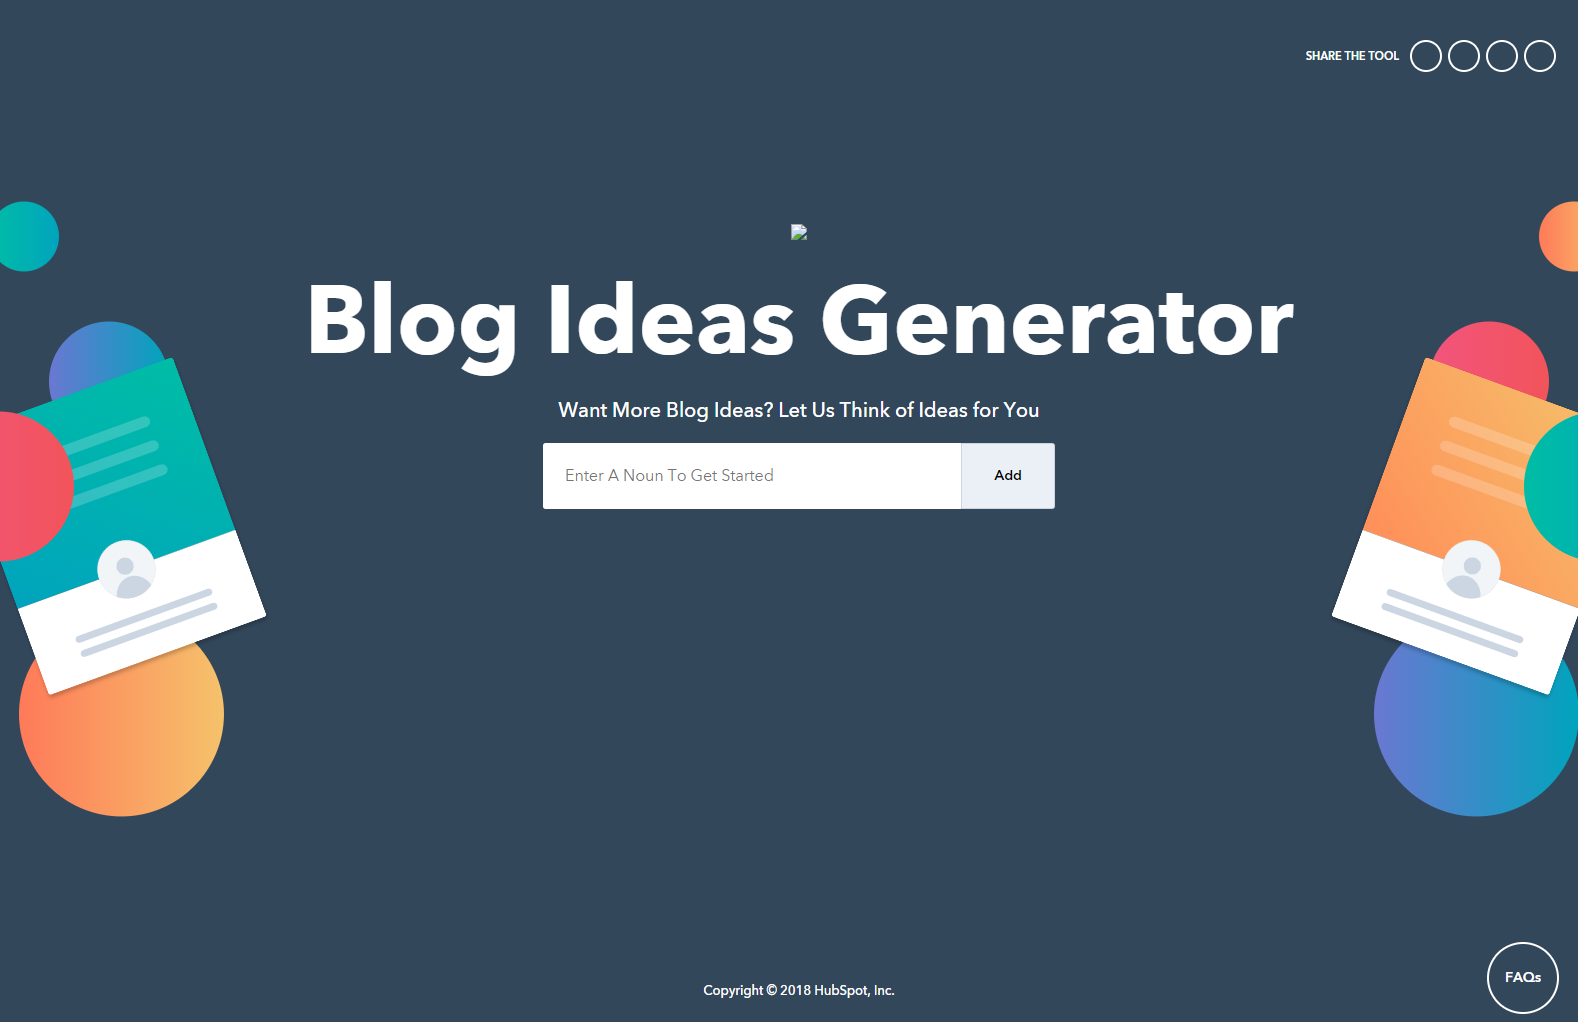
6. Use HubSpot’s Blog Idea Generator
So you’re really running out of ideas now? The previous options didn’t really work out on you? Well here’s the best answer to your problem. HubSpot’s Blog Ideas Generator.
It’s honestly one of my favorite ways to get new ideas and I’m sure this will help you as well.
So here’s out it works, once you get to the page, all you have to do is give a few words related to whatever topic you’re thinking right now.
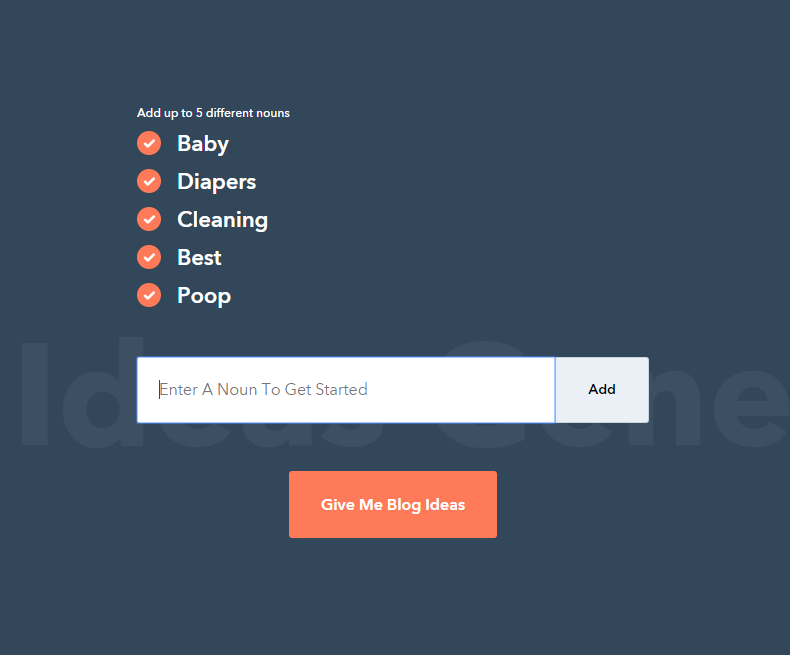
The page will actually ask you for 5 different nouns, so for examples here’s what we put in the list.
So in the example above, we put in 5 different nouns which are:
Baby
Diapers
Cleaning
Best
Poop
The system will use these nouns to generate five titles for your articles, and you can use that for your blog posts. Now here’s the result of what we entered.
This Week’s Top Stories about Poop, sounds interesting right?
Jokes aside, you can use this generator to get new ideas just by giving them a few words. You don’t have to follow the titles. What really matters is you have new ideas and you can just use the results to brainstorm another idea.
7. Use AnswerThePublic.com
If you think HubSpot’s Blog Ideas Generator is hard to use, well let me introduce to you AnswerThePublic.com. Technically it’s the same as the HubSpot’s but with more detailed results. Here, you don’t have to give five words or nouns but instead, you give just a word like the example above.
As you can see we entered the word “Babies“. Here, you can enter any keywords you like and after that, it will process your input and will give you not only five but hundreds of suggestions that you can use in your blog post.
Here’s the result of what we entered.
What I love about this generator is that the questions are legitimately relatable, SEO Friendly, and ready to be written as an article
A good example here is “will babies be born in heaven?“. That is the kind of article that bloggers could write about!
The results are not only that, you can scroll down the page and you will see more results related to what you have entered.
There you will see not only questions but also prepositions, comparisons, and topics related to the word you have entered.
There’s no doubt that AnswerThePublic.com is one heck of a generator and I really recommend you to use that whenever you run out of ideas.
Conclusion
Coming up with new blog post ideas is tough and even if you somehow get an idea. Sometimes that idea will never turn into an article. But it doesn’t mean you can’t have more ideas right?
Thankfully, the tools above can help you come up with not just one but hundreds of new ideas that you can use for your blog posts.
I recommend you to follow the tools from top to bottom. Instead of immediately using the blog ideas generator, use the first options instead.
If the first following options didn’t work for you then that’s the time you pull out the card and that is the generators.
If you haven’t actually written your first blog post, read this guideline on How to write your first blog post. You may also like reading the following