I have been working with so many businessmen that I already know “their” secrets and how they successfully grow their business.
Running a business is genuinely fun, but it comes with its own set of challenges. When you start a business, it’s all on you.
You’re responsible for its growth…
You’re responsible for its fall…
If you want to start a business to earn some money, then there are plenty of ways to do that. You can start a business like a coffee shop and sell… coffee or tea. If you’re a freelancer you can provide services in exchange for profit. etc. etc.
But let’s set the real-life business for now and focus on building yourself an online business since that’s what everyone is doing now.
Shopify Store Development
Welcome to the Shopify Store Development tutorial for beginners. In this tutorial, you’ll be learning how to set up a fully functional Shopify store from scratch ready to make sales in under an hour.
If you don’t have knowledge of Shopify, it’s okay. We’ll be guiding you through on how Shopify works and what else you can do after you set up your Shopify store.
After reading this tutorial, we’re hoping that you learn:
Now.
What is Shopify?
Shopify is an e-commerce platform that allows you to start, grow, and manage a business. With Shopify, you will be able to create a store and sell regardless of your location. You can sell your products literally to everyone around the world and not just that, with Shopify, you will understand how your business is doing. You’ll find how much sales you have earned in a month and so on.
Now, I’m sure that you already know that building yourself a business will require you a budget. Shopify requires you to pay for subscription fees. However, they can give you a 14-day free trial for testing purposes.
How Does it Work?
Some people say that if you want to start an online store, you should know how to design or develop a website. But that’s not the case at all! You don’t have to be a designer or developer to start a Shopify store. Shopify can help you design your store. Thanks to Shopify themes and apps.
Though if you require extra help. You can always contact Shopify’s support team or visit the Shopify Expert Marketplace to search for a certified Shopify expert.
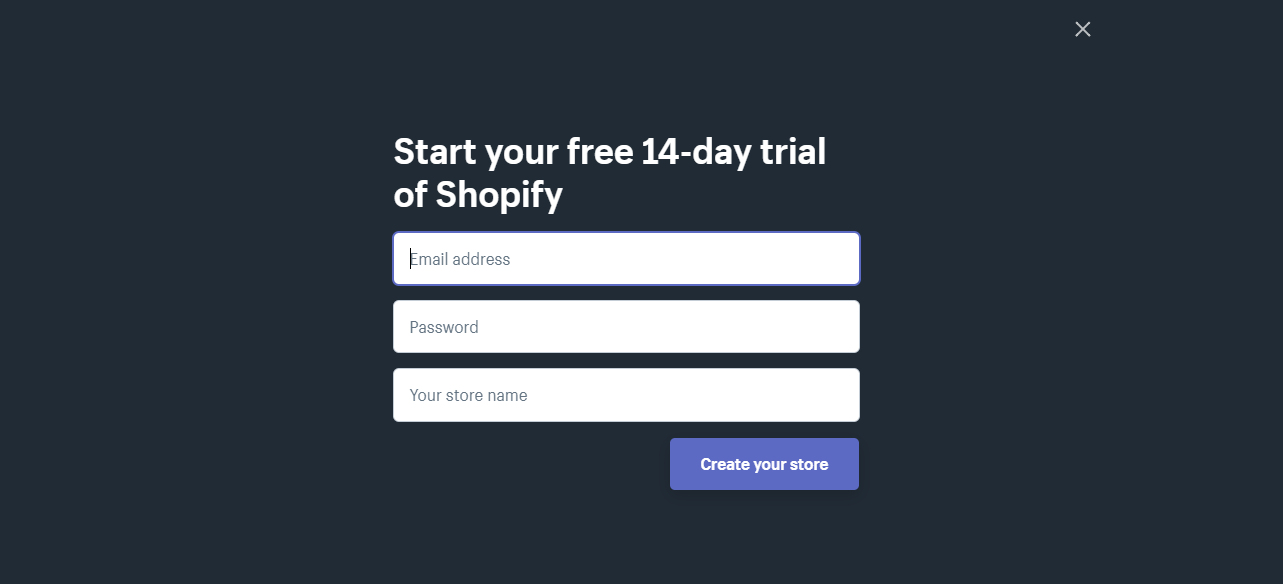
Now that you already know how Shopify works. Let’s begin by signing up to Shopify’s 14-day trial. However, if you already have an account. You can skip this step and proceed to the next process.
Signup to Shopify 14-day Trial
To help every entrepreneur start their online business, Shopify provided a 14-day trial. With this, you can learn how to use Shopify and kickstart your business to earn more sales.
To start, go to Shopify and click on Start free trial button located at the top right corner of the webpage.

Next, you will be prompted to fill the following form:
There’s no proof about this. But, there is a theory that if you put a higher value at your current revenue, your store will be prioritized more. Maybe because they think that you’ll be able to pay Shopify and its customer services for longer.
This won’t hurt if you try. So go ahead and put the following values instead.
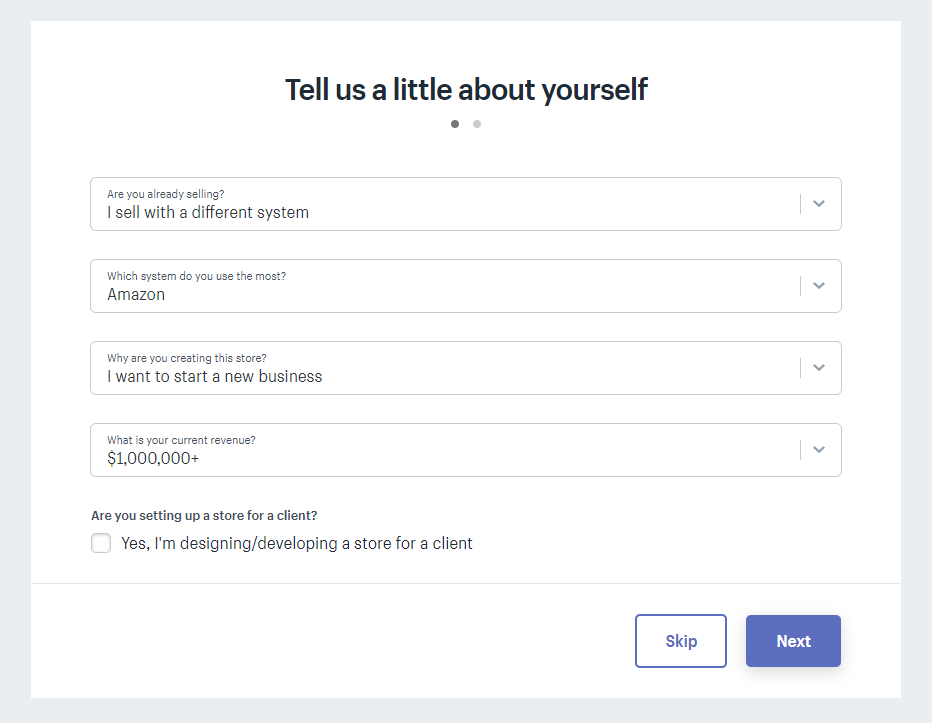
After that, just fill up the proceeding forms and create your store.
After filling up the forms, you’ll be redirected to your Shopify partner dashboard. We’re going to walk you through kind of what’s important in the sidebar menus and how to actually set everything up.

Online Store
When you jump into the online store section, Shopify will give you its default theme which is the Debut theme. It is important to pick yourself a new theme based on your niche. So for example, if you’re niche is about Men’s clothing. Then your store should portray its niche or to put it simply, it should look manly.
The point is, the frontend of your store is going to have a bigger role in your success. Make your store visitors feel like you’re a professional seller and make them trust you. Make them think that you’re worth their penny.
Some entrepreneurs think that the design doesn’t matter at all, it’s the product that you’re selling that matters.
I’m not gonna lie, it’s true that the quality of your products will give you more opportunities to be referred by your own customers to others.
But think about this for a second, every aspect of your store matters. The design, the products, the service, the cost, the price, everything. If you don’t take at least one of those seriously, then it will make an impact on your business.
Now go back to Shopify Partner Dashboard, and in the Online Store tab, theme section.
Underneath the current theme tab, you will see the theme library section. There are free themes and a Shopify theme store.
Select the free themes.
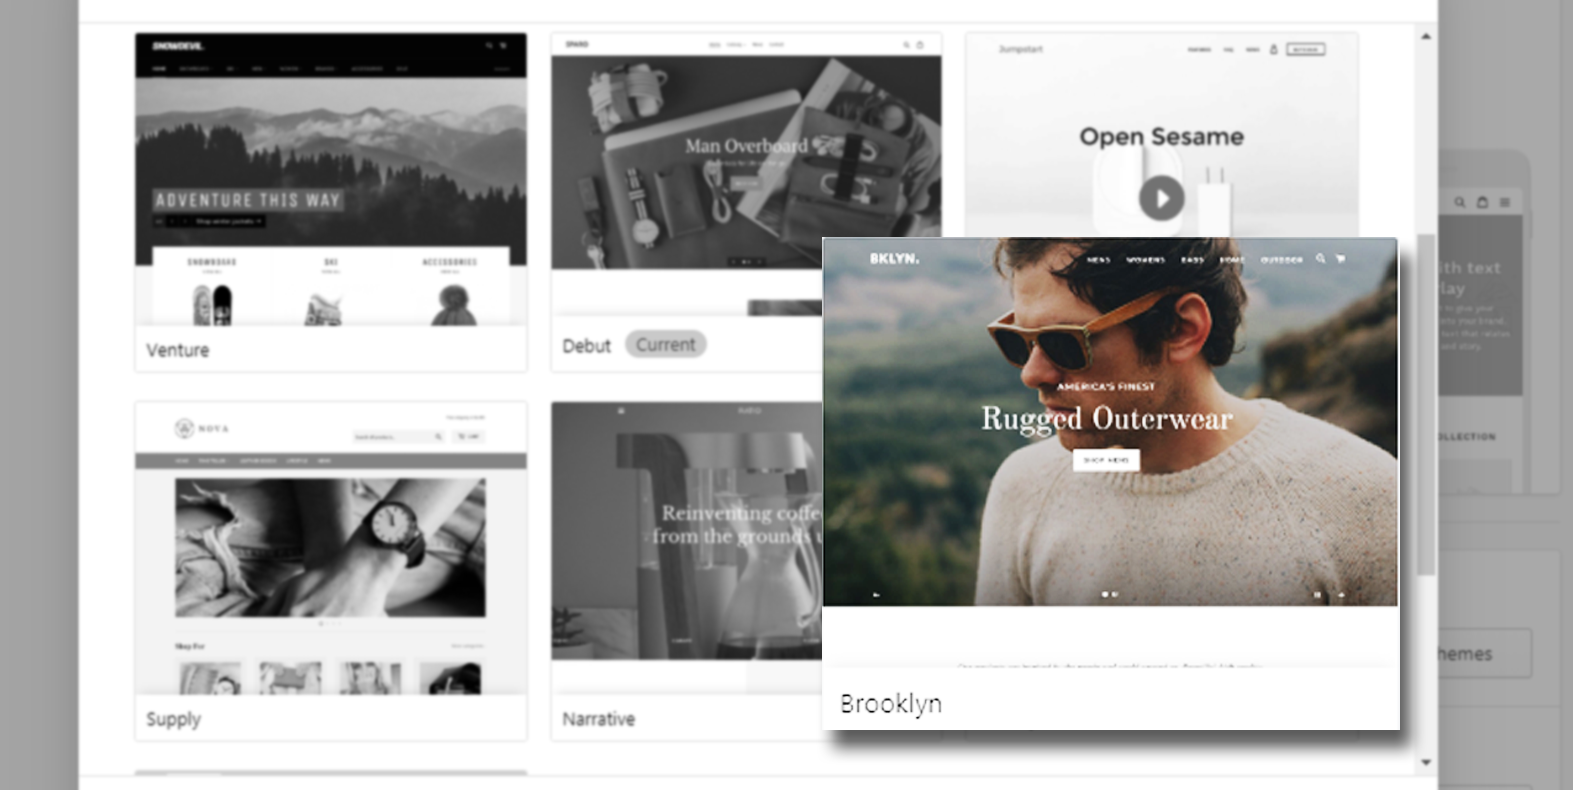
One of the themes that I recommend is Brooklyn, it is a free Shopify theme that you can use for any kind of niche that you can think of. It’s hella fast and responsive meaning it’s compatible with any device available.
If you don’t know already, most consumers buy their stuff using their mobile phone. So with this responsive theme, you’ll have the advantage of getting more sales.
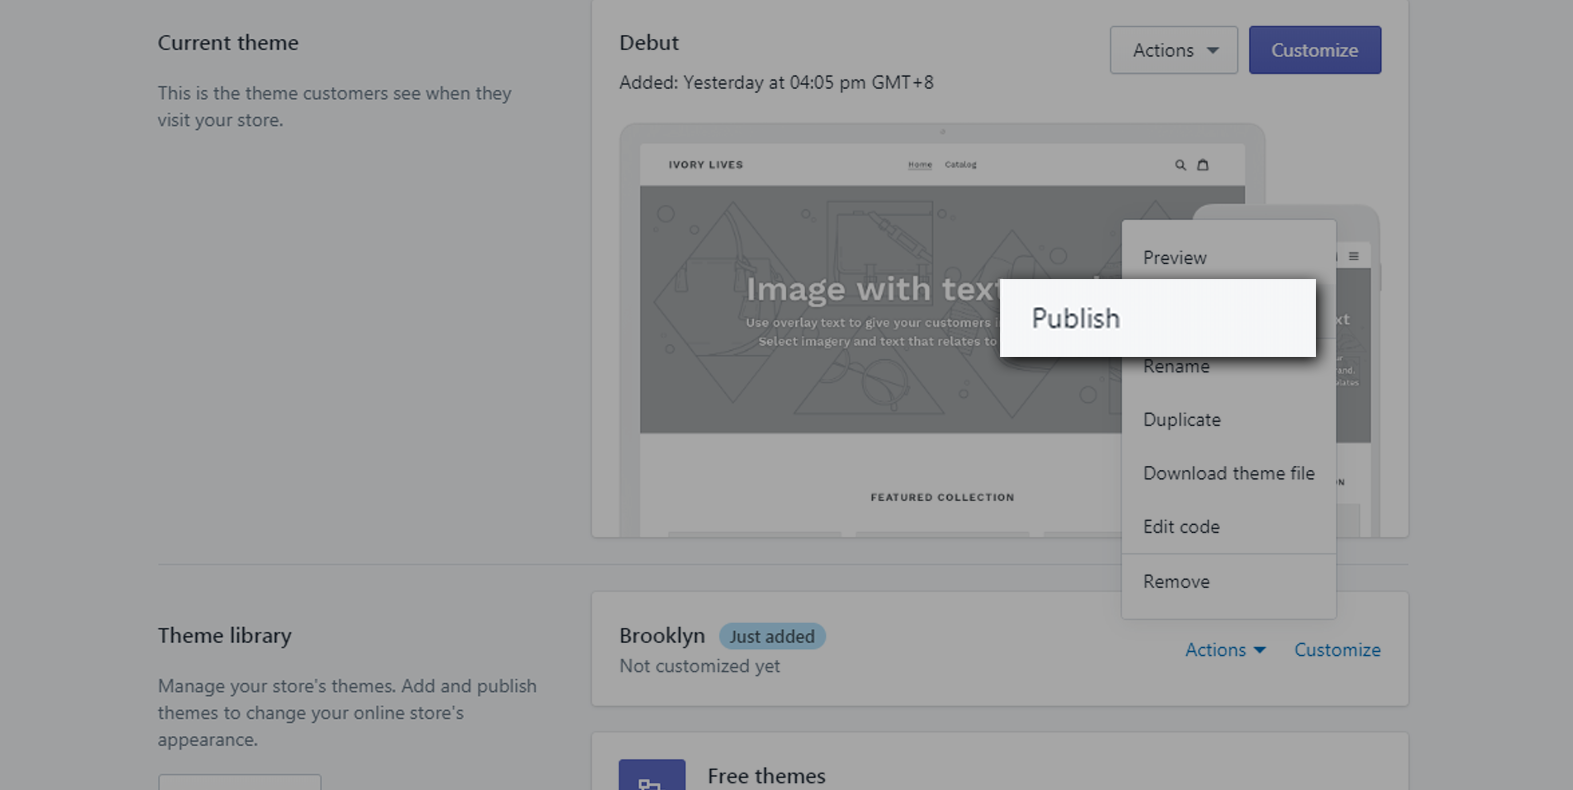
Choose the classic version and click Add to theme library.
After its upload, click Actions and select Publish
Now, after publishing you may take a look at your store and you will see the similar design as such:
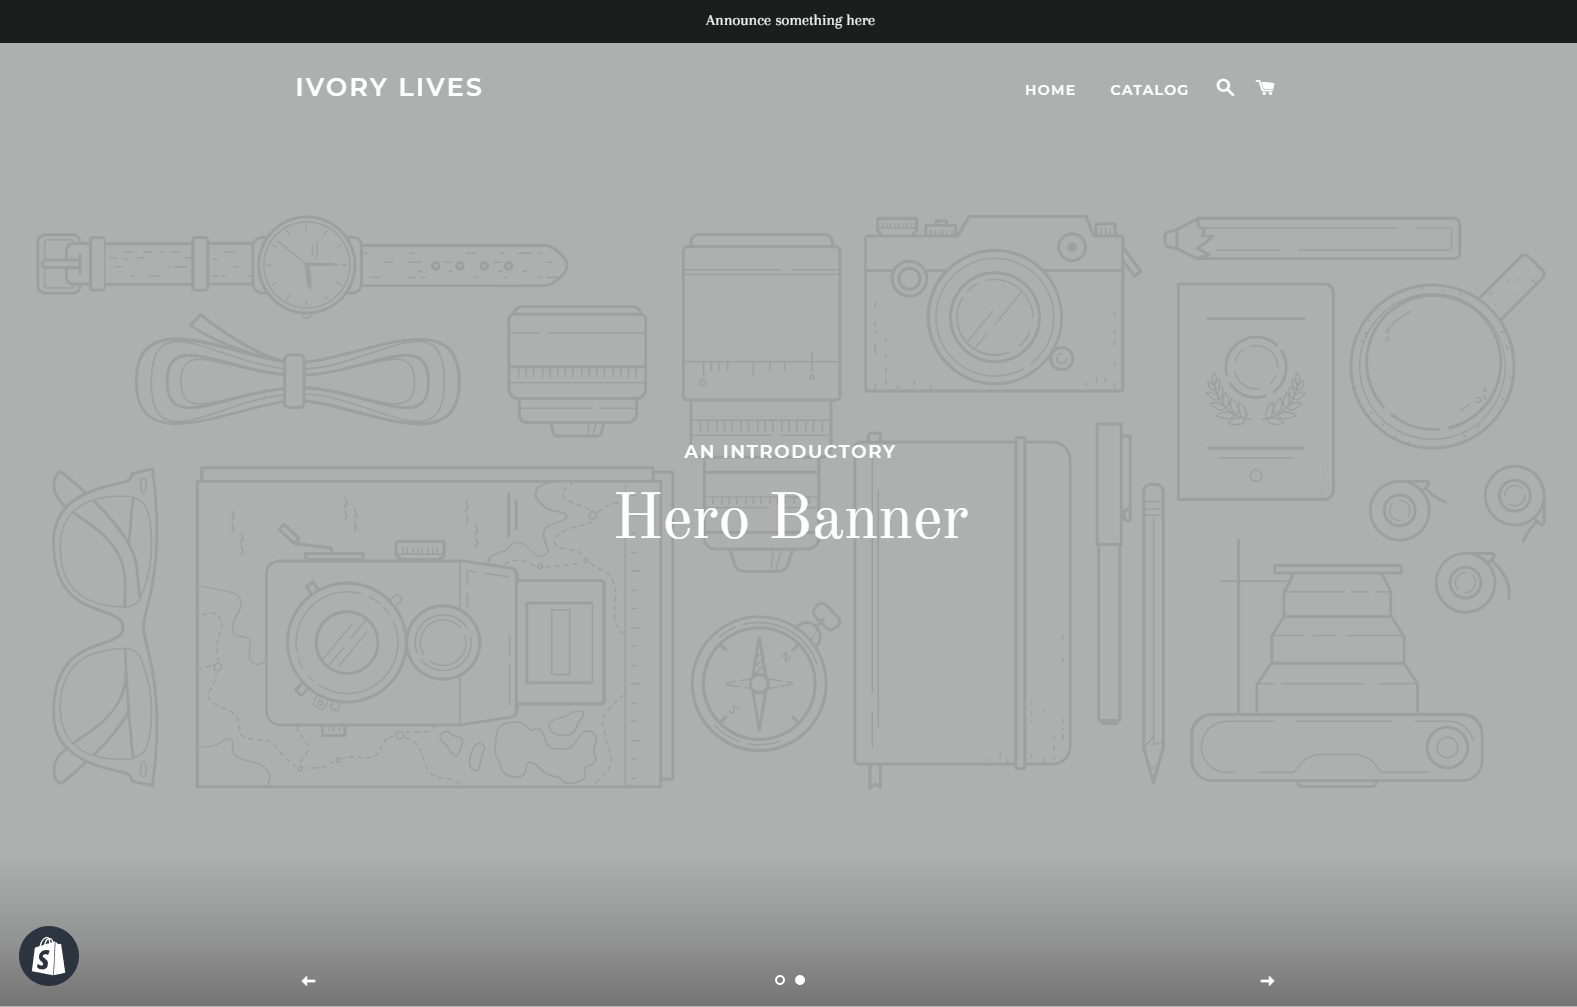
With Brooklyn theme, you can make announcements using the top bar and a showcase of your products using the Hero Banner. If you don’t know where to get free images, you can get some in Pexels or in Unsplash.
Keep in mind that if you download images online, you should be careful of using copyrighted images. Always verify if it is non-copyrighted or copyrighted.
Shopify Theme Customization
To customize your theme, go back to the Shopify Partner Dashboard and click on the Online Store menu and in the current theme section click Customize.
There are seven sections in your Brooklyn themed store.
Each of these section has its own purpose. For the header, this is where your logo or business title is located. In addition, this is where your customers can navigate through your entire store using menu.
If you’re looking for a logo for your business and you don’t know how to make one yourself, you can go to Fiverr and hire a talented designer to make the logo design for you. I usually go for someone who has a price tag between $5 to $10 and I ask them to design us a logo related to our niche.
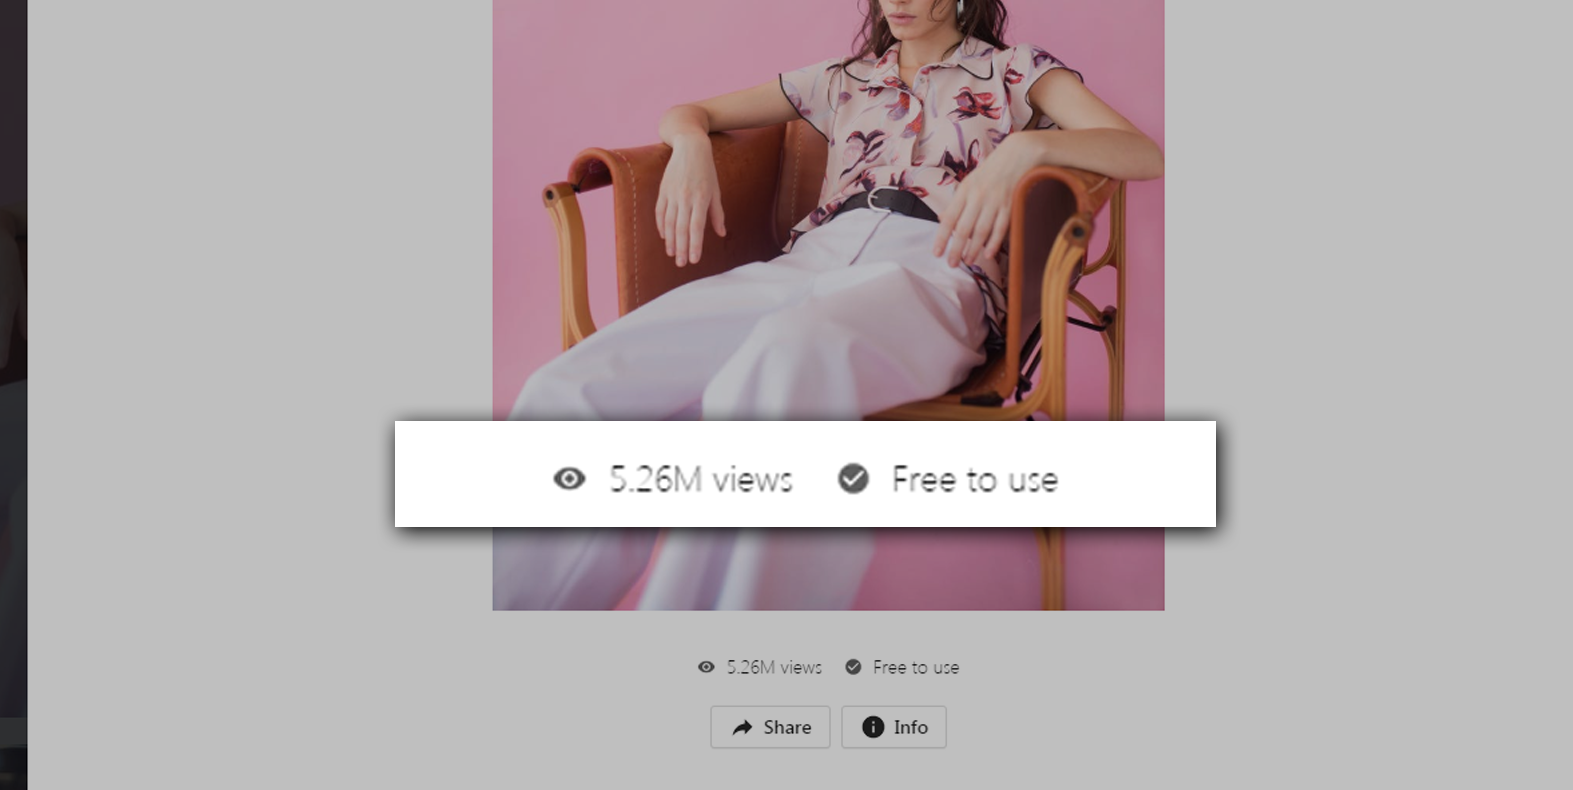
There’s the slideshow section where you can upload the images you have taken or downloaded from Unsplash or Pexels.
For the rich text section, you can introduce your brand with your customers. Describe what kind of products you’re selling, or you can welcome your guests using this section.
Collection list section is a section where you can display the collection of your products. It could be a collection of priced off items or a collection of shoes or anything you want to display here. It’s up to you.
Same goes with the featured collection section. The only difference is, you can only feature one collection. That’s why I recommend you pick the best collection you have.
Newsletter section is more about getting your customers email. Therefore you can notify them whenever you have a new item or whenever there’s a sale in your store.
For the footer section, it’s where you put all the necessary links that you can provide.
We know we haven’t gone through the products and collections yet but we’ll get back to this later on. So for now, let’s design our web page. You can make changes to your header and slideshow.

As you can see in the image above, I have designed my store and uploaded an image for the slideshow. Just a tip, make sure the image that you uploaded is high quality and compressed. Make sure it looks clean and crisp.
Compressing images for SEO
One thing about images is that their file size is quite heavy. Especially if they’re high quality. Making their file size small will make a huge impact on your Shopify store speed so before you upload your images, make sure you compress them using TinyPNG. TinyPNG is an online image compressor that will convert your images into lightweight images without losing its quality.
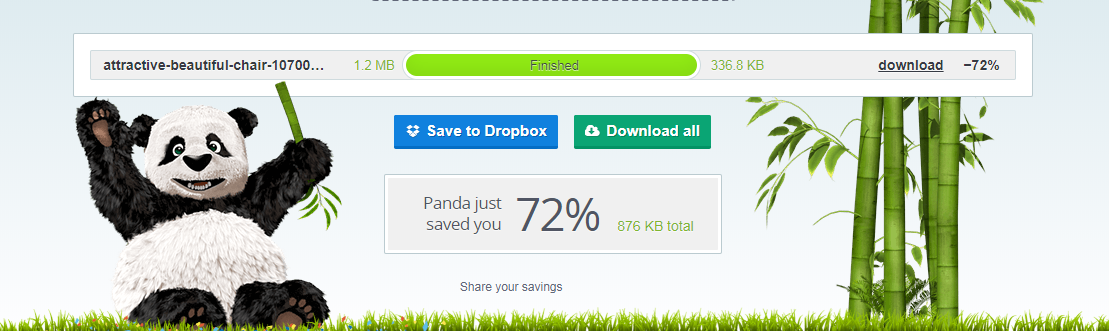
As you can see above, I have saved 72% of filesize! Before, it was 1.2mb. And right after the process, it became 329kb. That’s a huge difference!
This will make a huge improvement to our Shopify store performance.
Now, after compressing the image, download it and use that image for your slideshow section and see how much it improves your web loading speed.
File naming your uploads
Another thing you can do to improve your SEO is to make sure that the file name of your images/files is related to your niche. For example, I have an image of a woman wearing my latest product. Then I’ll probably name that image, New clothing for women this 2021.png or something like that.
Look for keywords that relate to your products.
Shopify Menu Customization
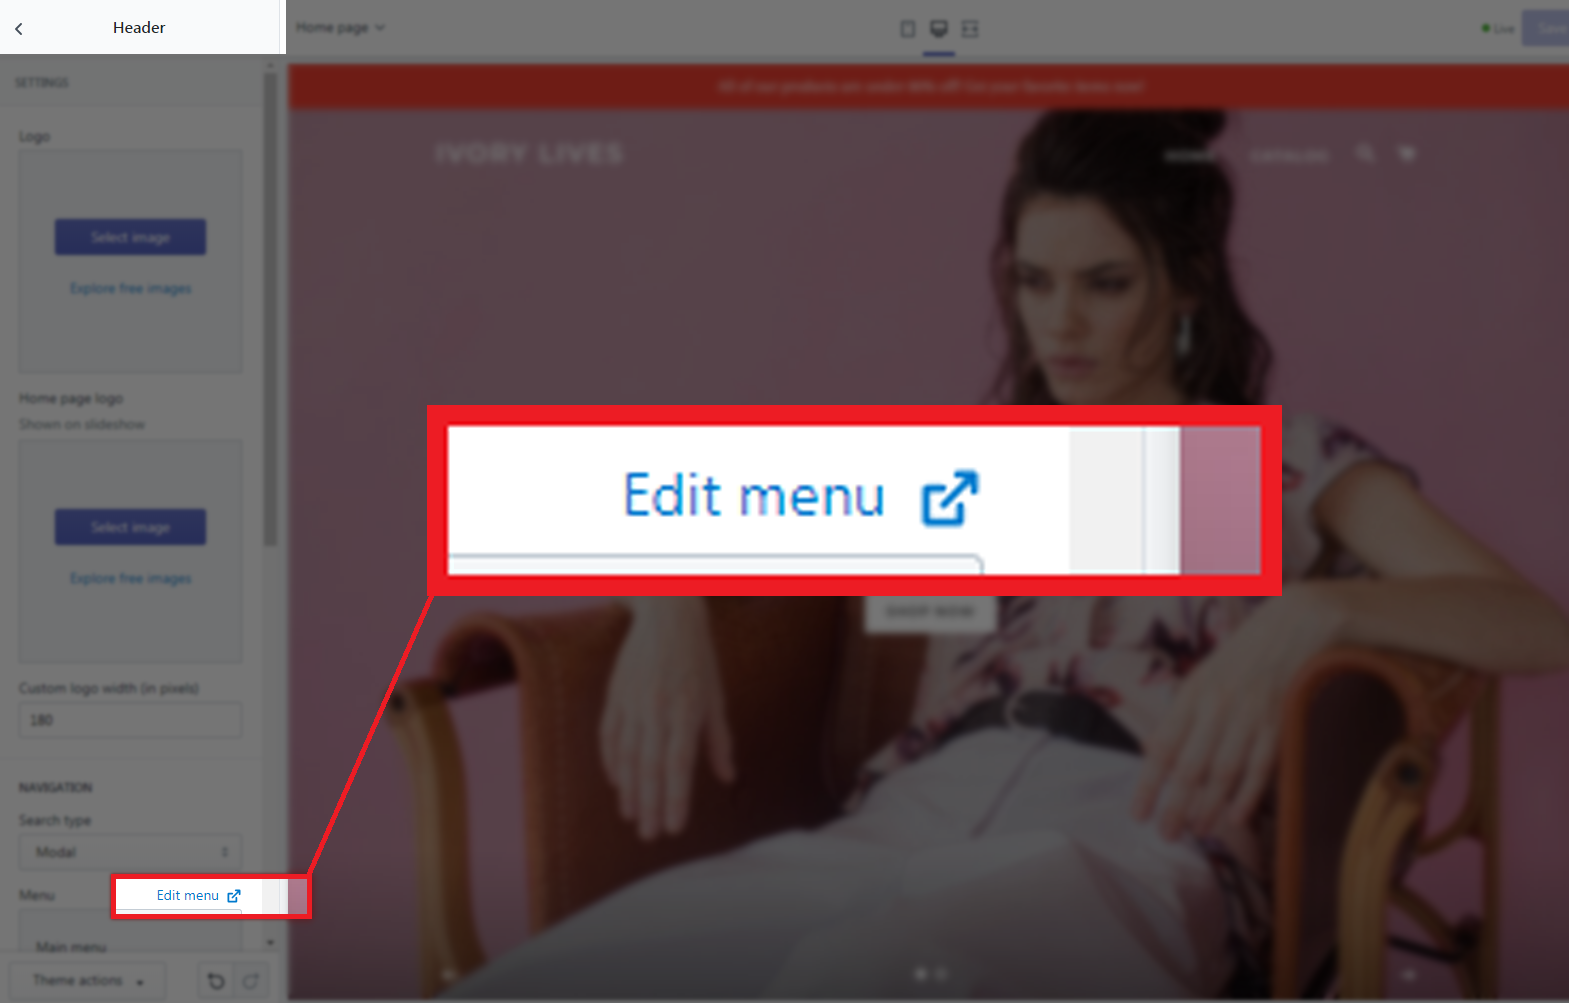
If you look at our Shopify store, you will see that we only have two links in our navigational bar and that is Home and Catalog. We can customize that and add a few more links to help visitors to navigate through our store. So for example, you want to bring your customers to your best selling products, you can do so by making a new menu and call it Best Sellers.
Another thing that I recommend is to change the Home menu, instead of saying Home, call it Shop. This way, your customers will know that they will be redirected to your store not somewhere else.
To navigate to your edit menu, go to your header section and scroll down to the menu section.
Now, that is basically how you customize your Shopify store. If you want to go in-depth on the customization, obviously, you can do that. But for the sake of this tutorial, we’re only going to show you where to go. So basically in the store customization, you can edit the color of your text, the color of the links or buttons, the size of the header, etc. etc.
Shopify Newsletter
If you have noticed in Brooklyn theme, there is a section where it allows you to get the email of your customers. This is called subscription or newsletter.
This section is very powerful because it allows you to communicate with your customers especially if they have devoted their life to your business.
Whenever you have a promo or sale, you can send a message to your email list informing everyone that you have a promo and they should check it out.
Now, most sales came from Email Marketing and other marketing strategies. We’ll go deep into this topic soon but for now, we just wanted to let you know what this section is about.
Shopify Store Settings
Now that we’re almost done with our store design, let’s go back to our dashboard and take a look at our Shopify store settings because it’s also important to know what’s happening behind the store.
To navigate to your store settings, look at your dashboard sidebar and just underneath the Online Store menu, you will see the Settings menu. (It is located at the bottom left corner of the page)
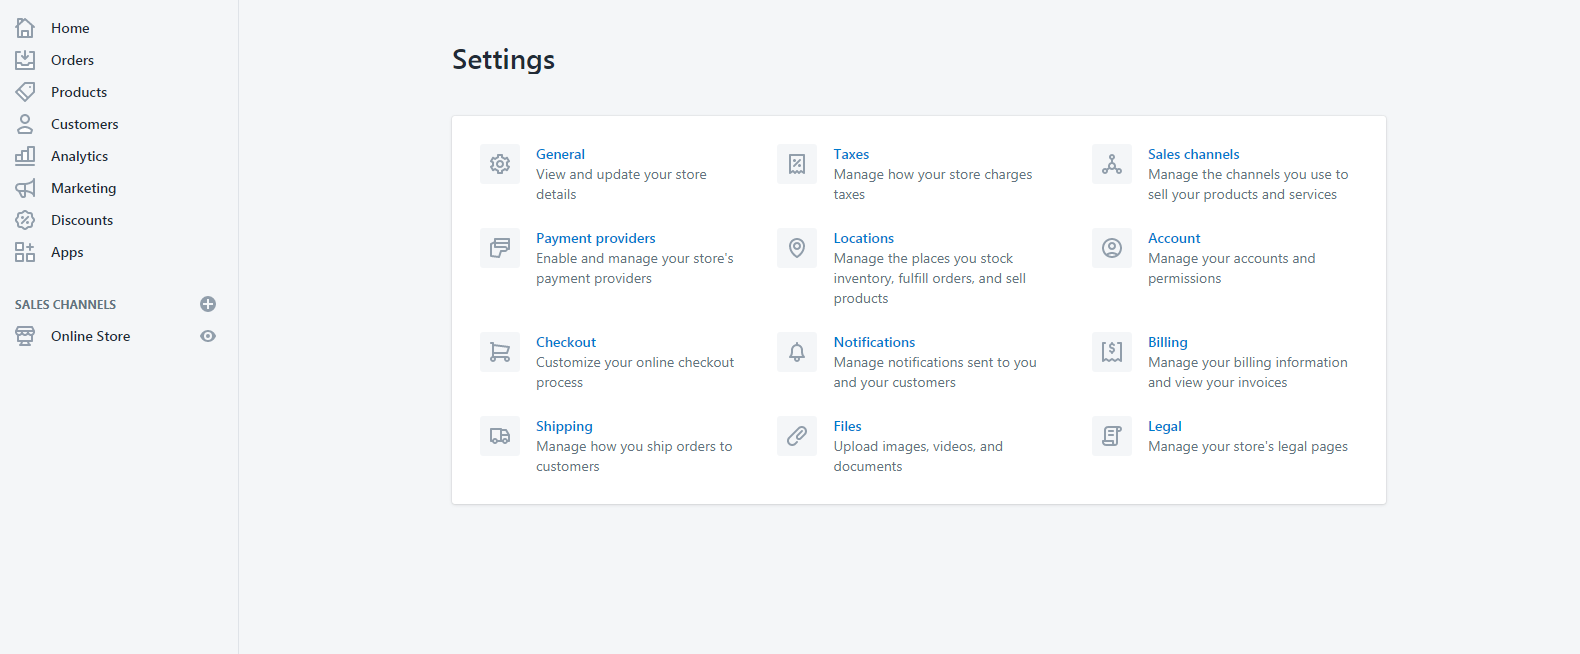
As you can see in the image above, we have:
General
The general setting is where your store details are located. Your customers will most likely use the information to contact you in case they have problems, questions or requests.
This is also where you can change the currency of your store. Make sure you change them into the currency of your country or where your store is located.
Payment Providers
Payment providers settings page is where you can manage how you wanted to get your payments. By default, PayPal Express Checkout is enabled and your earnings will be sent to the account connected with your Shopify store.
Make sure that the email indicated is your PayPal email address.
You may also choose a third-party provider like 2Checkout, Adyen, PayTabs, CyberSource, PaymentExpress, etc.
Checkouts
For this setting, it’s highly recommended to keep your customer accounts disabled which means that customers will only be able to check out items as a guest and not register to your store. It will remove the hassle for your customers from buying and it’s going to increase your conversion rate.
Shipping
Shipping setting is where you can modify your shipping origin, your rates at checkout, etc. I highly recommend you to leave everything by default unless you have a different shipping zone or shipping methods.
Taxes
By default, Shopify uses sales tax rates, which are updated regularly. If you use the default rates, make sure to confirm that they are updated and correct. Otherwise, override them whenever it’s necessary.
Locations
If you’re planning on managing your inventory and fulfill orders from different locations, then you can use this setting. This is very useful especially if you have multiple locations for your items. For instance, if you run out of stock at your first location but have inventory at your second location, then Shopify will split the order so that is it fulfilled from multiple locations.
Now, the remaining sections in the settings are mostly set up already so there’s no need for you to edit them besides you can just modify them once you actually started gaining earnings.
Let’s just focus on setting up your store to start getting sales. Now let’s talk about the products that you can sell.
Shopify Products
To start gaining profit, you obviously need something to sell and that is your products. There are many ways for you to get products. Number one is your actual products or services, and number two is products from drop shipping.
What is Dropshipping?
Dropshipping is a retail fulfillment method where a store doesn’t keep the products it sells in stock but instead, when a store sells a product, it purchases the item from a third party and has it shipped directly to the customer. In conclusion, the merchant will never see or handle the product.
To start selling with dropshipping, you can use the Shopify app called Oberlo. Go to your Shopify Partner Dashboard, and go to the Apps menu and then select Oberlo.
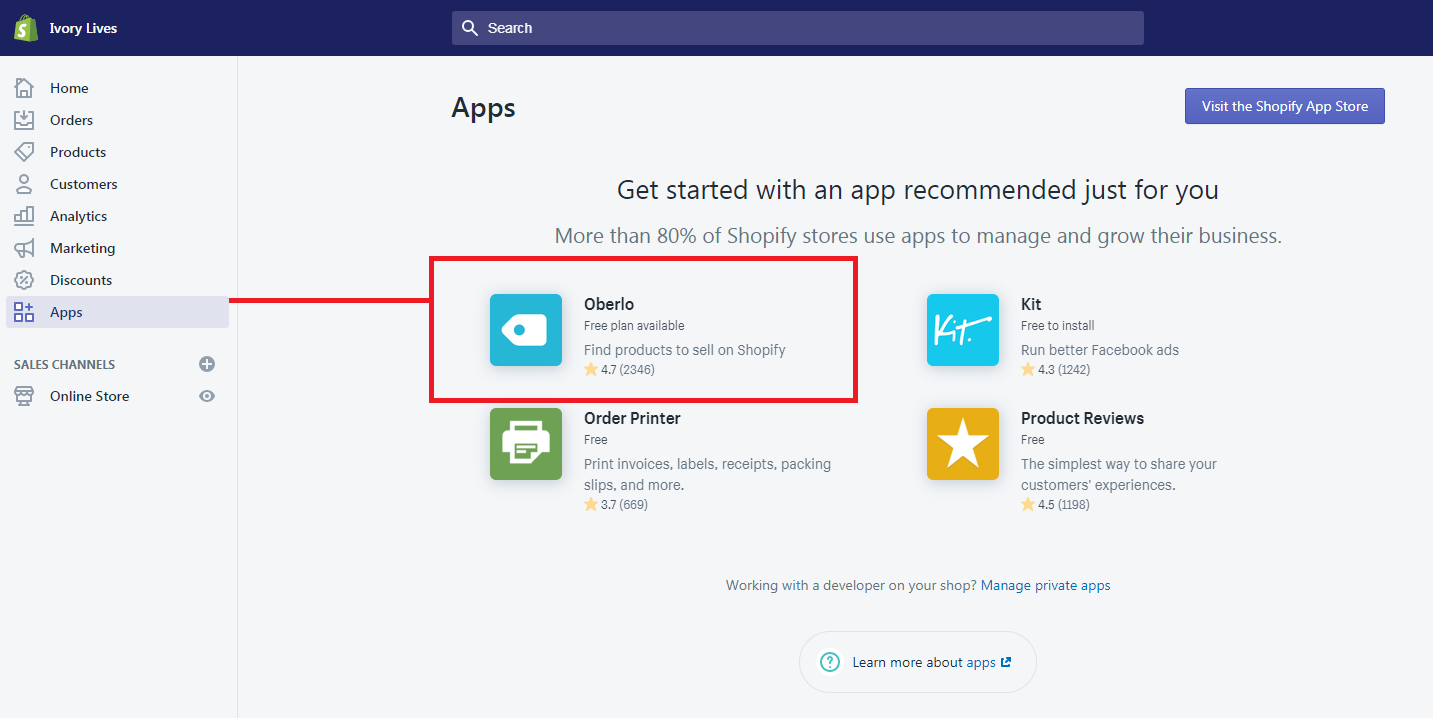
If somehow you don’t see Oberlo, you can visit the Shopify App Store by clicking the button at the top right corner of the app page.
After Installing, you may now start using Oberlo and start adding products to your store. There are plenty of products that Oberlo will start recommending you. But I suggest you add products that are related to your niche. For example, your store focuses more or men’s clothing then look for items that are men related like shoes, shirt, underwear shorts, etc.
Adding products from AliExpress
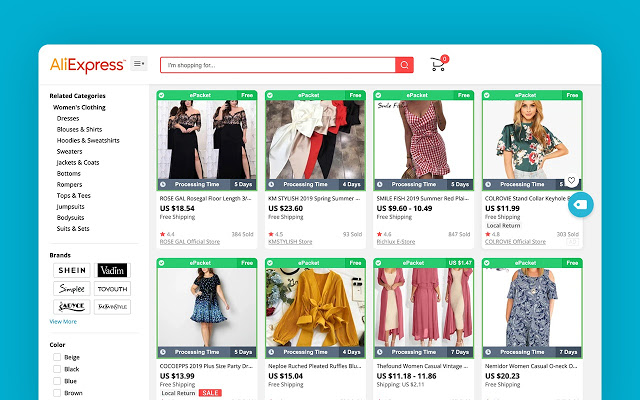
Another thing to keep in mind is Oberlo also allows you to import items from AliExpress. So if you want to sell items that are not available in Oberlo but available in AliExpress, you can add that item to your store by installing the Oberlo extension to your browser and then go to AliExpress, search for items, and then click Add to import list.
If you’re getting items from AliExpress, it’s best to select items that are under ePacket shipping. ePacket shipping basically means that items will be shifted out in around twelve to twenty days which we believe is the fastest form of dropshipping compared to other types of shipping. It will also save you a lot of time, money, and effort.
Shopify Collections
Once you’re done adding items to your store, you can start creating collections. Like what we have said before, collections are a group of products that are categorized based on a certain property. For example, you create a collection for products are free for shipping. You can do that by going to Products then collections then select Create collection.
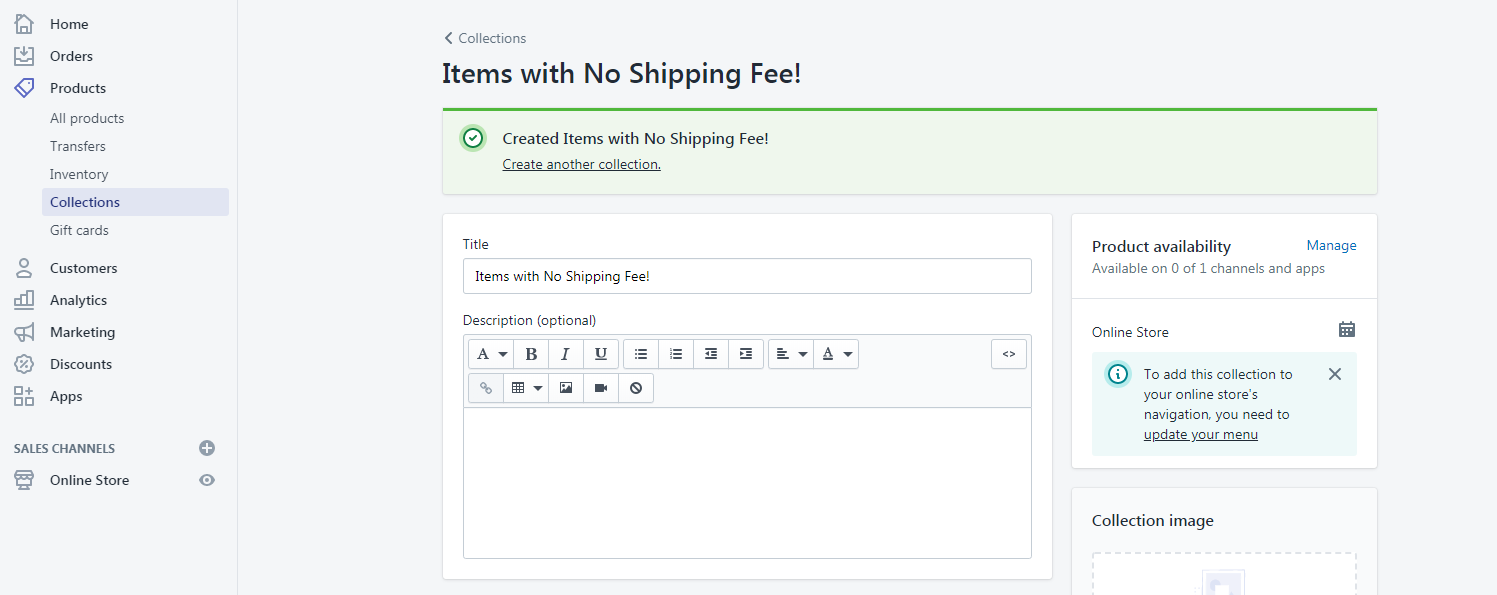
To add items to your custom collection, you can do that manually or automatically based on a certain condition. We prefer to use manually so we have more control of what’s coming inside a collection. But, if you want to use the automatic collection, make sure you enter a condition that follows its purpose.
Removing Shopify store Password
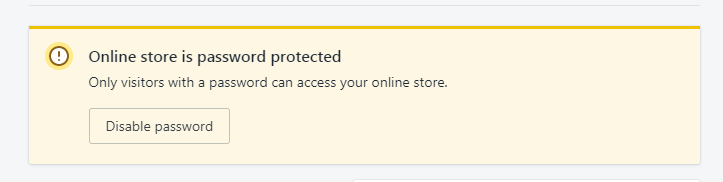
If you are under the 14-day free trial, customers will have no access to your store unless you give them the password that Shopify has given to you. But we don’t want that, we want to give our customers the service that will not make them click and do more actions before they can purchase an item from us.
So how can we get rid of the password from Shopify store? Simple, upgrade your store to a certain plan. Now, it might be scary to some but don’t worry if you’re still under the 14-day trial, you won’t be paying for anything. Just make sure to cancel your subscription before the trial ends if you don’t like Shopify.
Final Touch
Congratulations! You have setup your Shopify store. Now, what is the next step? Well, you can start doing marketing strategy or advertise your store to show your products to people on the internet.
Now to end this article, I would like to give you some tips for your business.
Video Attachment
I’ve tried recently if Shopify dropshipping still works in 2021. Here’s my research: