Search Results for: money

How To Make Money With Shopify in 2023 (As Developer)

Ever since the pandemic happened, a lot of programmers like us are working from home. Creating websites here, creating Shopify apps there. We do all of that just to make money. But what if I tell you that you can earn more money by doing something else with Shopify other than making web apps or websites?

In this article, we’re going to look at 4 ways that you can do to make money with Shopify as a developer without quitting your day job (unless you want to).

Let’s begin!

Featured video

If you’re interested to watch the video version of this blog post, you may watch the following video instead:

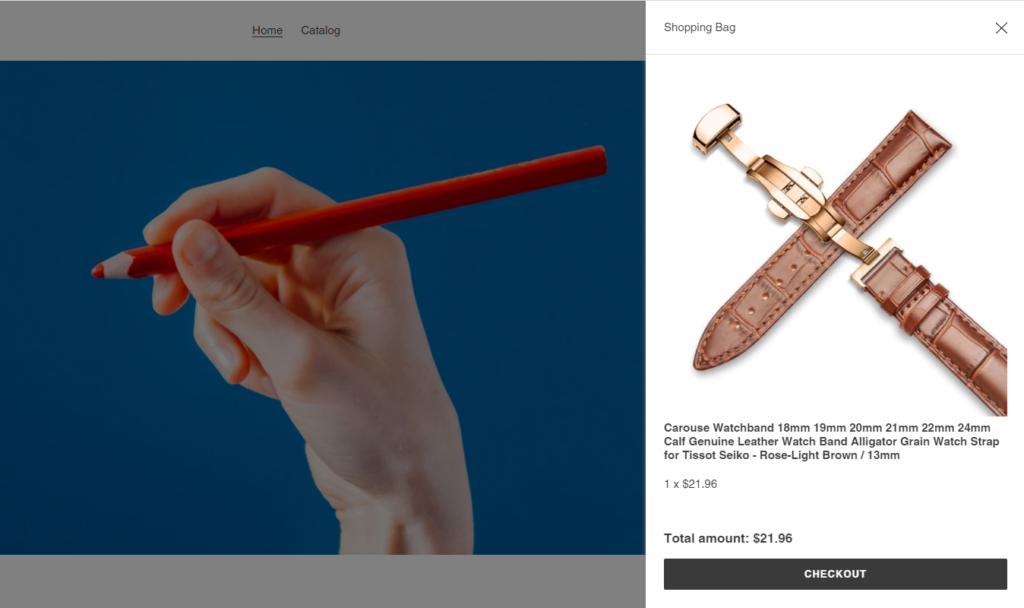
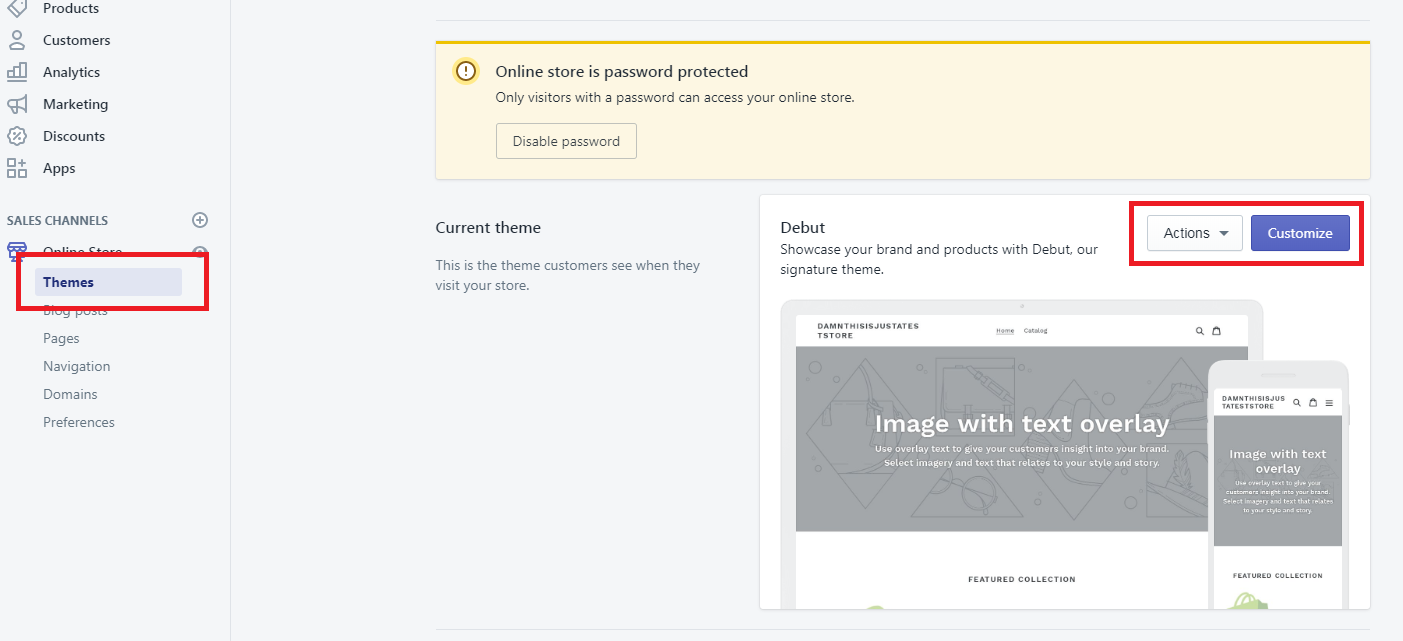
1. Build a Shopify store

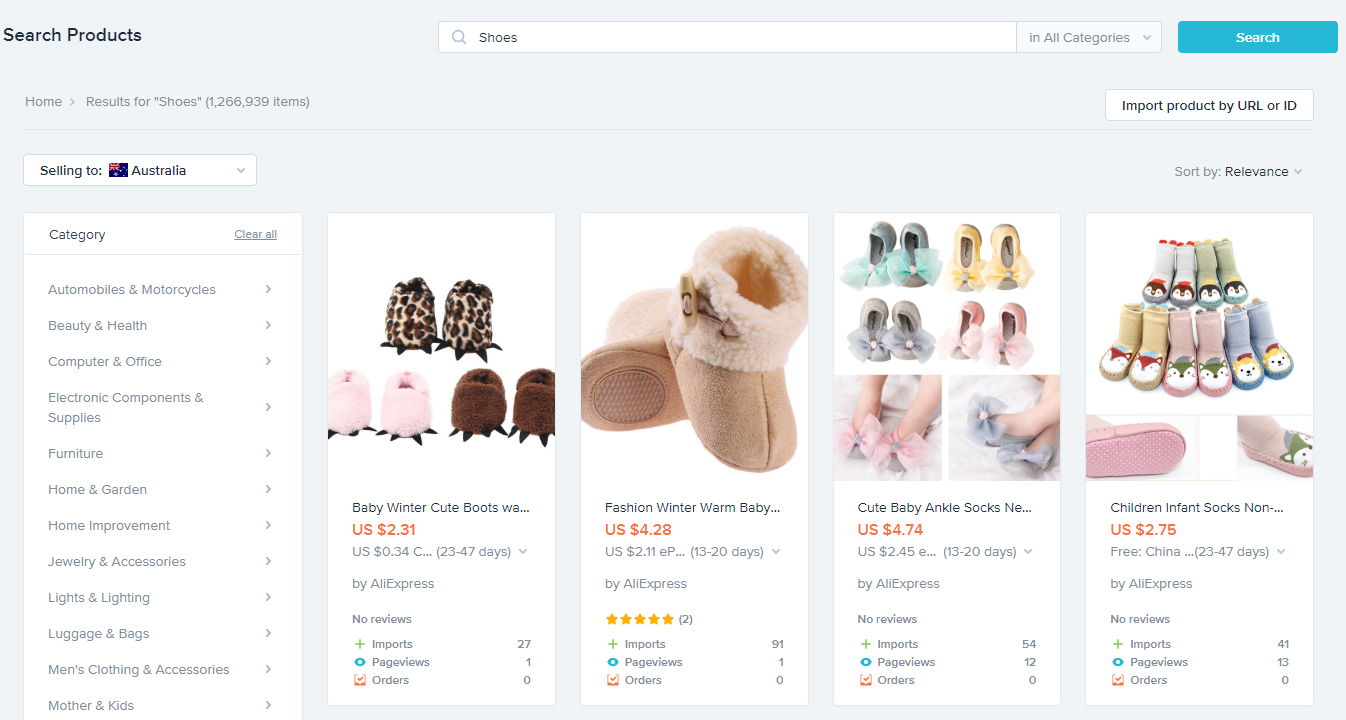
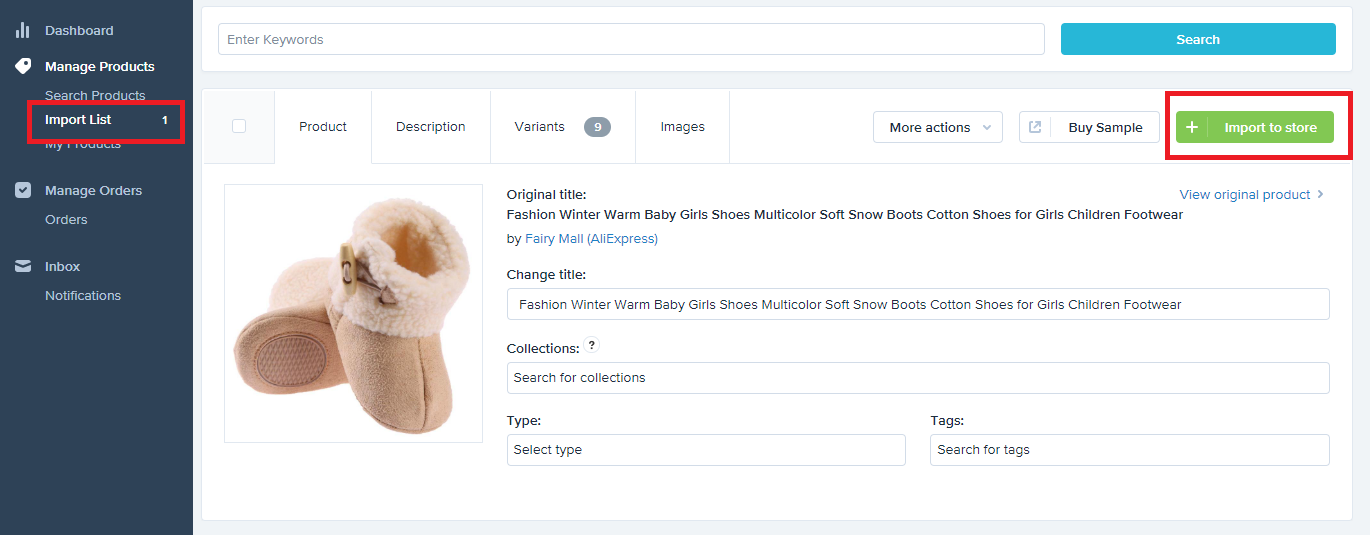
When you say Shopify, the first thing that comes to mind is dropshipping. But that’s not the only thing that you can do with Shopify. As a developer, we have the advantage to create a beautiful Shopify store that can earn us a lot of money.

Now, you might be asking…

“How am I supposed to do that? I just write codes. I don’t know how to sell products.”

Selling products is honestly, one of the easiest things that you can learn compared to writing codes or making apps. Luckily for us, Shopify is very easy to use and they provide a lot of blogs and documentation that we can use as a reference for making a great Shopify store.

“Okay, sure, maybe I can create a Shopify store and learn how to sell products but… what am I going to sell?”

As a developer, we can sell a lot of things! You can sell your own book, courses, or even your own web applications.

Once you have all of that, all you need to do next is to learn about marketing strategies, promotions, or advertising.

If you’re interested to go deep into building a Shopify store, I’ve created a thorough guide here and if you are interested in making your own online store, you can start by click the button below:

2. Become a Shopify Expert

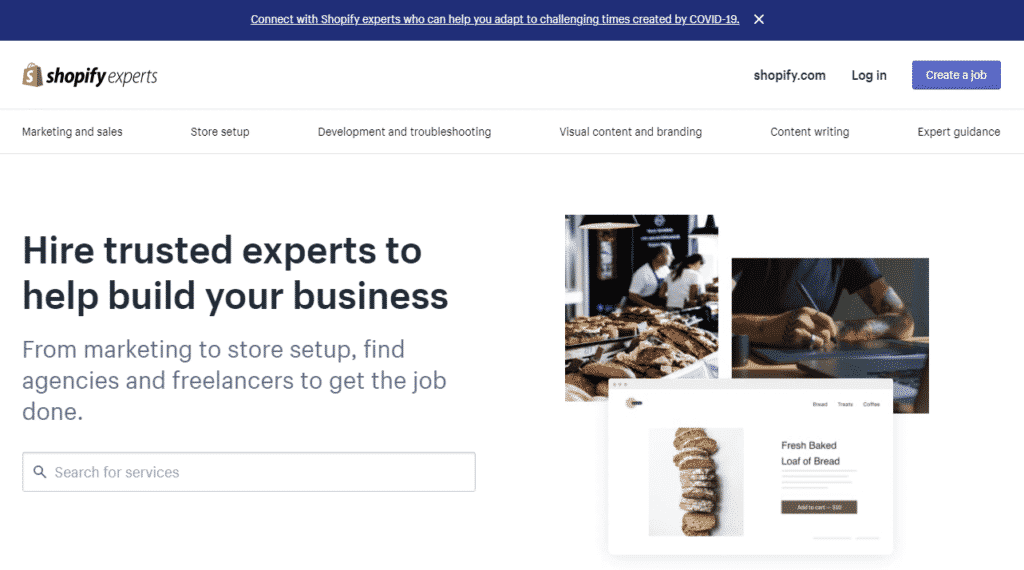
Who are the Shopify experts?

Shopify experts are the developers who help business owners create their very own Shopify store. In other words, this is you.

Shopify experts are in high demand right now. As a Shopify expert, you will be able to put your expertise to good use by helping business owners across the world with their projects.

You can become a Shopify expert even if you are working a 9-to-5 job. You know why? Because you are not the one who will look for a job, people are the ones who will be looking for you. Becoming a Shopify expert is like working with Fiverr, but fancier and expensive.

Working as a Shopify expert can make you a lot of money. In fact, per project, you can earn up to $2159. However, that would still depend on your experience and how much you’ve worked with business owners.

So how do you become a Shopify expert?

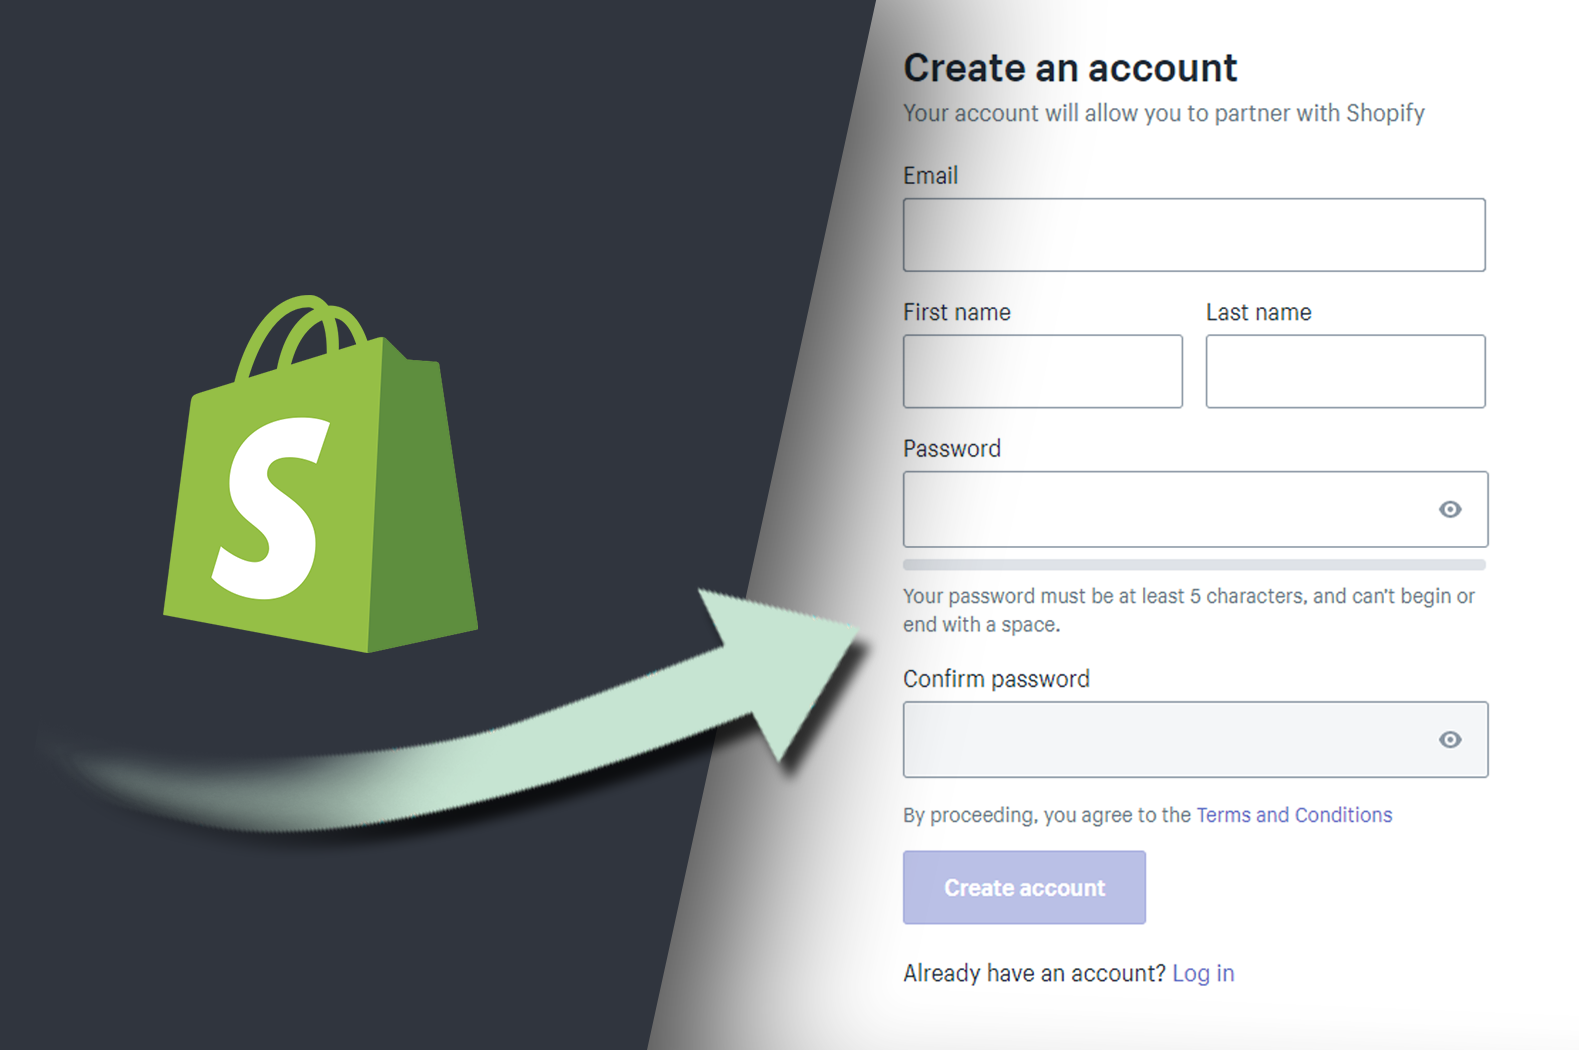
To become a Shopify expert, you’ll need to have access to the Shopify experts marketplace. This is where you can expose your profile to thousands of Shopify merchants looking for your help. So, if you want to join the Experts marketplace, then you can fill-up the Experts Marketplace request form here:

If you don’t hear back from the Experts Marketplace team, then that means your request wasn’t approved either because it doesn’t follow what the marketplace is looking for, or there isn’t enough demand for what you can offer.

3. Build Shopify Apps or Shopify Themes

Creating your very own Shopify apps and themes is honestly, one of the best ways to make money with Shopify. Why? Because Shopify apps and themes will always be there making you money.

Compared to working as a programmer, selling Shopify apps and themes only requires you a bit of your time. Once you have published your app to Shopify app store, you can sit back and relax and wait for that sweet sweet money to come into your bank account.

But of course, selling Shopify apps and themes can bring you a lot of responsibility especially when you get hundreds of installs daily. Merchants will more likely to send you emails about your app and theme so you will have to be super attentive toward your customers just so you can get a good review.

4. Joining Shopify Affiliate Program

This is honestly, one of the best ways to make money with Shopify. Joining the Shopify affiliate program can make you $58 per merchant.

Now, how does this works? Well, once you joined the Shopify affiliate program, Shopify will give you an affiliate link that you can use for referring customers. By default, your affiliate link will send the visitors to the Shopify free trial page and once the visitor signs up for a 14-day free trial, that’ll be counted as a referral. However, in order for you to get a commission, customers should convert their plan from a trial to paid plan.

A standard affiliate link should look like this:

https://www.shopify.com/?ref=[YOUR_REFERRAL_HANDLE]Code language: Markdown (markdown)

Conclusion

Some say that being a developer is one of the best professions anyone can have and personally, I agree with that and that’s because I believe that developers have a lot of things can do to earn money. I used to just work for my clients and now I run WeeklyHow and started selling my very own courses and that opened a lot of opportunities for me.

So if you’re a developer like me, I encourage you to try and push your limits. Explore the things that you wish to explore and who knows? Maybe one day, you’ll find more options that a developer like us can do to earn money.

Effective Marketing Strategy for Bloggers with No Money

When I started writing blogs here in WeeklyHow, All I had was spare money to keep my domain up for three months. I have no budget for investing in a good-looking WordPress theme, all I had was an experience, passion, and hope for growth that I always wanted to achieve.

Maybe this is what you are too right now, looking for ways to help your blog grow and be noticed by search engines.

What can we do?

The questions that bloggers usually ask is “What can I do to..”

  • make my blog grow?
  • improve google search rank of my blog?
  • make people subscribe to my mailing list?
  • obtain readers and make them come back for my new content?
  • get people to share my content?
  • make people talk about my blog?
  • ..and more

We all wish to find the answers to these questions. So in this article, I will be giving you ideas about effective marketing strategy and how to effectively market your blog without spending cash.

The way to the top

So how can you actually get your way up to the top and to the front of blogging industry line?

Well, you need to do a lot of work. It means putting a lot of time in keeping your blog fresh. A fresh blog that creates trust and builds awareness.

Blogging without money is like going to work without a fare for a taxi. You walk, instead of riding. Which still leads you to your desired destination but it will take you time.

You can achieve growth without spending cash by doing the following:

Word-of-mouth recommendation

The idea behind this is by suggesting another person, to check out your blog because it helped them, and that person can also suggest your blog post to his friend, and so on.

This is an effective marketing strategy especially when your blog talks about hot topics such as news and trends.

Another thing you can do to effectively market your blog using word-of-mouth is by giving people rewards. Give them something whenever they signup for your blog. These people will likely share this promo with other people.

People love to talk especially when they hear or see something interesting. So go ahead, write a blog that could potentially conceive people share your words.

Use Social Media

There are lots of social media that you can use to get free marketing, including Facebook and Twitter.

Out of all of the social media, Pinterest and LinkedIn were my favorites because it gives me a different result compared to Twitter and Facebook.

All I do is just pin a nice and eye-catching photo, and boom! people will visit your blog. Most of them will also comment on your blog saying that they liked the photo that you posted.

Don’t get me wrong, every social media gives a different result. I believe that it’s just about experimenting with what’s working and what’s not. Just keep using social media. I promise it will help your blogs a lot.

Guest Blogging

Provide high quality content for free on blogs with your target audience, then softly advertise your blog in a way where both you and the site owner will benefit.

Recommended reading:

How To Build Shopify Apps with PHP (Update 2023)

We have a Shopify App Development Course! Be one of the first students!

Are you looking for an in-depth guide on how to create Shopify apps? Click the enroll button !

Introduction

We are aware that there are hundreds of PHP tutorials online on how to create a Shopify app using PHP, but in this course, we’ll tackle all the components that you may want to add to your Shopify app like displaying products and such.

Now before we proceed, Shopify made an update with their API where they version their API quarterly also known as API versioning. It is important to know that Shopify will always make updates to their API so if you are developing Shopify apps, then you should also keep your apps updated.

Update in 2023

If you’re not aware, Shopify is encouraging most developers to create Shopify apps through their CLI and so, if you’re interested to learn how to create Shopify apps using Shopify CLI and PHP/Laravel, we’ve managed to compile a series of videos teaching how to create Shopify apps in Laravel.

What is Shopify?

Shopify is one of the most popular e-commerce platforms and provides a great opportunity for developers to build and monetize their own web applications. With the ever-evolving technology, building Shopify apps has become easier and more efficient thanks to Shopify CLI. In this blog, we’ll explore the latest technologies and tools for creating Shopify apps in 2023.

But first…

What is Shopify PHP?

There’s no such thing called “Shopify PHP”, but to make it understandable to you. PHP is a programming language for web development that can be used to develop a Shopify app. Though there are PHP Frameworks that you can use as well to build a Shopify app like Laravel.

In 2023, you can now create Shopify apps simply by using Shopify CLI.

Is it hard to do Shopify App Development?

Building your own Shopify Apps is very easy, all you need is to understand how the API works. Shopify is a Rails application, there are lots of Shopify repositories that you can use for FREE to integrate your website into Shopify API. Here’s the list:

Personally, I use this Shopify API Client made by Alex here:
Shopify Generating API Token Guide

To begin, you have to create a new Shopify app in your Shopify Developer account, so if you don’t have an account yet, you can sign up by visiting developers.shopify.com

Shopify App Development Tutorial PHP - WeeklyHow

Building Your Own Shopify App with PHP

In this article, we’re going to learn how to make a Shopify application from the scratch using PHP, if you already have a Shopify developer account this is the first page you’re going to see:

Developer Shopify Dashboard

Proceed to left navigation panel and click the Apps category

Shopify App Development Tutorial PHP

Click Create app and select what type of app you wish to build. Custom app or Public app? For custom apps, you can only install the app to one Shopify store with no need for Shopify to review your app. However, with public apps, Shopify will need to review your app in order for Shopify stores to install your Shopify app.

Shopify App Development Tutorial PHP

After selecting, that should give you the following form.

App Name – The name of the Shopify application you’re about to create.
App URL – The URL of your website where you’re going to upload your Shopify files
Whitelisted Redirection URL(s) – This is where you’re going to list your generate token script or URLs you need as you authenticate your Shopify.

For web hosting, we recommend getting it from Hostinger as it’s more compatible with Shopify especially if you’re just getting started.

Hostinger free hosting plan for everyone
  • Compatible with Shopify
  • LightSpeed Web Server
  • Free domain and SSL certificate
  • 30-day money-back guarantee

Once you’re done, filling out the form, click Create app

Image of Shopify App Development using PHP
Here’s everything you need to start building your Shopify App

Now that we have our first Shopify app created, it’s time to make our website connected using these API credentials. To do this, download at least one of the Shopify repositories that I have provided in this article.

Create Shopify Apps for Storefront

Customize and add more features to your Shopify store using Shopify apps!

To continue with this project, you may proceed to this article.

In part 2, we’ll be using the credentials that we have to connect it to PHP. If you’re interested, proceed to this article below:

Best WordPress Themes in 2023: 13 Clean WordPress Themes for Business

So you’re looking for a WordPress theme for your business? Don’t worry; Today, we’ll be giving you 13 WordPress themes that are clean and modern-looking to make your business look more appealing than ever.

Best WordPress Themes for Business Category

Before wasting time, let’s take a look at 13 of the best WordPress themes that are responsive and beautifully designed in 2020.

REHub

REHub is said to be one of the best WordPress themes in the market that offers not only a nice WordPress theme but also a way of generating money through eCommerce. So if selling products is your business, then this WordPress theme will definitely serve you in a long run.

Like most people say about this theme. This WordPress theme is a money maker. Even Amazon recommends this WordPress theme.

  • High conversional Gutenberg blocks
  • Elementor compatible
  • Extended AMP support
  • SEO optimized
  • WooCommerce ready

Divi

Divi is a WordPress page builder that is very popular in the WordPress community. In fact, it’s very popular that it is being used by more than 600,000 users around the globe.

Its drag and drop builder allows you to create a professional-looking website in less than 15 minutes and if you don’t feel making a web design from scratch then Divi comes with 20 pre-structured layouts allowing you to start your new project instantly. This is perfect for businesses that wish to have this glamorous look.

  • Built-in layouts
  • Over 46 content modules
  • Color, style and size customization
  • Advanced Tools for Developers
  • Advanced Visual Builder
  • Live preview

Yes, Divi is one of the most used WordPress themes in the market but it’s not always perfect. The downside of using Divi is it tends to make your web pages very slow and its code is not SEO-friendly. Not only that, if you use Divi and you decided to change themes, it will be very difficult to transfer your content to other WordPress themes.

ThemeForest best selling themes

Enfold

If you’re looking for a WordPress theme that is clean, flexible, and fully responsive then your search is about to be over. Enfold is one of the best themes that is known for having a good reputation in the WordPress community.

This WordPress theme offers a very modern design that can be used for any kind of business like corporate, e-commerce, and more. Not only that but it also offers plenty of good features such as:

  • Fully responsive layout design
  • AJAX instant search
  • Unlimited sidebars
  • Contact form builder
  • Retina ready
  • Documentation & support
  • WooCommerce ready
  • Translation ready
  • 2D/3D/Parallax Slideshows
  • Shortcode editor
  • 30+ PSD files
  • and many more!

Astra

Astra is no doubt one of the best free WordPress themes that you can use for any kind of business that you have. This WordPress theme provides many features that are perfect not only for beginners but also for experienced WordPress site owners.

Our favorite best features that they offer are the following:

  • Powerful design options
  • Multiple site layouts
  • Custom post-types
  • WooCommerce Compatible
  • Great widgets

Veen

Veen is yet another type of premium WordPress theme that focuses on a modern blog design that is super attractive thanks to its animations. With Veen, website visitors will never have an issue to navigate around your website as it is very organized and clean.

If your business is blogging, then this kind of WordPress theme is the best option for you, it offers the following great features:

  • 100% Fast and responsive
  • Full theme options
  • 6 Free custom shortcodes
  • 10 different types of demos
  • 5 post formats
  • Unlimited & customizable colors
  • Great animations
  • SEO optimized

Alterna

Alterna is one of the hottest and best-selling WordPress themes this 2020. With Alterna, you can create any type of website for any kind of business using its drag and drop visual composer page builder. The best thing with this WordPress theme is it provides features and plugins that are more expensive than the theme itself.

It comes with an amazing slider plugin, parallax slider, premium fancyBox, waterfall Flux with AJAX, and many more!

  • Unlimited Sidebar
  • Unlimited Colors
  • Lots of shortcodes & widgets
  • SEO optimized
  • Google Maps support
  • WooCommerce ready
  • Multilingual languages ready

Ocean WP

One of the fastest-growing themes for WordPress. This extendable and lightweight theme will allow you to create different kinds of WordPress websites for any kind of business that you can think of. It can be integrated with multiple platforms such as WooCommerce and other page builders.

With Ocean, you won’t need to install external plugins because it already provides awesome features like image sliders, multiple custom widgets, color options, header layouts, and many more.

  • Fastest page-load time
  • Fully responsive
  • Powerful design options
  • Multiple site layouts
  • Blog layout options
  • WooCommerce ready
  • Translation ready
  • SEO Optimized

Avada

This is one of the excellent premium WordPress themes. This multi-purpose theme allows you to develop versatile websites within a few clicks. Avada comes with over 41 featured websites and more than 255 web page designs. 

You can use their demo installer to set up the content. Moreover, it comes with over 1000 customization options. It is compatible with many WordPress themes. 

  • Unlimited design options and integrations
  • Drag & Drop page builder
  • Fully responsive
  • Free premium tools
  • Awesome fonts
  • User friendly

Soledad

Are you planning on making a magazine-type of blog? Then you should take Soledad as your WordPress theme.

There’s no doubt that this is the best WordPress theme that you find from ThemeForest. It comes with excellent magazine layout options, over 1000+ sliders, and many more. Its single post templates are worth mentioning that allow you to share your stories. 

You can create a completely customized website using its page editor support. It is compatible with the WP bakery and Elementor page builder.

  • Very easy to use WordPress theme
  • Superfast load times
  • Unlimited layout options
  • White label tool
  • WooCommerce ready
  • SEO Optimized

The 7

The 7 is one of the easiest to customize WordPress theme ever. It offers more than 1000+ theme options to allow you to build everything that you can think of for your website.

If you like using Page Builders then this theme is perfect for you as it offers full and seamless integration with WPBakery Page Builder and Ultimate Addons.

But of course that is not the only thing that is best with The 7. It also offers:

  • Unlimited web designs
  • Fully responsive & High-speed theme
  • Unlimited header layouts
  • Free premium plugins
  • Customizable sidebar & footer
  • WooCommerce ready
  • SEO optimized

Newspaper

Are you planning on building a news website or blog? Then Newspaper is the WordPress theme that you should be using.

With Newspaper, you can create a great news website that look simple yet professional and organized. You can also use this WordPress theme for different types of websites like fashion, food blogs, travel, and lifestyle.

  • Fully optimized theme (Lightning fast)
  • Fully responsive
  • 30 Free pro demos
  • Free premium plugins
  • Flexible header builder
  • No coding required
  • AdSense compatible
  • SEO ready

Bimber

Bimber is yet another newspaper WordPress theme that allows you to create an attractive, high-speed, and fully functional website in less than one day. It offers a bunch of powerful plugins that can improve the functionality of your website inside and out.

With Bimber, newsreaders won’t finally have trouble reading your news day and night. Thanks to its powerful dark mode feature, readers can finally switch your website into a dark mode setting in just one click of a button.

If your niche is about viral content then this theme is perfect for you.

  • 2X faster than other WordPress themes
  • Offers too many plugins
  • Outstanding dark mode
  • Instant Search Results
  • Easy to monetize
  • Image editor
  • SEO optimized

RealHomes

It’s quite hard to find a WordPress theme that matches with real estate niche right? Fortunately, it isn’t. RealHomes is a WordPress theme created specifically for real estate niche websites.

With RealHomes, you can easily create a website that showcases your properties. It’s super easy you can create a website in less than an hour.

  • Advanced & customizable real estate search
  • Google maps integration
  • OpenStreetMap integration
  • Gallery Templates
  • User registration & Login support
  • Fully documented
  • and more!

Conclusion

It can be a bit hard to find a great WordPress theme that fits your business requirement but we hope that in this article, you found one or two WordPress themes that you can use in a long run. If in case you haven’t found what you’re looking for, then feel free to talk to us! We offer WordPress theme development and we can help you create the theme that you’re looking for.

Disclosure: This article may contain affiliate links, which means we may receive a commission if you click a link and purchase something that we have recommended.

Shopify Theme Development: Online Store 2.0 + TailwindCSS

Shopify just recently updated their Shopify online experience which they call “Online Store 2.0”.

With this update, Shopify merchants can now customize their entire online store using sections & blocks. This opened a lot of doors not just for Shopify app developers but also for Shopify theme developers because now, you can add cool sections and blocks to the most commonly used pages like products page, collections page, blog page, etc.

If you’re a Shopify theme developer and you don’t know yet how to create a Shopify theme for Online Store 2.0, then this is the best time to learn because Shopify is now accepting Shopify themes to be listed on their Shopify Theme Store!

This means you can make money by selling your Shopify themes! So are you interested to learn more?

In this course, we’re going to learn how to create a Shopify theme for Online Store 2.0 using Shopify CLI with the help of TailwindCSS to design a cool online store.

In this course you will learn:

  1. How to set up your development store using Shopify CLI 3.0
  2. Using TailwindCSS to design a Shopify theme
    • Create navigational bar
    • Create collection page
    • Create product page
    • Create customer page
    • Create cart page
    • and more!
  3. Online Store 2.0 (JSON Templates)
  4. Shopify CLI
  5. Shopify GitHub Integration
  6. Project management
  7. Schema Settings
  8. Search Engine Optimization (SEO) for pages like articles, products, etc.
  9. Liquid language (Referencing asset files, loops, conditional statements, Shopify objects, filters, and many more)
  10. Customer Templates

If you think you’re ready to start, signup now, and let’s create the best Shopify theme together!

Changelog

February 24, 2022

  • Updated/added new lesson(s)
  • Updated course description

February 19, 2022

  • Updated/added new lesson(s)
  • Removed deprecated lesson(s)
  • Edited course description
  • Added new resource(s)
  • Updated metadatas

January 25, 2022

  • Updated/created new lesson(s)
  • Removed deprecated lesson(s)
  • Added new resource(s)

December 03, 2022

  • Updated/created new lesson(s) for Shopify CLI 3.0
  • Updated course description

Shopify Theme Development: Online Store 2.0 + TailwindCSS

Shopify just recently updated their Shopify online experience and now they call it “Online Store 2.0”.

With this update, Shopify merchants can now customize their entire online store using sections & blocks. This opened a lot of doors not just for Shopify app developers but also for Shopify theme developers because now, you can add cool sections and blocks to the most commonly used pages like products page, collections page, blog page, etc. If you’re a Shopify theme developer and you don’t know yet how to create a Shopify theme for Online Store 2.0, then this is the best time to learn because Shopify is now accepting Shopify themes to be listed on their Shopify Theme Store! This means you can make money by selling your Shopify themes! So are you interested to learn more? In this course, we’re going to learn how to create a Shopify theme for Online Store 2.0 using Shopify CLI with the help of TailwindCSS to design a cool online store. In this course you will learn:
  1. How to set up your development store using Shopify CLI 3.0
  2. Using TailwindCSS to design a Shopify theme
    • Create navigational bar
    • Create collection page
    • Create product page
    • Create customer page
    • Create cart page
    • and more!
  3. Online Store 2.0 (JSON Templates)
  4. Shopify CLI
  5. Shopify GitHub Integration
  6. Schema Settings
  7. Search Engine Optimization (SEO) for pages like articles, products, etc.
  8. Liquid language (Referencing asset files, loops, conditional statements, Shopify objects, filters, and many more)
  9. Customer Templates
If you think you’re ready to start, signup now, and let’s create the best Shopify theme together!

How To Create Easy Cart Drawers in Shopify (without Shopify apps)

So you have a Shopify store but you personally don’t like how you have to visit the cart page just to see the total amount you need to pay or to proceed to the checkout page. Well, in this article, we will be learning how to create an offset canvas or a cart drawer that displays the items inside of a Shopify store cart without installing Shopify apps.

Video Tutorial

If you prefer watching video tutorials rather than reading, then you can watch the video version of this article below:

Getting Started

Before we can start displaying the items from our cart, we, obviously, need to create the offset canvas or the drawer first. Now, I just want to make a shoutout to Tomasz Bujnowicz for making this amazing easy sliding drawer. So credits to him for making this lesson easier to accomplish.

Anyway, let’s begin! Open your Shopify store admin page and access your code editor.

Then, go to the assets folder and create two asset files:

  • drawer.css
  • drawer.js

Once you have created the two files, open them and apply the following codes:

Drawer.css

For the styles of the drawer, copy the following code:

.drawer {
  display: none;
}

.drawer__header {
  padding: 1.5rem;
  display: flex;
  justify-content: space-between;
  align-items: center;
  border-bottom: 1px solid #ddd;
}

.drawer__close {
  margin: 0;
  padding: 0;
  border: none;
  background-color: transparent;
  cursor: pointer;
  background-image: url("data:image/svg+xml,%0A%3Csvg width='15px' height='16px' viewBox='0 0 15 16' version='1.1' xmlns='http://www.w3.org/2000/svg' xmlns:xlink='http://www.w3.org/1999/xlink'%3E%3Cg id='Page-1' stroke='none' stroke-width='1' fill='none' fill-rule='evenodd'%3E%3Cg id='2.-Menu' transform='translate(-15.000000, -13.000000)' stroke='%23000000'%3E%3Cg id='Group' transform='translate(15.000000, 13.521000)'%3E%3Cpath d='M0,0.479000129 L15,14.2971819' id='Path-3'%3E%3C/path%3E%3Cpath d='M0,14.7761821 L15,-1.24344979e-14' id='Path-3'%3E%3C/path%3E%3C/g%3E%3C/g%3E%3C/g%3E%3C/svg%3E");
  width: 15px;
  height: 15px;
}

.drawer__wrapper {
  position: fixed;
  top: 0;
  right: 0;
  bottom: 0;
  height: 100%;
  width: 100%;
  max-width: 500px;
  z-index: 9999;
  overflow: auto;
  transition: transform 0.3s;
  will-change: transform;
  background-color: #fff;
  display: flex;
  flex-direction: column;
  -webkit-transform: translateX(103%);
  transform: translateX(103%);
  -webkit-overflow-scrolling: touch;
  box-shadow: 0 2px 6px #777;
}

.drawer__content {
  position: relative;
  overflow-x: hidden;
  overflow-y: auto;
  height: 100%;
  flex-grow: 1;
  padding: 1.5rem;
}

.drawer.is-active {
  display: block;
}

.drawer.is-visible .drawer__wrapper {
  -webkit-transform: translateX(0);
  transform: translateX(0);
}

.drawer.is-visible .drawer__overlay {
  opacity: 0.5;
}

.drawer__overlay {
  position: fixed;
  top: 0;
  right: 0;
  bottom: 0;
  left: 0;
  width: 100%;
  z-index: 200;
  opacity: 0;
  transition: opacity 0.3s;
  will-change: opacity;
  background-color: #000;
  -webkit-user-select: none;
  -moz-user-select: none;
  -ms-user-select: none;
  user-select: none;
}
Code language: CSS (css)

Drawer.js

For the JavaScript of the drawer, copy the following code:

var drawer = function () {
    if (!Element.prototype.closest) {
      if (!Element.prototype.matches) {
        Element.prototype.matches = Element.prototype.msMatchesSelector || Element.prototype.webkitMatchesSelector;
      }
      Element.prototype.closest = function (s) {
        var el = this;
        var ancestor = this;
        if (!document.documentElement.contains(el)) return null;
        do {
          if (ancestor.matches(s)) return ancestor;
          ancestor = ancestor.parentElement;
        } while (ancestor !== null);
        return null;
      };
    }
    var settings = {
      speedOpen: 50,
      speedClose: 350,
      activeClass: 'is-active',
      visibleClass: 'is-visible',
      selectorTarget: '[data-drawer-target]',
      selectorTrigger: '[data-drawer-trigger]',
      selectorClose: '[data-drawer-close]',

    };


    var toggleccessibility = function (event) {
      if (event.getAttribute('aria-expanded') === 'true') {
        event.setAttribute('aria-expanded', false);
      } else {
        event.setAttribute('aria-expanded', true);
      }
    };


    var openDrawer = function (trigger) {
      var target = document.getElementById(trigger.getAttribute('aria-controls'));
      target.classList.add(settings.activeClass);
      document.documentElement.style.overflow = 'hidden';
      toggleccessibility(trigger);


      setTimeout(function () {
        target.classList.add(settings.visibleClass);
      }, settings.speedOpen);
    };

    var closeDrawer = function (event) {
      var closestParent = event.closest(settings.selectorTarget),
        childrenTrigger = document.querySelector('[aria-controls="' + closestParent.id + '"');
      closestParent.classList.remove(settings.visibleClass);
      document.documentElement.style.overflow = '';
      toggleccessibility(childrenTrigger);
      setTimeout(function () {
        closestParent.classList.remove(settings.activeClass);
      }, settings.speedClose);
    };
    var clickHandler = function (event) {
      var toggle = event.target,
        open = toggle.closest(settings.selectorTrigger),
        close = toggle.closest(settings.selectorClose);


      if (open) { openDrawer(open); }
      if (close) { closeDrawer(close); }
      if (open || close) { event.preventDefault(); }
    };


    var keydownHandler = function (event) {
      if (event.key === 'Escape' || event.keyCode === 27) {
        var drawers = document.querySelectorAll(settings.selectorTarget),
          i;
        for (i = 0; i < drawers.length; ++i) {
          if (drawers[i].classList.contains(settings.activeClass)) {
            closeDrawer(drawers[i]);
          }
        }
      }
    };

    document.addEventListener('click', clickHandler, false);
    document.addEventListener('keydown', keydownHandler, false);
};

drawer();
Code language: JavaScript (javascript)

Creating the cart drawer

Now that we finally have the style and the JavaScript code for our cart drawer, we can now create the HTML of the drawer.

Open your Shopify code editor once again and in the sections folder, create a new section file and name it drawer.liquid and apply the following code:

<section class="drawer" id="drawer-name" data-drawer-target>
  <div class="drawer__overlay" data-drawer-close tabindex="-1"></div>
  <div class="drawer__wrapper">
    <div class="drawer__header">
      <div class="drawer__title">
        Continue Shopping
      </div>
      <button class="drawer__close" data-drawer-close aria-label="Close Drawer"></button>
    </div>
    <div class="drawer__content" id="cart__drawer">
      <div id="cart__drawer_items">
      </div>
      <div style="margin-top: 50px">
        <h4>Total: <span id="cart__total_price"></span></h4>
        <a id="cart__checkout_btn" href="/checkout" class="btn btn--has-icon-after cart__continue-btn" style="width:100%;">Proceed Checkout</a>
      </div>
    </div>
  </div>
</section>


<script>
  fetch('/cart.js')
  .then((resp) => resp.json())
  .then((data) => {
    
    if(data.items.length > 0) {
        data.items.forEach(function(product, index) { 
          document.getElementById('drawer_cart_items').innerHTML = '<img src="' + product.featured_image.url + '" alt="' + product.featured_image.alt + '"><h5>' + product.title + '</h5><p>' + product.quantity + ' x ' + theme.Currency.formatMoney(product.line_price, theme.moneyFormat) + '</p>';
      	});
    } else {
      document.getElementById('drawer_cart_items').innerHTML = '<p>Cart is empty</p>';
      document.getElementById('drawer_checkout_btn').setAttribute('disabled', 'disabled');
      document.getElementById('drawer_checkout_btn').style.pointerEvents = 'none';
    }
    
    document.getElementById('drawer_total_amount').innerHTML = theme.Currency.formatMoney(data.total_price, theme.moneyFormat);
    
  });
</script>
Code language: HTML, XML (xml)

Awesome! Now that we have all of the codes that we need, we can finally reference all of them in our theme.liquid. So open your theme.liquid and add the following objects inside of the head tag of your theme.liquid:

{{ 'drawer.css' | asset_url | stylesheet_tag }}
{{ 'drawer.js' | asset_url | script_tag }}Code language: JavaScript (javascript)

Next, reference your drawer.liquid using the section tag inside of the body tag of your theme.liquid.

{% section 'drawer' %}Code language: JavaScript (javascript)

Awesome! Now, the last thing that we need to do is to customize our header.liquid to trigger the drawer.

Go to your sections folder and open the header.liquid. Once opened, look for the anchor tag ( <a></a> ) that uses either of the following href attribute values:

  • {{ routes.cart_url }}
  • /cart

For example, I have the following:

You can always find these elements using the search box ( CTRL + F ).

Once you have found it, replace the value of href attribute with a number sign symbol ( # ).

Then, we’ll apply the following attributes to this anchor tag.

data-drawer-trigger aria-controls="drawer-name" aria-expanded="false"Code language: HTML, XML (xml)

So, it should look like this now:

<a href="#" class="site-header__icon site-header__cart" data-drawer-trigger aria-controls="drawer-name" aria-expanded="false">
  {% include 'icon-cart' %}
  <span class="icon__fallback-text">{{ 'layout.cart.title' | t }}</span>
  <div id="CartCount" class="site-header__cart-count{% if cart.item_count == 0 %} hide{% endif %} critical-hidden" data-cart-count-bubble>
    <span data-cart-count>{{ cart.item_count }}</span>
    <span class="icon__fallback-text medium-up--hide">{{ 'layout.cart.items_count' | t: count: cart.item_count }}</span>
  </div>
</a>Code language: HTML, XML (xml)

Save the file. Now, that should allow you to display/hide the drawer whenever you click the Shopping bag button.

Conclusion

There you have it! That’s how simple it is to create a drawer for your Shopify stores. Now, for simplicity reasons, this is still not the best way to create a drawer for your Shopify stores. I don’t know if you noticed but the content of the cart will only show once you have either refreshed the page or opened another page. That’s not effective right? So how do you fixed that? Well, that’s when you’ll have to use events for your Shopify theme.

5 Things I Wish I Knew When I Started Programming or Coding

As a programmer, it’s pretty interesting to see the changes and the things that you’ve realized along the way. I’m at this point where I’ve realized that programming isn’t THAT actually interesting. It’s fun , yes, but it’s not something that’ll make a conversation with friends super fun. I mean, what’s fun about codes? The output? That’s it?

Anyway, recently, I decided to make a video about the things that I wish I knew before I started programming and if you’re interested to watch a video instead of reading this blog, you can watch the video here:

Let’s start off by talking about myself and my experiences, to summarize my programming experience:

  • I started programming when I was 12.
  • My first programming language is ActionScript (AS2/3)
  • Then I moved on to PHP, HTML, CSS, and MySQL after learning AS3
  • Then, I tried to combine those programming languages so I can create a flash game. (Spoiler alert: Didn’t work)

And then I saw Unity. I learned it for a couple of years, and to me, that was the starting point of my programming career. I had my first client. I enjoyed it and so, after all of my experiences, I decided to take a Computer Science course. Unfortunately, I didn’t enjoy my computer science that much. It wasn’t that bad but felt more like a waste of time especially now. I’ve never been able to use that school experience anyway. So that’s my first wish…

1. Going To School To Learn Programming is a Waste of Time

Now, I’m not saying you should not go to school. I’m just saying that for me, I’ve learned more on my own rather than in school. In school, you will only learn a bit of C++, algorithms, HTML/CSS that even kids nowadays can figure out, and histories or language classes that don’t correlate with programming. All these subjects felt more like a waste of money and time.

So that’s one thing, I wish I knew before learning programming, that going to school to learn programming is a waste of time and effort.

If you’re new to programming and you still wish to go to university to study computer science, my advice for you is to study programming beforehand rather than relying on your upcoming teacher. Trust me, you will find it hard to learn programming in school especially if you easily get distracted by many things.

2. Don’t Let Yourself Go

Let’s face it. Most of us forget to take care of ourselves even unintentionally. When I was just starting, I spend more than 8 hours per day coding and the rest of the day is for playing (since I was still a kid after all) and working on other personal stuff. I used to get 3 hours of sleep every day. No joke. Until one day, I got tuberculosis. A sickness that ruined my plan to go overseas. It was hard and I blamed myself a lot for not taking care of myself.

We are all different and I get it. Maybe you can relate to what I have experienced, or maybe not. But there’s one thing to learn from this lesson. Not everything is about programming or coding. Someone’s entire life should not be surrounded only by codes. Programmers are not computers. We have a life to take care of. So if you’re just getting started, manage your time as much as possible or as soon as possible. Also, eat your veggies and workout for christ sake!

3. Learn Git As Early As You Can

As a programmer, you can’t get away from losing your own files. Also known as accidentally deleting your project.

I’m pretty sure you know what it feels like to lose important files right? Like losing your camera footage, family photos, etc.

I’m not going to lie to you. I just started using Git this year, 2021. Yes. I’m not kidding. Why? Well, I find it very time-consuming and I don’t really find it fun to do. I know that reason is very stupid but that’s just how I am.

I usually save or back up my files using my other drives and to me, that’s better compared to using Git. However, after using Git this year, I realized that I’m missing a lot of the good stuff. Using Git is very convenient. You see the changes that you made in your files. You can easily retrieve your files in case you accidentally deleted them. You can share it with other programmers and most importantly, you save space in your disk drive.

4. Working In TECH Company Is No Fun

Don’t get me wrong, not everyone will have the same experience as me.

I just wish I knew back then that not everything that you see online is real. You could say that I expected too much and that was my mistake and that’s why I included this here.

You know those videos that you see on YouTube? The “dAy In A LiFe oF a sOftWaRe EnGinEeR”? Those videos kind of like misled me to the wrong idea of how is it like to work in a tech company. In those videos, mostly, you see the “software engineer” spend most of his/her entire time eating or playing with other employees. That’s not what I experienced! “Wow, you guys are getting free foods? lots of breaks?” That’s what I said to myself.

Maybe I picked the wrong company.

Don’t get me wrong, not all tech companies are bad but if you’re going to study programming just because of these videos? Boy, oh boy you’re just about to get baited. If you’re watching those videos, don’t take them seriously. Most of these videos are for entertainment purposes only and obviously, they will not show the “real” work because like I said before, coding is no fun to watch or talk about.

5. Your Worth is Important

When I was just starting, I get paid like below minimum salary. For years, I’ve had that same pay and I never complain about it because how could you? You see yourself not worthy enough to get paid higher.

For your first year maybe it’s fine because you’re just getting started but as time goes by, you should start seeing your worth. How much should you get after your first year? How much after five years and so on and so forth.

Being a programmer is hard. It’s not a kind of job where you can easily produce one thing right after the other. So know your worth.

Also, I can’t stress this enough, don’t work for FREE!

Don’t get fooled by someone saying: “You’ll get exposure if you work for us”

Just don’t. It’s never going to help you at all. These employers are just too greedy to the point where they’ll do anything to get something for free. If you encounter someone like this, run from it!

Conclusion

Learning how to code is such a process. Just like everything else in this world. So if you’re new to coding, I hope you find some of the pointers here helpful. Otherwise, do you have something that you wish you knew before learning how to code? Do you have some tips that you can give to yourself if you can travel back in time? Let us know in the comments below.


Shopify App Development – How to Create Shopify Apps?

Shopify app development is an opportunity given to developers to help hundreds of thousands of Shopify stores. While doing so, they can earn as much as the entrepreneurs just by building for the Shopify App Store.

What is Shopify?

It’s such an understatement if you say that Shopify is just an eCommerce software. Technically it is, but personally speaking, Shopify is one of the best eCommerce platforms that provides everything you need to start selling not just online, but also on social media and in person.

Shopify is completely cloud-based and hosted, which means there’s no need for you to worry about the servers and such. Just create an account and you’re good to start.

But of course, we’re going to focus more on Shopify app development and why you should build apps.

So…

Why Develop Shopify Apps?

According to Shopify, 87% of Shopify entrepreneurs rely on Shopify apps to run their businesses. Not only that, it is expected to see more growth in the next few years coming.

Shopify apps gaining more growth since 2016

So why not develop Shopify apps when it’s clear that this could be a double win for both parties?

Now you might be asking…

How much does Shopify developers make?

According to Shopify, there are two ways to make money with your shopify apps:

  1. Create Shopify apps for your clients, which means the app is not yours once you have sold them to your clients.
  2. Create Shopify apps for Shopify store and sell them and you’ll earn 80% of each app sale.

On average, you can earn somewhere around $2000 per month. However, this all depends on how much your Shopify app is going to be. It also depends on which category your Shopify app is located.

Average price of Shopify apps per category - How much is Shopify apps?

In the graph given above, if your app is for Inventory or Accounting, then there’s a higher chance that you’ll get more profit because both of these categories are really expensive. So if you’re targeting to earn more money, then building apps for Inventory and Accounting is your best option.

Shopify App Development - What if my app is free?

Good question! What if your Shopify app is free?

How are you gonna make money with that?

There are ways to earn money with free Shopify app, your first option is to divide your app into two versions, first is a standard version which is free, and the other one is the PRO version which is the paid version.

Find Shopify Products with Oberlo

To make your chances of earning higher, make sure your PRO version provides really helpful features.

For example, your app is a dropshipping app. With the free version, you can only let users import 1000 products whereas, in paid version, you can import an infinite amount of products.

Another option is to give the users a number of days trial.

For example, your app can only be free for 14 days. After that, users will need to pay you monthly for the subscription.

All up to you.

But what is recommended? like really?

Well, personally, I like my apps to be free for a couple of weeks and then make them pay for the subscription once they like the app. This way, I can confirm that they will use my apps longer than I expect them to.

You can also combine them.

For example, you can give users 14-day free trial and then ask users for monthly subscriptions and at the same time, they can upgrade their app to PRO plan.

Getting Started

I have written already a complete guide on how to create Shopify apps using PHP. So in this article, I’ll just provide you the summary of it. However, if you’re interested in reading the step-by-step guide. Then I recommend you to follow this link:

To start making your app, login your account to Shopify developer website and if you don’t have an account yet. I suggest you create one.

Once you’re logged in, follow these steps:

Start making your Shopify app with PHP
  1. Proceed to left navigation panel and click the Apps category
  2. Click Create app and fill out the form
    • App Name â€“ The name of the shopify application you’re about to create.
    • App URL â€“ The URL of your website where you’re going to upload your Shopify files
    • Whitelisted Redirection URL(s) â€“ This is where you’re going to list your generate token script or URLs you need as you Authenticate your Shopify.
  3. click Create app

After that, Shopify developer will provide you your API key and Secret key. These two keys are used for authenticating your app to stores.

Shopify API

Next thing you need is an API, like what I have mentioned in my Shopify app development tutorial, you can use different APIs, but personally, I use Shopify API Client made by Alex. It’s very simple and easy to use.

Installing Shopify apps to stores

Next thing you need is the files to connect your app to stores, or let’s just say, let users install your app on their store. In this article, we’re going to use PHP to create the app. So, go ahead and create a new file and call it install.php and copy the following code:

<?php
$shop = $_GET['shop'];
$domain = $_SERVER['SERVER_NAME'];

$api_key = "ASSIGN YOUR API KEY HERE";
$scopes = "read_orders,write_products";

$redirect_uri = "http://".$domain."/token_generator.php";

$install_url = "https://" . $shop . "/admin/oauth/authorize?client_id=" . $api_key . "&scope=" . $scopes . "&redirect_uri=" . urlencode($redirect_uri);

header("Location: " . $install_url);
die();
Code language: PHP (php)

Make sure you change the value of API key to what was given to you by Shopify. Otherwise, the script won’t work.

Generating Token

Next, create a new PHP file and call it token_generator.php and copy the following code:

Keep in mind that both install.php and token_generator.php should be uploaded in the same folder. Unless you want to organize your files then you need to reference it correctly by changing the value of redirect_uri in the install.php file.

<?php
//Include your Shopify API
require_once("inc/functions.php");

//Change the value of these two
$api_key = "ASSIGN YOUR API KEY HERE";
$secret_key = "ASSIGN YOUR SECRET KEY HERE";

$params = $_GET; // Retrieve all request parameters
$hmac = $_GET['hmac']; // Retrieve HMAC request parameter

$params = array_diff_key($params, array('hmac' => '')); // Remove hmac from params
ksort($params); // Sort params lexographically
$computed_hmac = hash_hmac('sha256', http_build_query($params), $secret_key);

// Use hmac data to check that the response is from Shopify or not
if (hash_equals($hmac, $computed_hmac)) {
	// Set variables for our request
	$query = array(
		"client_id" => $api_key, // Your API key
		"client_secret" => $secret_key, // Your app credentials (secret key)
		"code" => $params['code'] // Grab the access key from the URL
	);
	// Generate access token URL
	$access_token_url = "https://" . $params['shop'] . "/admin/oauth/access_token";
	// Configure curl client and execute request
	$ch = curl_init();
	curl_setopt($ch, CURLOPT_RETURNTRANSFER, 1);
	curl_setopt($ch, CURLOPT_URL, $access_token_url);
	curl_setopt($ch, CURLOPT_POST, count($query));
	curl_setopt($ch, CURLOPT_POSTFIELDS, http_build_query($query));
	$result = curl_exec($ch);
	curl_close($ch);
	// Store the access token
	$result = json_decode($result, true);
	$access_token = $result['access_token'];
	// Show the access token (don't do this in production!)
	echo $access_token;
} else {
	// Someone is trying to be shady!
	die('This request is NOT from Shopify!');
}
Code language: PHP (php)

Make sure you have downloaded the API provided above and then upload it to your host. Otherwise, you will get an error.

In this file, make sure to change again the value of both api_key and secret_key variables.

Another thing to keep in mind is that you need to personally keep your access tokens to be able to interact with the app. But what if other users did not receive their tokens? The answer is simple, you need to store the access token yourself so they won’t need to do such actions.

I have written an article on how to store these access tokens in two ways. I’m sure you will need this in the future so you might as well learn how to save it. Click the link below to learn more:

Testing the Shopify App

Once everything is set up, you may go to your project URL and run install.php. To do this, you must include the GET variable shop in the URL. For example: 

https://mydomain.com/install.php?shop=mystorename.myshopify.com

After that, hopefully you’ll see something like this:

Installing shopify app to a store using Shopify App Development Tutorial with PHP

There you have it! Your Shopify app is now ready to be built. Of course, it’s not finished yet because you still have to plan what kind of app you want to create.

So if you are interested, I have made a tutorial on how to display Shopify products and its components like prices and such. This could help you understand how to communicate with Shopify API.

Brainstorming Ideas for the App

Whenever I develop Shopify apps, I usually design the app first. What I mean by that is, I set up the app first to make sure that everything is ready for users for installation.

It’s all up to you.

You can also brainstorm first, get ideas about what kind of app you are going to create. Now, keep in mind that there’s no right or wrong here. Just stay in your comfort zone and develop the app.

Now let’s start brainstorming!

For example, you’re planning on developing an app which tells the Shopify store owners about their statistics. Now, you may ask yourself these questions:

  • What is the purpose of this app?
  • What features are you going to add in this app that has not been added by your competitors?
  • How much is this app going to be?
  • How much is my budget?
  • Where am I going to promote this app? and How?
    and last but not least…
  • How long is my development going to be?

It is very important to know the answers first for the questions above. That way, you will understand your app better than anyone else.

Recommendations

Whenever you develop a Shopify app, you may do the following especially if you want conveniences:

  • List all your app features
  • Create a dummy store
  • Add more useful stuff as much as possible
  • Prevent yourself from making a private app
  • Do research (Lots of research). We offer a ton of tutorials for Shopify app development
  • Most importantly: Test your app always!

It is highly recommend to double check every single part of the app especially if you’re planning on publishing the app to the Shopify app store.

FREE Shopify Dropshipping Training in 2021

Are you wishing to have your own business? Do you want to learn how to earn $214,057/month with dropshipping? Look no more because you’re about to learn how to dropship with Shopify. In this training course, you’ll learn:

  • What is Dropshipping
  • Why you should start a dropshipping business
  • Disadvantages of Dropshipping
  • How to create a dropshipping store with Shopify
  • Marketing Strategy for Dropshipping

Now before we go in-depth about dropshipping, let’s understand first what is dropshipping.

What is Dropshipping?

Dropshipping is a business that allows you to market and sell products without actually having the products itself or anything related to items like inventory and storage.

What happens is, when the buyer buys an item in your online store, your only task is to notify the supplier that someone is buying an item and the supplier will take care of the delivery.

In other words, your online store is only the facade of the business.

Why Should I Start a Dropshipping Business?

There are many reasons why you should start a dropshipping business:

  • Easy To Get Started, running a dropshipping business is much easier than building an actual store. With drop shipping, you won’t have to worry about warehouse management, orders, inventory, returns, etc.
  • A Little Capital is Enough, you don’t need to spend thousands of dollars to start a dropshipping business. In fact, you don’t have to spend anything at all! For 14-days, you can start running an online store (Free trial) using Shopify. Once you have created a store, you may start using free apps like Oberlo to import products to dropship.
  • Location is not a problem, you can run your dropshipping business anywhere you like! It could be in your home, office, or outside as long as there is an internet connection that will allow you to communicate with the suppliers and customers.
  • Stable Growth, Since 2018, e-commerce started to grow by 10% and it is expected to grow at more than 20% rate by 2022 and it is also predicted to exceed its total amount up to $5.5 trillion. If you start building your own e-commerce business at this point in time, you can expect your business to grow as time goes by but of course, you need to work hard for that to happen.

You might be thinking that it’s really simple to run an e-commerce business and tell you what, it is! However, these conveniences always come with disadvantages.

Disadvantages of Dropshipping

  • Too many competitors, this is one of the biggest disadvantages of dropshipping. Since dropshipping is easy to get started and the costs are so small. Everyone will hop in and start there own business and sell items at the very minimum prices just to grow their revenue.
  • Suppliers issue, if your products come from different suppliers- You may not be able to track all the items that are in and out of stock. Also, there will be times that you can’t contact the suppliers at any time and that will cause you lots of problems and you may lose customers. Another issue with suppliers is that there will be times that they can’t fulfill the orders and when that happens, you’re the one who’ll be getting the blame and responsibility. This could ruin a business if not taken care of seriously.
  • Shipping fees, let’s say you have too many products and they are being handled by different suppliers. Now if a customer buys three items, these items could have different shipping fees due to the items are being handled by different suppliers and the fees are up to them.
Top view photo of dropshipping ships ready to deliver items to buyers from shopify stores

Is it worth a try?

Yes! I do believe it’s still worth a try. Sure, you may encounter issues on the run but there will be always a solution for each problem and it’s all your responsibility to handle them.

If you haven’t started building your dropshipping business yet then I highly suggest you do multiple research first and make sure you have enough knowledge to make sure you succeed in this industry. But don’t worry, we’re also here to make sure you’ll be getting enough knowledge for you to start building a profitable e-commerce business.

I’ve tried recently if Shopify dropshipping still works in 2021. Here’s my research:

How can I start dropshipping?

One of the easiest ways to start a dropshipping business is by using an integrated product marketplace and an e-commerce platform. That may sound too complicated but don’t you worry. It’s very easy and will cost you a very minimal cost.

One of the most used apps to start dropshipping is Oberlo, it is a Shopify dropshipping app that makes it very easy to manage products directly into your store so you can start your business as soon as you create your store.

If you don’t have a Shopify store yet, you can sign up and get a 14-day trial for free! Wait, I thought you said it’s free? Didn’t you say that? What if the 14-day trial ends? Am I gonna need to start paying? Well to answer your question. You can start a dropshipping business for free by building your website yourself using free web hosting. Unfortunately, that will take you a lot of time and that’s why we are going to mainly focus on using Shopify instead to build a dropshipping store.

Now, to start the process of building a dropshipping e-commerce business. You’re required to have the following:

  • A concept that is marketable
  • A source of goods
  • Sales channels
  • Marketing Strategies

Marketable Concept

Now here’s where it starts to get a little rough. When you conceptualize, ask yourself.

  • What’s the name of my store?
  • What could be the niche of my business?
  • Which theme am I going to use for my store?
  • What items am I going to sell for customers?
  • How am I going to promote my store?
  • What is my budget?

Store name

Naming your store is very easy. However, you’re gonna need a little time to make sure that your name is not taken by other stores. Don’t use Google search! You don’t need to use that to come up with names. Use your ideas. Go brainstorm and actually come up with a catchy name. Now hear me out, there are many things that you should consider before you come up with a name like what niche is your store is gonna be? what products are you going to sell? and who are your target customers?

These questions are really important because you’re making a brand name and that’s something that your customers’ gonna remember for the rest of their life.

Store design

This is also important. The design of your store is not just to serve your customers with a good looking shop. This is also needed to be considered in both style and speed.

Keep in mind that your store is an online store. If your online store is slow to load, chances are you won’t be getting many customers. Because they’ll be leaving your store if it’s not loading fast enough. I have written an article about Shopify themes that you can use as your inspiration and I have found out that some of them are really fast to load. So I highly recommend you to check that out.

Designing your Shopify store is not that hard anymore since Shopify themes are customizable and very easy to edit. Just go to Shopify store admin dashboard and proceed to your sales channels. Then you can see under sales channels the themes navigation.

There you can customize your current Shopify theme.

Photo of Shopify Sales channels to change and edit shopify themes for dropshipping business

One of the reasons why you should choose Shopify to run your dropshipping business is because your shop is mobile-friendly. Most people nowadays are using smartphones especially when they shop online. So if you’re worried about your store not being responsive to mobile phones then you don’t have to worry much about that. Shopify will save your day.

The source of items

Let’s say you have finally created your Shopify store and it’s already designed with a cool and fast Shopify theme. What do you think is the next thing you should add to your store? That’s correct. The items. There are many ways for you to easily find items to sell as long as you know what your niche is.

Oberlo

Oberlo is a dropshipping Shopify app which allows you to find all trending products to sell online, and then add them to your Shopify store. Oberlo is 100% free and no credit card required.

How to Install Oberlo to Shopify?

Installing Oberlo to your Shopify store is just really easy. All you need to do is go to Shopify App Store and search for Oberlo.

Image of Oberlo about to install to a Shopify Store for dropshipping business

Then click Install app.

Install Oberlo App to Shopify Dropshipping store

How to add products using Oberlo?

To add new products to your Shopify store using Oberlo, go to oberlo app and navigate to Search products.

Adding products to shopify store using oberlo app

Below, you can see the best-selling products that are being suggested by Oberlo. However, we’re not going to import any of that unless you wish to.

Oberlo search product for shopify ecommerce business

Let’s use the search bar for tutorial purposes. Go ahead and type in whatever item you want to search. For example, let’s go with Shoes.

Oberlo search product for shopify ecommerce business

Above, you can see that the search result gives us shoe products which we can import to our store. Let’s go and do that.

To do that, hover to any product you wanted to import and then click Add to Import list.

After Importing, proceed to left navigation panel and click Import list right below the Search products.

Importing products from Oberlo to Shopify Dropshipping business

In the image above, you can see that Oberlo already provided descriptions, collections, images, variants and so on. If you wish, you can customize these item. However, we’re going to do that here so go ahead and click Import to store.

And there you have it. The item is now on your store ready to be purchased.

Google Trends

If you are looking for a niche, Google Trends is a good place to start. It’s very simple, all you needed to do is to type in which item you’re most likely to sell for example shoes.

Google trends for you to find a good niche for dropshipping business

Now you can see how the interest over time of this product in Google Trends.

Keep in mind that the search term “Shoes” is just an example. You can search for a specific brand or item and see how it’s trending.

Google trends for finding good niche for shopify dropshipping business

Marketing Strategies for Dropshipping

Marketing a dropshipping business is no different from marketing a website.

If you are new to our blog, we provide effective marketing strategies for bloggers and these strategies are personally found by us, and let me tell you it’s 107% effective. So if this is effective for websites, then what more to e-commerce?

Conclusion

Building a business takes time and patience especially if it’s an e-commerce business. However, with tools like Oberlo. It is much easier to build a shop and start earning money.

But like I always say, there’s no guarantee that you will succeed in this industry. But if you work hard and managed to keep loyal costumers, surely you’ll be successful in the future.