So you’ve seen this ad somewhere, maybe on Facebook, that says that making an online store can bring you success easily- especially at this time of crisis.
There’s no doubt that Shopify is one of the best eCommerce platforms that help merchants create an online store in just very few steps.
However, should you really start a Shopify store in 2021?
The answer is yes. In fact, 2021 is the best year for you to start an eCommerce business. Why? because everyone is staying indoors browsing the internet and maybe doing online shopping.
If this is your first time and you have no idea what is an eCommerce then you may have to take a few more days or even weeks to do some research about building a successful Shopify store. In fact, I’ve studied eCommerce and Shopify for 12-months just to understand how it works and now I’m earning $2,305/monthly.
Don’t worry, we’re going to guide you through the basics and hopefully, you’ll understand what it is like to work as a Shopify store merchant.
Creating a Shopify Dropshipping store in 2021?
I’ve recently tried if Shopify dropshipping still works in 2021. Here’s my research:
Getting Started
Before you start building an online store, know that there are two possible outcomes to your business, success, and failure. Duh.
Like in most things, success happens if you truly know what you’re doing and you’re putting every time you have to your business. However, there are also instances that even if you believe that you know what you’re doing and you’re putting most of your time to your business, failure still comes and destroys your business.
Why are we mentioning these?
Most starters often think that eCommerce is an easy money maker or a very easy way to get success. That’s not true at all. Building an online store takes a lot of work, time, money, and patience.
But if you truly feel confident then keep on reading as we’ll cover more topics about building a Shopify store.
How much $$$ do you need to start a Shopify store?
You’ve probably heard somewhere that you’ll only need a few dollars to start a Shopify store. If that ‘few’ dollars means $50, then no, that will never take you somewhere. Yes, you can build an online store with that amount but it won’t bring you any profit at all.
Short answer, you’ll need an amount of $2000 or more.
But to be honest, the amount you need will depend on the niche of your Shopify store.
Why do you need that much money?
The reason why you need to have as much money as you possibly can is because you’ll be paying for the following fees:
Shopify fees
Transaction fees
Plugins (possibly)
Promotion fees
and other fees…
Not only that, but you’ll also have to pay for other services like web designs, logo designs, photography, and more. Especially if you can’t do those things by yourself.
Hopefully, everything made sense to you now that building an eCommerce business takes a lot of time especially if you’re doing it all by yourself.
For the Shopify fee, you’ll most likely spend $50 max especially if you just picked their basic plan. Shopify also offers the following plans:
Features
Basic
Shopify
Advanced
Online Store
✓
✓
✓
Unlimited Products
✓
✓
✓
Sales channels
✓
✓
✓
Staff members
2
5
15
Discount codes
✓
✓
✓
Abandoned cart recovery
✓
✓
✓
Transaction fees
2.0%
1.0%
0.5%
Professional reports
✓
✓
Advanced report builder
✓
Transaction fees
For the transaction fees, if you’re using the basic plan then you’ll have to pay their processing fee of 2.0% per transaction. Notice that the more you upgrade your store Shopify plan, the lesser transaction fee you’ll have to pay. Some people might think 2.0% is low but it’s actually very high and so you should upgrade to Shopify once you earn a good profit.
Plugins
For the plugins, you may have to install Shopify apps that may charge you monthly. If you’re just starting, then look for the free ones like Oberlo.
Promotion fees
Promotion fees. You’ll mostly spend all of your money on promotions like advertising or paying someone to promote your brand. This is the best way to get a profit.
How to start a Shopify store
Now that you have an idea of what it’s like to manage a Shopify store, let’s actually get started creating your Shopify store.
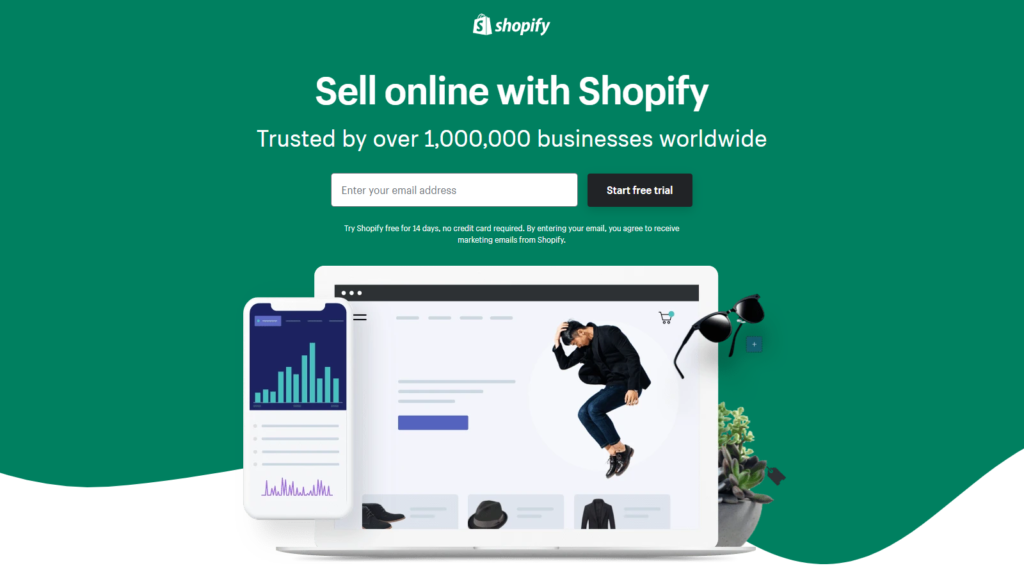
The first step to create a Shopify store is to obviously sign-up. Click the button below and get your free 14-day trial with Shopify.
It’s best to use this 14-day trial to study and roam around the system of Shopify. We suggest you learn as fast and much as you can because your time is very limited.
Store settings
For the first day, you should set up your store, payment methods, domain name, etc.
You should also start adding your products to your store through the product page. If you have a lot of products to sell, make sure you compile them into collections.
Store design
For the next 2 days, you should have your online store designed and ready to be published.
Most starters use the Debut theme but if you have a little knowledge with HTML/CSS, then we highly recommend you customize your store especially its colors and text fonts. Make sure everything blends together. If you’re looking for a store-design inspiration, we have made a list of the successful Shopify stores that you can look up to. They have great designs that you should definitely try to get inspired by.
It’s very important to make your store design as user friendly as possible and it should also have a personality. Do NOT bombard your store with too many Shopify apps as it will not only annoy your customers but also slow down your online store.
If you’re looking for Shopify app recommendations, we recommend the following apps:
The last 10 days should be the time you are promoting and selling your products.
There are many ways to promote your products.
Facebook Ads
Google Ads
Instagram Pages
Email Campaigns
Upselling
Advertisement
For Facebook ads, it’s best to keep your ads optimized otherwise you’ll end up spending a LOT of money. Make sure to target the people that are actually looking for your products. Same with Google Ads, although you’ll barely use Google Ads. Honestly, personally speaking, skip using Google Ads. It’s expensive and not really effective for Shopify stores.
Instagram Pages
For Instagram pages, you’ll have to prepare a few things. An HD video/image, depending on where you want your video to be posted (Instagram story or feed).
And of course, the cash to pay the page for promoting your video. Just make sure that they add the link to their bio.
The cost for this kind of promotion depends on the following of the page. The higher the follower, the higher the price. But be careful! A lot of Instagram pages have fake followers so make sure to check if their followers are actually active and interacting with the page’s posts.
Email Campaigns
Another way to get more sales is by using emails. When you want to notify your customers that you have a promo sale, sending them an email is the best way to do it.
Getting an email subscription is actually very easy. Luckily, there are hundreds of free Shopify apps that offer this kind of promotion.
Last day of trial
The last day of the 14-day trial should be the day that you decide if you’re going to keep the store or not. Otherwise, you’ll have to pay for the first month and you’ll have no choice but to keep going.
If you don’t have a product, then you’ll probably end up doing a dropshipping. If you don’t know what it means, it means that you’ll be selling products that are not in your hands. Once a customer purchases from your online store, you’ll have to buy the product from the wholesaler/retailer and they will take care of the delivery to the customer. We created a course on how you can create a dropshipping store for free.
Conclusion
There’s no denying that 2021 made our lives difficult. A lot of people lost their jobs and maybe you’re one of them and now you’re looking for an opportunity to earn a profit through Shopify. Yes, Shopify is definitely worth a try this 2021 especially that you can’t go out and find a new job. It might be scary to take risks but you’ll never know if you don’t try. Luckily, Shopify offers a 14-day trial so you can try eCommerce without risking any money.
Hopefully, this guide gave you an idea of what it is like to work as a Shopify store merchant or drop shipper.
We truly wish that your Shopify store become successful. Good luck!
I have been working with so many businessmen that I already know “their” secrets and how they successfully grow their business.
Running a business is genuinely fun, but it comes with its own set of challenges. When you start a business, it’s all on you.
You’re responsible for its growth… You’re responsible for its fall…
If you want to start a business to earn some money, then there are plenty of ways to do that. You can start a business like a coffee shop and sell… coffee or tea. If you’re a freelancer you can provide services in exchange for profit. etc. etc.
But let’s set the real-life business for now and focus on building yourself an online business since that’s what everyone is doing now.
Shopify Store Development
Welcome to the Shopify Store Development tutorial for beginners. In this tutorial, you’ll be learning how to set up a fully functional Shopify store from scratch ready to make sales in under an hour.
If you don’t have knowledge of Shopify, it’s okay. We’ll be guiding you through on how Shopify works and what else you can do after you set up your Shopify store.
After reading this tutorial, we’re hoping that you learn:
How to set up a Shopify store
Product researching
Dropshipping
and so on...
Now.
What is Shopify?
Shopify is an e-commerce platform that allows you to start, grow, and manage a business. With Shopify, you will be able to create a store and sell regardless of your location. You can sell your products literally to everyone around the world and not just that, with Shopify, you will understand how your business is doing. You’ll find how much sales you have earned in a month and so on.
Now, I’m sure that you already know that building yourself a business will require you a budget. Shopify requires you to pay for subscription fees. However, they can give you a 14-day free trial for testing purposes.
How Does it Work?
Some people say that if you want to start an online store, you should know how to design or develop a website. But that’s not the case at all! You don’t have to be a designer or developer to start a Shopify store. Shopify can help you design your store. Thanks to Shopify themes and apps.
Now that you already know how Shopify works. Let’s begin by signing up to Shopify’s 14-day trial. However, if you already have an account. You can skip this step and proceed to the next process.
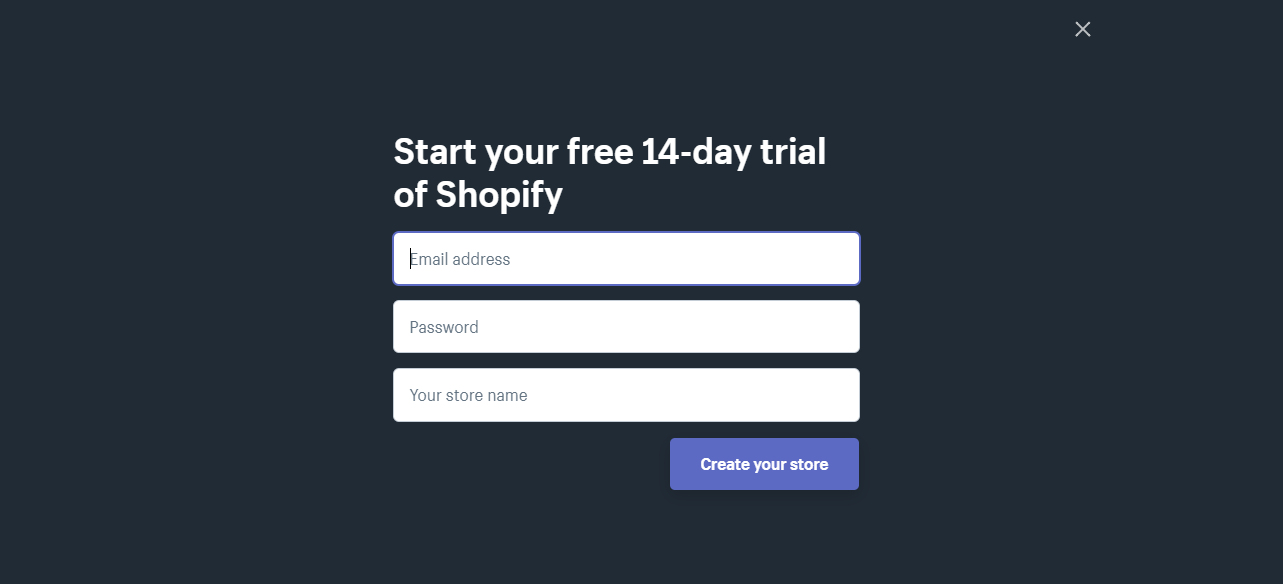
Signup to Shopify 14-day Trial
To help every entrepreneur start their online business, Shopify provided a 14-day trial. With this, you can learn how to use Shopify and kickstart your business to earn more sales.
To start, go to Shopify and click on Start free trial button located at the top right corner of the webpage.
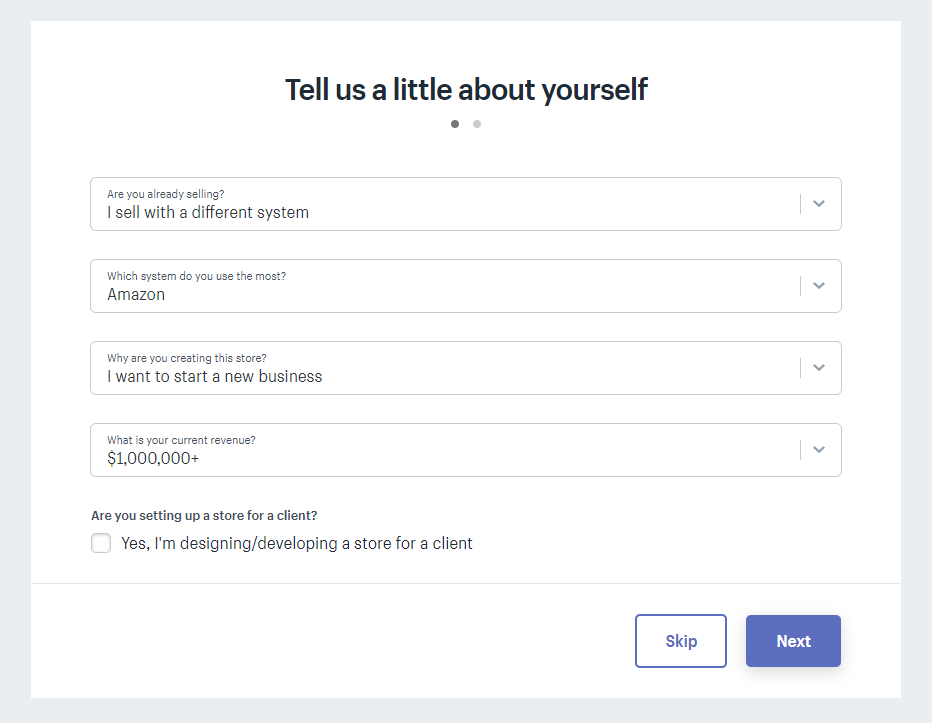
Next, you will be prompted to fill the following form:
There’s no proof about this. But, there is a theory that if you put a higher value at your current revenue, your store will be prioritized more. Maybe because they think that you’ll be able to pay Shopify and its customer services for longer.
This won’t hurt if you try. So go ahead and put the following values instead.
After that, just fill up the proceeding forms and create your store.
After filling up the forms, you’ll be redirected to your Shopify partner dashboard. We’re going to walk you through kind of what’s important in the sidebar menus and how to actually set everything up.
Online Store
When you jump into the online store section, Shopify will give you its default theme which is the Debut theme. It is important to pick yourself a new theme based on your niche. So for example, if you’re niche is about Men’s clothing. Then your store should portray its niche or to put it simply, it should look manly.
The point is, the frontend of your store is going to have a bigger role in your success. Make your store visitors feel like you’re a professional seller and make them trust you. Make them think that you’re worth their penny.
Some entrepreneurs think that the design doesn’t matter at all, it’s the product that you’re selling that matters.
I’m not gonna lie, it’s true that the quality of your products will give you more opportunities to be referred by your own customers to others.
But think about this for a second, every aspect of your store matters. The design, the products, the service, the cost, the price, everything. If you don’t take at least one of those seriously, then it will make an impact on your business.
Now go back to Shopify Partner Dashboard, and in the Online Store tab, theme section.
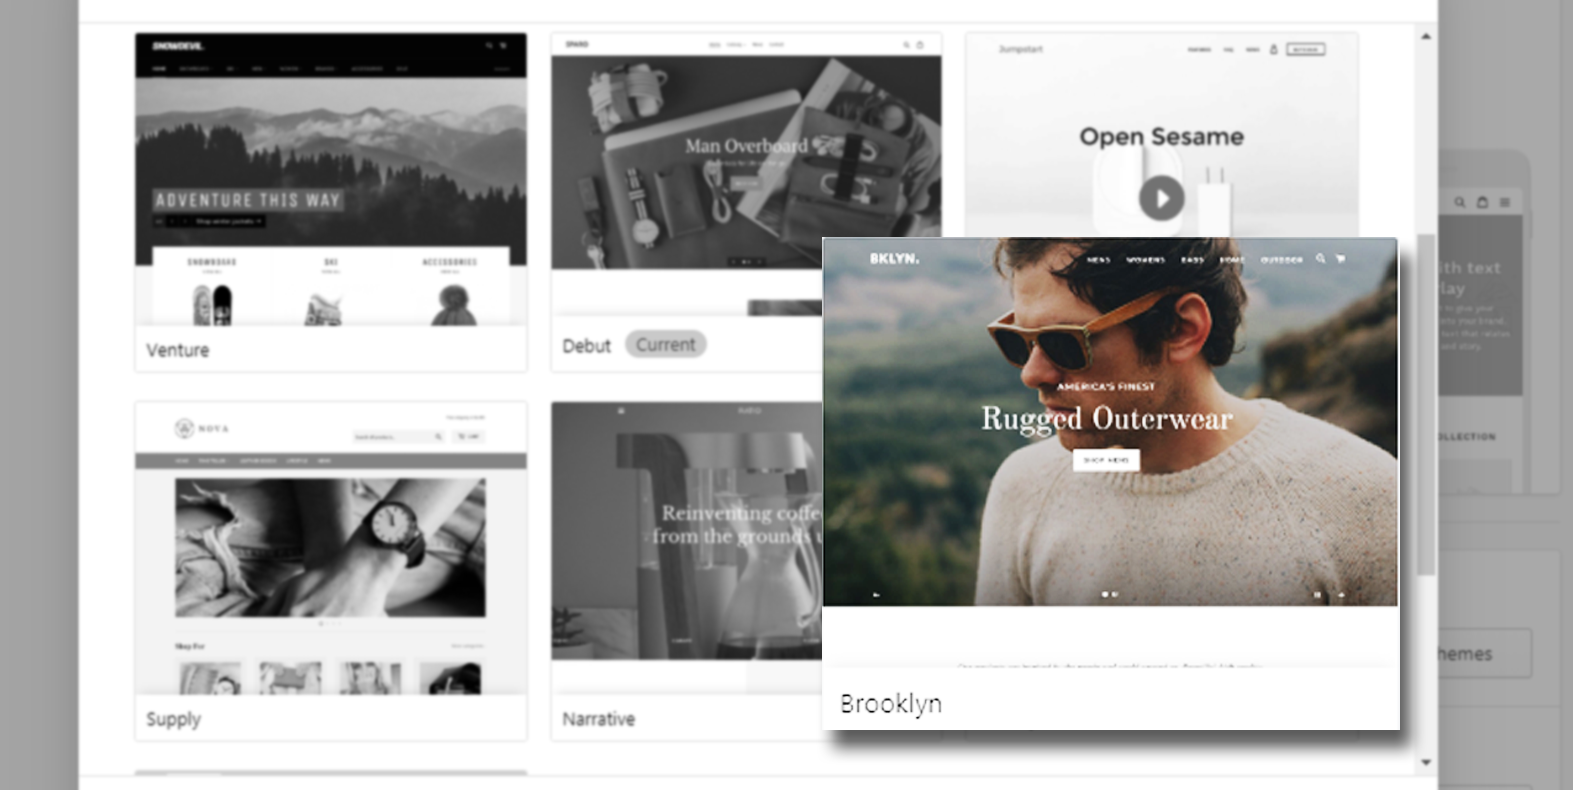
Underneath the current theme tab, you will see the theme library section. There are free themes and a Shopify theme store.
Select the free themes.
One of the themes that I recommend is Brooklyn, it is a free Shopify theme that you can use for any kind of niche that you can think of. It’s hella fast and responsive meaning it’s compatible with any device available.
If you don’t know already, most consumers buy their stuff using their mobile phone. So with this responsive theme, you’ll have the advantage of getting more sales.
Choose the classic version and click Add to theme library.
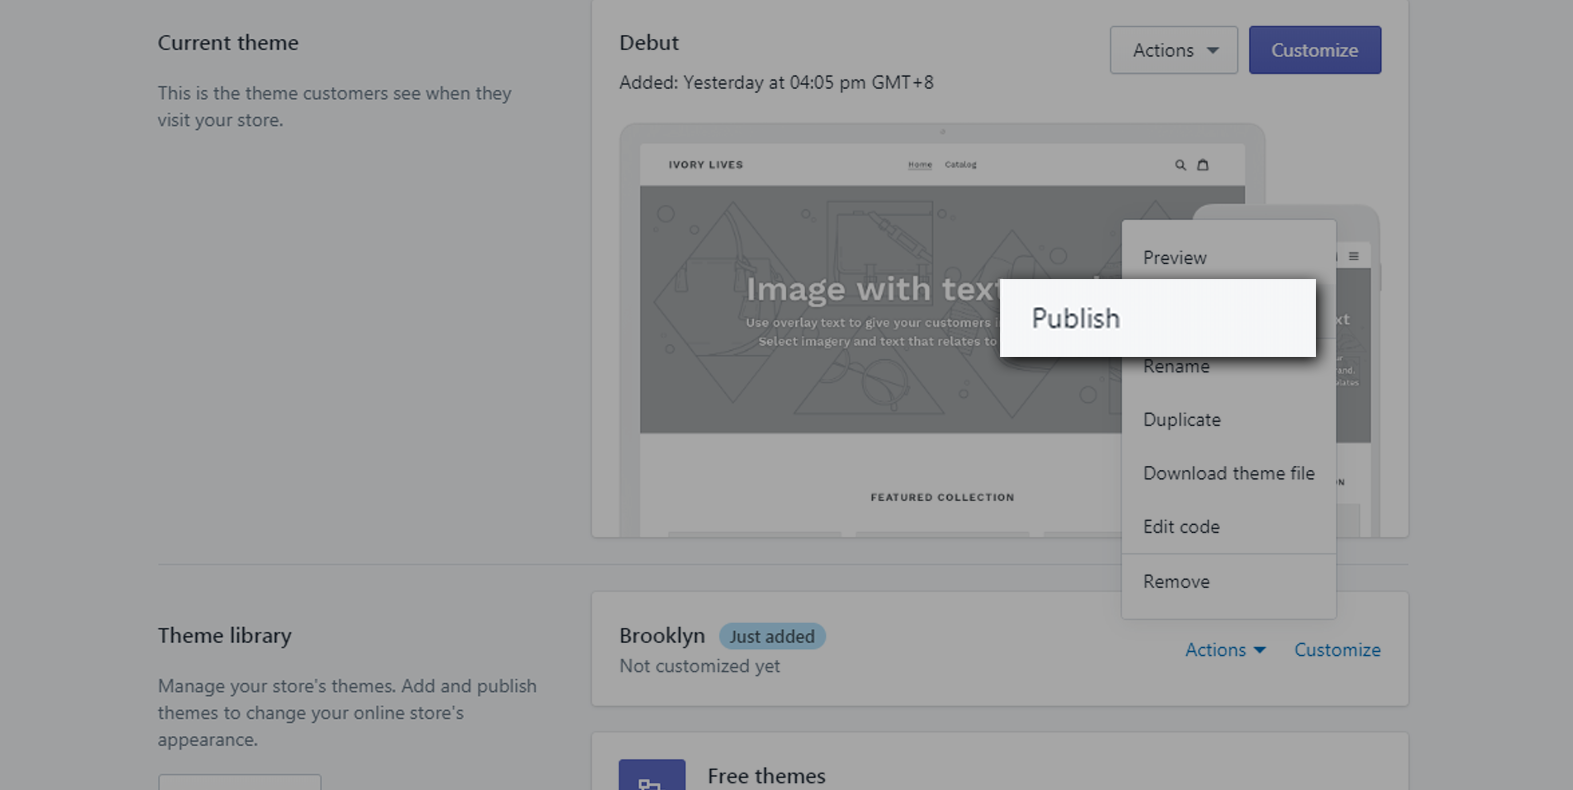
After its upload, click Actions and select Publish
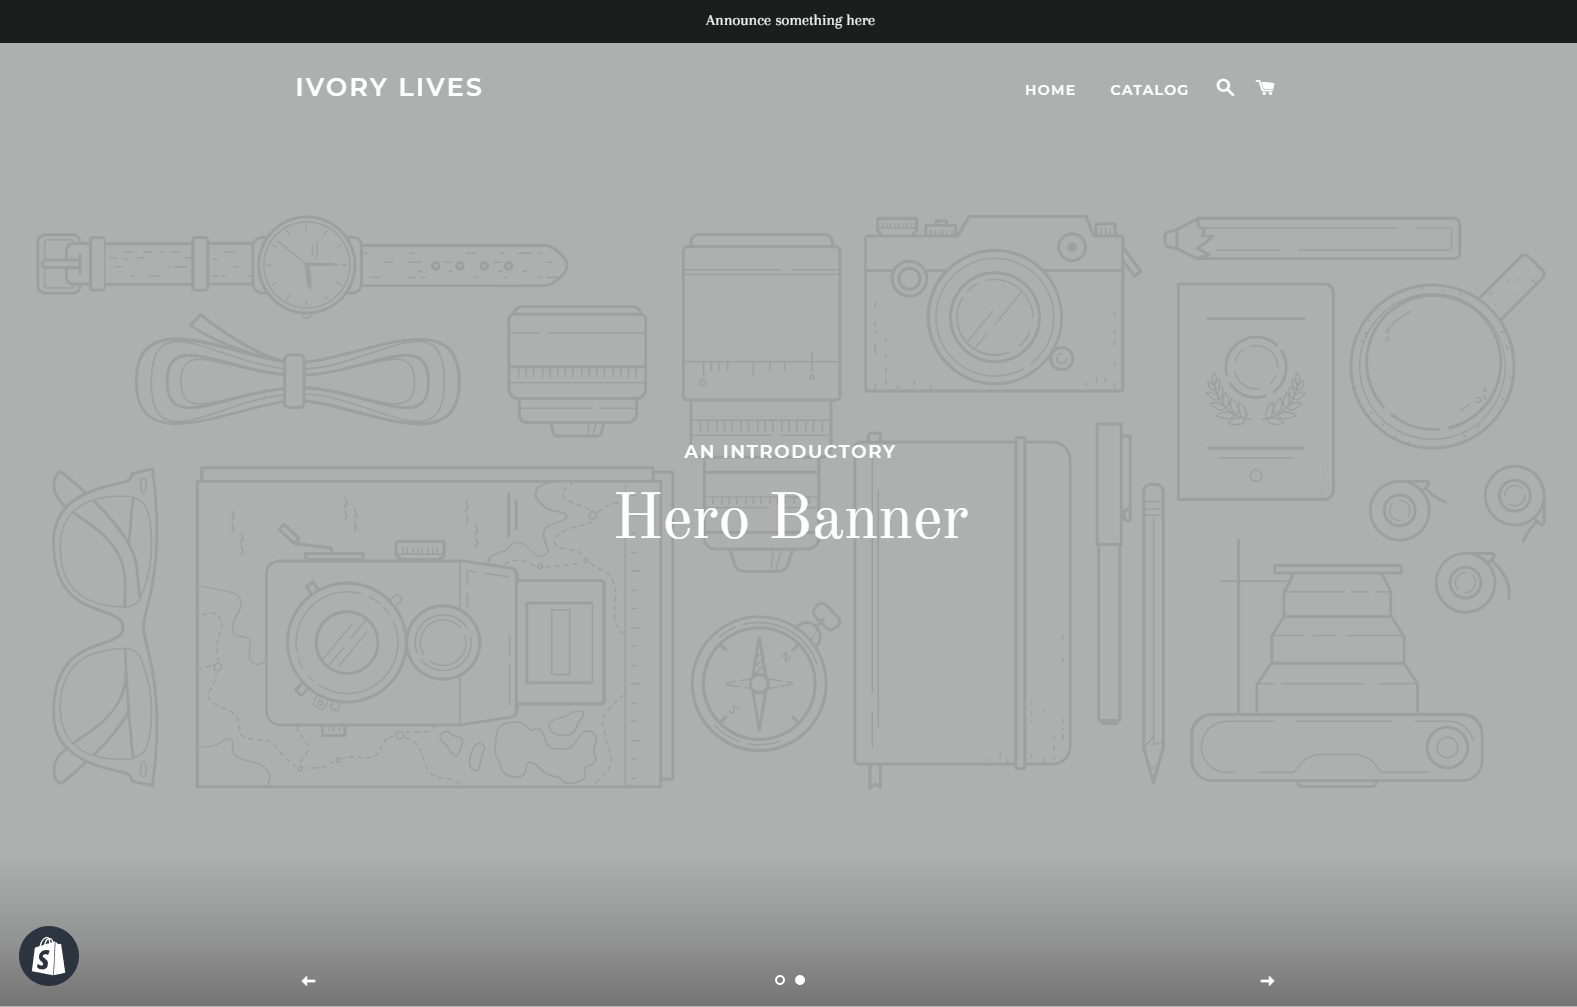
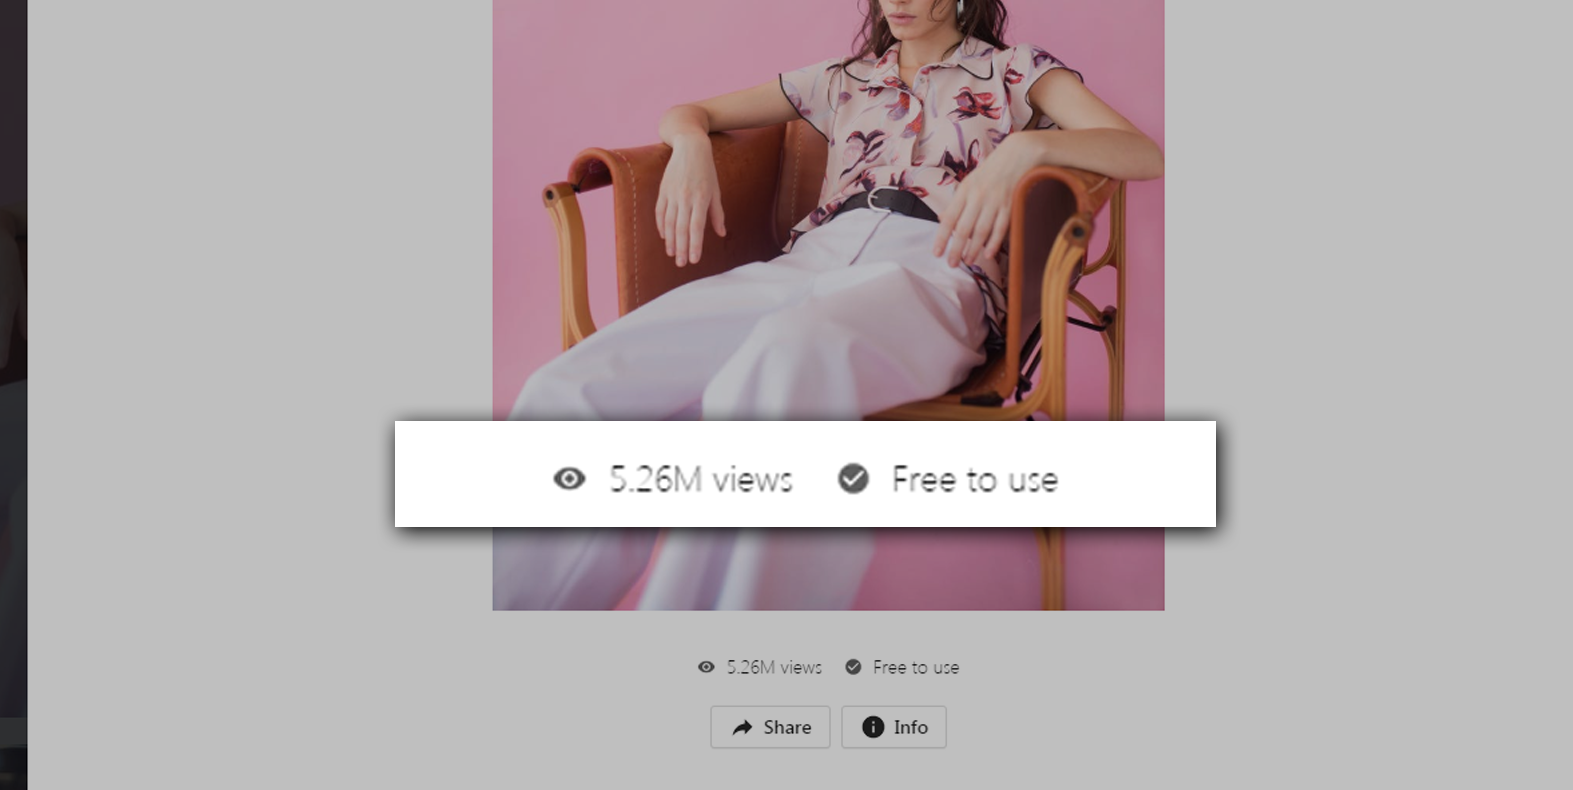
Now, after publishing you may take a look at your store and you will see the similar design as such:
With Brooklyn theme, you can make announcements using the top bar and a showcase of your products using the Hero Banner. If you don’t know where to get free images, you can get some in Pexels or in Unsplash.
Keep in mind that if you download images online, you should be careful of using copyrighted images. Always verify if it is non-copyrighted or copyrighted.
Shopify Theme Customization
To customize your theme, go back to the Shopify Partner Dashboard and click on the Online Store menu and in the current theme section click Customize.
There are seven sections in your Brooklyn themed store.
The header
The Slideshow
Rich text section
Collection list
Featured collection
Newsletter
Footer
Each of these section has its own purpose. For the header, this is where your logo or business title is located. In addition, this is where your customers can navigate through your entire store using menu.
If you’re looking for a logo for your business and you don’t know how to make one yourself, you can go to Fiverr and hire a talented designer to make the logo design for you. I usually go for someone who has a price tag between $5 to $10 and I ask them to design us a logo related to our niche.
There’s the slideshow section where you can upload the images you have taken or downloaded from Unsplash or Pexels.
For the rich text section, you can introduce your brand with your customers. Describe what kind of products you’re selling, or you can welcome your guests using this section.
Collection list section is a section where you can display the collection of your products. It could be a collection of priced off items or a collection of shoes or anything you want to display here. It’s up to you.
Same goes with the featured collection section. The only difference is, you can only feature one collection. That’s why I recommend you pick the best collection you have.
Newsletter section is more about getting your customers email. Therefore you can notify them whenever you have a new item or whenever there’s a sale in your store.
For the footer section, it’s where you put all the necessary links that you can provide.
We know we haven’t gone through the products and collections yet but we’ll get back to this later on. So for now, let’s design our web page. You can make changes to your header and slideshow.
As you can see in the image above, I have designed my store and uploaded an image for the slideshow. Just a tip, make sure the image that you uploaded is high quality and compressed. Make sure it looks clean and crisp.
Compressing images for SEO
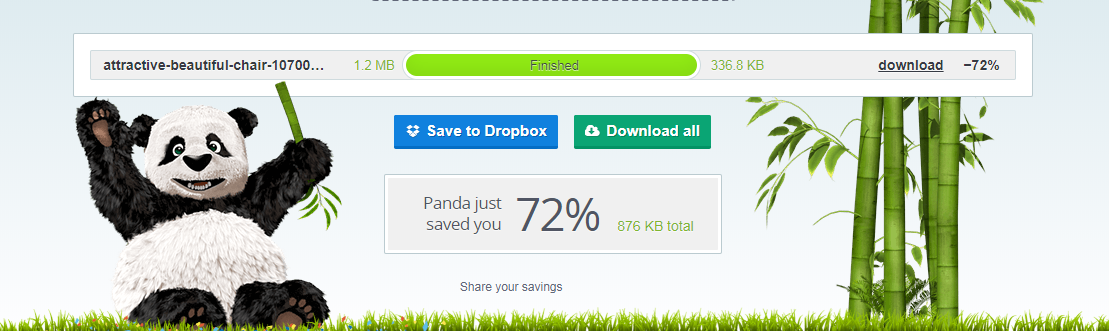
One thing about images is that their file size is quite heavy. Especially if they’re high quality. Making their file size small will make a huge impact on your Shopify store speed so before you upload your images, make sure you compress them using TinyPNG. TinyPNG is an online image compressor that will convert your images into lightweight images without losing its quality.
As you can see above, I have saved 72% of filesize! Before, it was 1.2mb. And right after the process, it became 329kb. That’s a huge difference!
This will make a huge improvement to our Shopify store performance.
Now, after compressing the image, download it and use that image for your slideshow section and see how much it improves your web loading speed.
File naming your uploads
Another thing you can do to improve your SEO is to make sure that the file name of your images/files is related to your niche. For example, I have an image of a woman wearing my latest product. Then I’ll probably name that image, New clothing for women this 2021.png or something like that.
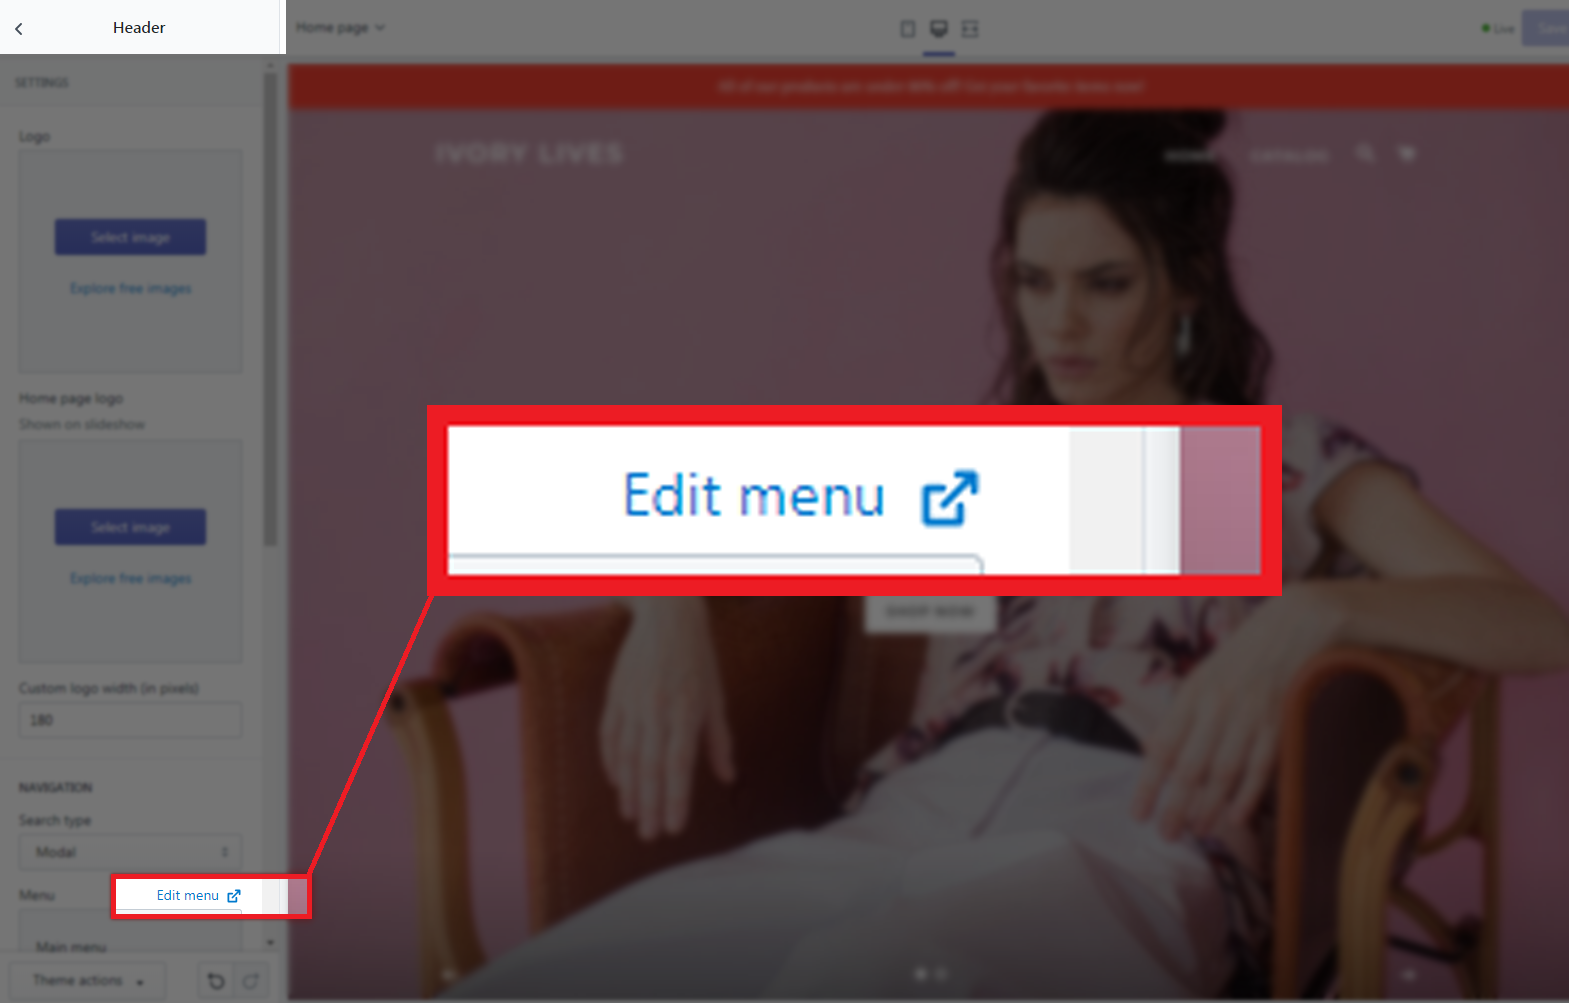
If you look at our Shopify store, you will see that we only have two links in our navigational bar and that is Home and Catalog. We can customize that and add a few more links to help visitors to navigate through our store. So for example, you want to bring your customers to your best selling products, you can do so by making a new menu and call it Best Sellers.
Another thing that I recommend is to change the Home menu, instead of saying Home, call it Shop. This way, your customers will know that they will be redirected to your store not somewhere else.
To navigate to your edit menu, go to your header section and scroll down to the menu section.
Now, that is basically how you customize your Shopify store. If you want to go in-depth on the customization, obviously, you can do that. But for the sake of this tutorial, we’re only going to show you where to go. So basically in the store customization, you can edit the color of your text, the color of the links or buttons, the size of the header, etc. etc.
Shopify Newsletter
If you have noticed in Brooklyn theme, there is a section where it allows you to get the email of your customers. This is called subscription or newsletter.
This section is very powerful because it allows you to communicate with your customers especially if they have devoted their life to your business.
Whenever you have a promo or sale, you can send a message to your email list informing everyone that you have a promo and they should check it out.
Now, most sales came from Email Marketing and other marketing strategies. We’ll go deep into this topic soon but for now, we just wanted to let you know what this section is about.
Shopify Store Settings
Now that we’re almost done with our store design, let’s go back to our dashboard and take a look at our Shopify store settings because it’s also important to know what’s happening behind the store.
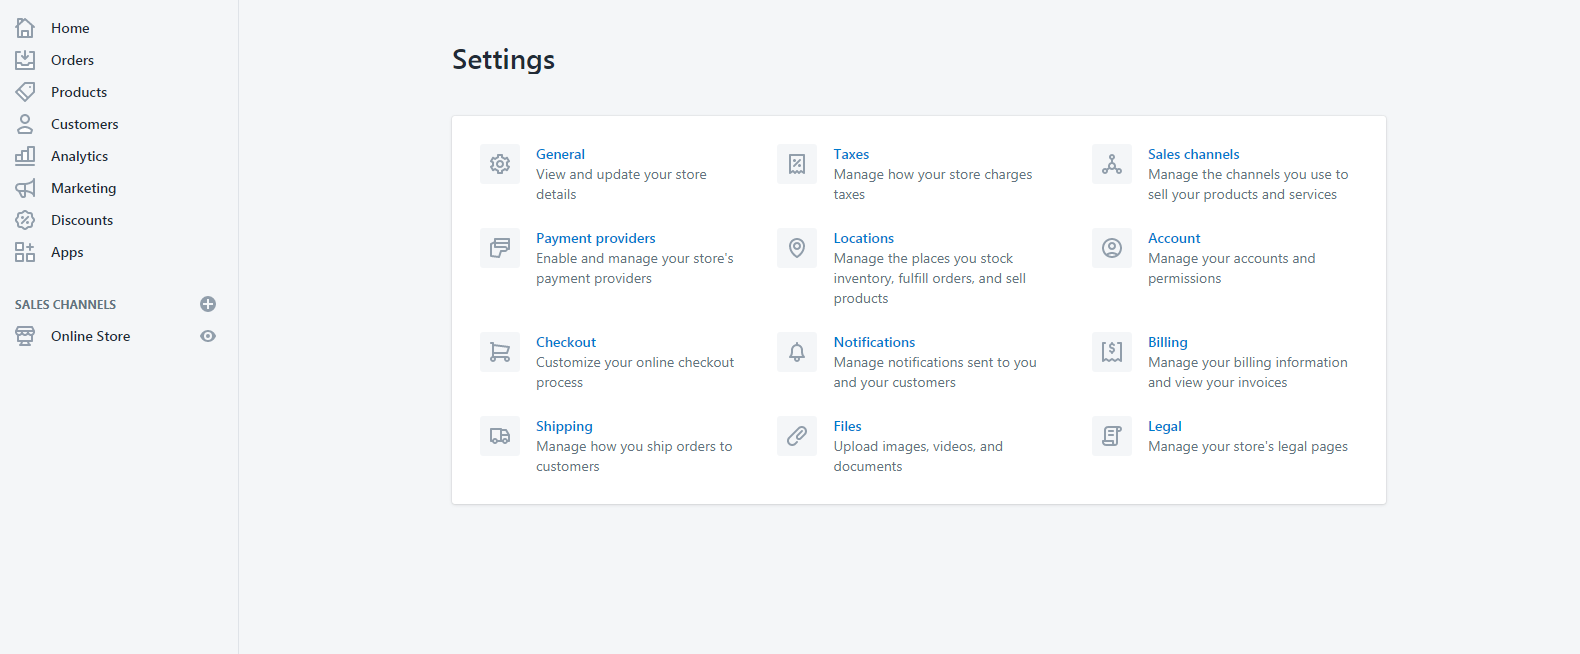
To navigate to your store settings, look at your dashboard sidebar and just underneath the Online Store menu, you will see the Settings menu. (It is located at the bottom left corner of the page)
As you can see in the image above, we have:
General section to view and update your store details
Payment providers section to manage your store’s payment providers
Checkout section for online checkout processing
Shipping to manage how you can ship the orders to customers
Taxes section for store’s charges or fees
Location section for managing where your stock inventory is placed
Notifications for you and your customers
Files for your uploads
Sales channels section for managing the channels you use to sell your products and services
Account section for managing your account and permission
Billing section for your Shopify plan billing information
Legal for store’s legal pages
General
The general setting is where your store details are located. Your customers will most likely use the information to contact you in case they have problems, questions or requests.
This is also where you can change the currency of your store. Make sure you change them into the currency of your country or where your store is located.
Payment Providers
Payment providers settings page is where you can manage how you wanted to get your payments. By default, PayPal Express Checkout is enabled and your earnings will be sent to the account connected with your Shopify store.
Make sure that the email indicated is your PayPal email address.
You may also choose a third-party provider like 2Checkout, Adyen, PayTabs, CyberSource, PaymentExpress, etc.
Checkouts
For this setting, it’s highly recommended to keep your customer accounts disabled which means that customers will only be able to check out items as a guest and not register to your store. It will remove the hassle for your customers from buying and it’s going to increase your conversion rate.
Shipping
Shipping setting is where you can modify your shipping origin, your rates at checkout, etc. I highly recommend you to leave everything by default unless you have a different shipping zone or shipping methods.
Taxes
By default, Shopify uses sales tax rates, which are updated regularly. If you use the default rates, make sure to confirm that they are updated and correct. Otherwise, override them whenever it’s necessary.
Locations
If you’re planning on managing your inventory and fulfill orders from different locations, then you can use this setting. This is very useful especially if you have multiple locations for your items. For instance, if you run out of stock at your first location but have inventory at your second location, then Shopify will split the order so that is it fulfilled from multiple locations.
Now, the remaining sections in the settings are mostly set up already so there’s no need for you to edit them besides you can just modify them once you actually started gaining earnings.
Let’s just focus on setting up your store to start getting sales. Now let’s talk about the products that you can sell.
Shopify Products
To start gaining profit, you obviously need something to sell and that is your products. There are many ways for you to get products. Number one is your actual products or services, and number two is products from drop shipping.
What is Dropshipping?
Dropshipping is a retail fulfillment method where a store doesn’t keep the products it sells in stock but instead, when a store sells a product, it purchases the item from a third party and has it shipped directly to the customer. In conclusion, the merchant will never see or handle the product.
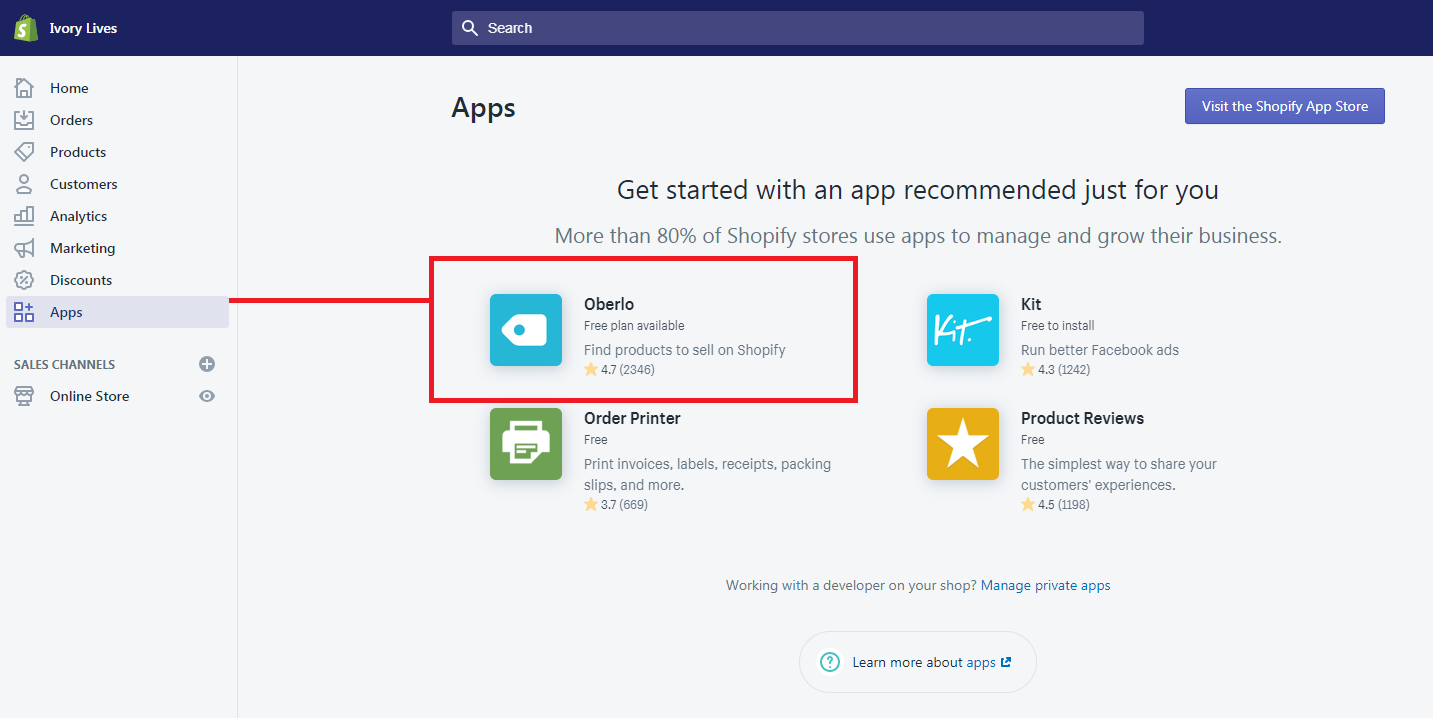
To start selling with dropshipping, you can use the Shopify app called Oberlo. Go to your Shopify Partner Dashboard, and go to the Apps menu and then select Oberlo.
If somehow you don’t see Oberlo, you can visit the Shopify App Store by clicking the button at the top right corner of the app page.
After Installing, you may now start using Oberlo and start adding products to your store. There are plenty of products that Oberlo will start recommending you. But I suggest you add products that are related to your niche. For example, your store focuses more or men’s clothing then look for items that are men related like shoes, shirt, underwear shorts, etc.
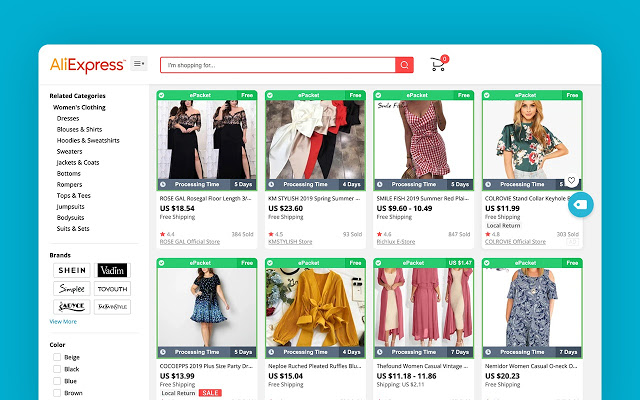
Adding products from AliExpress
Another thing to keep in mind is Oberlo also allows you to import items from AliExpress. So if you want to sell items that are not available in Oberlo but available in AliExpress, you can add that item to your store by installing the Oberlo extension to your browser and then go to AliExpress, search for items, and then click Add to import list.
If you’re getting items from AliExpress, it’s best to select items that are under ePacket shipping. ePacket shipping basically means that items will be shifted out in around twelve to twenty days which we believe is the fastest form of dropshipping compared to other types of shipping. It will also save you a lot of time, money, and effort.
Shopify Collections
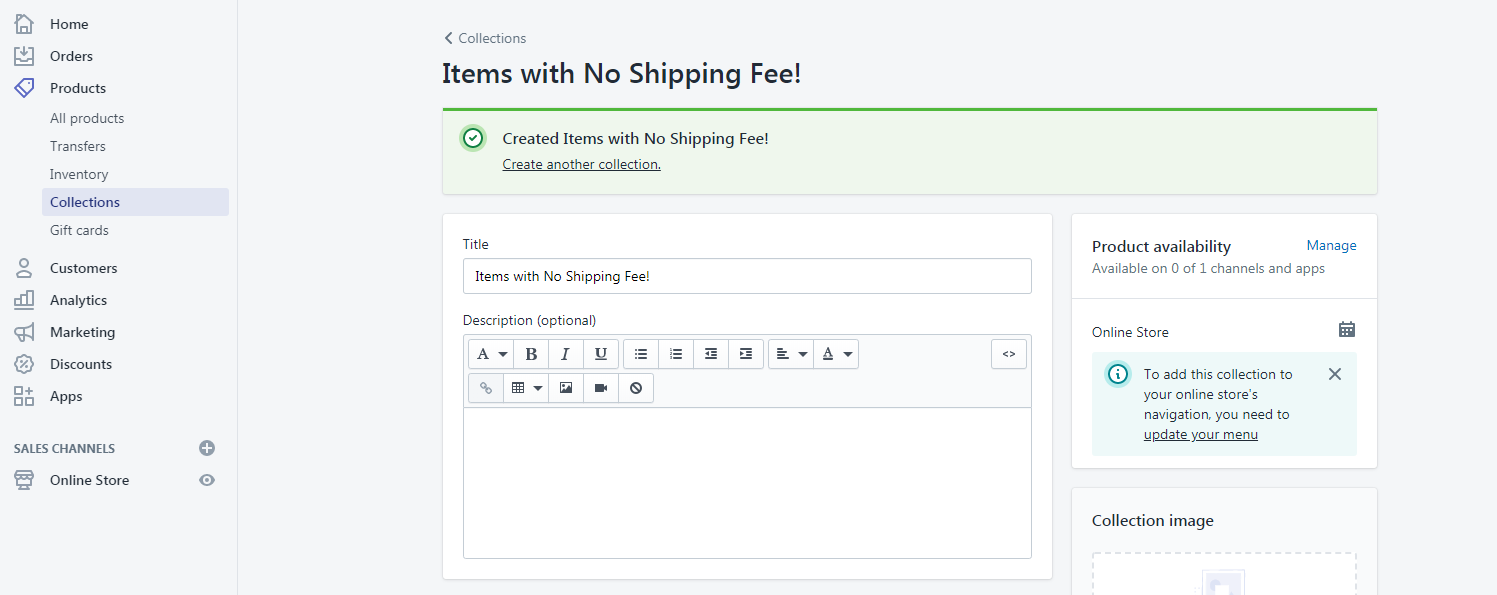
Once you’re done adding items to your store, you can start creating collections. Like what we have said before, collections are a group of products that are categorized based on a certain property. For example, you create a collection for products are free for shipping. You can do that by going to Products then collections then select Create collection.
To add items to your custom collection, you can do that manually or automatically based on a certain condition. We prefer to use manually so we have more control of what’s coming inside a collection. But, if you want to use the automatic collection, make sure you enter a condition that follows its purpose.
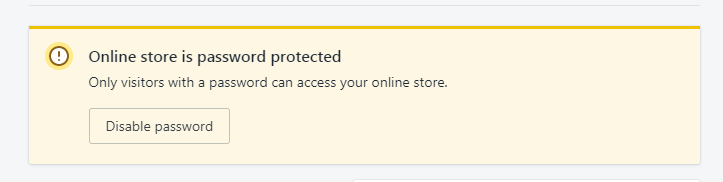
Removing Shopify store Password
If you are under the 14-day free trial, customers will have no access to your store unless you give them the password that Shopify has given to you. But we don’t want that, we want to give our customers the service that will not make them click and do more actions before they can purchase an item from us.
So how can we get rid of the password from Shopify store? Simple, upgrade your store to a certain plan. Now, it might be scary to some but don’t worry if you’re still under the 14-day trial, you won’t be paying for anything. Just make sure to cancel your subscription before the trial ends if you don’t like Shopify.
Final Touch
Congratulations! You have setup your Shopify store. Now, what is the next step? Well, you can start doing marketing strategy or advertise your store to show your products to people on the internet.
Now to end this article, I would like to give you some tips for your business.
Be patient, Building a successful business is not going to happen in just one day.
Get organic traffic with paid ads like AdWords or Bing Ads or use Facebook Ads to advertise your Shopify store.
Keep trying and learn from your mistakes. If this is your first time, expect it to be hard and try to be more understanding.
Video Attachment
I’ve tried recently if Shopify dropshipping still works in 2021. Here’s my research:
I believe that making Shopify apps is one of the easiest projects any developer can do. With the help of Shopify API, you can build apps that can interact with store owners.
If you are new to Shopify App Development, we have written many articles about it to help you get started.
Here is the list of tutorials that you can use to start building your very first Shopify app:
In this article, we are going to learn together how to use Shopify Order API to interact with Shopify stores and its recent products that have been purchased by customers.
We’ll be also guiding you through how to properly set up your store to get started with Order API because this API is different from the last API that we have used.
But don’t worry. This is very easy to do and won’t take you much time as long as you understand how to use Shopify API.
Now, to begin.
Go to your Shopify Partner Dashboard, go to your apps, and select the app that you want to use for this project. If you have no apps yet, please refer to the tutorials that I have listed above.
With your app selected, go to App setup highlighted in the image below:
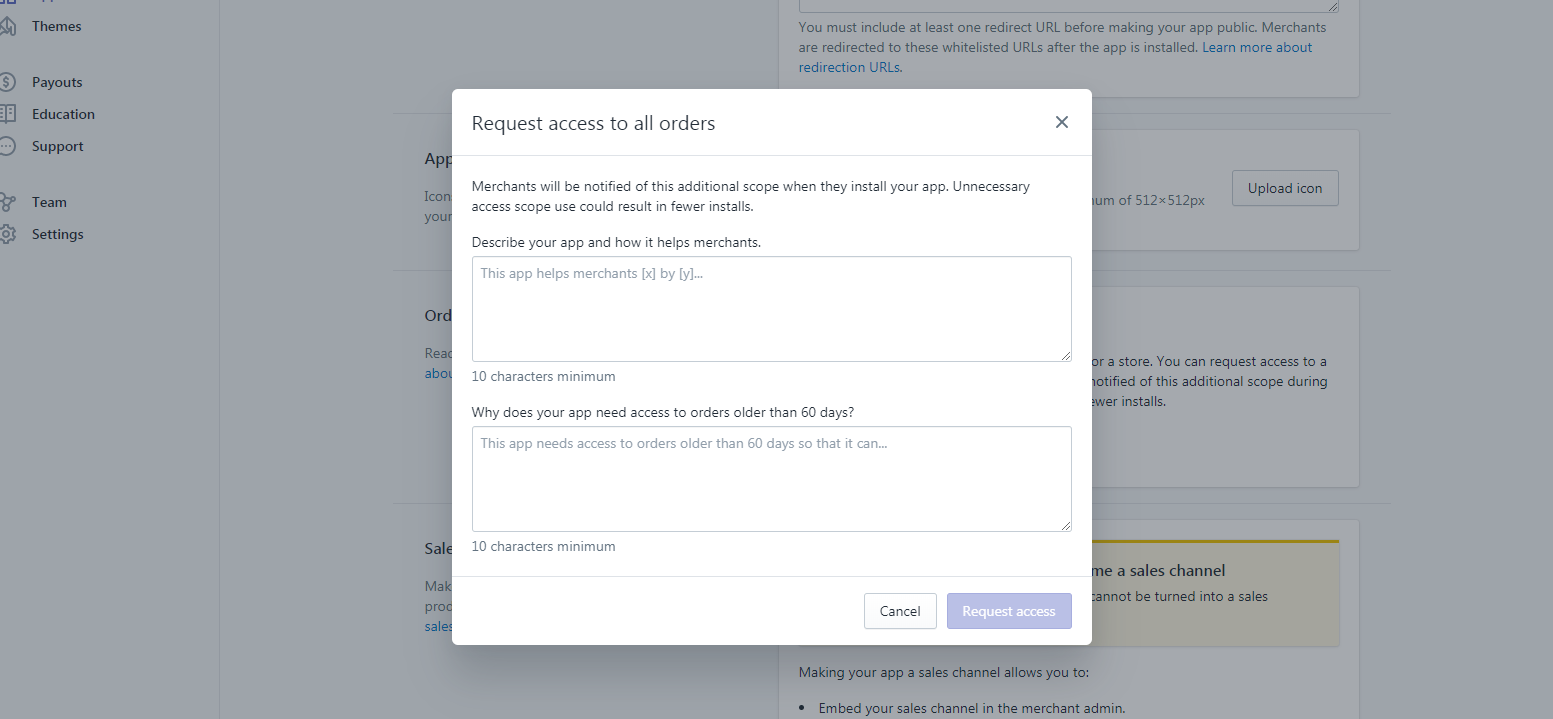
Scroll down the page until you see the Orders section. Now, to access the last 60 days of orders of a store. You are required to ask for a request to have access to the store’s full order history.
You will be sending a request to Shopify and they will review your request if it’s actually acceptable. My advice is to be accurate with your answers and tell them your objectives of why you need store orders.
Example Request
Describe your app and how it helps merchants. This app will help merchants understand where the order is coming from, is it from organic store purchase? or is the order came through this app?
Why does your app need access to orders older than 60 days? This app required access to orders older than 60 days to allow merchants to see if the purchases are made through this app or not
Once you have sent the request, Shopify will review your app and grant the request for accessing orders. Note that this will take two or three days to be reviewed.
Using Order API
Now you have access to Order API, let’s start with the basics and understand how the API works, and what can we do with the API?
Well, there are many things that you can do with Shopify Order API like listing the products that were purchased by the customer or show how much money they have spent on their shopping or retrieve what discount code they have. Sky is the limit!
Now, let’s start with coding.
We have a Shopify App Development Course! Be one of the first students!
Are you looking for an in-depth guide on how to create Shopify apps? Click the enroll button to get started!
Make sure you have set the token and shop variables.
In the code above, we used ini_set("display_errors", 1); to see if there’s going to be errors in our code same with error reporting. Then reference the function.php which came from Shopify API Client made by Alex.
Next, we get the requests from $_GET variable and take the HMAC code. Basic stuff… Then, we’ll be using the generated token, and the shop name which the subdomain of your shop URL.
Next, we create a new array then call the shopify_call() function. Make sure we’re using:
/admin/api/2020-01/orders.json
And then we decode the JSON code pulled from Order API. Easy
Now, the next thing that we’re going to do is to actually get the values that we need. There are many parameters that we can pull the values from. Which will take a lot of understanding on how to actually get them.
Let’s start with the basics.
What if we want to list the orders from the last 60 days?
You can see that there is A LOT of data that we can retrieve. We have order ID, email address of the customer, his/her location, number of purchased items, and so on. With the data above, you can basically display everything about the order.
Let’s use that for example to display the order ID.
foreach($orders as $order) {
foreach($order as $key => $value){
echo"<p>Order ID: " . $value['id'] . "</p>";
}
}
Code language:PHP(php)
Using the above code, you’ll be able to display the list of order IDs that are present in the past 60 days. Now, what if I only want to display the last 10 orders I have received? Simple, just do the count.
In the code above, you see that we accessed another array inside an array. In other words, this API will give you a ton of dimensional arrays and that’s confusing sometimes. But it’s never hard.
Great! Now we can access the data inside the three-dimensional array. Now, what if I wanted to display the image of the product that was purchased?
Again, that’s very easy. All you needed to do is to call shopify_call() function once again and get the image src by applying the product_id.
What about sorting? by creation date?
Sorting Orders by created_date with Order API
I think this is one of the easiest things to do since this is an array already. Well, all you needed to do is to call shopify_call() function once again but this time, use the following:
Understanding Order API is never that hard. It will just get more confusing as soon as you get more items to deal with. But I hope you get the idea of how you can extract the list of recent orders from a store.
If you have questions or if you encountered any errors, please let us know and we’ll get to you as soon as we can. We love interacting with you!
We thank you as well for taking the time to read us and being interest in Shopify Development. We’ll tackle more lessons in the future so keep in touch with us and sign up to our newsletter.
So you’ve been creating Shopify apps through localhost and you’re thinking of publishing it online so Shopify merchants can install your app to their store.
The issue that you’re having now is which web host provider is the best for your Shopify apps. Well, we’re here to tell you.
One of the best web host providers that you can use for your Shopify apps is Hostinger and part of the reason why is because, unlike other web hosts, Hostinger is allowed to interact with Shopify through XMLHTTPRequest or AJAX. You’re surprised? We are too!
We have tried so many web host providers for our Shopify apps and sadly, most of them failed to take care of our apps!
Of course, there are plenty of reasons why you should pick Hostinger for your Shopify app projects, and today, we’re going to list down all of them.
Why you should use Hostinger for your Shopify apps
If one of your main concerns is your budget, then you’ve come to the right place. Hostinger is one of the cheapest web host services in the market but does that mean it’s bad? no.
Below are some of the features why you should consider using Hostinger for your Shopify app projects.
Compatibility
Not all web hosts can be compatible with Shopify especially if your web host doesn’t have an SSL certificate.
If your website still runs under HTTP, then expect Shopify to deny it.
Luckily, Hostinger offers a FREE SSL certificate so you can always run your Shopify apps without any issue at all.
Well, is that all that makes Hostinger compatible with Shopify for our Shopify app development?
Like what we mentioned earlier, Hostinger allows you to do HTTP requests without being blocked by the CORS policy. Of course, you’ll have to make sure that your header is properly set up.
Ease of use
The Hostinger dashboard is fairly easy to use and if you’re new to web hosting, you’re going to love using Hostinger.
Everything in the Hostinger dashboard is understandable and straightforward. Each page is partnered with a very large logo and categorized to make it easier for you to find what you need.
There’s also a search bar for people that don’t like scrolling down.
Speed
For a very cheap web host, you would expect to have a very slow website. However, that’s not the case with Hostinger.
According to their website, the fastest response time that they can reach is about 45 milliseconds, which is insane! If you’re only using their shared web host, what more if you use their business web host plan?
Unlike other web host providers, Hostinger uses technologies that are up to date. In fact, they always update their technologies so that users can always have a good experience.
If you’re going to use Hostinger for your Shopify apps, it is expectable that your apps will load fast but of course, this will always depend on your codes or files. It is advisable to make your codes optimized as much as possible so that you can take advantage of Hostinger’s speed.
Price
If you’re in a tight budget and you want to save as much money as possible, then Hostinger should be your choice.
For only $0.99, you can have a single web host with a free SSL certificate which is a good deal especially if your only plan is to host your Shopify apps.
Though it’s important to remember that the price will depend on the contract you’re getting.
For a 1 month contract, the price will be almost $10 plus the setup fee which will cost you another $5. That’s still cheap compared to other web host providers but quite expensive just for a one month service.
To fully save a lot of money, it’s best if you take their 48 months contract, which will only cost you $47 and no setup fee. That’s FOUR years! and you will only need to pay $47.
Now the question is, which plan should you really take?
Well, of course, if you’re just trying out, we recommend taking the single shared web hosting. Then, just upgrade to the business plan once you get enough installs in the Shopify app store.
Stability
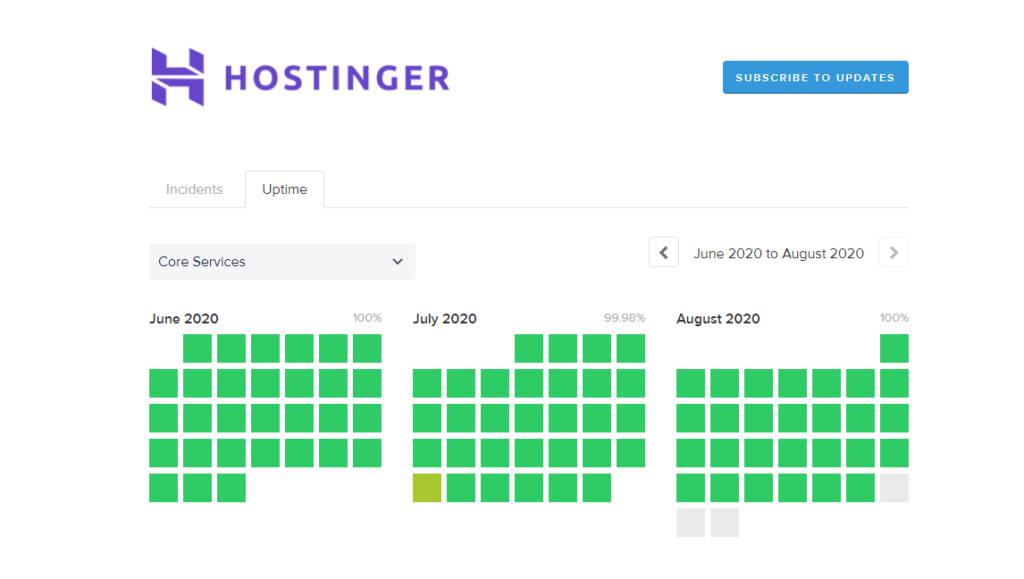
There will be times that your website can go offline but how long can your website stay offline if you use Hostinger?
According to Hostinger, the percentage of your website going offline is around 0.03% which means in one year, your website will barely go offline.
Support
It’s been known that Hostinger provides the best support for their users. However, in 2020, changes started to come up.
In 2019 or even before, Hostinger provides 24/7 support for all of their users but in 2020, Hostinger removed the chatbox in the dashboard and you can only contact them through their email.
But why?
According to their staff, due to the current situation of the entire world, Hostinger had to remove the chatbox.
We’re assuming that this is a temporary change and once the pandemic is over, their 24/7 support will be back for everyone.
Conclusion
Do we recommend using Hostinger for Shopify apps? Absolutely!
Hostinger is one of the trusted web host providers in the industry, offering a very cheap web hosting solutions for your Shopify app development. If your plan is to save up money, then you should consider using Hostinger.
Disclosure: This article may contain affiliate links, which means we may receive a commission if you click a link and purchase something that we have recommended.
Watching YouTube videos is obviously one of the favorite things to do by many people because YouTube provides not only hundreds but thousands of HD videos that are watchable for free.
However, there are still many people who wanted to watch YouTube videos especially if they are out of town having no internet connections and the only way to do that is to download the video itself.
The problem is, YouTube still doesn’t provide a way to download YouTube videos directly from its website. So how can you download YouTube videos? by using software or online downloaders.
In this article, we will be giving you our best free youtube downloaders that you can use to save YouTube videos on your PC.
Best Free YouTube Downloaders for Windows PC
Let’s begin this top 9 list with our best free YouTube downloaders for Windows PC.
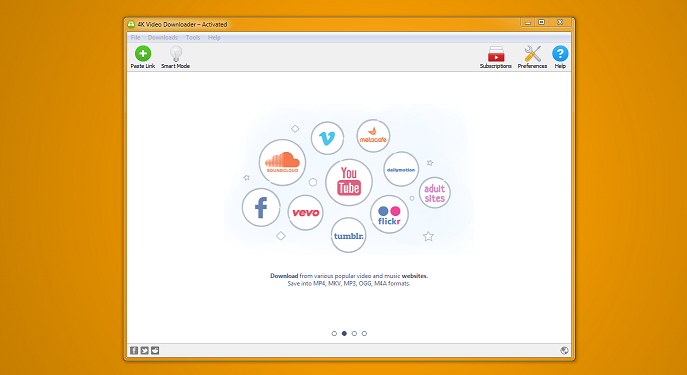
If you’re on a Windows PC machine and you wish to download videos from various popular video and music streaming websites, then 4K video downloader is one of the best tools that you can use.
Unlike any other tools, 4K video downloader can download ultra high-definition videos. Not just that, this downloader can also download playlists of videos from YouTube which is very useful especially if you wish to download a series like our tutorials so you can watch it anytime and anywhere.
Auto-Download videos from your favorite YouTube channels
Extract/Download Audio only
Download YouTube subtitles/CC
360° videos download
Download 3D videos
Pros
One of the features that we liked from this tool is the fact that you have plenty of options for downloading a video. If you wish to download a video in different codec, you have that option. If you wish to download the subtitles, you have option.
Not just that, each options shows its own frame rate which is very useful especially if you are downloading a high-definition video and if you are in a hurry and you want to download the video fast without sacrificing the quality of the video, you can see the file size of each video that you can download.
Cons
If you’re using the free version, you can only download 30 videos per day which is not that bad but if you have a playlist of videos with, let’s say 100 videos, then you can only fully download the videos after 4 days.
Download any time and anywhere with aTube Catcher. This downloader offers you a ton of features that allows you to not only download YouTube videos but also convert them into your desired format.
Not only that, aTube catcher uses a powerful algorithm that allows you to save bandwidth whenever you download. So not only you have downloaded your favorite YouTube videos, but you have also saved your internet connection.
aTube Catcher also offers an audio recording feature which is useful for grabbing a portion of audio from your favorite music video.
It’s been known that aTube catcher is not just a video downloader or converter, it is also a tool for screen capturing or audio recording, which makes this tool pretty handy.
With this software, you won’t have to install other software like Bandicam or Fraps just to screen capture.
Its user interface though may seem like a little oldish but considering its functionality. We believe it’s worth an install.
Not just that, aTube catcher updates automatically, so you won’t have to worry about updating this software at all.
Cons
Speaking of installing other software, aTube catcher may install unnecessary applications to your computer.
It is best to be cautious and aware because aTube catcher will ask you to install extra software.
Gihosoft TubeGet is a Youtube downloading software that only aims to download videos from YouTube and other video streaming websites.
It has a very similar functionality from the rest of the software, such as YouTube playlist downloader, YouTube to Mp3 downloader, and so on.
However, we believe that there’s one thing that makes this downloader standout and that is due to it is able to download videos like 360 videos, 3D videos, and videos with a high frame rate.
Gihosoft TubeGet often make updates with their software as they believe that YouTube regularly updates their algorithm. With this, they may also add new features like new site support or system improvements.
Features
Download videos from YouTube and 100+ video streaming sites
Gihosoft TubeGet is an awesome tool. It allows you to download YouTube videos on a playlist with just one click of a button. It also allows you to convert videos and so on.
In terms of its user interface, Gihosoft TubeGet has a very modern look. It is very easy to navigate as it only has two categories: Download and Convert.
Ease of use is also fine. Just like any other video downloader, you copy a video link, paste it in the input bar, select what quality or format you like, and click download.
With Gihosoft TubeGet, you won’t have to deal with annoying ads or extra software asking to be installed.
Cons
Unfortunately, if you are under the free version, you can only download 5 videos per day. Not only that, but there are also features that you won’t be able to use such as; one-click download mode, extract audio, infinite download speed, add subtitles, and so on.
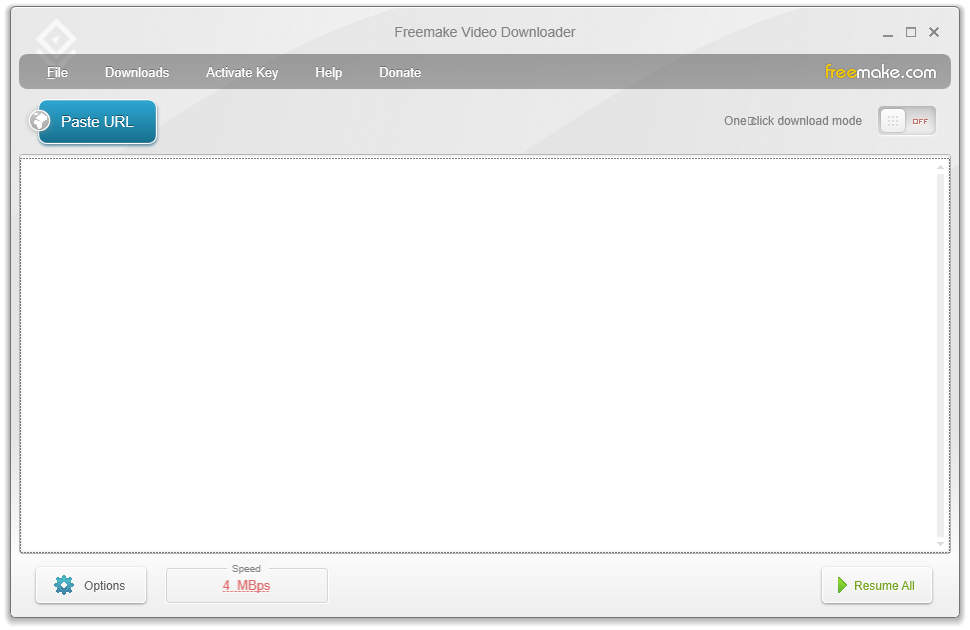
Freemake video downloader is one of the most known video downloaders online and it’s been used by more than 83+ million users. With Freemake video downloader, you can download videos either through their website or through a software install.
Freemake Video Downloaders lets you download videos from over 10,000 video streaming websites. With this downloader, you can save videos, video playlists, channels in Ultra HD, MP4, MP3, 3GP, AVI, FLV, MOV, etc.
Features
Download YouTube in any format
Download videos from 10,000+ sites
Supports 4K, Full HD, HD videos
Superfast Download
Proxy & Parental Control for adult sites
Pros
FreeMake video downloader supports 10,000+ sites, this includes sites that are not suitable for young users. That’s why it was a good idea to have a feature that disables these websites from being accessed.
Like we said before, Freemake video downloader can be used through its website or through its software. So if you don’t like installing software then you may just go to their website and download videos for free.
In terms of its user interface, FreeMake video downloader has a good-looking interface and not only that, it is very easy to use.
Cons
If you’re planning on downloading videos from Hulu then you may encounter issues or you may not be able to download it in the first place. We have tried so many times and we never get to make it work.
Other than that, this downloader works like a charm.
Best Free YouTube Downloaders for Mac OS
Some of the YouTube downloaders that we have listed above can be also downloaded for MacOS. However, we’ll be listing our own recommended YouTube downloaders for Mac OS. Let’s begin!
Free YouTube Download is one of the most popular YouTube downloaders. It was first released in 2006 and still getting updated this year. Free YouTube Download allows you to download and convert YouTube videos, so you can watch theme whenever and wherever you want.
Features
Download YouTube videos in any format, such as MP4, MKV, WEBM, MP3, and more!
Convert videos to MP4, AVI, or MP3
Download subtitles / closed captions
Transfer YouTube videos to iTunes automatically and convert them to iPhone / iPad / iPod format
Apply output filename format patterns
Pros
Free YouTube downloader is very simple and easy to use; all you need to do is to copy a YouTube video URL and paste the URL in the downloader.
It also auto-downloads the video on its own if the auto-downloading feature is enabled so you don’t have to click anything.
You may also batch download videos for free which is very convenient for downloading YouTube playlists.
Cons
There is a reason why we have placed this downloader in the #1 spot, and that is because of having no cons at all. We believe this downloader offers good features for downloading YouTube videos. We highly recommend this YouTube downloader 100%!
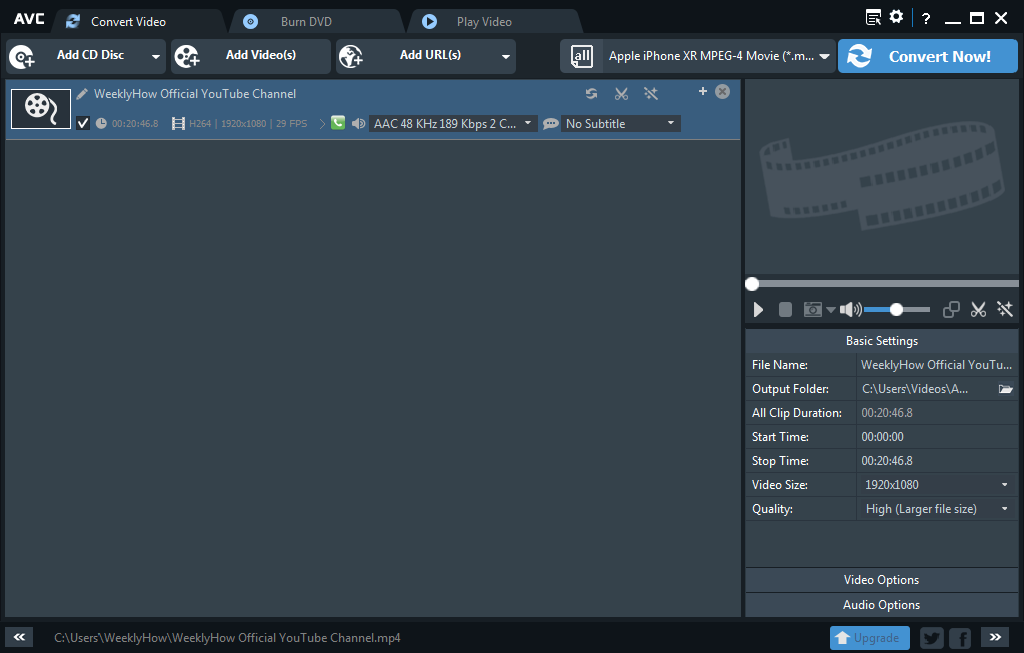
It may sound like this downloader’s purpose is just to convert videos but you’re wrong. Any Video Converter is designed with no limitations at all and not only that, it will cost you zero dollars!
Any Video Converter allows you to effortlessly download and convert videos to any file format you desire like MP4, MPEG, WMV, 3GP, MKV, M2TS, AVI, and so on!
Features
Download YouTube videos and from 100+ sites
Download & convert videos as MP3
Add effects and edit videos before converting
Pros
With Any Video Converter, you can download and convert videos from almost any file type which makes it a very powerful converter, unlike other video downloaders.
Another thing that we really appreciate from this downloader is that it doesn’t show any ads at all. There’s no spyware or malware or anything that can harm your computer.
In terms of the user interface, Any Video Converter is very easy to use. Its buttons are very noticeable and understandable, even if you’re just a first time user, you can easily tell which button to click to download and convert videos.
There’s also a preview panel that you can use to preview your videos.
Underneath the preview panel, you can adjust the video settings, change its resolution, format, duration, and quality.
If you want to change the audio settings, you can do that just below the Video Options.
Overall, this downloader is highly recommended for downloading YouTube videos.
Cons
Converting an hour-long video takes a really long time to finish. If you have movies that you want to convert, then this converter is probably not the best converter for you. Although, it still depends on your computer specification.
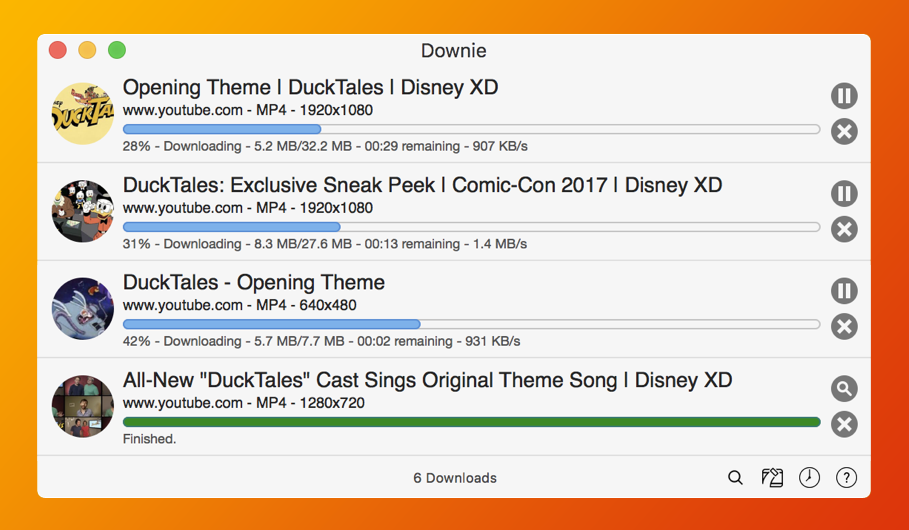
Downie is one of the most popular YouTube video downloaders online. It allows you to download videos not only from YouTube but also from thousands of different video streaming sites like Youku, Vimeo, Bilibili, Facebook, Instagram, etc.
Features
Download YouTube videos and from 1000+ sites
Download videos as MP3
Download videos in bulk
Supports 4K videos for download
Postprocessing for iTunes / Mp3s
Pros
Downie offers superb integration with popular browsers like Safari, Firefox, Google Chrome, and Opera. With Downie, you can download your favorite YouTube videos in just one single click.
In terms of the user interface, Downie is very simple and easy to use. Nothing fancy, just a simple but powerful downloader. Although, in Downie 3, the user interface was improved. If you want a simple interface, you can switch it in Downie 3.
Another cool feature that Downie offers is the advanced post-processing. This feature refers to what happens whenever your download finishes. Should your download be formatted into a certain format? Do you want to extract its audio? Send to iTunes? All of these can be done with Downie.
Cons
With Downie, you can only download and convert videos in a few file formats such as MP4, which is really a shame.
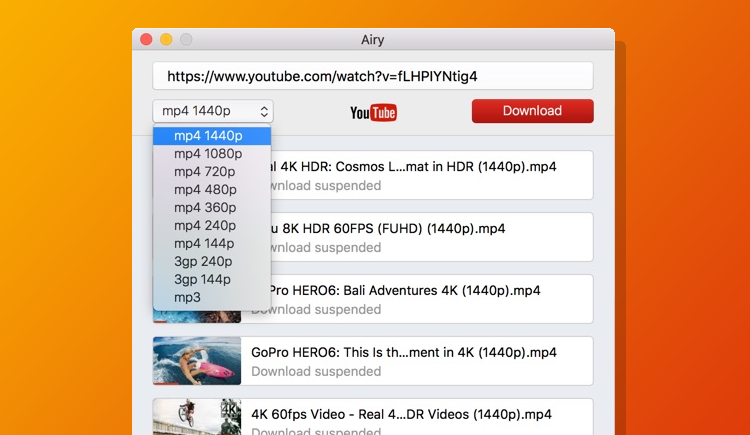
Airy is one of the best YouTube downloaders that you can find online. This YouTube downloader for Mac allows you to easily save all the YouTube videos you wish with ease.
With Airy, you can download multiple videos at once thanks to its playlist downloader.
Airy also allows you to download YouTube to MP3, so if you want to listen to your favorite songs and you don’t have an internet connection, Airy is the best option for that purpose.
Features
Download YouTube Full Playlists
Download Restricted / Private Videos
Save Subtitles / Closed Captions
Get Entire YouTune Channels or Categories
Download in 4K HD and Ultra HD
Pros
With the free version of Airy YouTube Downloader, you can only download two YouTube videos and one at a time.
Its user interface is pretty straightforward too. Just like the previous downloaders that we have listed, Airy YouTube downloader has the very same functionality.
So if you really don’t mind paying $20 for a downloader then I guess Airy YouTube downloader is a good choice.
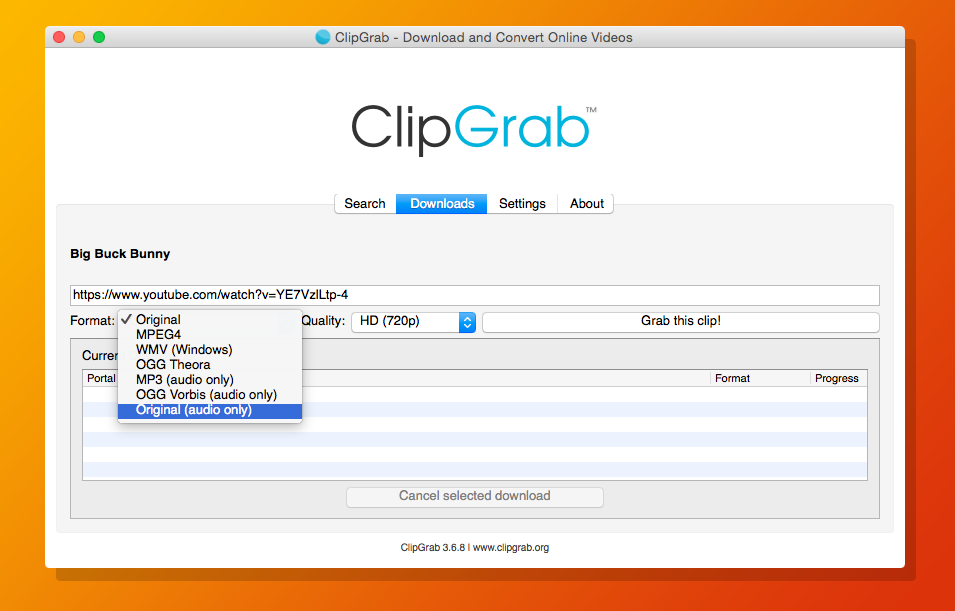
Next in the list is ClipGrab. ClipGrab is a free video downloader and converter that allows to easily download videos from YouTube, Video, Facebook and many other online video streaming sites.
ClipGrab brings you the best downloading experience not only for Windows PC but also for Grab.
Keep in mind though that using ClipGrab for Mac requires you at least macOS 10.10 (Yosemite). However, you may also install ClipGrab Legacy if you’re using an older version of macOS.
Features
Download videos from popular sites like YouTube, Vimeo, and Dailymotion
Supports popular video formats such as MP3, 3GP, and more
Save videos to iTunes
Pros
ClipGrab allows you to search and download videos directly so you won’t have to open a browser and go to the site where you will copy the video URL.
In terms of its user interface. It has a very simple interface which makes it easier to use especially if you’re a first time user.
If you are a developer, ClipGrab is an open-sourced software which means you can modify/customize this downloader to whatever you want though we recommend you contact the support first before doing so.
Speaking of open source, this downloader is free for download. You don’t have to pay to use this software.
So if you’re trying to save money then ClipGrab can be your best option.
Cons
ClipGrab only offers very few features although it’s not that big of an issue especially if downloading videos is your only purpose. It’s free in the first place. What else can you ask for?
Conclusion
There are a lot of YouTube video downloaders online. You can say that most of them do the very same thing and that is to download videos.
Some of them require you to pay to use its other features. But most of them are free.
Keep in mind that downloading a YouTube video is against YouTube terms and conditions. However, that rule only applies when you either, sell/monetize the video in any way or distribute songs that have copyright.
We highly suggest you use these downloaders with care as well as the videos.
Let’s face it, Shopify is one of the best e-commerce platforms for creating an online store and selling products online. However, there’s no denying that there are still drawbacks to Shopify like expensive transaction fees, lack of SEO tools, and inability to use other markup languages.
Luckily, there are Shopify alternatives that are quite cheaper compared to Shopify.
Top 8 Best Shopify Alternatives in 2020
Today, we’ve listed our best top 8 Shopify alternatives that are less expensive and more powerful than Shopify for your eCommerce needs.
Introducing in the #1 spot, BigCommerce. BigCommerce is one of the leading e-commerce platforms for enterprise brands. It provides a highly extensible SaaS solution and robust security to help your business so you can focus more on generating sales and less on monitoring and maintaining your business.
We genuinely believe that BigCommerce is one of the big competitors of Shopify. It is fast, secure, and has better SEO service compared to Shopify. But when it comes to BigCommerce vs Shopify, which is completely better?
We’ve done so many research, and we can tell you right now that Shopify is still better than BigCommerce, but don’t go yet! That don’t mean that Shopify is the perfect platform for everyone. There are BigCommerce features that Shopify currently don’t have and that is something that you could consider.
When you start using BigCommerce, you can expect its ease of use to be as good as Shopify. The only difference is BigCommerce has the most built-in features of any e-commerce platform.
Another difference between Shopify and BigCommerce is their markup languages, by default Shopify has their own language which is Liquid. But with BigCommerce, you can customize your store using HTML and CSS. This is an advantage if you have technical skills.
As we have said earlier, BigCommerce offers features such as SSL certificate to protect your store and validates it as a safe website for processing payments.
If you are looking for a cheaper e-commerce platform, we highly recommend you to choose BigCommerce. BigCommerce offers better value for money compared to Shopify. If you look at their pricing tables, you will see that both platforms start at $29 per month. However, BigCommerce offers more features compared to Shopify and that more will save you money.
BigCommerce also offers:
Strong SEO Performance
Absolutely Fast Mobile Performance
Multi-Channel Selling
Unlimited Number of Products
User-Friendly Theme Designs
No Additional Transaction Fees
If you’re looking for an e-commerce platform that offers a mad SEO performance then BigCommerce can be your number one option.
Volusion is a cloud-based e-commerce platform that is popular among small-sized companies and entrepreneurs with entry-level tech skills. If you’re new to e-commerce and you don’t have enough technical skills then Volusion is the perfect e-commerce platform for you.
We have done our own research for Volusion and we can 100% say that Unfortunately, Shopify is still better than Volusion. Sure, unlike Shopify, Volusion offers “no hidden transactions fees” which means all of your earnings are 100% yours.
However, in our OWN experience, Volusion offers bad business practices. They will raise up your fees without letting you know and customer services are completely bad.
Our experience could be different from what you can experience so we are not discouraging you from trying Volusion. If you are still interested in using Volusion, try their 14-day free trial.
Next up is Big Cartel. Most of the entrepreneur gets excited whenever they hear Big Cartel. Why? One of the reasons is because it’s free (If you have less than 5 products) and it cheaper compared to Shopify.
Bigcartel is mostly made for artists so if you like making designs, pottery, paintings, and so on then Big Cartel might be a good option for you. Bigcartel is also very easy to use. Thanks to its simple interface, you can create store in less than 3 minutes.
Unlike its competitors, Big Cartel comes with features that can help your marketing efforts. Big Cartel makes it very easy to connect your store with Facebook. With Big Cartel’s Facebook app, you can easily sell your products directly from your Facebook page. This is an advantage especially if you have a good amount of followers on Facebook.
If you ask us which one is better. Shopify vs Big Cartel. We would still recommend Shopify. However, if you’re only planning on making a small online business then Big Cartel can be a good option for you.
In a comparison between their prices, Big Cartel is much cheaper, only if you sell less than 25 products per month. Big Cartel’s pricing is divided into three.
$9.99/month (maximum of 25 products)
$19.99/month (maximum of 100 products)
$29.99/month (maximum of 300 products)
Currently, Big Cartel offers the following features:
Customizable themes
Five images per product
Google Analytics
Real-time statistics
Custom Domain
Inventory tracking
Discounts and promos
Bulk editing New!
Shipment tracker New!
Big Cartel might not offer all the features of its competitors, but honestly, we genuinely feel like they’re only targeting clients who are looking for arts and crafts niche. If you are an artist planning on selling just a few products and do not have enough technical skills then Big Cartel might be the right e-commerce platform for you.
WooCommerce is the next most talked about e-commerce platform and one of the reasons why is that it is free. Technically it is free but there are things that you’re gonna need to pay for but that’s why merchants liked WooCommerce.
Another thing that you may want to consider is that WooCommerce offers more plugins compared to Shopify. With WooCommerce, you won’t need to hire developers just to make you plugins. If you like SEO tools, you can just look it up and install it to your store. If you like to add more features in your storefront, there are a ton of storefront plugins that you can install.
However, if you are a serious entrepreneur who likes to grow then we suggest you stay with Shopify. Unlike Shopify, WooCommerce is NOT reliable and not only that, you still have to pay for your hosting. Sure, you can find cheap hostings everywhere but if you use Shopify vs WooCommerce, you won’t have to set up SSL, Google Analytics, Inventory Tracker, etc.
The next consequence with WooCommerce is it’s not as easy to use as other platforms and things can or will absolutely go wrong. This is because WooCommerce is reliant to your hosting. If your hosting is not secure enough, your business might get hacked and WooCommerce will not send support for that. If you want to use WooCommerce, you will need a bit of technical understanding. Like what we said previously, you will personally set up everything from scratch.
Next up is Magento. Just like WooCommerce, Magento is an open-sourced platform which means it is free to use and deeply customizable. When we said it is like WooCommerce, we meant that you also need to get yourself a host or a website where you can install Magento.
Now, what makes Magento vs WooCommerce different? To begin with, Magento is a content management system (CMS) just like WordPress but it is built specifically for e-commerce. On the other hand, WooCommerce is a framework that is built as a cherry on top of WordPress.
In conclusion, WooCommerce requires WordPress to be installed before you can use WooCommerce while Magento can stand on its own.
If you have technical skills, Magento might be a good option for you. Currently, Magento offers the following features:
Page Builder/Customizer
ERP Integration
Inventory Management
Powerful Dashboard
Search Engine Friendly (SEO)
Multiple Payment Gateways
Customer Accounts
In our experience with Magento, what we liked about their platform is how you have so much control to your store both front-end and back-end. Their support is always great, they provide 24×7 support to help you diagnose and solve occurring issues within your site. However, using Magento can be a little bit complicated and confusing at the beginning but if you put an effort and learn everything about Magento, everything will pay off eventually.
If you’re an entrepreneur who is looking for an easy to use interface and you don’t have much time to learn technical skills then we recommend you to stay with Shopify or WooCommerce.
Introducing PrestaShop, another freemium e-commerce platform just like WooCommerce and Magento.
PrestaShop, according to them, is an efficient and innovative e-commerce solution that offers all the features you need to create an online store and grow your business.
PrestaShop is also customizable just like other platforms. It can also help you manage your products, orders, and statistics. You may also represent your store in different languages, thanks to its global e-commerce feature.
If you’re a big fan of SEO and marketing then PrestaShop might be a good option for you as it can help you:
Run your store SEO
Connect your store to social networks
Collect customers’ email addresses and send emails to reduce abandonment cart rate
Create special offers like coupons or discount codes.
Offer free shipping promos
Now, let’s talk about the difference between Shopify vs PrestaShop. Like what we mentioned, PrestaShop is free, technically, but you still have to pay for your host and security features like SSL.
Now the question is, is it really a good alternative for Shopify? It depends. PrestaShop and other open-source solutions are built for developers. So if you are not technically equipped especially HTML, PHP, and CSS, then you may need to take some time to learn or you may need to hire a developer.
Another drawback with PrestaShop is how expensive their customer support is. Imagine, for only 3 hours of support time you’ll end up paying $250 per month. Now, you might say that you will barely get issues but trust us, every platform will give you an issue and if you don’t know how to fix them yourself then your only option is to call the customer support team.
Again, we’re not discouraging you to use PrestaShop, if you are still interested you may download PrestaShop.
If you’re looking for an e-commerce platform that is easy to use then Weebly is a great alternative for Shopify. Though Weebly is still far from what Shopify can provide, Weebly’s pricing is a bit cheaper than Shopify, so if you’re totally short on money then Weebly might be your good option.
To be honest, Weebly is nothing compared to Shopify but it has the potential to become an e-commerce platform.
First of all, Shopify is an actual e-commerce platform, whereas Weebly started as a website builder.
Shopify is fully loaded with awesome capabilities that can support anyone to get started on their business without issues.
Weebly, however, offers a lot less in terms of e-commerce. They offer less payment and shipping options and very basic analytics.
In terms of security, Weebly is great! They give you SSL out of the box without extra fees.
Both Weebly and Shopify offers a free trial. 14-day trial for Shopify and 30-day money-back guarantee for Weebly.
Squarespace is the all-in-one solution for anyone looking to create a beautiful website. Yes. That’s true. If your goal is to make your store beautiful instead of getting more sales then Squarespace is your best option.
Seriously though, Squarespace makes sleek websites but is it enough to choose them to run an online store? Just like Weebly, Squarespace is a website builder dedicated to people who like to own beautiful websites.
If you’re planning on building a blog and you want to add a store as a bonus then Squarespace is your great option. Selling products with Squarespace is often fast and you can sell both physical and digital products.
When it comes to SEO, we experience it to be not so great compared to other platforms. So if you like SEO then we regret to say this, Squarespace is not great for SEO.
Ease of use? We can say that Weebly is much easier to use compared to Squarespace. Their user interface is a bit complicated for beginners.
After reading and browsing through the list, hopefully, you’ve found the Shopify alternative that you’re looking for. Personally, I would pick between BigCommerce or WooCommerce especially if you don’t really like to use Shopify. These two are honestly the best alternative for Shopify in 2020.
Have you ever wondered how game companies created their games? Have you been researching how to become a unity developer or how to learn game development? If so, then you have come to the right place!
Today, we will be taking a look at a variety of different topics that are closely related to game development. However, we’ll be only focusing on one particular game engine and that is Unity and by the end of this article, you should be able to answer the following questions:
What makes Unity so good compared to other game engines?
What is the difference between a game designer and a game developer?
What is the best programming language for game development?
and more.
But before we get to the actual process of how to become a unity developer, let’s understand first what is Unity and what makes Unity stand out from other game engines.
What is Unity?
Unity is one of the most popular game engines that you can use for game development. It is just so good that you can create games in just 10 minutes or less. But what makes it stand out to other game engines?
Unity vs. Other Game Engines
The following are the features that makes Unity stand out.
Easy to use
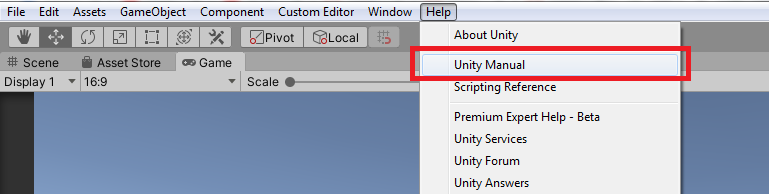
Compared to other game engines, Unity is one of the easiest tools to learn. In fact, if you ever get lost, you can easily navigate to their manual page through the help tab.
Well, it’s just a manual. Do you say?
Their documentation is very straight to the point and easy to understand and navigate through. It’s like their manual is not only meant for beginners but also for the ones that have experienced Unity.
Easy Programming Language
Unity used to work with JavaScript (also known as UnityScript), Boo and C# all at the same time but since working with three programming languages at the same time is one hell of a job, they decided to get rid of JavaScript and Boo, and stay with C#, which we believe is a good decision.
C# is one of the easiest programming languages out there and if you want to become a Unity developer, learning the programming language C# is your way to go. C# is also based on C which makes it easier to transition to other programming languages.
So you know C# already but still don’t know how to use it with Unity?
Well, Unity also provides scripting references! If you ever get confused about their built-in attributes and functions, you can just find it on their scripting references and there they explain each and everything.
Multi-Platform Development
Unity offers a multiple platform development which means you can build your games for android phones and later on build it for iOS, Windows PC, Mac and other platforms without having any issues at all.
Compatibility
Unlike Unreal Engine, Unity allows you to create complex projects for low-end devices without requiring a powerful computer setup. However, if you are looking to create a project that is too detailed then obviously none of the two will help you out. So if you think your computer is not the best then we suggest you start with mobile game development or casual game development.
With that said, Unity is the best game engine for developers who only have low-end computers.
Affordability
Compared to other game engines, Unity is very affordable. In fact, if your plan is to just learn game development, you can have Unity personal license for FREE!
Best Community Ever
Unity has the best and the most active community ever. Compared to other game engines, Unity provides a very good community that can support you throughout your game development journey.
Not only that, but Unity is also everywhere. You got scripting issues? search it on Google and you will find your answer immediately. You want tutorials? We have plenty of gaming tutorials here dedicated for Unity development.
How To Become A Unity Developer: Step by Step Guide
We’re not going to lie but learning how to develop video games is hard. Not only that but it also offers a TON of work. However, if you compare it to other skills or career paths, becoming a Unity developer is actually one of the easiest and coolest choices you could ever make!
If you’re still reading all the way here then that makes you really fit for this kind of career. Let’s get through the process of becoming a Unity developer.
Step 1: Understand Why You Want To Become A Unity Developer
The first and one of the most important steps on how to become a Unity developer is understanding and identifying your reasons for why you want to become a game developer.
Why do you want to learn game development?
Is it because you’re just curious about how games are created? or you really want it to turn into a career? or you have game designs in your head that you want to become a reality?
Most games especially the ones that are created by big companies are often created by multiple people with different roles. There are game designers, animators, 3D modeling, programmers, and sound designers.
Now why is this important?
Well, understanding the purpose of your quest and knowing what you really want to achieve will not only benefit you but also save you from future headaches.
You see, game development is a very tedious task especially if your game projects are overly huge.
Step 2: Installing Unity Editor
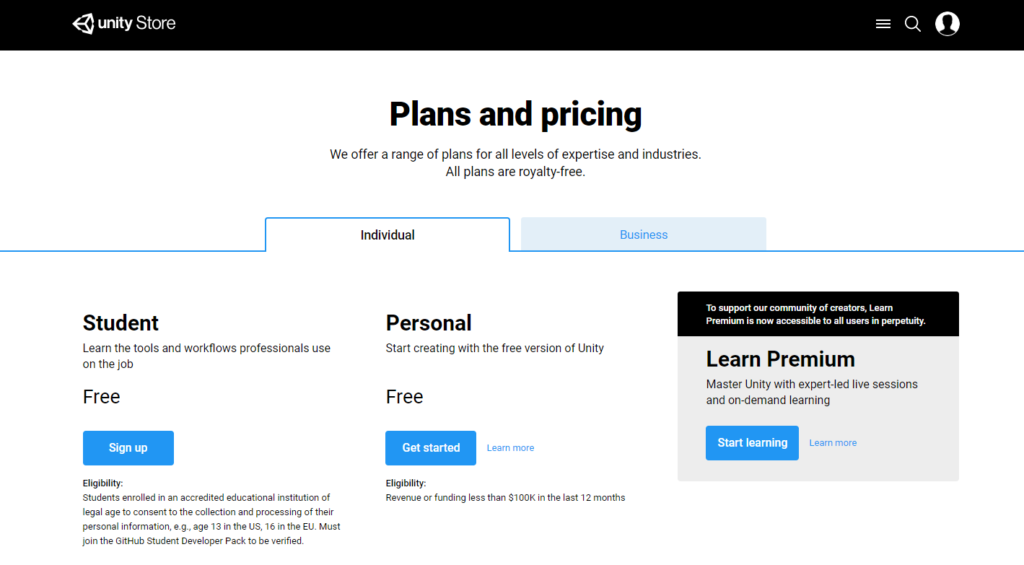
Before you can start learning how to become a Unity developer, obviously, you will need to install Unity into your computer.
Once you arrived to the plans and pricing page, just select Personal under the Individual tab and this should allow you to download the latest Unity Hub Installer.
Step 3: Playing Around Unity
Once you are able to use Unity, play around and understand each corner of the editor. Unity also provide free projects that you can download from their Asset Store and so if you ever get confused or lost, this is where you can use their documentation.
Step 4: Taking Unity Courses Online
Another way to fasten your learning journey is by taking Unity courses online. However, if you’re not interested in spending money on these courses then YouTube is your best option.
There are hundreds of free videos online that can help you understand how to use Unity. We recommend our good friend Brackeys. He provides good and straight to the point tutorials that will surely help you start.
Step 5: Never Stop & Focus On Your Projects
If you’re really serious of becoming a game developer then you have to commit to it. It’s unfortunate that we often see game developers start their project and after a couple of months they just get sick of it and stopped working. This is mostly the case especially if they only care for the profit of their work.
If you really want to become a Unity developer then you have make sure that you finish your projects. So don’t stop and just focus on finishing your projects.
Step 6: Publish Your First Game
After some time, usually 3-6 months, you should be able to publish your very first game. Wai-what?! I should be able to publish a game in just 3-6 months?! I don’t even know how to animate my character yet!
Well, that could be true that some game projects may take much time longer than 6 months but the whole point of learning to become a Unity developer is to start from a small game. We suggest to not look too much into detail like animations or graphics since they do take most of the time in development.
Now let’s say you have your first game ready for publishing. Where can you publish your game?
There are many places that you can publish your game but it all just depends on which platform your game is built. If it is meant for PC then publish your game on Steam. If it is a game meant for Android mobile phones then publish your game on the App Store. Just don’t forget to indicate that you are the developer who created the game as it will increase your respect+ points (*wink*).
Bonus Tip For Becoming a Unity Developer
We understand that learning how to create video games is hard and that’s why we’d love to provide you more tips and hopefully these helps you boost your learning journey.
Improve your programming skills
Every game developer knows that you always need to improve your skills in order to create something spectacular. If you’re looking to become a great Unity Developer, you need to learn everything about Unity editor.
Taking courses online regarding Unity and experimenting will also come in handy. You always need to try this out and improve your skills the best way you can, as it will make a huge difference in the long term. Plus, you can even read books on the topic, and Unity itself has a lot of tutorials and videos you can go through.
There are also plenty of Unity Game Development Cookbooks that you can use and download online that will surely help you learn game development and the whole process of game development.
Get a certification
So you’re taking this very seriously and you want your next career to be a Unity Developer. Well, acquiring a programming certification or even a Unity certification can help as well.
You want to show gaming companies that you have what it takes to work with Unity. Many times companies want developers with experience or a certification that shows their expertise. Get that, and you will have an advantage for getting jobs as a Unity Developer.
Learn more about the production process
A good Unity Developer will always have a plan in place for the game. You want to avoid situations when you are a feature creep and constantly focus on adding features. What you want to do is to plan everything accordingly and prepare a proper production map. That will give you more insight and focus, and you can also prevent any issues that can sometimes arise.
Understand how you can use the asset store
Some people that use assets get a bad rap, but they usually rely on them too much. Assets and templates can help you save time, and they can be very helpful. Since Unity has its own asset store, it makes a lot of sense to check it out and testing it for yourself. It can make a huge difference for you and people will appreciate it more.
Find ways to create systems that you can reuse and re-purpose
Automating stuff or having scripts to make the job easier is very helpful for every game developer. A Unity Developer in particular will appreciate this because you get to customize everything in the future. It works seamlessly and it will make your process a lot easier.
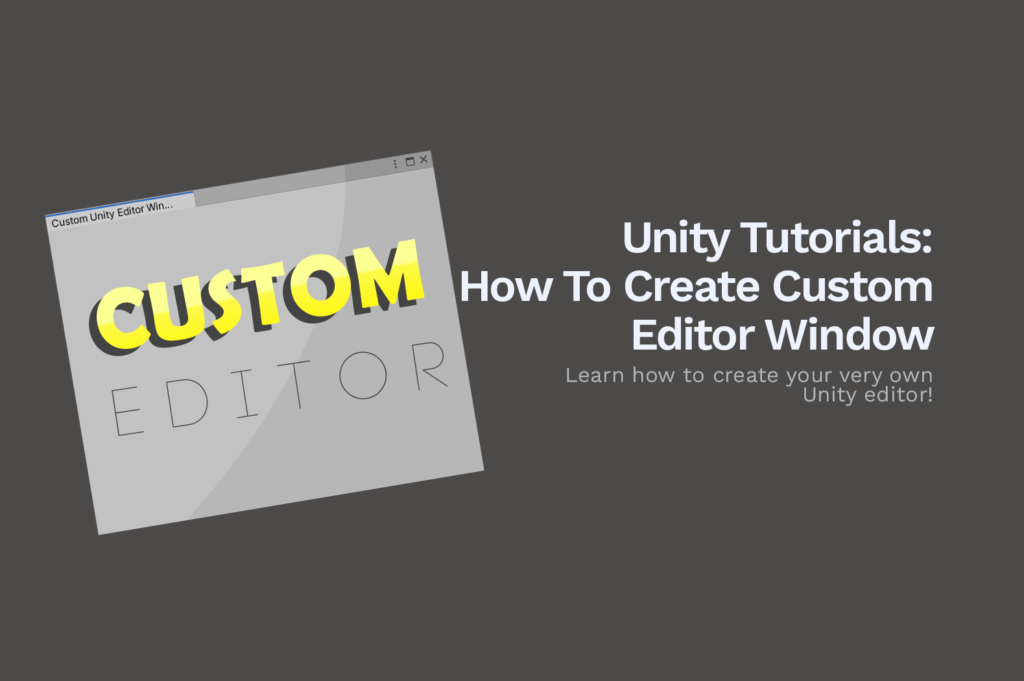
We recommend reading our tutorial on how to create a custom unity editor. This will help you customize your games much faster instead of doing it manually.
Study the Unity roadmap and be active on their forums
Every good Unity Developer stays on the forum, interacts with the Unity creators, talks about features and bugs, etc. These things will help you become a great developer and you will be able to focus a lot more on results and value.
Stuff like this can always make a huge difference, and it will surely give you the outcome that you would expect. You need to stay up to date with their roadmap too, since it will help you figure out whether you need such functions in your game.
Conclusion
Becoming a Unity Developer is a dream come true for a lot of programmers. While it can be tricky to become a Unity Developer at first, with the right planning, education and focus you can make it work. Yes, it requires a lot of practice, but it will help you pursue your dreams while also being able to create outstanding games!
Do you remember when Google Keyword Planner was still a thing? Because I do. Back in the good old days, I use Google Keyword Planner to understand Google search terms on its entirety like:
how much are the average monthly searches of a keyword?
Is the competition level too high or too low?
How much is the suggested bid for that keyword? and so on.
But after they updated the system, Google keyword planner only displays the range of the average monthly searches instead of giving us the exact number. Sometimes, you could still see the exact number of average monthly searches but only if you spend enough money on your campaigns through Google AdWords. Now here’s the question…
What is the Best Keyword Research Tool Online?
Well, I strongly believe that Google Keyword Planner is still the best tool to find good keywords since it’s from Google itself. Additionally, It still got useful features like grouping the keywords for everyone’s convenience. Not just that, it’s still totally 100% FREE.
But if you really think that Google Keyword Planner is your only hope to find the best keywords, then you’re obviously missing out a lot.
10 Best Keyword Research Tools for SEO
There are too many keyword research tools that have the same features as Google Keyword Planner. Tools like Ahrefs Keywords Explorer which provides a lot of data, features, and filters. However, you have to pay for these kinds of tools.
But we’re not going to focus on tools that require you to do monthly payments. In this article, we’ll be giving you the best FREE keyword research tools that you can use for your Search Engine Optimization.
Do you want to earn more traffic to your website? Do you want to know more and understand how your domains are doing? Then Ubersuggest is here to help you succeed in the game of SEO.
What is Ubersuggest?
Ubersuggest is one of the best keyword research tools that helps you generate keyword ideas for your content marketing strategy and production. It is free to use and provides a lot of features like:
Domain Overview where you can get detailed insight into the strategies that are working for others in your niche so you can adopt them and improve them for your own benefit.
Top SEO Pages report helps you discover which of your competitor’s pages are ranking for popular organic keyword phrases and which ones are loved by sites like Google. Because of this feature, you will no longer have a hard time finding the best keywords from your competitors so you can use them as well for your blogs to be liked by other platforms.
Keyword Suggestions will give you hundreds of head terms and long-tail phrases based on what is currently working for your competitors. It is also based on what people are typing into Google search.
Content Ideas will help you find the contents that are getting the most social shares and backlinks in your niche. This will help you get the topics that people are actually interested in reading.
Keyword Tool is a free online keyword research tool that uses Google’s Autocomplete to generate thousands of relevant long-tail keywords for any niche possible.
If you don’t know what Google Autocomplete is, it’s a feature used in Google Search to speed up the searches performed by online users on Google. The results are based on many different factors like how often the users were searching for that particular search term in the past.
How Does Keyword Tool work?
What Keyword Tool does is it extracts Google keyword suggestions and presents it to you in an easy-to-understand interface. Keyword Tool will prepend and append the search term that you specify with different characters, then it will be placed into a Google search box and pulls out the keyword suggestions. In just a matter of seconds.
Now here is the best part, there are features provided by Keyword Tool that are not provided by Google Keyword Planner. Here’s the list for that:
Easy to find keywords that are hidden in Google Keyword Planner
SEO and Content Creation
SEO Tool for any language
Advertisement Tool
Now despite its generic name, Keyword Tool delivers great results for your keyword researches. If you want to get more information like search volume of a keyword, CPC, and competition level. You may upgrade your account to see these other features.
I’ll put this one on the list because Bing Ads Intelligence is also one of the most powerful keyword planning tools that allow you to build and expand your keyword lists using the familiar Microsoft Office Excel interface.
It allows you to easily find the keywords you need and gauge their performance on the Bing Network, and then apply those insights to improve your keyword selection and campaign performance.
With Bing Ads Intelligence. You’ll be able to:
Work with large keyword lists that contain up to 200,000 words.
Perform integrated research on keyword and bid estimates.
Optimize your keyword campaigns
Tailor your bidding strategy based on pricing data for keyword-specific metrics such as clicks, impressions, rankings, click-through rate and cost per click.
Of course, we won’t be forgetting the goodness of Google Keyword Planner. Besides, it’s still one of the best keyword research tools that can help you with your SEO and keyword research.
If you haven’t tried using this tool then you must at least try because unlike any other research tools, Google Keyword Planner still provides the most accurate keywords that you can use for your own strategies.
Google Trends is a tool that you can use if you are in the news niche or any other general interest site.
This can help you not only find the keywords but also the topics that you can talk about. Topics that happened just recently and if you are fast enough to write blogs about what’s trending. Then you’re surely able to benefit with this tool.
With Buzz Sumo, you’ll be able to see not just the types of keywords but also the types of content that are most popular. This will also help you see what’s being shared online so you can get a handle on what’s popular on social media like Facebook and Twitter.
With this tool, you’ll be able to:
Define the time range in which you want to search
Filter by country in terms of Top Level Domain
Extract keywords depending on articles language
Narrow the results depending on which type of content it is
Filter by number of words
Buzz Sumo has a very simple interface yet provides a very powerful tool. So if you haven’t tried using this tool. We recommend you to try it at least once and let us know your feedback.
Do you want to do better research in less time? Do you want to identify which keywords your site could rank for right now and find high-impact suggests? Then Moz Keyword Explorer is the one that you’re looking for.
Moz Keyword Explorer performs in-depth keyword and SERP analysis to provide you detailed results about the keywords. Not just that, this keyword research tools also provide the following features:
Analyze keywords by search volume to accurately predict how much search volume a keyword will receive.
Generate and save keyword lists to be able to prioritize the keywords you need based on what topic you’re currently focused on.
Find keywords in question format, this will help you target long-tail keywords with high-relevancy in the form of questions.
Sort by predictive keyword metrics to help you to rank and drive website traffic.
Review SERP detail by keyword to understand why pages rank.
Most keyword research tools are found online with their own system where you needed to provide either URLs or keywords. But this time, you won’t need to do anything but install. Yes! That’s all you need to do.
Let me introduce to you, Keyword Everywhere. It’s a plugin for both Google Chrome and Mozilla Firefox where it generates detailed keywords or statistics like search volume, CPC, and competition level based on the search term that you provided into Google search.
It’s really easy to use, very useful and 100% FREE
Do you need more than a keyword research tool? How about a tool for market researching? A tool where you can take competitors’ keywords, and provides an in-depth PPC and SEO insights. Well, here’s Wordtracker.
Wordtracker is one of the best alternatives to the keyword planner. It provides not just hundreds but thousands of profitable long-tail keywords in every search you do.
Not just that, Wordtracker also provides the following features:
Actual keywords not grouped
Actual results not banded
Search trends
SEO competition metrics
SERP comparison
Live chat services
Related/lateral search
Amazon keywords
YouTube keywords
Negative keyword search
If you want more web traffic or if you want to understand more what your market is currently looking for, then you should try Wordtracker. It’s very useful, powerful, and FREE
Conclusion
Every keyword research tool above will provide you most of the features that you need to gain web traffic. I would recommend you to check each of the tools above and see what’s best for your website.
If there is one tool that stopped working or a link. Please help us by letting us know in the comments below.
There’s no doubt that Shopify is one of the best e-commerce platforms to make online stores and retail point-of-sale systems. It is so complete that it lets you grow and manage a business wherever you go.
Shopify lets you sell on any platforms as well like social media, marketplaces, blogs, or even in person. All you need to do is to build your own store and publish it to the public for viewing.
But is that really the only thing you need to do to make a Shopify store? Of course not, you still have to do marketing strategy and do lots of research to successfully attract customers and earn sales.
There are also too many Shopify apps that you can use to improve your Shopify store. Apps that can potentially increase your sales and customers. That’s why in this article, we’ll be giving you the best Shopify apps that you can use to improve your store, increase your sales, and attract more potential customers.
We’ll be breaking this down into categories so you know exactly which app to use to improve your Shopify store.
Marketing, SEO, and Promotions
Customer Support
Store Designs
Shopify Apps For Marketing, SEO, and Promotions
Promoting a Shopify store is something that everyone is doing. Not only it increases your sales but it also expose your store to any platform that is available only. Here are the Shopify apps that you can use to increase your sales.
I will put Free Shipping Bar by Hextom in number one because it’s also one of my favorites. A lot of customers today are expecting products to be shipped for free. Especially if they reached a certain amount of money in their cart. Free Shipping Bar lets you adjust this amount. Let’s say the goal $80, when they reached that amount, they will get free shipping.
According to recent data, 88% of consumers would be more likely to shop at a site that provides free shipping.
Free Shipping Bar Features
Customizable Free Shipping Bar display
Displays progressive messages as the customer increase the items in their shopping carts
Shows Congratulation message when the customer gets free shipping offers
Statistics for each bar to know which one generates sales the most
Lots of FREE bar templates to choose from
Free Shipping Bar Advanced Targeting Features
GeoTargeting, You may set different goals depending on locations. For example, you may set the goal for only $50 for the United States, and in Australia, the goal can be $70, and so on.
Limit where you display the bar, you may display it on the home page only, item page, or in the cashout page. You may also give a custom URL. As long as it’s not external links.
But do you know what’s best with this app? This app is FREE and will never show its company logo in the bar because they know it will look unprofessional.
Instagram is one of the biggest social media ever and fashion bloggers are mostly found in this platform. So why not use Instagram shop by Snapppt to increase your sales while the customers browse your photos?
How Instagram Shop works?
Connect to Instagram to automatically fetch images from your feed
Link images with your products using Snapppt’s plug-n-play Shopify store integration. Now, anyone can shop for your products.
Embed shoppable galleries and carousels directly in your store and product pages or, if you prefer to copy & paste your personalized URL to link to your Snapppt page in your bio link.
Your customers and your orders will appear in your shop dashboard, exactly as you’d expect. Purchases made as a result of a customer seeing your Instagram images are tracked all the way to the checkout so that you can see your best-performing images and the purchases they inspired. Customers no longer need to hunt down the things they saw in your Instagram feed in your store as each Instagram image is now linked with a ‘Buy’ button.
Consistent Cart is the app you should really give a try. It maximizes your marketing without being charged by ad agencies, SEOs or designers. It can also boost your sales up to 300% without spending any cash on ads.
There are times that a customer leaves a store with their items inside their cart, and this could lead to a loss of a huge amount of revenue. But, with PushOwl Web Push Notifications. It will help you remind your customers about their abandoned cart through push notifications. No more losing revenue!
Push Owl Features
Very easy to use
Abandoned cart reminders, helps to recover the items that were left behind by the potential customers.
Price drop push notifies the customers that the price of an item drops.
Back in stock push notifies the customers about an item having stocks once again.
Shipping push notifications notify the customers about their items being delivered
Welcome push notifications
Flash sales notifications
With Basic PushOwl, you may only have 500 impressions. But you may upgrade to 10,000 impressions with business type for only $19/month.
SMS Bump is Shopify’s most loved text marketing and automation app. With more than 300+ Shopify Plus clients, 1000+ Shopify Advanced and more than 5000 SMEs use SMS Bump to fully automate all notification and marketing processes in their stores.
Create SMS and Text with image marketing campaigns in seconds and track results. Fully TCPA and GDPR compliant. Integrates with major Shopify apps such as Klaviyo, MailChimp, ReCharge, Smile.io, PushOwl, ReCart and many more.
Download SMS Bump for FREE, set up in less than 5 mins and join 5000+ Shopify stores averaging a 35x increase in ROI.
Text marketing and automations
MMS support – Boost conversion by sending Image (PNG) or GIF SMS to your clients (US only)
SMS Segmentation – Combine Shopify filters for more narrow targeting
Run A/B Testing. Run different variants of a SMS message and measure performance
ROI Powered Text automations including Abandoned Cart Reminders and Customer Reactivation
Integrates with Shopify Flows
SMS Automations (On new order, based on the payment method, on shipped order and many more
Full support and tracking of Shopify discount codes + individual discount codes
SMS campaign scheduling
Opt out lists – keep track of unsubscribed clients
+ Many more
Features
Send messages just the right time – Launch campaigns or send automations based on your customer’s local timezone, wherever they are
Quiet hours – Input quiet hours based on your store timezone which guarantees that your clients would not be woken up in the middle of the night by a text message
Country restriction – Send messages only to a certain countries
Max cost per text message – Optimize your costs and do not send SMS messages above a certain threshold
Emojis – Spice up your campaigns
Analytics
Detailed In app Analytics – Track orders, link clicks, SMS by country, conversion rate, amount spent, specific automation stats, campaign stats, Image SMS, GIF SMS special tags and many more
Google UTM tracking
How to build your Text Marketing subscription list?
Make a small change in your checkout language (complimentary for all users + video tutorial included)
Use built-in subscription form generator (or use our integration with JustUno or Privy)
By texting a special SMS textword/keyword to our US shortcode (US users only)
Best Practices, where we detail how to get the most of text marketing and automations as well as sharing TCPA, CTIA, GDPR compliance
What I do love about Privy is that it effectively convert website visitors into subscribers and customers. Unlike other marketing apps, Privy gives you unlimited pop-ups, flyouts, spin to win (one of my favorites) and more.
Privy Features
Customizable, mobile-friendly display types including popups, spin to win wheel, banners, flyouts, scroll boxes, announcement bars, & embedded forms for email collections
Single-use, and bulk coupon code integration. Surface coupon codes in popups, or in email autoresponders
Target campaigns based on exit, cart abandonment, cart value, scroll, timer, location, device type, page, number of visits, number of orders, referral site, language & more
Run automated A/B split tests to understand how small changes impact conversion rates
Add ‘free shipping’ bars to any page
Send autoresponders & reminder emails to turn signups into sales
Run upsell models with add to cart buttons
Use Privy’s Automate plan to send newsletters, remind customers with their abandoned cart & send follow up emails
Seamlessly sync new contacts to more than 50 email marketing services like MailChimp, Klaviyo, Bronto, Conversion & more
Shopify Apps For Customer Support
Using Shopify apps to provide customer support is one of the important things that you should provide to your customers. It will build loyalty and it will increase customer satisfaction. So don’t hesitate to install one of the recommended Shopify apps for customer support.
Upgrade your customer support with our responsive and embeddable Easy Contact Form. Your customers can quickly and easily contact you privately on your website. Add fields and mark them optional or required. Premium versions include custom background images.
Easy Contact Form Features
Add a beautiful background image and impress your customers
Customize Templates for Customer Reviews and Feedback
Add custom fields and departments, attach image and auto-respond incl in our premium version
Multiple Forms also available with our premium option
Embed or Stand-Alone options
Secure with Ajax and HTML5 technology
Loads asynchronously. Won’t slow down your website
No coding needed. Easy Installation.
Mobile friendly
Easy contact form provides 30 days money back if you think that it’s not worth the money. But they also provide Free Plan if you don’t want to spend money.
Every Shopify store should provide an FAQ page. since most of the customers will have questions about shipments, mode of payment, etc. Shopify stores should also have a nice and easy-to-navigate FAQ page.
AfterShip is trusted by Shopify sellers to engage customers with a branded tracking experience. Start with their free plan to provide a better post-purchase experience!
Keep your customers updated on the whereabouts of their orders until delivery through an intuitive, customized tracking page and automated notifications.
Engage Customers with Branded Tracking Page – Build your own tracking page to include product marketing banner and Instagram image feeds to impress, engage and upsell your customers. You can also upload your logo and customize the color scheme to conform to your brand identity.
Improve SEO Ranking & Site Traffic – Replace the carrier’s tracking link with our auto-generated link to drive traffic to your site instead of the carrier’s site. Improve SEO and increase organic search.
Eliminate Customer Frustration – Assure your customers that their order is on the way and give them an estimate of the delivery time. Remember, if an order goes undelivered and a complaint goes unanswered, frustrated customers often resort to writing a review to let you and others know.
Monitor All Shipments in One Go – Track and check delivery status in the same place so that you can take remedial actions immediately before upsetting a customer.
Reduce Customer Inquiries & Complaints – Reduce customer inquiries on order status by enabling customers to look up order status by order number+email or tracking number anytime. At the end of the day, happy, engaged customers are the most effective tool for marketing your e-commerce business.
Notify Customers Before They Ask – Tell your customers where the order is and when it arrives at their door in a timely manner via automated email or text notifications.
If you’re looking for a free tool that would increase your customer’s satisfaction, and at the same time boost your sales, then Tidio Live Chat is what you’re looking for.
Tidio uniquely merges live chat, Bots, and Marketing Automation to meet the expectations of the most demanding Shopify store owners.
Tidio Live Chat Features
Fast Contact – By adding Tidio Chat to your store you empower your customers with the quickest and most effective form of contact. Research shows that live chat can boost sales by as much as 40%. Next time your customer faces an issue, they won’t go to the competitors or waste time — they’ll contact you.
Auto-Bot Response – Nobody can be available 24/7. Except for Bots, that is! Bots automatically reply to 43% of the most popular inquiries.
e-mail and Messenger integration – How many times have you missed a customer’s message that was sent through a channel you haven’t been checking frequently? In Tidio, you’ve got all your channels in one place — you’re always able to reply to messages. If you’re often away from your computer, Tidio will give you a free mobile app.
A modern widget design that suits any website – When designing the widget, it was our goal to make it gorgeous and suitable for any website. Dozens of thousands of sites that use Tidio have shown us that we’ve done a good job. You can adjust your own widget to the colour scheme of your store.
Store design is one of the components that you should consider improving as well. Customers first impression is important. Like the old saying: “It is the first impression that lasts forever, so make it count’. “
You can use the following Shopify apps to not only improve your store design but also optimize them for fast loading.
In e-commerce, you have less than three seconds to build trust with a potential buyer and one of the easiest ways to increase conversion rates for your store is to add a set of payment processor icons.
Displaying payment badges is one of the most proven ways to build trust during the customer sales journey.
Free Trust Badge Features
Brand new premium version – Unlock 250+ premium badges including full-color and credit card payment badges. You’ll also be able to add your badges to your homepage and cart page to build trust through the sales process. Upgrading to premium is an affordable one-time payment that gives you lifetime access to the premium version of the app.
Simple setup in just two minutes – Very easy to use with no technical skill needed. Just install, choose your badges and that’s it.
Fully customizable – Match your payment badges perfectly to your store’s design. You can customize the message, colors, alignment, size and much more.
TOP QUALITY SUPPORT – They are 100US-based and looking forward to helping you. Their passion is helping Shopify store owners grow their businesses and understand the importance of fast, reliable customer service.
Stamped.io Reviews has proven to increase social proof that leads to an increase in sales. It also boosts your organic traffic by optimizing SEO, showcasing star ratings on products and collections page in Google search, increasing site ranking.
Marketing & Upselling
Facebook Reviews Tab
Smart Product Recommendations
Incentivize Coupon for Writing Reviews or Sharing Reviews
Facebook & Instagram Reviews Retargeting Ads
Social Push reviews to drive traffic from Facebook and Twitter
Boost your organic traffic
SEO-optimized Widgets for Reviews and Q&A
Showcase star ratings on Product & Collections pages in Google Search, increasing site ranking
Let shoppers personalize products with dropdown menus, text and number inputs, checkboxes, radios, and more. Infinite Options is 100% free! No watermarks, gimmicks, or surprises.
Infinite Options Features:
Easily add an unlimited number of product customizations to your products so you’re not restricted by the normal 3 option limit
Control over placeholder and default values
Set fields as optional or required
Product bundling functionality allows you to add additional charges for services or add-ons offered with your products
Dropdown menus and checkboxes can be set up to allow multiple selections
Show a live count of remaining characters when you set a maximum character length
Numeric fields can have minimum and maximum values
It’s easy to get up and running in just 1 minute with only a single line of code to paste in your theme.
Bundle add-on products to your option selections to increase prices. Need a $5 gift wrapping surcharge? How about $15 for rush processing? Infinite Options makes this easy!