Search Results for: website

How To Create Website Subscription with Laravel Cashier

So you’re building a web application where users can signup to your website and access your web application but then, you realized that your web application can bring you hundreds if not, thousands of revenue.

However, you don’t really know exactly where to start.

In this tutorial, we will learn how to create monthly subscription plans using Laravel 7 and Cashier to get payments from users through Stripe (or their credit cards)

What is Laravel Cashier

laravel cashier stripe logo flat vector

Laravel cashier is a package from Laravel that provides an expressive and fluent interface to Stripe’s subscription billing services. With Laravel Cashier, you can create coupons, subscription plans, and even generate invoice PDFs.

It’s safe to say that almost everything you need to create a flawless subscription system is in Laravel cashier.

How to install Laravel Cashier

To install Cashier in Laravel, all you need to do is to use the following command in your terminal:

composer require laravel/cashierCode language: JavaScript (javascript)
installing laravel cashier command

It’s important to note that we will be using a pre-setup project for this tutorial. If you don’t know how to create a project in Laravel, you may check out our guide here.

After installation, you will then have to use the following command to create the database for the cashier:

php migrate artisan

The command should give you the following in the terminal.

php artisan migrate command image

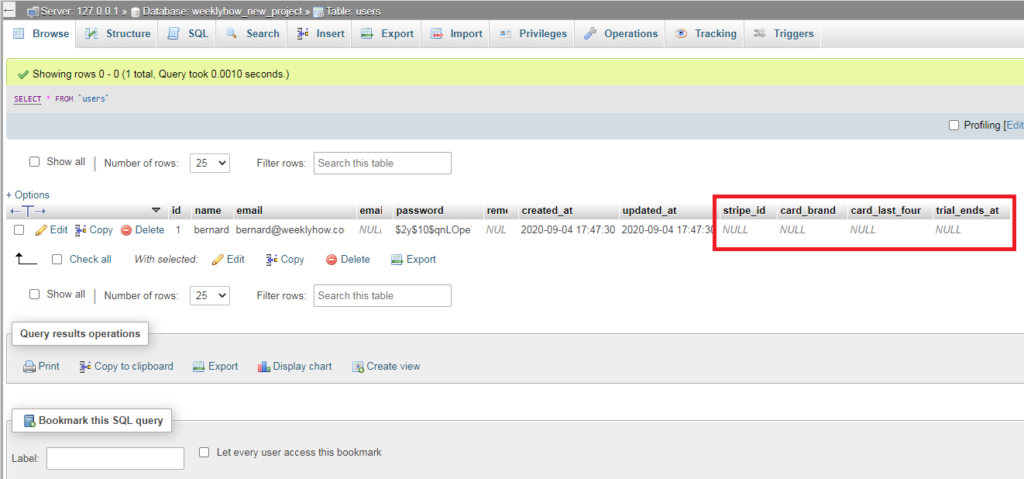
After the migration, you can see in your database that there are two new tables which are for subscriptions and other items.

xampp phpmyadming subscription table

Cashier will also add 4 columns inside the users table. These columns are for the card details and for when the trial will end (if any).

phpmyadmin user table laravel cashier

Stripe API

Before we begin using Laravel Cashier, we need to create an account from Stripe to get API keys and secret keys for Cashier.

If you already have an account, you may skip this step. Otherwise, you may register using the button below:

After the registration and email verification for your account.

Go to Developers tab and select the API keys page.

stripe dashboard api keys page

Since our account is not activated, we can only use the standard keys.

Under the standard keys section, you can copy the following keys. The publishable key is your API key and the secret key is your secret key.

Now let’s apply these keys to our application.

Open your .env file and copy the following code:

STRIPE_KEY=pk_test_xxxxxxxxxxxxxxxxxxxxxxxxxx
STRIPE_SECRET=sk_test_xxxxxxxxxxxxxxxxxxxxxxxxx

Make sure to replace the value with your API key and secret key.

Don’t forget to save the .env file.

User’s Billable

For us to be able to perform common billing tasks such as subscriptions, we will have to add the Billable trait to our User model.

Let’s open User.php

Go to your project folder > app > User.php

vs code laravel user php

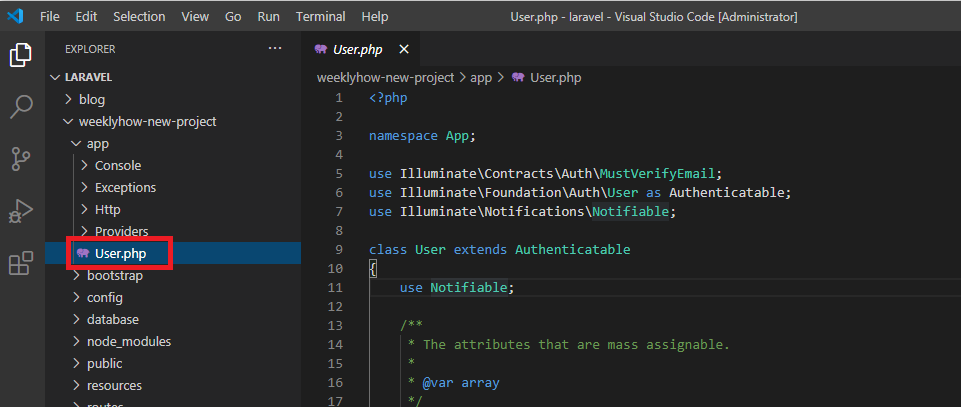
Then, just underneath the line of use Illuminate\Notifications\Notifiable;, apply the following code:

use Laravel\Cashier\Billable;
Code language: PHP (php)

Then, just beside the Notifiable, you can just add Billable.

The updated code should have the following:

laravel cashier billable model trait

Save the script.

And there we have it, we have finally installed and setup Cashier to our Laravel application.

Creating a subscription

Now that we have installed Cashier in our Laravel application, we can now start creating subscription plans for our users.

Create products with Stripe

Luckily, we can all do this with our Stripe account so login to our Stripe dashboard and navigate to the products page and click the Add Product button.

adding products in stripe dashboard page

A form should pop up as soon as you press the add product button.

Fill up the form.

NameThis will be the name of the subscription plan. Note that this is visible to customers at checkout and in their receipts or invoices.
Description *To describe what the plan can do for users. Note that this is also visible to users at checkout.
Image *You may upload an image to describe the subscription plan. Totally optional
Statement descriptor *Statement descriptor is what will be shown to your customer’s bank statement.
Unit label *This is used to describe how you sell your product. For example, if you sell a product by its weight, then you can enter either kg or any unit.

Since we’re creating a plan, you can just leave this empty.
Metadata *If you want to store additional data, you can create it here.
Pricing modelChoose standard pricing if your selling subscription plans or one time payment items.

Change to package pricing if you are selling products by units.

Select graduated pricing if you use pricing tiers that changes the price for some units in an order.

Select volume pricing if you want to charge your customers based on the quantity or units.
PriceEnter the amount that you want to charge your customers.

You can also select if you want to charge your customers monthly or one time only.
Billing periodHere you can select if you want to charge your customers daily, weekly, monthly or yearly (and so on).
Add free trial *If you want to give your customers a trial, you can set how many days before they will be charged.
Usage is metered *Metered billing lets you charge your customers based on their usage.
Price description *Something you can use to describe the price.
Items with * are optional

Once you’re done filling up the form, you can save by clicking the Save button at the top-right of the page.

After saving, you will be redirected to the product’s page.

product subscription plan in stripe dashboard

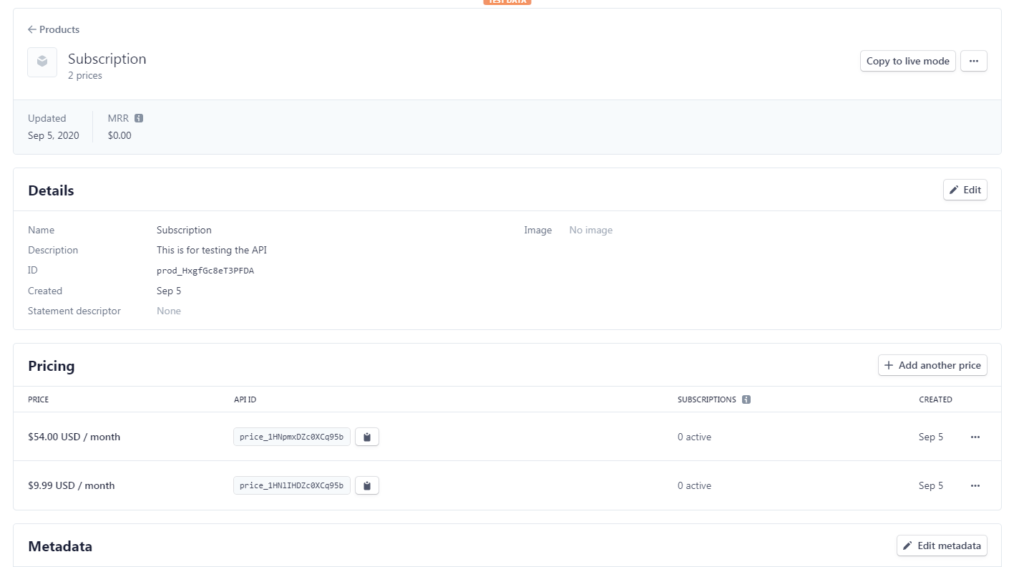
In the image above, we have created only two pricing. If you want to add more, feel free to do so.

So what we really need here is the API ID beside each of the pricing. We’re going store them in our database so it will be much easier to access them rather than going back to stripe.

Creating the model

Open your terminal and run the following code:

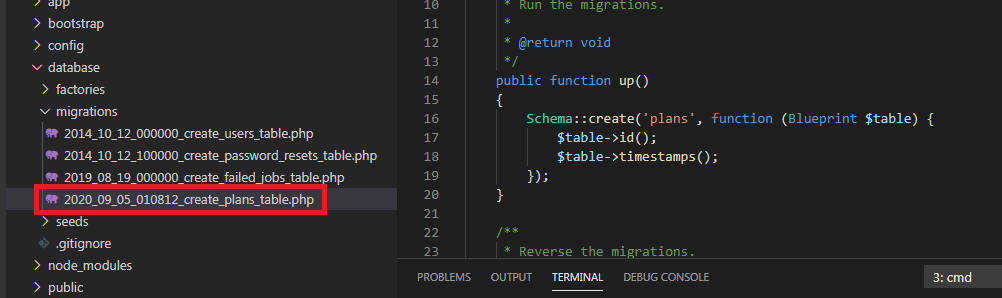
php artisan make:model Plans -mCode language: CSS (css)

This will create a migration file for us which we’ll then edit for our subscription plans.

So open the file which is located inside the migrations folder of the database folder.

creating model in laravel

Once you have accessed the file, copy the following code:

<?php

use Illuminate\Database\Migrations\Migration;
use Illuminate\Database\Schema\Blueprint;
use Illuminate\Support\Facades\Schema;

class CreatePlansTable extends Migration
{
    /**
     * Run the migrations.
     *
     * @return void
     */
    public function up()
    {
        Schema::create('plans', function (Blueprint $table) {
            $table->id();
            $table->string('title');
            $table->string('identifier')->unique;
            $table->string('stripe_id')->unique;
            $table->timestamps();
        });
    }

    /**
     * Reverse the migrations.
     *
     * @return void
     */
    public function down()
    {
        Schema::dropIfExists('plans');
    }
}

Code language: PHP (php)

Save the file and open your terminal once again and run the following command

php artisan migrate

This will create the table in your database.

migrating database in laravel

Now click the plans table.

We will have to insert two rows in this table or depending on how many plans you have created in your Stripe account.

So we’ll just go over the SQL page and use the following SQL query to insert our first row.

INSERT INTO plans(`title`,`identifier`,`stripe_id`,`created_at`,`updated_at`) VALUES ('Premium Plan','premium','ENTER YOUR API ID HERE',NOW(),NOW())Code language: JavaScript (javascript)

Make sure you enter your API ID which you can find beside the pricing of your Stripe product.

api id keys in stripe product page

Then, another SQL query:

INSERT INTO plans(`title`,`identifier`,`stripe_id`,`created_at`,`updated_at`) VALUES ('Basic Plan','basic','ENTER YOUR API ID HERE',NOW(),NOW())Code language: JavaScript (javascript)

Your table should look like this:

adding rows in php my admin with sql queries

Creating the subscription controller

The next thing that we need to create is the controller for our subscription plans. So open your terminal again and run the following command:

php artisan make:controller Subscriptions\SubscriptionControllerCode language: CSS (css)

This will create Subscriptions folder and a new file named SubscriptionController.php

You can access them under app > Http > Controllers

creating subscription controller in laravel

Open SubscriptionController.php and update its code to the following:

<?php

namespace App\Http\Controllers\Subscriptions;

use App\Plans;
use App\Http\Controllers\Controller;
use Illuminate\Http\Request;

class SubscriptionController extends Controller
{
    public function index() {
        $plans = Plans::get();

        return view('subscriptions.plans', compact('plans'));
    }
}

Code language: PHP (php)

Creating the subscription plans view

Navigate to your views folder which is located inside the resources folder.

Then, create a new folder and name it subscriptions.

Then, inside the subscriptions folder, create a new file and name it plans.blade.php.

creating subscription plan view in laravel

Open the plans.blade.php and copy the following code:

@extends('layouts.app')

@section('content')
<div class="container">
    <div class="row justify-content-center">
        <div class="col-md-8">
            <div class="card">
                <div class="card-header">{{ __('Subscription Plans') }}</div>

                <div class="card-body">
                    @foreach($plans as $plan)
                        <div>
                            <a href="{{ route('payments', ['plan' => $plan->identifier]) }}">{{$plan->title}}</a>
                        </div>
                    @endforeach
                </div>
            </div>
        </div>
    </div>
</div>
@endsection


Code language: PHP (php)

Adding routes

Open web.php which located inside the routes folder and update its code to the following:

<?php

use Illuminate\Support\Facades\Route;

/*
|--------------------------------------------------------------------------
| Web Routes
|--------------------------------------------------------------------------
|
| Here is where you can register web routes for your application. These
| routes are loaded by the RouteServiceProvider within a group which
| contains the "web" middleware group. Now create something great!
|
*/

Route::group(['namespace' => 'Subscriptions'], function() {
    Route::get('plans', 'SubscriptionController@index')->name('plans');
});

Route::get('/', function () {
    return view('welcome');
});

Auth::routes();

Route::get('/home', 'HomeController@index')->name('home');

Code language: PHP (php)

This should allow you to access the plans page like below

testing laravel web application

Creating payment controller

Open your terminal once again and use the following command to create the PaymentController.

php artisan make:controller Subscriptions\PaymentControllerCode language: CSS (css)

After that, navigate to your project folder > app > Http > Controllers > Subscription and open PaymentController.php and copy the following code:

<?php

namespace App\Http\Controllers\Subscriptions;

use App\Http\Controllers\Controller;
use Illuminate\Http\Request;

class PaymentController extends Controller
{
    public function index() {
        $data = [
            'intent' => auth()->user()->createSetupIntent()
        ];

        return view('subscriptions.payment')->with($data);
    }

    public function store(Request $request) {
        
    }
}

Code language: PHP (php)

So, what we’re doing here is we’re just passing to our payment view the intent value from the createSetupIntent() function.

Since we still don’t have the said view, let’s go and create that file.

Creating the payment view

Go to your resources folder and open the views folder and inside the subscriptions, create a new file and name it payment.blade.php.

Then copy the following code:

@extends('layouts.app')

@section('content')
<div class="container">
    <div class="row justify-content-center">
        <div class="col-md-8">
            <div class="card">
                <div class="card-header">{{ __('Checkout page') }}</div>

                <div class="card-body">
                    <form id="payment-form" action="{{ route('payments.store') }}" method="POST">
                        @csrf
                        <input type="hidden" name="plan" id="plan" value="{{ request('plan') }}">
                        <div class="form-group">
                            <label for="">Name</label>
                            <input type="text" name="name" id="card-holder-name" class="form-control" value="" placeholder="Name on the card">
                        </div>
                        <div class="form-group">
                            <label for="">Card details</label>
                            <div id="card-element"></div>
                        </div>

                        <button type="submit" class="btn btn-primary w-100" id="card-button" data-secret="{{ $intent->client_secret }}">Pay</button>
                    </form>
                </div>
            </div>
        </div>
    </div>
</div>

<script>
    const stripe = Stripe('{{ config('cashier.key') }}')

    const elements = stripe.elements()
    const cardElement = elements.create('card')

    cardElement.mount('#card-element')

    const form = document.getElementById('payment-form')
    const cardBtn = document.getElementById('card-button')
    const cardHolderName = document.getElementById('card-holder-name')

    form.addEventListener('submit', async (e) => {
        e.preventDefault()

        cardBtn.disabled = true
        const { setupIntent, error } = await stripe.confirmCardSetup(
            cardBtn.dataset.secret, {
                payment_method: {
                    card: cardElement,
                    billing_details: {
                        name: cardHolderName.value
                    }
                }
            }
        )

        if(error) {
            cardBtn.disable = false
        } else {
            let token = document.createElement('input')

            token.setAttribute('type', 'hidden')
            token.setAttribute('name', 'token')
            token.setAttribute('value', setupIntent.payment_method)

            form.appendChild(token)

            form.submit();
        }
    })
</script>
@endsection

Code language: PHP (php)

Next, go to your routes folder again and open the web.php file and update its code to the following:

<?php

use Illuminate\Support\Facades\Route;

/*
|--------------------------------------------------------------------------
| Web Routes
|--------------------------------------------------------------------------
|
| Here is where you can register web routes for your application. These
| routes are loaded by the RouteServiceProvider within a group which
| contains the "web" middleware group. Now create something great!
|
*/

Route::group(['namespace' => 'Subscriptions'], function() {
    Route::get('plans', 'SubscriptionController@index')->name('plans');
    Route::get('/payments', 'PaymentController@index')->name('payments');
    Route::post('/payments', 'PaymentController@store')->name('payments.store');
});

Route::get('/', function () {
    return view('welcome');
});

Auth::routes();

Route::get('/home', 'HomeController@index')->name('home');

Code language: PHP (php)

Now the next thing that we need to do is to make sure that we’re referencing the JavaScript file of Stripe so go and open the app.blade.php and add the following script tag inside the head tags.

<script src="https://js.stripe.com/v3/"></script>Code language: HTML, XML (xml)

After adding the script tag, you should then be able to run your app like below.

laravel subscription plan payment page example

Awesome!

Creating the subscription

Now the last thing that we need to do is to create the subscription and store the result into our database.

Let’s go and open the PaymentController.php for the very last time and update its code to the following:

<?php

namespace App\Http\Controllers\Subscriptions;

use App\Plans;
use App\Http\Controllers\Controller;
use Illuminate\Http\Request;

class PaymentController extends Controller
{
    public function index() {
        $data = [
            'intent' => auth()->user()->createSetupIntent()
        ];

        return view('subscriptions.payment')->with($data);
    }

    public function store(Request $request) {
        $this->validate($request, [
            'token' => 'required'
        ]);

        $plan = Plans::where('identifier', $request->plan)
            ->orWhere('identifier', 'basic')
            ->first();
        
        $request->user()->newSubscription('default', $plan->stripe_id)->create($request->token);

        return back();
    }
}

Code language: PHP (php)

Save the script and enter your test credit card details like below.

testing laravel cashier with stripe example

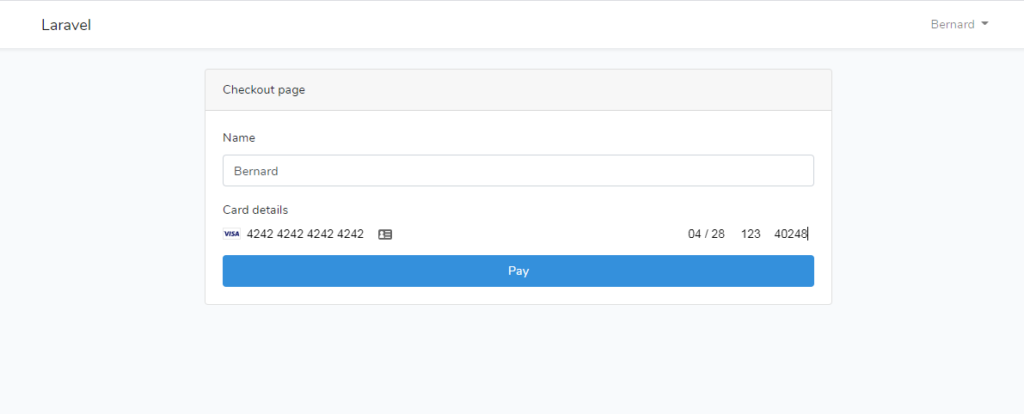
It should redirect you back to the payment page and if you check your database, you should see that a new row was created for the table subscriptions and subscriptions_items.

saving stripe transactions in the database with laravel

And if you check your Stripe dashboard, you should see that you’ve got the payment.

getting paid in laravel web application with laravel cashier and stripe

Conclusion

Adding subscription plans to your web applications can be intimidating but with Laravel cashier and Stripe, creating subscription plans will never be hard anymore.

We’re hoping that this guide helped you to create subscriptions in Laravel. If you have encountered any issues, you may let us know in the comments below and we’ll do our best to help you out.

11 Signs Your Website is Going to Fail & Here’s How To Fix It

If you’re a blogger or writer, you may have this kind of habit where you always check your analytics to see if your blog is growing or not and whenever you see your website is not doing so well, you tend to have this anxiety that feels like no one likes what you’re writing.

With all of that happening, you wanted to understand… why? or how is it happening?

In this article, we’ll be sharing 11 signs to look at to understand why your website is failing. If you don’t see any of these signs happening to your website then there’s nothing to worry about. However, if you do see some of these happening then we’ll provide you the best solution to help you fix your failing website.

1.) Your website is not responsive

This is one of the most common signs of a failing website. If you see in your analytics that your traffic is going down then your website is probably not looking good to other devices such as mobile and tablet.

According to the latest study from Broadbandsearch.net, only 47% of the internet users go for a desktop, whereas 53% of the users go for mobile over desktop and PCs.

In other words, if your website is not responsive to mobile, then that means you’re not earning more than half of the internet population.

Solution

The Internet is changing most of the time and if your website is not updated since 2012, then that’s the problem. As a blogger, it is your responsibility to cover the majority of the internet population by understanding who your users are and how they use the internet.

Google Search Console Mobile Friendly Test Page is not mobile friendly

To fix this issue, we recommend using Mobile-Friendly Test from Google Search Console to understand if your website is mobile-friendly or not.

If in case your page is not mobile-friendly, then we suggest getting an updated or a new theme to your blog. If you’re using WordPress then we recommend using the default TwentyTwenty theme as it is fast and optimized for blogging use only.

However, if you’re looking for a brand-new design, then we would love to help you create a new theme from scratch that will guarantee you to get a fast and optimized design.

2.) You’re getting less traffic and more bounce rate

If in your analytics says that you’re getting less traffic and more bounce rate, then it’s time to make some changes not just on your website design but also on your way on how to deliver web content.

However, the decrease in traffic and the rise in the bounce rate is determined by many factors.

High bounce rate and low session duration in google analytics

One of the factors to look at is your content pages. Does the content page have plenty of annoying pop-ups or ads? if so, then it’s time to remove them or put them less.

Put yourself in the shoes of the reader, let’s say you’re browsing this article and suddenly 10 pop-ups showed in your browser. How would you feel? Exactly, annoyed… So what are you gonna do? Close all the pop-ups? No, close the blog or browser. That’s how you get more bounce rate.

Another thing to look at is the design of your website. Like what we mentioned before, non-responsive websites will give you less traffic. Even if you get some, they’re likely to stay due to how bad your website is looking.

Solution

There could be many reasons why you’re getting less traffic at this point. The most common reason of all time is how weak your SEO is. Like most of us, Google is one of the best sources of free traffic.

To be at the top 10 of the search results, you have to follow several rules like publishing helpful content, setting up XML sitemaps, installing SEO plugins, optimizing website speed, and more.

If you’re targetting Google as your main source of traffic, then you should always put yourself in the shoe of your readers. Make your readers feel that you’re a friend who likes to help. Don’t overwhelm your readers with plenty of ads or pop-ups.

3.) Your site is TOO old

This could be one of the least reasons why your site is getting less traffic.

As an example, here is our design back in the days where we still write articles about mostly anything. (which is not good! we’ll explain later)

WeeklyHow Old website design


A lot of bloggers say that when your site is too old, you have a higher chance of getting more traffic. We are aware that this is true to some degree but this really depends on how your website is built.

Let’s say you have a 6-year old website and this website barely gets page views even if this has plenty of content. One of the reasons might be that this website has a history of getting penalized by Google or the content is not “fresh”.

Solution

One of the most obvious solutions to this problem is to make sure that your website is as fresh as lemon. Once you make your blog, try your best to update all of your content to make Google think that you’re keeping up with the latest information and you’re trying your best to help users.

Again, don’t let your content get dusted.

4.) You have LESS backlinks

If you are not aware of this, backlinks play a key role in your search rankings.

Most of the websites that rank in Google search results usually have high-quality backlinks directing to them. So if you think you haven’t done any link building to your website, then chances are you don’t have many backlinks to strengthen your website.

Solution

We all know that one of the hardest things to accomplish in blogging is link building.

I’m sure you are aware of how hard it is to ask other websites to link to your website. Some of them will even ask you to pay for the backlinks.

The best solution to this problem is to just keep writing helpful content. Write content that will make readers talk about it and there only you will get backlinks.

5.) Your content is NOT helpful

We all know that content is the primary reason why people find your blog.

If you’re only publishing bad and unreadable blog posts then no one will ever want to read them. Even if you try to market them, no one will stay in your content for more than 30 seconds.

Getting web traffic is very easy but making them stay is a responsibility. Yes, you can use SEO, keywords, marketing strategy and all that. But all of that is useless if your content is as bad as sweet carbonara.

Solution

Obviously, if your content is bad then you have to rewrite them. Improve them.

We know that it’s easier to say than to do it but if you really want your readers to stay in your content for more than one minute then you have to make sure that you impress them as soon as they land to your page.

How to do it? Well, you can always follow the following guidelines for a perfect blog.

  • Make space between your paragraphs
  • Avoid non-sense and unrelatable sentences
  • Use emphasis like bold and italics.
  • Include statistics if possible
  • Use images to describe your topic
  • Add sources as it will strengthen your research

Writing content takes time and it’s okay. So whenever you write content, take your time and do your best to provide the best information more than anyone else and you’ll be surprised that your blog is getting ranked on Google.

6.) Your headlines DOESN’T make sense

Did you know that writing a headline is the same as writing a content?

If your headlines are not making any sense then the chance of your blog getting traffic is slim. Even if you think your content is perfect, if your headlines are not readable then no one will read it.

Do you notice the pattern now?

Making your website responsive.

Writing a perfect content.

And now, writing a good headline.

Blogging is all about providing the BEST information out there. If you’re a blogger like us then you are on the battlefield too and your weapon is your words. Use them well and you will be profited.

Solution

If you are not aware, there is a formula for writing a good headline.

One of the easiest formulae that we use is the following.

[figure] + [adjective] + [main keyword] + [outcome]

The above formula is great especially if you’re writing a list post. An example of this is this article that you’re currently reading.

However, here are some of the other examples we found:

  • 32 Proven Ways to Make Income Fast
  • 10 Best Answers to Job Interviews That Gets You Job
  • 16 Awesome Life Hacks To Save You Time

Of course, there are more formulae for other types of posts.

If you are a blogger and you mostly post tutorials, then you probably know already your formula.

[How To] + [adjective] + [main keyword] + [outcome]

If you want more information in regards to this, we highly recommend reading Neil Patel’s Step-by-Step Guide to Writing Powerful Headlines and we also have an amazing resource to Effective Marketing Strategy for Bloggers with No Budget.

7.) You’re NOT working on your social media presence

social media facebook and instagram logo

Social media is believed to be the second source of website traffic and if you don’t believe this then you’re obviously missing out a LOT.

Having a huge presence in social media will help your website get more traffic so it’s best to always link your website to any of the popular social sites like Facebook, Instagram, and Twitter.

The reason why you should work on your social media presence is that it will strengthen the legitimacy of your business. If your website doesn’t have a social media presence, users may not take you seriously.

Solution

Getting a social media presence is very easy. All you need to do is to create an account from Facebook, Instagram, and Twitter and then, post all of your valuable content. If possible, promote your content using advertising. This will let people know that your business exists.

If you want to strengthen more your social media presence, you can create a YouTube channel where you convert your content into video content. This will spread the name of your website throughout social media thus you will get more page views.

8.) Your website is full of Low-Quality Content

Helpful and informative content is one of the most important factors for increasing your SEO score. If you provide low-quality content then expect your website to fail.

One of the reasons why bloggers fail is due to the fact that they tend to prioritize the quantity of the content over quality.

If you provide helpful content, your chance of getting referenced to other readers is higher. Heck, readers will even come back to your page because your content is informative.

Solution

Before you hit the publish button, take a deep breath and ask yourself if your content is worthy of your reader’s time.

Take your time before you even publish your content.

Do some research and make sure your information is above everything else. Make sure that your content helps people.

Stop rushing your content just to get more pages.

9.) Your website is full of non-sense

Most visitors, they often have a goal in their mind. Whether it is to buy a product or to read your article, they always have a goal.

If your website is full of non-sense stuff like widgets or other embedded codes that don’t really offer anything, visitors will obviously not take you seriously, and it will affect the future of your website.

Solution

Make your website dedicated to your visitors. If your website is meant for readers, then offer them navigations, to guide them where your articles are placed.

If your website is meant for selling a certain product then offer your visitors a landing page where it highlights the product that you want to sell. This will make your visitors feel that your website is a legit website that offers exactly what people want.

10.) Your website doesn’t have a niche

This is an addition to the previous list and it has a good relation to it. If your website doesn’t have a niche, visitors will most likely not understand what your website is meant for.

Before you even built your website, we’re sure that you had something in your mind. For example, you planned to build your website to provide pieces of information about planes.

That is a niche. Talking about planes is a niche.

If your niche is about airplanes, then you made a content about iPhones, then you made a content again about traveling… That would make your website unorganized and readers will most likely find it hard to get to your web pages.

Solution

Make your website focus only on a certain topic. Don’t go overboard as it will make it hard for readers to understand your business.

Sad to say but if your website started as a hobby site then it’s likely not to be successful.

There are a lot of factors to consider for creating a successful niche.

  • Website URL – make sure your site URL focuses on the keyword of the niche you want to create.
  • Website design – make sure that your website design fits well in your niche.
  • Blog page – make sure your site focuses on the right topics within your selected niche

11.) Your website is super slow

This is probably one of the reasons why your website is not getting that much traffic.

Imagine, you’re searching on Google about how to Instagram and you click on one of the results and that website took SO long to load. What are you gonna do? Of course, you’re going to leave the page and look for the answer somewhere else.

That itself will affect your website.

If your website is very slow then no one will be able to reach your content.

Solution

If you’re using WordPress as your CMS, then make sure you use the fastest and optimized WordPress themes.

To check how much time your website takes to load, you may use Google Page Speed Test or GTMetrix.

Do Free Website Traffic Generators Work? Are They Safe and Effective?

Getting organic traffic is not that hard to do especially nowadays that everything is in front of you. You just need to search online for guidance on how to get web traffic for free and then boom! Millions of articles will pop up in search results to help you get traffic.

But, how can you really get organic traffic in a short amount of time? by SEO? Paid promotion? spamming your website URL to blogs? Sure these could give you web traffic but what if I tell you that doing such things could still lead to a slow process of gaining organic traffic?

In this article, I’ll be helping you on how to increase your website traffic fast and free. Yes free! without spending money on promotions and stuff. All you need to do is to read this article and follow the steps without skipping.

Let’s start!

Website Traffic Generator vs. SEO

Why NOT use website traffic generators?

I’ve seen a lot of bloggers who try to use these FREE website traffic generators that promise to give you thousands of web traffic and now I’m here to tell you, stop using them! They won’t do any good for your website.

So yes, to answer your question. No! They are not safe and effective.

Some bloggers think that if they have this type of software to generate traffic then all they needed to do is to push a button that says “Generate Web Traffic!” and then boom! Instant traffic. Now let me tell you, that’s not how it works and you’re just cheating the system plus you’re just wasting not just time but also money.

These free website traffic generators will only give you fake traffic which could lead to being banned to Google services such as Google AdSense and not just that, instead of gaining website authority, you won’t get them because your page views are not organic at all.

I have used Website Traffic Generator, is my website gonna be okay?

If you are worried about the state of your website then don’t be. If you have used a website traffic generator, just stop using it and focus on getting back the trust of search engines by providing quality content, by getting backlinks and authority and by using proper ways of getting traffic like SEO and marketing strategy. Search engines will notice that eventually and will bring your website back to its right track.

How to get web traffic FAST?

You might have read this a lot of times but the only thing that is effective in giving you web traffic fast is by mastering SEO and marketing strategy.

Use keyword research tools like Google Keyword Planner. It’s free and very useful in providing the right keywords for your website. The thing that I will recommend you though is by using keywords with low competition level and high search volume. This will surely boost your website’s impressions and clicks.

I’m sure I know SEO now but I still don’t get traffic, why?

If you think you have mastered SEO yet you still don’t get traffic then there are possible reasons why this happen.

Your website is NEW

If your website is not older than 3 to 6 months old then expect your blog to not get that much traffic. In your first six months, you should only focus on writing high-quality content than focusing on gaining thousands of web traffic. Sure! You’re writing articles to gain traffic but if you focus your mind to that instead to your articles then your article might not end up useful. No one’s going to read that. So focus on writing an informative article.

Your content is not useful

Like I said before, making your content useful will not only help you gain traffic but it’ll also make your website trustworthy of useful information. If you don’t know, Google likes it when you help users online. So as much as possible, give everything you can when you write articles. Answer questions that are related to the topic that you’re writing about. Use google and take a look at related search. It will give you more questions related to the search keyword. If you do it this way, your visitors are more likely to stay and read more.

Your article is short

When you write a blog, do you just answer one question? or do you just tell stories about what happened to you in that topic? or do you combine them to make a very long informative blog? If the answer is no then your blog is probably shorter than a piece of paper.

So what is the recommended length for a blog post?

It is highly recommended to write your blog post with the length of 1600 words. That is equivalent to a 7-minute reading post. So, let me ask you again. Is your blog more than 1600 words? If no then it’s probably one of the reasons why you’re not getting that much traffic.

Okay, don’t get me wrong. I also have articles with less than a thousand words and I know it’s getting web traffic. It’s because I’m using the right keywords and Google finds my article useful so it’s being recommended to users online. BUT, most articles with 15 hundred words are usually getting more traffic. How? Because it’s informative, long, and contains keywords that help search engines.

Too much competition

This is the most common reason why most bloggers are not getting enough traffic. It’s because of the competition. It’s too high that you don’t get a chance to be in at least first top 10 search results.

So how can we defeat the competitors?

The answer is simple, beat their article. If their article is good. Make yours better than theirs. Blogging is a battlefield and your weapon is your content. Write deadly articles that could kill another blogger’s article. That’s the only way.

You want to know exactly how to do it? Go read their article. Look if they’re missing something. Check if they explain their article thoroughly. If not, then that’s your moment to write the same article but with a better explanation. You got it!

You have picked the wrong niche

Have you ever thought that maybe the reason why you’re not getting traffic is that the niche you have chosen is boring and not worth reading? In other words, if your blog is not interesting, even if you feel like it’s useful. No one’s going to read it because they don’t find your blog interesting.

My tip is to always put yourself into your readers’ shoes and try to ask yourself always, is my reader going to love this blog? is this worth reading?

Trust me, this will save you a lot of time of thinking.

You are not promoting your blog properly

It’s really common for bloggers to promote their blog posts through social media like posting on their pages, sharing on Twitter, pinning posts on Pinterest, and so on. Sure that will drive traffic but not that much as long as you do it improperly.

So how do you do it properly?

The best way to promote your blog posts is by including a short introduction about your article and then use the cliffhanger technique. Use words that will catch the reader’s attention and as soon as they’re interested hit them with the cliffhanger and put “Click here to learn more”. This is a very effective way to drive traffic to your website.

Also, use hashtags in your social media posts. This will also help your posts to be featured somewhere around social media.

Conclusion

Personally, I haven’t tried any web traffic generator myself and I’m not planning to try it. I’d rather work hard and earn a few page views than cheat the system with these “free” website traffic generators that are only gonna give you traffic bots which could potentially kill my website’s authority and trust from Google.

Look, gaining web traffic takes time and effort. If you don’t have the patience for it, there’s a little chance for you to survive this battle. As much as possible, try to avoid these temptations and just stay with the normal and effective of gaining web traffic and that is SEO.

If you want to improve your SEO skills, I have written an article specifically about Google Analytics and how it can surely make an impact on your SEO and search ranking. So if you are interested, go and click this link below:

Ways to Get Ranked on Google Search and Drive Traffic to Your Websites

Getting your website ranked on the first page of Google search and driving website traffic is probably one of the hardest things to achieve. Especially if you’re fresh to this kind of industry.

However, with good insight, passion, and eagerness to learn, you’ll surely be able to make at least one of your blogs rank up to the top of Google search results, or who knows? Maybe you’ll be able to make your entire website rank up as well.

So In this article, we’ll be guiding you on how to not just optimize your website but also understand how online marketing can help your website gather organic visitors.

We’ll also discuss website promotions and ways on how to promote your website properly. And not just that, we’ll be giving you as well some blogging tips that are highly recommended this year 2020, things to do and things not to do to your website.

So let’s get started.

How to Get Ranked Higher on Google Search Results?

Before you get frustrated, let me tell you first that getting your articles rank up to Google search result will take a lot of time, and not just that, it takes dedication, patience, creativity, and resourcefulness. It also depends on what kind of niche your blog is about and how much competitors you have.

Did you notice? Whenever you publish your blog post, your blog won’t show up yet in Google search results?

That’s obviously because Google or any other search engines require to:

  • Crawl your web pages first.
  • Then the spiders will analyze your content.
  • Then decide where it should be placed.

Most of the time it’ll end up under your competitors or other popular websites. Or let’s just say on page number 7, 8, or maybe 9.

The point is, you’re blog won’t climb up to the top of Google search results unless Google sees your content following their guidelines. (Which you should always by the way.)

So what can you do? Just wait and while you’re waiting, check your blog posts and see if there’s something you can do to improve them because the quality of a blog post is really important to get ranked.

Search Engine Optimization

I’ve mentioned this so many times that SEO is the most important thing that every blogger should learn.

Search Engine Optimization is one of the reasons why blogs are ranking up to the top of Google search results and if you don’t know how to SEO then chances are high that you won’t be able to rank any of your pages. Unless you wanted to pay for promotion. (which we’ll talk about this later shhhhh….)

Nowadays, it’s really tough to get ranked to Google search results using keywords with high competition level. So the better way is to use keywords with less competition and high search volume instead and keyword research tools can help you find these keywords.

Ubersuggest is the Best keyword research tool online

I highly recommend you to use keyword research tools like Ubersuggest by Neil Patel. It’s a free keyword research tool that offers the following good features:

  • Domain Overview allows you to get more insight into what’s working for others like marketing strategies.
  • Top SEO Pages report allows you to discover which of your competitor’s pages are ranking for popular organic keyword phrases and which ones are loved by Google.
  • Keyword Suggestions helps you gain not just head keywords but also long-tail keywords based on what’s currently working for your competitors.
  • Content Ideas, this will help you get the topics that people are actually interested in reading. Topics that are getting the most social shares and backlinks.

Use your keywords in your title!

Another thing that I would like you to remember is by using keywords in your title. Your titles will show up not just in your page but also in your browser’s tab, google search results and other websites that are linked to your blog.

Let me give you an example, let’s just say we have the keywords:

  • Website Ranking
  • Google Search
  • Organic Traffic

You can use these keywords to build an optimized title. Let’s give it a shot!
So we have Website Ranking, Google Search Results, and Organic Traffic.

We can do something like:

Get Organic Traffic For Ranking A Website To Google Search.

Do you see what happened? We used all the keywords to make a title that surely makes sense and easy to understand. By doing this, Google will know that your content is about getting organic traffic to your website to get ranked on Google search results.

Keep in mind as well that you should not make your titles more than 60 characters because you don’t want your title to be cut out like this one:

Image of SEO Titles with more than 60 characters

Meta Descriptions

They say that meta descriptions also help to rank up your blog but in my opinion, I don’t think so.

Google is so smart nowadays that it reads your content from top to bottom. That means they know what your content is about. So even if you keep on putting keywords in your meta descriptions and your content is just trash? Google will still not put it on the top of the search results. That’s why I’m telling you to keep on writing high-quality and helpful content.

Build Quality Backlinks

Everyone says that getting high authority backlinks is the one and only way to stay on the top of Google search rankings.

They are absolutely right!

Backlinks also known as inbound links, these are links that connect an external website to your website. This helps Google to determine the popularity of your website and that your website matters. Consider backlinks like a number of likes. The more likes, the more Google will like your website.

So how can you get backlinks?

There are many ways to get backlinks, number one is through outreaching.
Outreaching is when you contact other bloggers to link your website in their website but this is something that is really hard to achieve. Remember that everyone is your competitor and they’ll think that you are a competitor as well, taking advantage of them.

Effective Way to Get Backlinks

One of my favorite ways to get backlinks is through social media, message boards, and forums. You can use Reddit, Quora, etc – These are all good places to market your content.

Just summarize your content into something understandable and do a cliffhanger at the very end of your post and just add “Read more” at the very end of your post linking your website.

This helped me get hundreds of web traffic in just a few months and if you do this as well, I’m sure you’ll get web traffic too!

Another way to get traffic is by using Pinterest. There was this time where you can just pin your post and caption it with keywords again and again and again and it’ll just blow up and go all the way to the top of the feed. But right now, I believe they have made Pinterest a little bit smarter than before. But still, I highly recommend you use Pinterest especially if your niche is about health, lifestyle, home decorations, or beauty.

YouTube is another way to get backlinks! If you have a channel, use it. Build an audience, make videos, and link it to your website. I suggest you do the same thing here where you do a cliffhanger and just tell your audience to go to your website if they want more information. It’s a clever way to attract visitors.

Paid Promotions

There are many ways to get website traffic. One of which is through paid promotions.

Paid promotions is a way to get website traffic through advertising networks like Google Ads, Bing Ads, etc. These networks will help you find the right audience for your blogs so if you are planning on paying for search, you should do it right.

Before you pay for a search, make sure that your content is worth reading. Make sure that as soon as the reader arrives at your web page, they’ll interact with it until the very end of your article.

Make sure you convert them into your subscribers as well by showing a “Sign up to our mailing list” right at the very middle of your page.

Remember when I told you to use keywords with high search volume and low competition? This time you’ll be using competitive keywords.

When you pay for a search, it doesn’t matter anymore if the keywords have high or low competition. Just use any keywords RELATED to your article with high search volume and it’ll do its job.

Personally, I believe that paying for promotion is just a temporary way to beat the competition and once you ran out of budget for your ads then you’re back at the bottom. That’s why I’m telling you to use this opportunity to write an awesome article that will lead your paid readers to become your loyal readers.

If you want to learn more about effective marketing strategies, I’ve provided some more tips in this article:

Speed up Your Website

Imagine you’re a reader and you search on Google about website traffic and then you click on one of the search results. Then the website you clicked takes a lot of time to load. Let’s just say it’s taking more than 10 seconds. Would you still have the patience to wait for that to load? Some would say yes, but mostly no.

Most readers will leave your website if it’s taking more than 6 seconds to load. That’s why website speed matters too.

Our website WeeklyHow, takes up to 2 to 3 seconds to load and I believe that’s a good time to load a web page. However, if there’s an opportunity for you to lessen that time. Take it! Because Google likes websites with fast loading speed.

If you’re having trouble with your TTFB (Time To First Byte). Read this article, it will guide you to speed up your web pages.

Things To Do With Your Blog

You may have heard some of this already but these are the things that you should do to help your website get traffic and rank up to Google search.

  1. Write awesome articles
  2. Understand your audience, know what they want.
  3. Use both short and long-tail keywords
  4. Use 3 – 4 catchy images in your blog posts. I personally use pexel.com to get stock images for free without watermarks. Don’t forget to compress your images as well.
  5. If you’re using WordPress, use a theme that is very simple yet very eye-catchy.
  6. If you have time, you may do a guest posting. Find a website where they accept articles from bloggers outside their team and just link your website from theirs.
  7. Experiment with different Keyword Research Tools
  8. Always look at your statistics, use Google Search Console. Check which keywords are getting more clicks and impressions and use them more in your future articles.
  9. Research, Do lots of research and experiments. Since everything online is changing in a matter of seconds.
  10. ALWAYS UPDATE YOUR CONTENT. If there’s something that you can add in your old blog posts. Add it. Update it. Google will notice that you update your blog posts and it’ll rank up once again especially if it already ranked before.
  11. ALWAYS BACK UP YOUR WEBSITE

Things NOT To Do With Your Blog

  1. DO NOT GIVE UP! If you are new to blogging. Don’t give up just yet. Good results take time. It’s not like an instant noodle where you only need to put a little effort and you’re good to go.
  2. Do not upload heavy images. Do not upload images with file sizes of more than 1 MB. As much as possible make it less 1 MB.
  3. Do not flood your blog posts with ads. Your audience is visiting your website to read not to look for ads. Unless they do though, that’ll be great. But seriously, don’t put too many ads in your content.
  4. If you are writing blogs about products, do not make your content look spammy where you just wanted readers to click on your affiliate links.
  5. Do not forget to take care of your website.

Conclusion

Getting website traffic and increasing your Google rankings will take a lot of time and patience. There’s no guarantee that you will get thousands of visitors every day in less than a year. However, with hard work, knowledge, patience, and dedication. You will get your website rank up to Google search in no time.

Quick Guide: Reduce TTFB & Improve Website Performance

Time To First Byte (TTFB) is the parameter used to measure the time of a web server or another network resource. It also measures how speed the transmission of data with a client, it is usually measured by search engine spiders and measured in milliseconds.

There are three parts of TTFB:

  • The duration of the connection
  • The required time to send the HTTP request
  • The required time to get the very first byte of the web page.

TTFB Evaluation Guide

100ms – 200ms : Very Good
300ms – 500ms : Good
600ms – 900ms : Normal
1 – 1.5 seconds: Bad
1.6 seconds or beyond: Very Bad


Every web owners MUST consider their TTFB as it affects the web ranking and also the experience of every visitors, that’s why as much as possible it is important to make the TTFB value the lowest possible.

In this article, we’ll be talking about how to optimize your Time To First Byte and reduce server response times (TTFB).

You can follow all these following tips to speed up your web pages and get the lowest TTFB possible:

Use Content Delivery Network

A content delivery network or content distribution network is a geographically distributed network of proxy servers and their data centers. The goal is to provide high availability and high performance by distributing the service spatially relative to end-users

Reduce HTTP Requests

This is usually the main reason why your web pages are taking so long to load. It’s because files needed to be loaded are blocking your web page to load as soon as it can. For example, your web page is asking for 6 JavaScript files to be loaded and also CSS files like bootstrap and your own stylesheets.

These files will bring up your TTFB thus making your web pages slow. So to reduce your TTFB, optimize your files as well. If it’s possible to compress them or combine them into one file. That would help a lot.

Use Cache

A cache is a hardware or software component that stores data so that future requests for that data can be served faster; the data stored in a cache might be the result of an earlier computation or a copy of data stored elsewhere.

By using cache, visitors will have a better experience especially if they have been on your web page before. There are many ways to do cache, it’s either by using plugins or by editing your .htaccess file and putting this code:

# BEGIN Expire headers  
<ifModule mod_expires.c>  
        ExpiresActive On  
        ExpiresDefault "access plus 5 seconds"  
        ExpiresByType image/x-icon "access plus 2592000 seconds"  
        ExpiresByType image/jpeg "access plus 2592000 seconds"  
        ExpiresByType image/png "access plus 2592000 seconds"  
        ExpiresByType image/gif "access plus 2592000 seconds"  
        ExpiresByType image/svg+xml "access plus 2592000 seconds"
        ExpiresByType application/x-font-ttf "access plus 2592000 seconds"
        ExpiresByType application/x-font-truetype "access plus 2592000 seconds"
        ExpiresByType application/x-font-opentype "access plus 2592000 seconds"
        ExpiresByType application/font-woff "access plus 2592000 seconds"
        ExpiresByType application/font-woff2 "access plus 2592000 seconds"
        ExpiresByType application/vnd.ms-fontobject "access plus 2592000 seconds"
        ExpiresByType application/font-sfnt "access plus 2592000 seconds"
        ExpiresByType application/x-shockwave-flash "access plus 2592000 seconds"  
        ExpiresByType text/css "access plus 604800 seconds"  
        ExpiresByType text/javascript "access plus 216000 seconds"  
        ExpiresByType application/javascript "access plus 216000 seconds"  
        ExpiresByType application/x-javascript "access plus 216000 seconds"  
        ExpiresByType text/html "access plus 600 seconds"  
        ExpiresByType application/xhtml+xml "access plus 600 seconds"  
</ifModule>  
# END Expire headers  Code language: PHP (php)

Using mod_expires, you can tell visiting browsers to hold on to certain files longer (likes images, which are rarely changed). This .htaccess example shows how to cache specific file types for specific periods of time.

In the example above, png files expire their cache 2592000 seconds after they are accessed by a browser. View the mod_expires page for further details.

How To Create Viral Content on Your Website

Getting yourself at least one content that goes viral is like a jackpot feeling as it can bring tons of new visitors back to your website. The number one priority that you should be focusing on is the quality of your content. It’s not about the quantity, not at all. To learn how to create viral content on your blog, stay focused on how to do that.


Obviously, there is no guarantee that all of your “high-quality” blog posts will go viral. But, following these steps and having consistency can improve your website traffic.

In this article, we’ll be focusing on how to create viral content based on everything that works in the real world.

1.) Keep yourself updated to what’s trending or viral!

Related image

If you’re wanting to learn how to create viral content, it is important to keep yourself updated to what’s happening to the entire world. Keep reading news articles, and talk about it in your blog posts (if your WordPress blog is about news and stuff) However, there’s a way to put these trending news in your blog posts without actually talking about the entire story. Make it as an example, let’s say your blog posts are all about games, and a new product of Apple is trending. Let’s say a new iPhone, then include it in your post by saying “this game that was developed by Company X is compatible to the newest product of Apple, and that is iPhone X..treme..” (see what I did there?)

2.) Create a content that is relatable.

Another thing to remember when you’re wanting to learn how to create viral content is to make it relatable as much as possible. You don’t want to create content that is only targeted to a small group of readers. So as much as possible gather all the audience and don’t pick just five of them. So how can you do this? simple, just do a lot of research. Actually no, don’t do research anymore because we’ll talk about it here. A good example of this is an article about getting in shape or being healthy. Mostly everyone wanted to be healthy. So make a content talking about how to be healthy. I know there are thousands of articles that already talked about this but it’s not about that. it’s about how you write the content, and how unique it is from the rest of the websites that people knew.

If you haven’t posted anything in your WordPress blog, you may want to learn how to write your first blog post.

3.) Keep your content optimized

Now that you have an idea of what your blog posts should contain. It’s a good practice to make it also optimized. It is important to learn how SEO works so if you don’t know what SEO means. SEO or Search Engine Optimization is a practice where you’re making your content searchable by using keywords, images, and titles. Another thing to keep in mind is that always use keywords that are popular but low in competition. What does it mean? It means that you should use keywords that were never been used by other articles and also popular.


Conclusion

Learning how to create viral content is pretty easy by just following all these tips you could get that sweet traffic that you’re wanting to have.

In conclusion, you have to ensure to make your content go viral, the blog post must be:

  • Talking about what’s trending or could be relatable to what’s trending
  • Relatable to most of the audiences and possibly gain more.
  • Optimized by using strong keywords but low in competition

If you have any questions, don’t hesitate to ask them in the comments below

How To Build Shopify Apps with PHP (Update 2023)

We have a Shopify App Development Course! Be one of the first students!

Are you looking for an in-depth guide on how to create Shopify apps? Click the enroll button !

Introduction

We are aware that there are hundreds of PHP tutorials online on how to create a Shopify app using PHP, but in this course, we’ll tackle all the components that you may want to add to your Shopify app like displaying products and such.

Now before we proceed, Shopify made an update with their API where they version their API quarterly also known as API versioning. It is important to know that Shopify will always make updates to their API so if you are developing Shopify apps, then you should also keep your apps updated.

Update in 2023

If you’re not aware, Shopify is encouraging most developers to create Shopify apps through their CLI and so, if you’re interested to learn how to create Shopify apps using Shopify CLI and PHP/Laravel, we’ve managed to compile a series of videos teaching how to create Shopify apps in Laravel.

What is Shopify?

Shopify is one of the most popular e-commerce platforms and provides a great opportunity for developers to build and monetize their own web applications. With the ever-evolving technology, building Shopify apps has become easier and more efficient thanks to Shopify CLI. In this blog, we’ll explore the latest technologies and tools for creating Shopify apps in 2023.

But first…

What is Shopify PHP?

There’s no such thing called “Shopify PHP”, but to make it understandable to you. PHP is a programming language for web development that can be used to develop a Shopify app. Though there are PHP Frameworks that you can use as well to build a Shopify app like Laravel.

In 2023, you can now create Shopify apps simply by using Shopify CLI.

Is it hard to do Shopify App Development?

Building your own Shopify Apps is very easy, all you need is to understand how the API works. Shopify is a Rails application, there are lots of Shopify repositories that you can use for FREE to integrate your website into Shopify API. Here’s the list:

Personally, I use this Shopify API Client made by Alex here:
Shopify Generating API Token Guide

To begin, you have to create a new Shopify app in your Shopify Developer account, so if you don’t have an account yet, you can sign up by visiting developers.shopify.com

Shopify App Development Tutorial PHP - WeeklyHow

Building Your Own Shopify App with PHP

In this article, we’re going to learn how to make a Shopify application from the scratch using PHP, if you already have a Shopify developer account this is the first page you’re going to see:

Developer Shopify Dashboard

Proceed to left navigation panel and click the Apps category

Shopify App Development Tutorial PHP

Click Create app and select what type of app you wish to build. Custom app or Public app? For custom apps, you can only install the app to one Shopify store with no need for Shopify to review your app. However, with public apps, Shopify will need to review your app in order for Shopify stores to install your Shopify app.

Shopify App Development Tutorial PHP

After selecting, that should give you the following form.

App Name – The name of the Shopify application you’re about to create.
App URL – The URL of your website where you’re going to upload your Shopify files
Whitelisted Redirection URL(s) – This is where you’re going to list your generate token script or URLs you need as you authenticate your Shopify.

For web hosting, we recommend getting it from Hostinger as it’s more compatible with Shopify especially if you’re just getting started.

Hostinger free hosting plan for everyone
  • Compatible with Shopify
  • LightSpeed Web Server
  • Free domain and SSL certificate
  • 30-day money-back guarantee

Once you’re done, filling out the form, click Create app

Image of Shopify App Development using PHP
Here’s everything you need to start building your Shopify App

Now that we have our first Shopify app created, it’s time to make our website connected using these API credentials. To do this, download at least one of the Shopify repositories that I have provided in this article.

Create Shopify Apps for Storefront

Customize and add more features to your Shopify store using Shopify apps!

To continue with this project, you may proceed to this article.

In part 2, we’ll be using the credentials that we have to connect it to PHP. If you’re interested, proceed to this article below:

11 Best Shopify Apps for 2023: Increase Your eCommerce Profit

When it comes to selling items online, Shopify can be your reliable e-commerce. Not only it can make your selling easy but it also provides hundreds of Shopify apps available to help you grow your business.

However, due to the amount of the Shopify apps available, finding the best ones can be hard. But don’t worry, we are here to help you find the best Shopify apps to increase sales.

Best Shopify Apps for Sales

One of the most common problems in e-commerce is having a low sales rate. The follow Shopify apps for sales can help you increase your sale.

Mobile App Builder ‑ Shopney

Send Push Notifications using Mobile App Creator by AppIt

Most of your visitors can be using mobile devices and sometimes you are not able to reach them.

But with Mobile App Creator – Shopney, you can now develop a mobile app that will target your visitors who use android devices and iOS devices without any hassle or purchasing.

Their subscription cost only around $99.99/month for silver plan and $199.99/month for gold plan.

Product Reviews by Shopify

Feedbacks are very important for increasing sales because your customer’s feedback is like free marketing. Whenever your customers give reviews to your products, they’re allowing other customers to know that your product is good.

Shopify Product reviews allows you to add a customer review feature to your products. This provides a way for your customers to engage with you, as well as each other to encourage sales.

  • FREE to install!
  • Theme-friendly design Reviews automatically match your store’s look and feel
  • Easy customization – Edit layout options, text, and colours without needing to code
  • Bulk actions – Publish, hide, filter, and manage reviews quickly and easily
  • CSV import and Export – Import and export your reviews as a spreadsheet
  • SEO-friendly review scores – Add review scores to your Google search results.

Ultimate Sales Boost

Shopify App Ultimate Sales Boost by Hextom on cart page

As a buyer, you may already know how exciting it is to see that your favorite item is on sale or discount. That’s one of the features of Ultimate Sales Boost. Ultimate Sales Boost is a Swiss army knife to optimize your checkout flow (a.k.a conversion funnel). You may use it aggressively or moderately to build the path of your eCommerce success.

Another good thing about this app is you don’t need developer anymore. Just one click installation and launch your first campaign in one minute. That’s how easy to use this app is.

Conversion Plus

Most online merchants are losing about 67.45% of sales from cart abandonment and the key factors can be addressed simply by introducing a sense of urgency into the checkout flow.

By incorporating a sense of urgency to your checkout flow, you can make the consumers feel like they could lose out on an appealing offer if they don’t commit to an order immediately.

  • Free to use.
  • Cart reservation timer, with adjustable duration.
  • Change the displayed text as you see fit.
  • Options to define what happens after the timer expires.
  • Multi-language support.
  • Modify the look and feel to match your theme.
  • Optimized across all screen sizes including desktop, tablet, and mobile.
  • No App branding, to keep your site professional.
  • Easy step-by-step installation – No programming required.

Best Shopify Apps for Marketing

With Shopify apps for marketing, you can capture the attention and loyalty of your customers through social media, contests, programs, and more.

Use the following Shopify apps to effectively capture your customer’s attention.

Kit: Run better Facebook ads

Kit is not just a marketing app, it is an artificially-intelligent assistant that will talk to your customers 24/7. That means even if you’re not online, your Kit will always be reliable to assist your customers.

But of course, that’s not the only thing Kit can do. It can also manage your Instagram and Facebook ads, email marketing, and social posts to drive more sales and help you grow your business. All for Free!

Here’s what Kit can do for you:

  • Set up Facebook dynamic ads and retarget shoppers most likely to buy
  • Build lookalike audiences to ensure the best targeting for your ads
  • Create Facebook and Instagram ads that drive sales
  • Post Facebook updates to drive customer engagement
  • Send personalized ‘thank you’ emails to generate repeat purchases
  • Create and promote discount codes to acquire and retain customers
  • Generate quick reports to provide insights on sales and marketing performance

SEO Image Optimizer – SEO

According to a study of U.S. web-based searches, the world’s second most-used search engine is Google Images! That means your store can also get the benefit of getting traffic through proper SEO of images.

With SEO Image Optimizer, you can improve your Google search results and rankings in just a couple of clicks. No coding required!

Features:

  • Alt-Text Optimization
  • Unlimited Image Sync Quota
  • New Images Checked Once per Week
  • Always FREE!

Pro Features:

  • Complete SEO Optimization
  • Meta Tag Optimization
  • Auto Pilot SEO Fixes
  • Fix Broken Links
  • Google Snippets
  • Auto JSONLD

Smile: Rewards & Loyalty

Your customers become more valuable the more they shop and engage with your brand. A rewards program gives you an easy way to encourage the behaviour that builds emotional connections and customer loyalty.

Smile offers three programs that make program management simple and intuitive:

  • Loyalty points program
  • Referral program
  • VIP program

Why should you choose Smile.io for rewards and loyalty?

As the most used rewards program in the world, we’ve learned a lot from helping tens of thousands of businesses with their retention and loyalty strategies. We’ve used that experience to design a rewards solution that makes it easy for anyone using Shopify or Shopify Plus to create a beautiful rewards program that brings customers back.

  • Simple design customizations to reflect your brand
  • Get your rewards program started in just a few clicks
  • Integrate with the marketing tools you already use

We believe the future of commerce is rooted in emotional relationships, and want to help every business build a strong customer retention strategy that promotes sustainable growth.

Best Shopify Apps for Customer Support

The following apps can help you support and track your customers to increase their satisfaction and build more loyalty. I highly recommend you to install at least one of the following Shopify apps as it will no doubt help your business.

Tidio Live Chat

Research shows that live chat can boost sales by as much as 40%. Next time your customer faces an issue, they won’t go to the competitors or waste time — they’ll contact you.

With Tidio, you can help your customers immediately even if you are not available. Thanks to the artificially-intelligent bots. Bots automatically reply to 43% of the most popular inquiries. Right after registering, with a few clicks of the mouse, you’ll be able to add Bots that will check product availability, inform about delivery status, and give the estimated delivery time. When faced with an issue, the Bot will transfer the conversation to an operator.

Tidio uniquely merges live chat, Bots, and Marketing Automation to meet the expectations of the most demanding Shopify store owners.

With its Free plan, you will get the following features:

  • Up to 3 operators for a lifetime
  • Live Chat
  • Messenger Integration
  • Email Integration
  • iOS & Android App
  • 100 Chatbot Triggers a month

100 Chatbot Triggers feels too short? You may upgrade your plan to $18 per month and get UNLIMITED Chatbot Triggers.

AfterShip ‑ Track & Notify

Keep your customers updated of the whereabouts of their orders until delivery through an intuitive, customized tracking page and automated notifications.

Track & Notify is not just a tracking app, it is a Shopify app that will also help your SEO. Thanks to its improved SEO and ranking system that replaces the carrier’s tracking link with their auto-generated link to drive traffic to your site instead of the carrier’s site. Improve SEO and increase organic search.

With its starter plan, you can have the following features:

  • 50 shipments quota per month
  • Branded tracking page with banner

You may also upgrade your plan to essential, growth and up to PRO and get more shipments quota per month.

If you are having issues with your customers not being able to properly track their orders then I suggest you give Track & Notify a try. It’s worth a shot!

Best Shopify Apps for Products and Inventory

The following apps will help you automate track your inventory to prevent your customers from buying sold out items.

Wipeout

If you are having trouble manually setting up your inventory then you’re obviously not using Wipeout. Wipeout is a tool that will quickly hide your sold-out products and show them once they’re on-stock once again. Thanks to its automatic daily hide/publish feature, you won’t have to worry about your items being out of inventory.

Use wipeout for free and get the following features:

  • FREE manual option if the store has less than 3000 products
  • Manually press “Hide” or “Unhide” buttons whenever needed
  • Exclude
  • Reverse within 24 hours

You may also upgrade your plan to automatic plan for $9 per month and get the following features:

  • Automatically hide & unhide once a day.
  • Daily Email reports
  • Exclusion List to exclude products you want the app to ignore
  • Reverse within 24 hours

Oberlo

Oberlo by Shopify is one of my favorite apps. Not only it will help you get started for ecommerce but it will also help you find the products that you wanted to sell and not worry much about inventory and shipping.

You may install Oberlo and get all the free features to get started building your business. But if you want to level up your game, you may upgrade from starter plan to basic plan ($29.90/month) and pro plan ($79.90/month).

What to look for Shopify Apps?

If you are new to Shopify apps, chances are you install apps that you think will help your business. Some entrepreneurs think that Shopify is like a WordPress, you find plugins, install, and see results. Shopify is a different case, you have to do research when you look for Shopify apps.

I would recommend you do the following before hitting the install button.

  • Read the reviews of the Shopify apps
  • Check if the app is getting high ratings
  • Check if the contact is working and see if they will respond
  • Look for screenshots

Conclusion

Shopify apps are great, especially if you are working on your business by yourself. You may also check out these 20 Shopify apps that will increase your sales by up to 64.56%. If you have experience with apps both good and bad, you may share them in the comments below. We’d love to have a chat with you below.

Best WordPress Themes in 2023: 13 Clean WordPress Themes for Business

So you’re looking for a WordPress theme for your business? Don’t worry; Today, we’ll be giving you 13 WordPress themes that are clean and modern-looking to make your business look more appealing than ever.

Best WordPress Themes for Business Category

Before wasting time, let’s take a look at 13 of the best WordPress themes that are responsive and beautifully designed in 2020.

REHub

REHub is said to be one of the best WordPress themes in the market that offers not only a nice WordPress theme but also a way of generating money through eCommerce. So if selling products is your business, then this WordPress theme will definitely serve you in a long run.

Like most people say about this theme. This WordPress theme is a money maker. Even Amazon recommends this WordPress theme.

  • High conversional Gutenberg blocks
  • Elementor compatible
  • Extended AMP support
  • SEO optimized
  • WooCommerce ready

Divi

Divi is a WordPress page builder that is very popular in the WordPress community. In fact, it’s very popular that it is being used by more than 600,000 users around the globe.

Its drag and drop builder allows you to create a professional-looking website in less than 15 minutes and if you don’t feel making a web design from scratch then Divi comes with 20 pre-structured layouts allowing you to start your new project instantly. This is perfect for businesses that wish to have this glamorous look.

  • Built-in layouts
  • Over 46 content modules
  • Color, style and size customization
  • Advanced Tools for Developers
  • Advanced Visual Builder
  • Live preview

Yes, Divi is one of the most used WordPress themes in the market but it’s not always perfect. The downside of using Divi is it tends to make your web pages very slow and its code is not SEO-friendly. Not only that, if you use Divi and you decided to change themes, it will be very difficult to transfer your content to other WordPress themes.

ThemeForest best selling themes

Enfold

If you’re looking for a WordPress theme that is clean, flexible, and fully responsive then your search is about to be over. Enfold is one of the best themes that is known for having a good reputation in the WordPress community.

This WordPress theme offers a very modern design that can be used for any kind of business like corporate, e-commerce, and more. Not only that but it also offers plenty of good features such as:

  • Fully responsive layout design
  • AJAX instant search
  • Unlimited sidebars
  • Contact form builder
  • Retina ready
  • Documentation & support
  • WooCommerce ready
  • Translation ready
  • 2D/3D/Parallax Slideshows
  • Shortcode editor
  • 30+ PSD files
  • and many more!

Astra

Astra is no doubt one of the best free WordPress themes that you can use for any kind of business that you have. This WordPress theme provides many features that are perfect not only for beginners but also for experienced WordPress site owners.

Our favorite best features that they offer are the following:

  • Powerful design options
  • Multiple site layouts
  • Custom post-types
  • WooCommerce Compatible
  • Great widgets

Veen

Veen is yet another type of premium WordPress theme that focuses on a modern blog design that is super attractive thanks to its animations. With Veen, website visitors will never have an issue to navigate around your website as it is very organized and clean.

If your business is blogging, then this kind of WordPress theme is the best option for you, it offers the following great features:

  • 100% Fast and responsive
  • Full theme options
  • 6 Free custom shortcodes
  • 10 different types of demos
  • 5 post formats
  • Unlimited & customizable colors
  • Great animations
  • SEO optimized

Alterna

Alterna is one of the hottest and best-selling WordPress themes this 2020. With Alterna, you can create any type of website for any kind of business using its drag and drop visual composer page builder. The best thing with this WordPress theme is it provides features and plugins that are more expensive than the theme itself.

It comes with an amazing slider plugin, parallax slider, premium fancyBox, waterfall Flux with AJAX, and many more!

  • Unlimited Sidebar
  • Unlimited Colors
  • Lots of shortcodes & widgets
  • SEO optimized
  • Google Maps support
  • WooCommerce ready
  • Multilingual languages ready

Ocean WP

One of the fastest-growing themes for WordPress. This extendable and lightweight theme will allow you to create different kinds of WordPress websites for any kind of business that you can think of. It can be integrated with multiple platforms such as WooCommerce and other page builders.

With Ocean, you won’t need to install external plugins because it already provides awesome features like image sliders, multiple custom widgets, color options, header layouts, and many more.

  • Fastest page-load time
  • Fully responsive
  • Powerful design options
  • Multiple site layouts
  • Blog layout options
  • WooCommerce ready
  • Translation ready
  • SEO Optimized

Avada

This is one of the excellent premium WordPress themes. This multi-purpose theme allows you to develop versatile websites within a few clicks. Avada comes with over 41 featured websites and more than 255 web page designs. 

You can use their demo installer to set up the content. Moreover, it comes with over 1000 customization options. It is compatible with many WordPress themes. 

  • Unlimited design options and integrations
  • Drag & Drop page builder
  • Fully responsive
  • Free premium tools
  • Awesome fonts
  • User friendly

Soledad

Are you planning on making a magazine-type of blog? Then you should take Soledad as your WordPress theme.

There’s no doubt that this is the best WordPress theme that you find from ThemeForest. It comes with excellent magazine layout options, over 1000+ sliders, and many more. Its single post templates are worth mentioning that allow you to share your stories. 

You can create a completely customized website using its page editor support. It is compatible with the WP bakery and Elementor page builder.

  • Very easy to use WordPress theme
  • Superfast load times
  • Unlimited layout options
  • White label tool
  • WooCommerce ready
  • SEO Optimized

The 7

The 7 is one of the easiest to customize WordPress theme ever. It offers more than 1000+ theme options to allow you to build everything that you can think of for your website.

If you like using Page Builders then this theme is perfect for you as it offers full and seamless integration with WPBakery Page Builder and Ultimate Addons.

But of course that is not the only thing that is best with The 7. It also offers:

  • Unlimited web designs
  • Fully responsive & High-speed theme
  • Unlimited header layouts
  • Free premium plugins
  • Customizable sidebar & footer
  • WooCommerce ready
  • SEO optimized

Newspaper

Are you planning on building a news website or blog? Then Newspaper is the WordPress theme that you should be using.

With Newspaper, you can create a great news website that look simple yet professional and organized. You can also use this WordPress theme for different types of websites like fashion, food blogs, travel, and lifestyle.

  • Fully optimized theme (Lightning fast)
  • Fully responsive
  • 30 Free pro demos
  • Free premium plugins
  • Flexible header builder
  • No coding required
  • AdSense compatible
  • SEO ready

Bimber

Bimber is yet another newspaper WordPress theme that allows you to create an attractive, high-speed, and fully functional website in less than one day. It offers a bunch of powerful plugins that can improve the functionality of your website inside and out.

With Bimber, newsreaders won’t finally have trouble reading your news day and night. Thanks to its powerful dark mode feature, readers can finally switch your website into a dark mode setting in just one click of a button.

If your niche is about viral content then this theme is perfect for you.

  • 2X faster than other WordPress themes
  • Offers too many plugins
  • Outstanding dark mode
  • Instant Search Results
  • Easy to monetize
  • Image editor
  • SEO optimized

RealHomes

It’s quite hard to find a WordPress theme that matches with real estate niche right? Fortunately, it isn’t. RealHomes is a WordPress theme created specifically for real estate niche websites.

With RealHomes, you can easily create a website that showcases your properties. It’s super easy you can create a website in less than an hour.

  • Advanced & customizable real estate search
  • Google maps integration
  • OpenStreetMap integration
  • Gallery Templates
  • User registration & Login support
  • Fully documented
  • and more!

Conclusion

It can be a bit hard to find a great WordPress theme that fits your business requirement but we hope that in this article, you found one or two WordPress themes that you can use in a long run. If in case you haven’t found what you’re looking for, then feel free to talk to us! We offer WordPress theme development and we can help you create the theme that you’re looking for.

Disclosure: This article may contain affiliate links, which means we may receive a commission if you click a link and purchase something that we have recommended.

An Incoming Year Full of Hopes

Hello everyone! 2021 has been quite a year, hasn’t it? Amidst challenges, I am very happy that we got through all of it and achieved amazing milestones and I hope you did as well. This 2022, I am excited to say that there will be more content that I’m sure everyone will enjoy. Let’s talk about all of them.

But first! if you’re not aware, I’ve recently published a new video on our YouTube channel talking about the plans I have for 2022, so if you haven’t watched it yet, feel free to do so below.

Otherwise, we can proceed and talk about them here instead.

Plan to take my master’s degree.

I’ve been working on this for months and I am very excited to say that, yes I am planning to take my master’s degree. But, why? There are many reasons why I decided to take master’s degree and one of them is due to the fact that I am looking for further knowledge (Isn’t really the point?) and experiences. I’ve been going through my past experiences and I feel like I haven’t fully exposed myself to the CS industry. In my whole entire life, I’ve only worked remotely, collaborated online, and the only professional experiences that I had were not really related to the industry that I’m supposed to be in.

So, by taking master’s degree and by going out of my comfort zone, I am hoping that I get exposed to a real-life situation where I get to collaborate with CS professionals or businesses. In addition, I am wanting to further build this community and business that I have. I want to be able to create more and help programmers like myself to solve problems and create web applications.

There is a saying that I always keep in my mind: “Do not compare yourself to others” and I try not to, but there are moments that you can’t avoid comparing yourself to others when life is full of competitions and challenges. So here I am, trying to look for an opportunity to be a better engineer.

2022 for WeeklyHow

There are so many plans for WeeklyHow, I’ve already mentioned one in the previous take, but there will be more! I will be creating more content for our YouTube channel, create more courses, and make this website a little more easier to use.

More YouTube videos!

I will be creating more of these and cover more topics other than Shopify. I believe I promised in one of my older videos that I will be covering TailwindCSS, so in 2022, I will do that. Of course, I will create more Shopify videos, I will learn about Hydrogen so I can make a tutorial about that, I will also create a new series for Shopify app/theme development. Maybe GitHub tutorials? Maybe continue Unity? We’ll see. But one thing is for sure, I will experiment and try a new format for my tutorials. I will try to make it more watchable or easier to digest. I’ve been watching plenty of YouTube videos lately and I feel like I can make ours a little better. So, watch out for that 🙂

More courses!

I will be creating more courses but I won’t be spoiling the topics. I hope I get to publish 4 more courses this year though.

Make WeeklyHow better

This 2021, I’ve managed to improve our learning system, use a different video host (for some courses) and upgrade our video player. This 2022, my goal is to make the site a little more easier to use. So, changes in frontend might come pretty soon. I will also remove the FREE courses since most of them are not fully finished. However, I will try to replace them with something better.

Wrapping up

One thing is for sure, 2021 has been a very challenging year for all of us. It’s had ups and downs, but in the end, we’ve managed to become a better person or at least I hope so for myself. This 2022 would not be here without the support of each and everyone in our community, so thank you very much!

I promise to deliver everyone another quality content or tools that you need to make the eCommerce community a better place for all of us.