
Uploading files using drag and drop has been a norm since 2015. Let’s admit, no one likes to click a couple of buttons just to upload a single image, then go back to the very same page just to upload another one. It’s just a LOT of work.
It’s true, back in the days, uploading files is very difficult. Not only that, if you’re a developer, making those file selection inputs are SO tedious.
Thankfully, we have found, not only fancier but also an easier way to handle file uploading… and we call it: Drag and Drop. 🤯
There are plenty of ways to make a drag and drop upload. One is to create them yourself using vanilla JavaScript (Only if you’re not sick), two is by using libraries like Modernizr to detect drag and drop events, and three is by using plugins like Dropzone.js.
In this tutorial, we’re gonna be focusing on how to use the JavaScript library called Dropzone.js to implement a drag and drop file upload. We’re going to teach you too how to make sure that users can only upload images.
What is DropzoneJS
Dropzone.js is known to be one of the most popular drag and drop JavaScript libraries. Why? Well, first of all it’s FREE and open-source and second, it’s very easy to use and apply to any websites.
DropzoneJS made it easier for developers to implement such features just by adding one single line of code. That single line of code will do almost everything for you including the addition of inputs or HTML elements, styles, etc. and the only thing you need to do is to make sure that the file is going somewhere.
Features
DropzoneJS offers the following features:
Supported Browsers
At this moment, DropzoneJS supports the following browsers:
How to use DropzoneJS
The first thing you need to do to start using DropzoneJS is by downloading the latest version from their project’s GitHub page. At this very moment, the latest version is 6.0.0-beta-2.
If in case you are not able to download the source files from their GitLab page, you may alternatively go to their CDN page.
By doing so, your script tag should look something like this:
<script src="https://unpkg.com/dropzone@6.0.0-beta.1/dist/dropzone-min.js"></script>
Code language: HTML, XML (xml)
If you wish to use their default drag and drop styling, you can use the following CSS file.
<link href="https://unpkg.com/dropzone@6.0.0-beta.1/dist/dropzone.css" rel="stylesheet" type="text/css" />
Code language: HTML, XML (xml)
Using the sources above, you should have the following HTML code.
<!DOCTYPE html>
<html lang="en">
	<head>
		<meta charset="UTF-8">
		<title>File Upload Example</title>
		<link href="https://unpkg.com/dropzone@6.0.0-beta.1/dist/dropzone.css" rel="stylesheet" type="text/css" />
	</head>
	<body>


		<script src="https://unpkg.com/dropzone@6.0.0-beta.1/dist/dropzone-min.js"></script>
	</body>
</html>
Code language: HTML, XML (xml)
It’s also important to remember that the project provides two CSS files, the basic.css file which offers a very minimal styling, and a more extensive dropzone.css file. The source files that we’re using above are the minified versions of the DropzoneJS.
Basic Usage
One of the easiest ways to implement dropzone is to apply it to a form element, although according to dropzone’s official documentation, you can use any HTML element such as a <div>.
However, If you’re a starter, we suggest using the form as it requires only a few configurations to set.
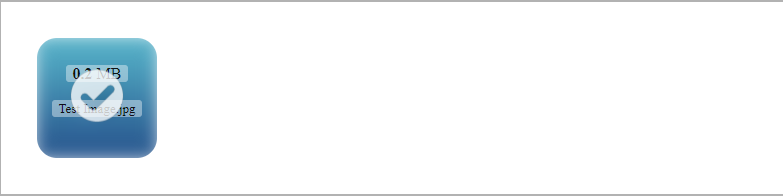
You can initialize it just by adding the dropzone class and the action page where you want to send the POST data.
<form id="dropzone-upload-form" method="POST" action="upload.php" class="dropzone"></form>
Code language: HTML, XML (xml)
By using the example above, you should have the following output:

You may try to upload files and encounter an error where the files were not being uploaded.

This error only occurs when the file referenced in the action attribute is not present in your project files.
Getting the POST data from Dropzone form
Retrieving data from the dropzone is no different from getting the data from Ajax or XMLHTTPRequest.
They all do the same work true. But, with Dropzone, you don’t need to create an Ajax or request function.
Once you applied the form in your code, all you need to do is make sure that the file is uploaded to your server, and to do that, you’ll need to create the PHP file referenced in the action attribute.
As an example, this will be what’s inside our upload.php file.
<?php

if ( !file_exists( 'images/' ) ) {
    mkdir( 'images/', 0777, true);
}

$imagesFolder = '/images/';

if (!empty($_FILES)) {

    $temp = $_FILES['file']['tmp_name'];

    $target = dirname( __FILE__ ) . $imagesFolder;

    $finalFile =  $target . $_FILES['file']['name'];

    move_uploaded_file( $temp, $finalFile );

}
?>
Code language: PHP (php)
First off, before we upload the files, let’s check if the folder we want to save our images into is existing. Otherwise, let’s create it using the mkdir() function.
Then, we check if the $_FILES variable is empty. If not, then we assign its file’s temporary name into a new variable $temp and make another set of variables to create the final file that we want to save.
And finally, we use the move_uploaded_file() function to save the files.
With all that, you should be able to save all the files you upload.
And make sure to check the directory you put in your upload.php file.

Awesome! Now we got our drop and drag file uploader set up.
Modifying Configuration Options
There are multiple ways to configure dropzones.
The first one is to pass an options object instantiating a dropzone.
The second one is to store the configuration somewhere so Dropzone will know how to set up the dropzones when you’re instantiating them.
This can be always done with the Dropzone.options object.
Dropzone.options.myDragAndDropUploader = {
	paramName: "file",
	accept: function(file, done) {
		if (file.name == "weeklyhow.png") {
			done("It is the file.");
		}
		else {
			done("It is not the file");
		}
	}
};
Code language: JavaScript (javascript)
Keep in mind that the myDragAndDropUploader is the id of the element of the file uploader. It may be a <div> or anything other than form.
Setting a Maximum File Size
With Dropzones, by default, you can upload files with file size up to 256MB. That is the default maxFileSize value. You could always change the value of this property by adding it to your options object like below.
Dropzone.options.myDragAndDropUploader = {
	paramName: "file",
	maxFilesize: 1,
	accept: function(file, done) {
		if (file.name == "weeklyhow.png") {
			done("It is the file.");
		}
		else {
			done("It is not the file");
		}
	}
};
Code language: JavaScript (javascript)
Keep in mind that the integer you type in the maxFilesize property only converts into Megabytes. If you need to limit the file size in kilobytes then use decimals.
Restricting Certain File Types
There are two ways to restrict certain file types.
One is to use the upload.php file and make conditions to check if the file is an image.
Two is to use the acceptedFiles parameter to restrict the type of file you want to upload.
Like what we mentioned earlier, we only wanted to upload image files.
So for this, we can accept image files using the following.
Dropzone.options.myDragAndDropUploader = {
	paramName: "file",
	maxFilesize: 10,
	acceptedFiles: 'image/*',
	accept: function(file, done) {
		if (file.name == "weeklyhow.png") {
			done("It is the file.");
		}
		else {
			done("It is not the file");
		}
	}
};
Code language: JavaScript (javascript)
As soon as you click on the file uploader, you should see that it only reads the image files.
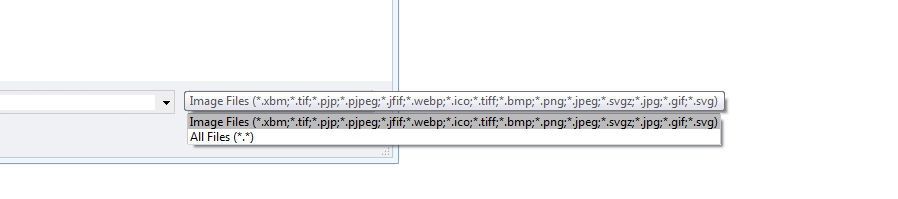
And if you try to drag and drop a different file type, you should see the following output.

Complete Example
With all the information provided above, you should be able to make the basics of the drag and drop using Dropzone.js.
And lastly, with all the source code we provided above, you should also have the following code.
The Index HTML File
<!DOCTYPE html>
<html lang="en">
	<head>
		<meta charset="UTF-8">
		<title>File Upload Example</title>
		<link href="https://unpkg.com/dropzone@6.0.0-beta.1/dist/dropzone.css" rel="stylesheet" type="text/css" />
	</head>
	<body>
		<form id="myDragAndDropUploader" method="POST" action="test.php" class="dropzone"></form>
		<script src="https://unpkg.com/dropzone@6.0.0-beta.1/dist/dropzone-min.js"></script>
	</body>
	<script type="text/javascript">
		Dropzone.options.myDragAndDropUploader = {
			paramName: "file",
			maxFilesize: 10,
			acceptedFiles: 'image/*'
		};
	</script>
</html>
Code language: HTML, XML (xml)
The Upload PHP File
<?php

if ( !file_exists( 'images/' ) ) {
    mkdir( 'images/', 0777, true);
}

$imagesFolder = '/images/';

if (!empty($_FILES)) {

    $temp = $_FILES['file']['tmp_name'];

    $target = dirname( __FILE__ ) . $imagesFolder;

    $finalFile =  $target . changeString( $_FILES['file']['name'] );

    move_uploaded_file( $temp, $finalFile );

}
?>  Code language: PHP (php)
Summary
DropzoneJS is one of the most powerful JavaScript library for implementing a drag and drop file upload. In this course, we have learned the basics of all of that. If you are interested in more, we’d love to provide you but in the meantime, we hope that everything we covered here is enough to get you started.