Laravel is one of the greatest PHP frameworks that you can use for creating web applications and if you’re still building your web applications through core PHP, then you’re giving yourself a ton of work.
On the 12th of March 2024, Laravel released its latest version which is Laravel 11.
Now, you may be asking…
If the bugs are not yet fixed for the newest version, does that mean I should not install the new version?
Well, that’s not always the case. Bugs are possible to be found on every version of Laravel.
If you don’t want to update your Laravel, you can always enjoy Laravel version 10
However, if you want to experience Laravel 11, then proceed reading as we’ll guide you on how to install Laravel version 11.
How to install Laravel 11 on Windows with XAMPP
Installing Laravel 11 on Windows is very easy. However, before we can enjoy the new version of Laravel, we have to make sure that our system is compatible and meets the following requirement:
PHP 8.2
If you don’t have PHP installed on your computer, don’t worry, XAMPP provides PHP on installation.
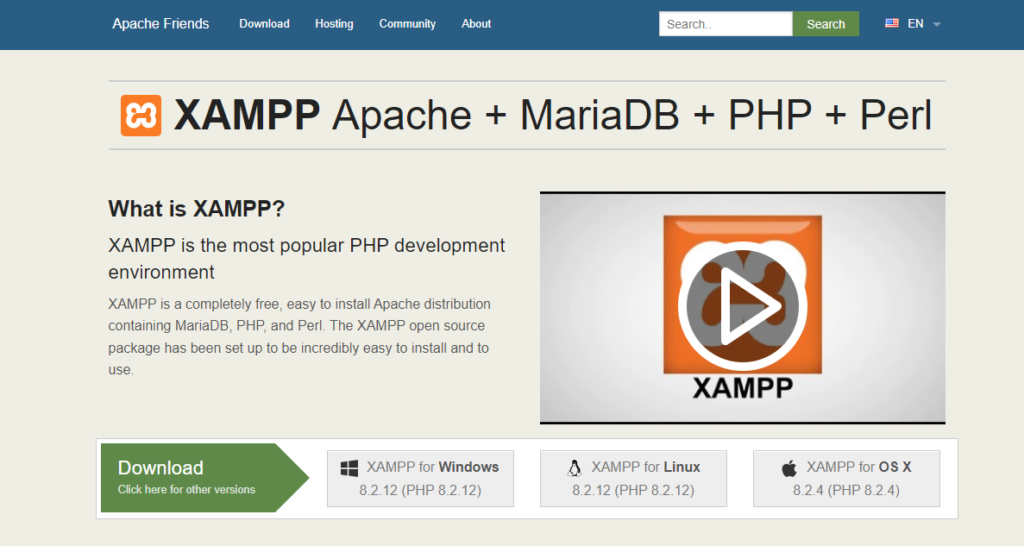
1. Installing XAMPP
XAMPP is one of the most popular cross-platform web server used mainly for local web development. Installing XAMPP into your computer will install the following packages:
Apache HTTP Server
MariaDB
PHP
PhpMyAdmin
You can download latest XAMPP installer by clicking the download button below:
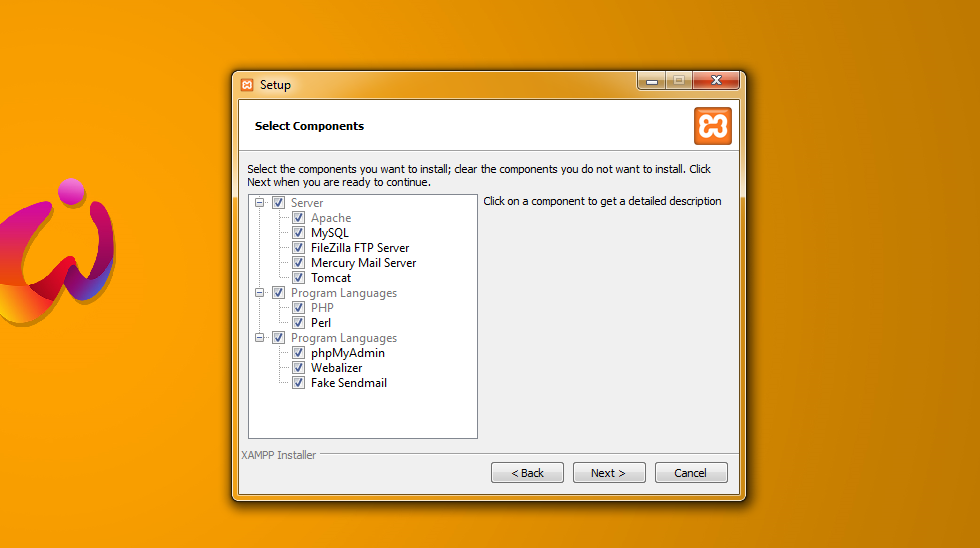
Once you have downloaded XAMPP, run it and just follow the steps below to install it properly.
Step #1: Select the components
We usually just select Apache, MySQL, and phpMyAdmin. However, you may just select everything to make sure that nothing goes wrong.
Step #2: Select the location
The default location for XAMPP is C:\xampp If you want to change the location, you may do it here.
Step #3: Starting XAMPP
After the installation, you should be able to run it and activate Apache and MySQL.
2. Installing Composer
Composer is an application-level manager that allows you to not only install libraries but also provides a standard format for managing dependencies of PHP software.
To install Composer, click the download button below.
After downloading Composer, just run it and don’t tick the checkbox for the developer mode. It will also ask you for proxy settings but just ignore it.
3. Installing Laravel 11
Now that we have everything we need, we can start installing Laravel.
Open your terminal and run the following command:
composer global require laravel/installerCode language:Bash(bash)
4. Creating a new Laravel project
There are two ways to create a new Laravel 8 project. The first one is by using the command from Laravel itself:
laravel new blogCode language:Bash(bash)
The second way is by issuing the Composer create-project command in your terminal:
Once the command is done creating the project, you can use the following command to test your app in your localhost.
php artisan serveCode language:Bash(bash)
If you’re looking for an in-depth guide for creating a Laravel project, you may take a look at our full guide on how to create a Laravel project.
Upgrading from Laravel 10 to Laravel 11
If you’re using an older version of Laravel like version 7, you can upgrade to Laravel 8 by running the following commands in your terminal:
composer global remove laravel/installer Code language:Bash(bash)
Then, use the following to install Laravel 11
composer global require laravel/installerCode language:Bash(bash)
In other words, you will need to remove the old Laravel and re-install the latest version.
Conclusion
There’s no doubt that Laravel is one of the best for creating web applications. With the release of Laravel 11, developers will be more able to create web applications that are efficient and easier to maintain.
To learn more about the release of Laravel 11, check out the Laravel 11 release notes as well as the official upgrade guide if in case the above step does not work for you.
So you’re looking for a WordPress theme for your business? Don’t worry; Today, we’ll be giving you 13 WordPress themes that are clean and modern-looking to make your business look more appealing than ever.
Best WordPress Themes for Business Category
Before wasting time, let’s take a look at 13 of the best WordPress themes that are responsive and beautifully designed in 2020.
REHub is said to be one of the best WordPress themes in the market that offers not only a nice WordPress theme but also a way of generating money through eCommerce. So if selling products is your business, then this WordPress theme will definitely serve you in a long run.
Like most people say about this theme. This WordPress theme is a money maker. Even Amazon recommends this WordPress theme.
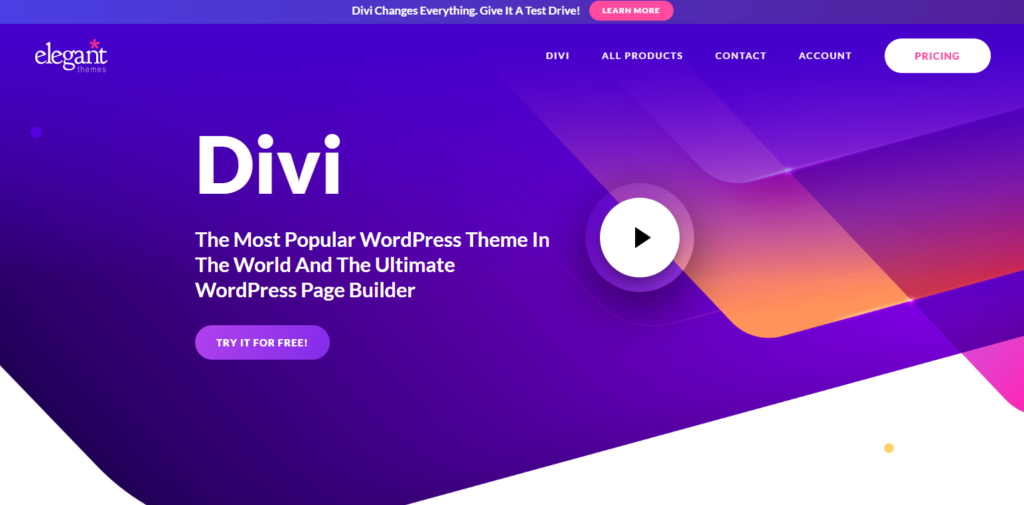
Divi is a WordPress page builder that is very popular in the WordPress community. In fact, it’s very popular that it is being used by more than 600,000 users around the globe.
Its drag and drop builder allows you to create a professional-looking website in less than 15 minutes and if you don’t feel making a web design from scratch then Divi comes with 20 pre-structured layouts allowing you to start your new project instantly. This is perfect for businesses that wish to have this glamorous look.
Built-in layouts
Over 46 content modules
Color, style and size customization
Advanced Tools for Developers
Advanced Visual Builder
Live preview
Yes, Divi is one of the most used WordPress themes in the market but it’s not always perfect. The downside of using Divi is it tends to make your web pages very slow and its code is not SEO-friendly. Not only that, if you use Divi and you decided to change themes, it will be very difficult to transfer your content to other WordPress themes.
If you’re looking for a WordPress theme that is clean, flexible, and fully responsive then your search is about to be over. Enfold is one of the best themes that is known for having a good reputation in the WordPress community.
This WordPress theme offers a very modern design that can be used for any kind of business like corporate, e-commerce, and more. Not only that but it also offers plenty of good features such as:
Astra is no doubt one of the best free WordPress themes that you can use for any kind of business that you have. This WordPress theme provides many features that are perfect not only for beginners but also for experienced WordPress site owners.
Our favorite best features that they offer are the following:
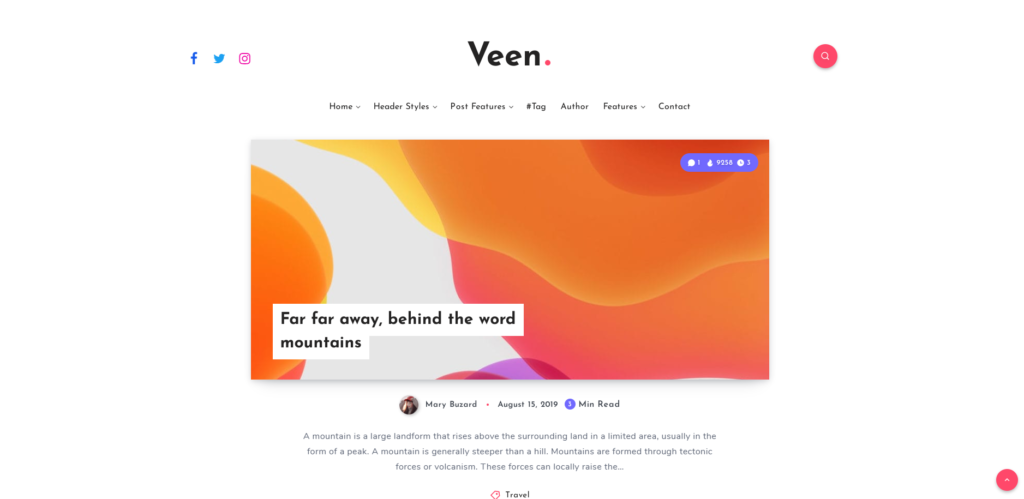
Veen is yet another type of premium WordPress theme that focuses on a modern blog design that is super attractive thanks to its animations. With Veen, website visitors will never have an issue to navigate around your website as it is very organized and clean.
If your business is blogging, then this kind of WordPress theme is the best option for you, it offers the following great features:
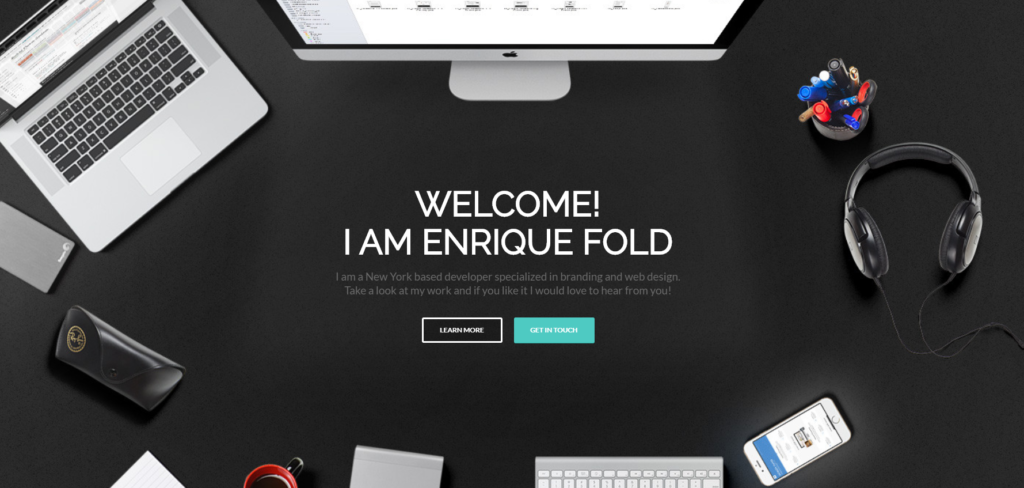
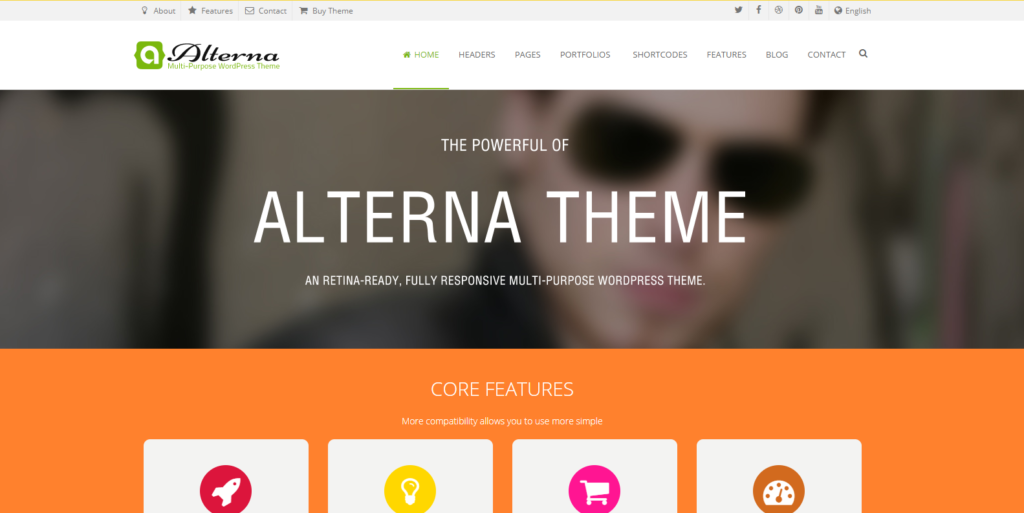
Alterna is one of the hottest and best-selling WordPress themes this 2020. With Alterna, you can create any type of website for any kind of business using its drag and drop visual composer page builder. The best thing with this WordPress theme is it provides features and plugins that are more expensive than the theme itself.
It comes with an amazing slider plugin, parallax slider, premium fancyBox, waterfall Flux with AJAX, and many more!
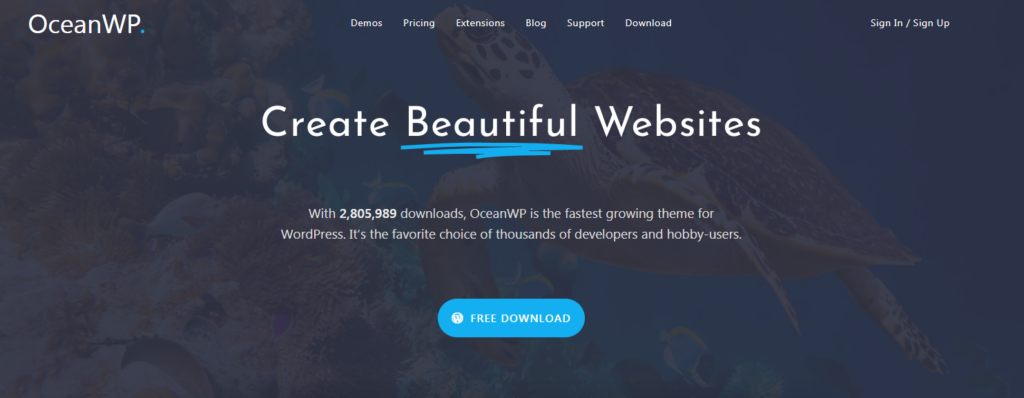
One of the fastest-growing themes for WordPress. This extendable and lightweight theme will allow you to create different kinds of WordPress websites for any kind of business that you can think of. It can be integrated with multiple platforms such as WooCommerce and other page builders.
With Ocean, you won’t need to install external plugins because it already provides awesome features like image sliders, multiple custom widgets, color options, header layouts, and many more.
This is one of the excellent premium WordPress themes. This multi-purpose theme allows you to develop versatile websites within a few clicks. Avada comes with over 41 featured websites and more than 255 web page designs.
You can use their demo installer to set up the content. Moreover, it comes with over 1000 customization options. It is compatible with many WordPress themes.
Are you planning on making a magazine-type of blog? Then you should take Soledad as your WordPress theme.
There’s no doubt that this is the best WordPress theme that you find from ThemeForest. It comes with excellent magazine layout options, over 1000+ sliders, and many more. Its single post templates are worth mentioning that allow you to share your stories.
You can create a completely customized website using its page editor support. It is compatible with the WP bakery and Elementor page builder.
The 7 is one of the easiest to customize WordPress theme ever. It offers more than 1000+ theme options to allow you to build everything that you can think of for your website.
If you like using Page Builders then this theme is perfect for you as it offers full and seamless integration with WPBakery Page Builder and Ultimate Addons.
But of course that is not the only thing that is best with The 7. It also offers:
Are you planning on building a news website or blog? Then Newspaper is the WordPress theme that you should be using.
With Newspaper, you can create a great news website that look simple yet professional and organized. You can also use this WordPress theme for different types of websites like fashion, food blogs, travel, and lifestyle.
Bimber is yet another newspaper WordPress theme that allows you to create an attractive, high-speed, and fully functional website in less than one day. It offers a bunch of powerful plugins that can improve the functionality of your website inside and out.
With Bimber, newsreaders won’t finally have trouble reading your news day and night. Thanks to its powerful dark mode feature, readers can finally switch your website into a dark mode setting in just one click of a button.
If your niche is about viral content then this theme is perfect for you.
It’s quite hard to find a WordPress theme that matches with real estate niche right? Fortunately, it isn’t. RealHomes is a WordPress theme created specifically for real estate niche websites.
With RealHomes, you can easily create a website that showcases your properties. It’s super easy you can create a website in less than an hour.
Advanced & customizable real estate search
Google maps integration
OpenStreetMap integration
Gallery Templates
User registration & Login support
Fully documented
and more!
Conclusion
It can be a bit hard to find a great WordPress theme that fits your business requirement but we hope that in this article, you found one or two WordPress themes that you can use in a long run. If in case you haven’t found what you’re looking for, then feel free to talk to us! We offer WordPress theme development and we can help you create the theme that you’re looking for.
Disclosure: This article may contain affiliate links, which means we may receive a commission if you click a link and purchase something that we have recommended.
This is Shopify liquid, a template language created by Shopify that serves as a framework for all Shopify themes. If you’re unfamiliar with Shopify themes, they are the templates that controls the styles and the layout of your online stores. So, if you wish to customize your online store, it’s best to learn liquid programming.
In this article, we’ll take a look at Shopify liquid.
We’ll start by understanding the Shopify liquid programming, and then we’ll learn about its features such as:
Objects in Liquid
Tags in Liquid
Filters in Liquid
So if you’re ready, let’s begin learning Shopify liquid!
Video Tutorial
Do you prefer video tutorials instead of reading? You may watch the video version of this article below:
What is Shopify Liquid?
Shopify liquid is a template language used for creating or modifying Shopify themes. If you’re familiar with Ruby, you probably have heard about this template language because it’s written in Ruby or it’s known to be written in Ruby, but in terms of syntax, it’s very different compared to other programming languages.
In addition, Shopify liquid is very limited. Like there’s a lot that you cannot do with liquid. For example, you cannot retrieve a data from a third party server. Just from Shopify.
What is it used for?
Shopify Liquid is mainly used as the “backend template language” of Shopify themes. Meaning, it is only used to control what is displayed in the Shopify storefront. Don’t get the wrong idea though because Liquid cannot do many things like connect to a third-party server, creating directives, etc.
In web development, there are two contents that you can render: static content and dynamic content.
Static content is a content of a page that stays the same and is usually hard-coded in HTML whereas dynamic content. It’s the content of a page that changes depending on specific parameter.
For example, we have the following product page.
It specifically rendered the product for cats because in the URL, we specified that we want to render this specific product.
The highlighted text above is called a handle. By changing this to a different handle of a product, the product page will render a different product.
In addition to that, Shopify uses its own architecture or template files to display this pages.
For example, the product page is using product.json. It’s a JSON template that uses sections to complete the page, taking a closer look at the section files you will see that there’s a liquid code mixed with HTML, CSS, and JavaScript.
Note that the code above is just an example of what code can a liquid file have.
So to put it simply Shopify Liquid is like the middle man between Shopify stores and the server of Shopify (where all the data about your Shopify store is stored).
When a Shopify store asks for a data through liquid, Shopify liquid will ask the server of Shopify if that data that is being requested is available.
If the server returns 200 OK, then the server will give the requested data back to liquid. Then liquid will hold that data and bring that to the Shopify store’s theme.
If the requested data is not available, then the server of Shopify will just return a 404 error response. Meaning, Shopify liquid won’t have anything to bring.
Shopify Liquid Features
Shopify liquid is categorized by three features: objects, tags, and filter.
Objects
Also known as variables are wrapped in double curly braces {{ }}. And it’s used to output pieces of data from a Shopify store. For example, this is a shop object:
{{ shop }}
Inside of the shop object, there are properties or attributes that you can use by using dot notation ( . ).
Let’s say we use the name attribute. It should be something like this:
{{ shop.name }}
So you’re going to type it like above. The above attribute should render the name of your Shopify store.
There are plenty of attributes that you can use from most of the objects in Shopify. So if you wish to learn more about these objects and attributes, I suggest going to the Shopify developers’s documentation page and get to know these attributes or objects. Now let’s proceed to tags.
Tags
Tags in Shopify liquid are the programming logic that tells templates what to do. This tags are wrapped in curly braces, followed by percentage symbols {% ... %}.
And it’s usually followed by a closing tag or an end tag {% end... %}.
Tags are divided into four categories: control flow, iteration, theme, and variable tags.
Control flow tags are the tags that you can use to create conditions. These control flow tags are the:
if
unless
else/elsif
case/when
And lastly, the operators and/or.
To create a tag, you need to start it with a tag itself. Say, for example, the, if tag:
{% if condition %}
...
Then you need to close it with a closing tag.
{% if condition %}
...
{% endif %}
Code language:PHP(php)
However, not all tags are required to have a closing tag. A good example of this is else or elsif. These tags can only be used between if and, endif.
Now, if you want to create multiple conditions for a control flow tag, you can use the operators and, or, or.
For example, we have the following condition:
{% if condition_A and condition_B %}
...
If you’re using and, the two conditions (condition_A and condition_B) must be true in order to execute the block of codes inside of the if.
If you’re using or, either of the two conditions can be true, it will still execute the code inside of the if tag.
{% if condition_A or condition_B %}
...
Now, all of this are part of the fundamentals of programming. And so if you’re a familiar with it, I suggest go and learn that because that’s quite a huge topic for this article.
Iteration tags are the tags that you can use to repeat blocks of code. This is where you can use the for tag to loop through an array of values. For example, we have the following for tag:
{% for product in collection %}
{{ product.title }}
{% endfor %}Code language:PHP(php)
In the example above we have a condition that for each product in the collection, we are going to render the name of the product.
So for example, in that collection, we have three products: Product #1, Product #2, and Product #3. The entire code above will basically output three, heading title ones (<h1>) with a text: Product #1, Product #2, and Product #3.
You can also combine for tag with an {% else %} tag. This is very useful too, especially if you want to know whether the {% for %} tag executed the codes inside of it or not.
Next up are the theme tags.
Theme tags are the tags that you can use:
to generate template specific HTML codes;
to divide arrays into multiple pages, and;
to tell Shopify themes to render or use a specific layout or snippets.
So this is where you’ll find the form tag, the section tag, the pagination tag, and the layout tag.
Lastly, is the variable tags, variable tags are the tags that you can use to create liquid variables. If you’re familiar with JavaScript or other programming languages, you can create variables (most of the time) using var keyword or a data type. In Shopify liquid, you can use either the {% assign %} tag or {% capture %} tag to create variables.
So how can you create a variable?
{% assign variable_name = shop.name %}
In the example above, we use the assign tag to create a variable. You can create the assigned tag, followed by the name of the variable. Then followed by an equal sign to create or assign a value. In the example above, we used the name of the Shopify store.
Now, if you use this variable, like how you use an object, this will output the name of the Shopify store.
Now let’s continue to the last feature of Shopify liquid. And that is the filters.
Filters
Filters are kind of hard to explain, but to put it simply, they are methods that modifies the value or the output of an object.
They are placed within an object tag and it’s denoted by a pipe symbol.
Now let’s take a look at this example above. Here we have a product.title object. Now we can use a filter by adding a pipe symbol and then specify what filter that you want to use. Let’s say we use the upcase filter.
{{ product.title | upcase }}
This will then change the output of the object and make the string output all uppercase. That’s basically how filters work. They change or modify the output of an object.
Now, there are plenty of filters that you can use for every situations. There are filters for strings, for numbers, for arrays, for URLs, for colors, et cetera, but they all do the same thing. They modify the value or the outputs of an object.
Closing lines
So that is Shopify Liquid, a template language used for rendering pieces of data from a Shopify store. Now, if you have any question, let me know in the comments below, otherwise, feel free to subscribe to our YouTube channel and like the attached video. We have plenty of good videos in our channel so feel free to check them out! If you have request, let us know!
Hello everyone! 2021 has been quite a year, hasn’t it? Amidst challenges, I am very happy that we got through all of it and achieved amazing milestones and I hope you did as well. This 2022, I am excited to say that there will be more content that I’m sure everyone will enjoy. Let’s talk about all of them.
But first! if you’re not aware, I’ve recently published a new video on our YouTube channel talking about the plans I have for 2022, so if you haven’t watched it yet, feel free to do so below.
Otherwise, we can proceed and talk about them here instead.
Plan to take my master’s degree.
I’ve been working on this for months and I am very excited to say that, yes I am planning to take my master’s degree. But, why? There are many reasons why I decided to take master’s degree and one of them is due to the fact that I am looking for further knowledge (Isn’t really the point?) and experiences. I’ve been going through my past experiences and I feel like I haven’t fully exposed myself to the CS industry. In my whole entire life, I’ve only worked remotely, collaborated online, and the only professional experiences that I had were not really related to the industry that I’m supposed to be in.
So, by taking master’s degree and by going out of my comfort zone, I am hoping that I get exposed to a real-life situation where I get to collaborate with CS professionals or businesses. In addition, I am wanting to further build this community and business that I have. I want to be able to create more and help programmers like myself to solve problems and create web applications.
There is a saying that I always keep in my mind: “Do not compare yourself to others” and I try not to, but there are moments that you can’t avoid comparing yourself to others when life is full of competitions and challenges. So here I am, trying to look for an opportunity to be a better engineer.
2022 for WeeklyHow
There are so many plans for WeeklyHow, I’ve already mentioned one in the previous take, but there will be more! I will be creating more content for our YouTube channel, create more courses, and make this website a little more easier to use.
More YouTube videos!
I will be creating more of these and cover more topics other than Shopify. I believe I promised in one of my older videos that I will be covering TailwindCSS, so in 2022, I will do that. Of course, I will create more Shopify videos, I will learn about Hydrogen so I can make a tutorial about that, I will also create a new series for Shopify app/theme development. Maybe GitHub tutorials? Maybe continue Unity? We’ll see. But one thing is for sure, I will experiment and try a new format for my tutorials. I will try to make it more watchable or easier to digest. I’ve been watching plenty of YouTube videos lately and I feel like I can make ours a little better. So, watch out for that 🙂
More courses!
I will be creating more courses but I won’t be spoiling the topics. I hope I get to publish 4 more courses this year though.
Make WeeklyHow better
This 2021, I’ve managed to improve our learning system, use a different video host (for some courses) and upgrade our video player. This 2022, my goal is to make the site a little more easier to use. So, changes in frontend might come pretty soon. I will also remove the FREE courses since most of them are not fully finished. However, I will try to replace them with something better.
Wrapping up
One thing is for sure, 2021 has been a very challenging year for all of us. It’s had ups and downs, but in the end, we’ve managed to become a better person or at least I hope so for myself. This 2022 would not be here without the support of each and everyone in our community, so thank you very much!
I promise to deliver everyone another quality content or tools that you need to make the eCommerce community a better place for all of us.
Let’s say you have a Shopify store and you’ve been working on it for years. Then, after some time, you’ve taken a look at your Shopify homepage and you’ve decided to customize your Shopify store for a little bit.
But then, BOOM!
You’ve found out that Shopify just recently changed the look of the customizer page and now, you’re lost. So you started reading about it and then you’ve realized that there are new features that you can do.
But, unfortunately, it looks like you can’t do any of the new features (like the “modularity” of the entire Shopify store, app blocks or app extensions, etc.) and that’s because you’re using an old Shopify theme and you need to upgrade it to a JSON template.
Well, in this article we are going to learn how to migrate a Shopify theme from Liquid to Online Store 2.0 (aka JSON templates).
Video Tutorial
If you prefer watching video tutorials, you can watch the following video version of this article.
Otherwise, you can continue below.
Getting Started
Before we get started, I want to point out that we are going to use Debut as an example in this article. We are also going to ONLY show you how to migrate a single template file from Liquid to JSON template and so if you’re looking for an in-depth tutorial about migrating all of the template files to JSON, I highly recommend taking the Shopify Theme Development course. In that course, I will be covering all of the template files from 404 to Search template file.
Also, before we begin, make sure that you BACKUP your Shopify theme. There are a lot of ways to backup a Shopify theme so make sure you do that before doing any of the steps that I will be mentioning in this article.
Migrating Shopify Themes to JSON Templates
You can migrate a Shopify theme in 3 simple steps:
Identify the sections of your theme templates
Replace the Liquid template with JSON template
Test your theme
Looks very simple no? Well, let’s see how to do them.
Identify the sections of your Shopify theme templates
Before you can start migrating your template files from .liquid to a JSON template, you need to make sure that all of the {% section %} tags inside of a template are removed. This is because Shopify doesn’t allow you to use the {% section %} tag inside of a section file and by using a {% section %} tag in a section file, you will receive the following error:
Liquid error (section/section-example.liquid line 58): Cannot render sections inside sections
Once you have found a section tag inside of your section, you have two options:
Move the code of that section to the section referencing that section. (Might be confusing but what I mean is merging these sections into one)
Create a layout that reference that section.
The second option is quite advanced so to make this article shorter and simple, we’ll just do the first option and so that you get what I’m trying to say in that list.
Open your theme code editor
Locate a template file (They’re usually inside of the /templates directory). Let’s use the article.liquid in this tutorial.
Search for {% section %} tags. (If this is your first time opening that template file, you should be able to find a section tag that references the section named “article-template”).
Did you find one? Great. Remove that section tag and open that “article-template” section file. Inside of that section file, you should see a part of the article template that renders the blog post.
So what you’re going to do is to move all of that code to the article.liquid. Because the whole point is to remove all of the section tags from your template.
Now, keep in mind that you should move or paste the code of the “article-template” to the line where the {% section %} tag is located. So if the section tag is located in line 17, then you should paste the code of that section in line 17.
Do the same steps for the rest of the section tags that you find.
Replace the old template with JSON template
Now that we have removed the section tags from our template file, we can finally replace this template file with JSON template. But first, we need to move the code of the article.liquid to a section file and then, we can delete the article.liquid and replace it with article.json.
Go to /sections directory or folder and create a new section. Name it whatever you what but make sure you remember this name because we’ll use this name in the article JSON template file. In my case, I’ll name it template-article.
Inside of the template-article.liquid, I’ll move ALL of the code from the article.liquid template file.
Delete the article.liquid.
Go to /templates directory or folder and create a new template file and select article and make sure that you select JSON instead of Liquid.
Once the article.json is created, replace its code with the following:
Once you have created your new template, open it with the customizer and check if you can add sections to your article template. If you can, then that means you have successfully migrated your template file from Liquid to JSON template.
Now the next thing that you’re going to do is to apply the same steps to the rest of the template files.
Conclusion
Migrating your Shopify themes from the old template system to Online Store 2.0 is honestly very easy, but it can be very difficult depending on what Shopify theme you’re about to migrate. So my advice, especially if you’re using a different theme, is to learn your Shopify theme first, back it up, and use it with a development store or a test store. That way, your Shopify store is safe from being broken.
We haven’t covered in this article how to use app blocks in JSON template so we’ll probably just cover them in the next video of our YouTube channel. So, if you’re interested, make sure you subscribe to our YouTube channel so we can notify you when we upload a new lesson.
One of the most commonly used effects in Unity is glow. Adding glow effect to your game levels is an alternative way to not only light up your scenes but also spice up your scenes.
It’s also known in the game development community that adding a glow effect can be hassling. That’s why in this tutorial, we’re gonna be guiding you on how to create a 2D glow in unity using shader graph and 2D lights.
Video Tutorial
The following tutorial will only cover the basics and installation of URP. If you prefer watching video tutorials, feel free to watch this video:
The above video tutorial did not cover how to create emission lights and so if you want to learn that, the guide is provided in this article.
Getting Started
Before we can successfully create a glow effect in any of our scenes. We have to make sure that our project is set up to use the Universal Render Pipeline (also known as URP)
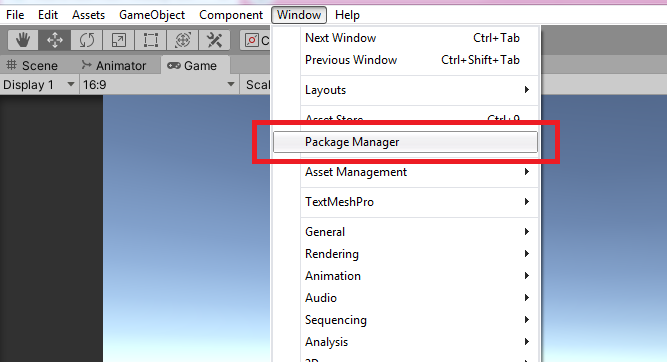
To set up, go to your Package Manager (Window > Package Manager).
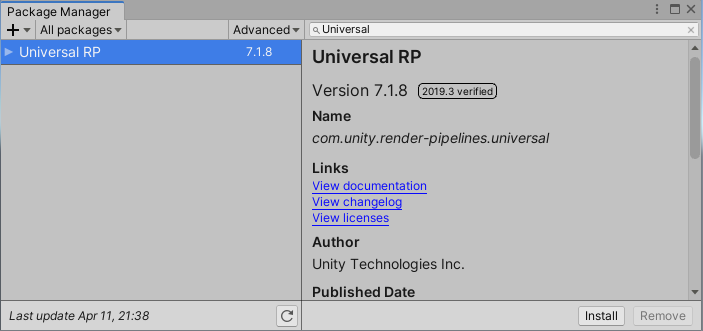
Then, you can search for Universal RP and click install.
This will download and install all packages related to URP including Core RP Library and Shader Graph.
Note
If in any case that your package manager stopped loading all of the packages, just restart your unity and try re-opening the package manager window. It’s also important to note that package manager is only available for Unity 2019.3 and beyond.
Pipeline Assets
After installing URP, we need to create a pipeline asset and assign the asset in the graphic settings. The pipeline asset will control most of the graphical features and quality settings for the Universal Render Pipeline.
Once you have imported this asset to your settings, Unity will switch from the built-in render to URP.
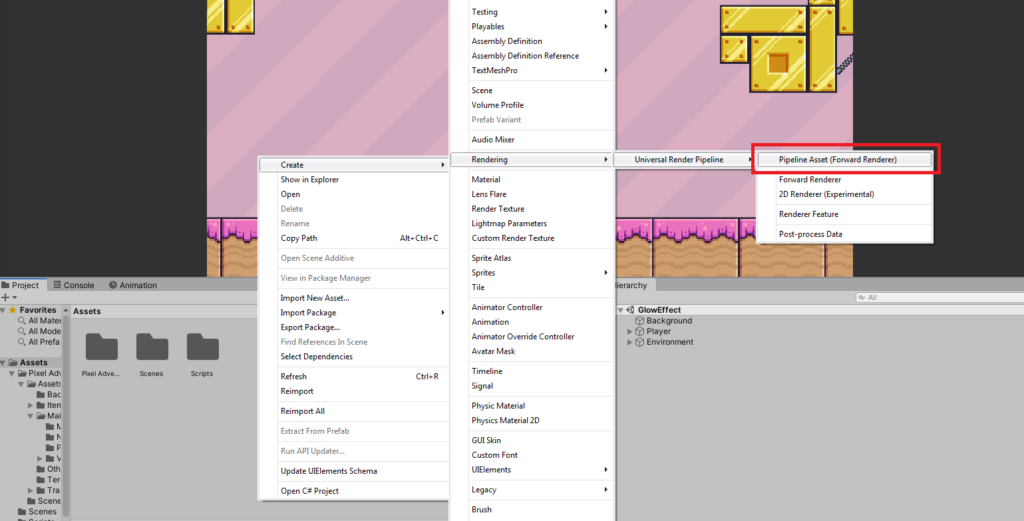
To do all of that, let’s go to our Project Window.
Hit right-click. Then look for Create > Rendering > Universal Render Pipeline > Pipeline Asset.
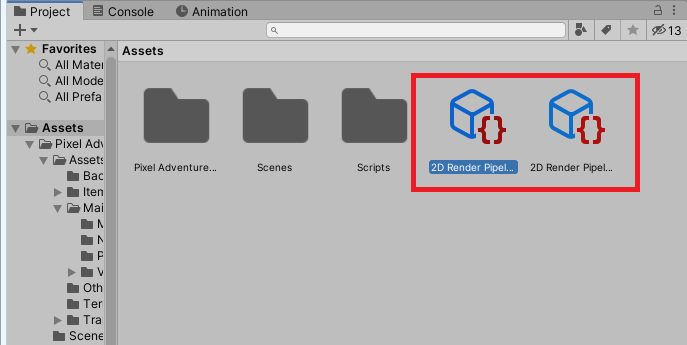
Name the asset 2D Render Pipeline.
Once renamed, the asset will create a new renderer with the name of 2D Render Pipeline_Renderer.
You may leave or delete the 2D Render Pipeline_Renderer because we’re going to create a 2D Renderer.
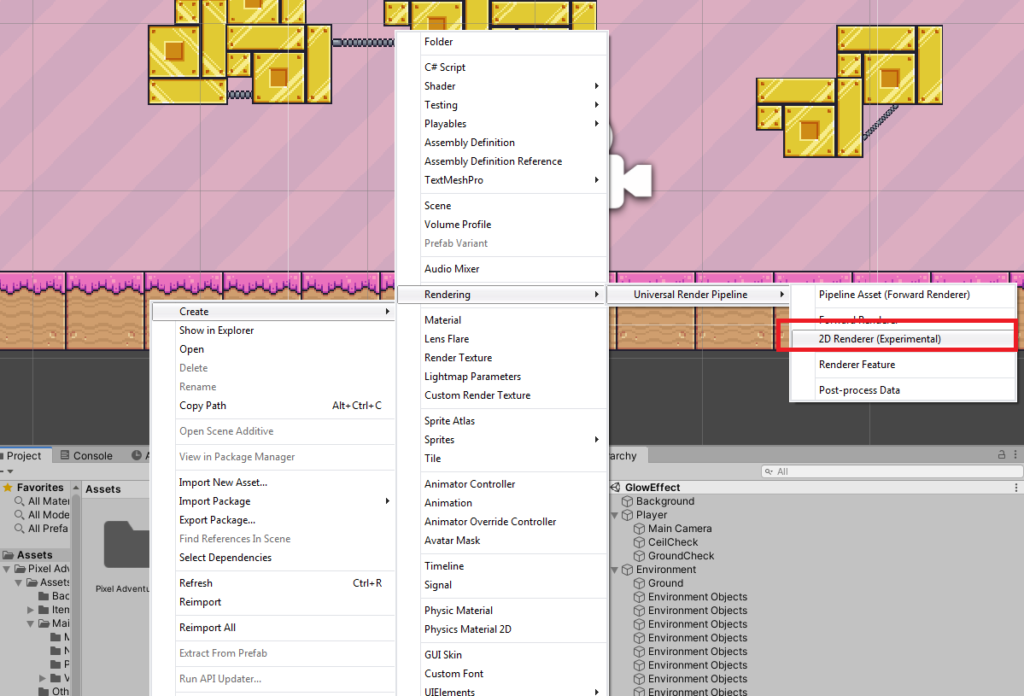
So in your project window again, right-click and look for Create > Rendering > Universal Render Pipeline > 2D Renderer.
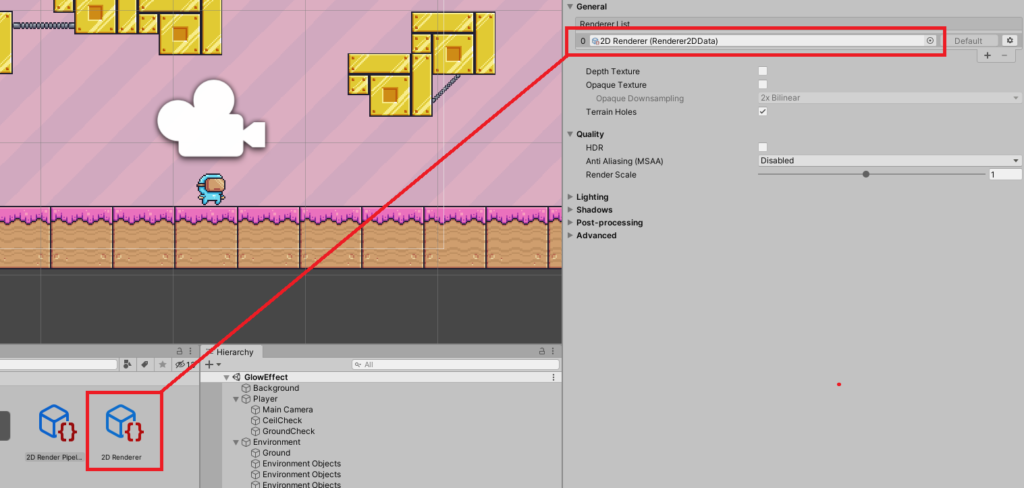
Next, select the 2D Render Pipeline and go to your inspector.
Under the General, there is a Renderer List with a Missing Default Renderer.
Simply drag the 2D Renderer that we just made into the Renderer List like below.
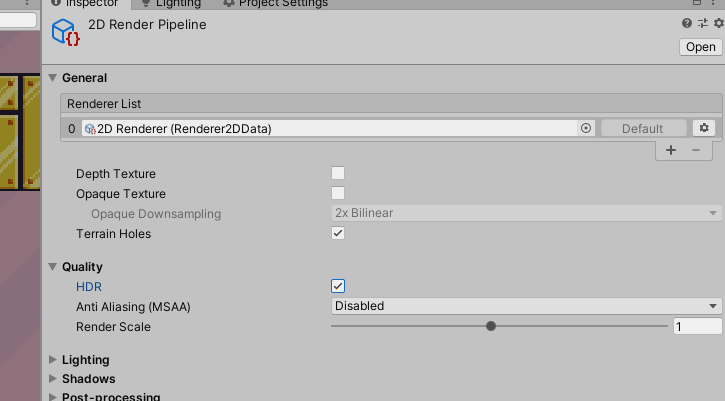
Next, under the Quality dropdown, make sure the HDR is enabled.
This will allow us to change the HDR values later to let the bloom effect know which objects to light up.
Camera Settings
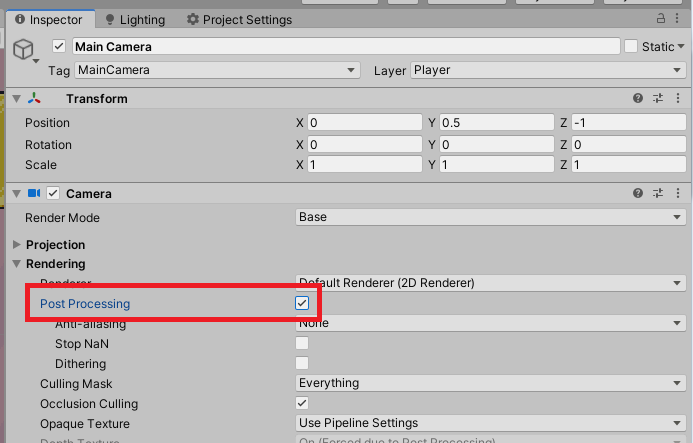
In order to see the effects that we’re going to create in this lesson, we will have to enable the post-processing in our camera.
To do this, go to your hierarchy, select the Camera and enable the post-processing.
Awesome! Now we’re almost done setting up our URP. Let’s continue.
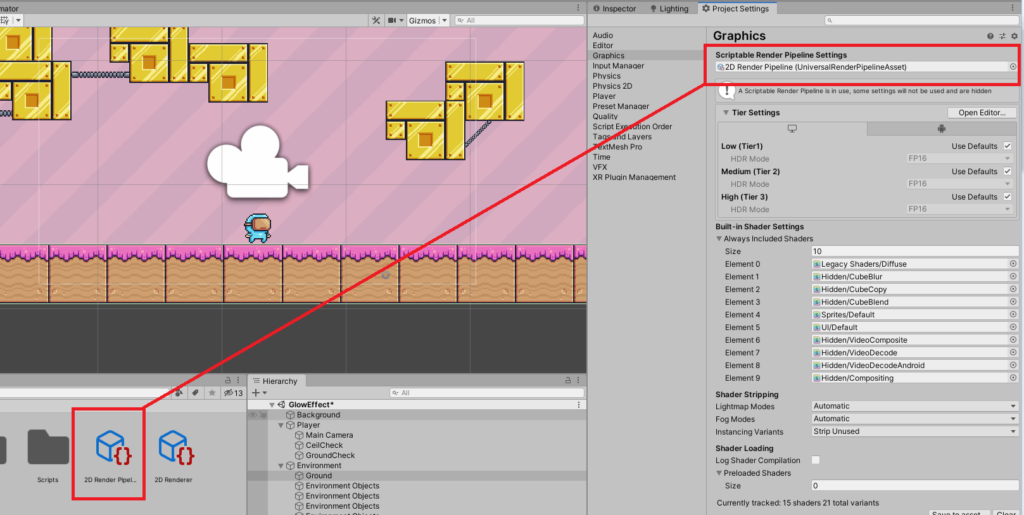
Project Settings
Once we created our Render Pipeline Asset, we can now proceed to our graphics settings to assign the pipeline asset that we just created.
To do that, open your project settings by going to Edit > Project Settings…
Then, navigate to the Graphics section to open the Graphics Settings.
And then, under the Scriptable Render Pipeline Settings… Simply drag the 2D Render Pipeline that we created into the input box like below.
Sprite Lit Shader
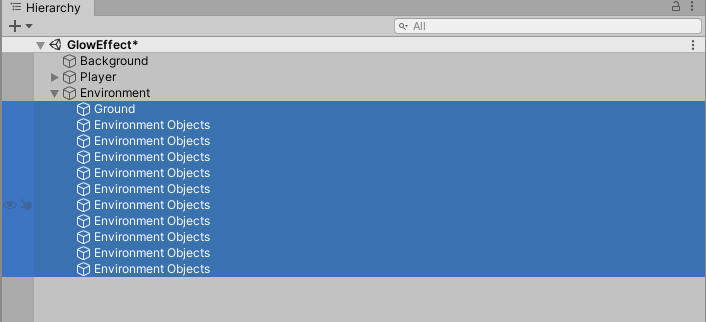
Tthe next thing that we need to do is to ensure that our environment will get affected by the glow effect that we’re about to create. To do this, we need to change all of the sprites in our game level (except the player).
So go ahead to hierarchy, select all of the game objects with sprites. In our case, that’ll be the environment.
Then, go to your inspector.
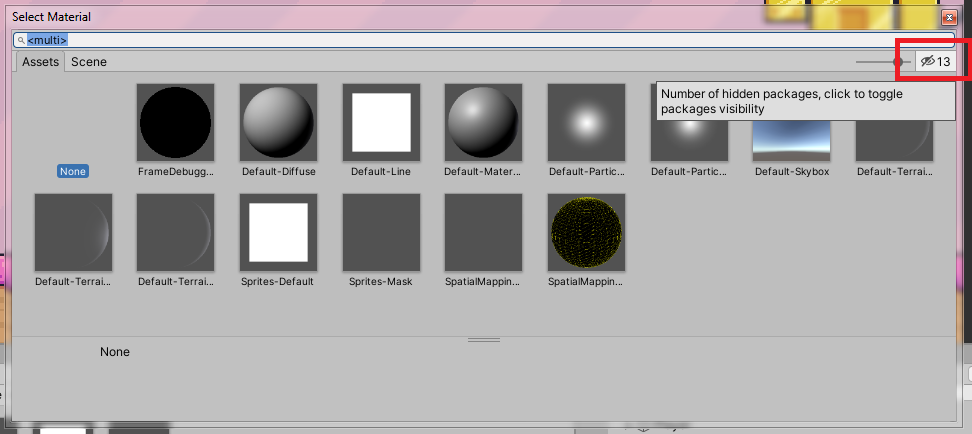
Under the Sprite Renderer component, change the Material by clicking on the button highlighted below.
A new window will pop up.
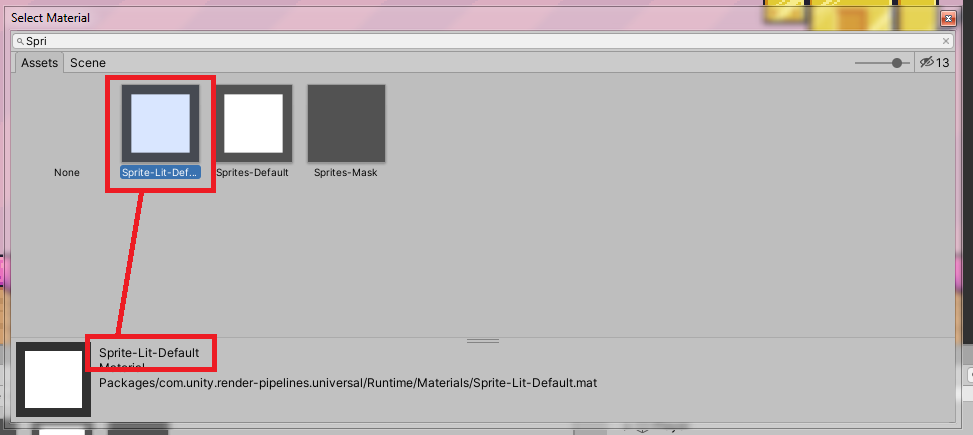
Then, click the cross-eyed button to show more options.
Then search for the Sprite-Lit-Default material and select it.
There are instances that after you selected the material, all of the sprites will turn to black. This is normal.
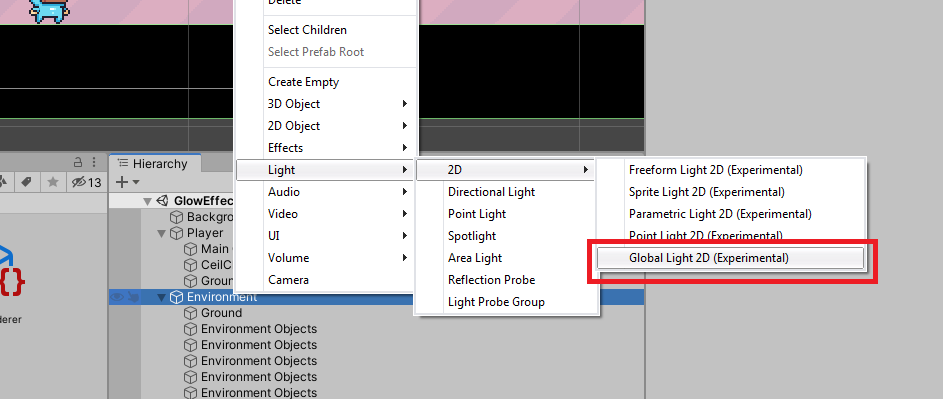
The main reason why this happens is that there are no lights in our scene yet. So, let’s create one by going to our hierarchy, right-click and select Light > 2D > Global Light 2D.
Once added, the scene will go back the sprites being normally displayed.
If you want to darken your level, you can do so by selecting your Global Light 2D and adjusting the intensity down. We will set ours to something like 0.65.
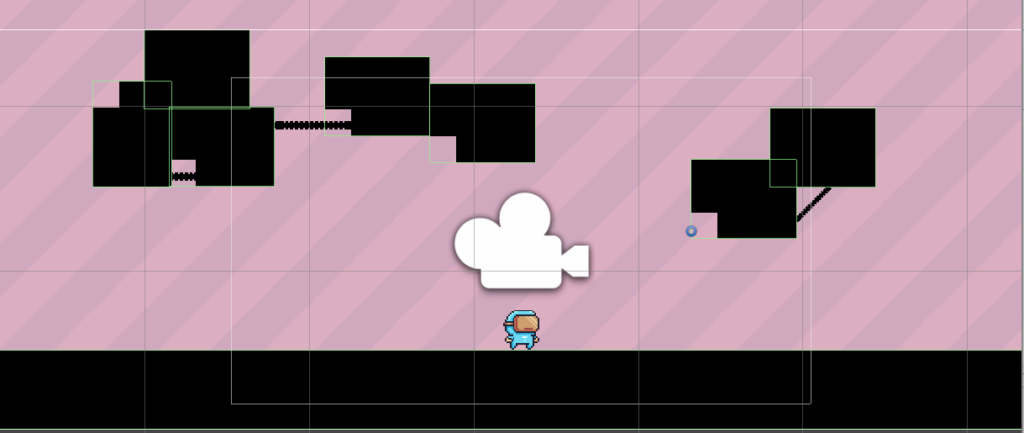
Now that we have our global light set up, we can start working on giving our player the glow that he needs.
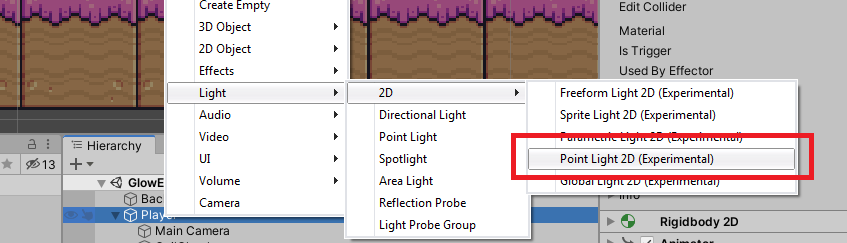
First, let’s add a point light to our player. To do that, select your player, right-click and select Light > 2D > Point Light 2D.
This will give our player the halo glow effect that we want.
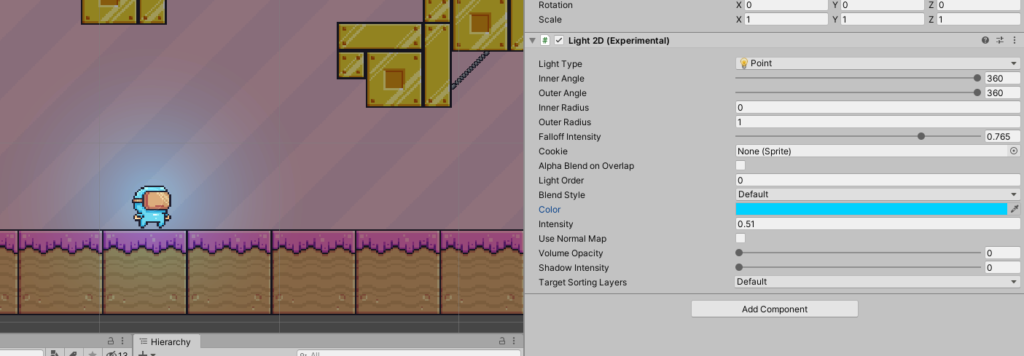
If you want, you can always adjust the intensity of the point light so it won’t blow out too much brightness in your scene. We’ll set ours to 0.51.
We’ll also set its Falloff intensity to somewhere around 0.765 and change its color to #00D1FF.
Awesome! Now we’re almost done.
Bloom Effect
The next thing that we need to add is the bloom effect or bloom post-processing effect (can be also interpreted as glow effect).
If you’re not aware, bloom is an effect that only happens within the lens of the camera and when a large amount of light gets focused on a single object, the camera’s sensor will eventually create a charge that bleeds out from pixel to pixel until it spreads out.
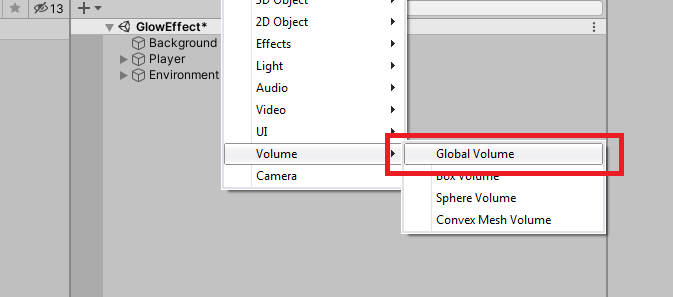
With all that being said, let’s add a new volume into our scene by going to the hierarchy, right-click and select Volume > Global Volume.
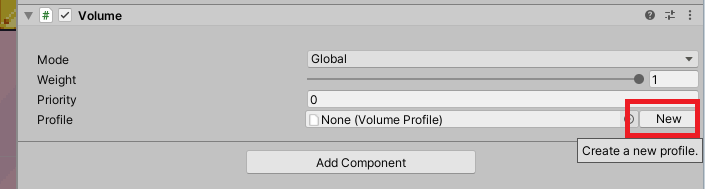
Next, go to your inspector, under the Volume component, click the New button to create a new profile.
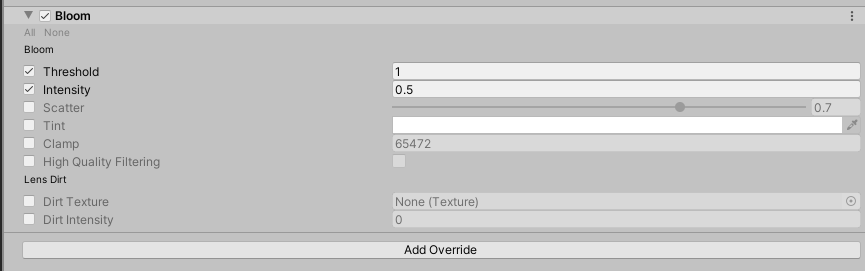
Once a new profile is created, click the Add Override button and select Post-processing > Bloom.
Under the bloom effect, enable the threshold and intensity and set their value to 1 and 0.5. Although you can always set their values to your liking.
Emission Map
Now that we have our bloom effect, the next thing that we need to do is to tell our post-processing effect which area should light up. To do this, we need to create an emission map.
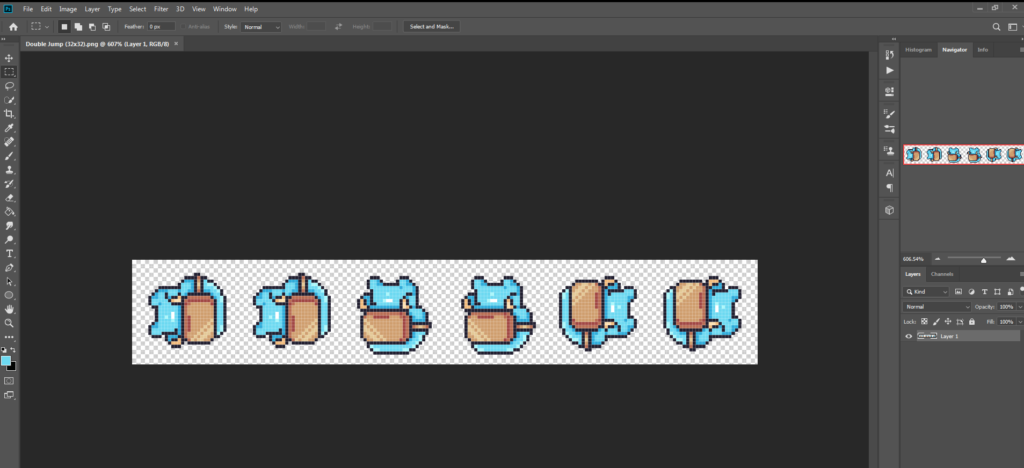
Creating emission maps can be hard depending on how much sprites you have and how much detail the sprites are. But thankfully, Photoshop can pretty much help you how to create the map.
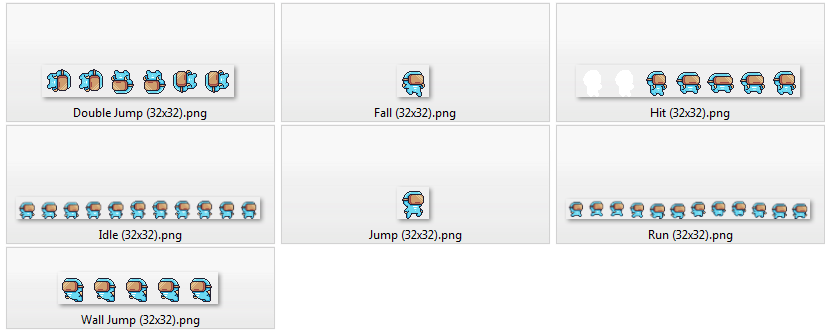
Say for instance that we have the following sprites.
Our goal for these sprites is to convert it into emission maps.. But… which part of its body do we want to emit lights?
In our case, we want its body to emit lights.
If you noticed, the color of this character is only blue, brown, and black.
Extracting blue from the rest of the colors is very easy.
Let’s open these sprites using Photoshop.
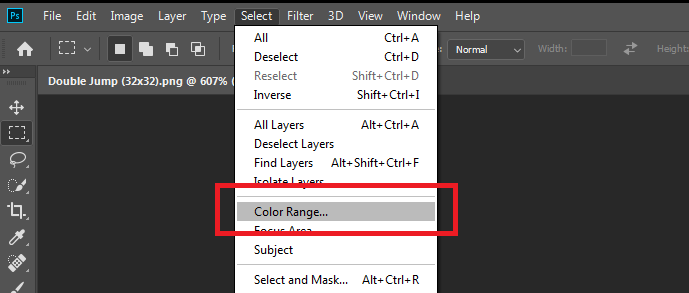
Then, select the Layer and go to Select tab > Color Range.
The color range window will pop up.
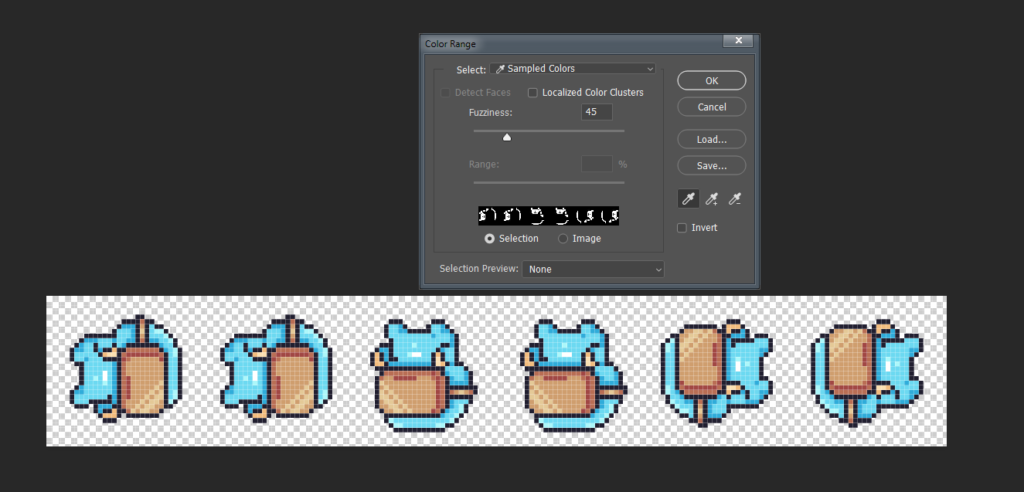
Next, make sure you select the Sampled Colors.
This will allow you to use the droplet tool.
Next, click on the color that you want your character to glow. In our case, it’s the cyan color.
Once clicked, the preview window in color range will show you which part of the image is selected.
Click OK.
This should select the parts of the character that you want to glow.
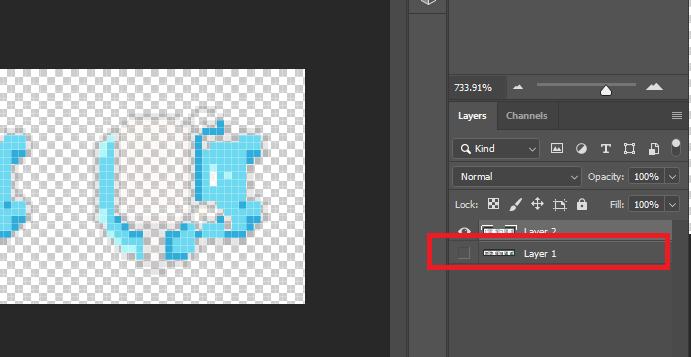
Press CTRL + J to create it as a new layer.
Next, go to your Layers window and disable Layer 1.
This time, it will only show the blue parts of the character.
Now, the last thing we need to do is to make sure that this image is black and white.
If you are not aware, emission maps only accepts black and white (like layer masks).
White means emit lights while black means don’t emit lights.
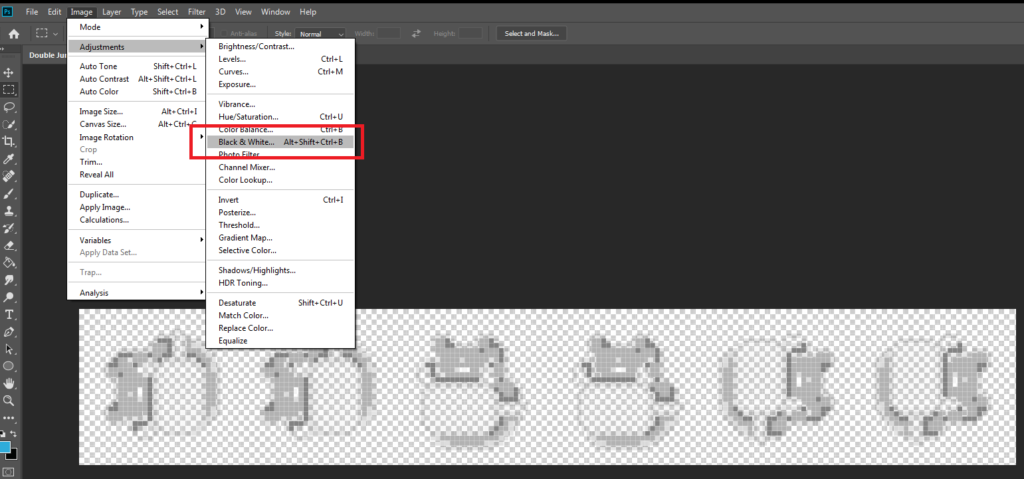
With all that being said, let’s turn our sprite into black and white by going to Image tab > Adjustments > Black and White or by simply pressing ALT + SHIFT + CTRL + B.
You can already save this image and use this as the emission map.
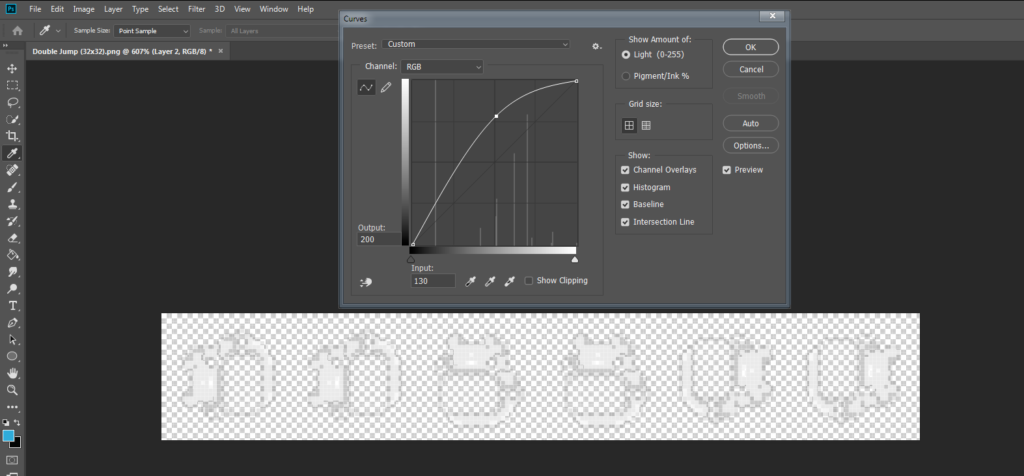
However, if you want to increase the intensity of the emission, you can always use RGB curves to increase the brightness of the image.
Save the image as PNG and make sure to name the file the same as before but with _emission at the end. (e.g. Double Jump_emission.png)
Then, do the same thing to the rest of the sprites you have.
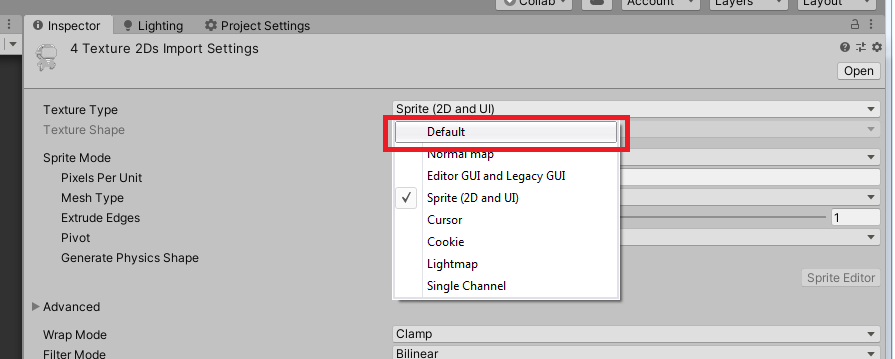
Once you’re done making emission maps, go back to Unity and import all the emission maps you have created.
Then select all the emission maps, go to the inspector and change its Texture type to Default.
Make sure that Alpha is transparent is also enabled and set the filter mode to Point.
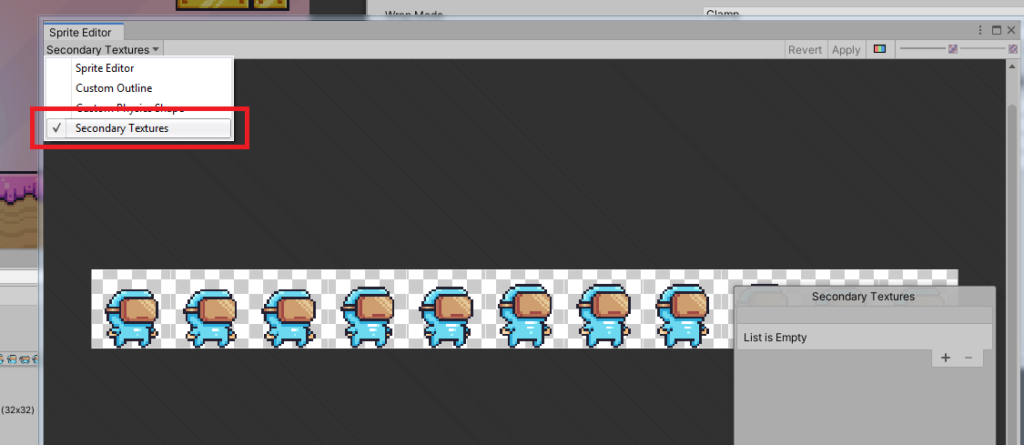
Now the next thing that we’re going to do is to use these emission maps as the secondary texture of the sprites of our character.
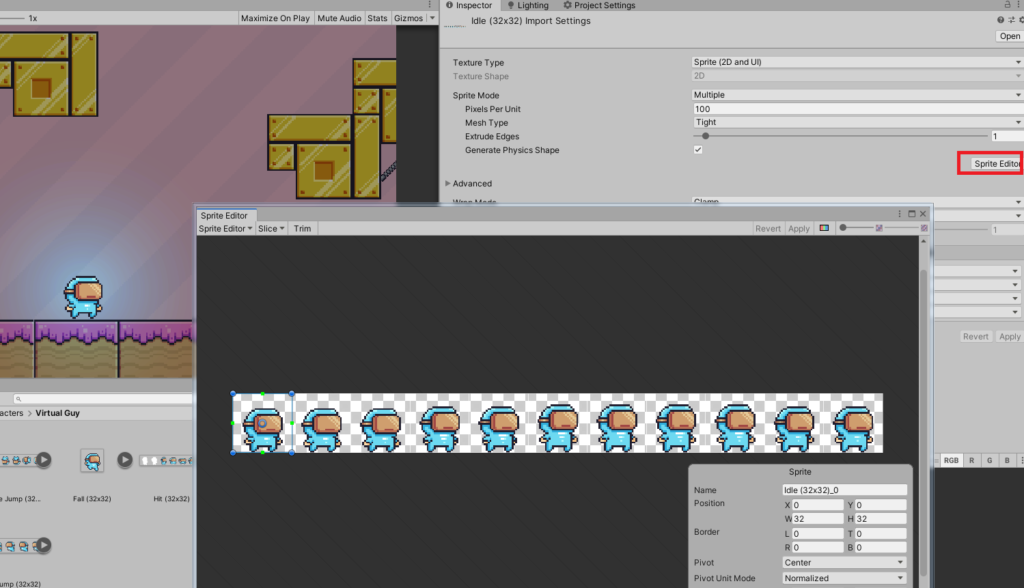
To do that, go to your project window.
Select the sprite of your character and open the Sprite Editor.
Next, click on the Sprite Editor dropdown and change it to Secondary Textures.
This will allow you to add list of your secondary textures which can be use later for shader graphs.
So click on the plus sign button to add a new texture.
Name the texture _Emission.
Then, drag the emission map that we created before. If the current sprite is Idle.png then we should add the Idle_Emission.png as the secondary texture and so on.
Now, click Apply.
Do the same process to the other sprites with its respective emission maps.
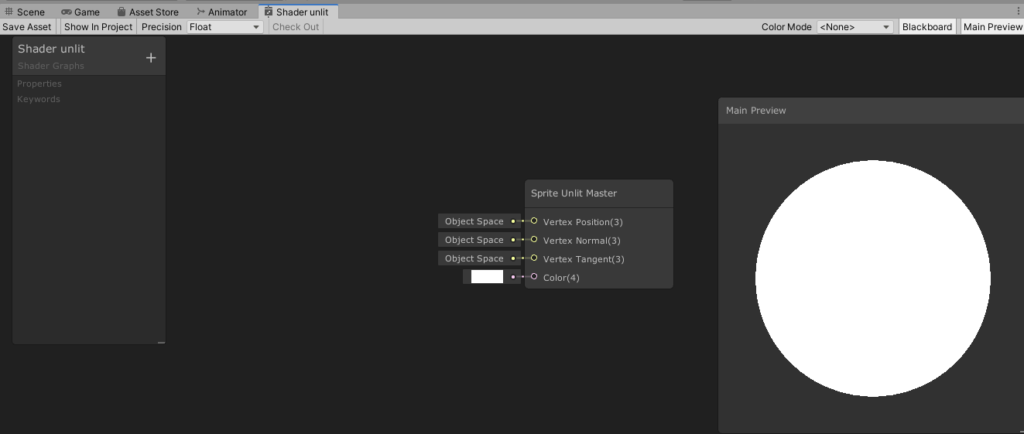
Shader Graph
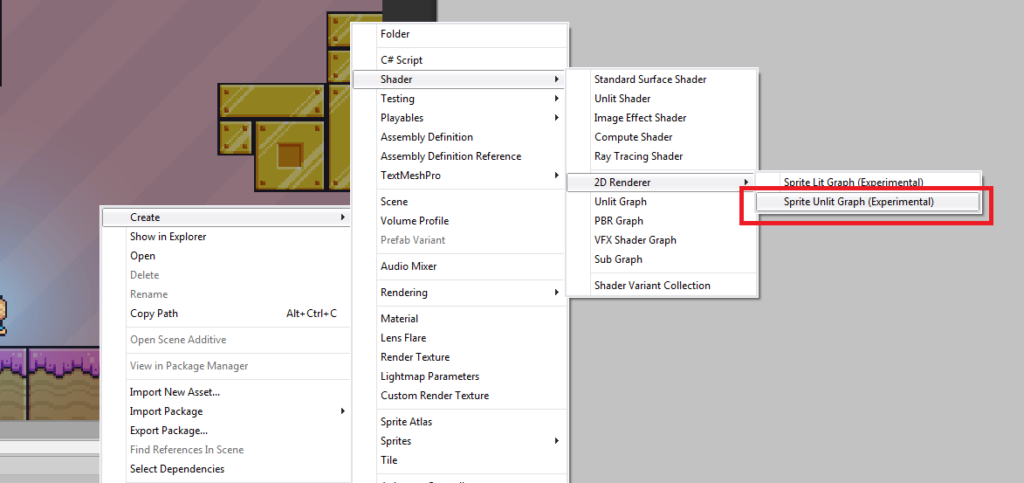
Now that we have everything finally set up, let’s finish this by creating the shader for our player.
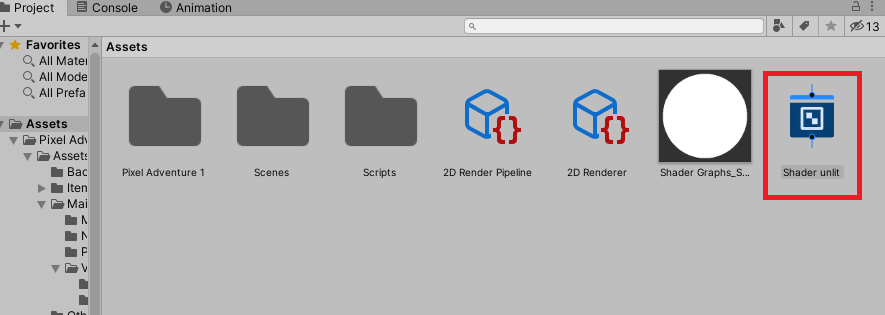
Inside our project window, hit right-click, and select Shader > 2D Renderer > Sprite Unlit Graph.
You can name it Shader unlit.
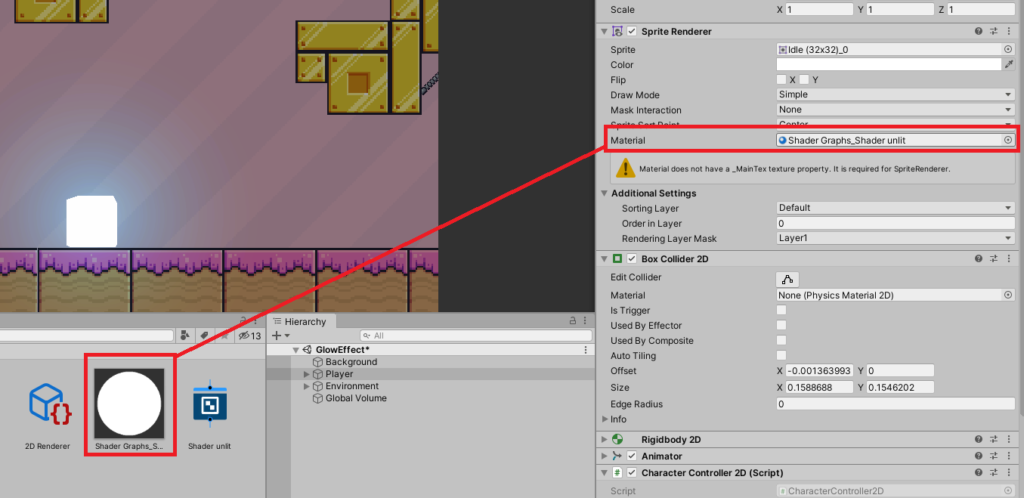
And immediately after creating the shader, hit right-click on the shader and select Create > Material.
This will create a new material with the shader that we just created.
Then, select your player and change the player’s sprite material to the material that we just created.
Once the material is changed, the player sprite will turn to blank, this is normal.
To show the player sprite, all we needed to do is go to our shader graph.
Double-click it and this will open the shader editor.
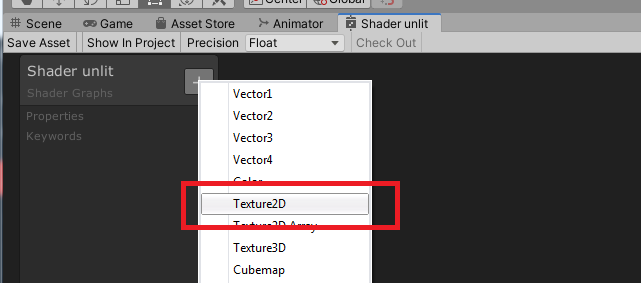
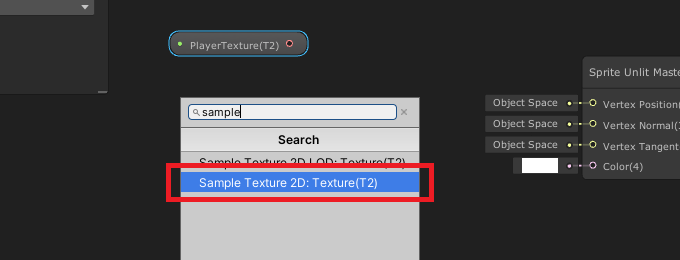
To display our sprite, all we need to do is to create a new texture 2D property.
To do this, click on the plus-sign icon and select Texture2D.
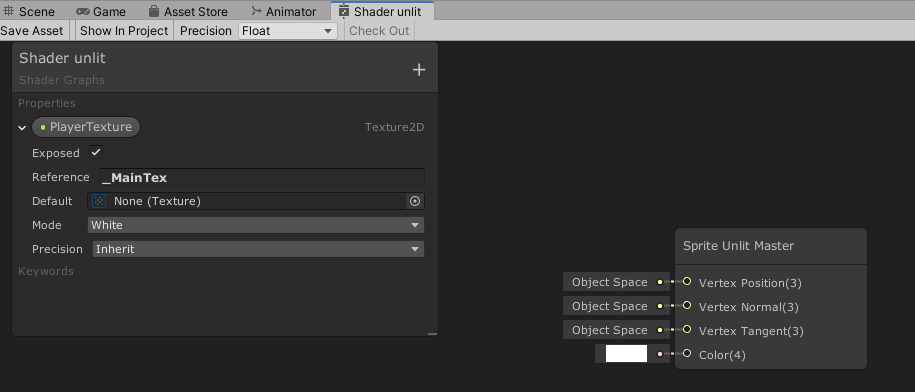
You can name it whatever you want.
Then, in reference, change its value to _MainTex.
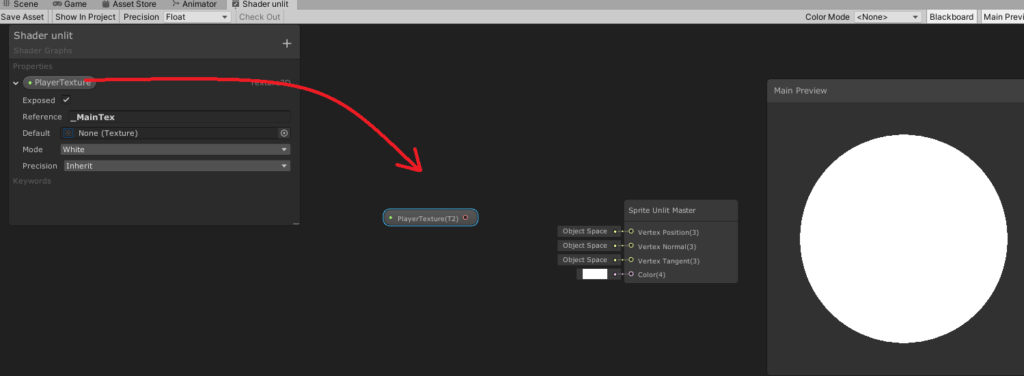
Next, drag the PlayerTexture on the field.
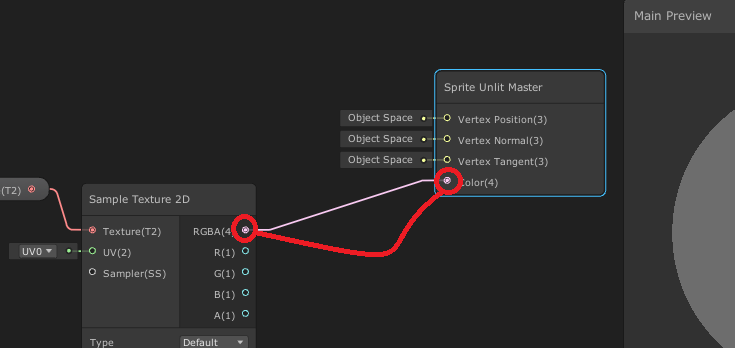
Next, drag the pink cirle on the field as well. This should display a new window.
Search for sample texture 2D.
Next, connect the RGBA(4) to the Color(4) of the Sprite Unlit Master.
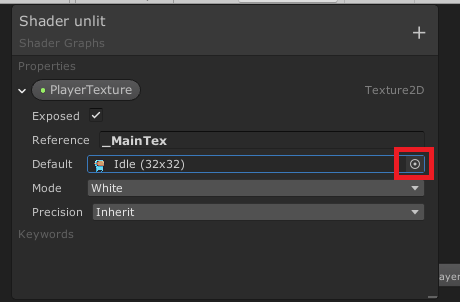
Then, go to the PlayerTexture property and change the Default texture from None to Idle or default sprite of your character.
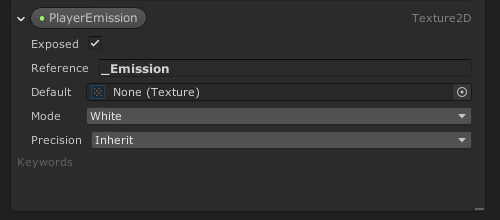
Next, let’s add the emission texture. So go ahead and click the plus-sign icon once again and select Texture2D again.
Now for the reference, we’ll type the same value that we typed in the name of our secondary texture which is _Emission.
Change the Default from None to the Idle_Emission.png.
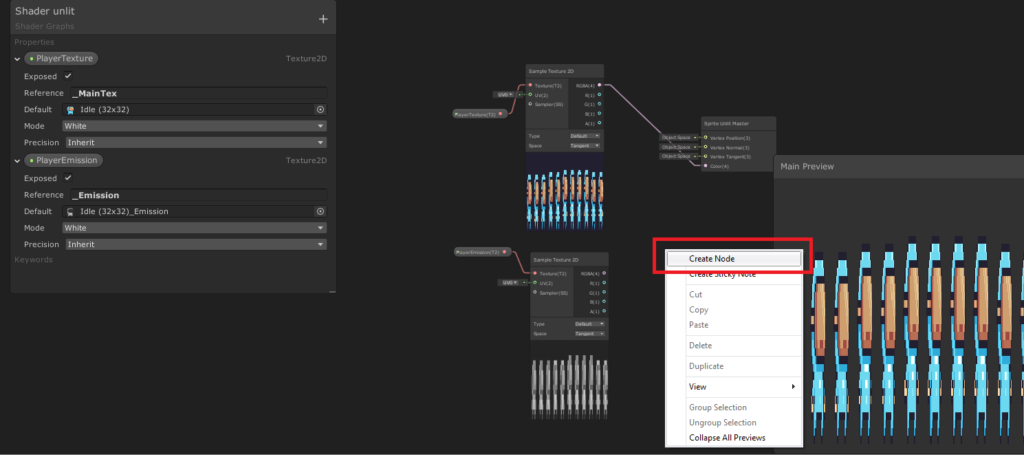
Then, do the same thing, drag the PlayerEmission onto the node field and create a new Sample Texture 2D by dragging the pink circle onto the node field.
Next, right-click onto the node field and select Create Node.
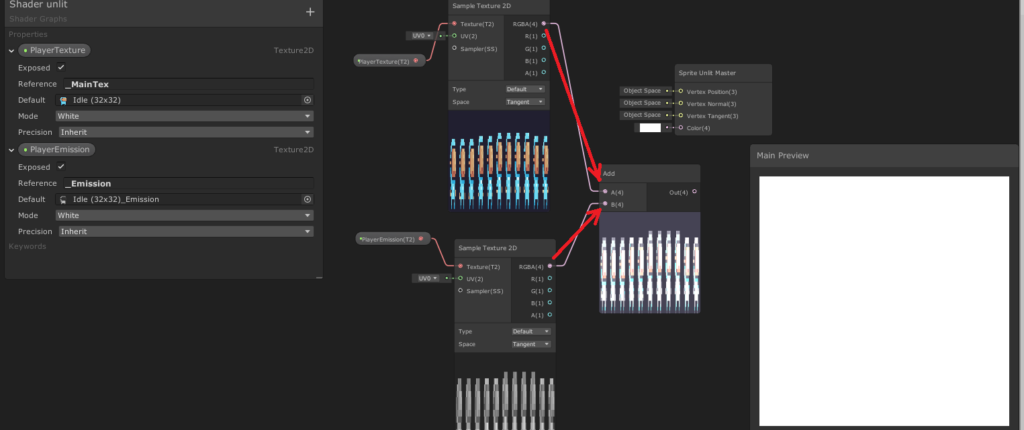
Then, look for the Add node.
Once Add node is created, mix the PlayerTexture with the PlayerEmission by dragging their RGBA to the A and B like below.
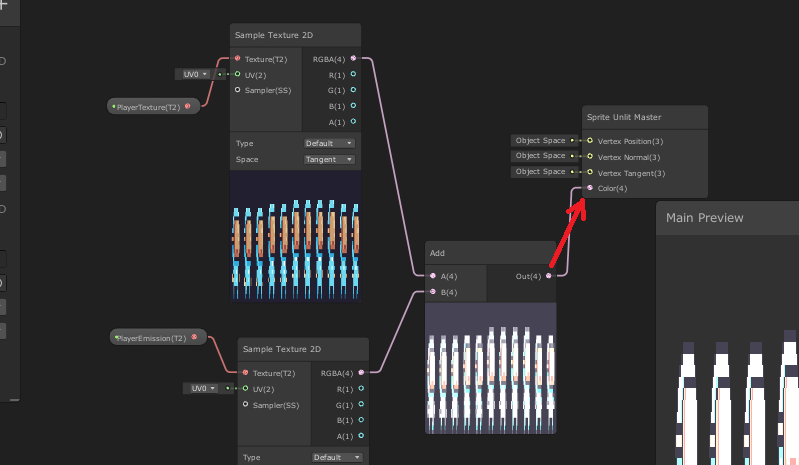
And for the output of Add node, drag it to the Sprite Unlit Master.
And if we save the shader. You should see that the player starts glowing. Awesome!
Now technically, we’re done making out player glow. But we can still make this look better by changing its glow color to something else like red, blue, or yellow.
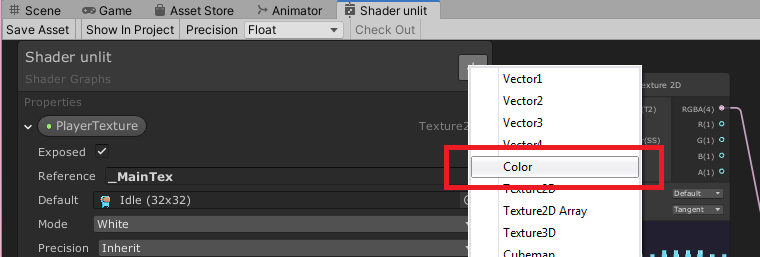
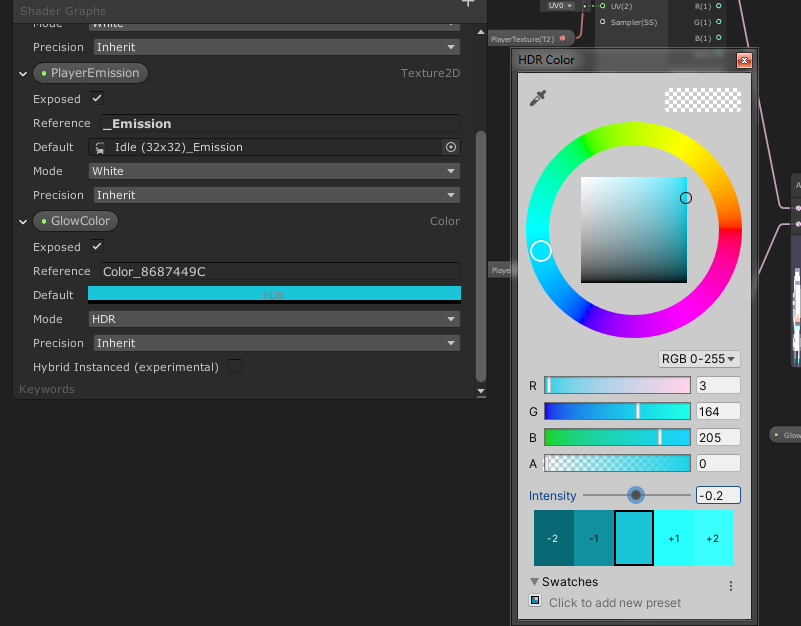
To do that, all we need to do is to create a color property in our shader.
So go back to your Shader Editor. Click the plus-sign icon, and select Color.
You can name it GlowColor. Then under the GlowColor property, set its Mode from Default to HDR.
Next, change its color by clicking on the Default value. In our case, we’ll set its value to the following.
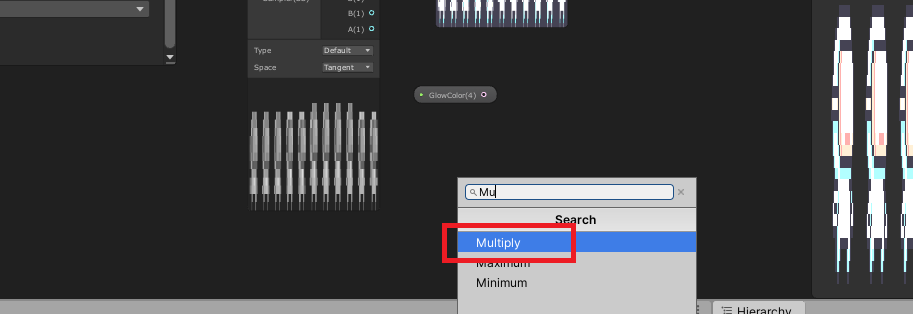
Then, drag the GlowColor onto the Node field.
Next, create a new Node by right-clicking on the Node field. Then look for Multiply.
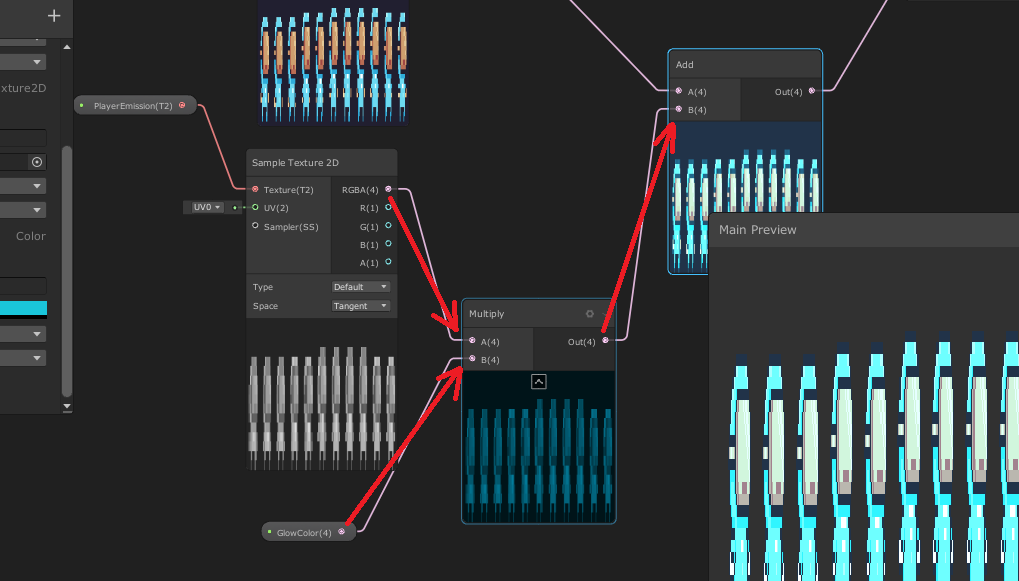
Then apply the output of the PlayerEmission’s Sample Texture 2D and GlowColor to the Multiply nodes’s input. Then the output of the Multiply Node, apply it to the Add node’s B like below.
Save your shader and you should have the following output.
As you can see, you can also change its color and intensity.
So, if you want to make a glow animation out of shader graph, you can perfectly do that and easily.
Wait before you go! You’ve come a long way and I’m very proud of what you have accomplished. If you are interested to learn more about 2D unity development and game designs, I suggest you take these books and learn how to develop 2D games from start to finish.
Conclusion
You may be thinking that making a character glow takes a lot of time but this way of making sprites glow is by far the most easiest. Not only that, after doing everything here in your scene, it will be much easier for you to customize other characters
Disclosure: This article may contain affiliate links, which means we may receive a commission if you click a link and purchase something that we have recommended.
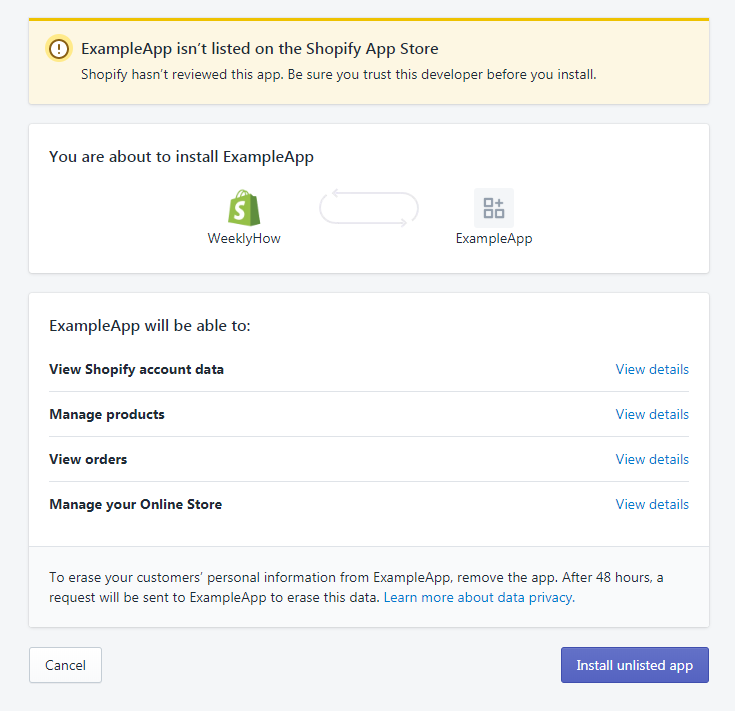
When you develop a Shopify app, you are required to store merchants’ data such as access tokens and shop URLs. These two data are one of the most important data for using the API.
The takeaway with this is that- you are responsible for deleting their data as soon as they uninstall the app.
So, how can you do that?
It’s simple. Just use webhooks.
Video Tutorial
If you prefer watching video tutorials, feel free to watch the video version of this article:
What is Webhook?
Webhook is a method of sending notifications about particular events that have happened in a shop.
For example, when a merchant uninstalls an app, Shopify will send a notification to the developer that a merchant has uninstalled the app. This notification will have a set of data that the developer can use to determine which store was the one who uninstalled the app.
Webhooks are also available for the following events/topics:
For this tutorial, we’ll be focusing on how to implement webhook API for the event/topic: app/uninstalled.
We’ll assume once again that you have already set up your Shopify app and connected it with the database because we’re going to delete the stored data as soon as we uninstall the app.
We’ll also assume that you are using the same script that we’re using for this tutorial. So if you’re not familiar with everything we used in this tutorial, we suggest you follow the tutorial where we teach you how to create a Shopify app from scratch.
We’re going to be editing generate_token.php or token_generator.php for this tutorial. So make sure you have that file ready.
Implementing Webhooks
Before you can make a post request to webhooks API, you will need to create a payload that contains the topic and the target URL that will load once the event is fired.
Of course, for this tutorial, we’ll be using PHP to implement webhook API although using a different programming language will also have the same process.
Now, let’s open our token generator script.
For the moment, we have the following inside our code.
<?php// Get our helper functionsrequire_once("inc/functions.php");
require_once("inc/connect.php");
// Set variables for our request$api_key = "xxxxxxxxxxxxxxxxxxxxxxxxxxxxxx"; //Replace with your API KEY$shared_secret = "xxxxxxxxxxxxxxxxxxxxxxxxxxxxxxxxx"; //Replace with your Shared secret key$params = $_GET; // Retrieve all request parameters$hmac = $_GET['hmac']; // Retrieve HMAC request parameter$shop_url = $params['shop'];
$params = array_diff_key($params, array('hmac' => '')); // Remove hmac from paramsksort($params); // Sort params lexographically$computed_hmac = hash_hmac('sha256', http_build_query($params), $shared_secret);
// Use hmac data to check that the response is from Shopify or notif (hash_equals($hmac, $computed_hmac)) {
// Set variables for our request $query = array(
"client_id" => $api_key, // Your API key"client_secret" => $shared_secret, // Your app credentials (secret key)"code" => $params['code'] // Grab the access key from the URL );
// Generate access token URL $access_token_url = "https://" . $params['shop'] . "/admin/oauth/access_token";
// Configure curl client and execute request $ch = curl_init();
curl_setopt($ch, CURLOPT_RETURNTRANSFER, 1);
curl_setopt($ch, CURLOPT_URL, $access_token_url);
curl_setopt($ch, CURLOPT_POST, count($query));
curl_setopt($ch, CURLOPT_POSTFIELDS, http_build_query($query));
$result = curl_exec($ch);
curl_close($ch);
// Store the access token $result = json_decode($result, true);
$access_token = $result['access_token'];
// Show the access token (don't do this in production!)//echo $access_token; $sql = "INSERT INTO example_table (store_url, access_token, install_date) VALUE ('" . $shop_url . "', '" . $access_token . "', NOW())";
if( mysqli_query( $conn, $sql ) ) {
header('Location: https://' . $shop_url . '/admin/apps');
exit();
} else {
echo"Error installation: " . mysqli_error( $conn );
}
} else {
// Someone is trying to be shady!die('This request is NOT from Shopify!');
}
Code language:PHP(php)
As you can see in the code above, we have already implemented MySQL to save the merchant’s data.
However, we’re not just going to save the merchant’s data but we’re also going to register webhook on app uninstall.
Also, make sure you reference your functions.php file since we’re going to do some API calls.
Now let’s talk about the payload. Let’s assume we have the following:
$array = array(
'webhook' => array(
'topic' => 'app/uninstalled',
'address' => 'THE URL OF YOUR SCRIPT THAT YOU WANT TO LOAD WHEN THE EVENT IS FIRED',
'format' => 'json' )
);
Code language:PHP(php)
Copy the code above just before the header() function.
Since we’re going to delete the merchant’s data when the app/uninstalled event is fired, that means we’re going to create a PHP file that uses MySQL functions.
In your project folder, create a new folder and name it webhooks.
Open the webhooks folder and inside, create a new file and name it delete.php.
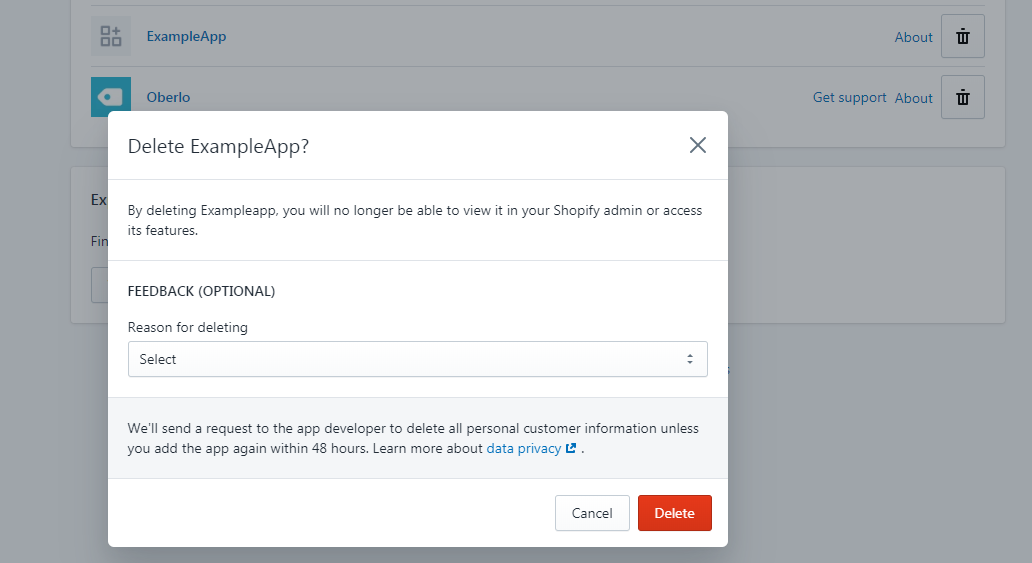
This time, we’re not going to open our app but uninstall the app.
Keep in mind though that the webhook is not yet registered which means we have to reinstall our app to register it.
Install your app.
Checking Applied Webhooks
If you are wondering how you can check the list of webhooks applied to your store, you have to do it by sending a GET request instead of just browsing the webhooks.json file.
Let’s open our index.php file and update our code to the following.
There you have it! You have successfully applied a webhook for the event app/uninstalled!
Now, the next thing we need to do is to actually create the delete.php file and use MySQL functions to delete the store data from the database.
So let’s open our delete.php file and add the following code:
<?phprequire_once("../inc/connect.php");
require_once("../inc/functions.php");
define('SHOPIFY_APP_SECRET', 'xxxxxxxxxxxxxx'); // Replace with your SECRET KEYfunctionverify_webhook($data, $hmac_header){
$calculated_hmac = base64_encode(hash_hmac('sha256', $data, SHOPIFY_APP_SECRET, true));
return hash_equals($hmac_header, $calculated_hmac);
}
$res = '';
$hmac_header = $_SERVER['HTTP_X_SHOPIFY_HMAC_SHA256'];
$topic_header = $_SERVER['HTTP_X_SHOPIFY_TOPIC'];
$shop_header = $_SERVER['HTTP_X_SHOPIFY_SHOP_DOMAIN'];
$data = file_get_contents('php://input');
$decoded_data = json_decode($data, true);
$verified = verify_webhook($data, $hmac_header);
if( $verified == true ) {
if( $topic_header == 'app/uninstalled' || $topic_header == 'shop/update') {
if( $topic_header == 'app/uninstalled' ) {
$sql = "DELETE FROM example_table WHERE store_url='".$shop_header."' LIMIT 1";
$result = mysqli_query($conn, $sql);
$response->shop_domain = $decoded_data['shop_domain'];
$res = $decoded_data['shop_domain'] . ' is successfully deleted from the database';
} else {
$res = $data;
}
}
} else {
$res = 'The request is not from Shopify';
}
error_log('Response: '. $res); //check error.log to see the result?>Code language:PHP(php)
Save the file and open your store.
As soon as you uninstall your app. Proceed to your webhooks folder and you should see a file called error_log. This file was generated by the delete.php file.
Open error_log file with your code editor. You should see the following if the process is successful.
If you see the same response then that means your store data is also deleted from the database.
Why add the webhook in the token generator? Instead of the index?
The reason why we have to register the webhook in token generator is because, merchants can always change their minds and uninstall the app without opening your app.
Conclusion
Webhooks in Shopify is very important, in fact, Shopify is encouraging you to implement this before you plan to publish your app to the app store.
If you have questions, don’t hesitate to comment down below. Let us know what you think by sending us your reaction!
I have been working with so many businessmen that I already know “their” secrets and how they successfully grow their business.
Running a business is genuinely fun, but it comes with its own set of challenges. When you start a business, it’s all on you.
You’re responsible for its growth… You’re responsible for its fall…
If you want to start a business to earn some money, then there are plenty of ways to do that. You can start a business like a coffee shop and sell… coffee or tea. If you’re a freelancer you can provide services in exchange for profit. etc. etc.
But let’s set the real-life business for now and focus on building yourself an online business since that’s what everyone is doing now.
Shopify Store Development
Welcome to the Shopify Store Development tutorial for beginners. In this tutorial, you’ll be learning how to set up a fully functional Shopify store from scratch ready to make sales in under an hour.
If you don’t have knowledge of Shopify, it’s okay. We’ll be guiding you through on how Shopify works and what else you can do after you set up your Shopify store.
After reading this tutorial, we’re hoping that you learn:
How to set up a Shopify store
Product researching
Dropshipping
and so on...
Now.
What is Shopify?
Shopify is an e-commerce platform that allows you to start, grow, and manage a business. With Shopify, you will be able to create a store and sell regardless of your location. You can sell your products literally to everyone around the world and not just that, with Shopify, you will understand how your business is doing. You’ll find how much sales you have earned in a month and so on.
Now, I’m sure that you already know that building yourself a business will require you a budget. Shopify requires you to pay for subscription fees. However, they can give you a 14-day free trial for testing purposes.
How Does it Work?
Some people say that if you want to start an online store, you should know how to design or develop a website. But that’s not the case at all! You don’t have to be a designer or developer to start a Shopify store. Shopify can help you design your store. Thanks to Shopify themes and apps.
Now that you already know how Shopify works. Let’s begin by signing up to Shopify’s 14-day trial. However, if you already have an account. You can skip this step and proceed to the next process.
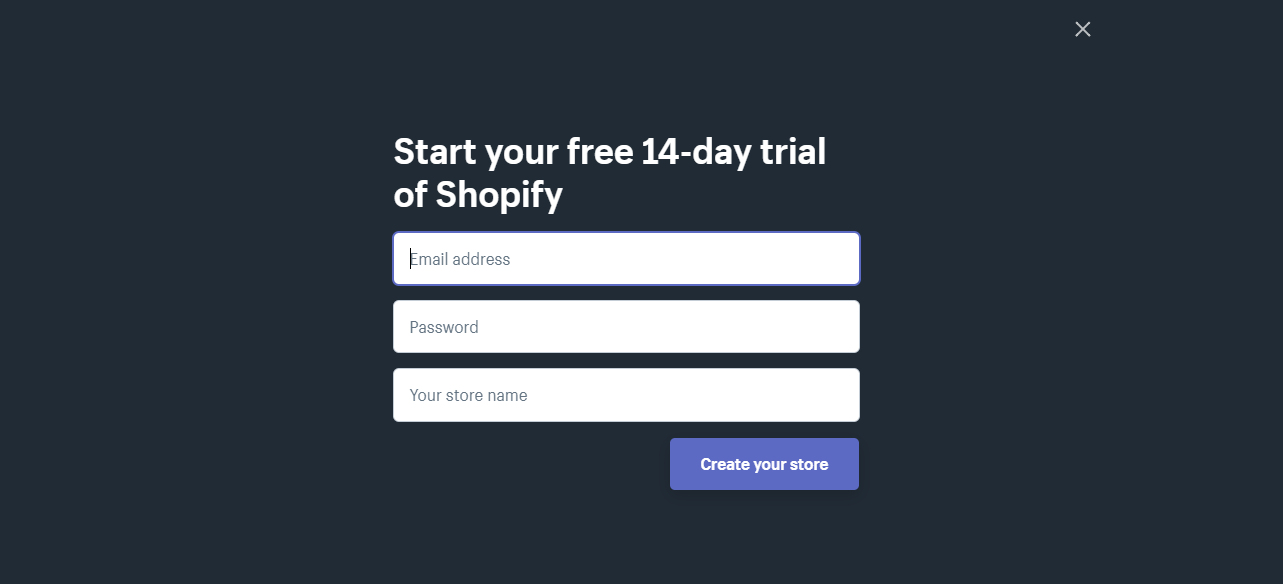
Signup to Shopify 14-day Trial
To help every entrepreneur start their online business, Shopify provided a 14-day trial. With this, you can learn how to use Shopify and kickstart your business to earn more sales.
To start, go to Shopify and click on Start free trial button located at the top right corner of the webpage.
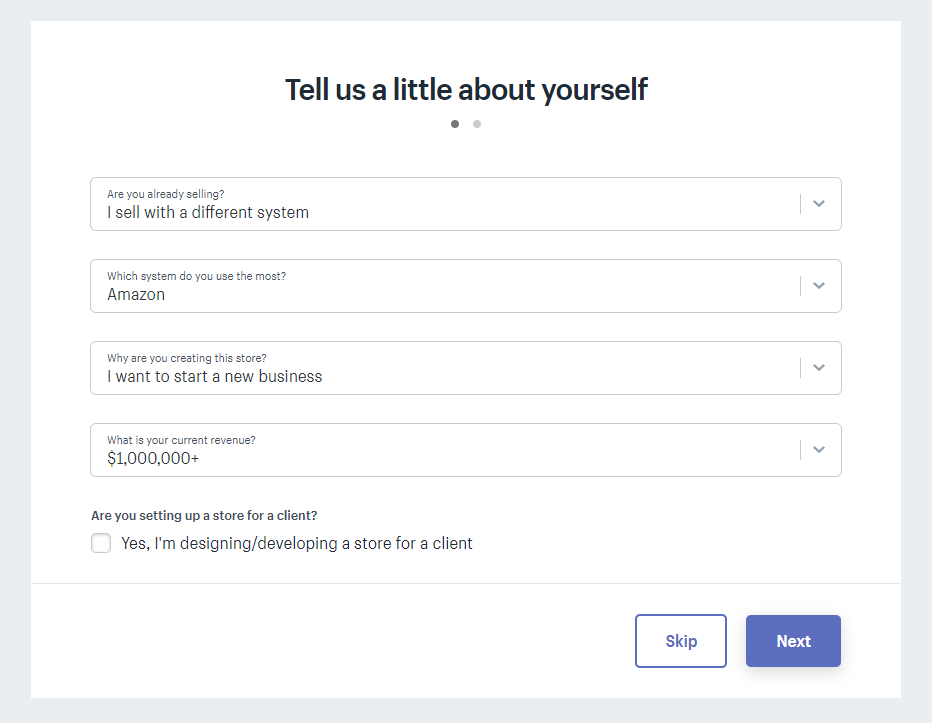
Next, you will be prompted to fill the following form:
There’s no proof about this. But, there is a theory that if you put a higher value at your current revenue, your store will be prioritized more. Maybe because they think that you’ll be able to pay Shopify and its customer services for longer.
This won’t hurt if you try. So go ahead and put the following values instead.
After that, just fill up the proceeding forms and create your store.
After filling up the forms, you’ll be redirected to your Shopify partner dashboard. We’re going to walk you through kind of what’s important in the sidebar menus and how to actually set everything up.
Online Store
When you jump into the online store section, Shopify will give you its default theme which is the Debut theme. It is important to pick yourself a new theme based on your niche. So for example, if you’re niche is about Men’s clothing. Then your store should portray its niche or to put it simply, it should look manly.
The point is, the frontend of your store is going to have a bigger role in your success. Make your store visitors feel like you’re a professional seller and make them trust you. Make them think that you’re worth their penny.
Some entrepreneurs think that the design doesn’t matter at all, it’s the product that you’re selling that matters.
I’m not gonna lie, it’s true that the quality of your products will give you more opportunities to be referred by your own customers to others.
But think about this for a second, every aspect of your store matters. The design, the products, the service, the cost, the price, everything. If you don’t take at least one of those seriously, then it will make an impact on your business.
Now go back to Shopify Partner Dashboard, and in the Online Store tab, theme section.
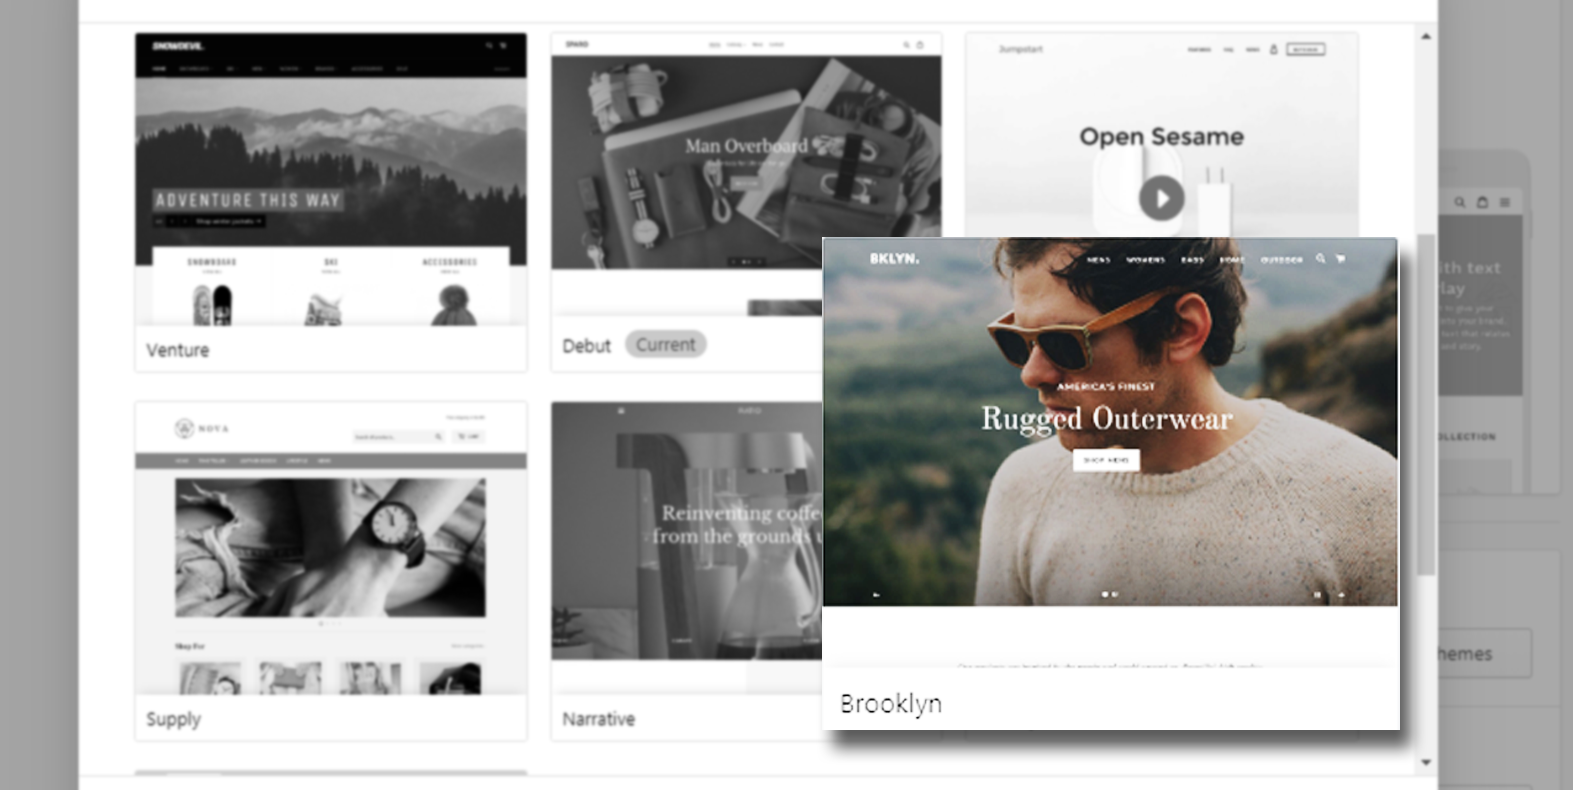
Underneath the current theme tab, you will see the theme library section. There are free themes and a Shopify theme store.
Select the free themes.
One of the themes that I recommend is Brooklyn, it is a free Shopify theme that you can use for any kind of niche that you can think of. It’s hella fast and responsive meaning it’s compatible with any device available.
If you don’t know already, most consumers buy their stuff using their mobile phone. So with this responsive theme, you’ll have the advantage of getting more sales.
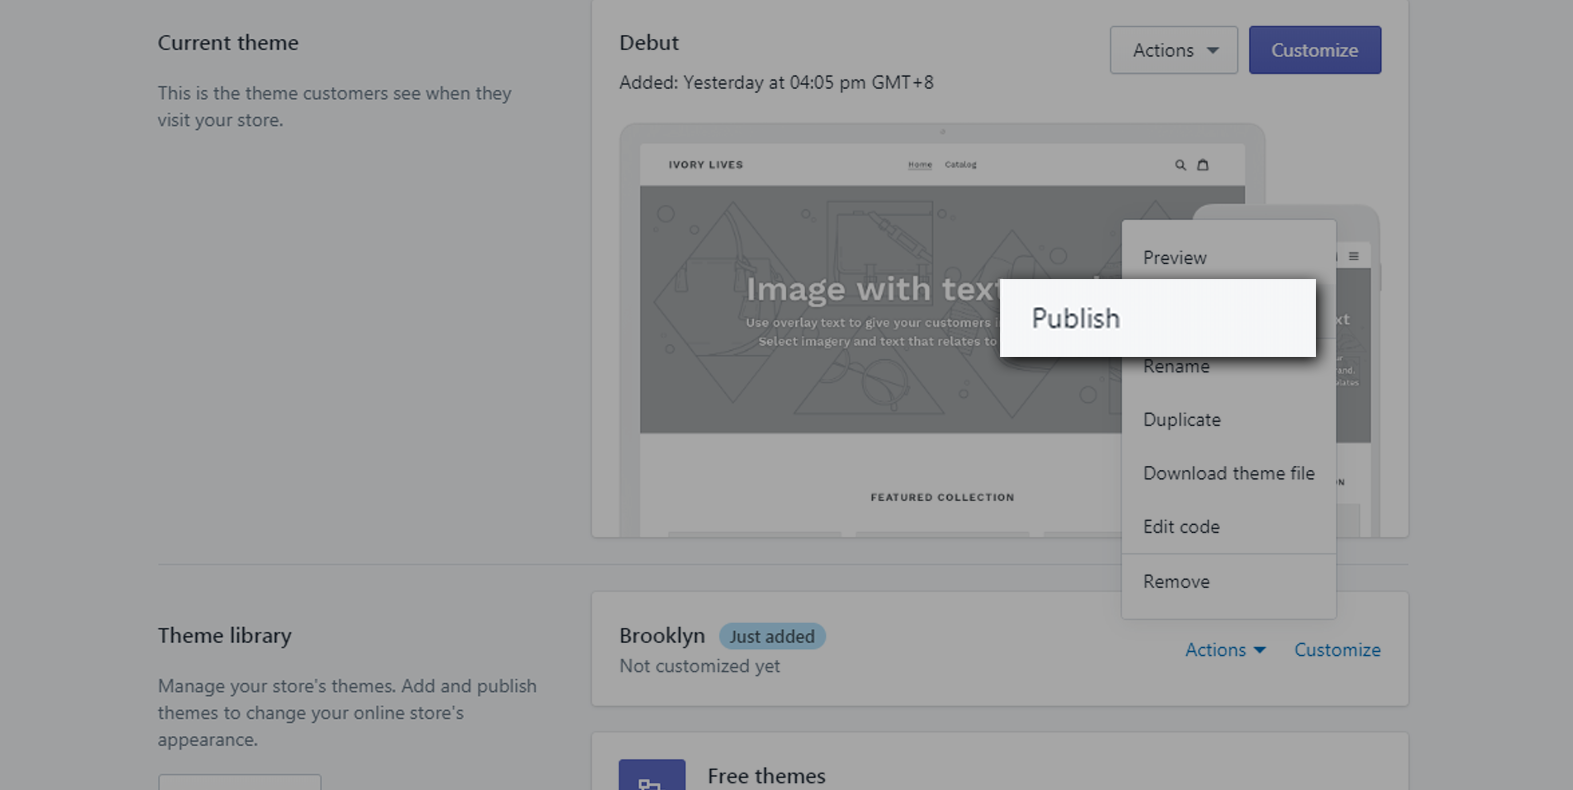
Choose the classic version and click Add to theme library.
After its upload, click Actions and select Publish
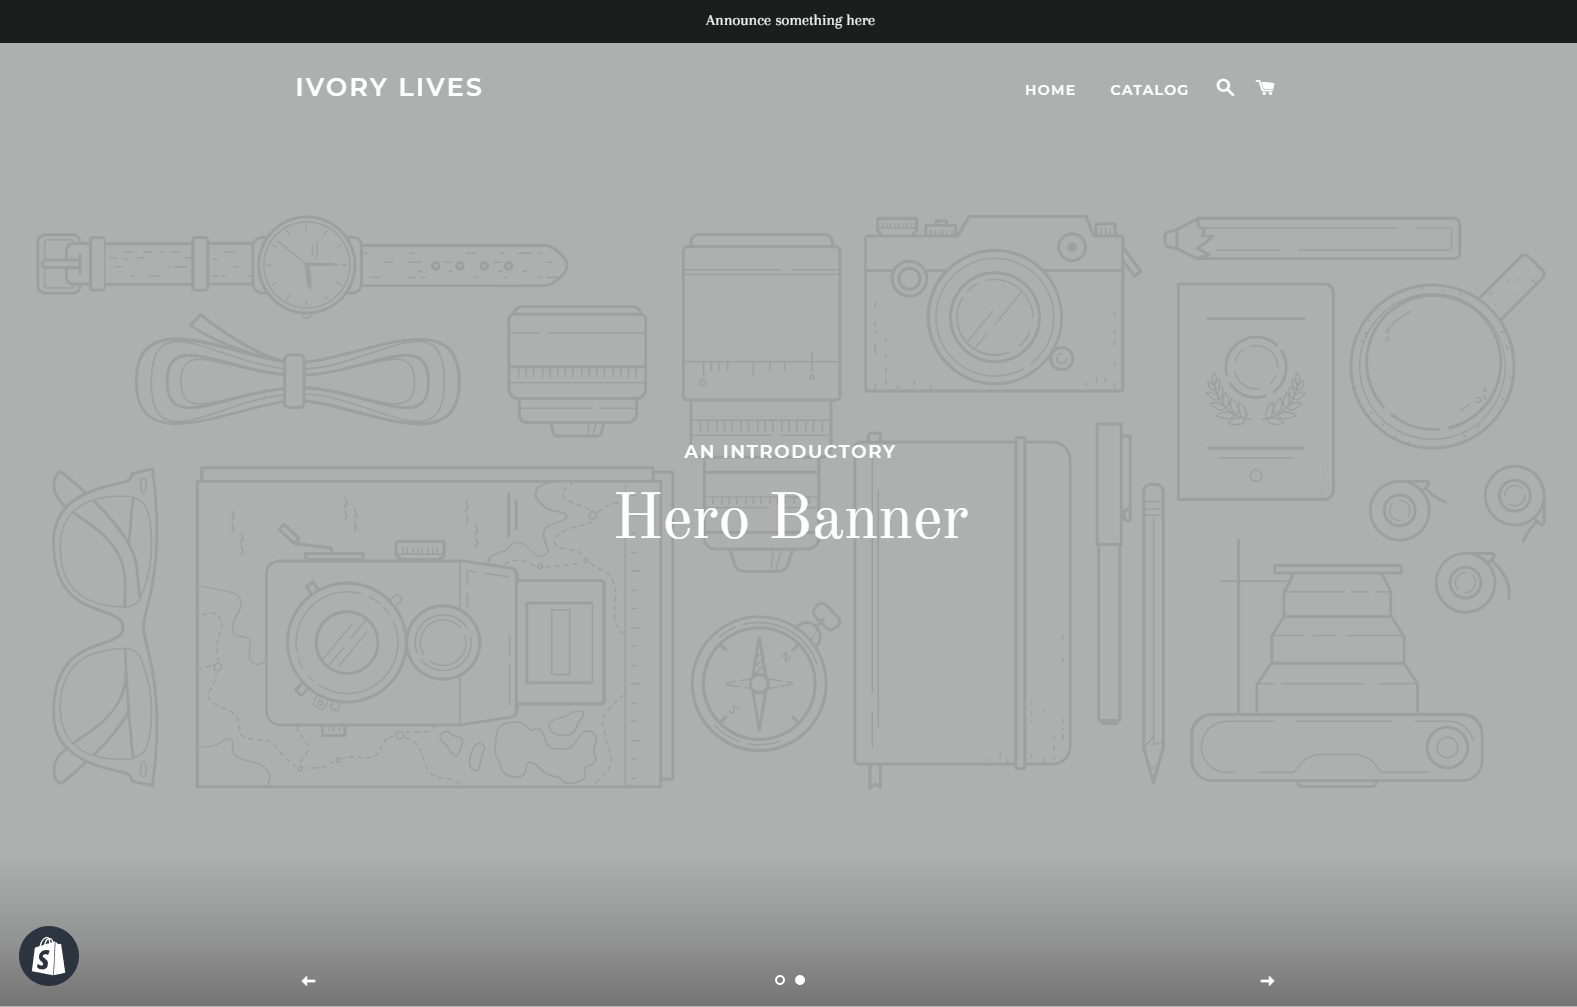
Now, after publishing you may take a look at your store and you will see the similar design as such:
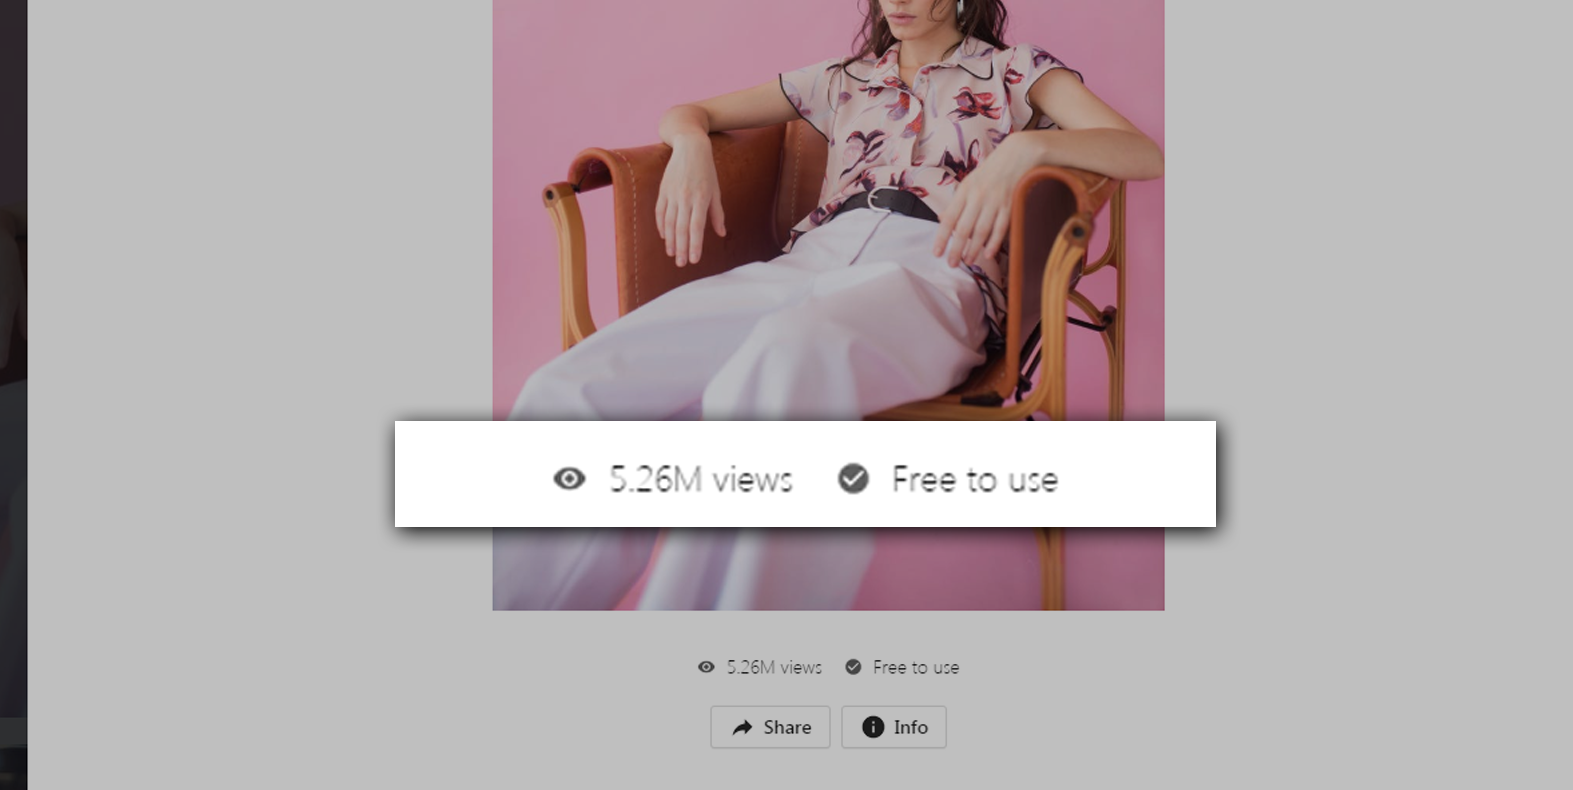
With Brooklyn theme, you can make announcements using the top bar and a showcase of your products using the Hero Banner. If you don’t know where to get free images, you can get some in Pexels or in Unsplash.
Keep in mind that if you download images online, you should be careful of using copyrighted images. Always verify if it is non-copyrighted or copyrighted.
Shopify Theme Customization
To customize your theme, go back to the Shopify Partner Dashboard and click on the Online Store menu and in the current theme section click Customize.
There are seven sections in your Brooklyn themed store.
The header
The Slideshow
Rich text section
Collection list
Featured collection
Newsletter
Footer
Each of these section has its own purpose. For the header, this is where your logo or business title is located. In addition, this is where your customers can navigate through your entire store using menu.
If you’re looking for a logo for your business and you don’t know how to make one yourself, you can go to Fiverr and hire a talented designer to make the logo design for you. I usually go for someone who has a price tag between $5 to $10 and I ask them to design us a logo related to our niche.
There’s the slideshow section where you can upload the images you have taken or downloaded from Unsplash or Pexels.
For the rich text section, you can introduce your brand with your customers. Describe what kind of products you’re selling, or you can welcome your guests using this section.
Collection list section is a section where you can display the collection of your products. It could be a collection of priced off items or a collection of shoes or anything you want to display here. It’s up to you.
Same goes with the featured collection section. The only difference is, you can only feature one collection. That’s why I recommend you pick the best collection you have.
Newsletter section is more about getting your customers email. Therefore you can notify them whenever you have a new item or whenever there’s a sale in your store.
For the footer section, it’s where you put all the necessary links that you can provide.
We know we haven’t gone through the products and collections yet but we’ll get back to this later on. So for now, let’s design our web page. You can make changes to your header and slideshow.
As you can see in the image above, I have designed my store and uploaded an image for the slideshow. Just a tip, make sure the image that you uploaded is high quality and compressed. Make sure it looks clean and crisp.
Compressing images for SEO
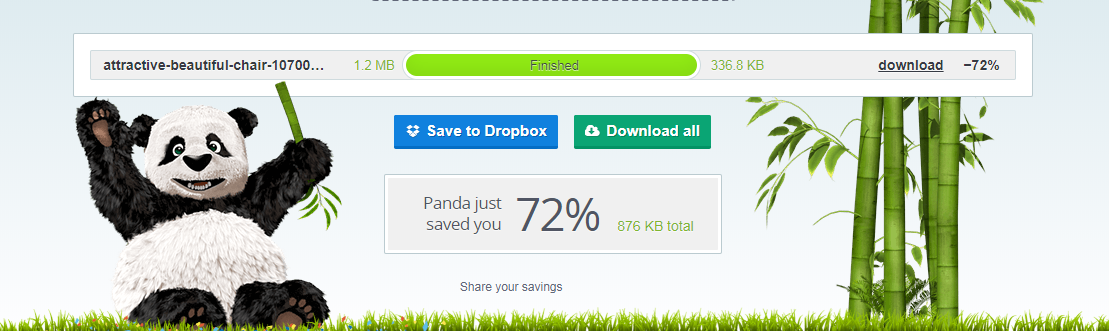
One thing about images is that their file size is quite heavy. Especially if they’re high quality. Making their file size small will make a huge impact on your Shopify store speed so before you upload your images, make sure you compress them using TinyPNG. TinyPNG is an online image compressor that will convert your images into lightweight images without losing its quality.
As you can see above, I have saved 72% of filesize! Before, it was 1.2mb. And right after the process, it became 329kb. That’s a huge difference!
This will make a huge improvement to our Shopify store performance.
Now, after compressing the image, download it and use that image for your slideshow section and see how much it improves your web loading speed.
File naming your uploads
Another thing you can do to improve your SEO is to make sure that the file name of your images/files is related to your niche. For example, I have an image of a woman wearing my latest product. Then I’ll probably name that image, New clothing for women this 2021.png or something like that.
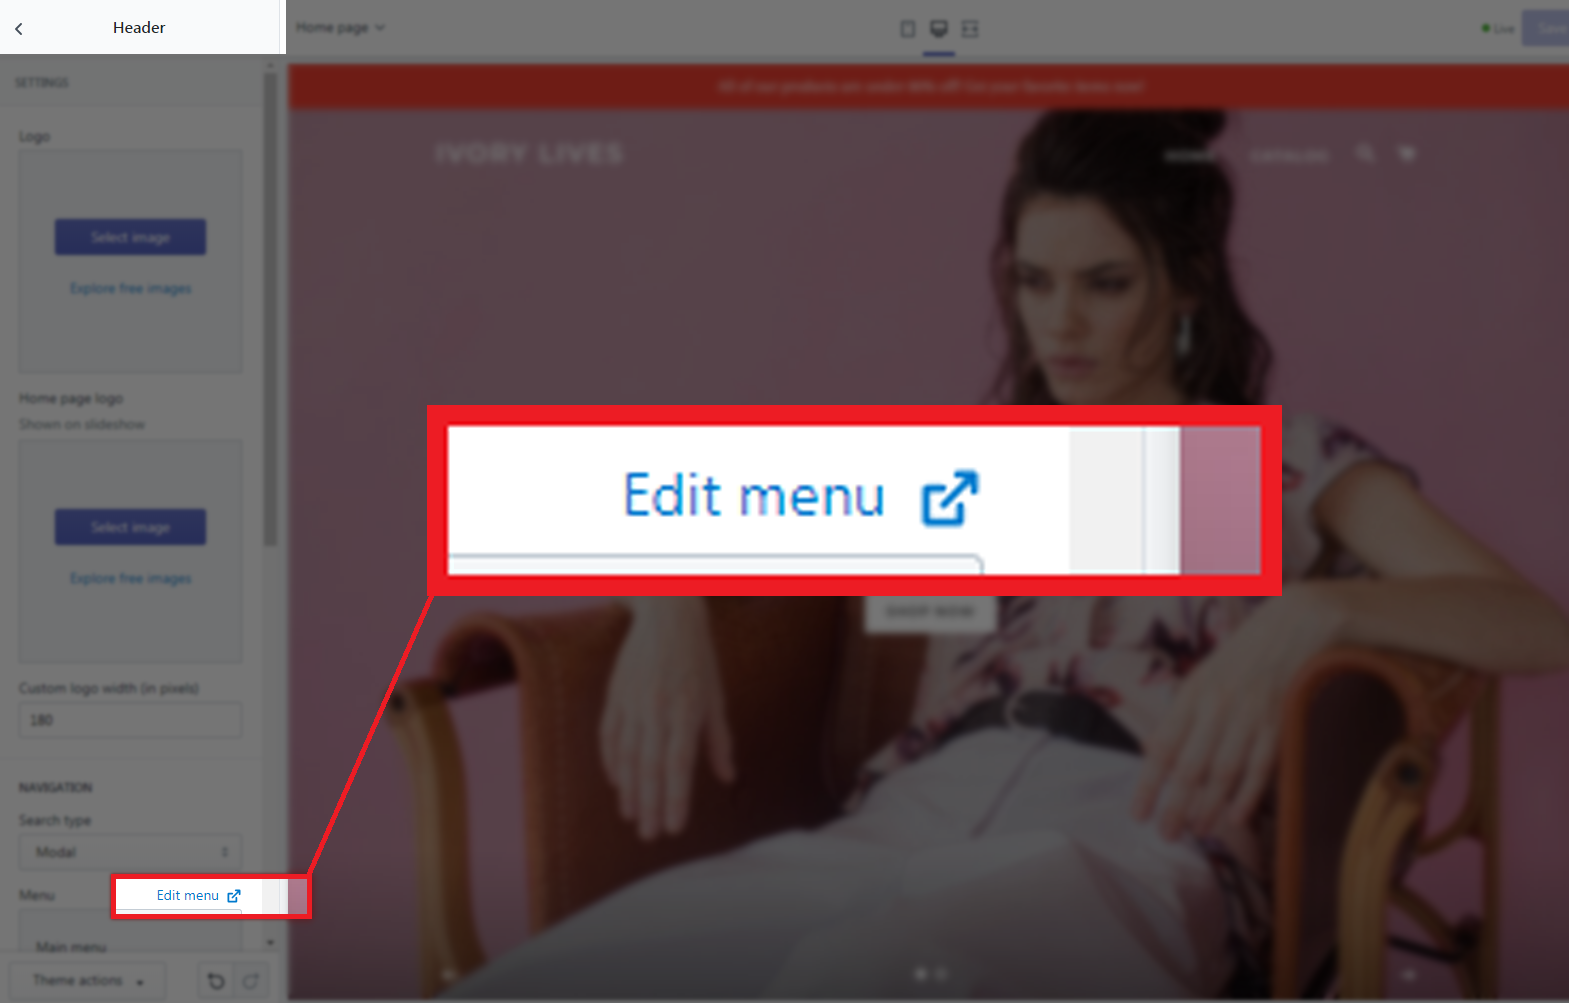
If you look at our Shopify store, you will see that we only have two links in our navigational bar and that is Home and Catalog. We can customize that and add a few more links to help visitors to navigate through our store. So for example, you want to bring your customers to your best selling products, you can do so by making a new menu and call it Best Sellers.
Another thing that I recommend is to change the Home menu, instead of saying Home, call it Shop. This way, your customers will know that they will be redirected to your store not somewhere else.
To navigate to your edit menu, go to your header section and scroll down to the menu section.
Now, that is basically how you customize your Shopify store. If you want to go in-depth on the customization, obviously, you can do that. But for the sake of this tutorial, we’re only going to show you where to go. So basically in the store customization, you can edit the color of your text, the color of the links or buttons, the size of the header, etc. etc.
Shopify Newsletter
If you have noticed in Brooklyn theme, there is a section where it allows you to get the email of your customers. This is called subscription or newsletter.
This section is very powerful because it allows you to communicate with your customers especially if they have devoted their life to your business.
Whenever you have a promo or sale, you can send a message to your email list informing everyone that you have a promo and they should check it out.
Now, most sales came from Email Marketing and other marketing strategies. We’ll go deep into this topic soon but for now, we just wanted to let you know what this section is about.
Shopify Store Settings
Now that we’re almost done with our store design, let’s go back to our dashboard and take a look at our Shopify store settings because it’s also important to know what’s happening behind the store.
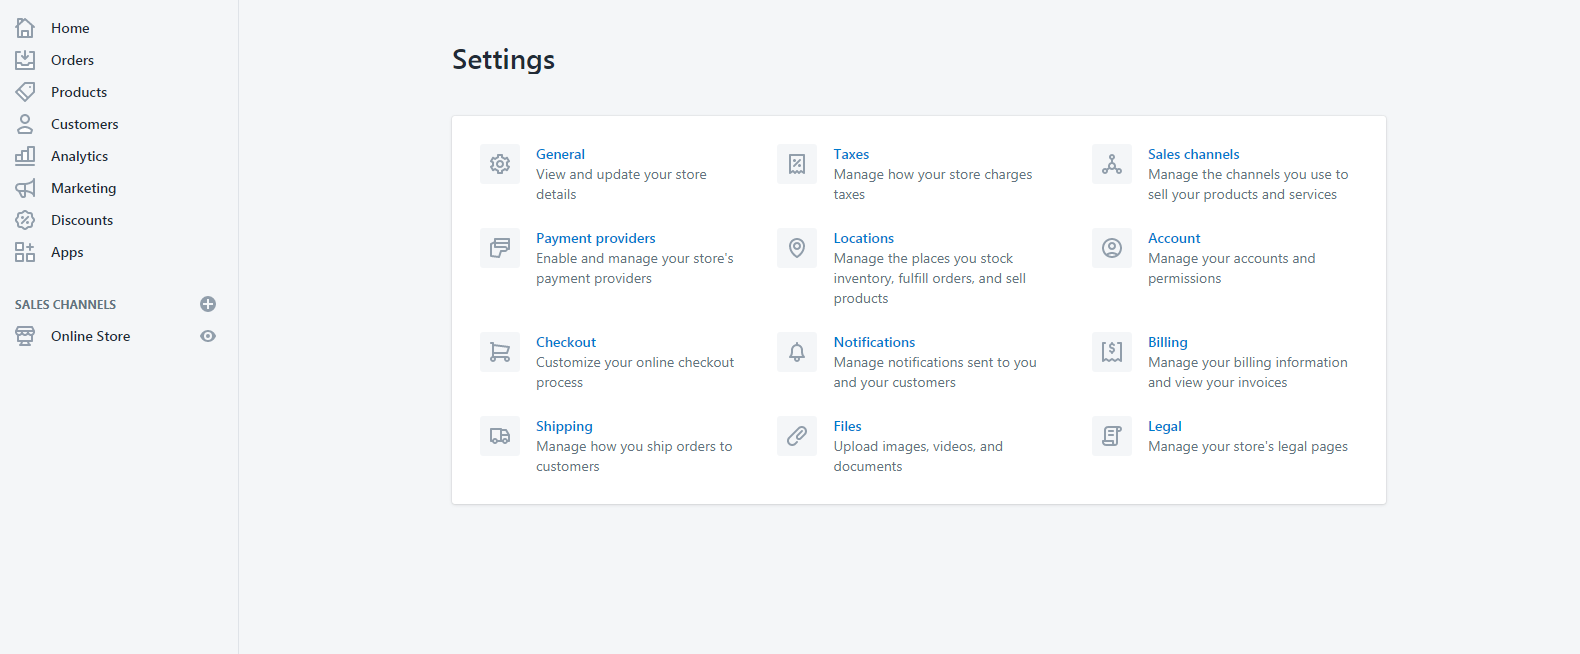
To navigate to your store settings, look at your dashboard sidebar and just underneath the Online Store menu, you will see the Settings menu. (It is located at the bottom left corner of the page)
As you can see in the image above, we have:
General section to view and update your store details
Payment providers section to manage your store’s payment providers
Checkout section for online checkout processing
Shipping to manage how you can ship the orders to customers
Taxes section for store’s charges or fees
Location section for managing where your stock inventory is placed
Notifications for you and your customers
Files for your uploads
Sales channels section for managing the channels you use to sell your products and services
Account section for managing your account and permission
Billing section for your Shopify plan billing information
Legal for store’s legal pages
General
The general setting is where your store details are located. Your customers will most likely use the information to contact you in case they have problems, questions or requests.
This is also where you can change the currency of your store. Make sure you change them into the currency of your country or where your store is located.
Payment Providers
Payment providers settings page is where you can manage how you wanted to get your payments. By default, PayPal Express Checkout is enabled and your earnings will be sent to the account connected with your Shopify store.
Make sure that the email indicated is your PayPal email address.
You may also choose a third-party provider like 2Checkout, Adyen, PayTabs, CyberSource, PaymentExpress, etc.
Checkouts
For this setting, it’s highly recommended to keep your customer accounts disabled which means that customers will only be able to check out items as a guest and not register to your store. It will remove the hassle for your customers from buying and it’s going to increase your conversion rate.
Shipping
Shipping setting is where you can modify your shipping origin, your rates at checkout, etc. I highly recommend you to leave everything by default unless you have a different shipping zone or shipping methods.
Taxes
By default, Shopify uses sales tax rates, which are updated regularly. If you use the default rates, make sure to confirm that they are updated and correct. Otherwise, override them whenever it’s necessary.
Locations
If you’re planning on managing your inventory and fulfill orders from different locations, then you can use this setting. This is very useful especially if you have multiple locations for your items. For instance, if you run out of stock at your first location but have inventory at your second location, then Shopify will split the order so that is it fulfilled from multiple locations.
Now, the remaining sections in the settings are mostly set up already so there’s no need for you to edit them besides you can just modify them once you actually started gaining earnings.
Let’s just focus on setting up your store to start getting sales. Now let’s talk about the products that you can sell.
Shopify Products
To start gaining profit, you obviously need something to sell and that is your products. There are many ways for you to get products. Number one is your actual products or services, and number two is products from drop shipping.
What is Dropshipping?
Dropshipping is a retail fulfillment method where a store doesn’t keep the products it sells in stock but instead, when a store sells a product, it purchases the item from a third party and has it shipped directly to the customer. In conclusion, the merchant will never see or handle the product.
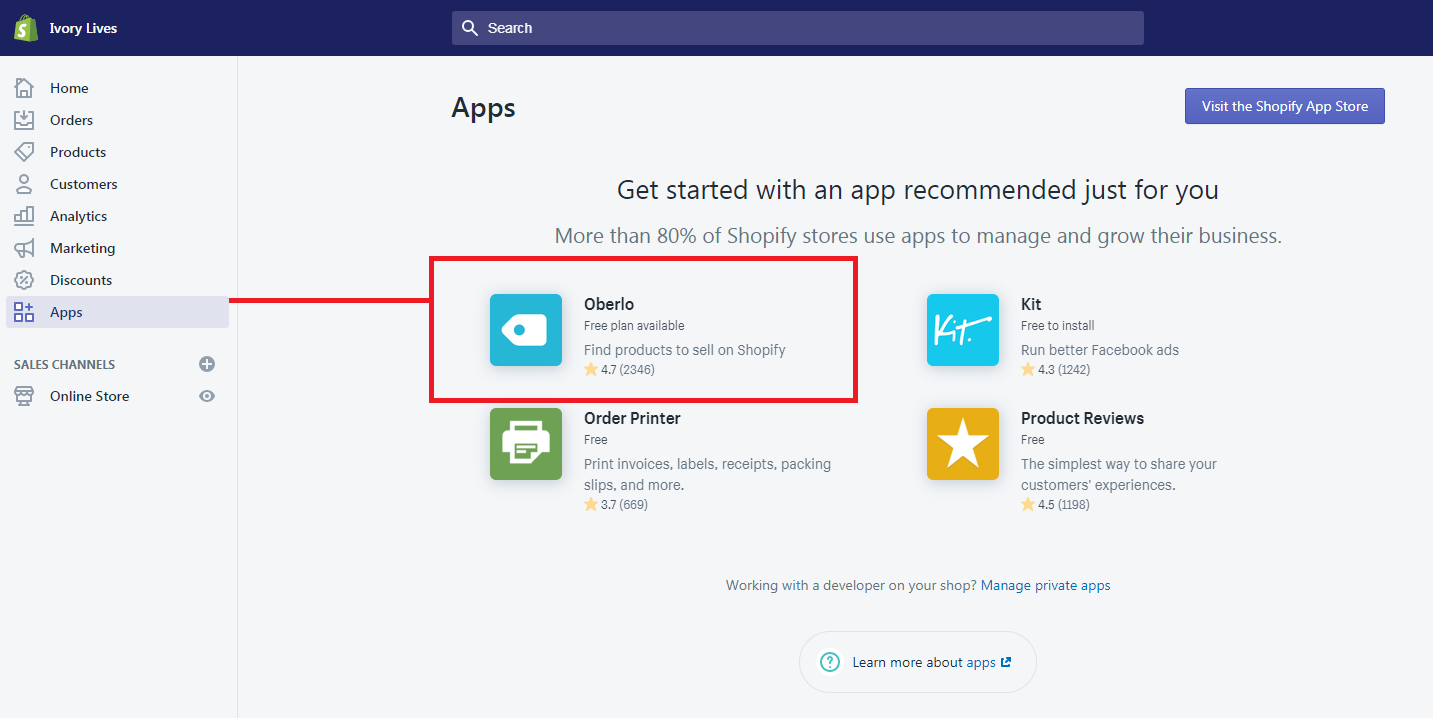
To start selling with dropshipping, you can use the Shopify app called Oberlo. Go to your Shopify Partner Dashboard, and go to the Apps menu and then select Oberlo.
If somehow you don’t see Oberlo, you can visit the Shopify App Store by clicking the button at the top right corner of the app page.
After Installing, you may now start using Oberlo and start adding products to your store. There are plenty of products that Oberlo will start recommending you. But I suggest you add products that are related to your niche. For example, your store focuses more or men’s clothing then look for items that are men related like shoes, shirt, underwear shorts, etc.
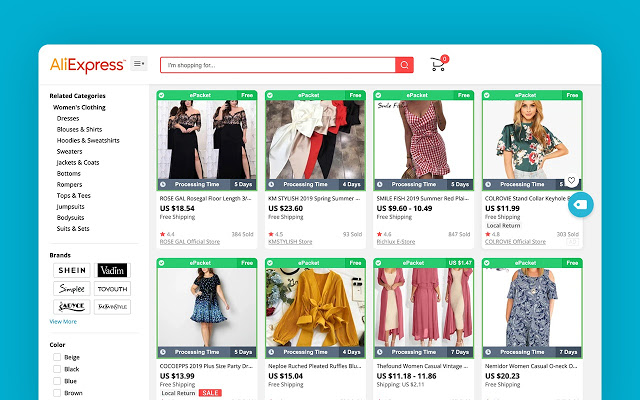
Adding products from AliExpress
Another thing to keep in mind is Oberlo also allows you to import items from AliExpress. So if you want to sell items that are not available in Oberlo but available in AliExpress, you can add that item to your store by installing the Oberlo extension to your browser and then go to AliExpress, search for items, and then click Add to import list.
If you’re getting items from AliExpress, it’s best to select items that are under ePacket shipping. ePacket shipping basically means that items will be shifted out in around twelve to twenty days which we believe is the fastest form of dropshipping compared to other types of shipping. It will also save you a lot of time, money, and effort.
Shopify Collections
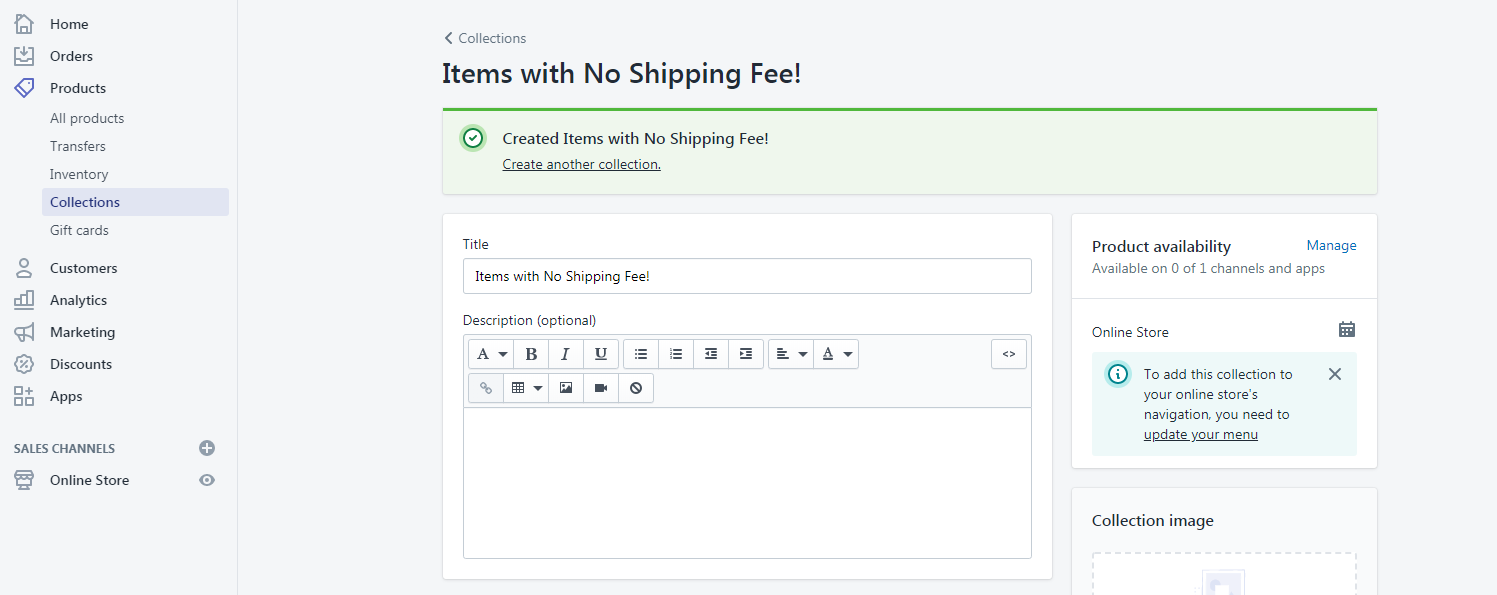
Once you’re done adding items to your store, you can start creating collections. Like what we have said before, collections are a group of products that are categorized based on a certain property. For example, you create a collection for products are free for shipping. You can do that by going to Products then collections then select Create collection.
To add items to your custom collection, you can do that manually or automatically based on a certain condition. We prefer to use manually so we have more control of what’s coming inside a collection. But, if you want to use the automatic collection, make sure you enter a condition that follows its purpose.
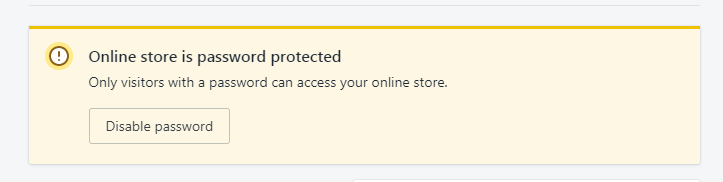
Removing Shopify store Password
If you are under the 14-day free trial, customers will have no access to your store unless you give them the password that Shopify has given to you. But we don’t want that, we want to give our customers the service that will not make them click and do more actions before they can purchase an item from us.
So how can we get rid of the password from Shopify store? Simple, upgrade your store to a certain plan. Now, it might be scary to some but don’t worry if you’re still under the 14-day trial, you won’t be paying for anything. Just make sure to cancel your subscription before the trial ends if you don’t like Shopify.
Final Touch
Congratulations! You have setup your Shopify store. Now, what is the next step? Well, you can start doing marketing strategy or advertise your store to show your products to people on the internet.
Now to end this article, I would like to give you some tips for your business.
Be patient, Building a successful business is not going to happen in just one day.
Get organic traffic with paid ads like AdWords or Bing Ads or use Facebook Ads to advertise your Shopify store.
Keep trying and learn from your mistakes. If this is your first time, expect it to be hard and try to be more understanding.
Video Attachment
I’ve tried recently if Shopify dropshipping still works in 2021. Here’s my research:
The thing that is so popular in the gaming community is the top-down gaming style (also known as isometric games). This type of perspective is often used by games like RPGs.
In this tutorial, we’re going to learn how to create unity top-down movement without writing the actual player movement script just pure animation and a little code. That’s right! We’re going to use Unity Animation to make solid movements for our Player.
Let’s get started!
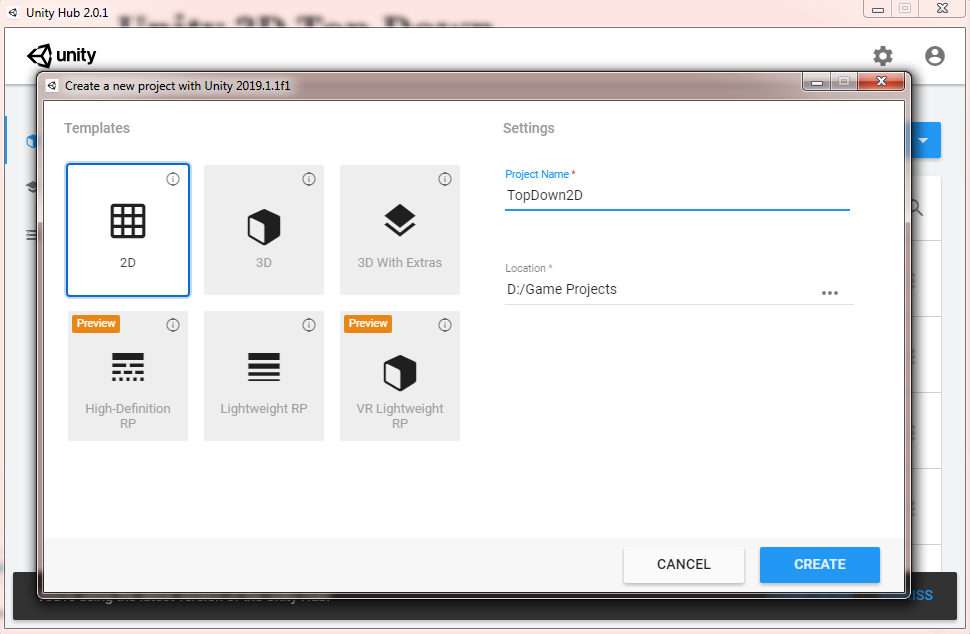
Open Unity and create a new project. (Make sure it is a 2D game project.)
Video Tutorial
If you prefer watching video tutorials, you may watch the video version of this lesson below:
Getting Started
Before we proceed, we need to download the 2D assets that we can use for this project. If you have your own assets like 2D characters and platform backgrounds, you may skip this step. However, we encourage you to follow along so you’ll understand how we made it to the final output.
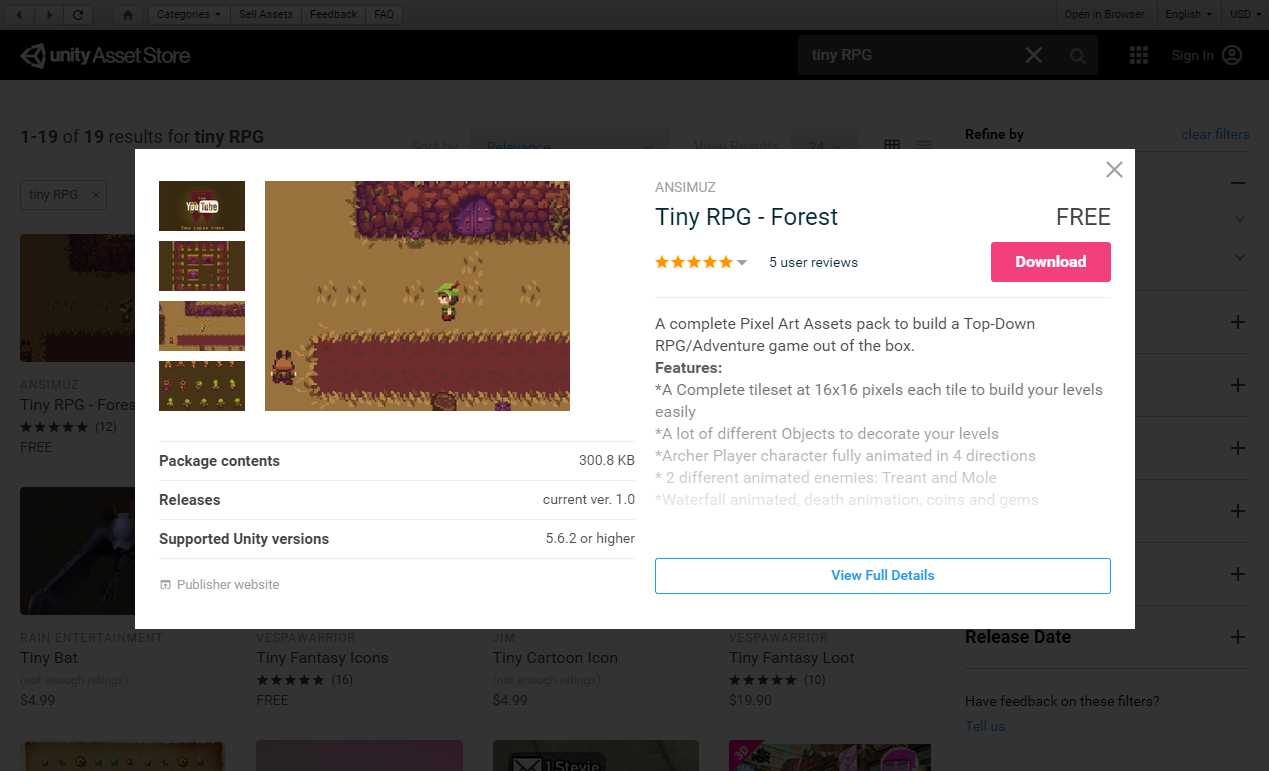
Press CTRL + 9 to open the asset store or Window tab > Asset Store
Search for Tiny RPG and download the asset.
If you’re looking for more 2D characters, we highly recommend using these retro characters as they all have the complete animations for most game needs.
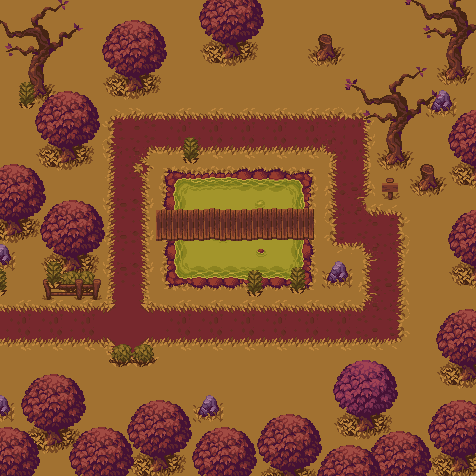
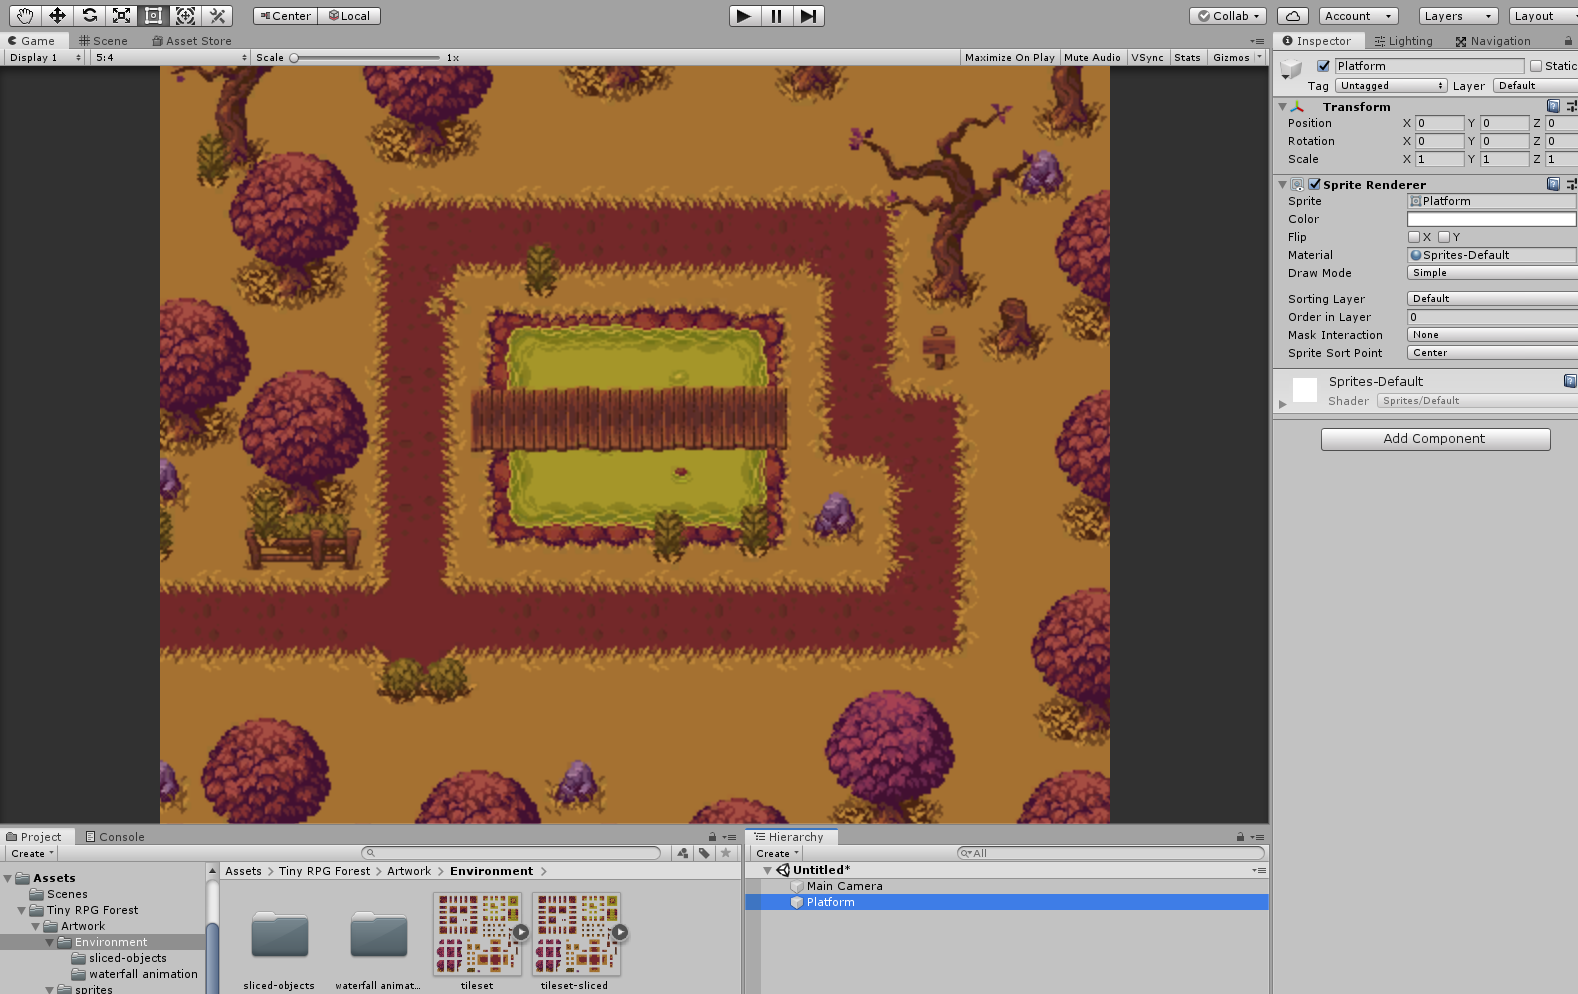
After importing the assets, design your own platform using the sprites inside the folder Environment or you may download the following image and use it as a sprite.
And here’s how it looks like in the editor:
Bringing in the 2D Character
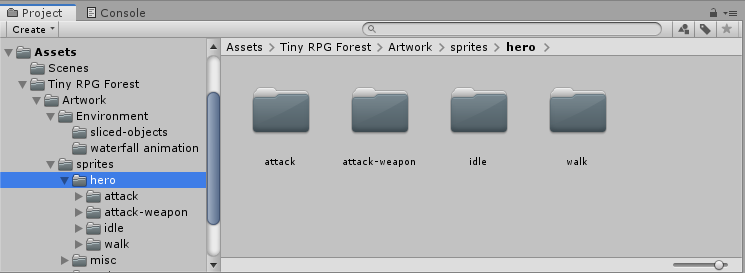
The next thing that we want to do is, of course, bring in our player. To do that, go to Tiny RPG Forest folder, and then Artwork folder, and then the sprites.
Inside the sprites folder, select the hero folder.
Notice the content of the hero folder. There you will see all of the action sprites for the player such as attack, idle, and walk. First, let’s open the Idle folder.
Inside the folder, you will see another three different folders for the different directions our player can be facing (front, back, and sides).
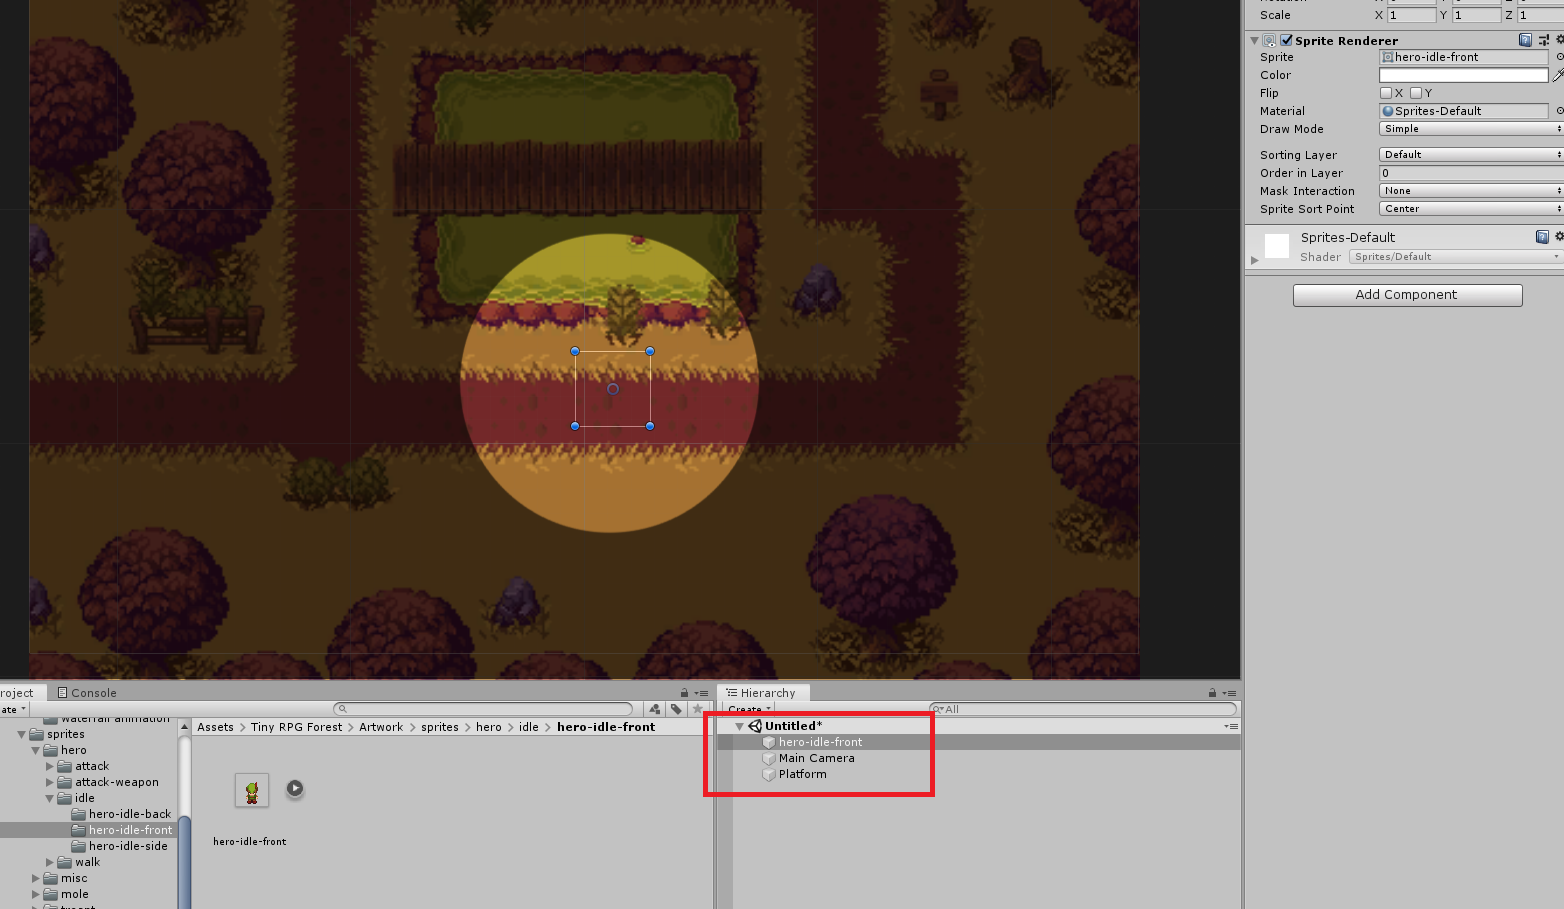
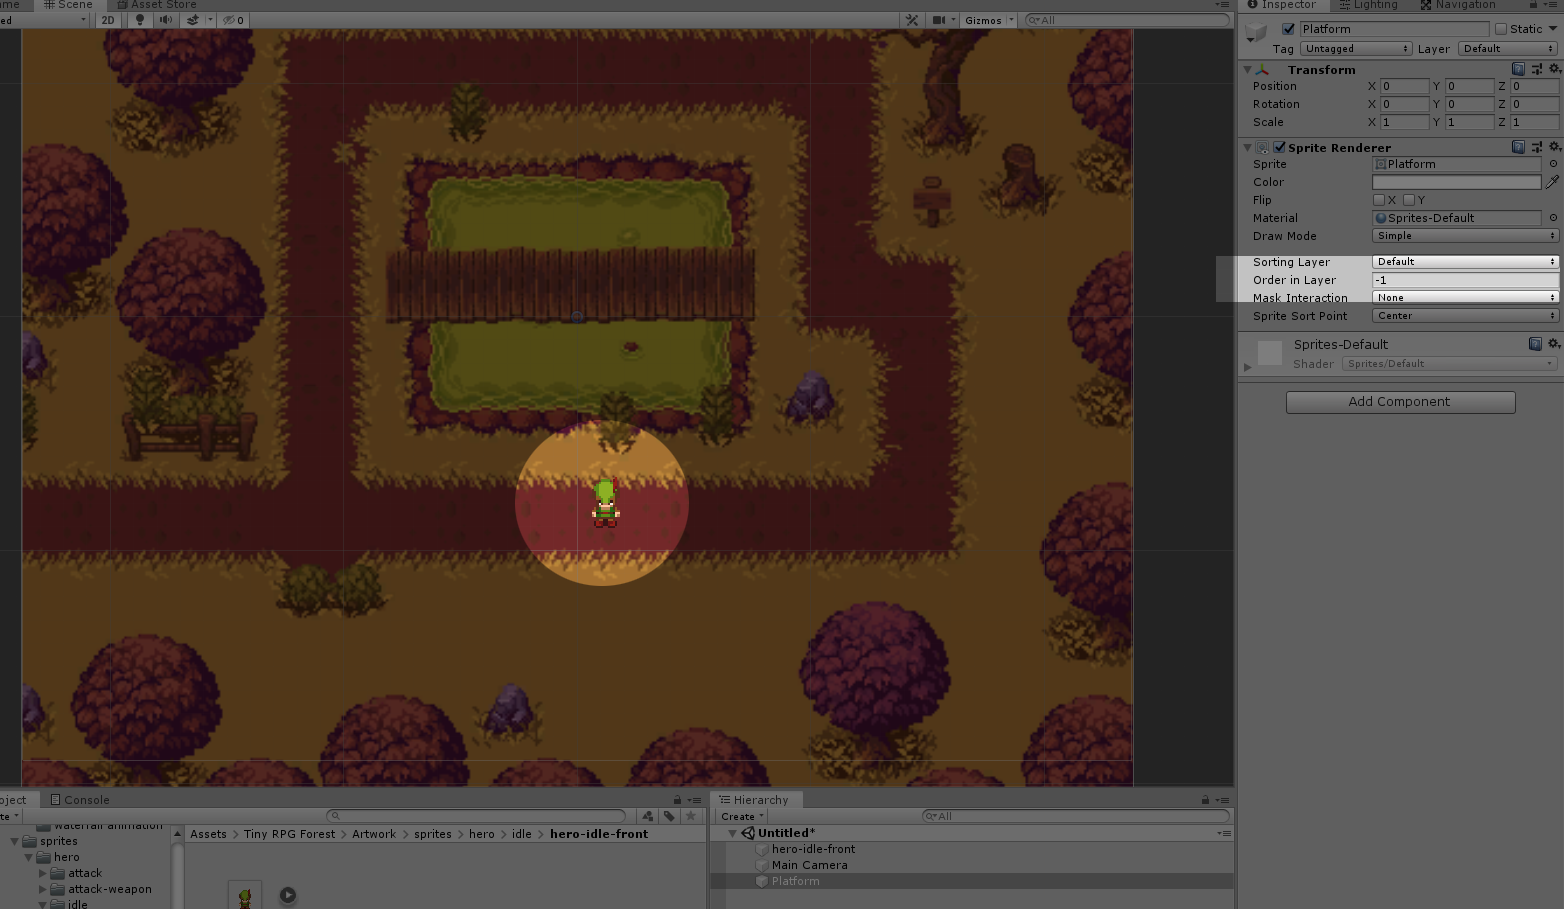
We’re going to select the hero-idle-front sprite and let’s drag it into our scene.
Sprite not showing up error
If somehow you encounter this type of error after you drag your sprite into your scene. Just make sure that your background or platform has an Order in Layer value of -1.
Awesome! Now that the character is in the scene, let’s rename it to Player so we know that he is the player that we’re going to control.
Now that everything is set up, let’s start making our player move around.
There are two ways to control our player. The first option is to add the actual movement to our player and the second option is to add Animation based on that movement. Both are equally possible but the first option will require too much programming and we don’t want that in this tutorial. We want to control our player with little programming possible.
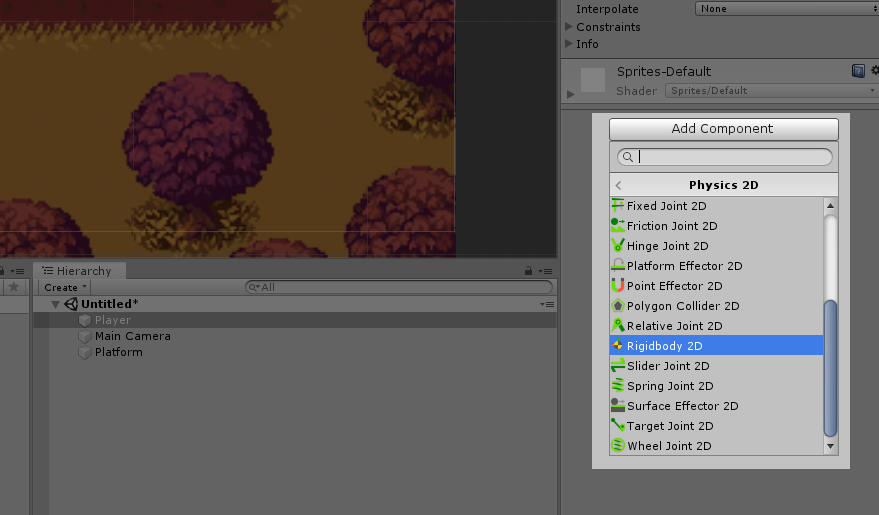
Now, let’s begin by adding Rigidbody 2D to our player. Select your Player, go to the Inspector and click Add Component. Scroll down until you find Physics 2D and then, select Rigidbody 2D.
You may also use the search bar and type Rigidbody 2D instead.
In the Rigidbody 2D component, set the value of Gravity Scale to 0 and under the constraints variable check the Freeze Rotation Z.
Player Movement
Create a new C# script and name it PlayerMovement.cs.
To start the code, let’s declare the first three variables.
publicfloat movementSpeed = 1f; //Movement Speed of the Playerpublic Vector2 movement; //Movement Axispublic Rigidbody2D rigidbody; //Player Rigidbody ComponentCode language:C#(cs)
The next thing that we’re going to do is to give our player’s rigidbody component to the rigidbody variable that we’ve created. To do that, use the GetComponent function.
// Start is called before the first frame updatevoidStart(){
rigidbody = this.GetComponent<Rigidbody2D>();
}
Code language:C#(cs)
Don’t forget to save your code.
Now, what the code above does is, it initialize the rigidbody variable as soon as we start our game. Because of that, we can access the physics to control our player.
If you look at your code, you will see that there is an Update function. If we use the update function, we can control the character in every frame possible. However, update function can be unreliable due to its constantly changing frame rate and we don’t want that for our player but instead, we’re going to use the FixedUpdate function.
Inside your PlayerMovement script, add the fixed update function just underneath the update function.
voidFixedUpdate() {}
Code language:C#(cs)
The reason why we’re doing it like this is because we have to make sure that there won’t be any delays to our player movement. FixedUpdate works exactly the same thing as the update function. The only difference is, the update function is depending on the frame rate. So for example, the frame rate goes down to 10 frames per second, expect the player to have a little choppiness to its animation.
FixedUpdate function, however, is by default, called 50 frames per second which are recommended especially if you’re working with Physics.
We’re still going to use the update function for registering the player input.
Let’s work on that.
The next thing that we’re going to do is to find out what exactly our player is currently pressing. Is it WASD? Arrow keys? Touch pad? etc.
In that case, we’re going to use Input.GetAxisRaw() function.
To simply explain what the function above does. Try to imagine the cartesian plane. Both axes will have a range of value between negative one and positive one. If the player presses the left arrow key, the function will return a value of negative one. If the player presses the up key, the function will return a value of positive one. The same goes to the rest of the keys, the function will return you a value depending on which keys your pressing.
Now, to retrieve the value for the x-axis, we’re going to use the horizontal input and to retrieve the value for the y-axis, we’re going to use the vertical input.
// Update is called once per framevoidUpdate(){
movement.x = Input.GetAxisRaw("Horizontal");
movement.y = Input.GetAxisRaw("Vertical");
}
Code language:C#(cs)
Now that we have the value of our inputs, we can now control the position of our player.
To do that, copy the following code for the FixedUpdate function.
What is happening in that code? Simple, we will move our player depending on its current position and then add the value of our input multiplied to the movement speed and fixedDeltaTime.
What is fixedDeltaTime? The interval in seconds at which physics and other fixed frame rate updates.
Save your code and go back to your editor.
If you try to run your game you will see that you can now actually move your player. However, there is no animation yet. Our player moves around but facing towards us. Creepy!
Let’s fix that.
Player Animation
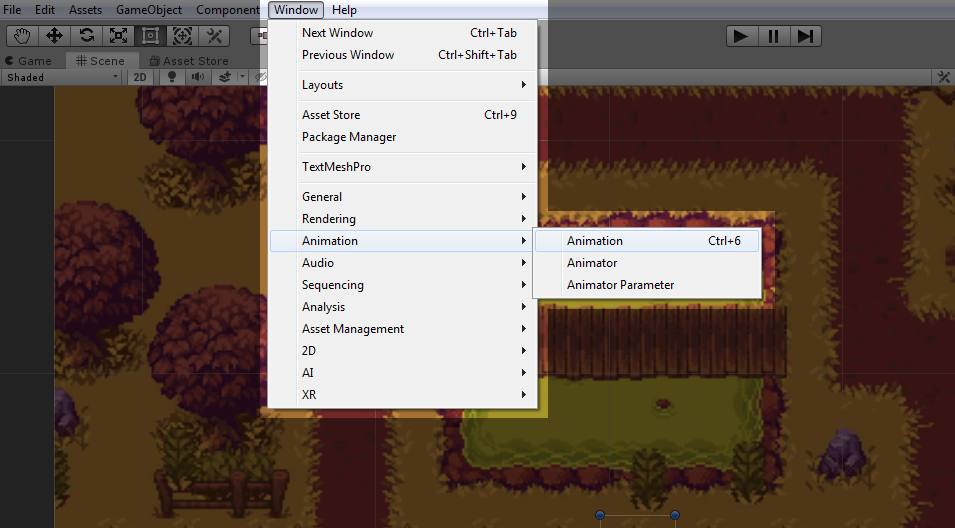
To start animating your player, go to Window tab, Animation, and select Animation. You may also just press CTRL + 6 for a shortcut.
Make sure it is Animation and not Animator, some people get confused by that.
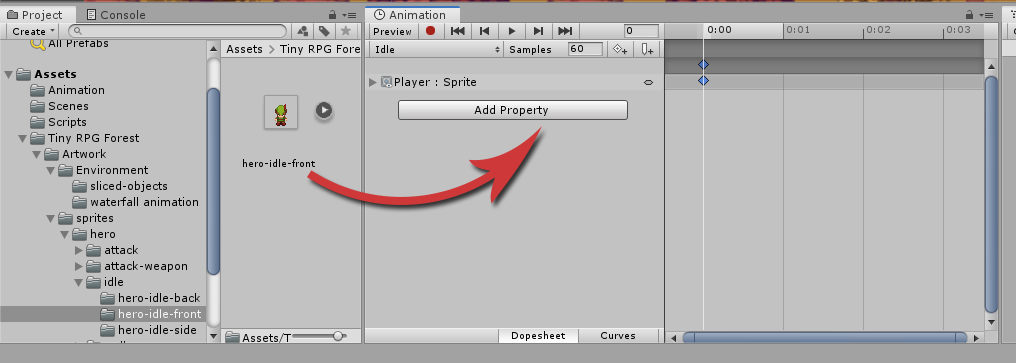
Now, with your player game object selected, click create.
You may go to your project root folder and create a new folder for the Animations, just for the sake of file structure.
Name the animation Idle.anim.
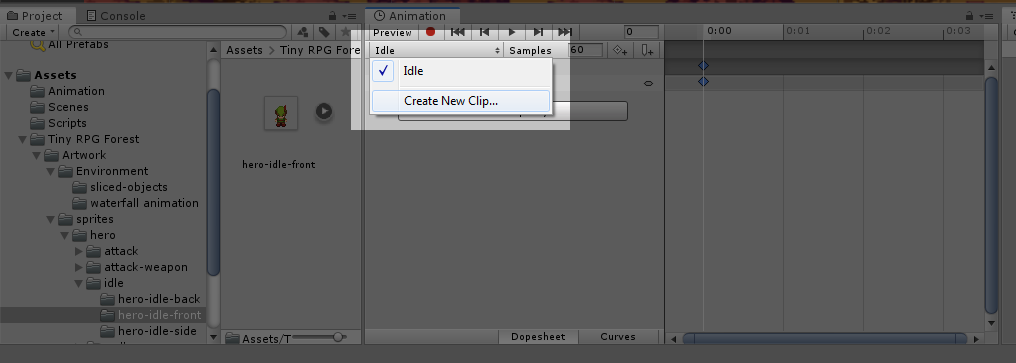
Next, go back to the hero folder that contains all the idle sprites and drag the hero-idle-front sprite in the animation window.
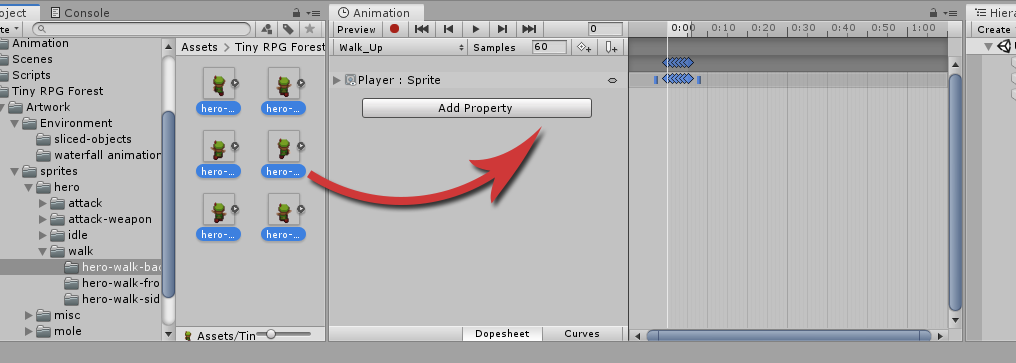
Next, create a new Animation clip by clicking the dropdown with the name of your current animation and click Create New Clip…
Name your new animation clip Walk_Up.anim and then go to the hero-walk-back folder and drag all the sprites into the animation window.
To select multiple sprites, simply click the first sprite, hold the shift key, and then click the last sprite.
If you try to play the animation, you will see that the animation is playing very fast. To fix that, change the value of Samples to a lower value like 15.
Now, create the animation clips and do the same process for the Walk_Down and Walk_Side animation clips.
If you have noticed, we only have animations for walking right and we don’t have animations for walking left. Now, there are many ways to solve this issue. First is to use Photoshop and manually flip all the sprites so it will face the left axis. Cool! But we’re not going to do that, but instead, we’re going to use our PlayerMovement script to flip the animation so it will look like he’s moving to the left.
Animation Component
After we’ve created all the animations, our player got a new component and that is the Animation.
If you go to Window tab, then Animation, and Animator, you will see something like this.
As you can see, there is our Idle animation, walk_up, walk_down, and walk_side animation. Think of this as a playlist of animations but in order for us to play them, we need to create a certain rule for each animation. For example, if the player is not pressing any keys, then play the idle animation. If the player is pressing the arrow keys or WASD keys then play the walking animation.
In order for us to do that, we need to create a parameter. Go to the top-left corner of the Animator window and click Parameters.
Right beside the search bar, there is a plus button. Press that and select float. Let’s name it Horizontal.
Again, do the same thing. Create a new parameter and select float and name it Vertical this time.
Next, delete all the animations in the Animator except the idle and walk-side animation.
Animator: Blend Tree
Now that we have the parameters ready, we can now use them to control a blend tree. Blend trees are used to smoothly transition from one animation state to another.
To create a blend tree, go to Animator, right-click, create state and select From New Blend Tree. Go to the inspector and rename it to Vertical.
Next, double click the blend tree and select the node (Blend Tree).
Go to the inspector, make sure the parameter used is vertical.
Then add a new motion field.
Next, find your walk-down animation and drag it to the motion field. Create another motion field but this time for the walk-up animation.
Awesome! Let’s uncheck the Automate Thresholds in the inspector and modify the thresholds of our animations.
For walk-up animation, the threshold would be 1 and the threshold for the walk-down animation would be -1. We’re doing this because we’re following the values that are given by our input.
Next, go back to the base layer and create a new parameter and call it speed.
Now, we’re going to create a transition between our animations so go ahead and right-click to the idle animation and select make transition. Then select the Vertical blend tree node.
We’re going to do this as well to our Vertical blend tree and walk-side animation, right-click, select make transition and choose the idle animation and vice versa. Awesome!
Transition: Idle to Vertical Blend Tree
Now, click on the transition that points to our vertical blend tree.
In the inspector, make sure that the Has exit time is unchecked and inside the settings, the transition duration is set to 0.
Next, In the conditions section, click the plus button and select speed and then choose Greater than the value 0.01
Transition: Vertical Blend Tree to Idle
Click on the transition that points to our idle animation.
In the inspector, make sure that the Has exit time is unchecked as well and inside the settings, the transition duration is set to 0.
In the conditions section, click the plus button and select speed and then choose Less than the value 0.01
Transition: Idle to Walk-side Animation
Click on the transition that points to our walk-side animation.
In the inspector, make sure that the Has exit time is unchecked as well and inside the settings, the transition duration is set to 0.
In the conditions section, click the plus button and select horizontal and then choose Greater than the value 0.01
Transition: Walk-side Animation to Idle
Click on the transition that points from walk-side animation to our idle animation.
In the inspector, make sure that the Has exit time is unchecked and inside the settings, the transition duration is set to 0.
In the conditions section, click the plus button and select horizontal and then choose Less than the value 0.01
Scripting Animator Controller
After setting up your animator component, we can now send the value of our input into our animator’s parameters and control our animation state.
To do that, we need to create a new variable.
Go back to your PlayerMovement.cs and add the following variable.
Disclosure: This article may contain affiliate links, which means we may receive a commission if you click a link and purchase something that we have recommended.