Search Results for: Shopify
How To Display Product Price Using Shopify REST API (ver 2020-10)
Welcome to another Shopify App Development Tutorial using PHP. In the previous article, we have guided you on how to display products using Shopify API and PHP and if you are interested in learning how to display products, you can read the article here.
I believe that once you know how to display products using Shopify API, you’ll be able to display its other components too. Such as product’s price, images, etc.
So in this article, we’ll be focusing on using variants from the API to display the product’s price.
Create a new index file
Create a new PHP file and name it index.php inside the file paste the following code:
<?php
require_once("inc/functions.php");

$requests = $_GET;
$hmac = $_GET['hmac'];
$serializeArray = serialize($requests);
$requests = array_diff_key($requests, array('hmac' => ''));
ksort($requests);

$token = 'PASTE YOUR GENERATED TOKEN HERE'
$shop = 'PASTE YOUR SHOP URL HERE'
Code language: PHP (php)
If you have noticed, this is the same code that we have used in the previous tutorial.
The first line of the code above includes the function.php file, and inside that script contains a function that allows us to communicate with Shopify API.
Next, the $request variable gets the value from the $_GET variable, and if you want to know where the value is coming from inside of GET then it came from the Shopify store.
When the app is loaded in Shopify. The store will generate variables that we can use to authenticate the connection. That’s why there’s an HMAC variable. This variable is used to make sure that the store is from Shopify and not from somewhere else.
Next, we convert the request variable and turn it into an array by using the serialize function. And then, we remove the HMAC key from that variable and sort the request variable. Pretty easy to understand.
Now next, the token and shop variable. These two variables are important so go ahead and initialize these variables using your token and shop URL sub-domain.
It should look like this:
$token = "xxxxxxxxxxxxxxxxxxxxxxxxxxxxxxxx";
$shop = "my-shop-is-awesome";            //no 'myshopify.com' or 'https://'
Code language: PHP (php)
Get the collections list
$collectionList = shopify_call($token, $shop, "/admin/api/2020-10/custom_collections.json", array(), 'GET');
$collectionList = json_decode($collectionList['response'], JSON_PRETTY_PRINT);
$collection_id = $collectionList['custom_collections'][0]['id'];

$array = array("collection_id" => $collection_id);
$collects = shopify_call($token, $shop, "/admin/api/2020-10/collects.json", $array, 'GET');
$collects = json_decode($collects['response'], JSON_PRETTY_PRINT);
Code language: PHP (php)
Keep in mind that in this tutorial, we’ll be using the latest API and that is the Shopify 2020-10 API. So if you don’t know how to migrate from old to new API. I highly recommend you to read this article how to upgrade the API version with Shopify.
Now, to explain the code above. The code will basically use the function shopify_call() to generate the list of custom collections available from the store. Then we’ll be decoding the response from JSON to array. And then, get the very first collection ID available.
If you want to display product prices from a specific collection, you may use this code instead:
$collection_id = PASTE YOUR COLLECTION ID HERE
$array = array("collection_id" => $collection_id);
$collects = shopify_call($token, $shop, "/admin/api/2020-10/collects.json", $array, 'GET');
$collects = json_decode($collects['response'], JSON_PRETTY_PRINT);
Code language: PHP (php)
Displaying the Prices
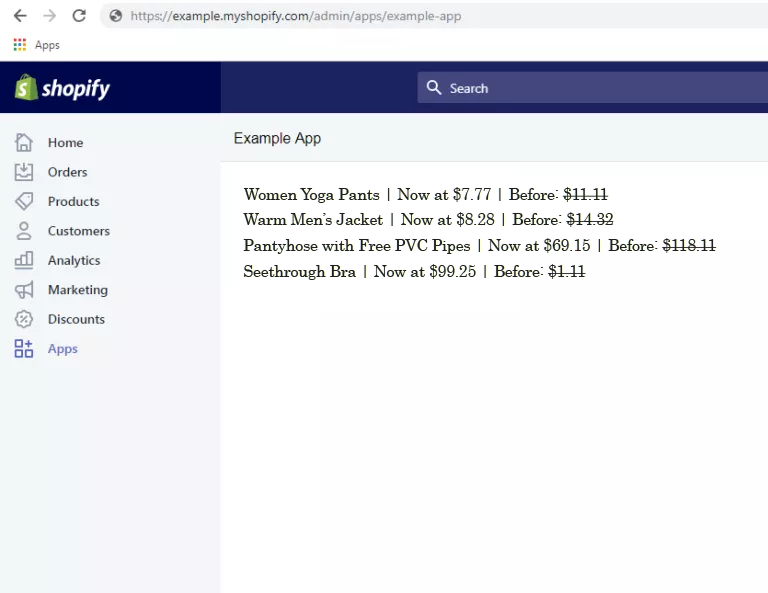
To display the prices, you may use this code below:
foreach($collects as $collect){
    foreach($collect as $key => $value){
		$products = shopify_call($token, $shop, "/admin/api/2020-10/products/".$value['product_id'].".json", array(), 'GET');
		$products = json_decode($products['response'], JSON_PRETTY_PRINT);

		$variants = shopify_call($token, $shop, "/admin/api/2020-10/products/".$value['product_id']."/variants.json", array(), 'GET');
		$variants = json_decode($variants['response'], JSON_PRETTY_PRINT);

		$originalPrice = $variants['variants'][0]['compare_at_price'];
		$discountedPrice = $variants['variants'][0]['price'];

		echo $products['product']['title'] . " | Now at $" . $discountedPrice . " | Before: <del>$" . $originalPrice . "</del><br />";
    }
} Code language: PHP (php)
The code above will display all the product’s name available inside the collection ID that we have used. It’ll also display both discounted price and original price.
Test the Shopify app
Congratulations! Now you have successfully displayed all the products and its variants. If you have concerns or questions, don’t hesitate to ask down in the comments.
What’s next?
The next thing that we are going to do is to display the image of the products. If you are interested, I have written already the full guidelines on how to display Shopify product images using PHP.
Where did we get the shopify_call() function?
Are you wondering where we get the shopify_call function? If so, then I recommend you to read the first article of this series where we set up the Shopify App and downloaded the Shopify API client that we used in this tutorial.
How To Make An Invoice App with Shopify Order API
When you build a Shopify store, it’s very common that you get customers to ask you for the invoices when they make a purchase. As a merchant, it’s your responsibility to provide that invoice.
There are few Shopify apps that provide invoice printing but what if you wish to create your own? In this tutorial, we’ll learn how to make an invoice app that allows you to print invoices using PHP and JavaScript.
Video Tutorial
If you prefer to learn through a video tutorial, you can watch the following video.
Getting Started
Like in most of our Shopify app written tutorials, we’ll assume that you have followed our Shopify app tutorial series and you are using the same repository/client that we are using here.
Now, for this tutorial, we’re just going to need the following two files:
In our index.php file, we should have the following code:
<!DOCTYPE html>
<html lang="en">
  <head>
    <meta charset="utf-8">
    <meta name="viewport" content="width=device-width, initial-scale=1, shrink-to-fit=no">
    <link rel="stylesheet" href="https://stackpath.bootstrapcdn.com/bootstrap/4.1.3/css/bootstrap.min.css">
    <title>WeeklyHow Shopify App</title>
  </head>
  <body class="bg-light">
	<div class="container py-5">
		<?php
		include_once("inc/functions.php");
		include_once("inc/mysql_connect.php");
		include_once("header.php");
		include_once("orders.php");
		?>
	</div>
    <script src="https://code.jquery.com/jquery-3.3.1.min.js"></script>
    <script src="https://cdnjs.cloudflare.com/ajax/libs/popper.js/1.14.3/umd/popper.min.js"></script>
    <script src="https://stackpath.bootstrapcdn.com/bootstrap/4.1.3/js/bootstrap.min.js"></script>
  </body>
</html>
Code language: PHP (php)
And for our orders.php file, we should have the following code:
<h4>Orders</h4>

<table class="table table-bordered my-5">
	<thead>
		<tr>
			<th scope="col">Order #</th>
			<th scope="col">Email Address</th>
			<th scope="col">Customer Name</th>
			<th scope="col">Total Sale</th>
		</tr>
	</thead>
	<tbody>
		<?php
			$orders = shopify_call($token, $shop_url, "/admin/api/2020-10/orders.json", array("status" => 'any'), 'GET');
			$orders = json_decode($orders['response'], JSON_PRETTY_PRINT);

			foreach ($orders as $order) {
				?>
					<tr>
					<?php
					foreach ($order as $key => $value) {
						?>
							<th><a href="#" data-toggle="modal" data-target="#printOrder<?php echo $value['order_number']; ?>"><?php echo $value['order_number']; ?></a></th>
							<td><?php echo $value['contact_email']; ?></td>
							<td><?php echo $value['billing_address']['name']; ?></td>
							<td><?php echo $value['total_price'] + $value['currency']; ?></td>
						<?php
					}
					?>
					</tr>
				<?php
			}
		?>
	</tbody>
</table>
Code language: PHP (php)
In the code above, what we just did is to create a very simple table to display the list of orders available from the store using Order API.
Now, notice in line 23 that we have added an anchor tag that uses custom attributes such as data-toggle and data-target. These will be used to open a modal to display the invoice.
For that to happen, we have to make sure that the value of the data-target attribute is unique so we concatenated the order_number.
If we save the scripts and run the app, we should have the following output:

And the HTML output should look like this

So that means, we need to create a modal with an id of #printOrder1001.
We can create a modal, just by inserting the following code in order.php file
<h4>Orders</h4>
<table class="table table-bordered my-5">
<thead>
<tr>
<th scope="col">Order #</th>
<th scope="col">Email Address</th>
<th scope="col">Customer Name</th>
<th scope="col">Total Sale</th>
</tr>
</thead>
<tbody>
<?php
$orders = shopify_call($token, $shop_url, "/admin/api/2020-10/orders.json", array("status" => 'any'), 'GET');
$orders = json_decode($orders['response'], JSON_PRETTY_PRINT);
foreach ($orders as $order) {
?>
<tr>
<?php
foreach ($order as $key => $value) {
?>
<th><a href="#" data-toggle="modal" data-target="#printOrder<?php echo $value['order_number']; ?>"><?php echo $value['order_number']; ?></a></th>
<td><?php echo $value['contact_email']; ?></td>
<td><?php echo $value['billing_address']['name']; ?></td>
<td><?php echo $value['total_price'] + $value['currency']; ?></td>
<div class="modal fade" id="printOrder<?php echo $value['order_number']; ?>" tabindex="-1" aria-labelledby="printOrderLabel" aria-hidden="true">
<div class="modal-dialog modal-lg" style="max-width: 80% !important;">
<div class="modal-content">
<div class="modal-header">
<h5 class="modal-title" id="printOrderLabel">Print Order #<?php echo $value['order_number']; ?></h5>
<button type="button" class="close" data-dismiss="modal" aria-label="Close">
<span aria-hidden="true">×</span>
</button>
</div>
<div class="modal-body">
<div class="card border-0" id="printThisInvoice">
<div class="card-body">
<div class="row p-2">
<div class="col-md-6"><h1>LOGO</h1></div>
<div class="col-md-6 text-right"><p class="font-weight-bold mb-1">Invoice #00001</p></div>
</div>
<hr class="my-3">
<div class="row p-2">
<div class="col-md-6">
<p class="font-weight-bold mb-4">Client Information</p>
<p class="mb-1"><?php echo $value['billing_address']['name']; ?></p>
<p class="mb-1"><?php echo $value['billing_address']['address1']; ?></p>
<p class="mb-1"><?php echo $value['billing_address']['country']; ?></p></div>
<div class="col-md-6 text-right">
<p class="font-weight-bold mb-4">Payment Details</p>
<p class="mb-1"><span class="text-muted">Payment Type: </span> <?php echo $value['payment_gateway_names'][0]; ?></p>
<p class="mb-1"><span class="text-muted">Name: </span> <?php echo $value['billing_address']['name']; ?></p>
</div>
</div>
<div class="row p-2">
<div class="col-md-12">
<div class="row">
<div class="col-3 border">Item</div>
<div class="col-3 border">Description</div>
<div class="col-2 border">Quantity</div>
<div class="col-2 border">Unit Cost (<?php echo $value['currency']; ?>)</div>
<div class="col-2 border">Total (<?php echo $value['currency']; ?>)</div>
</div>
<?php
$totalPrice = 0;
foreach ($value['line_items'] as $index => $item) {
$totalPrice += $item['price'];
?>
<div class="row">
<div class="col-3 border"><?php echo $item['title']; ?></div>
<div class="col-3 border"><?php echo $item['name']; ?></div>
<div class="col-2 border"><?php echo $item['quantity']; ?></div>
<div class="col-2 border"><?php echo $item['price']; ?></div>
<div class="col-2 border"><?php echo ($item['price'] * $item['quantity']); ?></div>
</div>
<?php
}
?>
</div>
</div>
<div class="row p-2">
<div class="col-md-6">
<p class="font-weight-bold mb-4">Other information</p>
<p class="mb-1">Note: <?php echo $value['note']; ?></p>
</div>
<div class="col-md-6 text-right">
<p class="font-weight-bold mb-4">TOTAL:</p>
<p class="mb-1"><?php echo $totalPrice; ?> <small><?php echo $value['currency']; ?></small></p>
</div>
</div>
</div>
</div>
</div>
<div class="modal-footer">
<button type="button" class="btn btn-secondary" data-dismiss="modal">Close</button>
<button type="button" class="btn btn-primary" id="printBtn">Print</button>
</div>
</div>
</div>
</div>
<?php
}
?>
</tr>
<?php
}
?>
</tbody>
</table>
Code language: PHP (php)So we have three parts for this modal.
First is the header. Second is the content and lastly is the footer.
Let’s take a look at the modal body. Here we added a div tag with a class of card. This div basically forms the template of a very simple invoice. Here we have:
All of these data can easily be customized and so feel free to change anything here. Just remember that variables and key names of the arrays must follow what’s from the API.
Next is the footer of the modal, here we have to buttons, the cancel button and the print button.
For the print button, we’ll have to create a javascript to make an on click event and execute a task and that is to print the invoice.
Saving the script should give you the following output:

Printing the invoice
For us to be able to print the invoice, we’ll have to use a plugin that is called printThis.
printThis is an extensive printing plugin for jQuery that allows for printing specific areas or multiple DOM elements. This is perfect since we only want to print what is inside the modal.
To use this plugin, we’ll be using the following CDN:
https://cdnjs.cloudflare.com/ajax/libs/printThis/1.15.0/printThis.min.jsCode language: JavaScript (javascript)Let’s open our index.php once again and update its code to the following:
<!DOCTYPE html>
<html lang="en">
  <head>
    <meta charset="utf-8">
    <meta name="viewport" content="width=device-width, initial-scale=1, shrink-to-fit=no">
    <link rel="stylesheet" href="https://stackpath.bootstrapcdn.com/bootstrap/4.1.3/css/bootstrap.min.css">
    <title>WeeklyHow Shopify App</title>
  </head>
  <body class="bg-light">
	<div class="container py-5">
		<?php
		include_once("inc/functions.php");
		include_once("inc/mysql_connect.php");
		include_once("header.php");
		include_once("orders.php");
		?>
	</div>
    <script src="https://code.jquery.com/jquery-3.3.1.min.js"></script>
    <script src="https://cdnjs.cloudflare.com/ajax/libs/popper.js/1.14.3/umd/popper.min.js"></script>
    <script src="https://stackpath.bootstrapcdn.com/bootstrap/4.1.3/js/bootstrap.min.js"></script>
    <script src="https://cdnjs.cloudflare.com/ajax/libs/printThis/1.15.0/printThis.min.js"></script>
    <script>
      $('#printBtn').on('click', function(e) {
        $('#printThisInvoice').printThis();
      });
    </script>
  </body>
</html>
Code language: HTML, XML (xml)
To use the plugin, all we really need to do is to select a DOM element and use the printThis() function to display the print window.
That’s why if we save our script and run the app, we should have the following output when we click the print button.

Isn’t that awesome?! Now you can easily print invoices and send these invoices to your customers through email.
Conclusion
In this lesson, we have learned how to create an invoice app using Shopify Order API, PHP, and a very powerful jQuery plugin. This is just the basic of making an invoice app. You can make this more useful by adding events such as sending the invoice to customer’s email as soon as the invoice is printed or something more! Feel free to experiment with the tools provided in this lesson.
If you have any questions, feel free to tell us in the comments below and we’ll try to answer.
Shopify Tutorial PHP: Update Product’s Collection with Collect API
So you are developing a Shopify app where merchants can easily customize their product’s title, description, and even the prices. However, you forgot one thing and that is the collections.
How do you actually update the product’s collections?
In this Shopify tutorial, we’ll learn how to update the product’s collections using Collect REST API and PHP.
Video Tutorial
If you prefer to learn through a video tutorial, you may watch the following video.
Getting started
To get started, we’ll assume that you have followed our Shopify app tutorial series and you are using the same repository/client that we are using here.
Now, for this tutorial, we’ll only need the following three files.
In our product.php, we should have the following code:
<div class="card-columns">
<?php
$products = shopify_call($token, $shop_url, "/admin/api/2020-07/products.json", array(), 'GET');
$products = json_decode($products['response'], JSON_PRETTY_PRINT);
foreach ($products as $product) {
foreach ($product as $key => $value) {
$images = shopify_call($token, $shop_url, "/admin/api/2020-07/products/" . $value['id'] . "/images.json", array(), 'GET');
$images = json_decode($images['response'], JSON_PRETTY_PRINT);
?>
<div class="card" product-id="<?php echo $value['id']; ?>">
<img class="card-img-top" src="<?php echo $images['images'][0]['src']; ?>" alt="Card image cap">
<div class="card-body">
<h5 class="card-title"><?php echo $value['title']; ?></h5>
</div>
</div>
<?php
}
}
?>
</div>
<!-- Modal -->
<div class="modal fade" id="productsModal" tabindex="-1" role="dialog" aria-labelledby="productsModalLabel" aria-hidden="true">
<div class="modal-dialog" role="document">
<div class="modal-content">
<div class="modal-header">
<h5 class="modal-title" id="exampleModalLabel">Modal title</h5>
<button type="button" class="close" data-dismiss="modal" aria-label="Close">
<span aria-hidden="true">×</span>
</button>
</div>
<div class="modal-body">
<form action="ajax.php" id="productForm">
<div class="form-group">
<label for="productName">Product Title</label>
<input type="text" class="form-control" id="productName" name="productName">
</div>
<div class="form-group">
<label for="productDescription">Product Description</label>
<textarea class="form-control" id="productDescription" name="productDescription" rows="7"></textarea>
</div>
<div class="form-group">
<select class="custom-select" id="productCollection" name="productCollection" multiple>
<?php
$custom_collections = shopify_call($token, $shop_url, "/admin/api/2020-07/custom_collections.json", array(), 'GET');
$custom_collections = json_decode($custom_collections['response'], JSON_PRETTY_PRINT);
foreach ($custom_collections as $custom_collection) {
foreach ($custom_collection as $key => $value) {
?>
<option value="<?php echo $value['id']; ?>"><?php echo $value['title']; ?></option>
<?php
}
}
$smart_collections = shopify_call($token, $shop_url, "/admin/api/2020-07/smart_collections.json", array(), 'GET');
$smart_collections = json_decode($smart_collections['response'], JSON_PRETTY_PRINT);
foreach ($smart_collections as $smart_collection) {
foreach ($smart_collection as $key => $value) {
?>
<option value="<?php echo $value['id']; ?>"><?php echo $value['title']; ?></option>
<?php
}
}
?>
</select>
</div>
</form>
</div>
<div class="modal-footer">
<button type="button" class="btn btn-secondary" data-dismiss="modal">Close</button>
<button type="button" class="btn btn-primary" id="SaveProduct" product-id=''>Save changes</button>
</div>
</div>
</div>
</div>
Code language: HTML, XML (xml)In our index.php, we should have the following code:
<!DOCTYPE html>
<html lang="en">
  <head>
    <meta charset="utf-8">
    <meta name="viewport" content="width=device-width, initial-scale=1, shrink-to-fit=no">
    <link rel="stylesheet" href="https://stackpath.bootstrapcdn.com/bootstrap/4.1.3/css/bootstrap.min.css">
    <title>WeeklyHow Shopify App</title>
  </head>
  <body>

	<div class="container">
		<?php
		include_once("inc/functions.php");
		include_once("inc/mysql_connect.php");
		include_once("header.php");
		include_once("products.php");
		?>
	</div>
    <script src="https://code.jquery.com/jquery-3.3.1.min.js"></script>
    <script src="https://cdnjs.cloudflare.com/ajax/libs/popper.js/1.14.3/umd/popper.min.js"></script>
    <script src="https://stackpath.bootstrapcdn.com/bootstrap/4.1.3/js/bootstrap.min.js"></script>

    <script>
      var shop = '<?php echo $shop_url; ?>';

      $('div[product-id]').on('click', function (e) {
        $.ajax({
          method: 'POST',
          data: {
            url: shop,
            id: $(this).attr('product-id'),
            type: 'GET'
          },
          url:'ajax.php',
          dataType: 'json',
          success:function(json){
            console.log(json);

            $('#productName').val(json['title']);
            $('#productDescription').val(json['description']);

            $('#productCollection option').each(function(i) {
              var optionCollection = $(this).val();

              json['collections'].forEach(function(productCollection) {
                if(productCollection['id'] == optionCollection) {
                  $('#productCollection option[value=' + optionCollection + ']').attr('selected', 'selected');
                }

              });
            });


            $('#SaveProduct').attr('product-id', json['id']);
            $('#productsModal').modal('show');
          }
        });
      });


      $('#productsModal').on('hide.bs.modal', function() {
        $('#SaveProduct').attr('product-id', '');
        $('#productCollection').val([]);
      });

      $('#SaveProduct').on('click', function() {
        var productID = $(this).attr('product-id');

        $.ajax({
          method: 'POST',
          data: {
            url: shop,
            id: productID,
            product: $('#productForm').serialize(),
            type: 'PUT'
          },
          url:'ajax.php',
          dataType: 'html',
          success:function(json){
            console.log(json);
          }
        });
      });
    </script>
  </body>
</html>
Code language: HTML, XML (xml)
And for our ajax.php, we should have the following code:
<?php
require_once("inc/functions.php");
require_once("inc/mysql_connect.php");

$id = $_POST['id'];
$shop_url = $_POST['url'];

$sql = "SELECT * FROM shops WHERE shop_url='" . $shop_url . "' LIMIT 1";
$check = mysqli_query($conn, $sql);

if(mysqli_num_rows($check) > 0) {
	$shop_row = mysqli_fetch_assoc($check);

	$token = $shop_row['access_token'];

	if($_POST['type'] == 'GET') {
		$products = shopify_call($token, $shop_url, "/admin/api/2020-07/products/" . $id . ".json", array(), 'GET');
		$products = json_decode($products['response'], JSON_PRETTY_PRINT);

		$id = $products['product']['id'];
		$title = $products['product']['title'];
		$description = $products['product']['body_html'];
		$collections = array();

		$custom_collections = shopify_call($token, $shop_url, "/admin/api/2020-07/custom_collections.json", array("product_id" => $id), 'GET');
		$custom_collections = json_decode($custom_collections['response'], JSON_PRETTY_PRINT);

		foreach ($custom_collections as $custom_collection) {
			foreach ($custom_collection as $key => $value) {
				array_push($collections, array("id" => $value['id'], "name" => $value['title']));
			}
		}

		$smart_collections = shopify_call($token, $shop_url, "/admin/api/2020-07/smart_collections.json", array("product_id" => $id), 'GET');
		$smart_collections = json_decode($smart_collections['response'], JSON_PRETTY_PRINT);

		foreach ($smart_collections as $smart_collection) {
			foreach ($smart_collection as $key => $value) {
				array_push($collections, array("id" => $value['id'], "name" => $value['title']));
			}
		}

		echo json_encode(
			array(
				"id" => $id,
				"title" => $title,
				"description" => $description,
				"collections" => $collections
			)
		);

	} else if( $_POST['type'] == 'PUT' ) {
		$productData = array();
		$productData = proper_parse_str($_POST['product']);

		$array = array("product" => array("title" => $productData['productName'], "body_html" => $productData['productDescription']));

		$products = shopify_call($token, $shop_url, "/admin/api/2020-07/products/" . $id . ".json", $array, 'PUT');
	}

}
?>
Code language: PHP (php)
The scripts above should allow us to edit and save a new title and description for any of the products that we select below.

Now, what we want to do is when we select a product. A bootstrap modal should appear and allow us to select new collections for our product.

Updating the product’s collection
There are two ways to update the product’s collection. One is to use the Collection API, delete the collection attached to the product, and create the deleted collection and assign all of the previous products assigned to the collection except that product that we selected. Two is to use Collect API.
Obviously, the first option is the worse way of updating the product’s collection. Why? Because it’s ugly and it’s making too many unnecessary API calls.
However, if you use collect API instead, all we needed to do is to get the collect attached to the product that we selected, delete the collect, and create a new collect with the new collection. Simple as that!
Let’s start by getting all of the collect from collect API. Open the ajax.php and update its code to the following:
<?php
require_once("inc/functions.php");
require_once("inc/mysql_connect.php");

$id = $_POST['id'];
$shop_url = $_POST['url'];

$sql = "SELECT * FROM shops WHERE shop_url='" . $shop_url . "' LIMIT 1";
$check = mysqli_query($conn, $sql);

if(mysqli_num_rows($check) > 0) {
	$shop_row = mysqli_fetch_assoc($check);

	$token = $shop_row['access_token'];

	if($_POST['type'] == 'GET') {
		$products = shopify_call($token, $shop_url, "/admin/api/2020-07/products/" . $id . ".json", array(), 'GET');
		$products = json_decode($products['response'], JSON_PRETTY_PRINT);

		$id = $products['product']['id'];
		$title = $products['product']['title'];
		$description = $products['product']['body_html'];
		$collections = array();

		$custom_collections = shopify_call($token, $shop_url, "/admin/api/2020-07/custom_collections.json", array("product_id" => $id), 'GET');
		$custom_collections = json_decode($custom_collections['response'], JSON_PRETTY_PRINT);

		foreach ($custom_collections as $custom_collection) {
			foreach ($custom_collection as $key => $value) {
				array_push($collections, array("id" => $value['id'], "name" => $value['title']));
			}
		}

		$smart_collections = shopify_call($token, $shop_url, "/admin/api/2020-07/smart_collections.json", array("product_id" => $id), 'GET');
		$smart_collections = json_decode($smart_collections['response'], JSON_PRETTY_PRINT);

		foreach ($smart_collections as $smart_collection) {
			foreach ($smart_collection as $key => $value) {
				array_push($collections, array("id" => $value['id'], "name" => $value['title']));
			}
		}

		echo json_encode(
			array(
				"id" => $id,
				"title" => $title,
				"description" => $description,
				"collections" => $collections
			)
		);

	} else if( $_POST['type'] == 'PUT' ) {
		$productData = array();
		parse_str($_POST['product'], $productData);

		$array = array("product" => array("title" => $productData['productName'], "body_html" => $productData['productDescription']));

		$products = shopify_call($token, $shop_url, "/admin/api/2020-07/products/" . $id . ".json", $array, 'PUT');

		$collects = shopify_call($token, $shop_url, "/admin/api/2020-07/collects.json", array('product_id' => $id), 'GET');
		$collects = json_decode($collects['response'], JSON_PRETTY_PRINT);

		foreach ($collects as $collect) {
			foreach ($collect as $key => $value) {
				$collects = shopify_call($token, $shop_url, "/admin/api/2020-07/collects/" . $value['id'] .".json", array(), 'DELETE');
			}
		}

	}

}
?>
Code language: PHP (php)
In the code above, we first get the collects assigned to our selected product and then loop through each collect using foreach and then delete each collect. These are just basics and you should be able to follow along 🙂
Next, we’ll use POST endpoint to create the new collect.
<?php
require_once("inc/functions.php");
require_once("inc/mysql_connect.php");

$id = $_POST['id'];
$shop_url = $_POST['url'];

$sql = "SELECT * FROM shops WHERE shop_url='" . $shop_url . "' LIMIT 1";
$check = mysqli_query($conn, $sql);

if(mysqli_num_rows($check) > 0) {
	$shop_row = mysqli_fetch_assoc($check);

	$token = $shop_row['access_token'];

	if($_POST['type'] == 'GET') {
		$products = shopify_call($token, $shop_url, "/admin/api/2020-07/products/" . $id . ".json", array(), 'GET');
		$products = json_decode($products['response'], JSON_PRETTY_PRINT);

		$id = $products['product']['id'];
		$title = $products['product']['title'];
		$description = $products['product']['body_html'];
		$collections = array();

		$custom_collections = shopify_call($token, $shop_url, "/admin/api/2020-07/custom_collections.json", array("product_id" => $id), 'GET');
		$custom_collections = json_decode($custom_collections['response'], JSON_PRETTY_PRINT);

		foreach ($custom_collections as $custom_collection) {
			foreach ($custom_collection as $key => $value) {
				array_push($collections, array("id" => $value['id'], "name" => $value['title']));
			}
		}

		$smart_collections = shopify_call($token, $shop_url, "/admin/api/2020-07/smart_collections.json", array("product_id" => $id), 'GET');
		$smart_collections = json_decode($smart_collections['response'], JSON_PRETTY_PRINT);

		foreach ($smart_collections as $smart_collection) {
			foreach ($smart_collection as $key => $value) {
				array_push($collections, array("id" => $value['id'], "name" => $value['title']));
			}
		}

		echo json_encode(
			array(
				"id" => $id,
				"title" => $title,
				"description" => $description,
				"collections" => $collections
			)
		);

	} else if( $_POST['type'] == 'PUT' ) {
		$productData = array();
		parse_str($_POST['product'], $productData);

		$array = array("product" => array("title" => $productData['productName'], "body_html" => $productData['productDescription']));

		$products = shopify_call($token, $shop_url, "/admin/api/2020-07/products/" . $id . ".json", $array, 'PUT');

		$collects = shopify_call($token, $shop_url, "/admin/api/2020-07/collects.json", array('product_id' => $id), 'GET');
		$collects = json_decode($collects['response'], JSON_PRETTY_PRINT);

		foreach ($collects as $collect) {
			foreach ($collect as $key => $value) {
				$collects = shopify_call($token, $shop_url, "/admin/api/2020-07/collects/" . $value['id'] .".json", array(), 'DELETE');
			}
		}


		if( count($productData['productCollection'] ) > 0) {
			for ($i = 0; $i < count($productData['productCollection']); $i++) {
				if(count($productData['productCollection']) >= 0 && count($productData['productCollection']) <= 1) {
					$value = $productData['productCollection'];
				} else {
					$value = $productData['productCollection'][$i];
				}


				$collects = shopify_call($token, $shop_url, "/admin/api/2020-07/collects.json", array('collect' => array('product_id' => $id, 'collection_id' => $value)), 'POST');
			}
		}
	}

}
?>
Code language: PHP (php)
In the above code, we need to check if the collections selected by the merchant is more than one. If it is, then we’ll loop through each collections and create the collect using the value of product ID and collection ID.
If you’re wondering why there is a condition inside the loop, it’s because the productData variable can create two-dimensional arrays especially if the length of the array is more than 1. So we need to make sure we get both values regardless of the array length.
With everything saved, we should be able to update the product’s collections. BUT! Unfortunately, the built-in parse_str() function is not going to work if there are two or more query strings with the same name.
For example, let’s say we have the following query string:
https://weeklyhow.com/?id=1&id=2&id=3
Code language: JavaScript (javascript)
If we use the built-in parse string function, the function will only return the last value which is 3.
So if we use the same function, it’ll most likely not create the first collects.
To fix that, we’ll have to use the following function provided by Evan K from php.net:
function proper_parse_str($str) {
  # result array
  $arr = array();

  # split on outer delimiter
  $pairs = explode('&', $str);

  # loop through each pair
  foreach ($pairs as $i) {
    # split into name and value
    list($name,$value) = explode('=', $i, 2);

    # if name already exists
    if( isset($arr[$name]) ) {
      # stick multiple values into an array
      if( is_array($arr[$name]) ) {
        $arr[$name][] = $value;
      }
      else {
        $arr[$name] = array($arr[$name], $value);
      }
    }
    # otherwise, simply stick it in a scalar
    else {
      $arr[$name] = $value;
    }
  }

  # return result array
  return $arr;
}
Code language: PHP (php)
You can copy the above function and paste it either on the very top of ajax.php or inside the functions.php.
Once you’re done copying the code, we should then be able to use it instead of the parse_str() function.
<?php
require_once("inc/functions.php");
require_once("inc/mysql_connect.php");

$id = $_POST['id'];
$shop_url = $_POST['url'];

$sql = "SELECT * FROM shops WHERE shop_url='" . $shop_url . "' LIMIT 1";
$check = mysqli_query($conn, $sql);

if(mysqli_num_rows($check) > 0) {
	$shop_row = mysqli_fetch_assoc($check);

	$token = $shop_row['access_token'];

	if($_POST['type'] == 'GET') {
		$products = shopify_call($token, $shop_url, "/admin/api/2020-07/products/" . $id . ".json", array(), 'GET');
		$products = json_decode($products['response'], JSON_PRETTY_PRINT);

		$id = $products['product']['id'];
		$title = $products['product']['title'];
		$description = $products['product']['body_html'];
		$collections = array();

		$custom_collections = shopify_call($token, $shop_url, "/admin/api/2020-07/custom_collections.json", array("product_id" => $id), 'GET');
		$custom_collections = json_decode($custom_collections['response'], JSON_PRETTY_PRINT);

		foreach ($custom_collections as $custom_collection) {
			foreach ($custom_collection as $key => $value) {
				array_push($collections, array("id" => $value['id'], "name" => $value['title']));
			}
		}

		$smart_collections = shopify_call($token, $shop_url, "/admin/api/2020-07/smart_collections.json", array("product_id" => $id), 'GET');
		$smart_collections = json_decode($smart_collections['response'], JSON_PRETTY_PRINT);

		foreach ($smart_collections as $smart_collection) {
			foreach ($smart_collection as $key => $value) {
				array_push($collections, array("id" => $value['id'], "name" => $value['title']));
			}
		}

		echo json_encode(
			array(
				"id" => $id,
				"title" => $title,
				"description" => $description,
				"collections" => $collections
			)
		);

	} else if( $_POST['type'] == 'PUT' ) {
		$productData = array();
		$productData = proper_parse_str($_POST['product']);

		$array = array("product" => array("title" => urldecode($productData['productName']), "body_html" => urldecode($productData['productDescription'])));

		$products = shopify_call($token, $shop_url, "/admin/api/2020-07/products/" . $id . ".json", $array, 'PUT');

		$collects = shopify_call($token, $shop_url, "/admin/api/2020-07/collects.json", array('product_id' => $id), 'GET');
		$collects = json_decode($collects['response'], JSON_PRETTY_PRINT);

		foreach ($collects as $collect) {
			foreach ($collect as $key => $value) {
				$collects = shopify_call($token, $shop_url, "/admin/api/2020-07/collects/" . $value['id'] .".json", array(), 'DELETE');
			}
		}


		if( count($productData['productCollection'] ) > 0) {
			for ($i = 0; $i < count($productData['productCollection']); $i++) {
				if(count($productData['productCollection']) >= 0 && count($productData['productCollection']) <= 1) {
					$value = $productData['productCollection'];
				} else {
					$value = $productData['productCollection'][$i];
				}


				$collects = shopify_call($token, $shop_url, "/admin/api/2020-07/collects.json", array('collect' => array('product_id' => $id, 'collection_id' => $value)), 'POST');
			}
		}
	}

}
?>
Code language: PHP (php)
Now, query strings are encoded to URL text formatting that’s why before we save the new title and description, we’ll have to decode the title and description back to a normal text format using urldecode() function.
Now if we save all of our scripts and run the app, we should then be able to update the collections without any problem. Awesome!

Conclusion
Updating a product’s collection can be a hassle especially if the products are attached to not just a custom collection, but also to a smart collection. However, with collect API, we should be able to update the product’s collection without doing too much unnecessary API calls.
We hope that you learned how to update your products using collect API. If you have encountered any issues or errors, let us know in the comments below and we’ll try to help out! 🙂
Building Shopify Apps with PHP (Shopify 2021-01 Update)
If you are a Shopify app developer, you may have already heard that they made an update with their Shopify’s Admin API (GraphQL and REST) called Shopify API versioning. At this moment, we are already at 2020-10 and the 2021 release is just around the corner.
Their goal is to ensure that any developers could build Shopify apps and Shopify themes confidently. They have also made changes to their Shopify Partner Dashboard, the Developer Changelog, and to their developer documentation page to make it easier for us developers to stay updated of upcoming new versions.
If you have already built a Shopify app using the old versions of Shopify API. Migrating to Shopify API 2020-10 is very easy. All you needed to do is to update the endpoint URLs that your app calls to explicitly declare the API version.
Each URL should include the following format.
/admin/api/<version date>Code language: HTML, XML (xml)For example, if you are trying to call using the REST endpoint, the URL endpoint could go something like:
https://<your-shop-name>.myshopify.com/admin/api/2020-10/smart_collections.jsonCode language: JavaScript (javascript)Shopify API Versioning
Keep in mind that Shopify will release another update for the API versioning quarterly. This means that you should always stay up-to-date on what’s new.
Now, if you are confused about when they’re going to make updates. You may use the following table as your guide or reminder.
| Stable version | Release date | Date stable version is supported until |
|---|---|---|
| 2020-04 | April 1, 2020 | April 1, 2021 |
| 2020-07 | July 1, 2020 | July 1, 2021 |
| 2020-10 | October 1, 2020 | October 1, 2021 |
| 2021-01 (Release candidate) | January 1, 2021 | January 1, 2022 |
How to use API versioning?
If you have already developed an app using the old API then I highly recommend you to update your PHP files and change the base URLs.
Also, to make it easier for you. You should just declare a variable holding the version name of the latest API version. By doing so, every time Shopify updates the API, you won’t need to change anything but the variable holding the version name.
For this example, we’ll be using the code that we wrote on our previous tutorial on how to display Shopify products using PHP.
$collectionList = shopify_call($token, $shop, "/admin/custom_collections.json", array(), 'GET');
$collectionList = json_decode($collectionList['response'], JSON_PRETTY_PRINT);
$collection_id = $collectionList['custom_collections'][0]['id'];

$array = array("collection_id"=>$collection_id);
$collects = shopify_call($token, $shop, "/admin/collects.json", $array, 'GET');
$collects = json_decode($collects['response'], JSON_PRETTY_PRINT);
Code language: PHP (php)
If you have noticed, the code above is using the old format of API. No versioning whatsoever.
Migrating to New Shopify API versioning
To migrate from old API to new Shopify API versioning. We must change the code above to something like this.
$shopifyVer = "api/2020-10";

$collectionList = shopify_call($token, $shop, "/admin/".$shopifyVer."/custom_collections.json", array(), 'GET');
$collectionList = json_decode($collectionList['response'], JSON_PRETTY_PRINT);
$collection_id = $collectionList['custom_collections'][0]['id'];

$array = array("collection_id"=>$collection_id);
$collects = shopify_call($token, $shop, "/admin/".$shopifyVer."/collects.json", $array, 'GET');
$collects = json_decode($collects['response'], JSON_PRETTY_PRINT);
Code language: PHP (php)
The code above will make it easier for us to update our Shopify API calls. Just overwrite the value of the variable and that’s it.
Another thing to remember to keep your app updated is to navigate to your app setup. In the Webhook API version section, change the dropdown value to the latest version like below.

Summary
There are a few changes going to happen to Shopify REST this 2021, and so if your app uses API resources such as FulfillmentOrder and Billing then make sure you update your app as soon as the new version of Shopify API is released. Otherwise, your app will break.
Why You Should Use Hostinger for your Shopify Apps in 2020

So you’ve been creating Shopify apps through localhost and you’re thinking of publishing it online so Shopify merchants can install your app to their store.
The issue that you’re having now is which web host provider is the best for your Shopify apps. Well, we’re here to tell you.
One of the best web host providers that you can use for your Shopify apps is Hostinger and part of the reason why is because, unlike other web hosts, Hostinger is allowed to interact with Shopify through XMLHTTPRequest or AJAX. You’re surprised? We are too!

We have tried so many web host providers for our Shopify apps and sadly, most of them failed to take care of our apps!
Of course, there are plenty of reasons why you should pick Hostinger for your Shopify app projects, and today, we’re going to list down all of them.
Why you should use Hostinger for your Shopify apps
If one of your main concerns is your budget, then you’ve come to the right place. Hostinger is one of the cheapest web host services in the market but does that mean it’s bad? no.
Below are some of the features why you should consider using Hostinger for your Shopify app projects.
Compatibility
Not all web hosts can be compatible with Shopify especially if your web host doesn’t have an SSL certificate.
If your website still runs under HTTP, then expect Shopify to deny it.
Luckily, Hostinger offers a FREE SSL certificate so you can always run your Shopify apps without any issue at all.
Well, is that all that makes Hostinger compatible with Shopify for our Shopify app development?
Like what we mentioned earlier, Hostinger allows you to do HTTP requests without being blocked by the CORS policy. Of course, you’ll have to make sure that your header is properly set up.
Ease of use
The Hostinger dashboard is fairly easy to use and if you’re new to web hosting, you’re going to love using Hostinger.
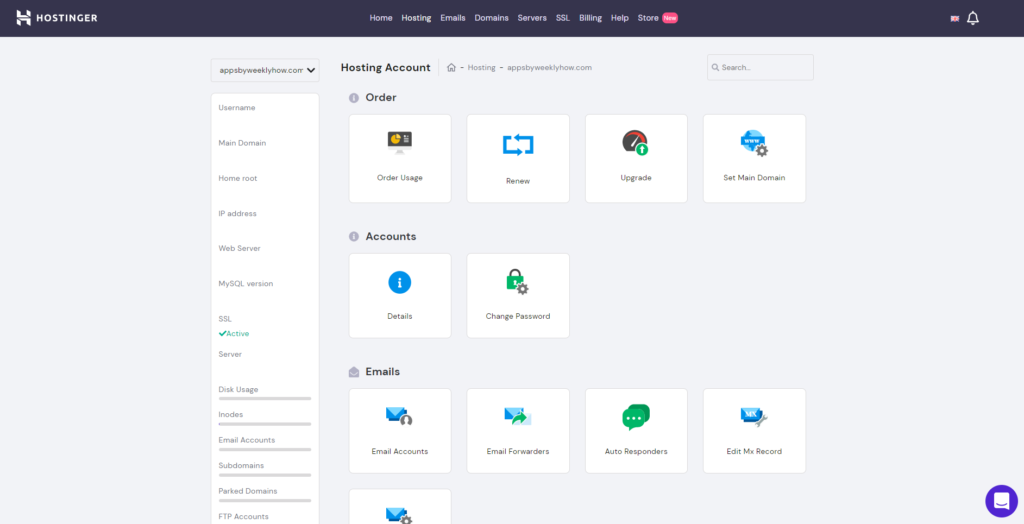
Everything in the Hostinger dashboard is understandable and straightforward. Each page is partnered with a very large logo and categorized to make it easier for you to find what you need.
There’s also a search bar for people that don’t like scrolling down.
Speed
For a very cheap web host, you would expect to have a very slow website. However, that’s not the case with Hostinger.
According to their website, the fastest response time that they can reach is about 45 milliseconds, which is insane! If you’re only using their shared web host, what more if you use their business web host plan?
Unlike other web host providers, Hostinger uses technologies that are up to date. In fact, they always update their technologies so that users can always have a good experience.
If you’re going to use Hostinger for your Shopify apps, it is expectable that your apps will load fast but of course, this will always depend on your codes or files. It is advisable to make your codes optimized as much as possible so that you can take advantage of Hostinger’s speed.
Price

If you’re in a tight budget and you want to save as much money as possible, then Hostinger should be your choice.
For only $0.99, you can have a single web host with a free SSL certificate which is a good deal especially if your only plan is to host your Shopify apps.
Though it’s important to remember that the price will depend on the contract you’re getting.
For a 1 month contract, the price will be almost $10 plus the setup fee which will cost you another $5. That’s still cheap compared to other web host providers but quite expensive just for a one month service.
To fully save a lot of money, it’s best if you take their 48 months contract, which will only cost you $47 and no setup fee. That’s FOUR years! and you will only need to pay $47.
Now the question is, which plan should you really take?
Well, of course, if you’re just trying out, we recommend taking the single shared web hosting. Then, just upgrade to the business plan once you get enough installs in the Shopify app store.
Stability
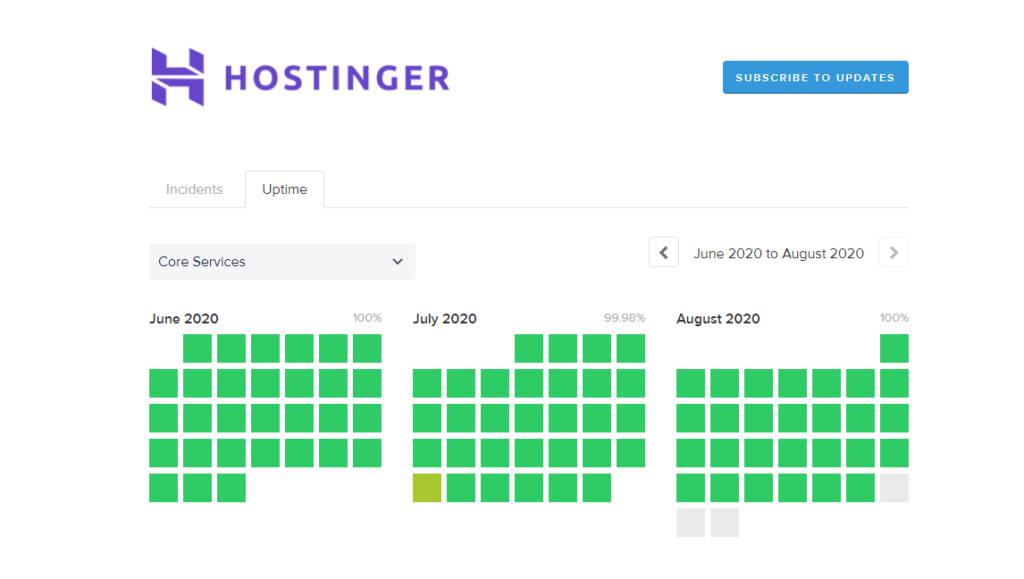
There will be times that your website can go offline but how long can your website stay offline if you use Hostinger?
According to Hostinger, the percentage of your website going offline is around 0.03% which means in one year, your website will barely go offline.
Support
It’s been known that Hostinger provides the best support for their users. However, in 2020, changes started to come up.
In 2019 or even before, Hostinger provides 24/7 support for all of their users but in 2020, Hostinger removed the chatbox in the dashboard and you can only contact them through their email.

But why?
According to their staff, due to the current situation of the entire world, Hostinger had to remove the chatbox.
We’re assuming that this is a temporary change and once the pandemic is over, their 24/7 support will be back for everyone.
Conclusion
Do we recommend using Hostinger for Shopify apps? Absolutely!
Hostinger is one of the trusted web host providers in the industry, offering a very cheap web hosting solutions for your Shopify app development. If your plan is to save up money, then you should consider using Hostinger.
Disclosure: This article may contain affiliate links, which means we may receive a commission if you click a link and purchase something that we have recommended.
How To Clear Unused Codes in Shopify After App Uninstall
One of the most common issues in Shopify is the files or codes that are left after uninstalling the Shopify apps from your store. You may have not realized it already but this issue will not only slow down your store but it will also make your theme files super unorganized.

Luckily, Shopify is working on fixing this issue through app snippets but the sad news is… it’s not yet available for the developers, so this problem will surely be around for a few more months.
But how do you actually remove the unused files from your Shopify store?
Today, we’ll be giving some tips on how to clear out the unused codes (or files) from your Shopify store after uninstalling the Shopify apps.
Getting Started
Before we provide the tips that you need for getting rid of the files from your Shopify store, make sure that you actually know your way around of your Shopify store especially with the theme files. Also…
Always backup your theme files!
It’s important to remember that once you have deleted a file from your store, you won’t be able to retrieve it unless you have a backup.
If you feel like you have all of your files protected then let’s get started.
Video Tutorial
The video tutorial below will guide you how to remove unused files or codes from your Shopify store specifically the ones that were installed by the apps that you have installed/uninstalled.
How To Remove Unused Codes From Your Shopify Store
The following are the steps that you can follow to remove unused codes or files from your Shopify store.
1. Scan through your theme.liquid file
Search for lines of codes that begins with the following:
{% includeCode language: PHP (php)Let’s give you an example, here is the bottom part of our theme.liquid file.

In the image above, we have the line of code that is referencing the asset file sumo.liquid.
Now let’s check if this is a file from Shopify or not?
2. Check if the file came from an app or not
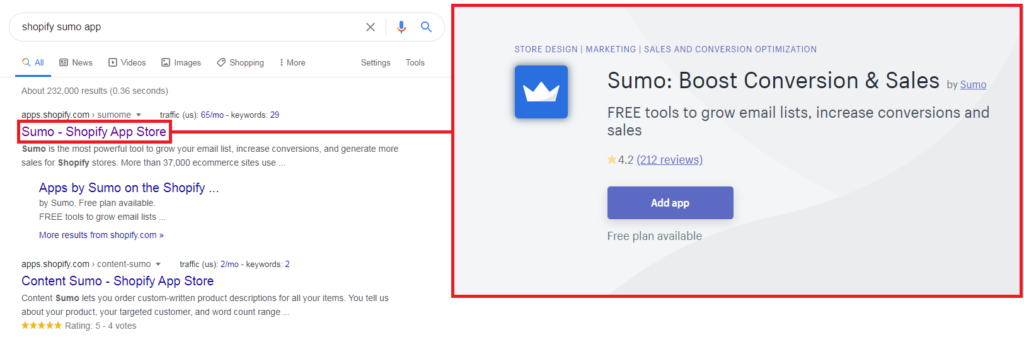
To check if the file is from a Shopify app, just simply type in the Google search Shopify <keyword> app.
For example:

And right below, we have the result which confirmed that it is from the Shopify app Sumo.
3. Check if the app is installed in the store
The next step is to check if the app is installed in your store.
Go to your Shopify store admin page > Apps
Then, scroll through and look for the app that contains the word sumo. If there’s no app, then that means the file sumo.liquid is unused.
We highly recommend double-checking because there are cases that the file is being used by a different app but developed by the same company. So again, delete the file at your own risk.
4. Remove the code & file
Once you have found that the code/file came from the uninstalled app, then it’s time to remove it from your theme.
Just open your theme.liquid file again and just remove the line:
{% include 'sumo' %}Code language: PHP (php)Then save the file.
5. Check if the changes you made caused an error
Once you have saved the file, open your Shopify store, navigate thoroughly around your store and check in the browser console if there is an error.
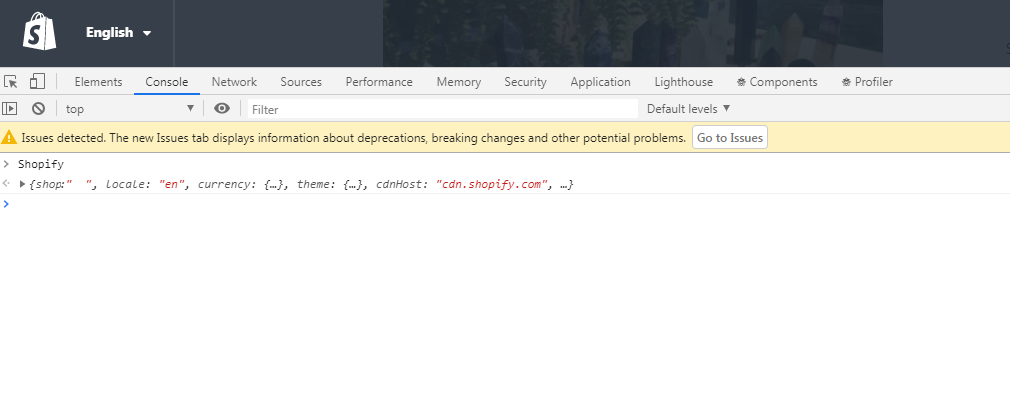
If there’s no error in each page then that means the file is safe to be deleted. Again, delete at your own risk.
How To Find Unused Files in Shopify
Looking for the unused files in your Shopify app is very easy. By using Google PageSpeed Insight, you can find all of the files from your Shopify store that are loaded but not being used.
Just type your website URL and scroll down and look for Remove Unused Javascript.
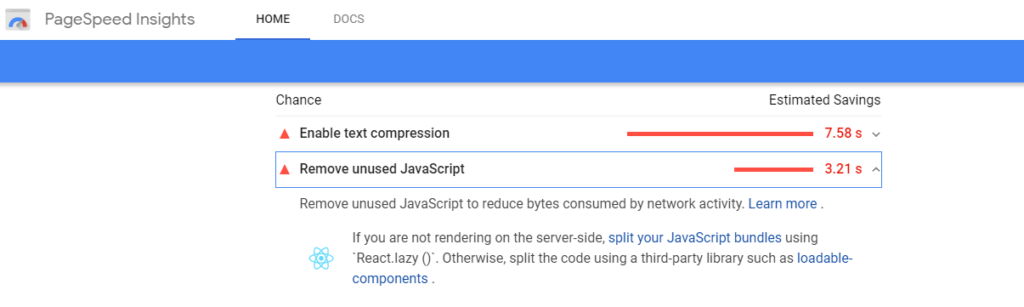
Underneath of it you will see a list of files that are being loaded in your store but is not being used by your store. You may verify each of the files by following the steps provided above.
Conclusion
Working as a merchant in Shopify can truly be tiresome especially if you’re doing everything just on your own.
Luckily, there are hundreds of Shopify apps that you can install so you won’t have to deal with so much stress. The sad thing is, the more apps you install, the more your store becomes slower. When you remove the apps, the apps leave some files that still makes your store super slow.
We highly recommend listing down all of the apps that you installed from the start, that way you’ll have a record which one is installed and which one is uninstalled. You may also check the app’s company page since they usually have a documentation about how to delete the files that the app installed in your store.
How To Create App Snippets from Shopify Apps to Shopify Stores
Shopify recently introduced that they will be adding a feature where Shopify apps can finally and easily import liquid files to Shopify stores without writing a bunch of long codes.
The feature is called App Snippets.
Note that app snippets are still on beta and is only available for Shopify development stores with a developer preview store enabled and is using the online store design experience.
What is App Snippet?
According to Shopify, App snippets are Liquid code that can be included in other Liquid files.
Now you might be asking…
Isn’t it just the same when you use the Theme API?
Yes, you’re absolutely correct. However, the difference is that when you use App Snippets instead of Theme API, Shopify store owners won’t finally need to remove liquid files in Shopify themes.
It’s a relief not just for the developers but also for the online store owners.
But… You will still have to insert one line of code to render your liquid files in their theme. Yep. But that’s better than writing a long code.
How To Create App Snippets
In this guide, we’ll take a look at how to create app snippets in Shopify using PHP. We’ll also create a liquid file that we’ll render in our development store.
If you’re new to Shopify app development, we suggest reading our complete guide on how to develop Shopify apps using PHP or Laravel.
Let’s start by creating the snippets.
Log in to your Shopify Partners account, go to the apps page, and select your app.
Then select Extensions.

We need to access the Online Store tab and so if you don’t have it beside the Shopify admin tab, then click the Manage extension areas.

In the Manage extension areas, scroll down and look for the Online Store section. On its right, click the Enable extension area.

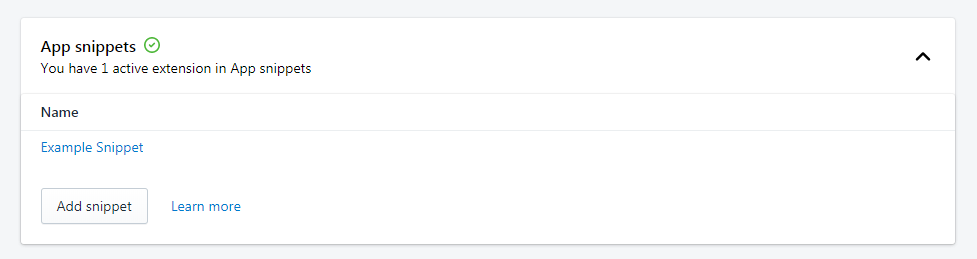
Then, go back to extensions page and you should find the Online Store tab.

Scroll down and look for App Snippets. Then click Add Snippet.

In the Create snippet page, enter a snippet title.
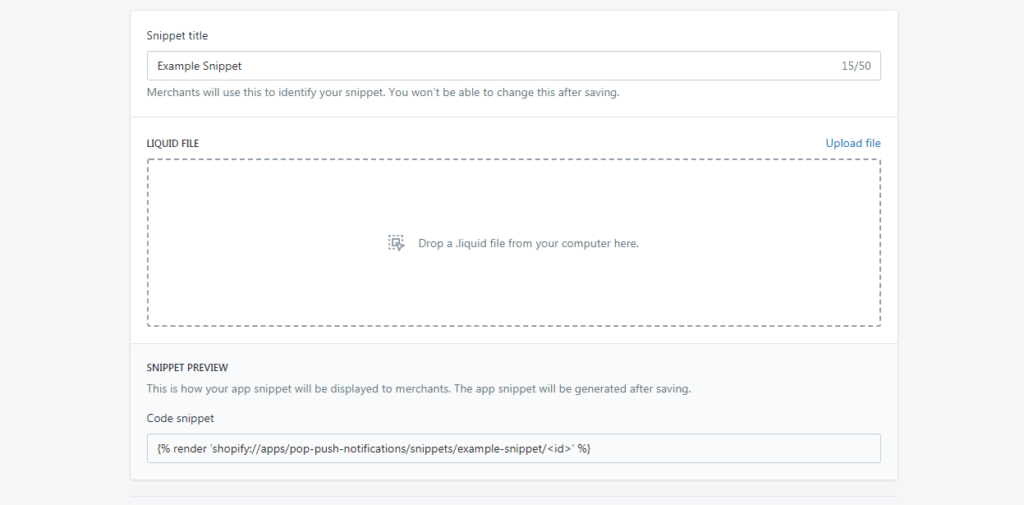
Notice that it ask us to drop a liquid file.
We’ll have to upload a liquid file and this is the liquid file that the app will be importing to Shopify stores. So for the sake of making this guide as simple as possible, we’ll create a very short liquid file that only displays an HTML.
Creating a Liquid File
Open your text editor and save the following code as snippet_test.liquid
<div>
<h1>This is an example Snippet</h1>
</div>
Code language: HTML, XML (xml)
Once you have created the file, upload the file to the create snippet page.

Underneath the form, you should see a code snippet that looks like this.
{% render 'shopify://apps/example-app/snippets/example-snippet/<id>' %}
Code language: HTML, XML (xml)
This code is what you will be using to import the file into Shopify stores.
Now, save the snippet.
Using the App Snippet
For us to be able to use this app snippet, we’ll have to create a development store with a Developer preview enabled.
Once again, this feature is still in beta and will not work on online stores.
To create a development store, navigate to your Store pages and click the Add Store button.

For store type, select Development store.
Fill out the form and right on the Developer preview section, tick the checkbox to enable the Developer preview. This should give you a dropdown to select Online store design experience.

Hit save.
Navigate back to your Store page and log in to your development store with Online store design experience enabled.

Once you’re logged in, install the app (with the snippet applied/enabled) into your development store.

Testing the Snippet
There are two ways to test if your snippets are working.
The first one is by using the Theme API.
Obviously, using Theme API is your only way to push your code to Shopify store’s theme files but since snippets are still on beta. You can test your snippet by just going to your theme files.
That’s the second way of testing your snippets. It’s by editing your liquid files and adding the snippet code into your theme.
Let’s try that.
Under the Sales Channels, select Online Store and navigate to your themes page.
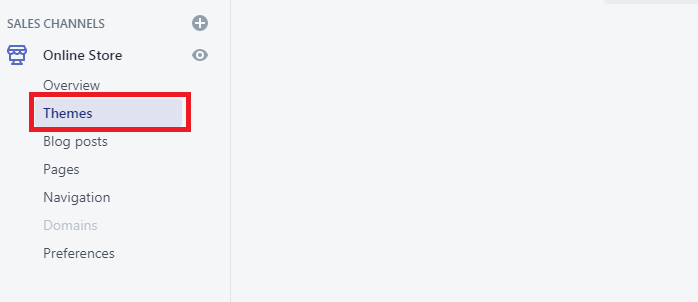
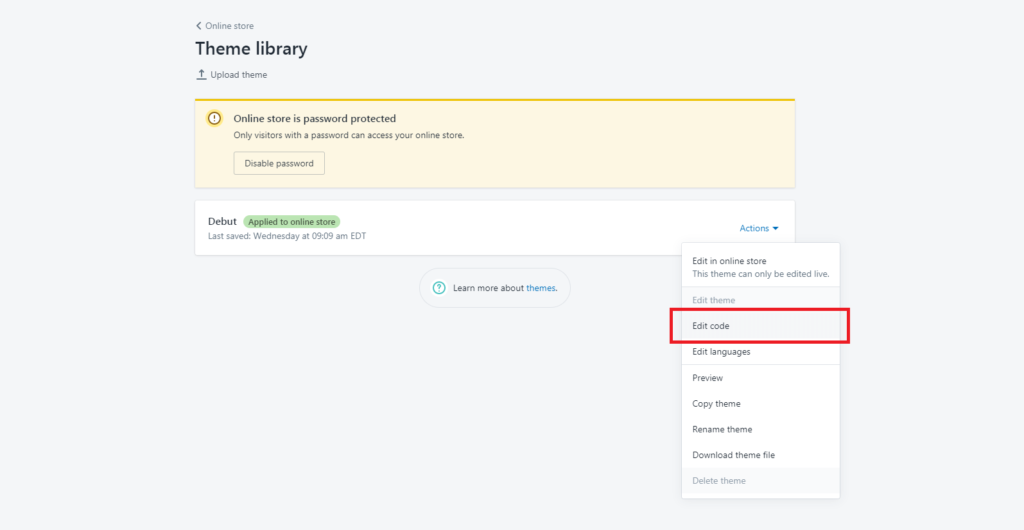
In your Theme library, select the theme that the store is currently using then select Action and click on Edit Code.
Then, look for the theme.liquid and paste the snippet code right at the top of the script like below, for example:
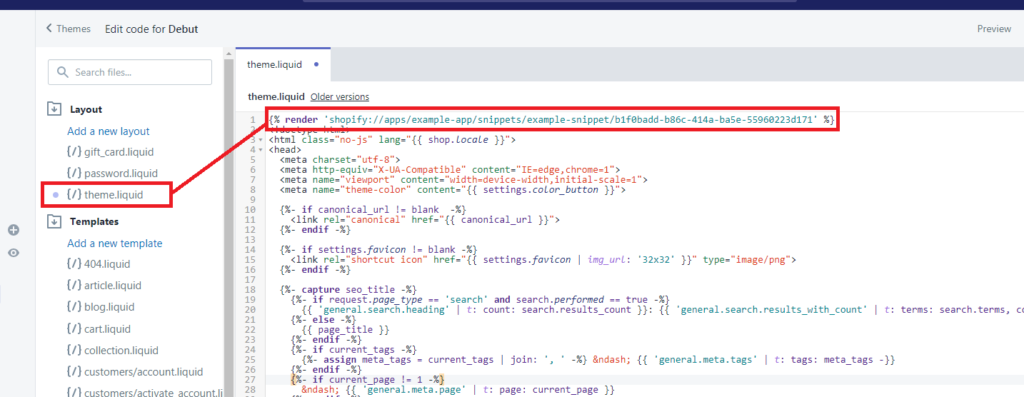
If you save the script and check your store, you should be able to see that the snippet is working like below.

Awesome! Now you can start customizing your snippet codes and update it directly with Shopify.
Removing App Snippets on Uninstallation
With app snippets, you don’t really need to worry about the removal of your scripts from Shopify stores. App snippets will do it all for you.
But like we said in the beginning, the snippet code that we added to the theme.liquid, it will stay until the store owner removes it themselves. So it’s better to always add a note/comment that the snippet code came from your app and they should remove it once they uninstall your application.
But hey! App snippets are still on beta so who knows? Maybe Shopify will provide a way to make it happen.
Conclusion
Shopify app development has been there since the very beginning and Shopify always provide updates not just to their API but to the entire software. Now that they’re working on App snippets, Shopify developers will probably start using webhooks and other API less.
8 Less Expensive Shopify Alternatives To Try in 2020
Let’s face it, Shopify is one of the best e-commerce platforms for creating an online store and selling products online. However, there’s no denying that there are still drawbacks to Shopify like expensive transaction fees, lack of SEO tools, and inability to use other markup languages.
Luckily, there are Shopify alternatives that are quite cheaper compared to Shopify.
Top 8 Best Shopify Alternatives in 2020
Today, we’ve listed our best top 8 Shopify alternatives that are less expensive and more powerful than Shopify for your eCommerce needs.
BigCommerce

Introducing in the #1 spot, BigCommerce. BigCommerce is one of the leading e-commerce platforms for enterprise brands. It provides a highly extensible SaaS solution and robust security to help your business so you can focus more on generating sales and less on monitoring and maintaining your business.
We genuinely believe that BigCommerce is one of the big competitors of Shopify. It is fast, secure, and has better SEO service compared to Shopify. But when it comes to BigCommerce vs Shopify, which is completely better?
We’ve done so many research, and we can tell you right now that Shopify is still better than BigCommerce, but don’t go yet! That don’t mean that Shopify is the perfect platform for everyone. There are BigCommerce features that Shopify currently don’t have and that is something that you could consider.
When you start using BigCommerce, you can expect its ease of use to be as good as Shopify. The only difference is BigCommerce has the most built-in features of any e-commerce platform.
Another difference between Shopify and BigCommerce is their markup languages, by default Shopify has their own language which is Liquid. But with BigCommerce, you can customize your store using HTML and CSS. This is an advantage if you have technical skills.
As we have said earlier, BigCommerce offers features such as SSL certificate to protect your store and validates it as a safe website for processing payments.
If you are looking for a cheaper e-commerce platform, we highly recommend you to choose BigCommerce. BigCommerce offers better value for money compared to Shopify. If you look at their pricing tables, you will see that both platforms start at $29 per month. However, BigCommerce offers more features compared to Shopify and that more will save you money.
BigCommerce also offers:
If you’re looking for an e-commerce platform that offers a mad SEO performance then BigCommerce can be your number one option.
Start your free trial now!
Volusion
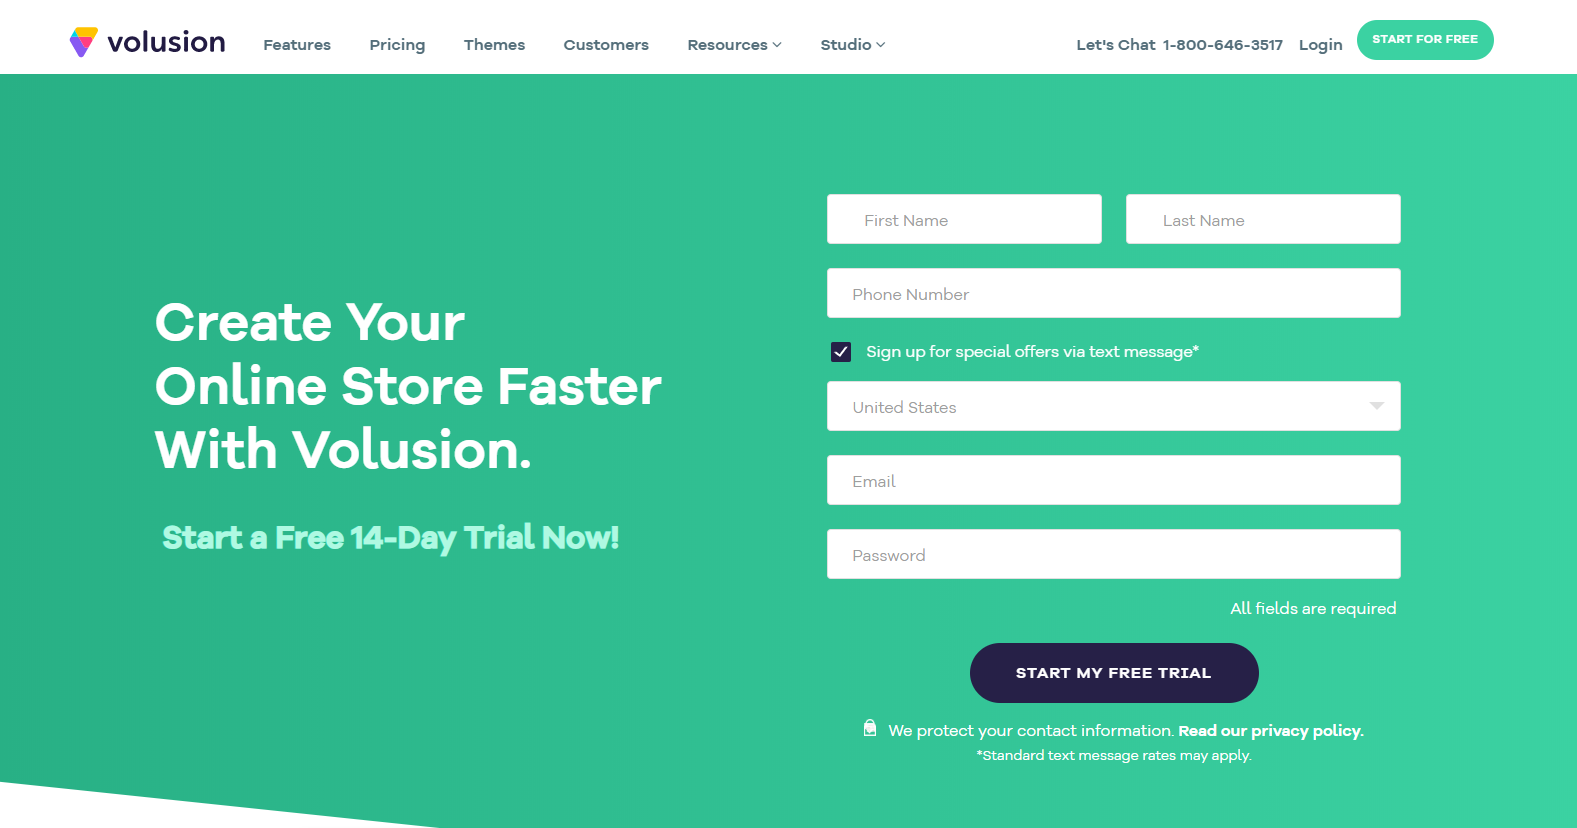
Volusion is a cloud-based e-commerce platform that is popular among small-sized companies and entrepreneurs with entry-level tech skills. If you’re new to e-commerce and you don’t have enough technical skills then Volusion is the perfect e-commerce platform for you.

We have done our own research for Volusion and we can 100% say that Unfortunately, Shopify is still better than Volusion. Sure, unlike Shopify, Volusion offers “no hidden transactions fees” which means all of your earnings are 100% yours.
However, in our OWN experience, Volusion offers bad business practices. They will raise up your fees without letting you know and customer services are completely bad.
Our experience could be different from what you can experience so we are not discouraging you from trying Volusion. If you are still interested in using Volusion, try their 14-day free trial.
Bigcartel
Next up is Big Cartel. Most of the entrepreneur gets excited whenever they hear Big Cartel. Why? One of the reasons is because it’s free (If you have less than 5 products) and it cheaper compared to Shopify.
Bigcartel is mostly made for artists so if you like making designs, pottery, paintings, and so on then Big Cartel might be a good option for you. Bigcartel is also very easy to use. Thanks to its simple interface, you can create store in less than 3 minutes.
Unlike its competitors, Big Cartel comes with features that can help your marketing efforts. Big Cartel makes it very easy to connect your store with Facebook. With Big Cartel’s Facebook app, you can easily sell your products directly from your Facebook page. This is an advantage especially if you have a good amount of followers on Facebook.
If you ask us which one is better. Shopify vs Big Cartel. We would still recommend Shopify. However, if you’re only planning on making a small online business then Big Cartel can be a good option for you.
In a comparison between their prices, Big Cartel is much cheaper, only if you sell less than 25 products per month. Big Cartel’s pricing is divided into three.
Currently, Big Cartel offers the following features:
Big Cartel might not offer all the features of its competitors, but honestly, we genuinely feel like they’re only targeting clients who are looking for arts and crafts niche. If you are an artist planning on selling just a few products and do not have enough technical skills then Big Cartel might be the right e-commerce platform for you.
Try Big Cartel now for free!
WooCommerce

WooCommerce is the next most talked about e-commerce platform and one of the reasons why is that it is free. Technically it is free but there are things that you’re gonna need to pay for but that’s why merchants liked WooCommerce.
Another thing that you may want to consider is that WooCommerce offers more plugins compared to Shopify. With WooCommerce, you won’t need to hire developers just to make you plugins. If you like SEO tools, you can just look it up and install it to your store. If you like to add more features in your storefront, there are a ton of storefront plugins that you can install.
However, if you are a serious entrepreneur who likes to grow then we suggest you stay with Shopify. Unlike Shopify, WooCommerce is NOT reliable and not only that, you still have to pay for your hosting. Sure, you can find cheap hostings everywhere but if you use Shopify vs WooCommerce, you won’t have to set up SSL, Google Analytics, Inventory Tracker, etc.
The next consequence with WooCommerce is it’s not as easy to use as other platforms and things can or will absolutely go wrong. This is because WooCommerce is reliant to your hosting. If your hosting is not secure enough, your business might get hacked and WooCommerce will not send support for that. If you want to use WooCommerce, you will need a bit of technical understanding. Like what we said previously, you will personally set up everything from scratch.
Read: Why You Should Use WordPress To Build E-Commerce
Magento

Next up is Magento. Just like WooCommerce, Magento is an open-sourced platform which means it is free to use and deeply customizable. When we said it is like WooCommerce, we meant that you also need to get yourself a host or a website where you can install Magento.
Now, what makes Magento vs WooCommerce different? To begin with, Magento is a content management system (CMS) just like WordPress but it is built specifically for e-commerce. On the other hand, WooCommerce is a framework that is built as a cherry on top of WordPress.
In conclusion, WooCommerce requires WordPress to be installed before you can use WooCommerce while Magento can stand on its own.
If you have technical skills, Magento might be a good option for you. Currently, Magento offers the following features:
In our experience with Magento, what we liked about their platform is how you have so much control to your store both front-end and back-end. Their support is always great, they provide 24×7 support to help you diagnose and solve occurring issues within your site. However, using Magento can be a little bit complicated and confusing at the beginning but if you put an effort and learn everything about Magento, everything will pay off eventually.
If you’re an entrepreneur who is looking for an easy to use interface and you don’t have much time to learn technical skills then we recommend you to stay with Shopify or WooCommerce.
PrestaShop

Introducing PrestaShop, another freemium e-commerce platform just like WooCommerce and Magento.
PrestaShop, according to them, is an efficient and innovative e-commerce solution that offers all the features you need to create an online store and grow your business.
PrestaShop is also customizable just like other platforms. It can also help you manage your products, orders, and statistics. You may also represent your store in different languages, thanks to its global e-commerce feature.
If you’re a big fan of SEO and marketing then PrestaShop might be a good option for you as it can help you:
Now, let’s talk about the difference between Shopify vs PrestaShop. Like what we mentioned, PrestaShop is free, technically, but you still have to pay for your host and security features like SSL.
Now the question is, is it really a good alternative for Shopify? It depends. PrestaShop and other open-source solutions are built for developers. So if you are not technically equipped especially HTML, PHP, and CSS, then you may need to take some time to learn or you may need to hire a developer.
Another drawback with PrestaShop is how expensive their customer support is. Imagine, for only 3 hours of support time you’ll end up paying $250 per month. Now, you might say that you will barely get issues but trust us, every platform will give you an issue and if you don’t know how to fix them yourself then your only option is to call the customer support team.
Again, we’re not discouraging you to use PrestaShop, if you are still interested you may download PrestaShop.
Weebly

If you’re looking for an e-commerce platform that is easy to use then Weebly is a great alternative for Shopify. Though Weebly is still far from what Shopify can provide, Weebly’s pricing is a bit cheaper than Shopify, so if you’re totally short on money then Weebly might be your good option.
To be honest, Weebly is nothing compared to Shopify but it has the potential to become an e-commerce platform.
First of all, Shopify is an actual e-commerce platform, whereas Weebly started as a website builder.
Shopify is fully loaded with awesome capabilities that can support anyone to get started on their business without issues.
Weebly, however, offers a lot less in terms of e-commerce. They offer less payment and shipping options and very basic analytics.
In terms of security, Weebly is great! They give you SSL out of the box without extra fees.
Both Weebly and Shopify offers a free trial. 14-day trial for Shopify and 30-day money-back guarantee for Weebly.
Try Weebly for free.
Squarespace
Squarespace is the all-in-one solution for anyone looking to create a beautiful website. Yes. That’s true. If your goal is to make your store beautiful instead of getting more sales then Squarespace is your best option.
Seriously though, Squarespace makes sleek websites but is it enough to choose them to run an online store? Just like Weebly, Squarespace is a website builder dedicated to people who like to own beautiful websites.
If you’re planning on building a blog and you want to add a store as a bonus then Squarespace is your great option. Selling products with Squarespace is often fast and you can sell both physical and digital products.
When it comes to SEO, we experience it to be not so great compared to other platforms. So if you like SEO then we regret to say this, Squarespace is not great for SEO.
Ease of use? We can say that Weebly is much easier to use compared to Squarespace. Their user interface is a bit complicated for beginners.
Again, we don’t discourage you to try Squarespace.
Conclusion
After reading and browsing through the list, hopefully, you’ve found the Shopify alternative that you’re looking for. Personally, I would pick between BigCommerce or WooCommerce especially if you don’t really like to use Shopify. These two are honestly the best alternative for Shopify in 2020.
How to Create Custom Shopify Template Files using Theme API & Asset API
Some of the Shopify apps that you have or may have installed in your store can create files that can help these apps function properly.
Take our Product Warnings app as an example.
Whenever you install this app, the app will create files that allow the store to display product warnings or popups.
So… How do we actually manage to do that?
The answer is actually really simple.
It’s by using Shopify’s Theme API and Asset API.
In this tutorial, we’re gonna be taking a look at how to create custom template files using Shopify’s Theme API and Asset API.
What is Theme & Asset API?
Let’s talk about the Theme API first. Theme API is part of the Shopify API that allows you to access the themes inside the Shopify store.

Shopify stores can have as many themes as possible that’s why Theme API is very useful for targeting the theme that is being used by the store.
Now, what about the Asset API?
Asset API is an API that allows you to create, update, or delete template files inside the theme of your choice. That’s why these two APIs are mostly used together especially if you’re customizing the theme.
Getting Started
For this tutorial, we’ll assume that you have already set up your Shopify app. Make sure you have your access token and the Shopify script files that we’re to use for this tutorial. Otherwise, we recommend learning first how to set up your Shopify app from scratch using PHP or feel free to watch the following tutorial from our YouTube channel.
Accessing the theme
Before we can create assets or template files, we have to make sure that we are accessing the right theme in which we want to upload our new file. To do that, we’ll be using Theme API.
Open your index.php and update its code to the following:
<?php
require_once("inc/functions.php");

$requests = $_GET;
$hmac = $_GET['hmac'];
$serializeArray = serialize($requests);
$requests = array_diff_key($requests, array( 'hmac' => '' ));
ksort($requests);

$token = "YOUR_ACCESS_TOKEN_HERE";

$url = parse_url( 'https://' . $requests['shop'] );
$host = explode('.', $url['host'] );
$shop  = $host[0];

$theme = shopify_call($token, $shop, "/admin/api/2020-04/themes.json", array(), 'GET');
$theme = json_decode($theme['response'], JSON_PRETTY_PRINT);

echo print_r($theme);
?>
Code language: HTML, XML (xml)
For the code above, all we did is we used the Theme API’s GET endpoint to know what are the themes inside our store.
So, if we save the script and test our app. We should be able to see all the themes installed in our store.

Now that we have the data that we need, the next thing that we’re going to do is to loop through this array and find which theme is the theme that the store is currently using.
Open your index.php once again and update its code to the following:
<?php
require_once("inc/functions.php");

$requests = $_GET;
$hmac = $_GET['hmac'];
$serializeArray = serialize($requests);
$requests = array_diff_key($requests, array( 'hmac' => '' ));
ksort($requests);

$token = "YOUR_ACCESS_TOKEN_HERE";

$url = parse_url( 'https://' . $requests['shop'] );
$host = explode('.', $url['host'] );
$shop  = $host[0];

$theme = shopify_call($token, $shop, "/admin/api/2020-04/themes.json", array(), 'GET');
$theme = json_decode($theme['response'], JSON_PRETTY_PRINT);

foreach($theme as $cur_theme) {
	foreach ($cur_theme as $key => $value) {
		if($value['role'] === 'main') {
			echo $value['name'] . ' is the theme that i am currently using';
		}
	}
}

?>
Code language: HTML, XML (xml)
For the update above, all we did is we created nested foreach functions to access the themes inside the $theme variable. Each theme will have to go through the if statement that will check if the theme in the current loop is the theme with a role value of main.
Once it’s found, the echo will display the text and will confirm to us that the main theme is found.

Awesome! Now it’s time for us to create the files.
Creating the template files
Now that we have access to our main theme, let’s start creating the template file using Asset API.
Open your index.php once again, and update its code to the following:
<?php
require_once("inc/functions.php");

$requests = $_GET;
$hmac = $_GET['hmac'];
$serializeArray = serialize($requests);
$requests = array_diff_key($requests, array( 'hmac' => '' ));
ksort($requests);

$token = "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";

$url = parse_url( 'https://' . $requests['shop'] );
$host = explode('.', $url['host'] );
$shop  = $host[0];

$theme = shopify_call($token, $shop, "/admin/api/2020-04/themes.json", array(), 'GET');
$theme = json_decode($theme['response'], JSON_PRETTY_PRINT);

foreach($theme as $cur_theme) {
	foreach ($cur_theme as $key => $value) {
		if($value['role'] === 'main') {
			$theme_id = $value['id'];
			$theme_role = $value['role'];

			$asset_file = array(
				"asset" => array(
									"key" => "sections/weeklyhow.liquid",
									"value" => "<h1>Hello World!</h1>"
								)
			);

			$asset = shopify_call($token, $shop, "/admin/api/2020-04/themes/" . $theme_id .  "/assets.json", $asset_file, 'PUT');
			$asset = json_decode($asset['response'], JSON_PRETTY_PRINT);

			echo print_r($asset);
		}
	}
}

?>
Code language: HTML, XML (xml)
After accessing the main theme, we created two variables, one is for the theme ID and one is for the role of the theme. (Although you don’t really need the role just to create a template file. It’s just to let you know that you can access more data inside our theme API.)
The next line is we created an associative array. Its first index should always be the “asset” pointing to another associative array that contains the key and the value indexes.
Make sure you’re following the right format.
Now the question is, what should be the value for the key and the value index?
The value for the key should always be following the format “folder/filename.filetype“.
Keep in mind that you can NOT create your own folder using the API. So, you’re most likely to only access the templates/sections/snippets folder.
After creating the associative array, just use the PUT Endpoint of the Asset API. Just don’t forget to concatenate the ID of the main theme.
By saving the script, you should be able to see the response from the API call.

And if you check the files inside your main theme, you should be able to see your file created.

Conclusion
So there you have it! You can finally start creating your own template files and customize your Shopify stores using your own Shopify applications. FYI, there are a lot of things that you can do with this API.
A good example of this is by creating a template for your collections page by clicking one button. Or, customize your index liquid file and adding an announcement bar. The sky is the limit!