Do you want to learn Liquid programming so that you can customize or understand the codes of your Shopify theme? If yes, then you have come to the right place!
Welcome to the Shopify Liquid Programming course! In this course, my goal is to help you understand what is Liquid like what it does, and how to use it.
We’re going to cover the following features of Liquid:
Objects
Tags
Filters
If you are a Shopify store owner, and you’d like to understand how a Shopify store is running, then learning Liquid can be extremely helpful.
One of the biggest mistakes that people make is that they customize their Shopify theme aimlessly. What they usually do is Google the features that they’re looking for, then they will copy a code from someone else and apply it to their Shopify store without understanding the code that they copied and pasted.
This can be an issue since they don’t understand the objects, tags, and filters.
That’s why I’m here to help you avoid making that mistake!
Now, what are the things that you need to know before taking this course?
To get the best experience out of this course, it’s highly recommended that you know how to use Shopify.
What I mean is, you should know your way around Shopify from admin, to settings and to storefront.
Next, it’s important that you know at least the basics of programming (Like the operators, or data types). Though I will do my best to explain what is going on in each lessons so that even if you have less knowledge about programming, you’ll be able to understand the code.
In addition, for each lessons, I will provide resources related to the lessons (e.g. PDFs or articles) so that you can use those resources to learn more about Liquid.
Another thing that you can do is to post questions in the QnA section. So if you have questions, you can post them in the QnA.
I will also include in this course, quizzes or questionnaires so that you can test yourself if you can finally use Liquid.
So are you ready to learn Liquid? If yes, join me and I will see you on the other side.
Shopify just recently updated their Shopify online experience and now they call it “Online Store 2.0”.
With this update, Shopify merchants can now customize their entire online store using sections & blocks. This opened a lot of doors not just for Shopify app developers but also for Shopify theme developers because now, you can add cool sections and blocks to the most commonly used pages like products page, collections page, blog page, etc.
If you’re a Shopify theme developer and you don’t know yet how to create a Shopify theme for Online Store 2.0, then this is the best time to learn because Shopify is now accepting Shopify themes to be listed on their Shopify Theme Store!
This means you can make money by selling your Shopify themes! So are you interested to learn more?
In this course, we’re going to learn how to create a Shopify theme for Online Store 2.0 using Shopify CLI with the help of TailwindCSS to design a cool online store.
In this course you will learn:
How to set up your development store using Shopify CLI 3.0
Using TailwindCSS to design a Shopify theme
Create navigational bar
Create collection page
Create product page
Create customer page
Create cart page
and more!
Online Store 2.0 (JSON Templates)
Shopify CLI
Shopify GitHub Integration
Schema Settings
Search Engine Optimization (SEO) for pages like articles, products, etc.
Liquid language (Referencing asset files, loops, conditional statements, Shopify objects, filters, and many more)
Customer Templates
If you think you’re ready to start, signup now, and let’s create the best Shopify theme together!
Becoming a Shopify developer can be extremely challenging and frustrating but with our tools and top-quality courses, you can become a Shopify expert in a short period of time. Join our community!
Help Shopify Merchants
Become a Shopify expert and help merchants grow their businesses.
Master Web Development
Learn new skills like Liquid and web programming to become a web master.
Build Your Own Business
Learn Shopify development and create web applications that you can sell online.
Become a Shopify Developer Pack!
Learn how to create Shopify apps and themes through the following highly-rated courses.
Learning online can sometimes be boring and slow but it doesn’t have to. With WeeklyHow, you can learn in a fun way with our well-produced lessons.
Learner’s Success Stories
Real feedbacks from our students.
Vu Vo
Bernard really helped us get exposed to the fundamentals of Shopify theme code and a few pitfalls that you may run into while developing Shopify themes
Gopal Satam
Amazing! Great course on Shopify Theme Development. After watching all the lessons so far I found learning Liquid language is quite enjoying and easy to understand. Thanks Bernard!
Jessica Doram
I learned a lot from Bernard’s course. I was from 0 Shopify knowledge to expert dev in just a few days. Job well done, thanks for sharing your knowledge!
Shopify Themes are one of the most important parts of a Shopify store. In order for a Shopify store to work, merchants have to install and use at least one Shopify theme to display their products.
If you’re not a developer, you might find it difficult to create a custom Shopify theme. However, does that mean you can’t create a custom Shopify theme?
Well, of course not!
Creating a custom Shopify theme is honestly very easy! Thanks to the libraries created by Shopify.
That being said, how do you create a Shopify theme?
In this article, we’ll learn about Shopify theme development and how to create a custom Shopify theme using ThemeKit step by step.
We have a Shopify Theme Development Course! Be one of the first students!
Are you looking for an in-depth guide on how to create Shopify themes? Click the enroll button now and become a Shopify developer!
If you’re looking for a video version of this article, you can watch the following video instead.
Getting Started
In order for us to be able to create a Shopify theme, we will need to do the following:
Create a development store
Create a private app and generate API credentials
Install ThemeKit
Create a Shopify ThemeKit project
So with all that being said, let’s start and create a Shopify theme.
Building a Shopify theme using ThemeKit
Let’s start off this tutorial by creating a development store. We’re going to need a development store to create a private Shopify app and generate API credentials. If you already have an account, you can skip this step and proceed to create a private app.
Once you have logged in, go to stores page and create a new store.
By clicking the Add store button, Shopify will ask you to pick whether it’s a development store or a managed store. Pick development store.
After, fill-up the form and click Save.
Create a private app
By creating a development store, you should be automatically logged in to your development store.
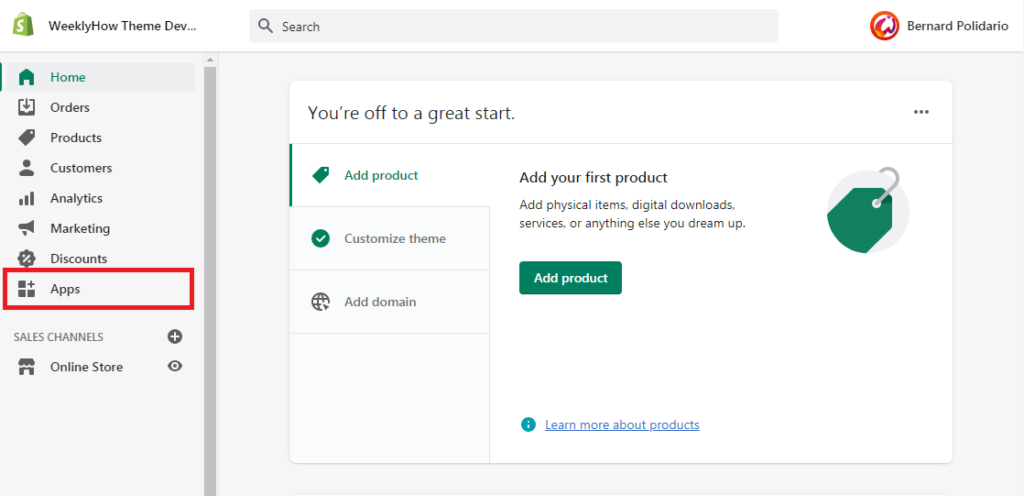
Go to the apps page.
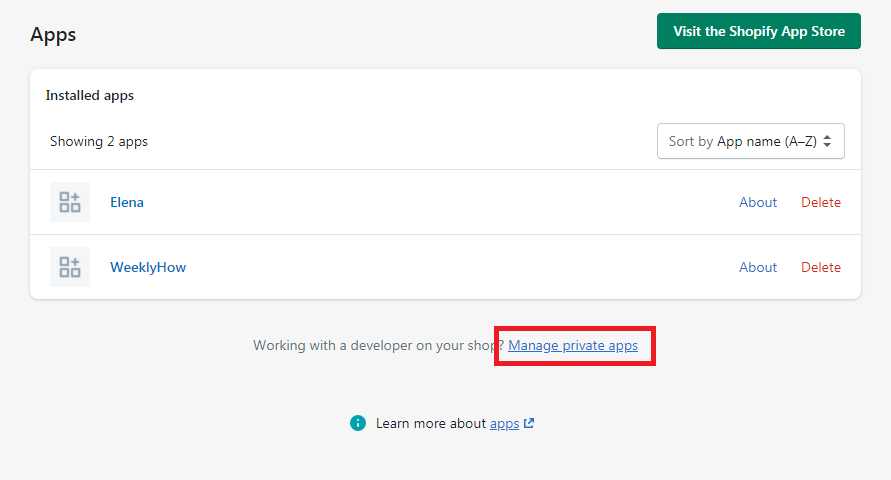
In the apps page, look for the link that says Manage private apps. It’s usually located underneath of the installed apps card.
By default, private apps are disabled so you’ll have to enable it by clicking the button shown like below.
By clicking the said button, Shopify will ask you to agree to their terms of use and conditions. Read all of them if you have time. Otherwise, check all the checkboxes and click the enable private app development button.
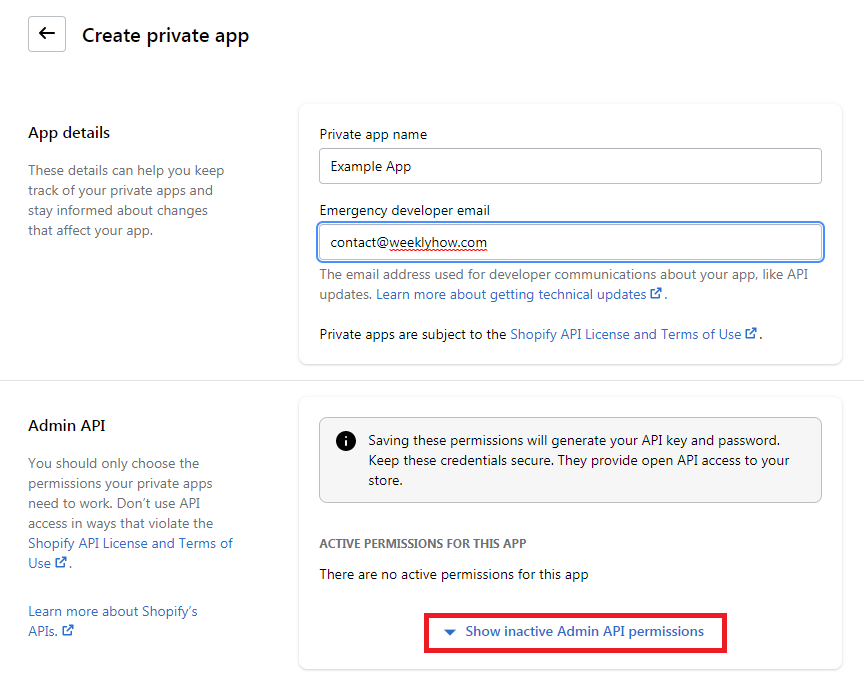
After enabling the private app development, you should be able this time to create a private app.
Fill-up the following form and click the Show inactive Admin API permissions and look for the Themes.
Set the theme API to Read and write.
Once set, click the save button and that should show you a modal. Just click the Create app button.
You should have an Admin API credentials like below.
Installing ThemeKit
Before we can start creating a Shopify theme project, we need to install and set up our local working environment. The first step is to install ThemeKit.
What is ThemeKit?
ThemeKit is a cross-platform command line tool used for building Shopify themes. With Theme Kit, you can use your own development tools to interact with the Shopify platform in the following ways:
Use workflow tools like Git to work with a team of theme developers.
Upload themes to multiple environments.
Watch for local changes and upload them automatically to Shopify.
Work on Linux, macOS, and Windows.
How to install ThemeKit
You can install ThemeKit using the following commands on the following operating systems:
Linux
If you’re using Linux as your operating system, you can use the following command using your terminal.
If you’re using MacOS as your operating system, you can use the following command using Homebrew.
$ brew tap shopify/shopify
$ brew install themekitCode language:Bash(bash)
Windows
If you’re using Windows as your operating system, you can use the following command using your terminal. Make sure you have Chocolatey installed in your system.
choco install themekitCode language:Bash(bash)
Creating the ThemeKit project
Now that we have both ThemeKit and API credentials, we can finally start creating a new ThemeKit project. To create a new project, run the following command in your terminal:
theme new --password=[YOUR_API_PASSWORD] --store=[YOUR_STORE.myshopify.com] --name=[NAME OF YOUR THEME]Code language:Bash(bash)
By running the above command, ThemeKit will start creating the template files for your new Shopify theme like below:
Now, to ensure that the changes that you make to your theme files are sent to your development store, you can run the following command:
theme watchCode language:Bash(bash)
If you open your development store, you should have the following:
As you can see, your store looked super empty and that’s where you can finally start working on your Shopify theme project.
Next steps
We have finally created a Shopify theme project, what’s next? Well, your next step is to start learning how to liquid programming and customize the template files created by ThemeKit.
Now, building a Shopify theme is like creating a WordPress theme, you have to work on each template files to make sure that all parts of a Shopify store are accessible by the users.
If you’re interested to learn more about Shopify Theme Development, you can enroll to our course and learn how to create Shopify themes from start to finish using ThemeKit.
Due to the pandemic, a lot of people are trying to learn how to create an online store with Shopify. These new merchants are looking for Shopify themes that are effective enough to bring them sales. Why not become one of the new Shopify developers and create an amazing Shopify theme from scratch?
In this course, we’re going to learn how to create a Shopify theme using ThemeKit and Liquid. We’re going to cover all of the important parts of Shopify Theme Development so you will be ready to create your very own Shopify theme as soon as possible.
In this course you will learn:
Private apps for theme development
Liquid files
Theme assets
Designing your own theme
Adding translations to your theme
Liquid language (Referencing asset files, loops, conditional statements, Shopify objects, filters, and many more)
AJAX API (Getting products data, Sending products to the cart, etc)
Online Store 2.0
If you think you’re ready to start, signup now, and let’s create the best Shopify theme together!
So you have been developing Shopify apps, but you’re not creating the Shopify apps using React or Node.js. So in other words, you can NOT use Polaris. Now you’re wondering… “How am I going to design this app? and I don’t want to use Bootstrap anyway”.
Well, to be fair though, I’ve been in that very same spot and that’s why I am writing this article to guide you on how to design Shopify apps without using or installing Polaris to your Shopify app projects.
Video Tutorial
If you prefer watching video tutorials, the here is the video version of this article.
Getting Started
To get started, I will assume that you have followed our Shopify app development series and you have your own undesigned Shopify app. However, if you have nothing but installed Shopify app in your development store, then feel free to copy the following code and paste it into your index.php file. That being said, for this article, we will be using PHP.
<?phprequire_once( "inc/functions.php" );
$shop_url = $_GET['shop'];
$access_token = "ENTER YOUR SHOPIFY STORE ACCESS TOKEN";
/*** Install Shopify App*///header('Location: install.php?shop=' . $shop_url);//exit();echo"Hello " . $shop_url . '<br /><br />';
echo"The following table will list down all of your items from your store. You can delete an item using the action column";
$products = shopify_call( $access_token, $shop_url, "/admin/api/2021-01/products.json", array(), 'GET');
$products = json_decode( $products['response'], true );
foreach( $products as $product ) {
foreach( $product as $key => $value ) {
$image = '';
if( count( $value['images'] ) > 0 ) {
$image = $value['images'][0]['src'];
}
echo'<img src="' . $image . '" width="60"><br />';
echo $value['title'] . '<br />';
}
}
?>Code language:PHP(php)
The code above should give us the following output:
Design Shopify Apps without Polaris
If you’re developing Shopify apps and you’re not using React, then obviously, you won’t be able to use Polaris. Luckily, there is a free CSS framework that you can use for designing Shopify apps and it’s called Uptown CSS.
Navigate to their official website and click the Download CSS button. We’re going to import this into our project.
Once you have downloaded the css file, import it to your project. I will put it inside of my css folder like below:
Since we need to import the CSS, we’ll have to create the skeleton for our HTML. Update your index.php to the following:
Once you saved your files and open your app, your app should update to something like below:
Awesome! That means we’re making a progress and Uptown CSS is working! Let’s continue and create the container and sections for our Shopify app.
Open your index.php and copy the following code.
<?phprequire_once( "inc/functions.php" );$shop_url = $_GET['shop'];$access_token = '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';/** * Install Shopify App *///header('Location: install.php?shop=' . $shop_url);//exit();?><!DOCTYPE html><htmllang="en"><head><metacharset="UTF-8"><metaname="viewport"content="width=device-width, initial-scale=1.0"><title>WeeklyHow</title><linkrel="stylesheet"href="css/uptown.css"><style>body {padding-top: 30px; }</style></head><body><main><section><article><divclass="column twelve"><?phprequire_once("header.php");?></div></article></section><section><article><divclass="card has-sections"><divclass="card-section"><?phprequire_once("product_table.php");?></div></div></article></section><footer><articleclass="help"><span></span><p>Learn more about <ahref="#">this app</a> at <ahref="#">WeeklyHow</a> Help Center.</p></article></footer></main></body></html>Code language:HTML, XML(xml)
In the code above, we created the basic structure of our app. Now, if you’re wondering what is the basic structure, you may use the following code as a reference:
As you can see in the code above, it consists of three parts: header, section, and footer.
Now we never really used the header tag in our code so if you wish to add the header tag, feel free to do so. But, personally speaking, I never truly liked how it looks. (shrugs)
Now noticed that we have created two files: header.php and product_table.php.
For the header.php file, this is the code:
<h6><?phpecho"Hello " . $shop_url . '<br /><br />'; ?></h6><divclass="alert warning"><dl><dt>Read me</dt><dd><?phpecho"The following table will list down all of your items from your store. You can delete an item using the action column <br/><br/>";?></dd></dl></div>Code language:HTML, XML(xml)
So in the code above, we only retrieve the products through Product API and loop through each product, and render them using table rows. If you want an in-depth guide on how to get Shopify products using Shopify API, you may click the following button to learn more about it.
By saving all of your files, you should have the following output:
Conclusion
There you have it! You have designed your Shopify app without Polaris.
Now, what I really like about this CSS framework is that it doesn’t need jQuery or other JavaScript framework. It’s a very independent framework and can be easily customize especially if you are familiar with CSS or SASS. So, what do you think? Do you think this is a great CSS framework? Let us know in the comments below.
Due to the pandemic, a lot of people are trying to learn how to create an online store with Shopify. These new merchants are looking for Shopify themes that are effective enough to bring them sales. Why not become one of the new Shopify developers and create an amazing Shopify theme from scratch?
In this course, we’re going to learn how to create a Shopify theme using ThemeKit and Liquid. We’re going to cover all of the important parts of Shopify Theme Development so you will be ready to create your very own Shopify theme as soon as possible.
In this course you will learn:
Private apps for theme development
Liquid files
Theme assets
Designing your own theme
Adding events to your theme
Liquid language (Referencing asset files, loops, conditional statements, Shopify objects, filters, and many more)
If you think you’re ready to start, signup now and let’s create the best Shopify theme together!
Are you thinking of becoming a Game Developer? or are you just wondering how game development works? In this article, we’ll be giving you ideas about game development and its importance of learning it.
Research suggests that playing video games can improve regions of your brain. Which are responsible for your attention and visuospatial skills- and make them more efficient.
Playing video games also helps reduce stress. Though it depends on what type of video game you are currently playing. Most video games are developed to challenge the players, make them feel frustrated, and keep them go play over and over again. These games are called mostly “strategy games”
But what really is a video game?
A video game is an electronic game that involves interaction with a user interface to generate visual feedback on a two- or three-dimensional video display devices such as a TV screen, Virtual reality headgear, or computer monitor.
Video games have been studied seriously for years and have been experimented with by many developers. If you don’t know, there are hundreds of different video games online and offline that players can enjoy. One of the most popular games nowadays is Minecraft. But there are also games that are popular like Grand Theft Auto, and Call of Duty. These video games are sold worldwide and one of the reasons why is because it is enjoyable and truly addictive.
There are many ways to enjoy a video game, one is to use a desktop gaming computer, two is to use a gaming console, and three is to use a mobile device. Of course, those are not the only apparatus that you can use to enjoy a video game but that being said, video games are created for entertainment and that’s all.
So, you might be wondering now…
How do you make video games?
Games are made simply by coding using a certain programming language. However, in this generation, most games are created using a game engine. A good example of this is Unity and Unreal Engine. These two game engines are two of the most used game engine in the game development industry.
Why should I learn game development?
There are plenty of reasons why you should learn about game development and how to create video games. If you enjoy playing games, chances are, you’re going to enjoy MAKING games too.
By learning how to make games, your knowledge will be extended far beyond what you expected. You will learn many programming languages such as C++, C#, HTML5, and JavaScript. You will also be able to learn Android (if you are into mobile games), iOS, and many more.
You should learn about game development because the gaming industry itself is VERY BIG and there’s no doubt that this will be much bigger in the future. There will be no end to this. In other words, your career will have no dead end. In fact, even if you change your career from game development to a different industry like, animation, web, and design, it wouldn’t be much of an issue because you will know most of it in game development.
Game Development consists of parts:
Game Designing – This includes terrain or platform designing, character designing, animations, cutscenes, and many more. So if you try to study game development. You will surely encounter all of this and it’ll benefit you in the future- no doubt.
Game Programming – This is obviously going to be part of your game development journey. To be honest, programming a game isn’t that hard anymore. Since most of the game engines to this day provide documentation about their APIs. So if you encounter a problem or forget a keyword, there will be always a helping hand online. Google is your friend here.
Music – Whoops, did you just say music? Of course! A game is boring without sound effects. So if you study game development, you will surely understand how music design works.
Last words
Learning how to make games can be hard for some people sometimes, but let me tell you that this will be the most fun experience you will ever have. Not only it is a high-paying career but it also gives you knowledge and security that you can use in the future. So if you are thinking of joining this diverse industry. GO! Do it.
When you build a Shopify store, it’s very common that you get customers to ask you for the invoices when they make a purchase. As a merchant, it’s your responsibility to provide that invoice.
There are few Shopify apps that provide invoice printing but what if you wish to create your own? In this tutorial, we’ll learn how to make an invoice app that allows you to print invoices using PHP and JavaScript.
Video Tutorial
If you prefer to learn through a video tutorial, you can watch the following video.
Getting Started
Like in most of our Shopify app written tutorials, we’ll assume that you have followed our Shopify app tutorial series and you are using the same repository/client that we are using here.
Now, for this tutorial, we’re just going to need the following two files:
index.php
orders.php
In our index.php file, we should have the following code:
In the code above, what we just did is to create a very simple table to display the list of orders available from the store using Order API.
Now, notice in line 23 that we have added an anchor tag that uses custom attributes such as data-toggle and data-target. These will be used to open a modal to display the invoice.
For that to happen, we have to make sure that the value of the data-target attribute is unique so we concatenated the order_number.
If we save the scripts and run the app, we should have the following output:
And the HTML output should look like this
So that means, we need to create a modal with an id of #printOrder1001.
We can create a modal, just by inserting the following code in order.php file
First is the header. Second is the content and lastly is the footer.
Let’s take a look at the modal body. Here we added a div tag with a class of card. This div basically forms the template of a very simple invoice. Here we have:
The logo
The invoice number
The client’s information
The payment details
The list of items that were purchased
Other information
…and the Total
All of these data can easily be customized and so feel free to change anything here. Just remember that variables and key names of the arrays must follow what’s from the API.
Next is the footer of the modal, here we have to buttons, the cancel button and the print button.
For the print button, we’ll have to create a javascript to make an on click event and execute a task and that is to print the invoice.
Saving the script should give you the following output:
Printing the invoice
For us to be able to print the invoice, we’ll have to use a plugin that is called printThis.
printThis is an extensive printing plugin for jQuery that allows for printing specific areas or multiple DOM elements. This is perfect since we only want to print what is inside the modal.
To use this plugin, we’ll be using the following CDN:
To use the plugin, all we really need to do is to select a DOM element and use the printThis() function to display the print window.
That’s why if we save our script and run the app, we should have the following output when we click the print button.
Isn’t that awesome?! Now you can easily print invoices and send these invoices to your customers through email.
Conclusion
In this lesson, we have learned how to create an invoice app using Shopify Order API, PHP, and a very powerful jQuery plugin. This is just the basic of making an invoice app. You can make this more useful by adding events such as sending the invoice to customer’s email as soon as the invoice is printed or something more! Feel free to experiment with the tools provided in this lesson.
If you have any questions, feel free to tell us in the comments below and we’ll try to answer.
So you’ve been creating Shopify apps through localhost and you’re thinking of publishing it online so Shopify merchants can install your app to their store.
The issue that you’re having now is which web host provider is the best for your Shopify apps. Well, we’re here to tell you.
One of the best web host providers that you can use for your Shopify apps is Hostinger and part of the reason why is because, unlike other web hosts, Hostinger is allowed to interact with Shopify through XMLHTTPRequest or AJAX. You’re surprised? We are too!
We have tried so many web host providers for our Shopify apps and sadly, most of them failed to take care of our apps!
Of course, there are plenty of reasons why you should pick Hostinger for your Shopify app projects, and today, we’re going to list down all of them.
Why you should use Hostinger for your Shopify apps
If one of your main concerns is your budget, then you’ve come to the right place. Hostinger is one of the cheapest web host services in the market but does that mean it’s bad? no.
Below are some of the features why you should consider using Hostinger for your Shopify app projects.
Compatibility
Not all web hosts can be compatible with Shopify especially if your web host doesn’t have an SSL certificate.
If your website still runs under HTTP, then expect Shopify to deny it.
Luckily, Hostinger offers a FREE SSL certificate so you can always run your Shopify apps without any issue at all.
Well, is that all that makes Hostinger compatible with Shopify for our Shopify app development?
Like what we mentioned earlier, Hostinger allows you to do HTTP requests without being blocked by the CORS policy. Of course, you’ll have to make sure that your header is properly set up.
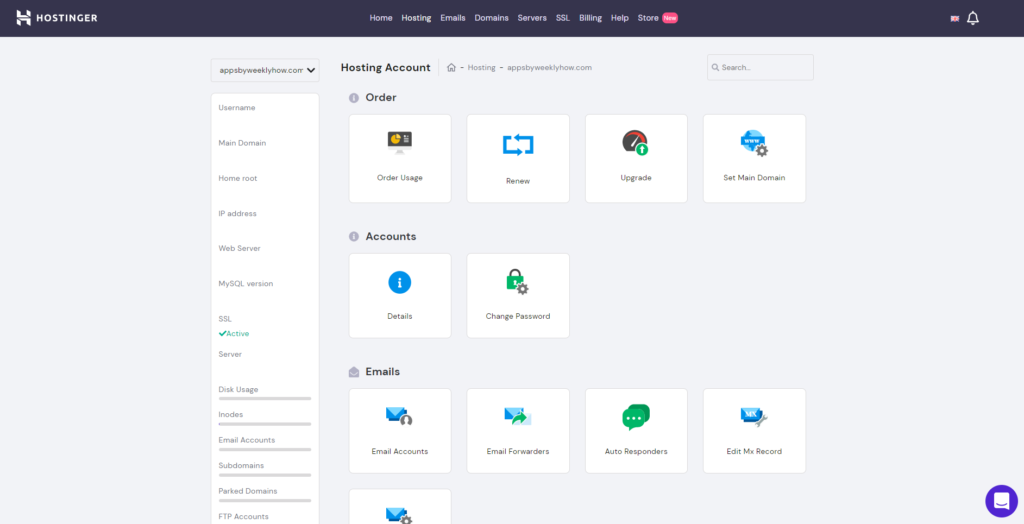
Ease of use
The Hostinger dashboard is fairly easy to use and if you’re new to web hosting, you’re going to love using Hostinger.
Everything in the Hostinger dashboard is understandable and straightforward. Each page is partnered with a very large logo and categorized to make it easier for you to find what you need.
There’s also a search bar for people that don’t like scrolling down.
Speed
For a very cheap web host, you would expect to have a very slow website. However, that’s not the case with Hostinger.
According to their website, the fastest response time that they can reach is about 45 milliseconds, which is insane! If you’re only using their shared web host, what more if you use their business web host plan?
Unlike other web host providers, Hostinger uses technologies that are up to date. In fact, they always update their technologies so that users can always have a good experience.
If you’re going to use Hostinger for your Shopify apps, it is expectable that your apps will load fast but of course, this will always depend on your codes or files. It is advisable to make your codes optimized as much as possible so that you can take advantage of Hostinger’s speed.
Price
If you’re in a tight budget and you want to save as much money as possible, then Hostinger should be your choice.
For only $0.99, you can have a single web host with a free SSL certificate which is a good deal especially if your only plan is to host your Shopify apps.
Though it’s important to remember that the price will depend on the contract you’re getting.
For a 1 month contract, the price will be almost $10 plus the setup fee which will cost you another $5. That’s still cheap compared to other web host providers but quite expensive just for a one month service.
To fully save a lot of money, it’s best if you take their 48 months contract, which will only cost you $47 and no setup fee. That’s FOUR years! and you will only need to pay $47.
Now the question is, which plan should you really take?
Well, of course, if you’re just trying out, we recommend taking the single shared web hosting. Then, just upgrade to the business plan once you get enough installs in the Shopify app store.
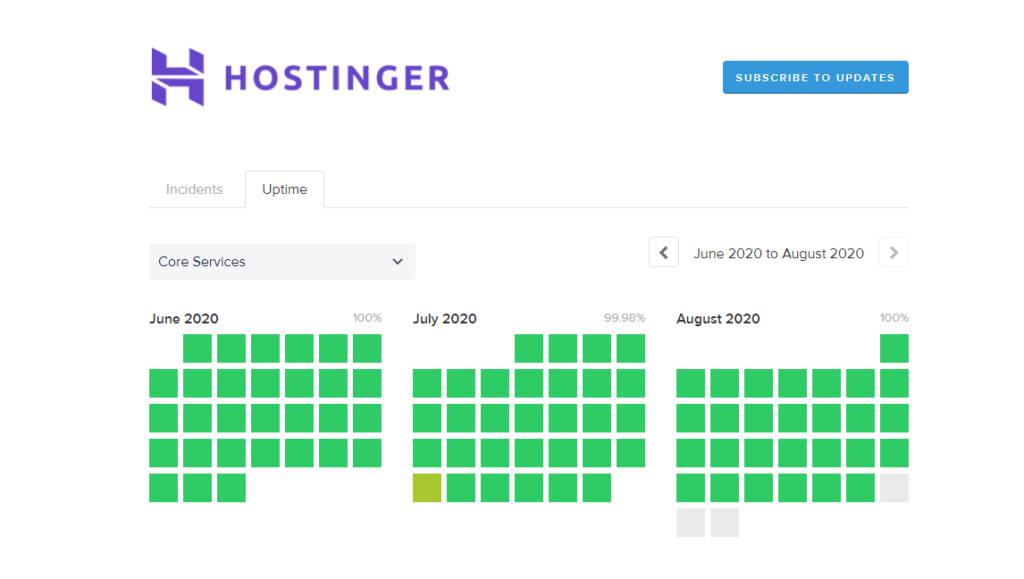
Stability
There will be times that your website can go offline but how long can your website stay offline if you use Hostinger?
According to Hostinger, the percentage of your website going offline is around 0.03% which means in one year, your website will barely go offline.
Support
It’s been known that Hostinger provides the best support for their users. However, in 2020, changes started to come up.
In 2019 or even before, Hostinger provides 24/7 support for all of their users but in 2020, Hostinger removed the chatbox in the dashboard and you can only contact them through their email.
But why?
According to their staff, due to the current situation of the entire world, Hostinger had to remove the chatbox.
We’re assuming that this is a temporary change and once the pandemic is over, their 24/7 support will be back for everyone.
Conclusion
Do we recommend using Hostinger for Shopify apps? Absolutely!
Hostinger is one of the trusted web host providers in the industry, offering a very cheap web hosting solutions for your Shopify app development. If your plan is to save up money, then you should consider using Hostinger.
Disclosure: This article may contain affiliate links, which means we may receive a commission if you click a link and purchase something that we have recommended.