When you wish to learn to program, the first thing most coders think of is to learn Python, C++, WordPress, or WooCommerce. But all of these languages and platforms are already saturated. That’s why if you learn them, you’ll most likely end up not getting a profit.
So, instead of making WordPress or other stuff, why not start making Shopify apps? Like what Shopify said, “There’s never been a better time to build a Shopify app because there are more than 1.8 million merchants across the globe that build, scale, and manage their businesses on Shopify”.
If you don’t know, Shopify apps play an important role in every Shopify store’s success. In fact, it is SO important that every Shopify store uses an average of SIX Shopify apps.
So why not start making Shopify apps?
💸 Imagine making thousands of 💵 dollars monthly with your very own Shopify app. Yes, MONTHLY! And the best part? Shopify won’t take a share of your app revenues. It’s all yours! 💰💰💰
🤩 Excited yet? You should be!
In this course, I’ll guide you through crafting a top-notch Shopify app from scratch, using vanilla PHP. No shortcuts, no pre-made repositories. We’re building it all from the ground up, ensuring you have the skills to create unique, high-demand Shopify apps.
👨💻 About me: I’ve been immersed in Shopify app development since 2018. Everything I’ve learned along the way, I’m sharing with YOU, so you can kickstart your new career and turn your Shopify apps into a lucrative venture.
Here is what you are going to learn in this course:
Creating API credentials
Understanding API and secret keys
Creating a local server and tunnel
Connect your Shopify app to the database
Creating Shopify OAuth
Generating access tokens
Creating REST API & GraphQL functions
Creating ScriptTags
Charging merchants with Billing API
Implementing Shopify App Bridge
and much more!
If you think you’re ready to start a new career then join us and let’s begin creating YOUR very first Shopify app!
Changelog
September 07, 2023
Updated course description
April 28, 2022
Added/Updated lessons
Added resource(s)
September 29, 2021
Added/Updated lessons
September 21, 2021
Updated links and resources in contents
September 15, 2021
Added new lesson “Application Credit” on “Billing API
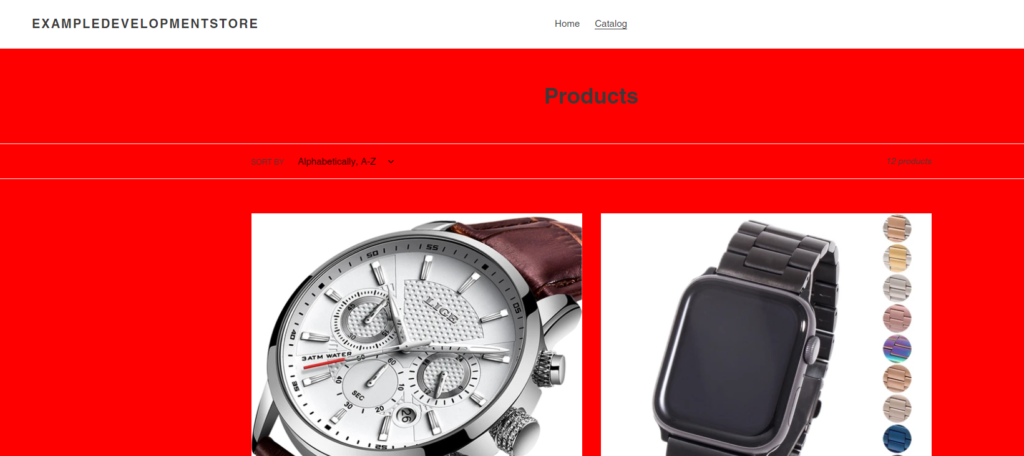
So you have a Shopify store but you personally don’t like how you have to visit the cart page just to see the total amount you need to pay or to proceed to the checkout page. Well, in this article, we will be learning how to create an offset canvas or a cart drawer that displays the items inside of a Shopify store cart without installing Shopify apps.
Video Tutorial
If you prefer watching video tutorials rather than reading, then you can watch the video version of this article below:
Getting Started
Before we can start displaying the items from our cart, we, obviously, need to create the offset canvas or the drawer first. Now, I just want to make a shoutout to Tomasz Bujnowicz for making this amazing easy sliding drawer. So credits to him for making this lesson easier to accomplish.
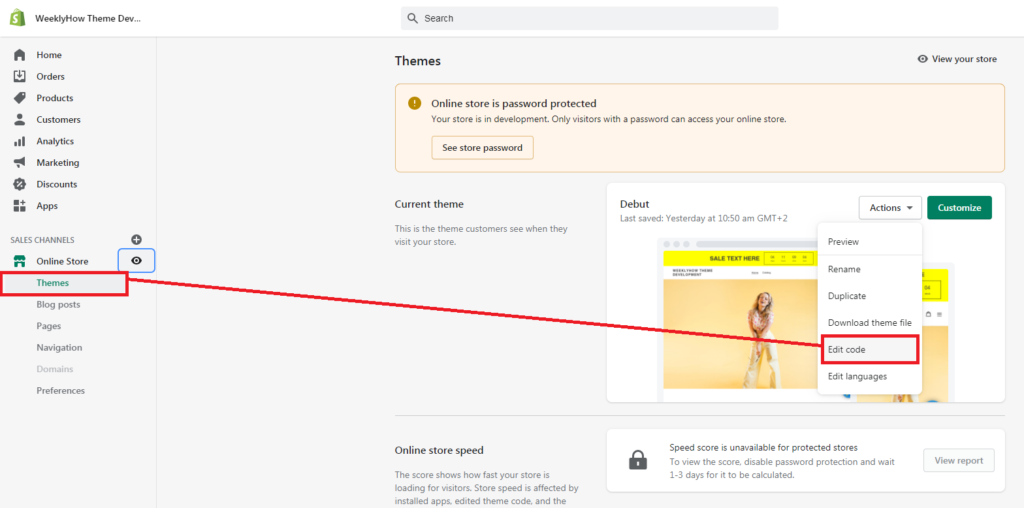
Anyway, let’s begin! Open your Shopify store admin page and access your code editor.
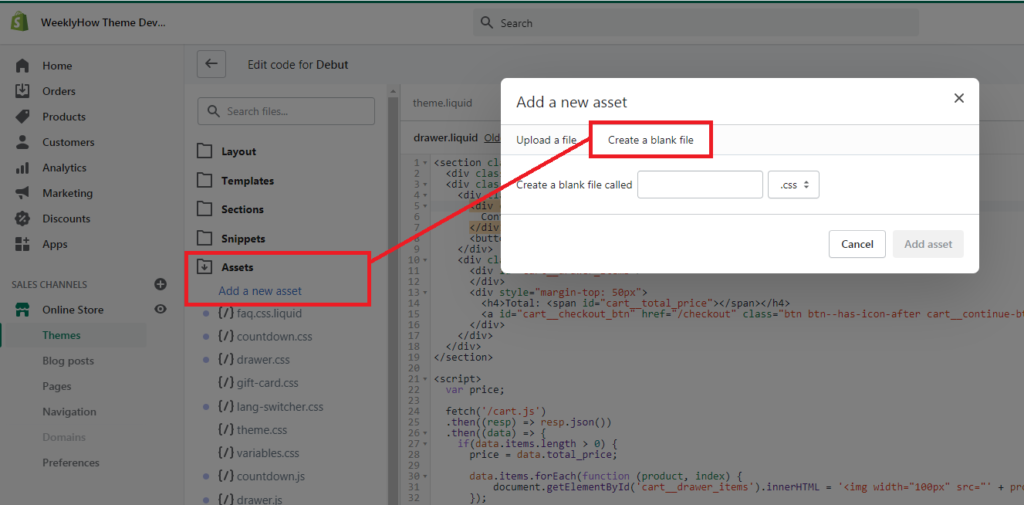
Then, go to the assets folder and create two asset files:
drawer.css
drawer.js
Once you have created the two files, open them and apply the following codes:
Drawer.css
For the styles of the drawer, copy the following code:
Awesome! Now that we have all of the codes that we need, we can finally reference all of them in our theme.liquid. So open your theme.liquid and add the following objects inside of the head tag of your theme.liquid:
Awesome! Now, the last thing that we need to do is to customize our header.liquid to trigger the drawer.
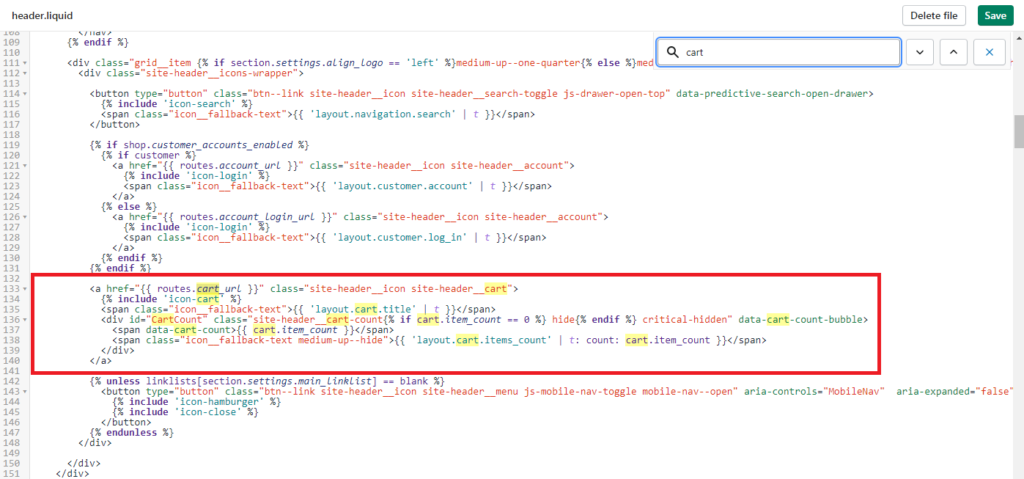
Go to your sections folder and open the header.liquid. Once opened, look for the anchor tag ( <a></a> ) that uses either of the following href attribute values:
{{ routes.cart_url }}
/cart
For example, I have the following:
You can always find these elements using the search box ( CTRL + F ).
Once you have found it, replace the value of href attribute with a number sign symbol ( # ).
Then, we’ll apply the following attributes to this anchor tag.
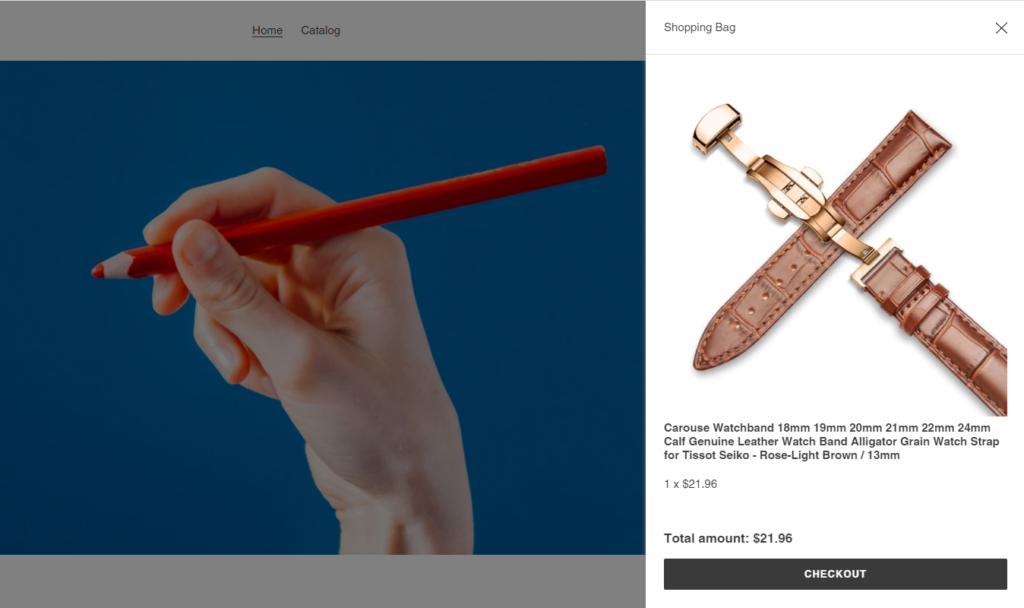
Save the file. Now, that should allow you to display/hide the drawer whenever you click the Shopping bag button.
Conclusion
There you have it! That’s how simple it is to create a drawer for your Shopify stores. Now, for simplicity reasons, this is still not the best way to create a drawer for your Shopify stores. I don’t know if you noticed but the content of the cart will only show once you have either refreshed the page or opened another page. That’s not effective right? So how do you fixed that? Well, that’s when you’ll have to use events for your Shopify theme.
I’ve recently published a course where I teach how to create Shopify apps and in that course, I’ve taught how to add JavaScript files using ScriptTag API. However, I’ve never really used that lesson entirely to show how powerful ScriptTags are when it comes to improving Shopify stores.
In this article, we will talk about how you customize your Shopify store using ScriptTag API.
Getting Started
Before we start this tutorial, I want to disclose that I will be using the course Shopify app development with Node & React as the reference. What I mean is I will use the codes from the course BUT it does not truly matter as you will do the same steps for your ScriptTag file (aka JavaScript file).
Okay, so let’s say we have the following JS file that allows us to install a ScriptTag to our development store.
const axios = require('axios');
const createScriptTag = async (accessToken, shop) => {
const url = `https://${shop}/admin/api/2021-04/script_tags.json`;
const src = 'https://test.com/test.js';
let scriptTagExist = false;
const shopifyHeader = (token) => ({
'Content-Type': 'application/json',
'X-Shopify-Access-Token': token,
});
const scriptTagBody = JSON.stringify({
script_tag: {
event: 'onload',
src,
},
});
const getScriptTags = await axios.get(url, { headers: shopifyHeader(accessToken) });
getScriptTags.data.script_tags.map((script) => {
if(script.src == src) {
scriptTagExist = true;
}
});
if(!scriptTagExist) {
await axios.post(url, scriptTagBody, { headers: shopifyHeader(accessToken) })
.then(response => { console.log(response); })
.catch(error =>console.log(error));
} else {
//IF THE SCRIPT TAG IS ALREADY INSTALLED, HERE IS WHERE YOU WILL BE DISPLAYING THE MESSAGE://YOU HAVE ALREADY INSTALLED THE SCRIPTTAGreturnJSON.stringify({scriptTagStatus: true});
}
}
module.exports = {
createScriptTag
}
Code language:JavaScript(javascript)
In the code above, we have the function createScriptTag that uses the ScriptTag API endpoints (GET & POST) to check if there is an existing ScriptTag with the same URL that we set for the src variable. If there’s none then the function will create the Script Tag.
Once the script tag is installed, you can now work on the javascript file that you use for ScriptTag API.
Using Script Tags to customize store front
When I say script tags, these are the javascript files that you imported using the ScriptTag API and to be honest with you, it’s not that TOO complicated. In fact, once the javascript files are imported to your Shopify store, you can finally customize the JavaScript file and use it to add stuff or edit stuff to your Shopify storefront.
Say for example, we had the JavaScript file here https://test.com/test.js
By opening your Shopify store, you should have the following output:
Woah, that’s it? That’s just too boring and simple…
Well, if you know JavaScript, you can basically DO ANYTHING you want to customize the frontend. Do you want to change the background color of your whole page? You can do that.
Do you want to use a library and extend the functionality of your Shopify store? Heck yeah you can do that!
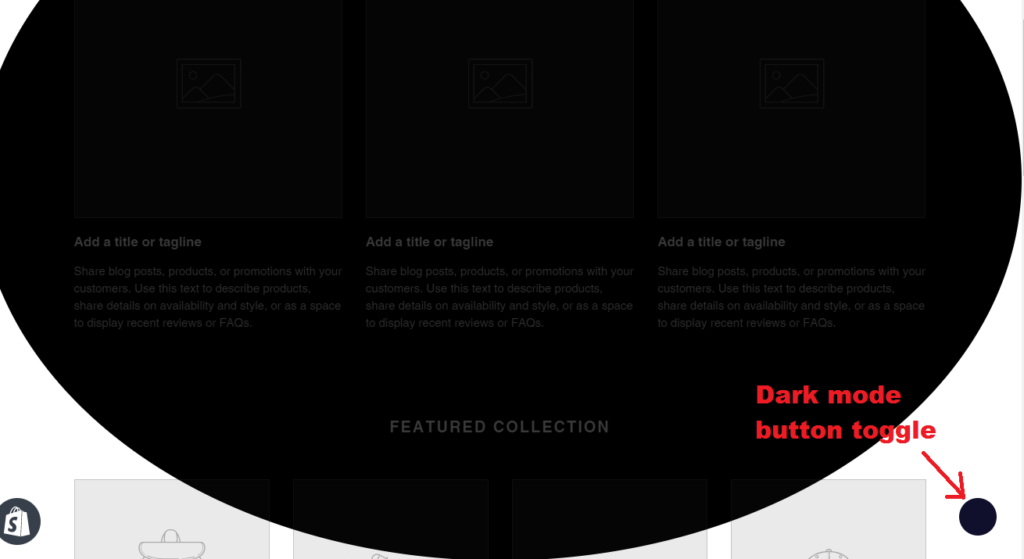
let darkmode;
functionaddWidget() {
darkmode = new Darkmode();
darkmode.showWidget();
}
var script = document.createElement('script');
script.onload = function () {
window.addEventListener('load', addWidget);
darkmode.toggle();
};
script.src = 'https://cdn.jsdelivr.net/npm/darkmode-js@1.5.7/lib/darkmode-js.min.js';
document.head.appendChild(script);
Code language:JavaScript(javascript)
Conclusion
There are a LOT of things that you can do with Script Tags. You know what they say? The sky is the limit! So go ahead and experiment with your codes and make your Shopify store more interactive and unique using JavaScript. There are hundreds of libraries out there that you can use to make your websites or store look like a badass. One of my favorites is the SweetAlert2. It’s lightweight and very easy to use.
I have a video using that library so if you’re interested, you can watch it here:
Becoming a Shopify developer can be extremely challenging and frustrating but with our tools and top-quality courses, you can become a Shopify expert in a short period of time. Join our community!
Help Shopify Merchants
Become a Shopify expert and help merchants grow their businesses.
Master Web Development
Learn new skills like Liquid and web programming to become a web master.
Build Your Own Business
Learn Shopify development and create web applications that you can sell online.
Become a Shopify Developer Pack!
Learn how to create Shopify apps and themes through the following highly-rated courses.
Learning online can sometimes be boring and slow but it doesn’t have to. With WeeklyHow, you can learn in a fun way with our well-produced lessons.
Learner’s Success Stories
Real feedbacks from our students.
Vu Vo
Bernard really helped us get exposed to the fundamentals of Shopify theme code and a few pitfalls that you may run into while developing Shopify themes
Gopal Satam
Amazing! Great course on Shopify Theme Development. After watching all the lessons so far I found learning Liquid language is quite enjoying and easy to understand. Thanks Bernard!
Jessica Doram
I learned a lot from Bernard’s course. I was from 0 Shopify knowledge to expert dev in just a few days. Job well done, thanks for sharing your knowledge!
Are you looking for the best Shopify themes for your eCommerce website? Look no more because today, we’ll be giving you the best Shopify themes in 2021 that are fully responsive and highly converting.
Best way to pick Shopify themes
When you are looking for a Shopify theme regardless if your online store is new or not, it’s best to always look for theme features that will not only make your set up faster but also give your customers the best shopping experience that they could ever ask for.
We have listed the following Shopify themes that you can use in 2021 that will give you just that.
Best Shopify Themes in 2021
Let’s look into some of the best Shopify themes 2021.
Wokiee is an incredible multipurpose & one of the most popular Shopify themes. In fact, it is one of the highly-recommended Shopify themes for eCommerce businesses according to EnvatoTut+.
With Wokiee, you can create a highly attractive eCommerce store within a few minutes. It provides full control with its own CMS and lets you customize the theme by changing its font style, navigation, and much more. It comes with 70 great-looking layouts & styles for your front-page to choose from.
Elise is an incredible multi-concept theme for your Shopify store. It comes with a variety of layouts and several other useful tools like newsletter popup which is great for email marketing.
This Shopify theme is great regardless of your niche and if you love designing and tweaking your storefront all the time, then Elise can be one of your best options as it offers the following great features:
Whether you’re new to Shopify or not, Avone can help you set up your online store in just a few clicks. Avone is a multi-purpose Shopify theme packed with so many great features that can help you not only set up your online store quickly but also grow your sales.
Thanks to its built-in features, you can now grow an online store without spending to much for Shopify apps.
Want a highly professional & one of the best Shopify themes 2021? Porto is an excellent Shopify theme with more than 20 niche demos & layouts. It has an extensive range of features that let you customize your store and convert your visitors to customers.
Key Features:
Exclusive eCommerce design
20+ niche demo concepts to give you great ideas
Optimized for better speed & performance
Extensive features that let you configure your store
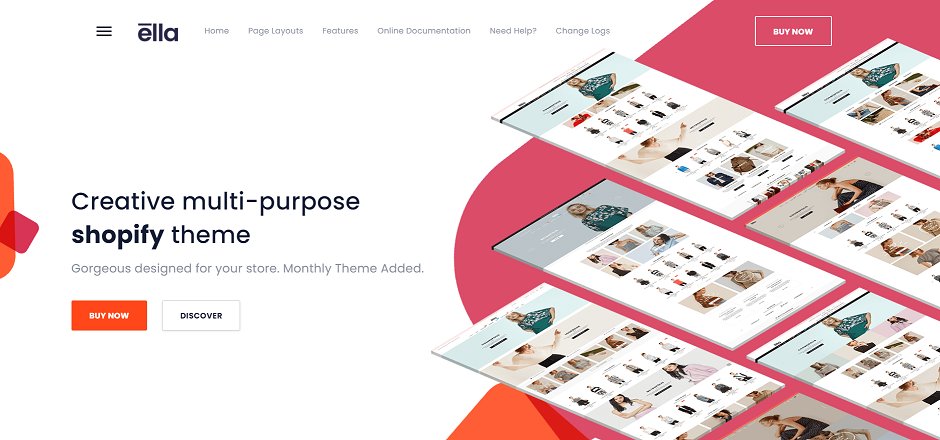
Ella is a very-well designed, and eye-catching Shopify theme. If you’re looking for a Shopify theme that will give you a modern look, then this Shopify theme is your BEST option.
Ella offers 15+ eye-catching homepage layouts, 7+ awesome shopping pages, and 9+ product pages that is enough to make you create an awesome looking Shopify store.
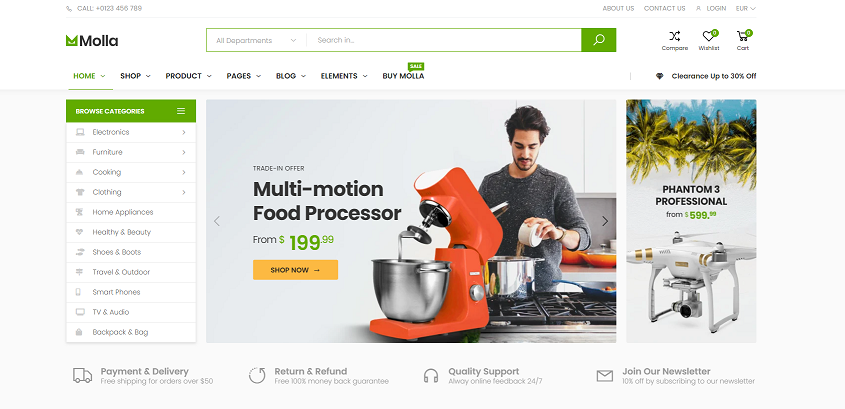
If you’re looking for a responsive Shopify theme that can be used for multiple purposes then Molla is one of your best options. This theme is perfect especially if you’re aiming for that market niche look.
Key Features:
This multipurpose responsive Shopify theme includes great features such as:
Looking for a highly professional and one of the best Shopify themes 2021? The themes mentioned above are not only highly attractive but also the highest converting Shopify themes as well. Give it one a try and see your sales boost up to 100%.
Disclosure: This article may contain affiliate links, which means we may receive a commission if you click a link and purchase something that we have recommended.
Shopify Themes are one of the most important parts of a Shopify store. In order for a Shopify store to work, merchants have to install and use at least one Shopify theme to display their products.
If you’re not a developer, you might find it difficult to create a custom Shopify theme. However, does that mean you can’t create a custom Shopify theme?
Well, of course not!
Creating a custom Shopify theme is honestly very easy! Thanks to the libraries created by Shopify.
That being said, how do you create a Shopify theme?
In this article, we’ll learn about Shopify theme development and how to create a custom Shopify theme using ThemeKit step by step.
We have a Shopify Theme Development Course! Be one of the first students!
Are you looking for an in-depth guide on how to create Shopify themes? Click the enroll button now and become a Shopify developer!
If you’re looking for a video version of this article, you can watch the following video instead.
Getting Started
In order for us to be able to create a Shopify theme, we will need to do the following:
Create a development store
Create a private app and generate API credentials
Install ThemeKit
Create a Shopify ThemeKit project
So with all that being said, let’s start and create a Shopify theme.
Building a Shopify theme using ThemeKit
Let’s start off this tutorial by creating a development store. We’re going to need a development store to create a private Shopify app and generate API credentials. If you already have an account, you can skip this step and proceed to create a private app.
Once you have logged in, go to stores page and create a new store.
By clicking the Add store button, Shopify will ask you to pick whether it’s a development store or a managed store. Pick development store.
After, fill-up the form and click Save.
Create a private app
By creating a development store, you should be automatically logged in to your development store.
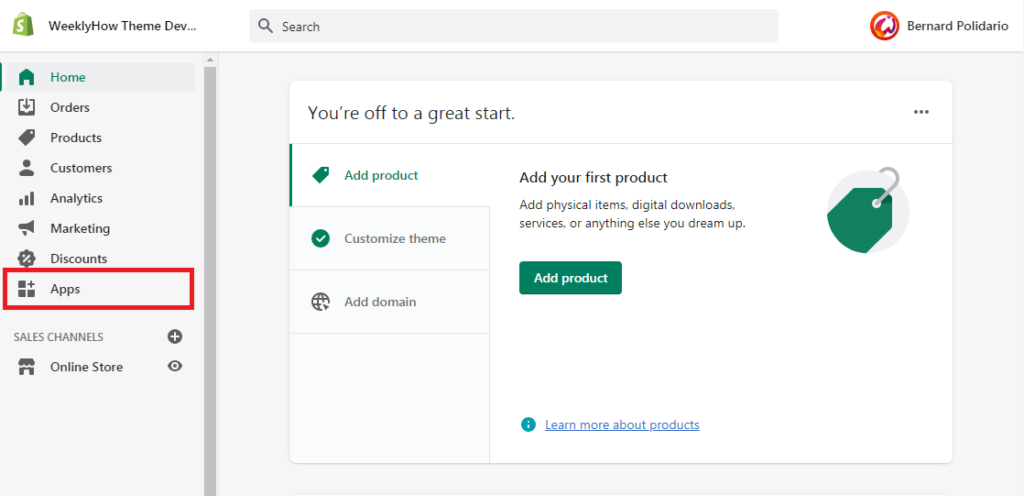
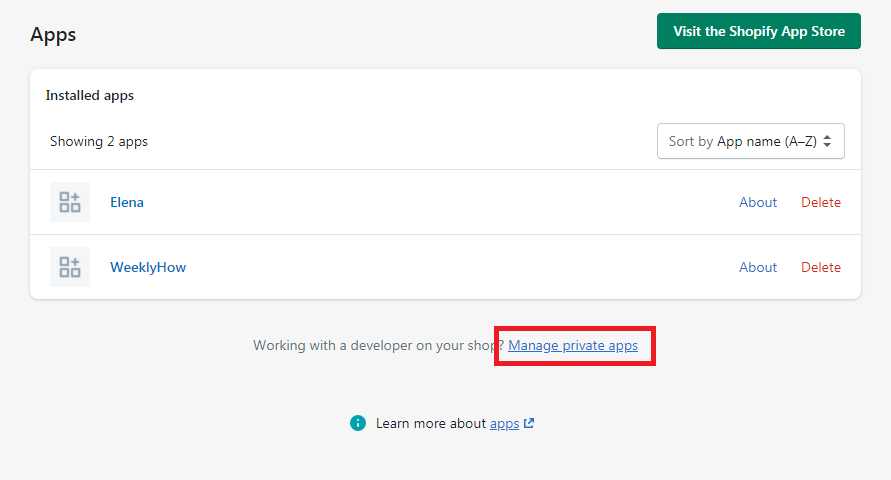
Go to the apps page.
In the apps page, look for the link that says Manage private apps. It’s usually located underneath of the installed apps card.
By default, private apps are disabled so you’ll have to enable it by clicking the button shown like below.
By clicking the said button, Shopify will ask you to agree to their terms of use and conditions. Read all of them if you have time. Otherwise, check all the checkboxes and click the enable private app development button.
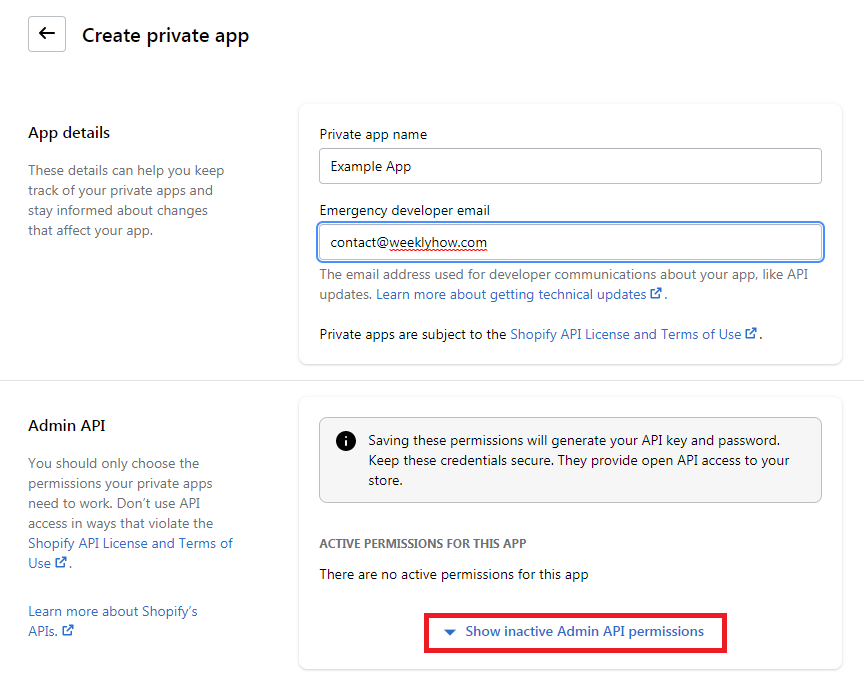
After enabling the private app development, you should be able this time to create a private app.
Fill-up the following form and click the Show inactive Admin API permissions and look for the Themes.
Set the theme API to Read and write.
Once set, click the save button and that should show you a modal. Just click the Create app button.
You should have an Admin API credentials like below.
Installing ThemeKit
Before we can start creating a Shopify theme project, we need to install and set up our local working environment. The first step is to install ThemeKit.
What is ThemeKit?
ThemeKit is a cross-platform command line tool used for building Shopify themes. With Theme Kit, you can use your own development tools to interact with the Shopify platform in the following ways:
Use workflow tools like Git to work with a team of theme developers.
Upload themes to multiple environments.
Watch for local changes and upload them automatically to Shopify.
Work on Linux, macOS, and Windows.
How to install ThemeKit
You can install ThemeKit using the following commands on the following operating systems:
Linux
If you’re using Linux as your operating system, you can use the following command using your terminal.
If you’re using MacOS as your operating system, you can use the following command using Homebrew.
$ brew tap shopify/shopify
$ brew install themekitCode language:Bash(bash)
Windows
If you’re using Windows as your operating system, you can use the following command using your terminal. Make sure you have Chocolatey installed in your system.
choco install themekitCode language:Bash(bash)
Creating the ThemeKit project
Now that we have both ThemeKit and API credentials, we can finally start creating a new ThemeKit project. To create a new project, run the following command in your terminal:
theme new --password=[YOUR_API_PASSWORD] --store=[YOUR_STORE.myshopify.com] --name=[NAME OF YOUR THEME]Code language:Bash(bash)
By running the above command, ThemeKit will start creating the template files for your new Shopify theme like below:
Now, to ensure that the changes that you make to your theme files are sent to your development store, you can run the following command:
theme watchCode language:Bash(bash)
If you open your development store, you should have the following:
As you can see, your store looked super empty and that’s where you can finally start working on your Shopify theme project.
Next steps
We have finally created a Shopify theme project, what’s next? Well, your next step is to start learning how to liquid programming and customize the template files created by ThemeKit.
Now, building a Shopify theme is like creating a WordPress theme, you have to work on each template files to make sure that all parts of a Shopify store are accessible by the users.
If you’re interested to learn more about Shopify Theme Development, you can enroll to our course and learn how to create Shopify themes from start to finish using ThemeKit.
Ever since the pandemic happened, a lot of programmers like us are working from home. Creating websites here, creating Shopify apps there. We do all of that just to make money. But what if I tell you that you can earn more money by doing something else with Shopify other than making web apps or websites?
In this article, we’re going to look at 4 ways that you can do to make money with Shopify as a developer without quitting your day job (unless you want to).
Let’s begin!
Featured video
If you’re interested to watch the video version of this blog post, you may watch the following video instead:
1. Build a Shopify store
When you say Shopify, the first thing that comes to mind is dropshipping. But that’s not the only thing that you can do with Shopify. As a developer, we have the advantage to create a beautiful Shopify store that can earn us a lot of money.
Now, you might be asking…
“How am I supposed to do that? I just write codes. I don’t know how to sell products.”
Selling products is honestly, one of the easiest things that you can learn compared to writing codes or making apps. Luckily for us, Shopify is very easy to use and they provide a lot of blogs and documentation that we can use as a reference for making a great Shopify store.
“Okay, sure, maybe I can create a Shopify store and learn how to sell products but… what am I going to sell?”
As a developer, we can sell a lot of things! You can sell your own book, courses, or even your own web applications.
Once you have all of that, all you need to do next is to learn about marketing strategies, promotions, or advertising.
If you’re interested to go deep into building a Shopify store, I’ve created a thorough guide here and if you are interested in making your own online store, you can start by click the button below:
Shopify experts are the developers who help business owners create their very own Shopify store. In other words, this is you.
Shopify experts are in high demand right now. As a Shopify expert, you will be able to put your expertise to good use by helping business owners across the world with their projects.
You can become a Shopify expert even if you are working a 9-to-5 job. You know why? Because you are not the one who will look for a job, people are the ones who will be looking for you. Becoming a Shopify expert is like working with Fiverr, but fancier and expensive.
Working as a Shopify expert can make you a lot of money. In fact, per project, you can earn up to $2159. However, that would still depend on your experience and how much you’ve worked with business owners.
So how do you become a Shopify expert?
To become a Shopify expert, you’ll need to have access to the Shopify experts marketplace. This is where you can expose your profile to thousands of Shopify merchants looking for your help. So, if you want to join the Experts marketplace, then you can fill-up the Experts Marketplace request form here:
If you don’t hear back from the Experts Marketplace team, then that means your request wasn’t approved either because it doesn’t follow what the marketplace is looking for, or there isn’t enough demand for what you can offer.
3. Build Shopify Apps or Shopify Themes
Creating your very own Shopify apps and themes is honestly, one of the best ways to make money with Shopify. Why? Because Shopify apps and themes will always be there making you money.
Compared to working as a programmer, selling Shopify apps and themes only requires you a bit of your time. Once you have published your app to Shopify app store, you can sit back and relax and wait for that sweet sweet money to come into your bank account.
But of course, selling Shopify apps and themes can bring you a lot of responsibility especially when you get hundreds of installs daily. Merchants will more likely to send you emails about your app and theme so you will have to be super attentive toward your customers just so you can get a good review.
4. Joining Shopify Affiliate Program
This is honestly, one of the best ways to make money with Shopify. Joining the Shopify affiliate program can make you $58 per merchant.
Now, how does this works? Well, once you joined the Shopify affiliate program, Shopify will give you an affiliate link that you can use for referring customers. By default, your affiliate link will send the visitors to the Shopify free trial page and once the visitor signs up for a 14-day free trial, that’ll be counted as a referral. However, in order for you to get a commission, customers should convert their plan from a trial to paid plan.
Some say that being a developer is one of the best professions anyone can have and personally, I agree with that and that’s because I believe that developers have a lot of things can do to earn money. I used to just work for my clients and now I run WeeklyHow and started selling my very own courses and that opened a lot of opportunities for me.
So if you’re a developer like me, I encourage you to try and push your limits. Explore the things that you wish to explore and who knows? Maybe one day, you’ll find more options that a developer like us can do to earn money.
Due to the pandemic, a lot of people are trying to learn how to create an online store with Shopify. These new merchants are looking for Shopify themes that are effective enough to bring them sales. Why not become one of the new Shopify developers and create an amazing Shopify theme from scratch?
In this course, we’re going to learn how to create a Shopify theme using ThemeKit and Liquid. We’re going to cover all of the important parts of Shopify Theme Development so you will be ready to create your very own Shopify theme as soon as possible.
In this course you will learn:
Private apps for theme development
Liquid files
Theme assets
Designing your own theme
Adding translations to your theme
Liquid language (Referencing asset files, loops, conditional statements, Shopify objects, filters, and many more)
AJAX API (Getting products data, Sending products to the cart, etc)
Online Store 2.0
If you think you’re ready to start, signup now, and let’s create the best Shopify theme together!
Shopify app development is an opportunity given to developers to help hundreds of thousands of Shopify stores. While doing so, they can earn as much as the entrepreneurs just by building for the Shopify App Store.
What is Shopify?
It’s such an understatement if you say that Shopify is just an eCommerce software. Technically it is, but personally speaking, Shopify is one of the best eCommerce platforms that provides everything you need to start selling not just online, but also on social media and in person.
Shopify is completely cloud-based and hosted, which means there’s no need for you to worry about the servers and such. Just create an account and you’re good to start.
But of course, we’re going to focus more on Shopify app development and why you should build apps.
So…
Why Develop Shopify Apps?
According to Shopify, 87% of Shopify entrepreneurs rely on Shopify apps to run their businesses. Not only that, it is expected to see more growth in the next few years coming.
So why not develop Shopify apps when it’s clear that this could be a double win for both parties?
Now you might be asking…
How much does Shopify developers make?
According to Shopify, there are two ways to make money with your shopify apps:
Create Shopify apps for your clients, which means the app is not yours once you have sold them to your clients.
Create Shopify apps for Shopify store and sell them and you’ll earn 80% of each app sale.
On average, you can earn somewhere around $2000 per month. However, this all depends on how much your Shopify app is going to be. It also depends on which category your Shopify app is located.
In the graph given above, if your app is for Inventory or Accounting, then there’s a higher chance that you’ll get more profit because both of these categories are really expensive. So if you’re targeting to earn more money, then building apps for Inventory and Accounting is your best option.
Good question! What if your Shopify app is free?
How are you gonna make money with that?
There are ways to earn money with free Shopify app, your first option is to divide your app into two versions, first is a standard version which is free, and the other one is the PRO version which is the paid version.
To make your chances of earning higher, make sure your PRO version provides really helpful features.
For example, your app is a dropshipping app. With the free version, you can only let users import 1000 products whereas, in paid version, you can import an infinite amount of products.
Another option is to give the users a number of days trial.
For example, your app can only be free for 14 days. After that, users will need to pay you monthly for the subscription.
All up to you.
But what is recommended? like really?
Well, personally, I like my apps to be free for a couple of weeks and then make them pay for the subscription once they like the app. This way, I can confirm that they will use my apps longer than I expect them to.
You can also combine them.
For example, you can give users 14-day free trial and then ask users for monthly subscriptions and at the same time, they can upgrade their app to PRO plan.
Getting Started
I have written already a complete guide on how to create Shopify apps using PHP. So in this article, I’ll just provide you the summary of it. However, if you’re interested in reading the step-by-step guide. Then I recommend you to follow this link:
To start making your app, login your account to Shopify developer website and if you don’t have an account yet. I suggest you create one.
Once you’re logged in, follow these steps:
Proceed to left navigation panel and click the Apps category
Click Create app and fill out the form
App Name – The name of the shopify application you’re about to create.
App URL – The URL of your website where you’re going to upload your Shopify files
Whitelisted Redirection URL(s) – This is where you’re going to list your generate token script or URLs you need as you Authenticate your Shopify.
click Create app
After that, Shopify developer will provide you your API key and Secret key. These two keys are used for authenticating your app to stores.
Shopify API
Next thing you need is an API, like what I have mentioned in my Shopify app development tutorial, you can use different APIs, but personally, I use Shopify API Client made by Alex. It’s very simple and easy to use.
Installing Shopify apps to stores
Next thing you need is the files to connect your app to stores, or let’s just say, let users install your app on their store. In this article, we’re going to use PHP to create the app. So, go ahead and create a new file and call it install.php and copy the following code:
Make sure you change the value of API key to what was given to you by Shopify. Otherwise, the script won’t work.
Generating Token
Next, create a new PHP file and call it token_generator.php and copy the following code:
Keep in mind that both install.php and token_generator.php should be uploaded in the same folder. Unless you want to organize your files then you need to reference it correctly by changing the value of redirect_uri in the install.php file.
<?php//Include your Shopify APIrequire_once("inc/functions.php");
//Change the value of these two$api_key = "ASSIGN YOUR API KEY HERE";
$secret_key = "ASSIGN YOUR SECRET KEY HERE";
$params = $_GET; // Retrieve all request parameters$hmac = $_GET['hmac']; // Retrieve HMAC request parameter$params = array_diff_key($params, array('hmac' => '')); // Remove hmac from paramsksort($params); // Sort params lexographically$computed_hmac = hash_hmac('sha256', http_build_query($params), $secret_key);
// Use hmac data to check that the response is from Shopify or notif (hash_equals($hmac, $computed_hmac)) {
// Set variables for our request $query = array(
"client_id" => $api_key, // Your API key"client_secret" => $secret_key, // Your app credentials (secret key)"code" => $params['code'] // Grab the access key from the URL );
// Generate access token URL $access_token_url = "https://" . $params['shop'] . "/admin/oauth/access_token";
// Configure curl client and execute request $ch = curl_init();
curl_setopt($ch, CURLOPT_RETURNTRANSFER, 1);
curl_setopt($ch, CURLOPT_URL, $access_token_url);
curl_setopt($ch, CURLOPT_POST, count($query));
curl_setopt($ch, CURLOPT_POSTFIELDS, http_build_query($query));
$result = curl_exec($ch);
curl_close($ch);
// Store the access token $result = json_decode($result, true);
$access_token = $result['access_token'];
// Show the access token (don't do this in production!)echo $access_token;
} else {
// Someone is trying to be shady!die('This request is NOT from Shopify!');
}
Code language:PHP(php)
Make sure you have downloaded the API provided above and then upload it to your host. Otherwise, you will get an error.
In this file, make sure to change again the value of both api_key and secret_key variables.
Another thing to keep in mind is that you need to personally keep your access tokens to be able to interact with the app. But what if other users did not receive their tokens? The answer is simple, you need to store the access token yourself so they won’t need to do such actions.
I have written an article on how to store these access tokens in two ways. I’m sure you will need this in the future so you might as well learn how to save it. Click the link below to learn more:
Testing the Shopify App
Once everything is set up, you may go to your project URL and run install.php. To do this, you must include the GET variable shop in the URL. For example:
After that, hopefully you’ll see something like this:
There you have it! Your Shopify app is now ready to be built. Of course, it’s not finished yet because you still have to plan what kind of app you want to create.
So if you are interested, I have made a tutorial on how to display Shopify products and its components like prices and such. This could help you understand how to communicate with Shopify API.
Whenever I develop Shopify apps, I usually design the app first. What I mean by that is, I set up the app first to make sure that everything is ready for users for installation.
It’s all up to you.
You can also brainstorm first, get ideas about what kind of app you are going to create. Now, keep in mind that there’s no right or wrong here. Just stay in your comfort zone and develop the app.
Now let’s start brainstorming!
For example, you’re planning on developing an app which tells the Shopify store owners about their statistics. Now, you may ask yourself these questions:
What is the purpose of this app?
What features are you going to add in this app that has not been added by your competitors?
How much is this app going to be?
How much is my budget?
Where am I going to promote this app? and How? and last but not least…
How long is my development going to be?
It is very important to know the answers first for the questions above. That way, you will understand your app better than anyone else.
Recommendations
Whenever you develop a Shopify app, you may do the following especially if you want conveniences: