I have written so many articles now about Shopify App Development and I know there’s going to be more things that I needed to talk about.
I also wanted to make a tutorial on how to create Shopify apps using frameworks such as Laravel but I believe it’ll take much time since I have to study the framework myself.
But for the meantime, I wanted to talk about all the errors that you guys are having. All the errors that I myself encountered as well.
So you guys have sent me lots of emails about your app issues and I wanted to take this opportunity to combine all of these errors into one article so that everyone in the future can use this as a reference.
Shopify App – 403 Forbidden Error
What is 403 Forbidden Error?
403 forbidden error is a type of HTTP error code that you can encounter when you’re trying to reach an address or a website that is forbidden to be located.
Now, what is that something to do with your Shopify app?
Well, to tell you honestly…
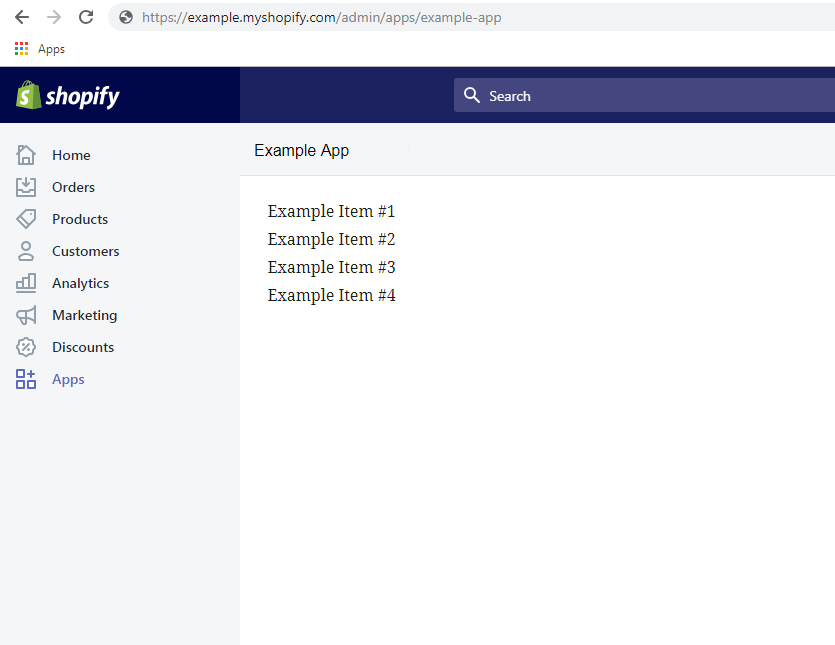
A couple of weeks ago, I made a mistake on my previous article and that mistake is the little typo in the install.php file.
Now take a look at this image.
What do you notice in the image above?
In the image above, you will see that the URL contains two myshopify.com. That means that the install URL was initiated incorrectly.
But keep in mind that both of the above URL will work.
If you type in the URL bar: https://example.com/install.php?shop=yourstorename
If you remove the myshopify.com in the install.php and then type in the URL bar: https://example.com/install.php?shop=yourstorename.myshopify.com
Invalid API key or access token (unrecognized login or wrong password)
{"errors":"[API] Invalid API key or access token (unrecognized login or wrong password)"}Code language:JSON / JSON with Comments(json)
This error occurs when you have used the expired access token. So go ahead and uninstall the app and make sure to generate a new access token and paste it in the token variable.
Same goes to shop variable, make sure that it has the name of your store.
<?php
ini_set("display_errors", 1);
error_reporting(E_ALL);
require_once("inc/functions.php");
$requests = $_GET;
$hmac = $_GET['hmac'];
$serializeArray = serialize($requests);
$requests = array_diff_key($requests, array('hmac' => ''));
ksort($requests);
$token ="HERE IS WHERE YOU PASTE YOUR NEW TOKEN";
$shop = "storename"; //no 'myshopify.com' or 'https'Code language:HTML, XML(xml)
This is also important why you should save the access token in your database. That way you won’t have to manually copy the token and paste it in the PHP code.
Argh! So inconvenient.
Shopify API – Foreach Error
If your app is not displaying anything. For example, products. Chances are you have not setup your store yet. Try adding more items to your store, make collections and add your items there.
The more items and collections the better.
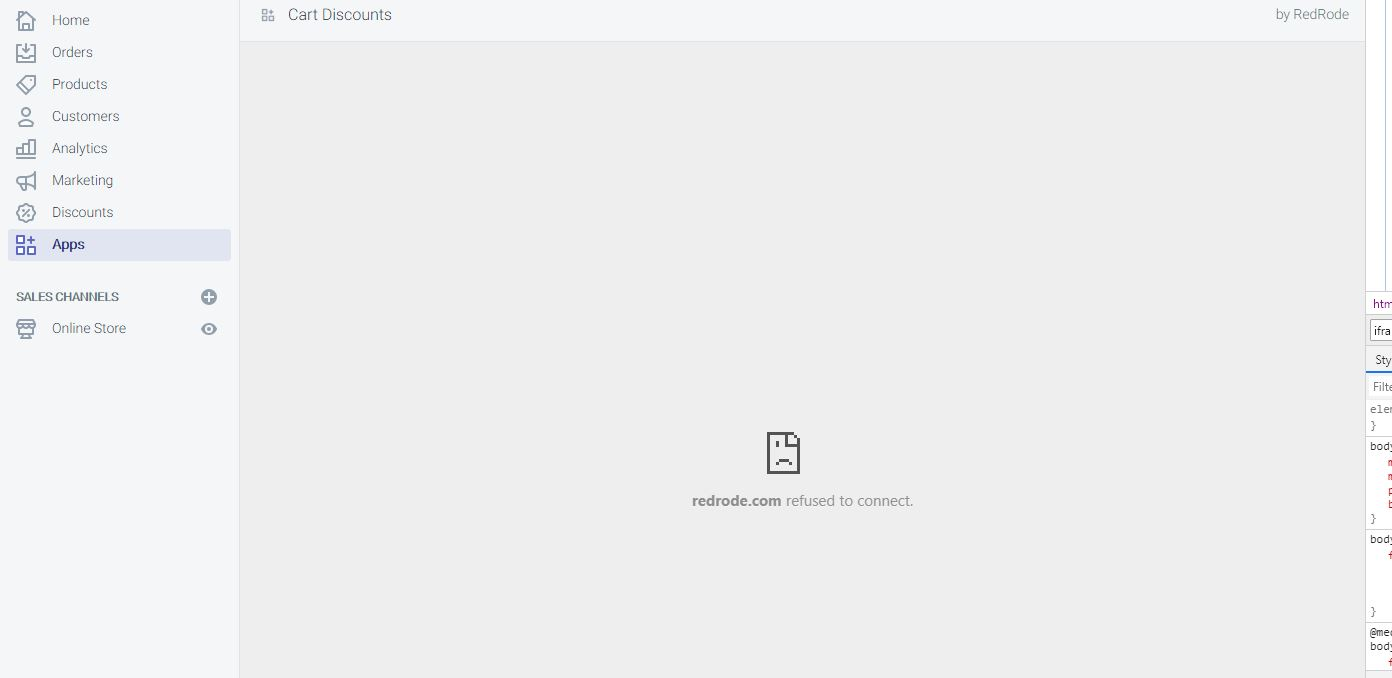
Shopify Refused To Connect Error
Special thanks to Corey for sending this error
According to Corey, the app is not loading properly inside the Shopify app hence returning a refused to connect error. BUT if you try to browse the app URL, the app will load.
I believe this is not TRUE at all.
If the app itself is not loading, then obviously the app URL will not load too.
To finally see what is happening behind the scene of your codes.
Put the following lines of code right at the top of your require_once("inc/functions.php");
This will return all the errors that you are not seeing behind the scene.
Shopify is not Giving the Access Token
Special thanks to Anand for sending me this error.
I have encountered this error so many times now and the usual problem here is the two root files. install.php and generate_token.php
Though I will recommend as well to double check the URLs that you have provided in the settings of your app. Keep in mind that everything is case-sensitive. If your URL is not properly cased then expect to receive an error.
So double check everything!
If your app is not giving access token then that means there is no OAuth happening between the store and the app.
Double check if both of your API key and secret key are correct. Make sure there are no spaces in the string.
Conclusion
I understand the errors like these are such a pain in the head but these errors will, of course, teach lessons and that lessons will help you avoid these errors.
If you are stuck in the following errors, then I suggest you start again from scratch.
I have written a full article on how to develop a Shopify app from scratch. So if you want, go ahead and read it.. maybe again.. because you’re here, looking for solutions and yet again, can’t fix it.
Before you can start working with Shopify store data using Shopify API, there must be an authentication where the store approves your app for certain permission.
We have done this so many times now. So if you don’t know yet how to set up your first Shopify app then I highly recommend you to read first my article on how to create Shopify apps using PHP.
In this article, we’re going to store and save access tokens in two ways and that is through MySQL/PHP and Cookies/Sessions. I will also explain anything you need to know and which one you should really use.
I have received comments about this recently so I decided to write about it as soon as I can. Now let’s say that you already have built your Shopify app and you’re having issues about access tokens. How can we actually save access tokens that were generated by the stores?
Well, there are…
Two ways to save access tokens
There are two ways to store access tokens and the first option you have is to…
Save access tokens using MySQL Database
This is quite obvious now since MySQL database is your only reliable and secured storage for saving data. Now how can we do this? Well, the first thing you wanna do is to create a database through your web host. If you’re using XAMPP/WAMP server then just go to your localhost URL and browse your phpMyAdmin and create a database. If you have your own web host then just go and proceed to your Dashboard and create a database.
Disclaimer, I can’t pretty much give you instructions on how to navigate to your database since we all don’t have the same dashboard or control panel. All I can tell you is to look for MySQL tab or category, click that, and try to create a new database account.
Keep in mind as well that some host requires you to create a username and password for database while some host does not require you to do so and you can just proceed to phpMyAdmin and get your account details there.
Now let’s proceed to PhpMyAdmin and create a database.
I will name my database example_db just for the sake of this tutorial. You can name your database whatever you want.
After that, click on the database that you just have created, and proceed to SQL tab and type in the following SQL query.
CREATE TABLE example_table ( id INT(8) UNSIGNED AUTO_INCREMENT PRIMARY KEY, store_url VARCHAR(255) NOT NULL, access_token VARCHAR(255) NOT NULL, install_date DATETIME )Code language:PHP(php)
Make sure that your database is selected.
And just click the ‘Go’ button located at the very bottom right corner of the query box.
You should have something like this:
Now that our database is ready, let’s go back to our Shopify app project and create a new script.
Let’s name it connect_to_mysql.php and copy the following code:
Make sure you replace the value of each variable above before you proceed. Otherwise, you’ll be getting an error once you reference this script in our next code.
To be sure that there will be no errors. Browse this file using your browser. For example, We have https://example.com/connect_to_mysql.php
If it shows no errors then that means you’re good to go.
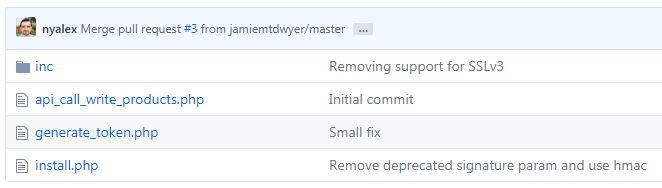
Now save the script and let’s go back to our generate_token.php or token_generator.php (I have created two tutorials as far as I can remember, so the name of the file doesn’t really matter, as long as it has the same code. 😛)
So far, these are the files I have in our project.
Make sure you have the same table name. After that, save the file and uninstall your app and re-install again.
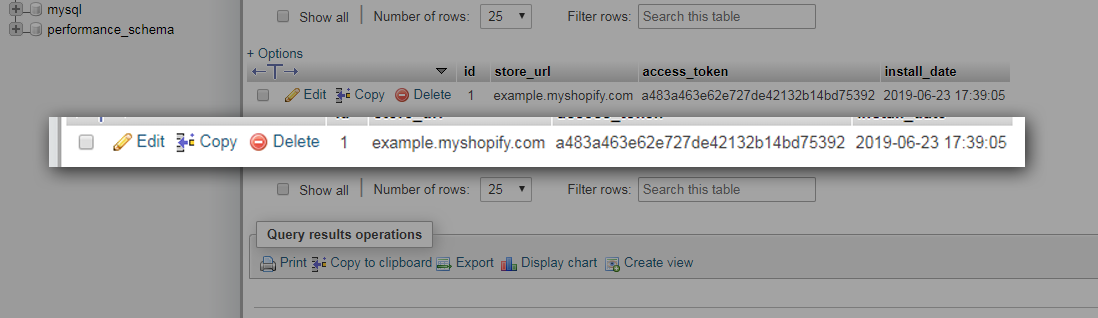
After installing the app, check your database and see if it saved the access token. Like this:
Keep in mind that these tokens are kind of like a password which is important for stores. So you might wanna encrypt these tokens just for the sake of additional security.
Save access tokens using cookies/sessions
The other option that you may use is by saving access tokens using cookies or sessions.
I don’t personally recommend doing this since cookies and sessions are temporary storage. Especially if you usually clear your browser’s data.
Plus, it is also not safe to do this.
However, if you still want to know how to save access tokens using cookies then doing that is very simple. All you need is JavaScript code like this:
See that code above? You’re pretty much displaying the token for the public to see. Yay! free tokens!
Conclusion
Shopify access token is very important for each store. It’s like a password which makes it very critical. So make sure you secure them as much as you can.
If you don’t know about encryption, I highly suggest you search about MD5 or HASH. This will help you secure your important data such as access tokens and passwords.
For now, I thank you for reaching this far. If you have more concerns regarding this series, feel free to share them down in the comments and I swear I respond faster than your internet connection.
I’ve been running this website for quite a long time now and never have I thought of selling products using my blog but instead, I use Shopify. But why? Maybe it’s because it’s easier and it’s much organized.
I know I’m pretty late about this because I’m living under the cave but a couple of days ago I started doing some research about e-commerce and I read that you could use WordPress to make e-commerce.
WordPress is quite known for being able to handle different kinds of systems. Whether if it’s CMS or Forums, WordPress can have that.
Well, It’s true, you can convert your blog into an e-commerce business and it’s very easy!
But before we dig deeper into that, let’s understand first what is e-commerce.
What is e-commerce?
Electronic commerce very well known as E-commerce is a type of business which allows you to sell goods or services using the internet. This all started when a man sold his CD to his friend on August 11, 1994, through his domain NetMarket. Since then, eCommerce evolved and now, selling products becomes easier. Thanks to platforms that allow you to sell products easier such as Shopify and WooCommerce.
What is Shopify?
Shopify is an eCommerce platform that allows you to sell products online. It helps you build your business from designing to selling. It also provides apps that you can use to help you increase your sale or even get products for dropshipping.
What is WooCommerce?
WooCommerce is an open-source e-commerce plugin for WordPress. It is designed for bloggers who want to sell products or services while they’re blogging.
That being said, these two allows you to sell products online. But.
What is the difference between Shopify and WooCommerce?
Shopify vs WooCommerce
The very first thing you would pretty much notice is that Shopify requires you to pay for their services whereas WooCommerce does not require you to pay anything.
And that is an automatic win for WooCommerce of course.
Of course, there’s a reason why you need to pay Shopify, one of which is the domain. Shopify is like a web hosting provider and they help you get started that all you needed to do is brand your store and put items into it. For WooCommerce however, you need to have your own domain and WordPress installed and there you can just install WooCommerce and set up your ecommerce.
So, which one would really win?
The answer will always depend on who will be using the platforms. For example, if you’re a blogger who has a WordPress already then WooCommerce is much appropriate for you to use since you have it already. On the other side, if you’re a fresher who doesn’t have anything at all and wanted to start an ecommerce business then Shopify will do good for you since it’s very easy to set up, unlike WooCommerce which will still wait for your WordPress to be set up.
WordPress for E-commerce?
Now that you already know them, let’s figure out why you should use WooCommerce and WordPress to create e-commerce.
The very first benefit when you use WordPress for creating e-commerce is that you are able to continue blogging while selling products. This way, you can increase your sales much easier.
Don’t require you to pay for anything. Which is good for entrepreneurs who have a very tight budget.
Designing is very easy.
WordPress allows you to have overall control over your site.
WordPress is compatible with any platforms available. Whether it’s in Mobile, PC, iOS, Tables, etc. Your site is available for everyone thus gives you more chances of getting sales.
Being an open-source system. You can pretty much modify your e-commerce technically.
Competitions
It’s not just WooCommerce and Shopify, there are too many options for you to choose from if you want to get started doing e-commerce. That’s why there is a huge competition going on as well when it comes to building an e-commerce website. As you know, WooCommerce is just a plugin for WordPress whereas Shopify, Big Cartel, and Magento is an actual platform for selling.
One thing to keep in mind is that WooCommerce does not provide much security like the rest of the e-commerce platform.
You need to make sure that your website is using SSL to ensure your costumers that they are protected with their transactions.
Keep in mind that WordPress and WooCommerce do not provide SSL. It’s only provided by your web host provider. That is why most people use Shopify for a more secure website.
Can I use Oberlo with WordPress?
I have received emails about Oberlo recently. Asking if they could actually use Oberlo with WordPress. Unfortunately. No. You can not use Oberlo with WordPress and WooCommerce.
Oberlo is an app that is designed for Shopify only.
However, if you’re looking for an alternative for Oberlo then try AliDropship.
AliDropship is an eCommerce plugin for WordPress that works directly with AliExpress to make it easier for bloggers to import products right into your WooCommerce.
Getting Started with WooCommerce
To start building your own e-commerce site using WooCommerce, you first need to install WordPress. There are two ways to install WordPress:
By source files – You may download the source files from WordPress official website and then upload it to your host.
By using your host control panel – If you’re hosting a website, you can install WordPress through your host control panel.
Once you have your WordPress is ready.
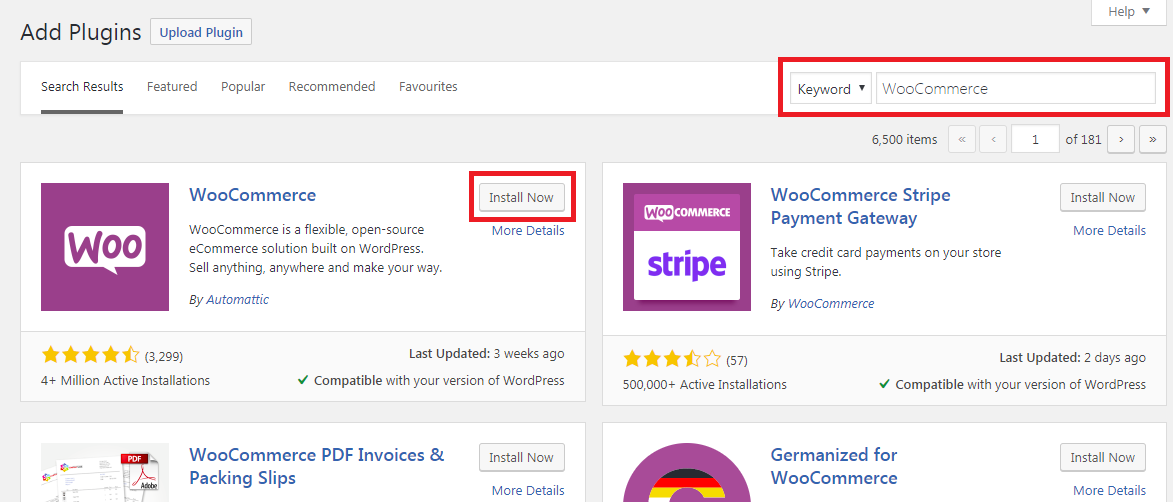
Navigate to Plugins > Add New
Search for WooCommerce and click Install Now
Once the installation is finished, you may now start setting up your WooCommerce.
WooCommerce Shortcodes
If Shopify comes with Shopify apps then WooCommerce comes with shortcodes that you can use inside your blog posts and pages.
Page Shortcodes
Shortcodes
Results
[ woocommerce_cart ]
Displays the cart page
[ woocommerce_checkout ]
Displays the checkout page
[ woocommerce_my_account ]
Displays the user account page
[ woocommerce_order_tracking ]
Displays the order tracking form
Product Shortcodes
The shortcodes of product is one of the most robust shortcodes. It allows you to display products with support for pagination, sorting, and product tags.
Shortcodes
Results
[ products ]
Displays the products
[ featured_products ]
Displays the featured products
[ sale_products ]
Displays products that are on sale
[ best_selling_products ]
Displays the best selling products
[ recent_products ]
Displays the most recent products
[ top_rated_products ]
Displays the top rated items
There are instances that you need to make adjustments to the way the shortcodes display the products. This is where attributes come in. You may use this attribute to control how your products are displayed.
Display Product Attributes
limit – The number of products to display. Defaults to and -1 (display all) when listing products, and -1 (display all) for categories.
columns – The number of columns to display. Defaults to 4.
paginate – Toggles pagination on. Use in conjunction with limit. Defaults to false set to true to paginate .
orderby – Sorts the products displayed by the entered option. One or more options can be passed by adding both slugs with a space between them. Available options are:
date – The date the product was published.
id – The post ID of the product.
menu_order – The Menu Order, if set (lower numbers display first).
popularity – The number of purchases.
rand – Randomly order the products on page load (may not work with sites that use caching, as it could save a specific order).
rating – The average product rating.
title – The product title. This is the default orderby mode.
skus – Comma-separated list of product SKUs.
category – Comma-separated list of category slugs.
order – States whether the product ordering is ascending (ASC) or descending (DESC), using the method set in orderby. Defaults to ASC.
class – Adds an HTML wrapper class so you can modify the specific output with custom CSS.
on_sale – Retrieve on sale products. Not to be used in conjunction with best_sellingor top_rated.
best_selling – Retrieve the best selling products. Not to be used in conjunction with on_sale or top_rated.
top_rated – Retrieve top rated products. Not to be used in conjunction with on_saleor best_selling.
Content Product Attributes
attribute – Retrieves products using the specified attribute slug.
terms – Comma separated list of attribute terms to be used with attribute.
terms_operator – Operator to compare attribute terms. Available options are:
AND – Will display products from all of the chosen attributes.
IN – Will display products with the chosen attribute. This is the default terms_operator value.
NOT IN – Will display products that are not in the chosen attributes.
visibility – Will display products based on the selected visibility. Available options are:
visible – Products visibile on shop and search results. This is the default visibility option.
catalog – Products visible on the shop only, but not search results.
search – Products visible in search results only, but not on the shop.
hidden – Products that are hidden from both shop and search, accessible only by direct URL.
featured – Products that are marked as Featured Products.
category – Retries products using the specified category slug.
cat_operator – Operator to compare category terms. Available options are:
AND – Will display products that belong in all of the chosen categories.
IN – Will display products within the chosen category. This is the default cat_operator value.
NOT IN – Will display products that are not in the chosen category.
ids – Will display products based off of a comma-separated list of Post IDs.
skus – Will display products based off of a comma-separated list of SKUs.
Special Product Attributes
These attributes cannot be used with the “Content Attributes” listed above, as they will likely cause a conflict and not display. You should only use one of the following special attributes.
best_selling – Will display your best selling products. Must be set to true.
on_sale – Will display your on-sale products. Must be set to true.
Product Category shortcodes
These two shortcodes will display your product categories on any page.
Shortcodes
Results
[ product_category ]
Displays products in a specified category.
[ product_categories ]
Displays all your product categories
Product Category attributes
ids – Specify specific category IDs to be listed
limit – The number of categories to display
columns – The number of columns to display. Defaults to 4
hide_empty – The default is “1” which will hide empty categories. Set to “0” to show empty categories
parent – Set to a specific category ID if you would like to display all the child categories
orderby – The default is to order by “name”, can be set to “id”, “slug”, or “menu_order”. If you want to order by the ids you specified then you can use orderby="include"
order – States whether the category ordering is ascending (ASC) or descending (DESC), using the method set in orderby. Default value is ASC.
Troubleshooting Shortcodes
There are instances that your shortcodes would not work or the shortcodes displays an error. The main cause of this is the <pre> tag that is attached to the code that you have pasted. To fix this, you have to make sure that you’re using the shortcode block using your Gutenberg editor. But if you are using the old editor then you may shift in the text editor instead of the visual editor.
Conclusion
Building yourself an e-commerce store is very easy, especially nowadays that we already have that many tools and platforms to use.
If you are planning on making yourself a business then don’t hesitate to give WooCommerce a try… maybe as a test?
Welcome to another Shopify App Development Tutorial using PHP. In the previous article, we have guided you on how to display the product’s name as well as its price using our chosen Shopify API.
In this article, we’ll be displaying not just the name of the product, not just the prices, but also the product’s images.
Product image is one of the most important parts of an online store. This gives your customers an idea about what you’re selling.
If there’s no image… How are they gonna know what the item looks like? Right?
So without wasting any more time, let’s start this tutorial.
Getting Started
Create a new PHP file and name it index.php inside the file paste the following code:
If you have been reading my previous tutorials on how to display products, then you might already know what the code above does or at least you’re familiar with what it is.
However, if you are not.
Then I’ll summarize it for you so, you won’t have to read the previous tutorial.
Okay so.
The code above is just the initialization of the code, we make variables which is important for Shopify API.
We referenced function.php and the changed header file to be able to read both JSON and HTML languages.
Next, we separated the value of hmacwhich is generated by Shopify from $_GET variable and then we sort the request variable. Simple.
Next, we declare two variables:
$token = PASTE YOUR GENERATED TOKEN HERE
$shop = PASTE YOUR SHOP URL HERECode language:PHP(php)
These variables needed to have values, so as you can see, it is stated that you need to paste your generated token and your shop URL.
Alright, some of you may be wondering where I can get the value of the token. If you have been following this series for quite a long time, then you probably know already that this comes from generated_token.php.
If you have no idea what is that, then I SUPER recommend you to read my previous article about how to build Shopify apps using PHP. It contains the script of token generation and I explained it there as well.
The code above will get the collection ID from the store’s custom_collection.json and then convert it into an array.
Keep in mind that the code above will most likely get the default collection which is the homepage collection. So if you want to specify the collection ID, you may use this code instead:
$collection_id = PASTE YOUR COLLECTION ID HERE
$array = array("collection_id"=>$collection_id);
$collects = shopify_call($token, $shop, "/admin/api/2020-01/collects.json", $array, 'GET');
$collects = json_decode($collects['response'], JSON_PRETTY_PRINT);Code language:PHP(php)
Displaying the Product Images
Before we get started, make sure there are images attached to your Shopify products. Because if it is empty then it will obviously return an error or an empty space. So make sure you double-check your items first.
Also, keep in mind that you can only upload up to 250 images per item. But obviously, you won’t be uploading that many images per item. Right?
To do that, navigate to All products > Then select one of your available items.
Next, let’s use this code below to display the very first image of the products
As you can see. This is a multi-dimensional array. Which is why you need to access the values through several ways like looping statements or direct-accessing.
The zero between images and src is the very first index of the array. So let’s say you have 5 images. Then you will need to use foreach for that. Kind of like this:
foreach($images['images'] as $image){
foreach($image as $key => $value){
echo'<img src="'.$value['src'].'" />';
}
}Code language:PHP(php)
The code above will go through each key available in the array. Which is really convenient especially if you need to display all the images.
This is also pretty much easier to control.
Let’s say you want to display 5 images only then all you needed to do is just put a conditional statement with a variable that increments its value as it loops back and then once it reaches 4 then just exit the looping statement.
I’m never displaying the full code in each of my tutorials since it will make you not read the article and you won’t understand each code. But this time, I will make an exception.
If you have set up the code properly. The result will look something like this:
There you have it, we have finally displayed all the item’s first image.
The next thing we’re going to do is to design the app because no one will like to see your app looking like a gallery. Unless you want it that way. But in our case, no.
Designing the App
To design your app, insert this code at the very top of your script:
Now, instead of echoing (yes that’s a word :P) the image. Let’s wrap it between div tags and then create some text underneath the image so it will look like an actual product with details.
So, in the code above, we have displayed the image, the title of the product, and its price.
Now, you might also have noticed that your title may go through the div panel. It’s because, in the CSS, we have added an overflow that is hidden. Then set the text to ellipsis once it overflows in the panel.
Bla bla bla. It’s just a style
Going back to designing.
What if you want to link the image and text to the purchasing page? How can you do that?
Well, since you are now able to display the image, the title, and the price. Then I’m sure you already get the idea on how to get all the components of each product from the API.
But still, let’s do it.
Let’s start with declaring a new variable, and let’s call it storeURL and then give it the value of the shop variable plus myshopify.com.
Now let’s wrap the image tag with anchor tag and then get the URL of your store and then concatenate it with “/products/” plus the value of handle from the products variable.
With the code above, you may now click the images and it will redirect you to its product page where you can “add to cart” the item.
Awesome right?
Conclusion
Creating Shopify apps is very easy especially if you already know your API. If you are using a different client then doing research about it will help you understand it easier.
I’m hoping that there are no issues with your code but if there is then don’t hesitate to let us know in the comments below and we will respond to you as soon as we can.
I think you deserve congratulation on achieving these results.
Every blogger knows how important it is to understand what’s happening behind their website. It’s like if you don’t know anything about it. It will feel like you’re working for nothing.
That’s why we have Google Analytics to help us analyze our website visitors.
What is Google Analytics?
Google Analytics is a free web analytics service offered by Google that can help you understand the following:
How do you acquire users
How are your active users trending over time
How well do you retain users
When do your users visit
Where are your users located
What are the top devices your users are using
What pages do your users visit
and so on…
That’s why if you don’t know anything about what your visitors are doing, then they practically don’t mean anything.
In this article, we’ll guide you on how to use Google Analytics to help you understand not just your visitors but also your website’s statistics. That’s right! Google Analytics also provides detailed insights into how your website is performing like how many visitors you have, how much percentage your bounce rate is, what page is the slowest to load, and the list goes on.
How to use Google Analytics?
To use Google Analytics, you will need to sign up for a Google Analytics account. To register, go to Google Analytics’ official website and click on Sign in or Create an Account located on the upper left corner of the page. However, if you’re already signed in, click on Access Google Analytics and fill in the required information such as your name, name of your website, URL, etc.
After that, click on Get Tracking ID and agree to all of the terms and conditions to finish your sign up. After signing up, you will be getting your Tracking code that you can copy and paste into your website’s HTML files between the head tags.
Google Analytics for HTML
To paste it to your HTML file, you’re required to have access to your files by using either an FTP client like FileZilla or by going to your control panel and proceeding to File Manager. Then open your HTML file using a text editor like Notepad and paste it inside the <head></head> tags.
Google Analytics for Shopify Stores
To use Google Analytics for your Shopify stores, go to your Shopify store’s admin page and click Online store located at the left navigation panel. Then proceed to preferences and paste the code in the Google analytics’ text box.
Google Analytics for WordPress
Another way to use Google Analytics is by installing their plugin through WordPress. To do this, go to your WordPress admin page, proceed to plugin page and search Google Analytics.
After installing the plugin, proceed to Google Analytics tab located at the left navigation panel of your WordPress admin page. Then authorize the plugin by providing the access code.
Personally, I think It’s better to just use Google Analytics on their web page instead of installing it to your WordPress blog because number one, it doesn’t provide that much data unlike in Google Analytics’ web page where you can see what’s happening to your website in real-time. Number two, it could slow down your website since it’s another plugin installed on your website.
Getting Started with Google Analytics
Once you’re done setting up your Google Analytics account, you can start learning about your website traffic. In your dashboard, you will see different sections about your website’s data like active users, traffic channel, sessions, users by time of day, top pages by pageviews, sessions by device and many more.
If you have more than one websites, you can access them by clicking on “all accounts” beside the Google Analytics logo and select which website you wanted to see.
Audience Overview
Audience Overview is where you can find almost all the details you needed to understand your visitors. There you will find how much website visitors you have per month, as well as sessions, page views, bounce rate percentage, average session duration, language of the visitors, and so on.
If you want to adjust the date range of the data, you may change it by clicking the date located at the top right corner of the page below your profile picture. You can also make a comparison between two data by applying two date range. For example, you wanted to compare your website traffic from last month to current month.
Real-time Report
What I love about Google Analytics is that it allows you to view who’s reading your articles in real-time. To do this, click on real-time overview located at the left navigation panel and click overview.
This will bring you to this page:
Above, you see that there were 16 hundreds of people – who were viewing a website in real-time. That’s crazy! Not just that, you’ll be able to locate where the visitors are located and what page they’re currently looking at. You can see as well where they came from through the Top referrals tab. There you can also see which keywords they were using to reach your website.
More about Google Analytics
Some of you might have not known the purpose of other data like bounce rate, session, time, and etc. What do they really mean? What are they for? Why did Google put it there in the first place?
How Bounce Rate is Computed?
They were lots of speculation that if you have a higher bounce rate, that means your website is not doing well. Which is true but it depends on your website. However, let’s understand what this actually means.
Bounce rate happens when a user visits your website and then proceed to another website or web page. Like literally, bouncing onto something. Now how is that computed? When a user visits your website the percentage of bounce rate is 100%. However, if the user looks at your next page. It will be divided into two, which is now 50%.
However, according to Google Analytics, bounce rate is calculated in the following way: single-page sessions divided by all sessions or the percentage of all sessions on your site in which users viewed only a single page and triggered only a single request to the Analytics server.
How Page Value is Calculated?
Page value is the average value for a page that a user visited before landing on the intended page. This value is intended to give you an idea of which page in your site contributed more to your website’s revenue.
Below is the equation you can follow to calculate Page Value. Please note that the unique pageview statistic represents the number of individual users who have loaded a given page per session. Each user is counted only once per session, no matter how many pages are opened by the same user.
E-commerce Revenue + Total Goal Value
Number of Unique Pageviews for Given Page
How Google Analytics can help your SEO
If you have fully understood how Google Analytics work then you probably know already that you can use it to improve your SEO. But how?
If you are quite new to my blog, I mostly talk about marketing strategies and techniques on how to improve your SEO or how to get organic traffic through SEO.
SEO also known as Search Engine Optimization is a technique that helps to improve the growth of the amount of organic search traffic to a website via search engines like Google.
Organic Traffic can only be earned through search engines. To do this, you have to improve your SEO. Now how can you improve your SEO? using keywords. Now, where can you get keywords? You can get short and long-tail keywords using keyword research tools like Google Keyword Planner tool or any other tools online.
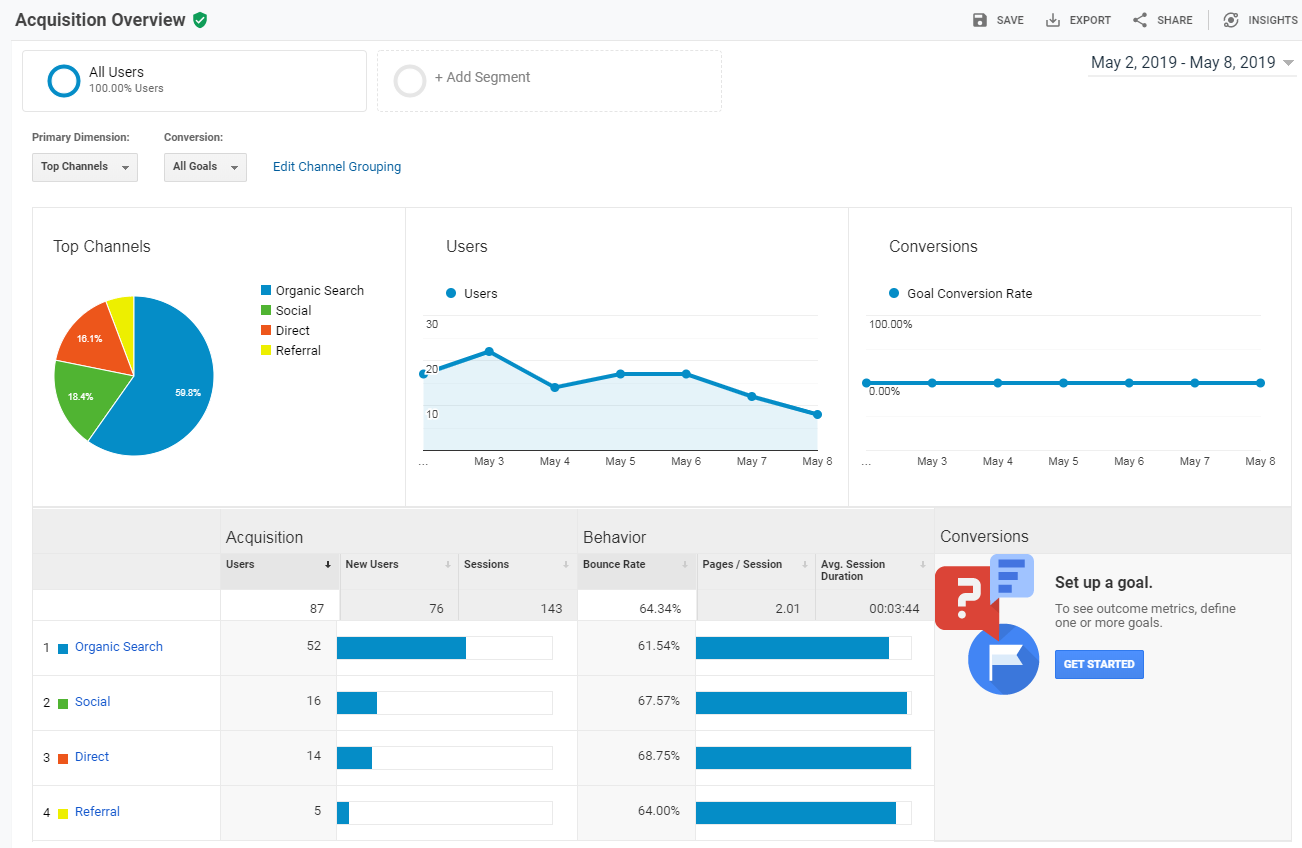
But do you know that you can also use Google Analytics to improve your SEO? Just go to Acquisition and try to look first at the overview page.
There you can see all the information you needed to understand where your visitors are coming from. Are they coming from Google search results? Are they from social media? Did they directly looked at your website by typing the URL of your website? Or were they referred by other websites? This information can be used to improve your SEO.
Now go back to the navigation panel and click search console and click queries (Acquisition > Search Console > Queries).
Now, if you haven’t linked your Google Analytics with your Google Search Console. You may do so, by following the steps below:
Once you clicked the Queries tab:
Click Setup Search Console Data Sharing
Click “All Products” located at the left new navigation panel under the Product Linking panel.
Scroll down until you see Search Console
Click Link Search Console
It will open a new tab redirecting you to Google Search Console
Now click on the radio button with your website labeled on it
Click save
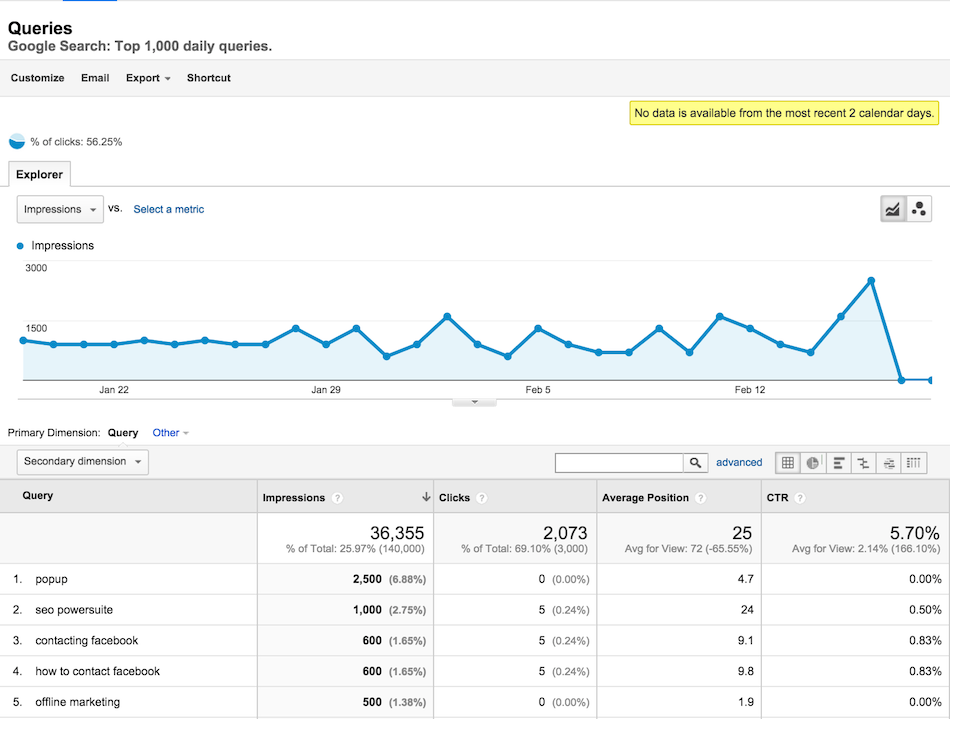
Once you’re done, go back to Google Analytics and proceed once again to your Acquisition > Search Console > Queries. There you will something like this:
With Queries, you’ll be able to directly see on Google Analytics what keywords your visitors are using to get to your web pages.
You can use these keywords to improve your SEO and get rank up all the time in Google Search results. If you wanted to learn more about getting organic traffic and ranking up on Google search results, please read this article:
Create Your Own Google Analytics Dashboard
If you don’t know already, Google Analytics allows you to modify or even create your own dashboard to suit your style. You know, if you love seeing bar graphs or pie graphs you can do so by clicking on Customization > Dashboards > Create. There you can choose to start either with a blank canvas or starter dashboard canvas.
Conclusion
Google Analytics is one of the best tools that you can freely use to not just understand your website but also improve your businesses. There are many tools out there that claim to be better at providing website analytics but personally, Google Analytics will never be beaten as they have mostly everything that you need to measure your website.
If you are developing a shopify app OR let’s just say that you have developed already a shopify app, chances are that your shopify app might be slow.
So how can you optimize your shopify app? In this article, we’ll be giving you tips and tricks to make your Shopify App fast and reliable. Who knows? maybe because of this article, your app will get more installs than before.
Shopify App Optimization
I have personally developed a Shopify app where it generates an embed code to display a collection of products. If you already don’t know, the more items you display, the more your Shopify app will get slowed down but that’s just my observation.
According to Shopify, the maximum item you can display is up to 250 items. Personally, that is a lot, and displaying all of that 250 items in just one query can absolutely overkill your application. So what can we do to optimize this?
1. Displaying Shopify Products through AJAX
If you are a big fan of JQuery like me, then this is the best time for you to use AJAX to optimize your Shopify app. You can do this by making a PHP file where it accepts a collection ID sent by AJAX. Then do all the process inside that PHP file. (Obviously, this won’t make a big difference. Unless you optimize as well the PHP file that accepts data from AJAX.)
Obviously, this works depending on a case. But if you are displaying many items which consist of its title, description, price, and its image. Then putting in a loop to display 250 products will take some time to load.
I recommend using a variable that limits the loop up to 15 items. Then use AJAX pagination system to display the rest of the items (kind of like Google search result).
3. Shopify Image Optimization
If you are going to display images of the products, then it’s best to add a system where it compresses the images before it’s about to be displayed.
I know this could block the page load but there’s a trick to this. After you compress the images, upload it to a folder then add a conditional statement asking if the compressed image exists. If it doesn’t exist, then run the image compression until it gets uploaded.
This way, your Shopify app will load fast because the file sizes of the images becomes small.
4. Use Cache
Caching is the best thing you can use to speed up your Shopify app. If you are using JavaScript, CSS, and lots of images, it is best for you to use cache as it speeds up the page load once the user visited your Shopify app. You may use the following code in your .htaccess file:
# BEGIN Expire headers
<ifModule mod_expires.c>
ExpiresActive On
ExpiresDefault "access plus 5 seconds"
ExpiresByType image/x-icon "access plus 2592000 seconds"
ExpiresByType image/jpeg "access plus 2592000 seconds"
ExpiresByType image/png "access plus 2592000 seconds"
ExpiresByType image/gif "access plus 2592000 seconds"
ExpiresByType image/svg+xml "access plus 2592000 seconds"
ExpiresByType application/x-font-ttf "access plus 2592000 seconds"
ExpiresByType application/x-font-truetype "access plus 2592000 seconds"
ExpiresByType application/x-font-opentype "access plus 2592000 seconds"
ExpiresByType application/font-woff "access plus 2592000 seconds"
ExpiresByType application/font-woff2 "access plus 2592000 seconds"
ExpiresByType application/vnd.ms-fontobject "access plus 2592000 seconds"
ExpiresByType application/font-sfnt "access plus 2592000 seconds"
ExpiresByType application/x-shockwave-flash "access plus 2592000 seconds"
ExpiresByType text/css "access plus 604800 seconds"
ExpiresByType text/javascript "access plus 216000 seconds"
ExpiresByType application/javascript "access plus 216000 seconds"
ExpiresByType application/x-javascript "access plus 216000 seconds"
ExpiresByType text/html "access plus 600 seconds"
ExpiresByType application/xhtml+xml "access plus 600 seconds"
</ifModule>
# END Expire headers Code language:PHP(php)
Conclusion
Shopify apps are like regular websites. They need to be fast and user-friendly, especially if you’re planning on publishing it to the Shopify app store.
The tips above are just few of the things that you can try to optimize your Shopify app. If you believe that your Shopify app is too slow then utilizing at least one of the options above will surely help your app.
So you have finally set up your Shopify app. You have connected it to your web host. Now, you want to start working with Shopify API to display the products of the Shopify store.
In this tutorial, we’re going to take a look at how to display Shopify products using PHP.
If in case you ended up here and you don’t have any Shopify developer account, then we suggest reading our guide below to get started.
Video Tutorial
If you prefer watching tutorials over reading, you can watch the video version of this article below.
Getting Started
Create a new PHP file and name it products.php inside the file paste the following code:
<?phprequire_once("inc/functions.php");
$requests = $_GET;
$hmac = $_GET['hmac'];
$serializeArray = serialize($requests);
$requests = array_diff_key($requests, array('hmac' => ''));
ksort($requests);
$token = PASTE YOUR GENERATED TOKEN HERE
$shop = PASTE YOUR SHOP URL HERE
Code language:PHP(php)
The code above will basically retrieve first the data of the Shopify store.
After getting all the data, assign the $_GET['hmac'] to a new variable $hmac then serialize the $requests variable. Then remove the key ‘hmac’ inside the array $requests.
Then we’ll sort the $requests variable with ksort() function.
Next, the following variables are important for making Shopify requests. Remember that we generated a token when we installed the app in our store? Right now we’re going to use that, now paste the token in the value of $token variable.
Note that we are not yet using the database and so it’s important to back up the access token in a file for reference.
Next, the $shop variable. Paste the URL of the store that you are using for this app BUT without https and myshopify.com. Just the SUBDOMAIN.
We’ll be using the function shopify_call() to get the first collection ID that we needed for retrieving the products. You may skip this part if you want to display specific products from a collection ID.
To display specific products from a collection ID, you can use this code instead:
$collection_id = PASTE YOUR COLLECTION ID HERE
$array = array("collection_id"=>$collection_id);
$collects = shopify_call($token, $shop, "/admin/api/2020-07/collects.json", $array, 'GET');
$collects = json_decode($collects['response'], JSON_PRETTY_PRINT);
Code language:PHP(php)
The numerical value at the end of the URL above is the collection ID, copy that and paste it to your $collection_id variable.
To explain, the code above will return an array that contains all the product IDs inside the collection ID that we used. Basically, it’s a JSON code but we decoded it and turn it into an array that’s why we use json_decode() function.
The code above will display all the product’s name available inside the collection ID that we have used.
Output
Congratulations! Now you have successfully displayed all the products that are available inside a certain collection. If you have concerns or questions, don’t hesitate to ask down in the comments.
In the previous article, through the Shopify developer, we set up the Shopify app that we’re going to use in this article. If you haven’t read the article yet or if you have no Shopify app ready yet, you may read the first part of this series to help you catch up.
Getting Started
To make your Shopify app work, your Shopify app must be authenticated by the store. That means that the shop owner must install your Shopify app and give you the permission you needed to work on their store. For example, displaying a list of available products. This process is mainly done by OAuth, which is a very highly secured method for communication between applications.
It is also important to know that every shop that installs your Shopify app, they have an access token that they need to use to keep their session running. That token can be saved to your database
Generating Shopify API Token
To build Shopify app using PHP, we’ll be using the client that I’m personally using which is the Shopify Generating API Token Guide by Alex. If you don’t have it yet, you may download it from GitHub and extract the files to your project.
Source Files
inc – this folder contains a PHP file (functions.php) that contains a function that you can use to make Shopify actions like displaying the products from a collection.
api_call_write_products.php – An example PHP file to make actions like modify a product. You can read the file and study it yourself. But in this tutorial, we’ll be making it from a scratch.
generate_token.php – PHP file for generating token per store. This file we’ll be used after the store install the app.
install.php – PHP file for Shopify app installment. self-explanatory.
First, assign the value of $_GET[‘shop’] to the variable $shop. If you don’t know where that value is coming from. It’s from the URL that the user will be visiting. For example:
$api_key variable is where you’ll be assigning your API key. You can get your API key from your developer app page.
You may leave the $scope variable.
$redirect_uri should contain the URL of your generate_token.php file $install_url is a variable that contains the complete URL where the user will be prompted to install the app.
After setting up the variables, redirection to the URL from $install_url variable will happen.
Important! You should only change the value of the $api_key and $redirect_uri variables.
generate_token.php
<?php// Get our helper functionsrequire_once("inc/functions.php");
// Set variables for our request$api_key = "ASSIGN YOUR API KEY HERE";
$shared_secret = "ASSIGN YOUR SECRET KEY HERE";
$params = $_GET; // Retrieve all request parameters$hmac = $_GET['hmac']; // Retrieve HMAC request parameter$params = array_diff_key($params, array('hmac' => '')); // Remove hmac from paramsksort($params); // Sort params lexographically$computed_hmac = hash_hmac('sha256', http_build_query($params), $shared_secret);
// Use hmac data to check that the response is from Shopify or notif (hash_equals($hmac, $computed_hmac)) {
// Set variables for our request $query = array(
"client_id" => $api_key, // Your API key"client_secret" => $shared_secret, // Your app credentials (secret key)"code" => $params['code'] // Grab the access key from the URL );
// Generate access token URL $access_token_url = "https://" . $params['shop'] . "/admin/oauth/access_token";
// Configure curl client and execute request $ch = curl_init();
curl_setopt($ch, CURLOPT_RETURNTRANSFER, 1);
curl_setopt($ch, CURLOPT_URL, $access_token_url);
curl_setopt($ch, CURLOPT_POST, count($query));
curl_setopt($ch, CURLOPT_POSTFIELDS, http_build_query($query));
$result = curl_exec($ch);
curl_close($ch);
// Store the access token $result = json_decode($result, true);
$access_token = $result['access_token'];
// Show the access token (don't do this in production!)echo $access_token;
} else {
// Someone is trying to be shady!die('This request is NOT from Shopify!');
}
Code language:PHP(php)
Before we proceed, make sure you change the value of the variables $api_key and $shared_secret. Again, you can get this data from your developer app dashboard.
If you noticed, the code above is using cURL client to execute requests. These requests will give you a value which is a JSON data type and that needs to be decoded so that PHP can use this value.
After getting the access token, you may add a MySQL query to save the value of the$access_token variable for future use but if you want to learn how to easily store it in the database, then you might as well check this link below (trust me it’s very easy):
Installing the Shopify App
Once everything is set up, you may go to your project URL and run install.php. To do this, you must include the variable shop in the URL. For example:
Hello everyone! 2021 has been quite a year, hasn’t it? Amidst challenges, I am very happy that we got through all of it and achieved amazing milestones and I hope you did as well. This 2022, I am excited to say that there will be more content that I’m sure everyone will enjoy. Let’s talk about all of them.
But first! if you’re not aware, I’ve recently published a new video on our YouTube channel talking about the plans I have for 2022, so if you haven’t watched it yet, feel free to do so below.
Otherwise, we can proceed and talk about them here instead.
Plan to take my master’s degree.
I’ve been working on this for months and I am very excited to say that, yes I am planning to take my master’s degree. But, why? There are many reasons why I decided to take master’s degree and one of them is due to the fact that I am looking for further knowledge (Isn’t really the point?) and experiences. I’ve been going through my past experiences and I feel like I haven’t fully exposed myself to the CS industry. In my whole entire life, I’ve only worked remotely, collaborated online, and the only professional experiences that I had were not really related to the industry that I’m supposed to be in.
So, by taking master’s degree and by going out of my comfort zone, I am hoping that I get exposed to a real-life situation where I get to collaborate with CS professionals or businesses. In addition, I am wanting to further build this community and business that I have. I want to be able to create more and help programmers like myself to solve problems and create web applications.
There is a saying that I always keep in my mind: “Do not compare yourself to others” and I try not to, but there are moments that you can’t avoid comparing yourself to others when life is full of competitions and challenges. So here I am, trying to look for an opportunity to be a better engineer.
2022 for WeeklyHow
There are so many plans for WeeklyHow, I’ve already mentioned one in the previous take, but there will be more! I will be creating more content for our YouTube channel, create more courses, and make this website a little more easier to use.
More YouTube videos!
I will be creating more of these and cover more topics other than Shopify. I believe I promised in one of my older videos that I will be covering TailwindCSS, so in 2022, I will do that. Of course, I will create more Shopify videos, I will learn about Hydrogen so I can make a tutorial about that, I will also create a new series for Shopify app/theme development. Maybe GitHub tutorials? Maybe continue Unity? We’ll see. But one thing is for sure, I will experiment and try a new format for my tutorials. I will try to make it more watchable or easier to digest. I’ve been watching plenty of YouTube videos lately and I feel like I can make ours a little better. So, watch out for that 🙂
More courses!
I will be creating more courses but I won’t be spoiling the topics. I hope I get to publish 4 more courses this year though.
Make WeeklyHow better
This 2021, I’ve managed to improve our learning system, use a different video host (for some courses) and upgrade our video player. This 2022, my goal is to make the site a little more easier to use. So, changes in frontend might come pretty soon. I will also remove the FREE courses since most of them are not fully finished. However, I will try to replace them with something better.
Wrapping up
One thing is for sure, 2021 has been a very challenging year for all of us. It’s had ups and downs, but in the end, we’ve managed to become a better person or at least I hope so for myself. This 2022 would not be here without the support of each and everyone in our community, so thank you very much!
I promise to deliver everyone another quality content or tools that you need to make the eCommerce community a better place for all of us.