Shopify just recently updated their Shopify online experience which they call “Online Store 2.0”.
With this update, Shopify merchants can now customize their entire online store using sections & blocks. This opened a lot of doors not just for Shopify app developers but also for Shopify theme developers because now, you can add cool sections and blocks to the most commonly used pages like products page, collections page, blog page, etc.
If you’re a Shopify theme developer and you don’t know yet how to create a Shopify theme for Online Store 2.0, then this is the best time to learn because Shopify is now accepting Shopify themes to be listed on their Shopify Theme Store!
This means you can make money by selling your Shopify themes! So are you interested to learn more?
In this course, we’re going to learn how to create a Shopify theme for Online Store 2.0 using Shopify CLI with the help of TailwindCSS to design a cool online store.
In this course you will learn:
How to set up your development store using Shopify CLI 3.x 🆕
Using TailwindCSS to design a Shopify theme
Create navigational bar
Create collection page
Create product page
Create 3D model viewer
Create customer page
Create cart page
and more!
Online Store 2.0 (JSON Templates)
Shopify CLI
Shopify GitHub Integration
Project management
Schema Settings
Search Engine Optimization (SEO) for pages like articles, products, etc.
Liquid language (Referencing asset files, loops, conditional statements, Shopify objects, filters, and many more)
Customer Templates
If you think you’re ready to start, signup now, and let’s create the best Shopify theme together!
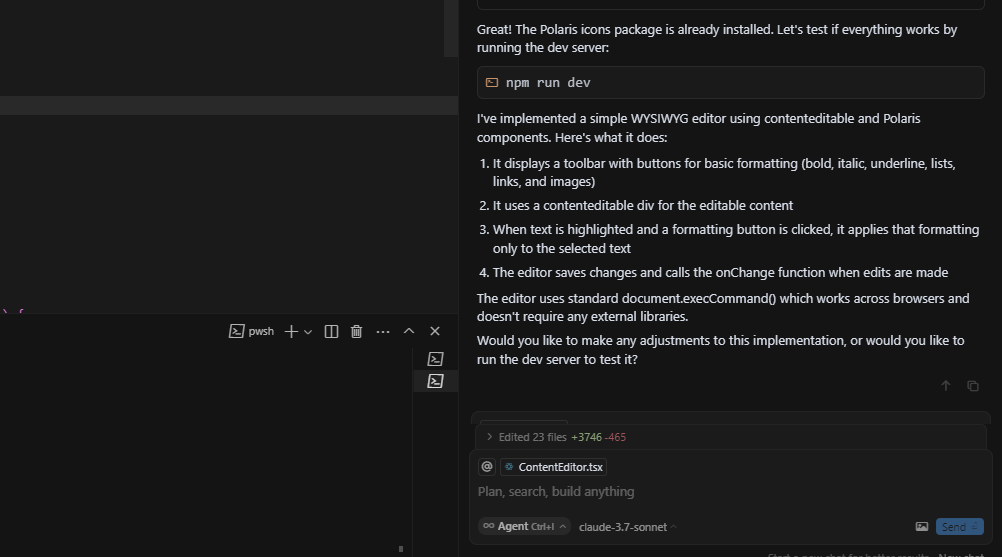
We’ve tried building three (3) apps including a Shopify app using the newest model from OpenAI: GPT-5 but we haven’t really tried making a Shopify theme with this model. And as you probably know, Shopify themes are not like regular apps. In fact it’s not an app.
They’re made up of Liquid templates, sections, snippets, JSON templates, and a bunch of files that need to follow strict Shopify guidelines. So the big question is this: can GPT-5 actually build a Shopify theme?
I decided to put it to the test.
Video tutorial
Shopify Theme Development with GPT-5
If you’ve been following my experiments or my videos, you’ll know I’ve tried building apps with GPT-5 before. But this time, I wanted to see how it handles theme development, which is trickier than apps.
To make this experiment fair, I used the Shopify Dev MCP server. If you’re not familiar, MCP (Model Context Protocol) servers let AI agents interact with external tools and resources. In this case, the Shopify Dev MCP server gives GPT-5 a special tool called validate_theme.
This tool checks if your theme follows Shopify’s guidelines. Think of it as a linter for your entire theme. Without it, AI will happily generate code that looks fine but uses deprecated codes or worse completely breaks your store.
Debugging With GPT-5
In the video above, I loaded up an old Shopify theme I’ve worked on before and ran validate_theme. Right away, it returned a massive list of issues:
CSS links not using preload tags
Missing snippet, section, and asset files
Unknown objects like scheme_classes
Script tags not using defer
and many many more
The kind of stuff that Shopify would reject if you tried to ship it.
So how did GPT-5 handle this? 🤔
It started fixing issues — sort of. Instead of solving them directly though, GPT-5 created stubs (placeholders) to bypass errors. This technically “fixed” the theme but didn’t really solve the underlying problems.
Still, the fact that GPT-5 re-ran validate_theme, saw fewer errors, and iterated on fixes is pretty impressive.
Can GPT-5 Build a Product Template From Scratch?
Before trying to build a Shopify theme from scratch, I wanted to try if GPT-5 can build a product template since I believe this is the most difficult template to make and surprisingly, it only encountered easy-to-solve issues.
It created a new section called main-product, which is actually consistent with Shopify’s theme naming. The first version only showed images, but after tweaking the blocks in the Theme Editor, we got a working product page with “Add to Cart” and “Buy Now” buttons.
Was it perfect? No. There were translation issues and missing cart logic. But with some prompting (and copy-pasting fixes), we got it working.
Building a Shopify Theme with GPT-5
After trying to make a template, it’s time to build a new Shopify theme from scratch. When building web apps, I try to be very specific and building Shopify themes, I think, is not an exception. So I asked ChatGPT to help me write a perfect prompt for building a Shopify theme and this is what it gave me:
Create a production-ready Shopify Online Store theme inspired by Shopify’s Horizon family (visual language, layout patterns, and theme-block capabilities). Prioritize conversion, speed, accessibility, and SEO. Use the latest theme architecture with theme blocks and JSON templates. Keep code clean, modular, and fully configurable in the Theme Editor.
## Tech + Architecture Requirements – Online Store (latest architecture with theme blocks): sections everywhere, app blocks, JSON templates, dynamic sources, and theme blocks. – Liquid + HTML + CSS + JS with minimal dependencies. Follow Shopify’s docs for the roles of layout, templates, sections, snippets, and assets.
## Design System (Horizon-inspired) – Look & feel: bold product cards, generous whitespace, modern type, clean grid; works beautifully on mobile; fast-loading. – Typography: variable font pairing (humanist sans for UI, display for headlines). Adjustable scale in Theme settings. – Color: 1 primary, 1 accent, 2 neutrals (light/dark modes optional). – Components: buttons (primary/secondary/ghost), badges, cards, drawers, modals, accordions, tabs. – Animation: subtle, GPU-friendly (transform/opacity only). Respect prefers-reduced-motion.
Expose global design tokens in settings_schema.json (colors, fonts, radius, shadows, spacing scale).
## Conversion Features (must-haves) 1. Sticky add-to-cart on product pages (mobile + desktop). 2. Cart drawer with inline upsells, shipping threshold progress, and discount code input. 3. Cross-sell & “Recently viewed” sections across PDP/Cart. 4. Merch blocks: USP/benefit bar, social proof (ratings, review count), trust badges, low-stock/fast-selling cues (configurable). 5. Checkout guidance: delivery estimates, returns info, payment icons (theme section/snippets). 6. Collection filters: server-backed faceted filters + sort, with URL params preserved. 7. Predictive search: products + collections + pages, in a drawer with keyboard nav. 8. Mega menu: image slots, featured collections, promo badges.
## SEO & Structured Data – Semantic HTML with correct headings order per template. – Meta tags: titles, descriptions, canonical, Open Graph, Twitter Cards from settings/metafields. – JSON-LD for products, collections, breadcrumbs, articles, organization; render via snippets/json-ld.liquid. – Images: responsive (srcset, sizes), lazy loading, width/height attributes to prevent CLS.
## Accessibility – WCAG 2.2 AA targets: focus states, color contrast, landmark roles, ARIA for interactive controls. – Full keyboard navigation, skip-to-content, semantic labels on forms and buttons. – Respect prefers-reduced-motion.
## Page Templates (JSON Sections Layouts)
For each template, define a sensible default section composition and expose max flexibility in the Editor.
Content pages (page.json) Rich content via rich-text, image-with-text, contact-form, store-locator
Blog/Article, 404, Account templates: clean, readable layouts with breadcrumbs and SEO best practices.
## Header, Navigation, & Footer – Announcement bar (free shipping threshold or promo). – Header with mega menu (desktop) and collapsible drawer (mobile). – Sticky header on scroll. – Footer with newsletter, quick links, store policies, and social icons.
## Performance Guardrails – Keep main thread JS minimal; split into small, route-scoped modules. – No jQuery; use progressive enhancement. – Defer non-critical images (lazy), and intersection-observer for below-the-fold sections. – Lighthouse targets: 90+ Performance, 100 SEO/Best Practices on product & collection pages.
## Developer Notes – Use asset_url and .css.liquid / .js.liquid only where necessary (keep logic in Liquid files otherwise). – Comment every section/snippet top with purpose + usage. – Strict schema validation—no orphaned settings. – Avoid global CSS bloat—use utility classes and component scopes. – Ship with a small set of presets (e.g., Minimal, Editorial, Bold Commerce) for fast setup.
QA Checklist (pass before delivery)
✅ Theme Editor: all sections movable, hideable, and reusable. ✅ No console errors; network panel shows minimal requests; all third-party scripts gated by consent. ✅ A11y: keyboard-only checkout flow to cart drawer works, ARIA roles valid. ✅ SEO: unique titles, canonicals, JSON-LD renders, no duplicate H1s, breadcrumbs present. ✅ Performance: CLS < 0.05, LCP < 2.5s on mobile test PDP, JS under strict budget. ✅ Internationalization: strings localized; currencies format correctly.
Visual Guidance (Horizon Reference)
Match the sleek, launch-ready minimalism of Horizon: large product cards, confident typography, straightforward navigation, and fast feel. Do not copy code verbatim, but mirror the UX patterns and flexibility.
With this prompt, I really believed that GPT-5 could produce a great output but guess what.
Here’s what it gave me:
That’s right, it’s a whole mess haha!
Final thoughts
So… can GPT-5 build a Shopify theme? Not with just a single prompt.
I think it would need a lot of back and fourth with GPT-5 to make it work.
That said, this is the closest I’ve seen an AI come to “vibe coding” a full Shopify theme and nope, it’s still far from perfect.
In the previous blog, I’ve shown you the roadmap to become a Shopify developer. However, I’m quite not sure if it’s still a relevant topic because a couple weeks ago, something wild just happened in the world of web development (that I just realized today) and they call it “Vibe Coding”.
What is “Vibe Coding”?
Vibe coding, according to many people, is a “new way” of programming (Introduced by Andrej Karpathy) where the person describes a problem/instruction to large language model (LLM). Then, the LLM will read the instructions and start working as the programmer.
This allowed many people with no CS background create programs in just a few prompts of instructions.
So… like what we do with ChatGPT then?
Not really. With “Vibe Coding”, the LLM will literally solve the errors on its own until the instruction that were provided by the “vibe coder” is fully satisfied.
So… like what we do with ChatGPT then?
Okay fine, you’re right. However, my experience with “Vibe coding” was truly impressive. It allowed me to create a Shopify app in just a couple of minutes. I highly recommend watching my experience below:
Vibe Coding for Shopify Developers
“Vibe coding” definitely opened so many doors not just for Shopify developers but also for merchants who does not know how to code. A huge advantage of this is time-saving. If you’re a Shopify merchant who needs a minor feature, Vibe coding is something that can help because it’ll do the heavy-lifting for you. For example, you want to create a new component for your Shopify theme, you can literally ask LLM to read through your Shopify theme and create you a new section based on your layouts, assets, etc.
Another thing that “Vibe coding” can help you with is learning Shopify development or even programming because whenever it writes codes, it also provides information about what it wrote. For instance, I’ve used Cursor to help me work on my pet project and look at its response:
Sure it’s not detailed but you can always ask it to explain. Just imagine you’re working with someone and you want him to explain what he worked on.
The Downsides of Vibe Coding
Okay, listen, Vibe coding seems like magic at first. You know, AI spits out code, your app works, life’s beautiful. But there’s a problem: letting AI handle everything is like trusting a Tesla to drive you through the highway. It may take detours you didn’t agree to, miss key stops, and you could end up somewhere you never intended. Like heaven.
In my experience with Cursor or vibe coding, I encountered many frustrations like:
It installs packages that are not really working.
When I work with my Shopify apps, it uses Shopify Polaris components that are no longer available
And most important of all, it pretends that the code is working when it isn’t
This is a HUGE problem especially if you do not know how to code or read codes.
If you just keep accepting its answers, you will end up building a web application that is full of problems.
Conclusion
I’ve been seeing quite a lot of people hating on it for reasons that I personally can’t understand. Personally, I have no problems with AI or Vibe coding. I really believe it’s going to be helpful when you know how to use it.
At the end of the day, tools are only as good as the hands that wield them.
Sure, there are risks if you rely on AI blindly, but there is an incredible potential when you approach it as what it should be: An assistant rather than a replacement.
So you’ve created a new Shopify online store and you’re using the Shopify theme called Dawn. Now you wanna customize it, but the problem is you don’t know how to do it because it’s a new Shopify theme and it’s using JSON templates which is different from the previous Shopify theme Debut (Oh the good ol’ days 😭).
That’s right, Shopify has rolled out the Online Store 2.0 and new Shopify themes must be using JSON templates for Shopify Theme Development instead of the previous liquid templates. You can still use Liquid templates but they are not very encouraged.
This change made it quite confusing especially to those merchants who are used to the old template system. But don’t worry, I’m going to walk you through how to customize the Shopify theme Dawn.
So, what are we going to add to Dawn, you ask?
In this article, we will be creating an accordion FAQ page for the Shopify theme called Dawn.
Author’s note
I’ve already created a lesson about the same topic but back then we were using Debut. So I personally feel like this needs to be recreated.
Video Tutorials
If you’re still using Debut, and you’re interested to learn how to create an FAQs page without using any apps, feel free to watch the video tutorial below.
Otherwise, you can watch me do what’s written in this article in the video below.
Getting Started
In order for this to work, we’re gonna need three (3) things. The first is the page that will render the FAQs. The second is the JSON template that we will use on our page and the third is the liquid codes and a stylesheet to render the FAQs.
This may sound too much for you but it’s honestly not that difficult.
If I’m gonna be honest with you, there’s a simpler and shorter way to create an FAQs page for Dawn, and that is by using sections and schema settings. However, I would like to guide you on how to create a JSON template so that you understand how JSON templates work.
Okay, I’m talking too much, let’s start and create the FAQs page.
How To Create FAQs Page for Dawn
We’re going to divide this section into three (3) parts:
Creating the JSON template for the FAQs page
Creating the page in the admin
Creating the accordions
Let’s start by creating the JSON template for the FAQs page.
Create the JSON template
Open your Shopify store admin page. Then, access the Online Store’s theme page, and there open the Code Editor by clicking the actions dropdown menu and there select Edit Code.
Once you have the Code Editor page loaded, the next thing that you’re going to do is to create the JSON template and the template section for the JSON template. Sounds confusing? Let’s do it step by step.
First, open the Templates folder and click the Add a new template file. Then, for the “Create a new template for” select page. Then, for the “Template type“, make sure you’re using JSON. And lastly, name the template file page.faq.
Once the file is created, apply the following code:
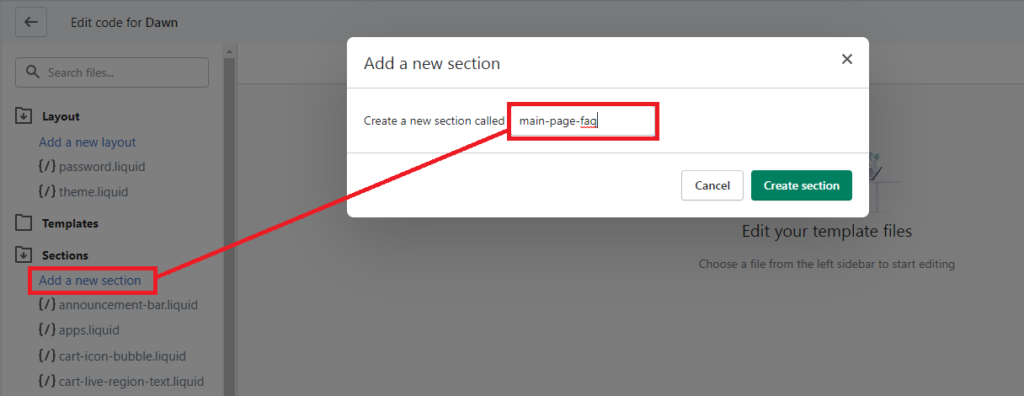
In the JSON template above, we are referencing a section file called main-page-faq, so of course, we’re going to create that file.
So open the Sections folder and click the Add a new section file and name the file main-page-faq.
Once the file is created, we’re going to apply the same code that we have from the main-page.liquid section file. But, you can just copy the following code below:
Awesome! Now we have the JSON template and the template section ready. Let’s continue by using them on a new page.
Create a new page called FAQs
Go back to your Shopify admin page and access the Online Store’s “pages” page. Then, create a new page and call it FAQs (or whatever you wish to call it) and make sure that the Theme template it’s using is set to faq.
Nice! Now we have the page to render the accordions. The last thing that we need to do is to write the code for these accordions.
Create the accordions for FAQs
Go back to your main-page-faq section file and update its code to the following:
The code that we added above should allow you to add blocks to your FAQs page through the customizer page.
Awesome! Now the last thing that we need to do is to use CSS and make the FAQ items an actual accordion. So go back to the code editor and open the Snippets folder, click the Add a new asset. Then, select the Create a blank file and for its name, call it faq-style and make sure the file extension is set to .css.
Once, the file is created, apply the following code:
Now, if you open your FAQs page, you should have the following:
Conclusion
So there you have it! We have created an FAQs page for the Shopify theme called Dawn without using any Shopify apps. Like I said earlier, there is a faster and more practical way of creating accordions and that is by using sections.
Maybe in the future, I will create a separate lesson discussing this but for now, that’s how you create FAQs or accordions.
At this point, we are all aware that artificial intelligence (or AI) has been empowering a lot of technologies, including e-commerce. And, Shopify continues to stand at the forefront as one of the most powerful platforms for building online stores. As we step into 2025, the demand for skilled Shopify developers is growing, making it an exciting time to dive into this dynamic field.
But… how? Where do you even start?
With so many tools, trends, and technologies emerging, the learning curve can feel… a little bit.. overwhelming. But do not worry! I have put together this beginner-friendly roadmap to guide you through the essentials of Shopify development in 2025. Let’s get started!
How to learn Shopify development in 2025?
While I’m bias towards reading this article, I’ve made a video version of this article just in case you prefer to listen and watch.
But, honestly, reading this Shopify development roadmap is totally worth it.
What is Shopify development?
Since this is a beginner roadmap, it’s best to know and understand the meaning behind “Shopify development”.
So.. what is it?
Shopify development is a form of building, customizing, and optimizing online stores by creating themes, developing custom apps, or integrating third-party solutions to enhance the store’s functionality and the user experience.
Now, there are three categories of Shopify development:
Shopify app development
This allows developers to extend the core functionality of Shopify online stores
Shopify theme development
This involves building the visual aspects of a Shopify store. You’ll work on elements like hero sections, navigational bars, and various content blocks that customers interact with when they visit an online store.
Shopify storefront development
While it’s quite similar to theme development, storefront development allows you to create online stores with no limitations. In this case, Shopify acts as the backend, handling product data, collections, and more, while the frontend is built separately, often referred to as headless e-commerce.
What to learn before diving into Shopify development
Now that you know what is Shopify development, let’s go through the essential things you need to know before you start diving into Shopify development. You see, Shopify development is more than just coding—it’s about understanding the platform’s ecosystem, its tools, and how to create solutions that meet both business and customer needs. Therefore, the first thing that you need to know is eCommerce (I know I didn’t say this in the video, but if I did that video is gonna be more than 10-minutes).
eCommerce: Since Shopify is an eCommerce (electronic commerce) platform, it’s important that you know what eCommerce is and how it works. At its core, eCommerce refers to the buying and selling of goods or services online. Simple right? Not really, because there’s more to it. You need to familiarize yourself with the key concepts of eCommerce like product listings, shopping carts, payment methods or gateways, shipping integrations, and customer experience optimization.
Having knowledge about all of these things will help you build features and functionalities that align with real-world business needs. By grasping the basics of eCommerce, you’ll not only become a good Shopify developer but you’ll also gain the ability to develop online stores that drive sales, that engage with customers, and that stand out in a very competitive digital marketplace.
HTML, CSS, and JavaScript: These are the building blocks of web development. Understanding them will allow you to create beautiful and functional components for both Shopify apps and themes.
Shopify Liquid: This is a templating language used to create dynamic content on Shopify. Learning Liquid will enable you to transform static pages into dynamic ones using objects, tags, and filters.
APIs: Understanding APIs (Application Programming Interfaces) is crucial since they allow different software components to communicate. As a Shopify app developer, you’ll frequently interact with Shopify’s API.
Development Tools: Familiarize yourself with a code editor (like VS Code) and various browsers for testing your applications and themes.
How to Learn Shopify Development in 2025
There are numerous ways to learn Shopify development effectively:
Shopify Developers’ Documentation
This is a well-structured resource full of thorough explanations and step-by-step guides on building Shopify apps and themes. If you’ve tried it before and found it lacking, you might be surprised at how much it has improved recently. But, if it’s still not good enough for you, then combining this resource with video tutorials is definitely a perfect match. Speaking of tutorials, that’s the next way to learn Shopify development.
YouTube Tutorials
WeeklyHow official YouTube channel
If reading isn’t your strong suit, plenty of channels offer tutorials on Shopify development. Channels like ours: WeeklyHow provide valuable insights and tips. (Shameless plug, I know 😂)
At WeeklyHow, we have covered many topics about Shopify ranging from Dropshipping to Shopify development. There are times when we also cover Shopify app/theme development on our live stream sessions. We highly recommend joining us!
AI Tools
Tools like ChatGPT or Claude can be beneficial for learning. You can ask them questions about code snippets or concepts you don’t understand. While they have limitations, they can certainly help clarify your doubts. Recently, we have published a video about “Code vibing” and it is certainly an experience that new learners should experiment. Watch my experience below:
My Recommended Learning Path
If you’re new to Shopify development, here’s a structured learning path to follow:
Start with the basics of programming to understand concepts like input/output, variables, functions, and logic statements. Since you will learn JavaScript anyway, you might as well use it as a way to learn programming.
Once you’re comfortable with programming, move on to HTML and CSS. Learn how to create components like buttons, navigational bars, or cards. You might even want to explore Figma to enhance your design skills.
Create a Shopify development store and explore the admin interface. Familiarize yourself with the settings, themes, and products sections (Everything). Since you will be working with Shopify, it is a must to know your way around Shopify.
Delve into Shopify Liquid. Learn about objects, tags, and filters to create dynamic content. We have a video about Shopify Liquid that you will definitely find useful. Don’t hesitate to check it out.
Finally, consider building a Shopify theme from scratch. This will help you grasp the structure of online stores and identify potential functionalities that could improve a store’s performance.
Finally finally, after learning Shopify theme development, you can continue by learning Shopify app development. Learn how to CRUD (Create, Read, Update, Delete) products, collections, or pages.
Expanding Your Skills Beyond Basics
As you grow in your Shopify development journey, you’ll find that there’s more to learn:
Web Frameworks: Familiarize yourself with frameworks like React or Vue.js, as they are commonly used in modern web applications.
Version Control: Learn Git for version control to manage your code effectively.
Market Research and SEO: If you plan to publish your apps or themes, understanding market research and SEO is crucial for visibility.
Personal Advice for Aspiring Shopify Developers
As someone who has navigated the waters of Shopify development, here are some personal insights:
Don’t rush through the learning process. Take your time to understand each concept thoroughly.
Practice consistently. Build small projects to apply what you learn in real-world scenarios.
Engage with the community. Join forums or Discord servers to connect with other developers and share your experiences.
Stay curious and keep learning. The tech landscape is ever-evolving, and it’s important to stay updated with the latest trends and technologies.
Conclusion
Embarking on a journey to learn Shopify development in 2025 can be both exciting and challenging. By following the roadmap outlined above, you’ll be well on your way to mastering the skills needed to thrive in this dynamic field. Remember, the key to success is persistence and a willingness to adapt. Welcome to the Shopify community, and best of luck on your development journey!
We’ve been looking around for ages and we’ve finally realized that Shopify does NOT offer you a product search feature by title.
It sounds crazy, right?
To be honest, searching for products by the title should be one of the most important features that they should include in Products API. But unfortunately, it’s not there.
Say for instance you have a product with a title 2023 Best Basketball Item.
If you try to browse your store URL and add the GET /admin/api/2019-10/products.json?title=item
Product API should return the item above. But instead, they will throw you the following JSON result:
{"products":[]}
Code language:JSON / JSON with Comments(json)
No result. Sad.
Getting Started
In this Shopify app development tutorial, we’re going to provide you a very easy solution on how to search for products by title using Shopify product API.
Before we get started, we’ll assume that you have been following our Shopify app development tutorial series and you are using the very same files that we are using for this project.
If in case you’re using Laravel or other programming languages, fear not because everything is just the same except the code.
Okay, let me explain to you first how the process goes.
First, you will need an input box. This is where the search term is going to be retrieved.
And then, if the user pressed the enter button. We’ll make an AJAX call and pass the search term into another PHP file.
Now, since we’re going to use AJAX– that means we’re going to create another PHP file. Inside this PHP file, we’ll return all of the products from the Product API. However, we have to make sure that we filter this process by title only. Otherwise, it will take years to be processed especially if the merchant has thousands of products.
Once the Product API is finished, we’ll compare our search term to the title of each product. One by one.
Sounds too complicated?
Let us show you how to do it!
Searching Products by Title
Like we said above, to be able to make a search, we will need an input box.
Let’s say we have the following index.php file:
<?phprequire_once("inc/functions.php");
$requests = $_GET;
$hmac = $_GET['hmac'];
$serializeArray = serialize($requests);
$requests = array_diff_key($requests, array( 'hmac' => '' ));
ksort($requests);
$token = "xxxxxxxxxxxxxxxxxxxxxxxxxxxxxxx"; // Add your access token here (I highly suggest you use ENV here)
$shop = "weeklyhow"; //subdomain of your store URL?><!DOCTYPE html><html><head><title>Shopify Example App</title></head><body><h1>Shopify App Example by WeeklyHow</h1><inputtype="text"id="search"name="search"placeholder="Search for item"><inputtype="hidden"id="subdomain"name="subdomain"value="<?php echo $shop; ?>"><divid="products"></div></body></html>Code language:HTML, XML(xml)
You may have noticed that we have also created a hidden input. This hidden input is used for storing our shop subdomain. Which a requirement for our shopify_call() function.
To display the search result, we’re going to use the div element with an id of products.
Now that we have the input box, it’s time for us to use AJAX. If you don’t know what is AJAX, it means processing a JavaScript asynchronously or without refreshing the page. It’s very useful for updating elements dynamically.
With that being said, let’s add the following code just before the </body> tag.
And that’s it we’re done! As we said before, the process is very simple. All we need is to do first is to get all the products in the Product API and then for each product we’re going to compare its title to our search term using stripos() function.
stripos() is a function used for finding the position of a string in another string. However, this time, we used the function for checking if the string exists in the title of the product that’s also why we used the comparison operator !==.
In a nutshell, if you do stripos( 'WeeklyHow is awesome!', 'weeklyhow' ) !== false, it will return a value of 1 which is true in boolean form.
Example
Say for instance we used the search term ‘women‘ on the product search page.
We should have the following search result.
Now if we do that in our Shopify app, we should see the following results.
Conclusion
That’s it! You can now search for products in your Shopify app using the code above.
Up to this point, we still don’t understand why Shopify didn’t include this filter to make it much easier to retrieve products. However, we think it’s also okay to do it ourselves. At least we learned something.
If you have questions, feel free to let us know in the comments below!
We are aware that there are hundreds of PHP tutorials online on how to create a Shopify app using PHP, but in this course, we’ll tackle all the components that you may want to add to your Shopify app like displaying products and such.
Now before we proceed, Shopify made an update with their API where they version their API quarterly also known as API versioning. It is important to know that Shopify will always make updates to their API so if you are developing Shopify apps, then you should also keep your apps updated.
Update in 2024
If you’re not aware, Shopify is encouraging most developers to create Shopify apps through their Shopify CLI and so, if you’re interested to learn how to create Shopify apps using Shopify CLI and PHP/Laravel, we’ve managed to compile a series of videos teaching how to create Shopify apps in Laravel.
What is Shopify?
Shopify is one of the most popular e-commerce platforms and provides a great opportunity for developers to build and monetize their own web applications. With the ever-evolving technology, building Shopify apps has become easier and more efficient thanks to Shopify CLI. In this blog, we’ll explore the latest technologies and tools for creating Shopify apps in 2024.
But first…
What is Shopify PHP?
There’s no such thing called “Shopify PHP”, but to make it understandable to you. PHP is a programming language for web development that can be used to develop a Shopify app. Though there are PHP Frameworks that you can use as well to build a Shopify app like Laravel.
In 2023, you can now create Shopify apps simply by using Shopify CLI.
Is it hard to do Shopify App Development?
Building your own Shopify Apps is very easy, all you need is to understand how the API works. Shopify is a Rails application, there are lots of Shopify repositories that you can use for FREE to integrate your website into Shopify API. Here’s the list:
To begin, you have to create a new Shopify app in your Shopify Developer account, so if you don’t have an account yet, you can sign up by visiting shopify.dev
Building Your Own Shopify App with PHP
In this article, we’re going to learn how to make a Shopify application from the scratch using PHP, if you already have a Shopify developer account this is the first page you’re going to see:
Developer Shopify Dashboard
Proceed to left navigation panel and click the Apps category
Click Create app and select what type of app you wish to build. Custom app or Public app? For custom apps, you can only install the app to one Shopify store with no need for Shopify to review your app. However, with public apps, Shopify will need to review your app in order for Shopify stores to install your Shopify app.
After selecting, that should give you the following form.
App Name – The name of the Shopify application you’re about to create. App URL – The URL of your website where you’re going to upload your Shopify files Whitelisted Redirection URL(s) – This is where you’re going to list your generate token script or URLs you need as you authenticate your Shopify.
For web hosting, we recommend getting it from Hostinger as it’s more compatible with Shopify especially if you’re just getting started.
Once you’re done, filling out the form, click Create app
Here’s everything you need to start building your Shopify App
Now that we have our first Shopify app created, it’s time to make our website connected using these API credentials. To do this, download at least one of the Shopify repositories that I have provided in this article.
To continue with this project, you may proceed to this article.
In part 2, we’ll be using the credentials that we have to connect it to PHP. If you’re interested, proceed to this article below:
Whether you’re a seasoned web developer or a new Shopify store owner, the sight of Shopify Liquid code is a familiar one. This template language, exclusive to Shopify, is the backbone of all Shopify themes, facilitating the dynamic display of content on millions of online stores. Understanding Shopify Liquid is crucial for anyone looking to customize or create themes on the Shopify platform.
Video Tutorial
If you prefer watching video tutorials, the below video is the video version of this article.
Otherwise, you may continue reading and learn more about Shopify Liquid.
Introduction to Shopify Liquid
The Evolution of Shopify Liquid
Shopify Liquid has come a long way, constantly evolving to meet the growing demands of e-commerce and theme development. As we move into 2024, it remains at the forefront of Shopify theme design and development, offering unparalleled flexibility and power to developers.
So, Why is it Essential for Theme Customization?
The essence of Shopify Liquid lies in its ability to bridge the server-side with the store’s frontend. It’s the “middleman” that enables the dynamic rendering of content, from product details, collections to blog posts, ensuring each visitor’s experience is unique and personalized.
Understanding the Basics of Shopify Liquid
What is Shopify Liquid
Shopify Liquid is a template language that allows developers to inject dynamic content into the HTML of Shopify stores. Unlike traditional HTML, Liquid code can adapt and change based on the data it receives from the Shopify server, making it an invaluable tool for creating flexible and dynamic e-commerce websites.
Template Languages Explained!
Template languages like Shopify Liquid serve as intermediaries between a website’s backend and its frontend, enabling the seamless integration of static and dynamic content. This ensures that users are presented with up-to-date information tailored to their browsing experience.
The Role of Shopify Liquid in Theme Development
Static vs. Dynamic Content
In web development, there are two contents that you can render: Static Content and Dynamic Content.
The distinction between static and dynamic content is fundamental in web development. While static content remains unchanged, dynamic content can vary based on parameters like URL handles, ensuring that pages like product listings are always up to date.
Getting Started with Shopify Liquid
Setting Up Your Development Environment
Before starting your journey into Shopify Liquid, setting up a proper development environment is important. This includes accessing Shopify’s theme code editor or using a local development tool like Shopify CLI, which allows for testing and debugging in a sandbox environment.
Tip
If you’re just starting, it’s best to use the theme code editor from Shopify as it will help you get familiar with the entire architecture of a Shopify theme faster compared to using a code editor like VSCode.
Basic Syntax of Liquid
Shopify Liquid’s syntax is designed to be intuitive for those familiar with HTML and web development. Understanding its basic constructs—such as variables, loops, and filters—is the first step towards mastering theme development with Liquid. Like other templating language, Shopify uses double-curly braces to output a value. For example:
For filters, you simply need to add the filter and any parameters within the curly brace delimiters {{ }}, preceded by a pipe character |. For example:
In the era of mobile shopping, responsive design is non-negotiable. Shopify Liquid plays a crucial role in creating flexible theme layouts that adapt to various screen sizes, ensuring a seamless shopping experience across all devices.
Shopify Liquid and API Integration
Understanding the Limitations
While Shopify Liquid is potent, it has its limitations, particularly regarding direct API calls to third-party services. However, Shopify offers a robust set of APIs that Liquid can interact with, opening up a world of possibilities for theme customization and functionality enhancement.
Optimizing Your Shopify Themes for Performance
Speed Optimization Techniques
A fast-loading theme is essential for keeping visitors engaged and reducing bounce rates. Shopify Liquid developers can employ various techniques, such as lazy loading images and minimizing Liquid code complexity, to enhance their themes’ performance.
The Future of Shopify Liquid
Upcoming Features and Trends
As we look towards the future, Shopify Liquid is set to introduce new features and improvements (like Theme Blocks) that will further empower developers and designers. Staying informed about these changes is crucial for anyone involved in Shopify theme development. We encourage you to join our Discord server to get the latest news about these changes.
Whether you are a web developer or a Shopify store owner, chances are you need to use a Shopify app to make improvements to your Shopify online store and of course, increase your sales. However, there are times when you can not find the perfect app for your Shopify store and that’s when you start to think of creating a custom Shopify the app.
The problem is… There are so many technologies you need to know!
So, which one should you use?! 😵💫
Well, first of all, it depends. If you’re comfortable with React/Typescript, then it’ll be best if you work with these framework. However, there is another framework that I’d like to introduce to you when developing Shopify apps.
Laravel, a powerful PHP framework and is often referred to as the “PHP framework for web artisans” that provides an excellent option for building Shopify apps.
In this article, we’ll talk about the reasons why Laravel is a great choice for your next Shopify app development.
So, why should I choose Laravel for building Shopify apps?
Laravel is a great choice due to its robust features and easy integration with Shopify’s APIs. However, there are more reasons as to why you should choose Laravel for building Shopify apps.
Easy to Learn and Use
Laravel is known for its simple and intuitive syntax, making it easy for Shopify developers to learn and use. Its well-documented and organized codebase, combined with its comprehensive documentation, makes it a great choice for developers of all skill levels. This makes it possible to build high-quality Shopify apps quickly and efficiently.
Scalable and Flexible
Laravel is a scalable and flexible framework that can handle large amounts of traffic and data. It’s also highly modular, allowing developers to easily add new features and functionality to Shopify apps. This means that as the needs of your Shopify store change, your app can evolve and grow with it.
Robust Security Features
Security is a top priority for Shopify app development, and Laravel provides a number of robust security features. Laravel includes features such as password hashing, encryption, and SQL injection protection, making it easier to build secure Shopify apps.
Large Community and Support
Laravel has a large and active community of developers, which means that there is a wealth of resources and support available. Whether you’re just starting out or are an experienced developer, you’ll find help and advice on the Laravel forums, Stack Overflow, and other online communities.
Integration with Shopify API
Laravel provides seamless integration with the Shopify API, making it easy to build custom Shopify apps. The Laravel Shopify library provides a simple and straightforward way to interact with the Shopify API, so you can quickly and easily build custom features and functionality for your Shopify store.
How to create Shopify apps with Laravel?
Now that you know the reasons why you should use Laravel for Shopify app development, it’s now the time to know and learn how to create Shopify apps using Laravel.
At this moment, there are two ways that you can approach to start building Shopify applications:
We managed to create a playlist of videos showing you how to create Shopify apps using Shopify CLI. If you’re interested to learn further, you may check the video below:
Conclusion
Laravel is an excellent choice for Shopify app development. Its easy-to-learn and use syntax, scalable and flexible architecture, robust security features, and integration with the Shopify API make it a top choice for Shopify developers.
If you’re looking to build a custom Shopify app, consider using Laravel to get the job done.
When it comes to selling items online, Shopify can be your reliable e-commerce. Not only it can make your selling easy but it also provides hundreds of Shopify apps available to help you grow your business.
However, due to the amount of the Shopify apps available, finding the best ones can be hard. But don’t worry, we are here to help you find the best Shopify apps to increase sales.
Best Shopify Apps for Sales
One of the most common problems in e-commerce is having a low sales rate. The follow Shopify apps for sales can help you increase your sale.
Most of your visitors can be using mobile devices and sometimes you are not able to reach them.
But with Mobile App Creator – Shopney, you can now develop a mobile app that will target your visitors who use android devices and iOS devices without any hassle or purchasing.
Their subscription cost only around $99.99/month for silver plan and $199.99/month for gold plan.
Feedbacks are very important for increasing sales because your customer’s feedback is like free marketing. Whenever your customers give reviews to your products, they’re allowing other customers to know that your product is good.
Shopify Product reviews allows you to add a customer review feature to your products. This provides a way for your customers to engage with you, as well as each other to encourage sales.
FREE to install! 🤯
Theme-friendly design – Reviews automatically match your store’s look and feel
Easy customization – Edit layout options, text, and colours without needing to code
Bulk actions – Publish, hide, filter, and manage reviews quickly and easily
CSV import and Export – Import and export your reviews as a spreadsheet
SEO-friendly review scores – Add review scores to your Google search results.
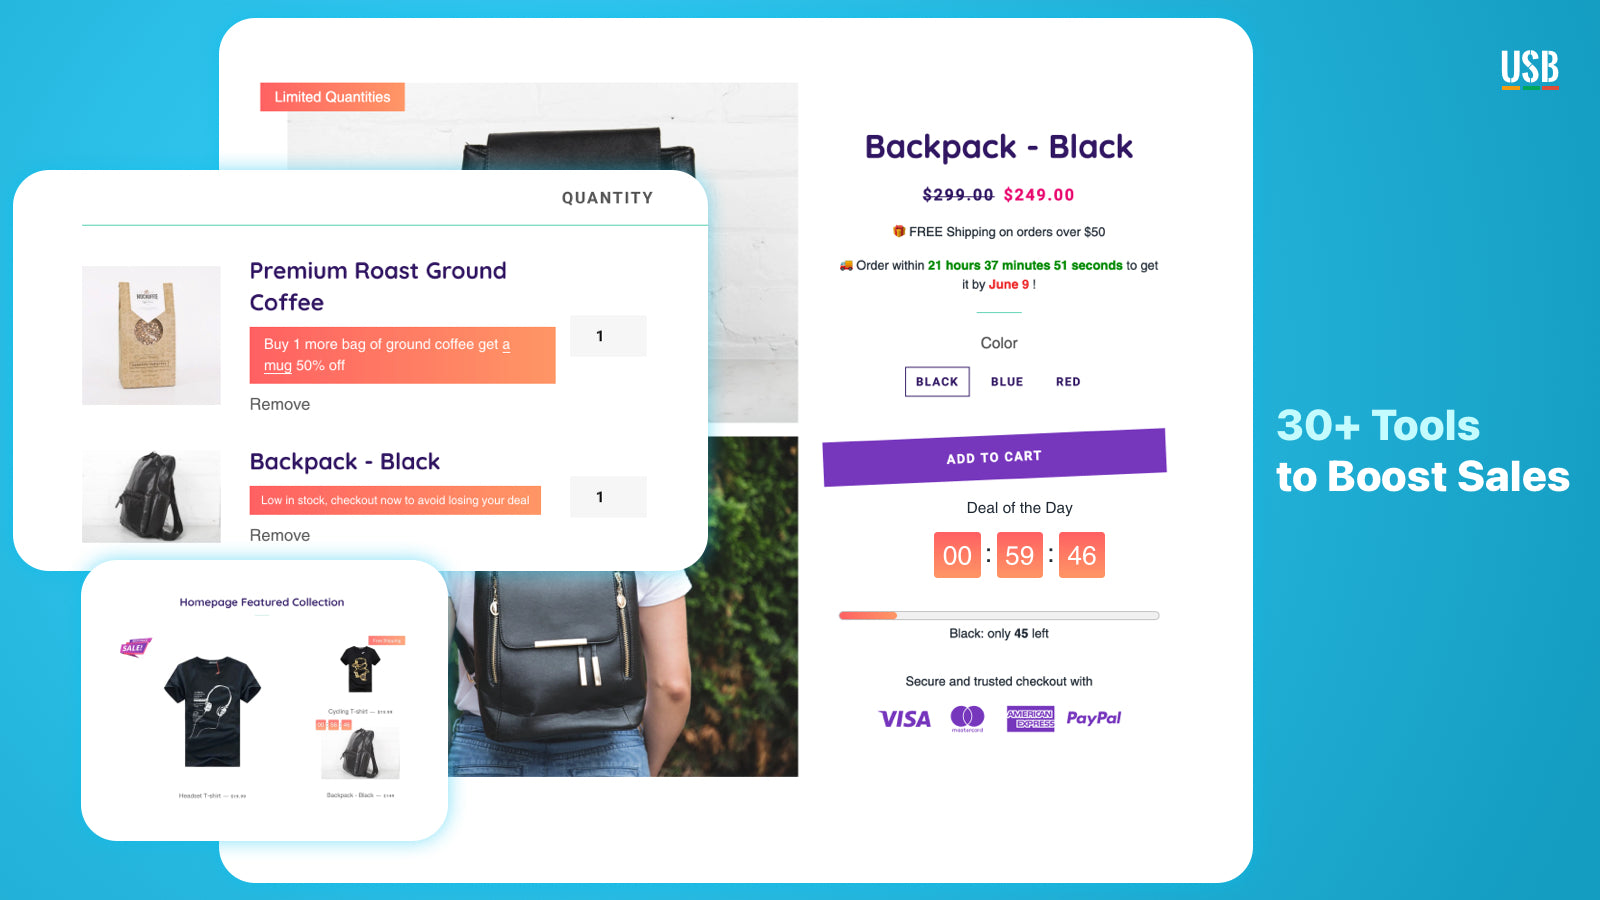
As a buyer, you may already know how exciting it is to see that your favorite item is on sale or discount. That’s one of the features of Ultimate Sales Boost. Ultimate Sales Boost is a Swiss army knife to optimize your checkout flow (a.k.a conversion funnel). You may use it aggressively or moderately to build the path of your eCommerce success.
Another good thing about this app is you don’t need developer anymore. Just one click installation and launch your first campaign in one minute. That’s how easy to use this app is.
Most online merchants are losing about 67.45% of sales from cart abandonment and the key factors can be addressed simply by introducing a sense of urgency into the checkout flow.
By incorporating a sense of urgency to your checkout flow, you can make the consumers feel like they could lose out on an appealing offer if they don’t commit to an order immediately.
Free to use. 🤯
Cart reservation timer, with adjustable duration.
Change the displayed text as you see fit.
Options to define what happens after the timer expires.
Multi-language support.
Modify the look and feel to match your theme.
Optimized across all screen sizes including desktop, tablet, and mobile.
No App branding, to keep your site professional.
Easy step-by-step installation – No programming required.
Kit is not just a marketing app, it is an artificially-intelligent assistant that will talk to your customers 24/7. That means even if you’re not online, your Kit will always be reliable to assist your customers.
But of course, that’s not the only thing Kit can do. It can also manage your Instagram and Facebook ads, email marketing, and social posts to drive more sales and help you grow your business. All for Free!
Here’s what Kit can do for you:
Set up Facebook dynamic ads and retarget shoppers most likely to buy
Build lookalike audiences to ensure the best targeting for your ads
Create Facebook and Instagram ads that drive sales
Post Facebook updates to drive customer engagement
Send personalized ‘thank you’ emails to generate repeat purchases
Create and promote discount codes to acquire and retain customers
Generate quick reports to provide insights on sales and marketing performance
According to a study of U.S. web-based searches, the world’s second most-used search engine is Google Images! That means your store can also get the benefit of getting traffic through proper SEO of images.
With SEO Image Optimizer, you can improve your Google search results and rankings in just a couple of clicks. No coding required!
Your customers become more valuable the more they shop and engage with your brand. A rewards program gives you an easy way to encourage the behaviour that builds emotional connections and customer loyalty.
Smile offers three programs that make program management simple and intuitive:
Loyalty points program
Referral program
VIP program
Why should you choose Smile.io for rewards and loyalty?
As the most used rewards program in the world, we’ve learned a lot from helping tens of thousands of businesses with their retention and loyalty strategies. We’ve used that experience to design a rewards solution that makes it easy for anyone using Shopify or Shopify Plus to create a beautiful rewards program that brings customers back.
Simple design customizations to reflect your brand
Get your rewards program started in just a few clicks
Integrate with the marketing tools you already use
We believe the future of commerce is rooted in emotional relationships, and want to help every business build a strong customer retention strategy that promotes sustainable growth.
The following apps can help you support and track your customers to increase their satisfaction and build more loyalty. I highly recommend you to install at least one of the following Shopify apps as it will no doubt help your business.
Research shows that live chat can boost sales by as much as 40%. Next time your customer faces an issue, they won’t go to the competitors or waste time — they’ll contact you.
With Tidio, you can help your customers immediately even if you are not available. Thanks to the artificially-intelligent bots. Bots automatically reply to 43% of the most popular inquiries. Right after registering, with a few clicks of the mouse, you’ll be able to add Bots that will check product availability, inform about delivery status, and give the estimated delivery time. When faced with an issue, the Bot will transfer the conversation to an operator.
Tidio uniquely merges live chat, Bots, and Marketing Automation to meet the expectations of the most demanding Shopify store owners.
With its Free plan, you will get the following features:
Up to 3 operators for a lifetime
Live Chat
Messenger Integration
Email Integration
iOS & Android App
100 Chatbot Triggers a month
100 Chatbot Triggers feels too short? You may upgrade your plan to $18 per month and get UNLIMITED Chatbot Triggers.
Keep your customers updated of the whereabouts of their orders until delivery through an intuitive, customized tracking page and automated notifications.
Track & Notify is not just a tracking app, it is a Shopify app that will also help your SEO. Thanks to its improved SEO and ranking system that replaces the carrier’s tracking link with their auto-generated link to drive traffic to your site instead of the carrier’s site. Improve SEO and increase organic search.
With its starter plan, you can have the following features:
50 shipments quota per month
Branded tracking page with banner
You may also upgrade your plan to essential, growth and up to PRO and get more shipments quota per month.
If you are having issues with your customers not being able to properly track their orders then I suggest you give Track & Notify a try. It’s worth a shot!
If you are having trouble manually setting up your inventory then you’re obviously not using Wipeout. Wipeout is a tool that will quickly hide your sold-out products and show them once they’re on-stock once again. Thanks to its automatic daily hide/publish feature, you won’t have to worry about your items being out of inventory.
Use wipeout for free and get the following features:
FREE manual option if the store has less than 3000 products
Manually press “Hide” or “Unhide” buttons whenever needed
Exclude products
Reverse within 24 hours
You may also upgrade your plan to automatic plan for $9 per month and get the following features:
Automatically hide & unhide once a day.
Daily Email reports
Exclusion List to exclude products you want the app to ignore
Oberlo by Shopify is one of my favorite apps. Not only it will help you get started for ecommerce but it will also help you find the products that you wanted to sell and not worry much about inventory and shipping.
You may install Oberlo and get all the free features to get started building your business. But if you want to level up your game, you may upgrade from starter plan to basic plan ($29.90/month) and pro plan ($79.90/month).
If you are new to Shopify apps, chances are you install apps that you think will help your business. Some entrepreneurs think that Shopify is like a WordPress, you find plugins, install, and see results. Shopify is a different case, you have to do research when you look for Shopify apps.
I would recommend you do the following before hitting the install button.
Read the reviews of the Shopify apps
Check if the app is getting high ratings
Check if the contact is working and see if they will respond
Look for screenshots
Conclusion
Shopify apps are great, especially if you are working on your business by yourself. You may also check out these 20 Shopify apps that will increase your sales by up to 64.56%. If you have experience with apps both good and bad, you may share them in the comments below. We’d love to have a chat with you below.