Whether you are a web developer or a Shopify store owner, chances are you need to use a Shopify app to make improvements to your Shopify online store and of course, increase your sales. However, there are times when you can not find the perfect app for your Shopify store and that’s when you start to think of creating a custom Shopify the app.
The problem is… There are so many technologies you need to know!
So, which one should you use?! 😵💫
Well, first of all, it depends. If you’re comfortable with React/Typescript, then it’ll be best if you work with these framework. However, there is another framework that I’d like to introduce to you when developing Shopify apps.
Laravel, a powerful PHP framework and is often referred to as the “PHP framework for web artisans” that provides an excellent option for building Shopify apps.
In this article, we’ll talk about the reasons why Laravel is a great choice for your next Shopify app development.
So, why should I choose Laravel for building Shopify apps?
Laravel is a great choice due to its robust features and easy integration with Shopify’s APIs. However, there are more reasons as to why you should choose Laravel for building Shopify apps.
Easy to Learn and Use
Laravel is known for its simple and intuitive syntax, making it easy for Shopify developers to learn and use. Its well-documented and organized codebase, combined with its comprehensive documentation, makes it a great choice for developers of all skill levels. This makes it possible to build high-quality Shopify apps quickly and efficiently.
Scalable and Flexible
Laravel is a scalable and flexible framework that can handle large amounts of traffic and data. It’s also highly modular, allowing developers to easily add new features and functionality to Shopify apps. This means that as the needs of your Shopify store change, your app can evolve and grow with it.
Robust Security Features
Security is a top priority for Shopify app development, and Laravel provides a number of robust security features. Laravel includes features such as password hashing, encryption, and SQL injection protection, making it easier to build secure Shopify apps.
Large Community and Support
Laravel has a large and active community of developers, which means that there is a wealth of resources and support available. Whether you’re just starting out or are an experienced developer, you’ll find help and advice on the Laravel forums, Stack Overflow, and other online communities.
Integration with Shopify API
Laravel provides seamless integration with the Shopify API, making it easy to build custom Shopify apps. The Laravel Shopify library provides a simple and straightforward way to interact with the Shopify API, so you can quickly and easily build custom features and functionality for your Shopify store.
How to create Shopify apps with Laravel?
Now that you know the reasons why you should use Laravel for Shopify app development, it’s now the time to know and learn how to create Shopify apps using Laravel.
At this moment, there are two ways that you can approach to start building Shopify applications:
We managed to create a playlist of videos showing you how to create Shopify apps using Shopify CLI. If you’re interested to learn further, you may check the video below:
Conclusion
Laravel is an excellent choice for Shopify app development. Its easy-to-learn and use syntax, scalable and flexible architecture, robust security features, and integration with the Shopify API make it a top choice for Shopify developers.
If you’re looking to build a custom Shopify app, consider using Laravel to get the job done.
Over the past few years, REST has become the only way for designing web APIs. However, there are things that make REST very inflexible. For example, you cannot control how much data you can retrieve or you can’t specify the only data that you wish to retrieve, etc.
This happens in Shopify app development as well. If you want to get a product using REST API, all of the data about your products will be sent to you. This makes REST very heavy and slow to use.
So, that’s why GraphQL was created, to cope with the need for more flexibility and efficiency.
But, we’re not going to focus on the difference between REST and GraphQL. Instead, we’re going to learn how to create products using GraphQL mutations and vanilla PHP.
Video Tutorial
If you prefer watching video tutorials, then the video below is for you.
Otherwise, feel free to keep reading the content below.
Getting Started
If this is your first time learning how to make Shopify apps using vanilla PHP, then we highly recommend reading through our guide here. We also have a ton of videos covering Shopify app development, so before you proceed, make sure that you have a local web server and a Shopify app installed in your development store.
Before we start using GraphQL mutations in PHP, we need to create a function that will allow us to make API calls.
GraphQL API Call Function
Create a new PHP file called functions.php and copy the following code:
This function above will allow you to send GraphQL queries to the Shopify GraphQL endpoint. You just need to provide your access token, Shopify store domain, and the query/mutation.
Alright, so now that we have the function to make GraphQL API calls, we can start and set up our index file.
The Index File
Create a new PHP file in your project and make sure it’s your index file so name it index.php. Once the file is created, you can copy the following code:
In the code above, we referenced the functions.php so that we can use the graphql() function.
Now, make sure that you have your access token in the $access_token variable. If you don’t know how to generate an access token, then watch our tutorial here.
Let’s assume you already have your access token, we can now proceed and use the GraphQL function to create products.
Creating Products using GraphQL Mutations
In the same file, create a new variable and use the function graphql() like what we did below.
In the 3rd argument, we applied an empty array, that array is where you’re going to apply the query/mutation.
So let’s create a new variable and call it $query or whatever you want. Then, in this variable, we will create an array and its key SHOULD be set to query. Again, the key SHOULD be set to query and not something else. Then, we’re going to use that variable in the 3rd argument of the graphql() function.
<?phprequire_once( "inc/functions.php" );
$shop_url = $_GET['shop'];
$access_token = 'shpca_xxxxxxxxxxxxxxxxxxxxxxxxxxxxxxxx';
$query = array("query" => ' mutation { productCreate( input: { title: "Vanilla PHP & GraphQL" descriptionHtml: "<p>I am created using GraphQL!</p>" } ) { product { id title } } }');
$mutation = graphql($access_token, $shop_url, $query);
?>Code language:PHP(php)
In this mutation, we used the productCreate field and this field requires us to provide an argument input so there we provided a title and a descriptionHtml. After the product is created, the mutation will then return a field called product and in that field, we create retrieve data about the product like its id, title, tags, images, etc. To learn more about the product field, click here.
That’s it! If you run your app, it should give you the following response.
When you wish to learn to program, the first thing most coders think of is to learn Python, C++, WordPress, or WooCommerce. But all of these languages and platforms are already saturated. That’s why if you learn them, you’ll most likely end up not getting a profit.
So, instead of making WordPress or other stuff, why not start making Shopify apps? Like what Shopify said, “There’s never been a better time to build a Shopify app because there are more than 1.8 million merchants across the globe that build, scale, and manage their businesses on Shopify”.
If you don’t know, Shopify apps play an important role in every Shopify store’s success. In fact, it is SO important that every Shopify store uses an average of SIX Shopify apps.
So why not start making Shopify apps?
💸 Imagine making thousands of 💵 dollars monthly with your very own Shopify app. Yes, MONTHLY! And the best part? Shopify won’t take a share of your app revenues. It’s all yours! 💰💰💰
🤩 Excited yet? You should be!
In this course, I’ll guide you through crafting a top-notch Shopify app from scratch, using vanilla PHP. No shortcuts, no pre-made repositories. We’re building it all from the ground up, ensuring you have the skills to create unique, high-demand Shopify apps.
👨💻 About me: I’ve been immersed in Shopify app development since 2018. Everything I’ve learned along the way, I’m sharing with YOU, so you can kickstart your new career and turn your Shopify apps into a lucrative venture.
Here is what you are going to learn in this course:
Creating API credentials
Understanding API and secret keys
Creating a local server and tunnel
Connect your Shopify app to the database
Creating Shopify OAuth
Generating access tokens
Creating REST API & GraphQL functions
Creating ScriptTags
Charging merchants with Billing API
Implementing Shopify App Bridge
and much more!
If you think you’re ready to start a new career then join us and let’s begin creating YOUR very first Shopify app!
Changelog
September 07, 2023
Updated course description
April 28, 2022
Added/Updated lessons
Added resource(s)
September 29, 2021
Added/Updated lessons
September 21, 2021
Updated links and resources in contents
September 15, 2021
Added new lesson “Application Credit” on “Billing API
Shopify app development is an opportunity given to developers to help hundreds of thousands of Shopify stores. While doing so, they can earn as much as the entrepreneurs just by building for the Shopify App Store.
What is Shopify?
It’s such an understatement if you say that Shopify is just an eCommerce software. Technically it is, but personally speaking, Shopify is one of the best eCommerce platforms that provides everything you need to start selling not just online, but also on social media and in person.
Shopify is completely cloud-based and hosted, which means there’s no need for you to worry about the servers and such. Just create an account and you’re good to start.
But of course, we’re going to focus more on Shopify app development and why you should build apps.
So…
Why Develop Shopify Apps?
According to Shopify, 87% of Shopify entrepreneurs rely on Shopify apps to run their businesses. Not only that, it is expected to see more growth in the next few years coming.
So why not develop Shopify apps when it’s clear that this could be a double win for both parties?
Now you might be asking…
How much does Shopify developers make?
According to Shopify, there are two ways to make money with your shopify apps:
Create Shopify apps for your clients, which means the app is not yours once you have sold them to your clients.
Create Shopify apps for Shopify store and sell them and you’ll earn 80% of each app sale.
On average, you can earn somewhere around $2000 per month. However, this all depends on how much your Shopify app is going to be. It also depends on which category your Shopify app is located.
In the graph given above, if your app is for Inventory or Accounting, then there’s a higher chance that you’ll get more profit because both of these categories are really expensive. So if you’re targeting to earn more money, then building apps for Inventory and Accounting is your best option.
Good question! What if your Shopify app is free?
How are you gonna make money with that?
There are ways to earn money with free Shopify app, your first option is to divide your app into two versions, first is a standard version which is free, and the other one is the PRO version which is the paid version.
To make your chances of earning higher, make sure your PRO version provides really helpful features.
For example, your app is a dropshipping app. With the free version, you can only let users import 1000 products whereas, in paid version, you can import an infinite amount of products.
Another option is to give the users a number of days trial.
For example, your app can only be free for 14 days. After that, users will need to pay you monthly for the subscription.
All up to you.
But what is recommended? like really?
Well, personally, I like my apps to be free for a couple of weeks and then make them pay for the subscription once they like the app. This way, I can confirm that they will use my apps longer than I expect them to.
You can also combine them.
For example, you can give users 14-day free trial and then ask users for monthly subscriptions and at the same time, they can upgrade their app to PRO plan.
Getting Started
I have written already a complete guide on how to create Shopify apps using PHP. So in this article, I’ll just provide you the summary of it. However, if you’re interested in reading the step-by-step guide. Then I recommend you to follow this link:
To start making your app, login your account to Shopify developer website and if you don’t have an account yet. I suggest you create one.
Once you’re logged in, follow these steps:
Proceed to left navigation panel and click the Apps category
Click Create app and fill out the form
App Name – The name of the shopify application you’re about to create.
App URL – The URL of your website where you’re going to upload your Shopify files
Whitelisted Redirection URL(s) – This is where you’re going to list your generate token script or URLs you need as you Authenticate your Shopify.
click Create app
After that, Shopify developer will provide you your API key and Secret key. These two keys are used for authenticating your app to stores.
Shopify API
Next thing you need is an API, like what I have mentioned in my Shopify app development tutorial, you can use different APIs, but personally, I use Shopify API Client made by Alex. It’s very simple and easy to use.
Installing Shopify apps to stores
Next thing you need is the files to connect your app to stores, or let’s just say, let users install your app on their store. In this article, we’re going to use PHP to create the app. So, go ahead and create a new file and call it install.php and copy the following code:
Make sure you change the value of API key to what was given to you by Shopify. Otherwise, the script won’t work.
Generating Token
Next, create a new PHP file and call it token_generator.php and copy the following code:
Keep in mind that both install.php and token_generator.php should be uploaded in the same folder. Unless you want to organize your files then you need to reference it correctly by changing the value of redirect_uri in the install.php file.
<?php//Include your Shopify APIrequire_once("inc/functions.php");
//Change the value of these two$api_key = "ASSIGN YOUR API KEY HERE";
$secret_key = "ASSIGN YOUR SECRET KEY HERE";
$params = $_GET; // Retrieve all request parameters$hmac = $_GET['hmac']; // Retrieve HMAC request parameter$params = array_diff_key($params, array('hmac' => '')); // Remove hmac from paramsksort($params); // Sort params lexographically$computed_hmac = hash_hmac('sha256', http_build_query($params), $secret_key);
// Use hmac data to check that the response is from Shopify or notif (hash_equals($hmac, $computed_hmac)) {
// Set variables for our request $query = array(
"client_id" => $api_key, // Your API key"client_secret" => $secret_key, // Your app credentials (secret key)"code" => $params['code'] // Grab the access key from the URL );
// Generate access token URL $access_token_url = "https://" . $params['shop'] . "/admin/oauth/access_token";
// Configure curl client and execute request $ch = curl_init();
curl_setopt($ch, CURLOPT_RETURNTRANSFER, 1);
curl_setopt($ch, CURLOPT_URL, $access_token_url);
curl_setopt($ch, CURLOPT_POST, count($query));
curl_setopt($ch, CURLOPT_POSTFIELDS, http_build_query($query));
$result = curl_exec($ch);
curl_close($ch);
// Store the access token $result = json_decode($result, true);
$access_token = $result['access_token'];
// Show the access token (don't do this in production!)echo $access_token;
} else {
// Someone is trying to be shady!die('This request is NOT from Shopify!');
}
Code language:PHP(php)
Make sure you have downloaded the API provided above and then upload it to your host. Otherwise, you will get an error.
In this file, make sure to change again the value of both api_key and secret_key variables.
Another thing to keep in mind is that you need to personally keep your access tokens to be able to interact with the app. But what if other users did not receive their tokens? The answer is simple, you need to store the access token yourself so they won’t need to do such actions.
I have written an article on how to store these access tokens in two ways. I’m sure you will need this in the future so you might as well learn how to save it. Click the link below to learn more:
Testing the Shopify App
Once everything is set up, you may go to your project URL and run install.php. To do this, you must include the GET variable shop in the URL. For example:
After that, hopefully you’ll see something like this:
There you have it! Your Shopify app is now ready to be built. Of course, it’s not finished yet because you still have to plan what kind of app you want to create.
So if you are interested, I have made a tutorial on how to display Shopify products and its components like prices and such. This could help you understand how to communicate with Shopify API.
Whenever I develop Shopify apps, I usually design the app first. What I mean by that is, I set up the app first to make sure that everything is ready for users for installation.
It’s all up to you.
You can also brainstorm first, get ideas about what kind of app you are going to create. Now, keep in mind that there’s no right or wrong here. Just stay in your comfort zone and develop the app.
Now let’s start brainstorming!
For example, you’re planning on developing an app which tells the Shopify store owners about their statistics. Now, you may ask yourself these questions:
What is the purpose of this app?
What features are you going to add in this app that has not been added by your competitors?
How much is this app going to be?
How much is my budget?
Where am I going to promote this app? and How? and last but not least…
How long is my development going to be?
It is very important to know the answers first for the questions above. That way, you will understand your app better than anyone else.
Recommendations
Whenever you develop a Shopify app, you may do the following especially if you want conveniences:
I got asked a while ago by one of my students, “What is the best programming language for Shopify app development?”.
If you’ve been following us for a long time, you’d know that we create Shopify apps using PHP. However, in my work, I do use React. Surprisingly to say but I really liked developing with React than the core PHP. Now, you may be asking why? Well, there are a lot of reasons why I prefer using React and in this blog post, I will be comparing the two languages from a coding point of view.
Shopify App Development with Node, React, REST API & GraphQL
Discover how to create a Shopify app that works using Node, React.js, Polaris, REST & GraphQL.
Making Shopify apps with PHP is great especially if you prefer to have control over everything in your development. Because you’re not using any frameworks and modules, you know exactly where you’ve written your own functions, classes, and features. Not only that but you know exactly how to fix them if in case you encounter an error. But to be fair is it not the same if you use other programming languages or libraries like React?
If you’ve been following us for a while, you may be familiar with the following code:
The code above is written by our friend Alex and this is what I personally use for generating Shopify access tokens in PHP. Very simple, right? Just provide your API and secret keys and use cURL and you’ll be able to get your access tokens.
Now, what is the problem with the code above? Well, first of all, if you’re not truly familiar with PHP then you probably won’t understand the code above at first glance.
You see, in the code above it took us 10 lines of code just to get the access token and with PHP, you will have to do the same process to use REST API. In other words, developing Shopify apps with PHP can take a lot of your time. Yes, you have control over everything, but is it really worth a try?
Now, what about in React? How do you get the access token?
Well, getting Shopify access tokens in React is actually very easy. Thanks to koa-shopify-auth, you can generate an access token by simply using one single function: shopifyAuth. Here’s an example for shopifyAuth function:
In this single function, you can easily generate access tokens. Just one function! Unlike PHP, you won’t have to learn about cURL, setup your URL, etc. Just provide your API and secret keys, set up your access scopes and you’re good to go.
Now, if I am going to ask you, which one is more readable and easier to understand? PHP or React?
If you answered PHP, then good for you because it means that you’re up for a challenge. If you answered React, then that means you’re taking the easy and fastest way to develop Shopify apps.
Now, does that mean the PHP is a bad programming language for Shopify app development? Of course not! But I wouldn’t say it’s the best either.
There are a lot of reasons why you should use Node and React for developing Shopify apps. One of the reasons is GraphQL and Polaris.
If you’re not fully aware yet, REST API is very slow compared to GraphQL. This is because REST do not allow you to pick the fields you want to query. Let’s take a look at the following code:
As you can see in the code above, we’ll have to do two REST API calls just to get the images of a single product. This itself is very costly and can slow your application down.
Unlike PHP, Node and react can allow you to use Shopify GraphQL using React apollo and graphql-tag. Also, you can use both REST and GraphQL in React. So, that’s a win for React.
As you can see in the code above, we only needed to do one query to get 10 images per product. It’s also very easy to understand because, with GraphQL, you can specify in the query which data you want to retrieve. In the code above, we simply used the products field and specified in the input that we only need the first 10 products. Then, in each node, we are going to use the images field and specify in the input that we only need the first 10 images and each node response will only give us the value of originalSrc field.
If you’re curious about the response, here’s the JSON response generated by my code above:
So, is React.js better than PHP for Shopify App Development?
If we’re going to compare the two, in my own opinion, yes. React is much better to use compared to PHP. However, it doesn’t mean that PHP is not good for Shopify app development because after all, it will depend on the project that you’re working on and where you’re comfortable creating the app.
Summary
There are a few similarities between React and PHP, but there are more important differences that you need to be aware of. Obviously, PHP is more for back-end development, and React is more of a front-end development language so in other words, these two are totally different from one another. My only advice for you is to use React if you’re going to need a lot of data from a Shopify store and if you’re going to create an app that only customizes the storefront using your own functions, then go for PHP because it will be much easier for you to manage it, especially if it’s live on the internet.
I have talked about this on our YouTube channel, and so if you’re interested, feel free to watch it here:
Shopify is growing exponentially! A lot of eCommerce businesses are being built using Shopify. Why not take this opportunity to learn how to create a Shopify app and make a profit out of it by making an app that works and helps Shopify merchants?
In this course, you will learn how to develop Shopify apps using Node.js and React. We will also go through the important parts of Shopify REST API like subscriptions, script tags, products, orders, and more!
Frequently Asked Questions
Is this course updated and using the latest version of koa-shopify-auth?
Most of the lessons of this course are using the previous version of koa-shopify-auth which is, of course, version 3. However, I’m doing everything I can to ensure that this course can help you migrate from version 3 to version 4. I will be adding new lessons about the new koa-shopify-auth, the new Shopify library, and how to create a custom session.
Is this course relying on the documentation of Shopify?
Yes, but we only do that at the beginning, once we have set up our server and the modules, we’ll stop using the documentation and learn how to use the Shopify API ourselves.
How long do I have access to this course?
Once you have enrolled in the course, you will have unlimited access to this course for as long as you like.
Changelog
March 21, 2021
Added a new lesson “Database and Creating Custom Session Storage” to section “Update”
Attached a project ZIP file to lesson “Database and Creating Custom Session Storage”
March 17, 2021
Added a new lesson “Setting up App Bridge, GraphQL, and using Old Project Files” to section “Update”
Attached a project ZIP file to lesson “Setting up App Bridge, GraphQL, and using Old Project Files”
March 14, 2021
Added a new lesson “Setting Up A New Project & Server & Polaris” to section “Update”
Updated course description
March 13, 2021
Added new section “Update”
March 07, 2021
Shopify recently updated their koa-shopify-auth to version 4 and since this course is made using version 3, you’ll have to downgrade the library in the meantime.
Updated the video of the lesson “Create and Installing the app to a store”
Added an instructional description to the lesson “Create and Installing the app to a store.”
February 11, 2021
Updated the video of the lesson “Installing Polaris”
Added an instructional description to the lesson “Installing Polaris.”
I have written so many articles now about Shopify App Development and I know there’s going to be more things that I needed to talk about.
I also wanted to make a tutorial on how to create Shopify apps using frameworks such as Laravel but I believe it’ll take much time since I have to study the framework myself.
But for the meantime, I wanted to talk about all the errors that you guys are having. All the errors that I myself encountered as well.
So you guys have sent me lots of emails about your app issues and I wanted to take this opportunity to combine all of these errors into one article so that everyone in the future can use this as a reference.
Shopify App – 403 Forbidden Error
What is 403 Forbidden Error?
403 forbidden error is a type of HTTP error code that you can encounter when you’re trying to reach an address or a website that is forbidden to be located.
Now, what is that something to do with your Shopify app?
Well, to tell you honestly…
A couple of weeks ago, I made a mistake on my previous article and that mistake is the little typo in the install.php file.
Now take a look at this image.
What do you notice in the image above?
In the image above, you will see that the URL contains two myshopify.com. That means that the install URL was initiated incorrectly.
But keep in mind that both of the above URL will work.
If you type in the URL bar: https://example.com/install.php?shop=yourstorename
If you remove the myshopify.com in the install.php and then type in the URL bar: https://example.com/install.php?shop=yourstorename.myshopify.com
Invalid API key or access token (unrecognized login or wrong password)
{"errors":"[API] Invalid API key or access token (unrecognized login or wrong password)"}Code language:JSON / JSON with Comments(json)
This error occurs when you have used the expired access token. So go ahead and uninstall the app and make sure to generate a new access token and paste it in the token variable.
Same goes to shop variable, make sure that it has the name of your store.
<?php
ini_set("display_errors", 1);
error_reporting(E_ALL);
require_once("inc/functions.php");
$requests = $_GET;
$hmac = $_GET['hmac'];
$serializeArray = serialize($requests);
$requests = array_diff_key($requests, array('hmac' => ''));
ksort($requests);
$token ="HERE IS WHERE YOU PASTE YOUR NEW TOKEN";
$shop = "storename"; //no 'myshopify.com' or 'https'Code language:HTML, XML(xml)
This is also important why you should save the access token in your database. That way you won’t have to manually copy the token and paste it in the PHP code.
Argh! So inconvenient.
Shopify API – Foreach Error
If your app is not displaying anything. For example, products. Chances are you have not setup your store yet. Try adding more items to your store, make collections and add your items there.
The more items and collections the better.
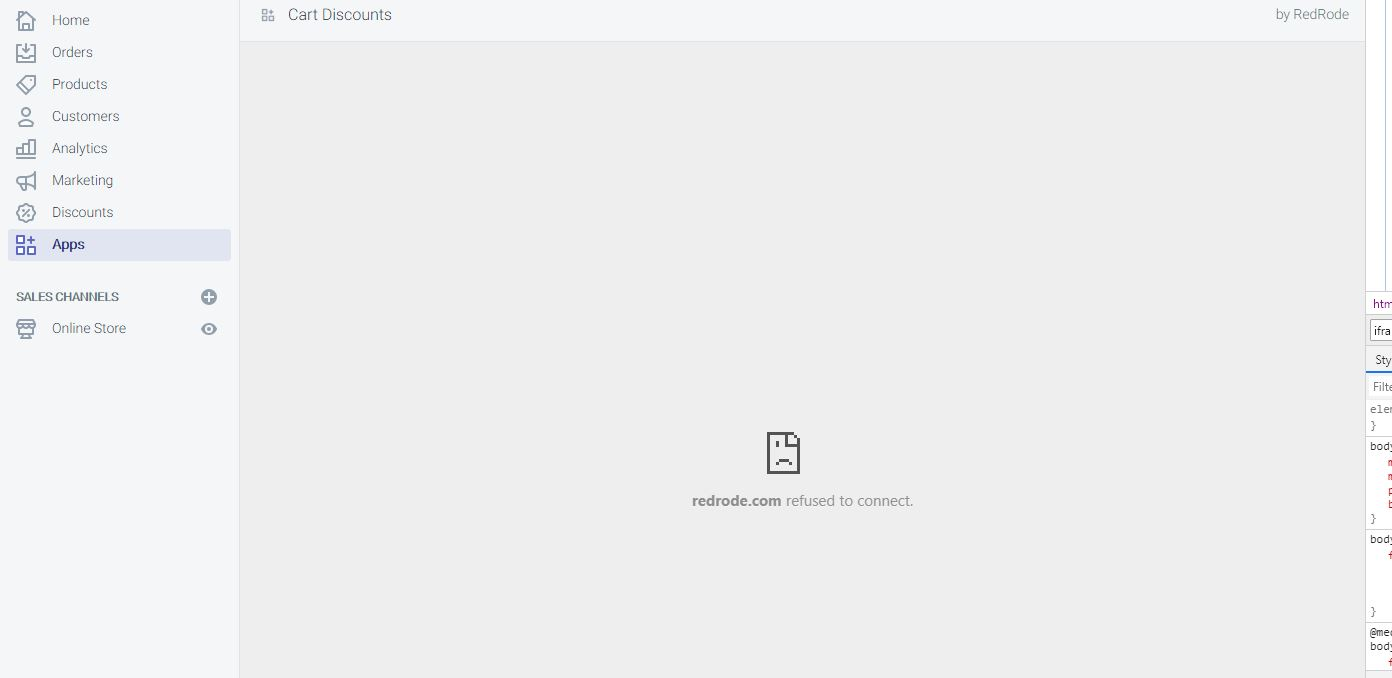
Shopify Refused To Connect Error
Special thanks to Corey for sending this error
According to Corey, the app is not loading properly inside the Shopify app hence returning a refused to connect error. BUT if you try to browse the app URL, the app will load.
I believe this is not TRUE at all.
If the app itself is not loading, then obviously the app URL will not load too.
To finally see what is happening behind the scene of your codes.
Put the following lines of code right at the top of your require_once("inc/functions.php");
This will return all the errors that you are not seeing behind the scene.
Shopify is not Giving the Access Token
Special thanks to Anand for sending me this error.
I have encountered this error so many times now and the usual problem here is the two root files. install.php and generate_token.php
Though I will recommend as well to double check the URLs that you have provided in the settings of your app. Keep in mind that everything is case-sensitive. If your URL is not properly cased then expect to receive an error.
So double check everything!
If your app is not giving access token then that means there is no OAuth happening between the store and the app.
Double check if both of your API key and secret key are correct. Make sure there are no spaces in the string.
Conclusion
I understand the errors like these are such a pain in the head but these errors will, of course, teach lessons and that lessons will help you avoid these errors.
If you are stuck in the following errors, then I suggest you start again from scratch.
I have written a full article on how to develop a Shopify app from scratch. So if you want, go ahead and read it.. maybe again.. because you’re here, looking for solutions and yet again, can’t fix it.
Unlike public Shopify apps, Private apps are built exclusively just for your Shopify store. If you’re a Shopify developer and owns a Shopify store, developing a private app is a great way to add features to your Shopify admin page and access your store’s data using Shopify’s APIs.
You can create as many private apps as you want. However, if your store is under the 14-day trial plan, then you can’t create more than five private apps (which is not a big deal at all since you can do a lot more with just one app).
In this Shopify Private app tutorial, you’ll learn how to create private apps exclusively just for your development store.
Use cases of private Shopify apps
There are many different use cases for private apps, the following are good examples:
Build an embed code generator to use for displaying your Shopify store on a website.
Display a detailed list or table about your customer’s orders.
Build an importer to transfer your data from a different e-commerce platform to Shopify
How to install a private Shopify app
Installing a private Shopify app to a development store is very easy but before you can do that, you need to create the required credentials from the Shopify admin of the store that you want to connect with your app.
It could be a little confusing but don’t worry! We’re here to guide you through the process and it’s very simple.
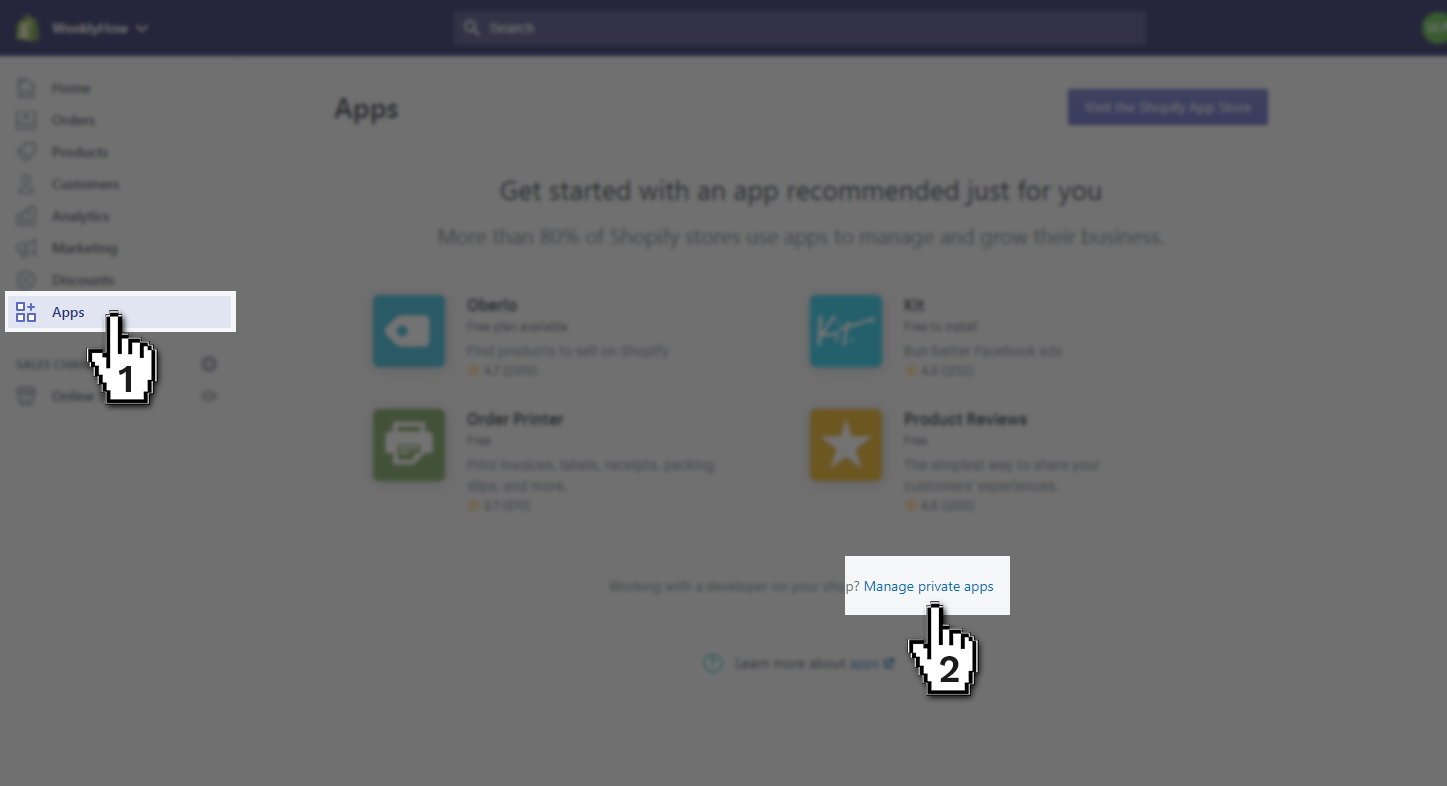
Manage Private Apps
To create a new private Shopify app, log in to your Shopify store and navigate to the Apps section and select Manage private apps which is located at the bottom of the page.
and navigate to the Apps section and select Manage private apps which is located at the bottom of the page.
Then click on the Create a new private app button.
This button can be located at the center of the page (if there are no existing private apps yet) and at the top menu (if there are private apps created already).
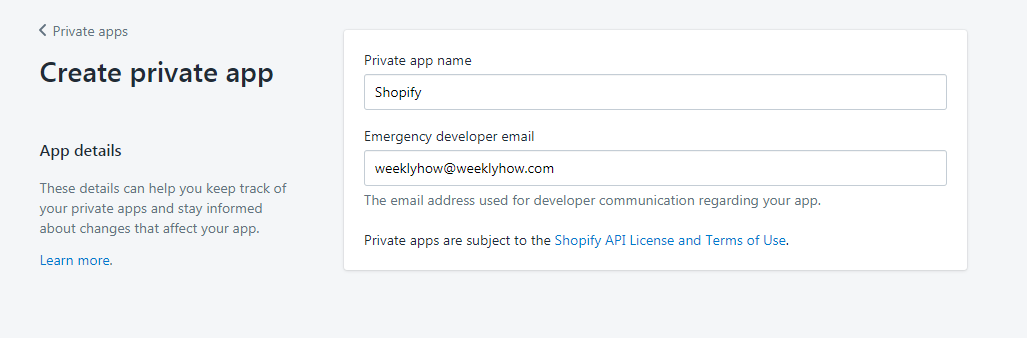
Shopify Private App Title & Credentials
Installing a private Shopify app to a development store is very easy but before you can do that, you need to create the required credentials from the Shopify admin of the store that you want to connect with your app.
In the App details section, enter the name you wish to call your private app.
The difference between private apps and public apps is that you can call your private apps anything you want since the app is exclusive just for your store.
Shopify Admin API Access
In the Admin API section, you can select the options you want your app to have access on. For example, you want your private app to have access to your analytics. You can do that by just finding Analytics at the bottom of the list and change No access to Read access. Simple as that!
Storefront API Permissions
On the other hand, if you want your private app to have access to the storefront API, you can select Allow this app to access your storefront data using the Storefront API. Then, select which store data you want to deliver to the app.
By default, Read products and collections, Read and modify customers, Read and modify checkouts, and Read blogs and articles are enabled.
Now, keep in mind that anything that your private does to your storefront will be seen publicly. So you should use the storefront API with care.
Another way to have access to your storefront is by using script tag API. If you’re planning on publishing a Shopify app then script tag API is the one that you should use instead.
Finally, hit save.
After saving the app, Shopify will generate an API key and a secret key. Treat these credentials as your password for accessing your Shopify app.
Now, to start developing Shopify Private Apps for your development store. You can read my Shopify app development course.
Conclusion
Creating Shopify private apps is very simple and won’t take you that much time. Thanks to Shopify for making it so easy! If you don’t know what’s the next step for developing a private Shopify app, I suggest you read my course on how to build Shopify apps using PHP.