
If you’re a Shopify Developer, you might not know that one of the most powerful features of Shopify is the script tag API. It’s an API that allows Shopify apps to import javascript files to give more custom features for Shopify stores.
For example, you’re planning on creating a Shopify app that displays a coupon code. Some themes don’t provide that feature but you can do that by adding a script tag with a source URL coming from your server and that script has a callback function that communicates with your Shopify app to get the coupon codes from the store’s database.
Sounds too complicated? Don’t worry, we’ll explain this further so keep on reading.
Getting started
Whatever you’re trying to build, the script tag API will give you a way to add your javascript to your customers’ Shopify stores without making them import your script files manually.
In this tutorial, we’ll learn everything you need to know to be able to build a Shopify app that displays an HTML code in the storefront. We’ll also cover all the things that you can do to control your customer’s front store using pure JavaScript and HTML/CSS.
Also, we’re going to assume that you already have your Shopify app created using PHP and Shopify Repository by Nyalex so if you don’t have a Shopify app yet, we recommend you to learn how to create a Shopify app from scratch.
What is Script Tag?
Just like any other Shopify API, script tag is an API object that you can create, update, and delete on the Shopify store. It might seem a little confusing especially if you’re familiar with the other type of script tag which is enclosed with angle brackets (also known as <script>).
So to clear things up, script tag in Shopify is an API object and script tag in HTML is a code for sourcing a javascript file.
If you have questions, don’t hesitate to ask it out in the comments below and we’ll answer that as soon as we can.
Alright, so let’s proceed.
The first thing we need to do obviously is to create a script tag using Shopify API. However, there are two things that you need to do first before you can successfully create a script tag.
Video Tutorial
If you prefer to watch video tutorials, you may click this video
How to use Script Tags
The following are the step by step guide on how to use script tags in Shopify.
Installing Script Tag
Now, let’s assume we have the following install.php script.
<?php
// Set variables for our request
$shop = $_GET['shop'];

$api_key = "ASSIGN YOUR API KEY HERE";
$scopes = "read_orders,write_products";
$redirect_uri = "http://YOUR-DOMAIN-NAME.COM/generate_token.php";

// Build install/approval URL to redirect to
$install_url = "https://" . $shop . "/admin/oauth/authorize?client_id=" . $api_key . "&scope=" . $scopes . "&redirect_uri=" . urlencode($redirect_uri);

// Redirect
header("Location: " . $install_url);
die();
Code language: PHP (php)
The PHP script above is a basic example of installing Shopify app to your customers.
As you can see, we have the $_GET variable for Shopify store URL and the API key which you can retrieve from your Shopify Partner dashboard under the app credentials.

Now, we have the $scopes variable.
This variable contains a string which is required for asking very specific permissions to Shopify stores. For example, you want to create a Shopify app that will retrieve all the products. Then you may use the read_products scope.
To be able to add scripts to your customer’s store, you need to use the scope write_script_tags.
In your install.php file, update the scope variable to:
$scopes = "read_orders,write_products,write_script_tags";
Code language: PHP (php)
Keep in mind that there must be NO spaces in the string.
List of Shopify API Access Scopes
To successfully access the Shopify API, you are required to ask your customers for permission to allow you to access their resources. You may use the following authenticated access scopes for that.
read_contentwrite_content | Used for accessing blog posts, comments, pages, and redirect |
read_themeswrite_themes | Used for accessing themes and assets |
read_productswrite_products | Used for accessing products and collections |
read_product_listings | Used for accessing product listings and collection listings |
read_customerswrite_customers | Used for accessing customers’ data |
read_orderswrite_orders | Used for accessing orders, fulfillments, and other transactions |
read_all_orders | Used for accessing all orders instead of the default window of 60 days worth of orders. (If you are going to use this scope, make sure you used this with read_orders, or write_orders scopes. You also need to write a request to Shopify before adding this scope to your app.) |
read_draft_orderswrite_draft_orders | Used to access draft orders |
read_inventorywrite_inventory | Used to access inventory |
read_locations | Used to access locations |
read_script_tagswrite_script_tags | Used to access script tags |
read_fulfillmentswrite_fulfillments | Used to access fullfillment services |
read_shippingwrite_shipping | Used to access to carrier services, country, and province |
read_analytics | Used to access Analytics API |
read_userswrite_users | Used to access users (Available for Shopify Plus only) |
read_checkoutswrite_checkouts | Used to access checkouts API |
read_reportswrite_reports | Used to access Reports API |
read_price_ruleswrite_price_rules | Used to access Price Rules |
read_discountswrite_discounts | Used to access GraphQL Admin API – Discounts features |
read_marketing_eventswrite_marketing_events | Used to access Marketing Event |
read_resource_feedbackswrite_resource_feedbacks | Used to access Resource Feedback |
read_shopify_payments_payouts | Used to access the Shopify Payments Payout, Balance, and Transaction resources |
read_shopify_payments_disputes | Used to access the Shopify Payments Dispute resources. |
Installing Shopify App
Assuming you followed our Shopify app development tutorial. You can install your Shopify app into your store using the following URL:
https://your-shopify-app-website/install.php?shop=your-shopify-store.myshopify.com
Code language: JavaScript (javascript)
Keep in mind that your-shopify-app-website is your host where your Shopify app source files are uploaded in. And your-shopify-store.myshopify.com is your shopify store URL.
After loading that URL, you should see the following:

Notice that there is Manage your Online Store.
Once your customers installed your app, your app will have access to your customers’ storefront and that’s where the magic happens.
Creating JavaScript for Script Tag API
Now that your Shopify app is installed to your store. You can start using Shopify API to import your script to your customer’s storefront.
But how?
Before we proceed to add the javascript to our store. Let’s create the file first.
Open your preferred text editor and create a javascript file called shopify.js.
jQuery(document).ready(function() {
	console.log('Thanks for reading WeeklyHow\'s Tutorials!');
});
Code language: JavaScript (javascript)
Assuming you have uploaded this script into your host scripts folder. You can access this file through:
https://your-shopify-app-website/scripts/shopify.js
Code language: JavaScript (javascript)
Creating Script Tag API Object
Now that we have installed our app to our store and created a sample javascript. Let’s import this script using script tag API.
To do this, we’re going to use the shopify_call() method which is included in the function.php file.
Here’s how your index.php file should look like.
<?php
require_once("inc/functions.php");

$params = $_GET;
$hmac = $_GET['hmac'];
$serializeArray = serialize($params);
$params = array_diff_key($params, array('hmac' => ''));
ksort($params);

$parsedUrl = parse_url('https://'.$params['shop']);
$host = explode('.', $parsedUrl['host']);
$subdomain = $host[0];

$shop = $subdomain;
$token = "PUT YOUR STORE GENERATED ACCESS TOKEN HERE";


$array = array(
	'script_tag' => array(
		'event' => 'onload',
		'src' => 'https://your-shopify-app-website/scripts/shopify.js'
	)
);

$scriptTag = shopify_call($token, $shop, "/admin/api/2019-07/script_tags.json", $array, 'POST');
$scriptTag = json_decode($scriptTag['response'], JSON_PRETTY_PRINT);


?>
Code language: PHP (php)
Before you test your app, make sure you have replaced the value of the variable $token. Keep in mind that each store have its own unique access token so make sure you get the access token which is generated by your generate_token.php. You can also store the access token to the database so it’ll be much easier for you to retrieve it whenever your customers use your app.
Notice as well the value of the $array, this variable is a multi-dimensional array so be careful of creating this variable.
The first key of our array is the script_tag and its value is another array which has two keys. event and src.
By default, event should always have a value of onload. To be clear, there are no other values available for the event key. However, it is important to always initialize this whenever you create a script tag.
The next key is src. This key is used to source the file that you want to import to your customer’s storefront. In the code above, we have sourced the link https://your-shopify-app-website/scripts/shopify.js.
Make sure you replace this with the URL you have in your domain.
$array, this variable is a multi-dimensional array so be careful of creating this variable.
The first key of our array is the script_tag and its value is another array which has two keys. event and src.
By default, event should always have a value of onload. To be clear, there are no other values available for the event key. However, it is important to always initialize this whenever you create a script tag.
The next key is src. This key is used to source the file that you want to import to your customer’s storefront. In the code above, we have sourced the link https://your-shopify-app-website/scripts/shopify.js.
Make sure you replace this with the URL you have in your domain.
Testing the App
Once you’re done with everything, you can open the Shopify app. If you haven’t seen any errors and such, you may proceed to your Shopify store and open the console.
If you’re using Google Chrome, you may open the console by pressing CTRL + Shift + I.
If you’re using Firefox, just right-click the window and press Q.

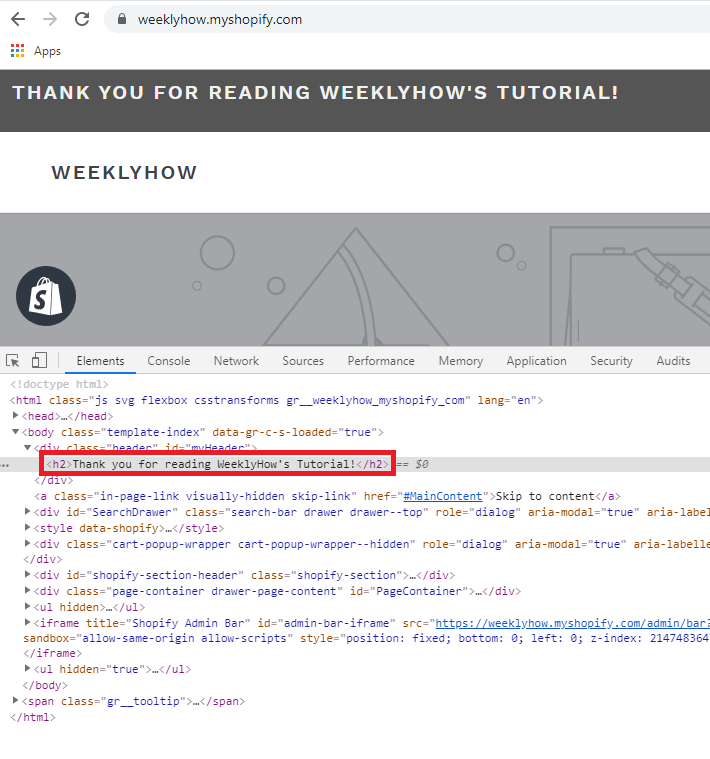
There you have it! You have successfully displayed a message in your Shopify store.
“But that’s boring! No one will actually look at their browser’s console just to see that message. We want to show it as soon as the guests arrive at our customers’ store” – Everyone 2019
Chill! Well, since we already displayed a sample message, it’ll be much easier to append HTML/CSS codes. Thanks to JavaScript!
Alright, for example, we want to display a bar on the top of the page saying that we’re on a sale. You can do that by using the following example code in your javascript:
jQuery(document).ready(function() {
	$('body').prepend('<div class="header" id="myHeader"><h2>Thank you for reading WeeklyHow\'s Tutorial!</h2></div>');
	$('head').prepend('<style>.header { padding: 10px 16px; background: #555; color: #f1f1f1; } .content { padding: 16px; } .sticky { position: fixed; top: 0; width: 100%} .sticky + .content { padding-top: 102px; }</style>');

	var header = document.getElementById("myHeader");
	var sticky = header.offsetTop;

	window.onscroll = function() {
		if (window.pageYOffset > sticky) {
			header.classList.add("sticky");
		} else {
			header.classList.remove("sticky");
		}
	};

});
Code language: JavaScript (javascript)
Feel free to change the text to “We’re on 100% Sale!” (Wow)
Conclusion
There you go! You have successfully displayed a message in your customer’s storefront. I suggest you experiment with this API because like we said before, you can do almost everything with script tag API.
But there’s always a downside with this.
Everything will only load once the whole document is loaded. That’s why if you noticed, whenever you reload your store, the message will only display a couple of seconds later.
If you enjoyed this article, feel free to share your thoughts! Do you have questions? Let us know in the comments below!
thanks
How we can change the text and make it dynamic?
Hi Omar,
Thank you for taking the time to read our articles.
If you’d like to change the text and make it dynamic, I suggest using AJAX and PHP. You pass data through AJAX and process it in PHP and return a JSON value back to the javascript.
Also, keep in mind that there will be an issue with passing data from Shopify store to your domain, so make sure you add the header: Access-Control-Allow-Origin.
Good luck!
Nice Tutorial!
How we can remove/delete the script tag as per above example. Can you guideline/paste line of code?
Hi Muhammad!
First of all, Thank you for reading our tutorials!
To delete a script tag, just follow the same process as posting a new script tag. Instead of POST, use DELETE. For example:
$scriptTag = shopify_call($token, $shop, "/admin/api/2019-07/script_tags.json", array(), 'DELETE');$scriptTag = json_decode($scriptTag['response'], JSON_PRETTY_PRINT);
Hope we helped you!
Thank you!
Hey thanks for the tutorial. I have 2 questions:
1. How to properly posit the html element? In the example the header is fixed but I see some apps could locate relative elements in the wanted position, e.g. right below a product’s image.
2. Is script tag the only approach to inject html elements? Would it lead to slow loading?
Thanks!
Thanks for the tutorial. Its very very helpful, but I think I had missed something in the 3rd or 4rd video. The section handling the block code for the theme was´t explained.
Anyway, I continued the 4rd video, put the right code like in the video, but when I refresh the index page, the entire content of the page is changed. Otherwise, instead of having at the index.liquid somthing like:
New content
{{ content_for_index }}
I have just
New content
What can I do please? There is some code to add to receive an additional code?
Thanks in advance
Hello ADDOU,
Thank you for sharing with us what you’re dealing with.
I believe the issue is the
index.liquiditself. Try to not remove this line{{ content_for_index }}and see if it helps.Best,
WeeklyHow
Can you help me to implement a button in the product page using React and Node in Shopify Store
Hi, I add some custom scripts on checkout order status page for that I build a custom app using ScriptTag API. When I install on the development store it shows an error.
Array ( [error] => 783: unexpected token at ‘script_tag%5Bevent%5D=onload&script_tag%5Bsrc%5D=https%3A%2F%2Fflamead.com%2Fauksales_shopify_app%2Fjs%2Fscript_tag.js&script_tag%5Bdisplay_scope%5D=all’ )
Love your content man,
How do we install the custom scripts when the user installs the app?
Thanks!
I guess you would just put the script tag code in the install file instead of the index.php
Hi How we can render this code before or after some specific div on the PDP page or CART page
Hey your tutorials are really very helpful for learning custom app using PHP. I have created the app for “Display HTML in Shopify Store with Shopify App ” but I have found no results. I found “Uncaught ReferenceError: jQuery is not defined” error every time. I have tried to do it by using $ but this is also showing same error will you please help me with this.