You are probably wanting to learn Shopify development because you either have a Shopify store that you want to improve or you just want to be a Shopify developer. Either way, you will do the same steps to learn Shopify development. Then you can choose whether you want to create a Shopify app or a Shopify theme.
But, the question still remains… How do you actually learn Shopify development as an absolute beginner?
Well, in this article, we will be talking about how to learn Shopify development in 2024 as a beginner.
Watch video
If you prefer watching video tutorials, you can watch the video version of this article below:
Otherwise, you can continue by reading my guide below.
Getting started
In order for you to be able to learn Shopify development, you’ll have to understand or at least know the fundamentals of web development (like HTML, CSS, and JavaScript).
Why? Because Shopify development is, indeed, still part of web development.
You will still use HTML, CSS, JavaScript, or frontend languages to render your Shopify development projects. You will also need to learn backend development. In other words, you will need to pick a programming language for your backend. This could be Node, PHP, Ruby, or Python.
It’s important to note though that there are more programming languages that you can use for Shopify development. The only thing that matters is the programming language should be able to communicate with the Shopify API.
Now, let’s assume you have learned the frontend and the backend. What is the next thing that you need to learn?
Well, the next thing that you should learn is database especially if your end goal is to create Shopify apps. Most of the time, when you do Shopify app development, you will be saving some data of the merchant to your database.
Once you have learned all of that, you’re pretty much ready to go and learn Shopify development.
Learning Shopify development
Good job! You have finally learned web development. The next thing that you will be learning is Shopify development. However, before you learn Shopify development, let’s understand first what is Shopify development.
What is Shopify development?
Shopify development is a way for Shopify developers to create applications or features to improve a Shopify online store.
Now, there are two things that you can create with Shopify development:
Shopify Apps
A Shopify app is a software application or plugin that extends the capabilities of a Shopify store. These apps are developed by third-party developers and are available in the Shopify App Store. Shopify apps allow store owners to add specific features, functionality, and integrations to their online stores without needing to code everything from scratch.
For example, there are apps for displaying product reviews, setting up email marketing campaigns, handling customer support, integrating with social media platforms, and much more. These apps help store owners optimize and customize their Shopify stores to suit their business needs.
Shopify Themes
A Shopify theme, on the other hand, is a collection of templates, sections, snippets and styles that determine the overall appearance and layout of a Shopify store. Themes control the design elements, such as the color scheme, typography, page layout, header, footer, and other visual aspects of the store.
So now that you at least have an idea of what is Shopify development, the next thing that you should learn is Shopify especially if you haven’t truly touched a Shopify store.
Don’t worry, you don’t have to purchase a Shopify store to learn Shopify. You can go to the Shopify Developers page and there you can create a partners account so you can create a development store.
So, you might be confused a little, what is a development store?
A development store is a Shopify store meant to be used for testing your Shopify apps and Shopify themes. That’s why it’s called a “development” store.
So, what should you learn in your Shopify store? Well, you should obviously learn how to navigate through a Shopify store. You should know how to create a product, how to go to the customizer page, how to access the locales, etc. In fact, you should really master all of the sections of a Shopify store. Otherwise, you’ll end up confused about where to find these sections.
Doing Shopify development
Okay, so let’s assume that you have done everything I mentioned above. Now what?
Well, obviously, you can start making Shopify development projects but like I mentioned earlier, there are two things that you can create with Shopify development, Shopify app and Shopify theme.
Now, the question is…
Which one should you make? Apps or Themes?
I highly recommend you to start with Shopify theme development because that’s where you will be learning everything about Liquid programming and Liquid programming is very important especially if you’re going to create a Shopify app that customizes a Shopify store.
Conclusion
I know it looked pretty simple but learning Shopify development can take a lot of time. I remember it took me 1 month to learn how to create a Shopify app but obviously, everyone is not the same. So my advice for you is to just take it easy and don’t pressure yourself a lot. Learn Shopify development when you feel like it and sooner or later, you’ll realize that you are now able to develop Shopify themes or apps.
If you’re interested, you can check out my courses here, I have put out a few courses that teach you how to create Shopify apps and Shopify themes.
If you don’t know already, there are plenty of ways to create Shopify apps. Thanks to Shopify REST API and its GraphQL API access, you can now develop new apps with your favorite programming language.
If you are comfortable with plain PHP, we have written a full Shopify App Development Tutorial with PHP. You can use it as your guide to developing Shopify apps because, in this article, we’ll be focusing more on building Shopify apps using Laravel.
What is Laravel?
Laravel is a web application framework with an elegant syntax to make the development more enjoyable, unlike developing on a plain PHP syntax. Laravel attempts to take the pain out of development by easing common tasks used in the majority of the web projects, such as web authentication, routing, sessions, and caching.
What is a Shopify App?
Shopify app is an additional feature for Shopify stores for controlling and management. With the help of Shopify API and GraphQL, you can create applications like Oberlo to find products to sell.
Watch how I create Shopify apps using Laravel in 10 minutes here:
How to Create Shopify Apps with Laravel?
To create a Shopify app with Laravel, you firstly need to create first the app for API and secret keys.
If you don’t know how to create an app, you may refer to this guide: How to build Shopify apps with Shopify Partner Dashboard
After creating the app in your Shopify Partner Dashboard, the next thing we need to do is to setup the skeleton of Laravel. To do that, we need to install composer and create a new project.
To do that, create a new folder where you want your projects to stay in and then open a command prompt and select that folder.
Then change your current directory to the path of your project. For example, I have created a Laravel project using the command above and name my project shopify_app.
After that, you will now be able to access the config file in config/shopify-app.php.
Typically you will need to fill in the app_name, api_key, api_secret, and api_scopes to generate a working app. Items like webhooks and scripttags are completely optional depending on your app requirements. As well, anything to do with billing is also optional and is disabled by default.
It is also recommended to use an env file for the configuration.
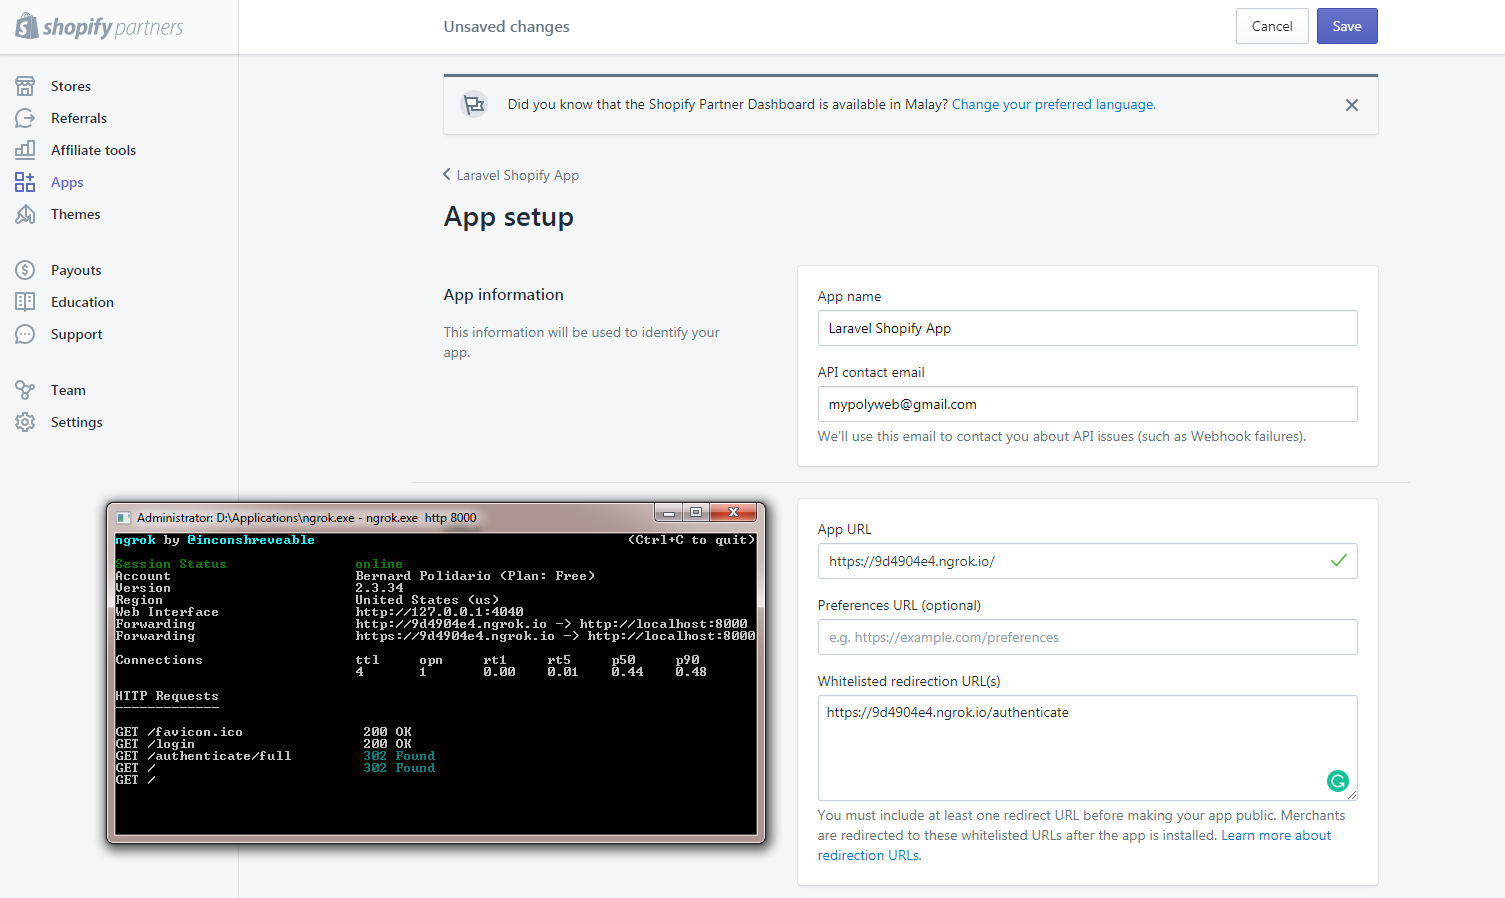
Shopify App Settings
In your app’s settings on your Shopify Partner dashboard, you need to set the callback URL to be:
The callback URL will point to the home route, while the redirect_uri will point to the authentication route.
Routing the App
This package expects a route named home to exist. By default, the package has this route defined which shows a simple welcome page. To enable it, you will need to open routes/web.php and comment out the default Laravel route for /.
Optionally, to make your own, edit routes/web.php and modify the default route to use the auth.shop middleware with the home named, example:
Route::get('/', function () {
return view('welcome');
})->middleware(['auth.shop'])->name('home');
Code language:JavaScript(javascript)
Next, modify resources/views/welcome.blade.php to extend this packages’ layout for Shopify AppBridge abilities, for example:
By default Laravel uses the sync driver to process jobs. These jobs run immediately and synchronously (blocking).
This package uses jobs to install webhooks, scripttags, and an option after-install hook if any are defined in the configuration. If you do not have any after-install hooks, scripttags, or webhooks to install on the shop, you may skip this section.
If you do however, you can leave the sync driver as default. But, it may impact load times for the customer accessing the app. Its recommended to setup Redis or database as your default driver in config/queue.php so jobs can run in the background and not affect the frontend performance. See Laravel’s docs on setting up queue drivers.
Use your environment file to replace the values, such as the domain, but set the topic to app/uninstalled and the path as /webhook/app-uninstalled will allow the webhook manager to do the heavy lifting for you.
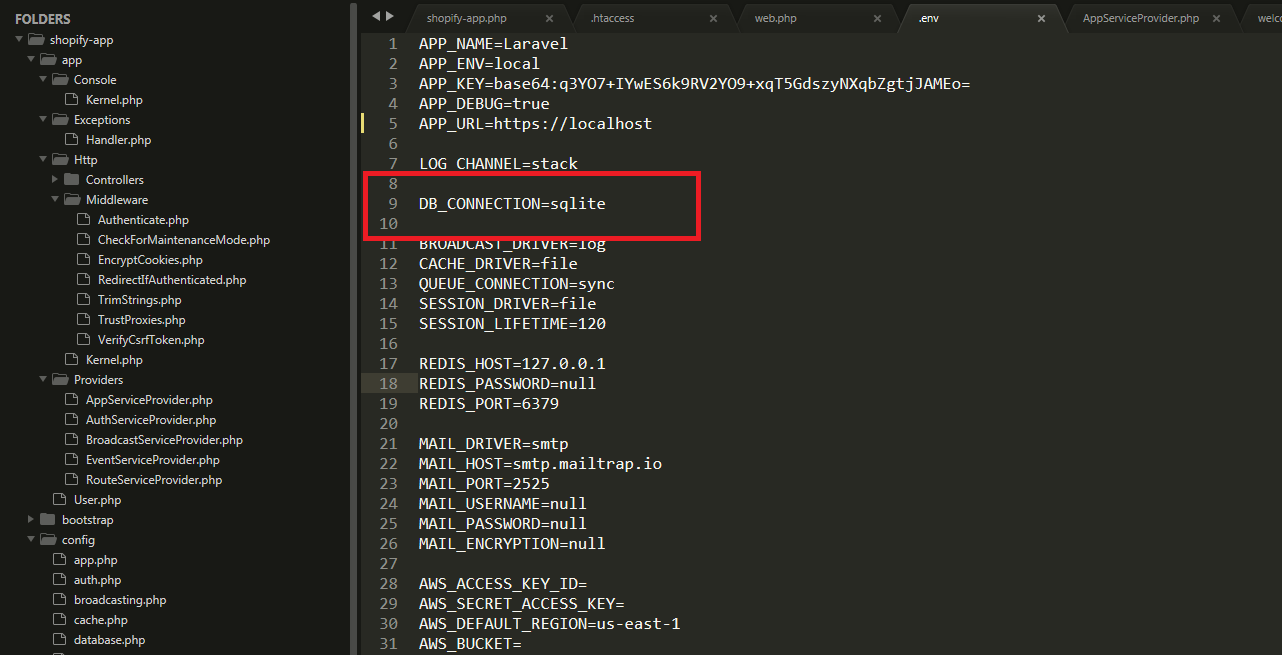
If you have encountered an error after using the commands above. Chances are, you haven’t configured your php.ini file and Laravel and trying to access the database module.
In your Laravel project, open the .env file and get rid of the lines starting with DB_ but keep the DB_CONNECTION and change the value to sqlite.
That’s the database that we’re going to use.
Next, find your php.ini file and look for the lines starting with ;extension and remove the semi-colon for these two modules.
extension=pdo_mysql
extension=pdo_sqlite
Once you’re done with everything, try to run the command again
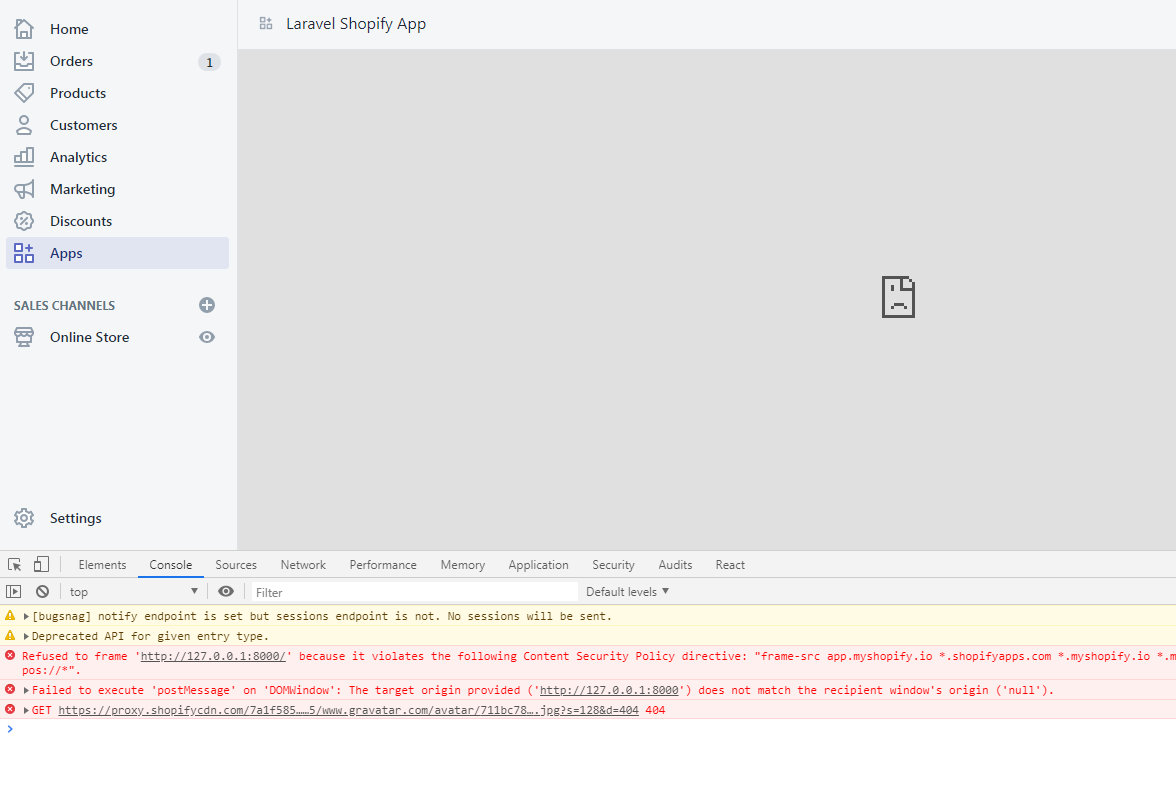
By default, Laravel is only being served through HTTP and as you might already know, Shopify requires your application to be served with SSL and Laravel can’t help you with this at all.
There has been a lot of solutions out there, that you should modify this or add this code to your code. None of them will work.
I suggest you run your own server or use ngrok to expose local servers behind NATs and firewalls to the public internet over secure tunnels.
After you get the URL from ngrok, replace the URLs in your Shopify Partner App Dashboard and there you can access your app.
After that, you’ll be able to access your Shopify app using the URL provided by ngrok.
And here it is, you may now be redirected to the Shopify app created with Laravel. Lovely!
The ‘Loop’ Problem
If you are using Webhooks to listen for changes, such as a new customer, and then using the API to update this customer, you can create an inadvertent loop. As an example:
Laravel App listens for a customer update Shopify webhook.
Laravel App receives this webhook from Shopify and processes it.
Laravel App then makes a Shopify API call to update this same customer.
Shopify then triggers another webhook to your Laravel App as the customer was updated.
And thus an infinite loop is created.
To combat this, it is recommended to implement some mechanism to avoid a loop. For example, don’t perform a customer update on the same customer within 60 seconds. The Shopify Dev forums have a number of solutions to this problem but you must implement logic to avoid a loop or you risk hitting API limits, in addition to annoying your App users.
App Bridge & Legacy
By default, Appbridge is enabled, the embeddable mode for Shopify Apps. If you wish to disable this, set SHOPIFY_APPBRIDGE_ENABLED=0 for your environment variable. This will enabled legacy mode and skip any AppBridge modes.
Please note, X-Frame-Options header must be removed for AppBridge to function. This package attempts to remove this header through the responses in Laravel, but this does not work for all cases. For Nginx, and Laravel Forge, you must specifically comment-out or remove the line below from the Nginx configuration:
The Nginx configuration is found in Laravel Forge at the very bottom of the page for the site in question: Files->Edit Nginx Configuration
Conclusion
Special thanks to the developers who developed the packages for building Shopify apps easier.
Creating Shopify apps with Laravel and Composer can be a little bit complex to some but it wouldn’t be that much hard if you know a little bit of Laravel and Shopify API. If in case you don’t know any of these, you may refer to their documentation.
This is Shopify liquid, a template language created by Shopify that serves as a framework for all Shopify themes. If you’re unfamiliar with Shopify themes, they are the templates that controls the styles and the layout of your online stores. So, if you wish to customize your online store, it’s best to learn liquid programming.
In this article, we’ll take a look at Shopify liquid.
We’ll start by understanding the Shopify liquid programming, and then we’ll learn about its features such as:
Objects in Liquid
Tags in Liquid
Filters in Liquid
So if you’re ready, let’s begin learning Shopify liquid!
Video Tutorial
Do you prefer video tutorials instead of reading? You may watch the video version of this article below:
What is Shopify Liquid?
Shopify liquid is a template language used for creating or modifying Shopify themes. If you’re familiar with Ruby, you probably have heard about this template language because it’s written in Ruby or it’s known to be written in Ruby, but in terms of syntax, it’s very different compared to other programming languages.
In addition, Shopify liquid is very limited. Like there’s a lot that you cannot do with liquid. For example, you cannot retrieve a data from a third party server. Just from Shopify.
What is it used for?
Shopify Liquid is mainly used as the “backend template language” of Shopify themes. Meaning, it is only used to control what is displayed in the Shopify storefront. Don’t get the wrong idea though because Liquid cannot do many things like connect to a third-party server, creating directives, etc.
In web development, there are two contents that you can render: static content and dynamic content.
Static content is a content of a page that stays the same and is usually hard-coded in HTML whereas dynamic content. It’s the content of a page that changes depending on specific parameter.
For example, we have the following product page.
It specifically rendered the product for cats because in the URL, we specified that we want to render this specific product.
The highlighted text above is called a handle. By changing this to a different handle of a product, the product page will render a different product.
In addition to that, Shopify uses its own architecture or template files to display this pages.
For example, the product page is using product.json. It’s a JSON template that uses sections to complete the page, taking a closer look at the section files you will see that there’s a liquid code mixed with HTML, CSS, and JavaScript.
Note that the code above is just an example of what code can a liquid file have.
So to put it simply Shopify Liquid is like the middle man between Shopify stores and the server of Shopify (where all the data about your Shopify store is stored).
When a Shopify store asks for a data through liquid, Shopify liquid will ask the server of Shopify if that data that is being requested is available.
If the server returns 200 OK, then the server will give the requested data back to liquid. Then liquid will hold that data and bring that to the Shopify store’s theme.
If the requested data is not available, then the server of Shopify will just return a 404 error response. Meaning, Shopify liquid won’t have anything to bring.
Shopify Liquid Features
Shopify liquid is categorized by three features: objects, tags, and filter.
Objects
Also known as variables are wrapped in double curly braces {{ }}. And it’s used to output pieces of data from a Shopify store. For example, this is a shop object:
{{ shop }}
Inside of the shop object, there are properties or attributes that you can use by using dot notation ( . ).
Let’s say we use the name attribute. It should be something like this:
{{ shop.name }}
So you’re going to type it like above. The above attribute should render the name of your Shopify store.
There are plenty of attributes that you can use from most of the objects in Shopify. So if you wish to learn more about these objects and attributes, I suggest going to the Shopify developers’s documentation page and get to know these attributes or objects. Now let’s proceed to tags.
Tags
Tags in Shopify liquid are the programming logic that tells templates what to do. This tags are wrapped in curly braces, followed by percentage symbols {% ... %}.
And it’s usually followed by a closing tag or an end tag {% end... %}.
Tags are divided into four categories: control flow, iteration, theme, and variable tags.
Control flow tags are the tags that you can use to create conditions. These control flow tags are the:
if
unless
else/elsif
case/when
And lastly, the operators and/or.
To create a tag, you need to start it with a tag itself. Say, for example, the, if tag:
{% if condition %}
...
Then you need to close it with a closing tag.
{% if condition %}
...
{% endif %}
Code language:PHP(php)
However, not all tags are required to have a closing tag. A good example of this is else or elsif. These tags can only be used between if and, endif.
Now, if you want to create multiple conditions for a control flow tag, you can use the operators and, or, or.
For example, we have the following condition:
{% if condition_A and condition_B %}
...
If you’re using and, the two conditions (condition_A and condition_B) must be true in order to execute the block of codes inside of the if.
If you’re using or, either of the two conditions can be true, it will still execute the code inside of the if tag.
{% if condition_A or condition_B %}
...
Now, all of this are part of the fundamentals of programming. And so if you’re a familiar with it, I suggest go and learn that because that’s quite a huge topic for this article.
Iteration tags are the tags that you can use to repeat blocks of code. This is where you can use the for tag to loop through an array of values. For example, we have the following for tag:
{% for product in collection %}
{{ product.title }}
{% endfor %}Code language:PHP(php)
In the example above we have a condition that for each product in the collection, we are going to render the name of the product.
So for example, in that collection, we have three products: Product #1, Product #2, and Product #3. The entire code above will basically output three, heading title ones (<h1>) with a text: Product #1, Product #2, and Product #3.
You can also combine for tag with an {% else %} tag. This is very useful too, especially if you want to know whether the {% for %} tag executed the codes inside of it or not.
Next up are the theme tags.
Theme tags are the tags that you can use:
to generate template specific HTML codes;
to divide arrays into multiple pages, and;
to tell Shopify themes to render or use a specific layout or snippets.
So this is where you’ll find the form tag, the section tag, the pagination tag, and the layout tag.
Lastly, is the variable tags, variable tags are the tags that you can use to create liquid variables. If you’re familiar with JavaScript or other programming languages, you can create variables (most of the time) using var keyword or a data type. In Shopify liquid, you can use either the {% assign %} tag or {% capture %} tag to create variables.
So how can you create a variable?
{% assign variable_name = shop.name %}
In the example above, we use the assign tag to create a variable. You can create the assigned tag, followed by the name of the variable. Then followed by an equal sign to create or assign a value. In the example above, we used the name of the Shopify store.
Now, if you use this variable, like how you use an object, this will output the name of the Shopify store.
Now let’s continue to the last feature of Shopify liquid. And that is the filters.
Filters
Filters are kind of hard to explain, but to put it simply, they are methods that modifies the value or the output of an object.
They are placed within an object tag and it’s denoted by a pipe symbol.
Now let’s take a look at this example above. Here we have a product.title object. Now we can use a filter by adding a pipe symbol and then specify what filter that you want to use. Let’s say we use the upcase filter.
{{ product.title | upcase }}
This will then change the output of the object and make the string output all uppercase. That’s basically how filters work. They change or modify the output of an object.
Now, there are plenty of filters that you can use for every situations. There are filters for strings, for numbers, for arrays, for URLs, for colors, et cetera, but they all do the same thing. They modify the value or the outputs of an object.
Closing lines
So that is Shopify Liquid, a template language used for rendering pieces of data from a Shopify store. Now, if you have any question, let me know in the comments below, otherwise, feel free to subscribe to our YouTube channel and like the attached video. We have plenty of good videos in our channel so feel free to check them out! If you have request, let us know!
Do you want to learn Liquid programming so that you can customize or understand the codes of your Shopify theme? If yes, then you have come to the right place!
Welcome to the Shopify Liquid Programming course! In this course, my goal is to help you understand what is Liquid in Shopify: what it does, and how to use it.
In this course, I’m going to cover the following features of Liquid:
Objects: Global objects & content objects
Tags: Making conditions & looping statements
Filters
Metafields & Metaobjects
If you are a Shopify store owner, and you’d like to understand how a Shopify store is running, then learning Liquid can be extremely helpful.
In this course, I will also give you as many examples as possible to make Shopify Liquid easy to understand and how it blends with markup languages like HTML.
You will learn:
How to create navigations / menu links
How to create paginations
How to create custom sections
How to use metafields
and more!
🤔 Why Take This Course?
One of the biggest mistakes that people make is that they customize their Shopify theme aimlessly. What newbies usually do is Google the features that they’re looking for, then they will copy a code from someone else and apply it to their Shopify store without understanding the code that they copied and pasted. This can be an issue since they don’t understand the objects, tags, and filters.
That’s why I’m here to help you avoid making that mistake!
📌 Before Taking This Course
Now, what are the things that you need to know before taking this course? To get the best experience out of this course, it’s highly recommended that you know how to use Shopify. What I mean is, you should know your way around Shopify from admin, to settings, code editor and to the theme editor.
Next, it’s important that you know at least the fundamentals of programming (Like the operators, data structures or data types). Though I will do my best to explain what is going on in each lesson so that even if you have less knowledge about programming, you’ll be able to understand the code. In addition, for each lesson, I will provide resources related to the lessons (e.g. PDFs or articles) so that you can use those resources to learn more about Liquid.
Another thing that you can do is post questions in the Q&A section. So if you have questions, you can post them in the Q&A. I will also include in this course, quizzes or questionnaires so that you can test yourself if you can finally use Liquid.
So are you ready to learn Liquid? If yes, join me and I will see you on the other side.
Do you want to learn Liquid programming so that you can customize or understand the codes of your Shopify theme? If yes, then you have come to the right place!
Welcome to the Shopify Liquid Programming course! In this course, my goal is to help you understand what is Liquid like what it does, and how to use it.
We’re going to cover the following features of Liquid:
Objects
Tags
Filters
If you are a Shopify store owner, and you’d like to understand how a Shopify store is running, then learning Liquid can be extremely helpful.
One of the biggest mistakes that people make is that they customize their Shopify theme aimlessly. What they usually do is Google the features that they’re looking for, then they will copy a code from someone else and apply it to their Shopify store without understanding the code that they copied and pasted.
This can be an issue since they don’t understand the objects, tags, and filters.
That’s why I’m here to help you avoid making that mistake!
Now, what are the things that you need to know before taking this course?
To get the best experience out of this course, it’s highly recommended that you know how to use Shopify.
What I mean is, you should know your way around Shopify from admin, to settings and to storefront.
Next, it’s important that you know at least the basics of programming (Like the operators, or data types). Though I will do my best to explain what is going on in each lessons so that even if you have less knowledge about programming, you’ll be able to understand the code.
In addition, for each lessons, I will provide resources related to the lessons (e.g. PDFs or articles) so that you can use those resources to learn more about Liquid.
Another thing that you can do is to post questions in the QnA section. So if you have questions, you can post them in the QnA.
I will also include in this course, quizzes or questionnaires so that you can test yourself if you can finally use Liquid.
So are you ready to learn Liquid? If yes, join me and I will see you on the other side.
We’ve recently learned how to create an FAQ page for online store 2.0. Now, let’s learn how to make an FAQ section that you can reuse as many as wish.
Video Tutorial
If you prefer to watch video tutorials, you may watch the video version of this article instead.
Getting Started
Before we start this tutorial, we would like to mention that we will be using the free Shopify theme Dawn created by Shopify. If you’re using a different Shopify theme, don’t be surprised that yours are going to look different from mine. So if you’re having issues with your accordions, that may be because of your Shopify theme and its CSS.
Let’s begin this tutorial, by opening your theme’s code editor.
Go to Online Store and Themes.
Then, in the card of your Shopify theme of choice, click the Actions button and select Edit code.
This should open the code editor of your Shopify theme. Now, it’s time to make the section!
Creating The FAQ Section
For this FAQ section, we’re going to need two (2) files: sections/faq.liquid and assets/faq-style.css.
Let’s start with the stylesheet.
Open the assets folder and create a new asset and name it faq-style and make sure its extension is .CSS.
Once the file is created, copy the following code:
If you save your files, you should be able to create as many FAQ blocks as your want!
Conclusion
There you have it! You just created FAQ blocks using sections. Now, you will be able to create accordions everywhere you want as long as the template file is using sections. There are a few problems in this accordion though, specifically, the styling of it. In this project, we haven’t used any styling for the buttons and its label so if your Shopify theme is using bright colors for buttons, the label of this accordion will not be that visible so you may have to tweak the styling a bit if you encounter the said issue. Other than that, that’s pretty much it.
Shopify just recently updated their Shopify online experience and now they call it “Online Store 2.0”.
With this update, Shopify merchants can now customize their entire online store using sections & blocks. This opened a lot of doors not just for Shopify app developers but also for Shopify theme developers because now, you can add cool sections and blocks to the most commonly used pages like products page, collections page, blog page, etc.
If you’re a Shopify theme developer and you don’t know yet how to create a Shopify theme for Online Store 2.0, then this is the best time to learn because Shopify is now accepting Shopify themes to be listed on their Shopify Theme Store!
This means you can make money by selling your Shopify themes! So are you interested to learn more?
In this course, we’re going to learn how to create a Shopify theme for Online Store 2.0 using Shopify CLI with the help of TailwindCSS to design a cool online store.
In this course you will learn:
How to set up your development store using Shopify CLI 3.0
Using TailwindCSS to design a Shopify theme
Create navigational bar
Create collection page
Create product page
Create customer page
Create cart page
and more!
Online Store 2.0 (JSON Templates)
Shopify CLI
Shopify GitHub Integration
Schema Settings
Search Engine Optimization (SEO) for pages like articles, products, etc.
Liquid language (Referencing asset files, loops, conditional statements, Shopify objects, filters, and many more)
Customer Templates
If you think you’re ready to start, signup now, and let’s create the best Shopify theme together!
Over the past few years, REST has become the only way for designing web APIs. However, there are things that make REST very inflexible. For example, you cannot control how much data you can retrieve or you can’t specify the only data that you wish to retrieve, etc.
This happens in Shopify app development as well. If you want to get a product using REST API, all of the data about your products will be sent to you. This makes REST very heavy and slow to use.
So, that’s why GraphQL was created, to cope with the need for more flexibility and efficiency.
But, we’re not going to focus on the difference between REST and GraphQL. Instead, we’re going to learn how to create products using GraphQL mutations and vanilla PHP.
Video Tutorial
If you prefer watching video tutorials, then the video below is for you.
Otherwise, feel free to keep reading the content below.
Getting Started
If this is your first time learning how to make Shopify apps using vanilla PHP, then we highly recommend reading through our guide here. We also have a ton of videos covering Shopify app development, so before you proceed, make sure that you have a local web server and a Shopify app installed in your development store.
Before we start using GraphQL mutations in PHP, we need to create a function that will allow us to make API calls.
GraphQL API Call Function
Create a new PHP file called functions.php and copy the following code:
This function above will allow you to send GraphQL queries to the Shopify GraphQL endpoint. You just need to provide your access token, Shopify store domain, and the query/mutation.
Alright, so now that we have the function to make GraphQL API calls, we can start and set up our index file.
The Index File
Create a new PHP file in your project and make sure it’s your index file so name it index.php. Once the file is created, you can copy the following code:
In the code above, we referenced the functions.php so that we can use the graphql() function.
Now, make sure that you have your access token in the $access_token variable. If you don’t know how to generate an access token, then watch our tutorial here.
Let’s assume you already have your access token, we can now proceed and use the GraphQL function to create products.
Creating Products using GraphQL Mutations
In the same file, create a new variable and use the function graphql() like what we did below.
In the 3rd argument, we applied an empty array, that array is where you’re going to apply the query/mutation.
So let’s create a new variable and call it $query or whatever you want. Then, in this variable, we will create an array and its key SHOULD be set to query. Again, the key SHOULD be set to query and not something else. Then, we’re going to use that variable in the 3rd argument of the graphql() function.
<?phprequire_once( "inc/functions.php" );
$shop_url = $_GET['shop'];
$access_token = 'shpca_xxxxxxxxxxxxxxxxxxxxxxxxxxxxxxxx';
$query = array("query" => ' mutation { productCreate( input: { title: "Vanilla PHP & GraphQL" descriptionHtml: "<p>I am created using GraphQL!</p>" } ) { product { id title } } }');
$mutation = graphql($access_token, $shop_url, $query);
?>Code language:PHP(php)
In this mutation, we used the productCreate field and this field requires us to provide an argument input so there we provided a title and a descriptionHtml. After the product is created, the mutation will then return a field called product and in that field, we create retrieve data about the product like its id, title, tags, images, etc. To learn more about the product field, click here.
That’s it! If you run your app, it should give you the following response.
So you have finally learned how to display products using Shopify Product REST API. However, you have a bit of a problem, you want to display products with pagination and the only thing you think you can do is to create an array of products and display them depending on their keys.
Believe it or not, it’s not actually a bad idea but offers a TON of work.
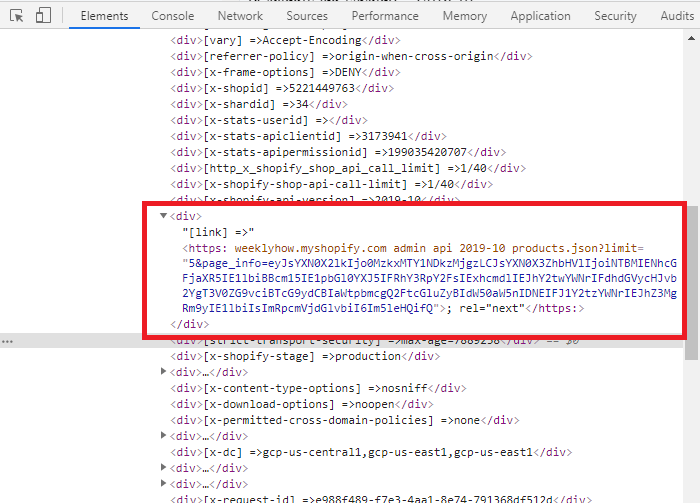
Shopify Product API (version 2021-07 and beyond) provides a link header that you can use for requesting paginated REST Admin API endpoints and that’s what we’re going to learn today.
Keep in mind that before proceeding, you must know already how to use Shopify API or you have created a Shopify app using our Shopify app development tutorial.
If in case this is your first time, we highly suggest you read our tutorial below.
If you prefer watching video tutorials, you can watch the video version of this article here:
Getting Started
Before you can create pagination, it’s important to understand that this will only work for API version 2021-01 and beyond. So if you’re using an old version of the API, then we highly recommend you to go to your app settings and update your API version.
Another important thing is to understand how the product API works. By default, you can return up to 50 products per page but you can also maximize the number up to 250 products.
Each page will provide you a set of links (aka. page info) in the header that you can use to go to the next or previous set of items.
To properly explain this… Let’s say we have 200 products, and we want to display 10 products per page.
If we are on the very first page of our products, the API will give us just one link in the header, for us to be able to go to the next page.
If we are on the second page, the API will give us two links in the header, one for the previous page and one for the next page.
And so on, and so forth.
REST API Function
If this is your first time working with PHP, keep in mind that we are using the following functions.php. In this PHP file, we have a function that allows us to do API calls. So if you don’t have this function, you won’t be able to get products from Shopify API.
Awesome! Now we’re just displaying the first 5 products.
Previous & Next Buttons
Now that we have successfully displayed and limit our products. Let’s create the buttons that we’re going to use to navigate to the next page (…and also the previous page of course).
Just underneath your unordered list element, add the following code.
If you’re using the same function that we used for developing Shopify apps, then you’ll most likely encounter the very same bug that we experience whenever we use the rest_api() function.
If you use the said function just for the sake of returning Shopify’s response, then you might think that there’s no problem at all.
However, when you use the function to get headers, specifically for making pagination. You will notice that there’s something wrong/missing and that is the link header.
The main reason why that’s happening is because of the ‘colons’ in the header.
The functions.php file is simply using the explode() function to create an array for the header. Then loop through each key in the array, and explode once again with the help of colon this time. That’s also where the issue starts to develop.
Since URLs have their own colon (https://), the function explode will obviously malfunction.
So with all that being said, let’s update our functions.php.
We basically got everything we need to display our products and pagination. Now let’s work with AJAX so we can retrieve the next and previous products.
Just before your body closing tag, add the following code.
First of all, we need to get everything that we need such as our access token, our shop subdomain, and the data values that we passed through AJAX.
Next, we’ll create the API. So just underneath the code, add the following:
//Create an array for the API$array = array(
'limit' => 5,
'page_info' => $page_info,
'rel' => $rel
);
$products = rest_api($access_token, $shop_url, "/admin/api/2021-07/products.json", $array, 'GET');
Code language:PHP(php)
Next, we’ll create everything we need for our headers, check if the link header contains two page_infos, otherwise retrieve the default value.
//Get the headers$headers = $products['headers'];
//Create an array for link header$link_array = array();
//Check if there's more than one links / page infos. Otherwise, get the one and only link providedif( strpos( $headers['link'], ',' ) !== false ) {
$link_array = explode(',', $headers['link'] );
} else {
$link = $headers['link'];
}
Code language:PHP(php)
Next, we’ll create another set of variables and check if the $link_array count is greater than one. If it is, then we take the two page_infos from each link array. Otherwise, just get what’s provided.
And last but not least, we’ll create the variable for our frontend to display the next set of products.
//Create and loop through the next or previous products$html = '';
$products = json_decode($products['data'], true);
foreach($products as $product) {
foreach($product as $key => $value) {
$html .= '<li>' . $value['title'] . '</li>';
}
}
Code language:PHP(php)
Seriously though, this is the last…
Let’s encode everything into JSON and pass it back to AJAX.
//Then we return the values back to ajaxecho json_encode( array( 'prev' => $prev_link, 'next' => $next_link, 'html' => $html ) );
Code language:PHP(php)
Save all your files and you should have the following output.
Conclusion
If you have reached this part then good job! You have successfully learned how to create pagination for your Product API. Obviously, there are plenty of other ways to do this but this tutorial is just to give you an idea that it is possible to make paginations for products.
If you have concerns or questions, don’t hesitate to let us know in the comments below!
Let’s say you have a Shopify store and you’ve been working on it for years. Then, after some time, you’ve taken a look at your Shopify homepage and you’ve decided to customize your Shopify store for a little bit.
But then, BOOM!
You’ve found out that Shopify just recently changed the look of the customizer page and now, you’re lost. So you started reading about it and then you’ve realized that there are new features that you can do.
But, unfortunately, it looks like you can’t do any of the new features (like the “modularity” of the entire Shopify store, app blocks or app extensions, etc.) and that’s because you’re using an old Shopify theme and you need to upgrade it to a JSON template.
Well, in this article we are going to learn how to migrate a Shopify theme from Liquid to Online Store 2.0 (aka JSON templates).
Video Tutorial
If you prefer watching video tutorials, you can watch the following video version of this article.
Otherwise, you can continue below.
Getting Started
Before we get started, I want to point out that we are going to use Debut as an example in this article. We are also going to ONLY show you how to migrate a single template file from Liquid to JSON template and so if you’re looking for an in-depth tutorial about migrating all of the template files to JSON, I highly recommend taking the Shopify Theme Development course. In that course, I will be covering all of the template files from 404 to Search template file.
Also, before we begin, make sure that you BACKUP your Shopify theme. There are a lot of ways to backup a Shopify theme so make sure you do that before doing any of the steps that I will be mentioning in this article.
Migrating Shopify Themes to JSON Templates
You can migrate a Shopify theme in 3 simple steps:
Identify the sections of your theme templates
Replace the Liquid template with JSON template
Test your theme
Looks very simple no? Well, let’s see how to do them.
Identify the sections of your Shopify theme templates
Before you can start migrating your template files from .liquid to a JSON template, you need to make sure that all of the {% section %} tags inside of a template are removed. This is because Shopify doesn’t allow you to use the {% section %} tag inside of a section file and by using a {% section %} tag in a section file, you will receive the following error:
Liquid error (section/section-example.liquid line 58): Cannot render sections inside sections
Once you have found a section tag inside of your section, you have two options:
Move the code of that section to the section referencing that section. (Might be confusing but what I mean is merging these sections into one)
Create a layout that reference that section.
The second option is quite advanced so to make this article shorter and simple, we’ll just do the first option and so that you get what I’m trying to say in that list.
Open your theme code editor
Locate a template file (They’re usually inside of the /templates directory). Let’s use the article.liquid in this tutorial.
Search for {% section %} tags. (If this is your first time opening that template file, you should be able to find a section tag that references the section named “article-template”).
Did you find one? Great. Remove that section tag and open that “article-template” section file. Inside of that section file, you should see a part of the article template that renders the blog post.
So what you’re going to do is to move all of that code to the article.liquid. Because the whole point is to remove all of the section tags from your template.
Now, keep in mind that you should move or paste the code of the “article-template” to the line where the {% section %} tag is located. So if the section tag is located in line 17, then you should paste the code of that section in line 17.
Do the same steps for the rest of the section tags that you find.
Replace the old template with JSON template
Now that we have removed the section tags from our template file, we can finally replace this template file with JSON template. But first, we need to move the code of the article.liquid to a section file and then, we can delete the article.liquid and replace it with article.json.
Go to /sections directory or folder and create a new section. Name it whatever you what but make sure you remember this name because we’ll use this name in the article JSON template file. In my case, I’ll name it template-article.
Inside of the template-article.liquid, I’ll move ALL of the code from the article.liquid template file.
Delete the article.liquid.
Go to /templates directory or folder and create a new template file and select article and make sure that you select JSON instead of Liquid.
Once the article.json is created, replace its code with the following:
Once you have created your new template, open it with the customizer and check if you can add sections to your article template. If you can, then that means you have successfully migrated your template file from Liquid to JSON template.
Now the next thing that you’re going to do is to apply the same steps to the rest of the template files.
Conclusion
Migrating your Shopify themes from the old template system to Online Store 2.0 is honestly very easy, but it can be very difficult depending on what Shopify theme you’re about to migrate. So my advice, especially if you’re using a different theme, is to learn your Shopify theme first, back it up, and use it with a development store or a test store. That way, your Shopify store is safe from being broken.
We haven’t covered in this article how to use app blocks in JSON template so we’ll probably just cover them in the next video of our YouTube channel. So, if you’re interested, make sure you subscribe to our YouTube channel so we can notify you when we upload a new lesson.