We’ve recently learned how to create an FAQ page for online store 2.0. Now, let’s learn how to make an FAQ section that you can reuse as many as wish.
Video Tutorial
If you prefer to watch video tutorials, you may watch the video version of this article instead.
Getting Started
Before we start this tutorial, we would like to mention that we will be using the free Shopify theme Dawn created by Shopify. If you’re using a different Shopify theme, don’t be surprised that yours are going to look different from mine. So if you’re having issues with your accordions, that may be because of your Shopify theme and its CSS.
Let’s begin this tutorial, by opening your theme’s code editor.
Go to Online Store and Themes.

Then, in the card of your Shopify theme of choice, click the Actions button and select Edit code.

This should open the code editor of your Shopify theme. Now, it’s time to make the section!
Creating The FAQ Section
For this FAQ section, we’re going to need two (2) files: sections/faq.liquid and assets/faq-style.css.
Let’s start with the stylesheet.
Open the assets folder and create a new asset and name it faq-style and make sure its extension is .CSS.
Once the file is created, copy the following code:
.faq-description {
  margin-top: 2em;
  margin-bottom: 2em;
}

.faq-checkbox {
  position: absolute;
  opacity: 0;
  z-index: -1;
}

.tabs {
  border-radius: 10px;
  overflow: hidden;
  box-shadow: 0px 0px 12px #4141416e;
}

.tab {
  width: 100%;
  color: white;
  overflow: hidden;
}

.tab-label {
  width: 100%;
  display: flex;
  justify-content: space-between;
  padding: 1em;
  font-weight: bold;
  color: white;
}

.tab-content {
  max-height: 0;
  padding: 0 1em;
  background-color: white;
  transition: all 0.5s ease;
  color: black;
}

.tab-content p {
  margin: 0;
}

.faq-checkbox:checked ~ .tab-content {
  max-height: 100vh;
  padding: 1em;
}
Code language: CSS (css)
Save the file.
Next, let’s create the sections/faq.liquid.
Open the sections folder and create a new section file and name it faq. Then, copy the following code:
<link rel="stylesheet" href="{{ 'faq-style.css' | asset_url }}" media="print" onload="this.media='all'">

<div class="page-width page-width--narrow">
  <div class="faq-container">
    <div class="tabs">
    	{% for block in section.blocks %}
      		{% assign item = block.settings %}

      		<div class="tab">
      			<input type="checkbox" id="faq_checkbox_{{ forloop.index }}" class="faq-checkbox">
        		<label for="faq_checkbox_{{ forloop.index }}" class="tab-label button button--primary">{{ item.question }}</label>
        		<div class="tab-content">{{ item.answer }}</div>
      		</div>
      	{% endfor %}
    </div>
  </div>
</div>

{% schema %}
{
	"name": "FAQ",
	"tag": "section",
	"class": "spaced-section",
	"blocks": [
		{
			"name": "FAQ Item",
			"type": "faq",
			"settings": [
				{
					"type": "text",
					"id": "question",
					"label": "Question",
					"default": "Do you have a question?"
				},
				{
					"type": "richtext",
					"id": "answer",
					"label": "Answer",
					"default": "<p>I have an answer</p>"
				}
			]
		}
	],
	"presets": [
		{ "name": "FAQ Block" }
	]
}
{% endschema %}
Code language: HTML, XML (xml)
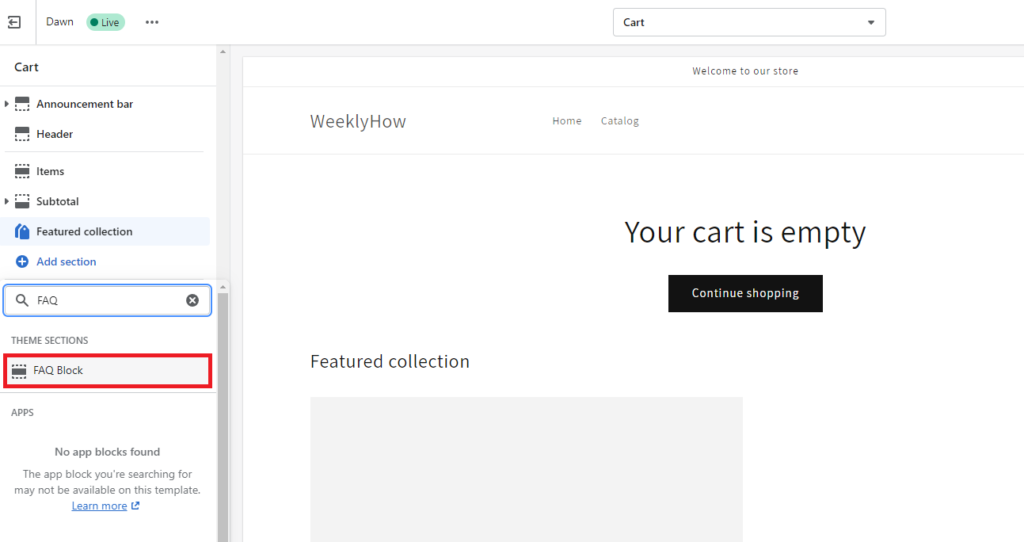
Now, if you open your theme editor, you should be able to add FAQ blocks by clicking the Add section button like below

Now, if you wish to add titles and descriptions to your FAQ blocks, you can update your faq.liquid to the following code.
<link rel="stylesheet" href="{{ 'faq-style.css' | asset_url }}" media="print" onload="this.media='all'">

<div class="page-width page-width--narrow">
  <h1 class="main-page-title page-title h0">
    {{ section.settings.faq_title | escape }}
  </h1>

  {% if section.settings.faq_description %}
    <div class="rte faq-description">
      {{ section.settings.faq_description }}
    </div>
  {% endif %}

  <div class="faq-container">
    <div class="tabs">
    	{% for block in section.blocks %}
      		{% assign item = block.settings %}

      		<div class="tab">
      			<input type="checkbox" id="faq_checkbox_{{ forloop.index }}" class="faq-checkbox">
        		<label for="faq_checkbox_{{ forloop.index }}" class="tab-label button button--primary">{{ item.question }}</label>
        		<div class="tab-content">{{ item.answer }}</div>
      		</div>
      	{% endfor %}
    </div>
  </div>
</div>

{% schema %}
{
	"name": "FAQ",
	"tag": "section",
	"class": "spaced-section",
	"settings": [
		{
			"type": "text",
			"id": "faq_title",
			"default": "Frequently Asked Questions",
			"label": "Title"
		},
		{
			"type": "text",
			"id": "faq_description",
			"default": "Lorem ipsum dolor sit amet, consectetur adipiscing elit, sed do eiusmod tempor incididunt ut labore et dolore magna aliqua.",
			"label": "Description"
		}
	],
	"blocks": [
		{
			"name": "FAQ Item",
			"type": "faq",
			"settings": [
				{
					"type": "text",
					"id": "question",
					"label": "Question",
					"default": "Do you have a question?"
				},
				{
					"type": "richtext",
					"id": "answer",
					"label": "Answer",
					"default": "<p>I have an answer</p>"
				}
			]
		}
	],
	"presets": [
		{ "name": "FAQ Block" }
	]
}
{% endschema %}
Code language: HTML, XML (xml)
If you save your files, you should be able to create as many FAQ blocks as your want!

Conclusion
There you have it! You just created FAQ blocks using sections. Now, you will be able to create accordions everywhere you want as long as the template file is using sections. There are a few problems in this accordion though, specifically, the styling of it. In this project, we haven’t used any styling for the buttons and its label so if your Shopify theme is using bright colors for buttons, the label of this accordion will not be that visible so you may have to tweak the styling a bit if you encounter the said issue. Other than that, that’s pretty much it.

When I insert several FAQ blocks, each with several FAQ items below it, and I want to open a FAQ item from a lower FAQ block, the FAQ item from the top FAQ block is always opened. So I open the 2nd question in the 2nd block, but it opens the 2nd question in the first block. I open the 2nd question in the 3rd block and it opens the 2nd question in the 1st block…