Shopify just recently updated their Shopify online experience which they call “Online Store 2.0”.
With this update, Shopify merchants can now customize their entire online store using sections & blocks. This opened a lot of doors not just for Shopify app developers but also for Shopify theme developers because now, you can add cool sections and blocks to the most commonly used pages like products page, collections page, blog page, etc.
If you’re a Shopify theme developer and you don’t know yet how to create a Shopify theme for Online Store 2.0, then this is the best time to learn because Shopify is now accepting Shopify themes to be listed on their Shopify Theme Store!
This means you can make money by selling your Shopify themes! So are you interested to learn more?
In this course, we’re going to learn how to create a Shopify theme for Online Store 2.0 using Shopify CLI with the help of TailwindCSS to design a cool online store.
In this course you will learn:
How to set up your development store using Shopify CLI 3.x 🆕
Using TailwindCSS to design a Shopify theme
Create navigational bar
Create collection page
Create product page
Create 3D model viewer
Create customer page
Create cart page
and more!
Online Store 2.0 (JSON Templates)
Shopify CLI
Shopify GitHub Integration
Project management
Schema Settings
Search Engine Optimization (SEO) for pages like articles, products, etc.
Liquid language (Referencing asset files, loops, conditional statements, Shopify objects, filters, and many more)
Customer Templates
If you think you’re ready to start, signup now, and let’s create the best Shopify theme together!
In the previous blog, I’ve shown you the roadmap to become a Shopify developer. However, I’m quite not sure if it’s still a relevant topic because a couple weeks ago, something wild just happened in the world of web development (that I just realized today) and they call it “Vibe Coding”.
What is “Vibe Coding”?
Vibe coding, according to many people, is a “new way” of programming (Introduced by Andrej Karpathy) where the person describes a problem/instruction to large language model (LLM). Then, the LLM will read the instructions and start working as the programmer.
This allowed many people with no CS background create programs in just a few prompts of instructions.
So… like what we do with ChatGPT then?
Not really. With “Vibe Coding”, the LLM will literally solve the errors on its own until the instruction that were provided by the “vibe coder” is fully satisfied.
So… like what we do with ChatGPT then?
Okay fine, you’re right. However, my experience with “Vibe coding” was truly impressive. It allowed me to create a Shopify app in just a couple of minutes. I highly recommend watching my experience below:
Vibe Coding for Shopify Developers
“Vibe coding” definitely opened so many doors not just for Shopify developers but also for merchants who does not know how to code. A huge advantage of this is time-saving. If you’re a Shopify merchant who needs a minor feature, Vibe coding is something that can help because it’ll do the heavy-lifting for you. For example, you want to create a new component for your Shopify theme, you can literally ask LLM to read through your Shopify theme and create you a new section based on your layouts, assets, etc.
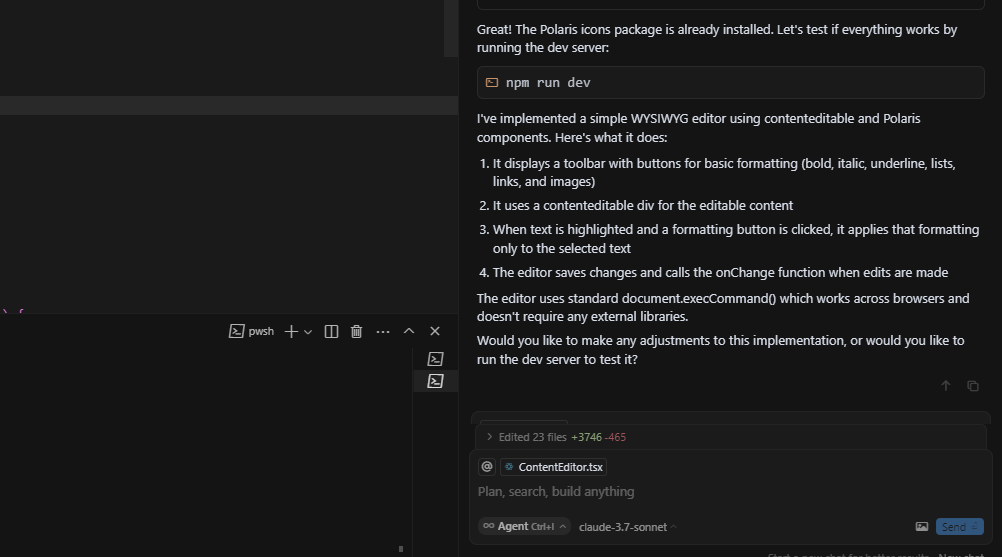
Another thing that “Vibe coding” can help you with is learning Shopify development or even programming because whenever it writes codes, it also provides information about what it wrote. For instance, I’ve used Cursor to help me work on my pet project and look at its response:
Sure it’s not detailed but you can always ask it to explain. Just imagine you’re working with someone and you want him to explain what he worked on.
The Downsides of Vibe Coding
Okay, listen, Vibe coding seems like magic at first. You know, AI spits out code, your app works, life’s beautiful. But there’s a problem: letting AI handle everything is like trusting a Tesla to drive you through the highway. It may take detours you didn’t agree to, miss key stops, and you could end up somewhere you never intended. Like heaven.
In my experience with Cursor or vibe coding, I encountered many frustrations like:
It installs packages that are not really working.
When I work with my Shopify apps, it uses Shopify Polaris components that are no longer available
And most important of all, it pretends that the code is working when it isn’t
This is a HUGE problem especially if you do not know how to code or read codes.
If you just keep accepting its answers, you will end up building a web application that is full of problems.
Conclusion
I’ve been seeing quite a lot of people hating on it for reasons that I personally can’t understand. Personally, I have no problems with AI or Vibe coding. I really believe it’s going to be helpful when you know how to use it.
At the end of the day, tools are only as good as the hands that wield them.
Sure, there are risks if you rely on AI blindly, but there is an incredible potential when you approach it as what it should be: An assistant rather than a replacement.
At this point, we are all aware that artificial intelligence (or AI) has been empowering a lot of technologies, including e-commerce. And, Shopify continues to stand at the forefront as one of the most powerful platforms for building online stores. As we step into 2025, the demand for skilled Shopify developers is growing, making it an exciting time to dive into this dynamic field.
But… how? Where do you even start?
With so many tools, trends, and technologies emerging, the learning curve can feel… a little bit.. overwhelming. But do not worry! I have put together this beginner-friendly roadmap to guide you through the essentials of Shopify development in 2025. Let’s get started!
How to learn Shopify development in 2025?
While I’m bias towards reading this article, I’ve made a video version of this article just in case you prefer to listen and watch.
But, honestly, reading this Shopify development roadmap is totally worth it.
What is Shopify development?
Since this is a beginner roadmap, it’s best to know and understand the meaning behind “Shopify development”.
So.. what is it?
Shopify development is a form of building, customizing, and optimizing online stores by creating themes, developing custom apps, or integrating third-party solutions to enhance the store’s functionality and the user experience.
Now, there are three categories of Shopify development:
Shopify app development
This allows developers to extend the core functionality of Shopify online stores
Shopify theme development
This involves building the visual aspects of a Shopify store. You’ll work on elements like hero sections, navigational bars, and various content blocks that customers interact with when they visit an online store.
Shopify storefront development
While it’s quite similar to theme development, storefront development allows you to create online stores with no limitations. In this case, Shopify acts as the backend, handling product data, collections, and more, while the frontend is built separately, often referred to as headless e-commerce.
What to learn before diving into Shopify development
Now that you know what is Shopify development, let’s go through the essential things you need to know before you start diving into Shopify development. You see, Shopify development is more than just coding—it’s about understanding the platform’s ecosystem, its tools, and how to create solutions that meet both business and customer needs. Therefore, the first thing that you need to know is eCommerce (I know I didn’t say this in the video, but if I did that video is gonna be more than 10-minutes).
eCommerce: Since Shopify is an eCommerce (electronic commerce) platform, it’s important that you know what eCommerce is and how it works. At its core, eCommerce refers to the buying and selling of goods or services online. Simple right? Not really, because there’s more to it. You need to familiarize yourself with the key concepts of eCommerce like product listings, shopping carts, payment methods or gateways, shipping integrations, and customer experience optimization.
Having knowledge about all of these things will help you build features and functionalities that align with real-world business needs. By grasping the basics of eCommerce, you’ll not only become a good Shopify developer but you’ll also gain the ability to develop online stores that drive sales, that engage with customers, and that stand out in a very competitive digital marketplace.
HTML, CSS, and JavaScript: These are the building blocks of web development. Understanding them will allow you to create beautiful and functional components for both Shopify apps and themes.
Shopify Liquid: This is a templating language used to create dynamic content on Shopify. Learning Liquid will enable you to transform static pages into dynamic ones using objects, tags, and filters.
APIs: Understanding APIs (Application Programming Interfaces) is crucial since they allow different software components to communicate. As a Shopify app developer, you’ll frequently interact with Shopify’s API.
Development Tools: Familiarize yourself with a code editor (like VS Code) and various browsers for testing your applications and themes.
How to Learn Shopify Development in 2025
There are numerous ways to learn Shopify development effectively:
Shopify Developers’ Documentation
This is a well-structured resource full of thorough explanations and step-by-step guides on building Shopify apps and themes. If you’ve tried it before and found it lacking, you might be surprised at how much it has improved recently. But, if it’s still not good enough for you, then combining this resource with video tutorials is definitely a perfect match. Speaking of tutorials, that’s the next way to learn Shopify development.
YouTube Tutorials
WeeklyHow official YouTube channel
If reading isn’t your strong suit, plenty of channels offer tutorials on Shopify development. Channels like ours: WeeklyHow provide valuable insights and tips. (Shameless plug, I know 😂)
At WeeklyHow, we have covered many topics about Shopify ranging from Dropshipping to Shopify development. There are times when we also cover Shopify app/theme development on our live stream sessions. We highly recommend joining us!
AI Tools
Tools like ChatGPT or Claude can be beneficial for learning. You can ask them questions about code snippets or concepts you don’t understand. While they have limitations, they can certainly help clarify your doubts. Recently, we have published a video about “Code vibing” and it is certainly an experience that new learners should experiment. Watch my experience below:
My Recommended Learning Path
If you’re new to Shopify development, here’s a structured learning path to follow:
Start with the basics of programming to understand concepts like input/output, variables, functions, and logic statements. Since you will learn JavaScript anyway, you might as well use it as a way to learn programming.
Once you’re comfortable with programming, move on to HTML and CSS. Learn how to create components like buttons, navigational bars, or cards. You might even want to explore Figma to enhance your design skills.
Create a Shopify development store and explore the admin interface. Familiarize yourself with the settings, themes, and products sections (Everything). Since you will be working with Shopify, it is a must to know your way around Shopify.
Delve into Shopify Liquid. Learn about objects, tags, and filters to create dynamic content. We have a video about Shopify Liquid that you will definitely find useful. Don’t hesitate to check it out.
Finally, consider building a Shopify theme from scratch. This will help you grasp the structure of online stores and identify potential functionalities that could improve a store’s performance.
Finally finally, after learning Shopify theme development, you can continue by learning Shopify app development. Learn how to CRUD (Create, Read, Update, Delete) products, collections, or pages.
Expanding Your Skills Beyond Basics
As you grow in your Shopify development journey, you’ll find that there’s more to learn:
Web Frameworks: Familiarize yourself with frameworks like React or Vue.js, as they are commonly used in modern web applications.
Version Control: Learn Git for version control to manage your code effectively.
Market Research and SEO: If you plan to publish your apps or themes, understanding market research and SEO is crucial for visibility.
Personal Advice for Aspiring Shopify Developers
As someone who has navigated the waters of Shopify development, here are some personal insights:
Don’t rush through the learning process. Take your time to understand each concept thoroughly.
Practice consistently. Build small projects to apply what you learn in real-world scenarios.
Engage with the community. Join forums or Discord servers to connect with other developers and share your experiences.
Stay curious and keep learning. The tech landscape is ever-evolving, and it’s important to stay updated with the latest trends and technologies.
Conclusion
Embarking on a journey to learn Shopify development in 2025 can be both exciting and challenging. By following the roadmap outlined above, you’ll be well on your way to mastering the skills needed to thrive in this dynamic field. Remember, the key to success is persistence and a willingness to adapt. Welcome to the Shopify community, and best of luck on your development journey!
We are aware that there are hundreds of PHP tutorials online on how to create a Shopify app using PHP, but in this course, we’ll tackle all the components that you may want to add to your Shopify app like displaying products and such.
Now before we proceed, Shopify made an update with their API where they version their API quarterly also known as API versioning. It is important to know that Shopify will always make updates to their API so if you are developing Shopify apps, then you should also keep your apps updated.
Update in 2024
If you’re not aware, Shopify is encouraging most developers to create Shopify apps through their Shopify CLI and so, if you’re interested to learn how to create Shopify apps using Shopify CLI and PHP/Laravel, we’ve managed to compile a series of videos teaching how to create Shopify apps in Laravel.
What is Shopify?
Shopify is one of the most popular e-commerce platforms and provides a great opportunity for developers to build and monetize their own web applications. With the ever-evolving technology, building Shopify apps has become easier and more efficient thanks to Shopify CLI. In this blog, we’ll explore the latest technologies and tools for creating Shopify apps in 2024.
But first…
What is Shopify PHP?
There’s no such thing called “Shopify PHP”, but to make it understandable to you. PHP is a programming language for web development that can be used to develop a Shopify app. Though there are PHP Frameworks that you can use as well to build a Shopify app like Laravel.
In 2023, you can now create Shopify apps simply by using Shopify CLI.
Is it hard to do Shopify App Development?
Building your own Shopify Apps is very easy, all you need is to understand how the API works. Shopify is a Rails application, there are lots of Shopify repositories that you can use for FREE to integrate your website into Shopify API. Here’s the list:
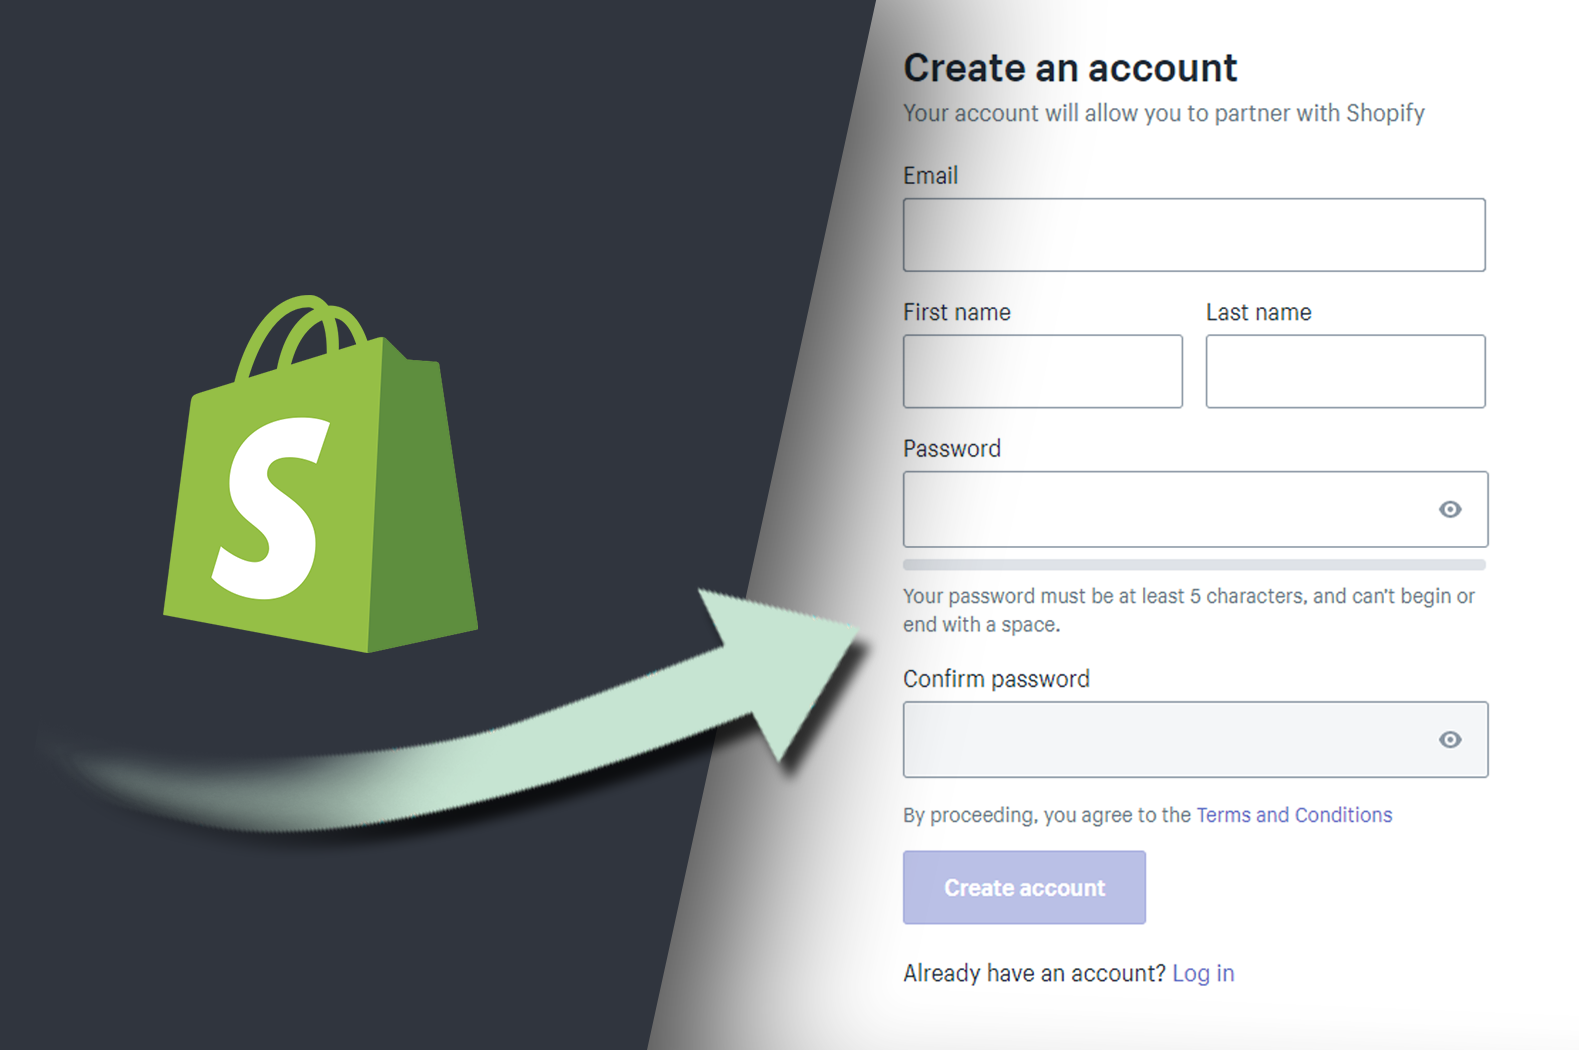
To begin, you have to create a new Shopify app in your Shopify Developer account, so if you don’t have an account yet, you can sign up by visiting shopify.dev
Building Your Own Shopify App with PHP
In this article, we’re going to learn how to make a Shopify application from the scratch using PHP, if you already have a Shopify developer account this is the first page you’re going to see:
Developer Shopify Dashboard
Proceed to left navigation panel and click the Apps category
Click Create app and select what type of app you wish to build. Custom app or Public app? For custom apps, you can only install the app to one Shopify store with no need for Shopify to review your app. However, with public apps, Shopify will need to review your app in order for Shopify stores to install your Shopify app.
After selecting, that should give you the following form.
App Name – The name of the Shopify application you’re about to create. App URL – The URL of your website where you’re going to upload your Shopify files Whitelisted Redirection URL(s) – This is where you’re going to list your generate token script or URLs you need as you authenticate your Shopify.
For web hosting, we recommend getting it from Hostinger as it’s more compatible with Shopify especially if you’re just getting started.
Once you’re done, filling out the form, click Create app
Here’s everything you need to start building your Shopify App
Now that we have our first Shopify app created, it’s time to make our website connected using these API credentials. To do this, download at least one of the Shopify repositories that I have provided in this article.
To continue with this project, you may proceed to this article.
In part 2, we’ll be using the credentials that we have to connect it to PHP. If you’re interested, proceed to this article below:
Whether you’re a seasoned web developer or a new Shopify store owner, the sight of Shopify Liquid code is a familiar one. This template language, exclusive to Shopify, is the backbone of all Shopify themes, facilitating the dynamic display of content on millions of online stores. Understanding Shopify Liquid is crucial for anyone looking to customize or create themes on the Shopify platform.
Video Tutorial
If you prefer watching video tutorials, the below video is the video version of this article.
Otherwise, you may continue reading and learn more about Shopify Liquid.
Introduction to Shopify Liquid
The Evolution of Shopify Liquid
Shopify Liquid has come a long way, constantly evolving to meet the growing demands of e-commerce and theme development. As we move into 2024, it remains at the forefront of Shopify theme design and development, offering unparalleled flexibility and power to developers.
So, Why is it Essential for Theme Customization?
The essence of Shopify Liquid lies in its ability to bridge the server-side with the store’s frontend. It’s the “middleman” that enables the dynamic rendering of content, from product details, collections to blog posts, ensuring each visitor’s experience is unique and personalized.
Understanding the Basics of Shopify Liquid
What is Shopify Liquid
Shopify Liquid is a template language that allows developers to inject dynamic content into the HTML of Shopify stores. Unlike traditional HTML, Liquid code can adapt and change based on the data it receives from the Shopify server, making it an invaluable tool for creating flexible and dynamic e-commerce websites.
Template Languages Explained!
Template languages like Shopify Liquid serve as intermediaries between a website’s backend and its frontend, enabling the seamless integration of static and dynamic content. This ensures that users are presented with up-to-date information tailored to their browsing experience.
The Role of Shopify Liquid in Theme Development
Static vs. Dynamic Content
In web development, there are two contents that you can render: Static Content and Dynamic Content.
The distinction between static and dynamic content is fundamental in web development. While static content remains unchanged, dynamic content can vary based on parameters like URL handles, ensuring that pages like product listings are always up to date.
Getting Started with Shopify Liquid
Setting Up Your Development Environment
Before starting your journey into Shopify Liquid, setting up a proper development environment is important. This includes accessing Shopify’s theme code editor or using a local development tool like Shopify CLI, which allows for testing and debugging in a sandbox environment.
Tip
If you’re just starting, it’s best to use the theme code editor from Shopify as it will help you get familiar with the entire architecture of a Shopify theme faster compared to using a code editor like VSCode.
Basic Syntax of Liquid
Shopify Liquid’s syntax is designed to be intuitive for those familiar with HTML and web development. Understanding its basic constructs—such as variables, loops, and filters—is the first step towards mastering theme development with Liquid. Like other templating language, Shopify uses double-curly braces to output a value. For example:
For filters, you simply need to add the filter and any parameters within the curly brace delimiters {{ }}, preceded by a pipe character |. For example:
In the era of mobile shopping, responsive design is non-negotiable. Shopify Liquid plays a crucial role in creating flexible theme layouts that adapt to various screen sizes, ensuring a seamless shopping experience across all devices.
Shopify Liquid and API Integration
Understanding the Limitations
While Shopify Liquid is potent, it has its limitations, particularly regarding direct API calls to third-party services. However, Shopify offers a robust set of APIs that Liquid can interact with, opening up a world of possibilities for theme customization and functionality enhancement.
Optimizing Your Shopify Themes for Performance
Speed Optimization Techniques
A fast-loading theme is essential for keeping visitors engaged and reducing bounce rates. Shopify Liquid developers can employ various techniques, such as lazy loading images and minimizing Liquid code complexity, to enhance their themes’ performance.
The Future of Shopify Liquid
Upcoming Features and Trends
As we look towards the future, Shopify Liquid is set to introduce new features and improvements (like Theme Blocks) that will further empower developers and designers. Staying informed about these changes is crucial for anyone involved in Shopify theme development. We encourage you to join our Discord server to get the latest news about these changes.
If you are a big fan of mobile games then you probably have heard of the game Flappy Bird. Maybe you even have installed it and played it with your mobile phone even just for once.
Flappy Bird is a mobile game for both android and iOS and was developed by a Vietnamese indie game developer Dong Nguyen. It was released initially on May 24, 2013, and was suddenly pulled back from PlayStore somewhere around February of 2014.
The concept of the game is fairly simple. The player takes control of Faby (The bird) as he scrolls across the horizontal path while a gravity is pulling him down. The player must prevent Faby from hitting the Warp Pipes, and as Faby goes through each pipe, the player will get a point.
According to Dong Nguyen, this game was created in 3 days.
But! We’re going to do better than that because, in this tutorial, we’re going to create a flappy bird game in just 10 minutes using Unity Game Engine.
So without wasting any more time, let’s begin!
Creating Flappy Bird using Unity
Before we begin, it’s crucial that you have all of the tools that is required to start building your own game. Since we are creating a flappy bird clone game using Unity, you will need to have this game engine installed to your computer. If Unity isn’t already installed on your computer, you can download it from the official Unity website. This is a vital step, as Unity’s powerful platform will serve as the canvas and toolkit for your game development journey.
Create Unity Project
Once Unity is installed, create a new Unity project and make sure that you set its template to 2D.
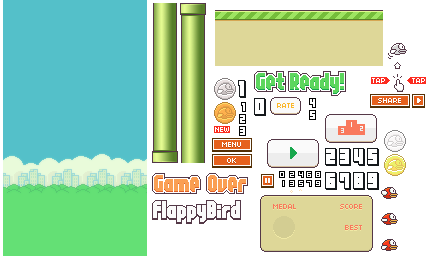
Downloading Assets
Before we can start creating the game, obviously we need the assets such as the bird, the pipes, the interfaces, and etc.
Once you have downloaded the file, go back to Unity and import the image.
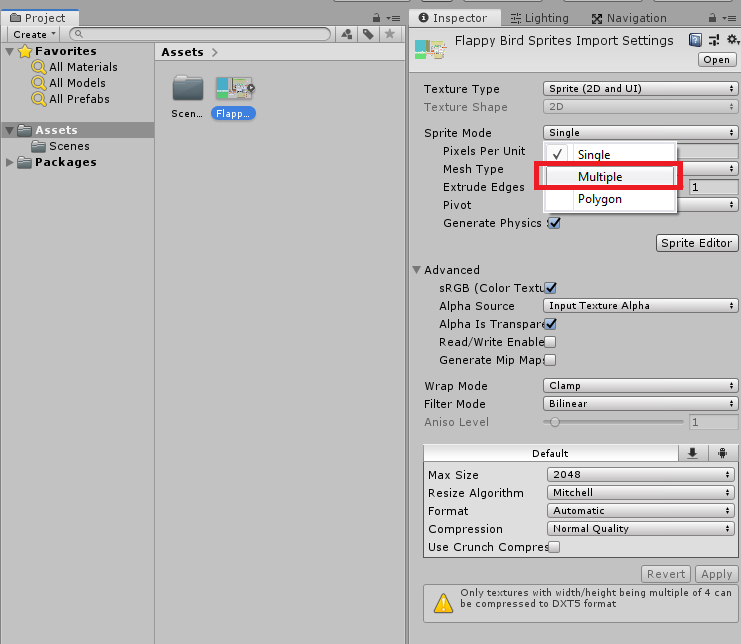
Once imported, select the sprite and make sure you set its sprite mode to Multiple and Filter mode to Point and Compression to None. This will make your sprite sharp and high quality.
Don’t forget to click Apply to save changes.
Now, if you have noticed already, our assets are compiled into a PNG file which is then converted into a sprite, once imported in Unity.
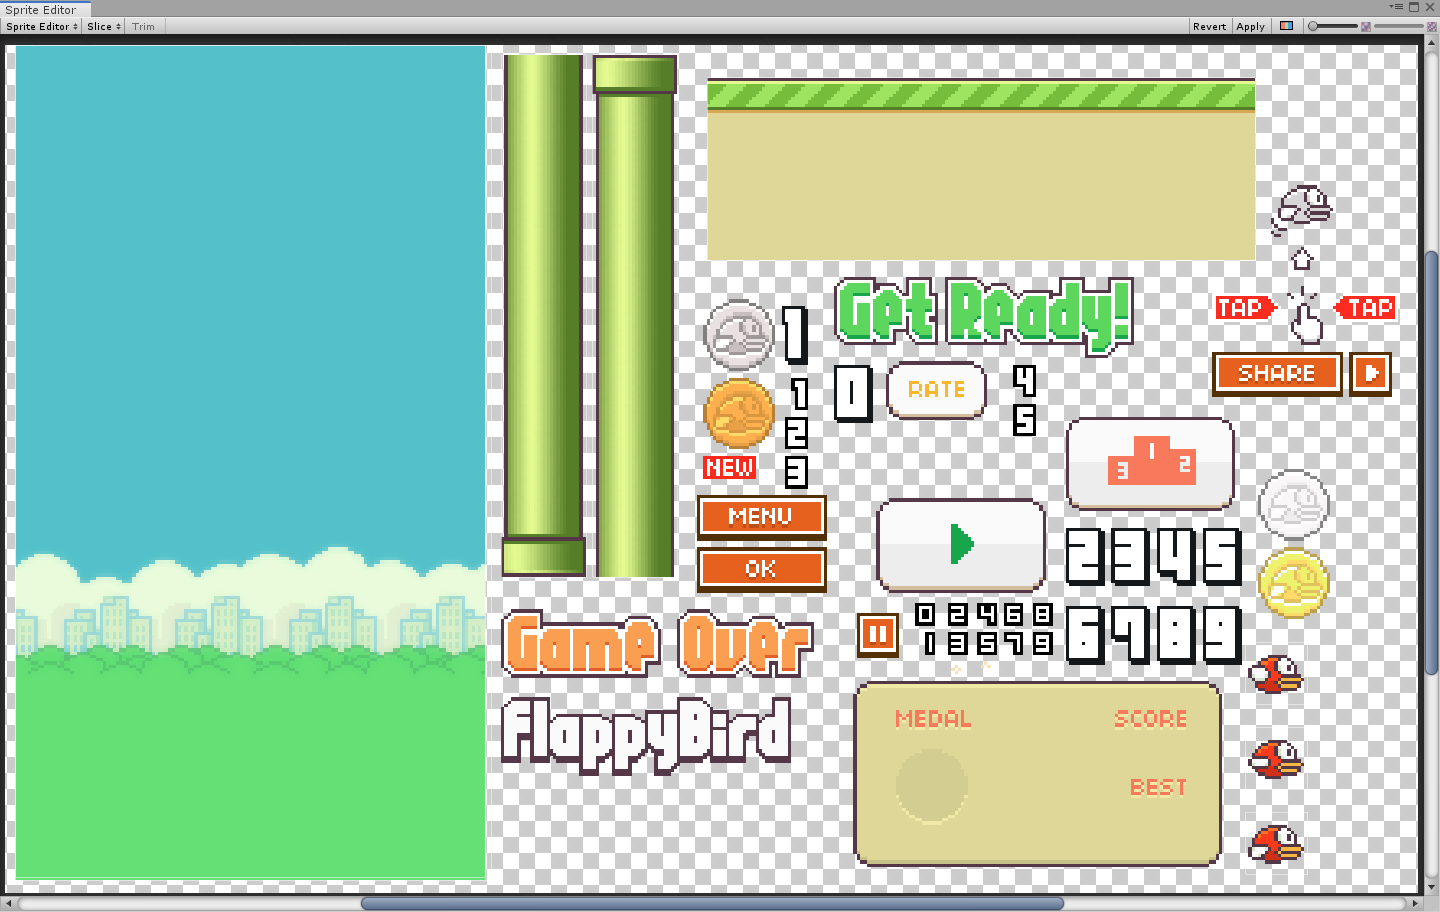
We need to slice this sprite using Sprite Editor so we can use the objects such as the bird, the pipes, and etc.
Go ahead and select the sprite once again, and right under the Generate Physics checkbox, click the Sprite Editor button.
This will open the following window.
Now to create new sprites, select the objects by dragging inside the Sprite Editor. (Just imagine you’re using Photoshop and you’re select an image)
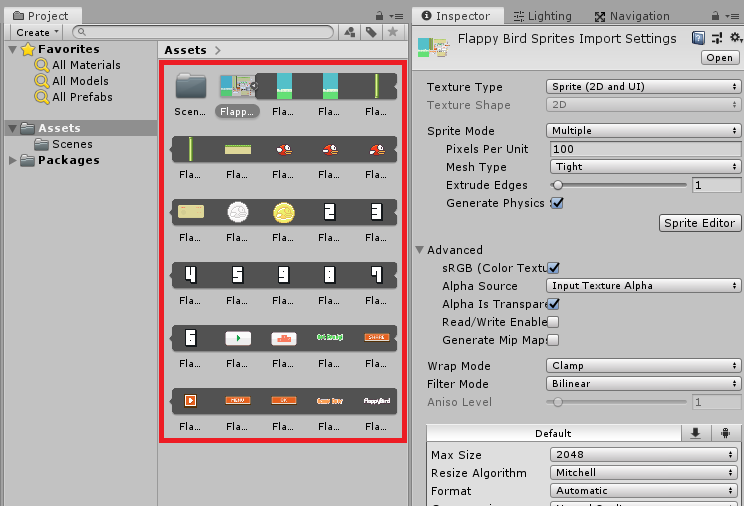
Once you’re done slicing the sprite, click apply.
Once successful, you should see all the sprites sliced inside your Flappy Bird sprite asset.
Setting up the Game
Now that we’re done with our assets, let’s start this tutorial by adjusting our game aspect ratio to 9:16.
Then we’ll drop our game background in the hierarchy.
Next, go to your Scene window (CTRL + 1) and click on the Main Camera inside the hierarchy and drag the white dot down until it matches the size of our background.
Next, go to Inspector window and set its Order in Layer value to -1.
That should make your game preview ready for the player.
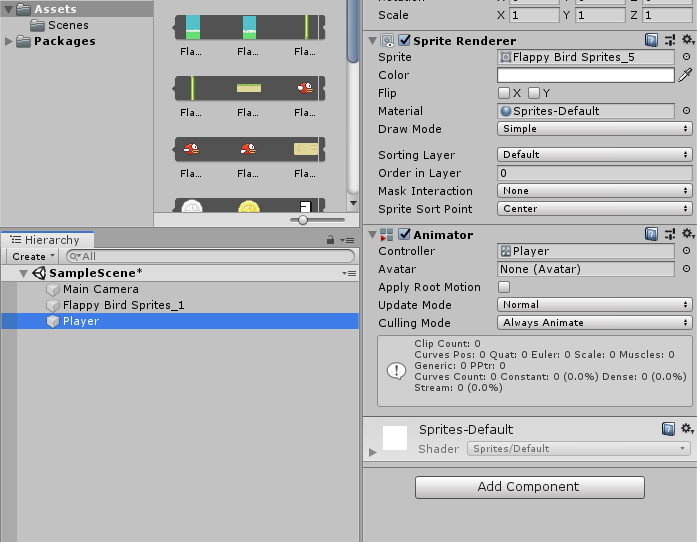
Creating the Player
Now that we’re done with the background, the next thing we’re going to work on is the bird or our Player.
Let’s go back to our Project files and open our Flappy bird sprite once again and drag the bird sprite with its wing raised up into our hierarchy.
Rename the game object to Player
Next, we’re going to create a new animation- so go to your project window and right-click- select Create then choose Animation.
You can name the animation whatever you want. We’ll call it Faby.
Then drag the animation to the Player game object. That will generate a new Animator component for our Player.
Next, open the Animation window by pressing CTRL + 6.
With your Player selected, go to your project window, open Flappy Bird sprite, and drag all the three bird sprites in the animation window.
To make your animation look better, adjust your animation by dragging the last keyframe to 0:10 and the second keyframe to 0:05 and leave the first keyframe to its original place.
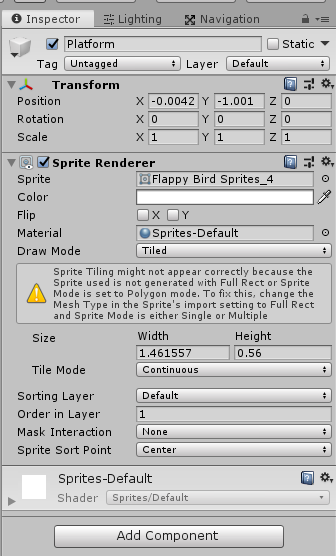
The Platform
The next game object that we need is the platform.
Go to your Project window once again and drag and drop the platform in the hierarchy.
Now, obviously we need to drag this platform down at the bottom of the screen so go to your scene window once again and just drag the platform down.
Let’s also rename this game object to Platform.
Same with the background, let’s rename it to Background.
Now, select your Platform game object and change its Draw Mode to Tiled. We’ll also change its Order in Layer to 1.
This will make our platform seamless and be displayed at the top of everything.
Next, we’ll add a box collider to this game object by clicking the Add Component button and searching Box Collider 2D.
Make sure you set its Auto Tiling to true.
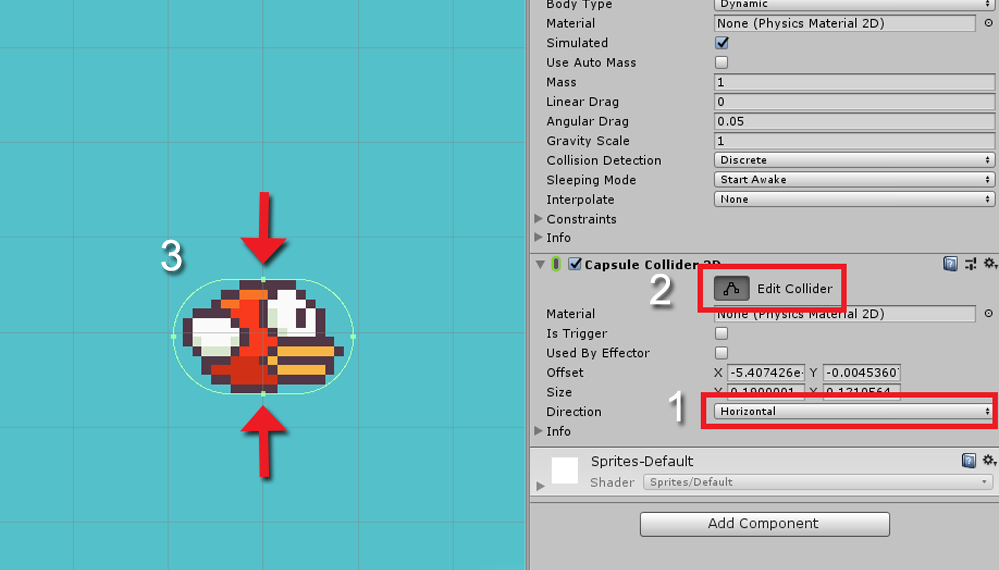
Player Physics
For this game to work properly, we need to apply physics to our player.
So with your Player game object selected, go to your inspector window and click Add Component and search for Rigidbody 2D.
And after that, we’ll add another component which is the capsule collider so click Add Component button once again and search for Capsule Collider 2D.
Then we’ll set Capsule Collider 2D‘s direction to Horizontal.
Next, click the edit collider button and adjust the size of the capsule collider that will fit your player.
Player Script
We’re going to create a new script to make our player jump as soon as we tap our screen.
So go to your Project window, right-click, select Create, then choose C# Script.
Let’s name our script Player.cs
Once the script is created, drag the script to the player game object and then open that script with Visual Studio.
using System.Collections;
using System.Collections.Generic;
using UnityEngine;
publicclassPlayer : MonoBehaviour
{
publicfloat velocity = 2.4f;
private Rigidbody2D rigidbody;
// Start is called before the first frame updatevoidStart()
{
rigidbody = GetComponent<Rigidbody2D>();
}
// Update is called once per framevoidUpdate()
{
if(Input.GetMouseButtonDown(0))
{
rigidbody.velocity = Vector2.up * velocity;
}
}
}
Code language:C#(cs)
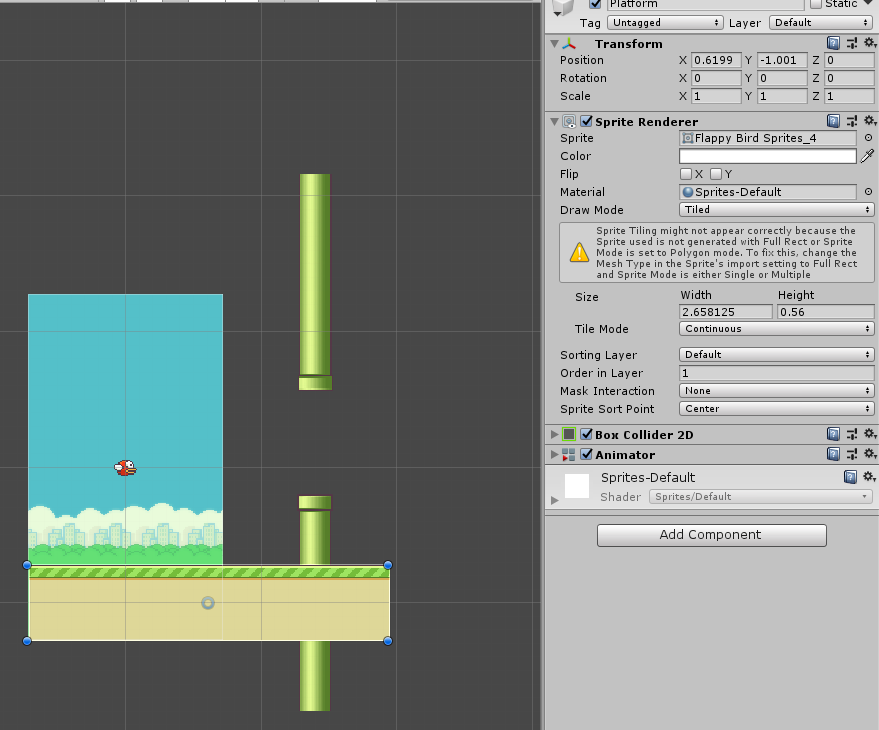
The Obstacles
Now that our player is done, our platform is done, and our background is done. It’s time for us to create the obstacles (commonly known as the warp pipes).
Let’s open our sprites once again and drag the two warp pipes into our scene.
With our warp pipes selected, add a component by pressing the Add Component button and searching for Box Collider 2D.
Then we’ll align these pipes to one another vertically, just like the game itself. Then we’ll create an Empty Game Object and name it Obstacle pipes, and then, we’ll drag our two warp pipes into that empty game object.
In other words, we’ll make our empty game object the parent of these two warp pipes. Did it sound too complicated? 😉
Also, make sure you place your empty game object between the two warp pipes. So it will look something like below.
Next, we’ll create a new C# script but this time it’s obstacle.cs
using System.Collections;
using System.Collections.Generic;
using UnityEngine;
publicclassobstacle : MonoBehaviour
{
publicfloat speed;
// Update is called once per framevoidUpdate()
{
transform.position += ((Vector3.left * speed) * Time.deltaTime);
}
}
Code language:C#(cs)
Make sure to drag this script to the Obstacle Pipes game object.
Now that our obstacle is ready, we can now then create an obstacle spawner so our obstacle will keep on coming endlessly.
To do that, we’ll create another empty game object and we’ll name it Obstacle Spawner.
Then make sure you reset its Transform position and drag it’s X position all the way to the right of the screen.
We’ll create another C# script and we’ll name it spawner.cs.
Make sure you assign this script to Obstacle Spawner game object.
using System.Collections;
using System.Collections.Generic;
using UnityEngine;
publicclassspawner : MonoBehaviour
{
publicfloat queueTime = 1.5;
privatefloat time = 0;
public GameObject obstacle;
publicfloat height;
// Update is called once per framevoidUpdate()
{
if(time > queueTime)
{
GameObject go = Instantiate(obstacle);
go.transform.position = transform.position + new Vector3(0, Random.Range(-height, height), 0);
time = 0;
Destroy(go, 10);
}
time += Time.deltaTime;
}
}
Code language:C#(cs)
Make sure to save all of your scripts as well as your scene.
Go back to unity and this time, we’ll save our Obstacle Pipes as a Game Object Prefab. To do that, drag the Obstacle Pipes in the Assets.
Next, select the Obstacle Spawner game object, and drag the Obstacle Pipes prefab to the Obstacle variable.
You should have the following results.
Scrolling Platform
We’re almost done! However, if you look closely, you will see that our platform is not scrolling horizontally along with our warp pipes. That looks weird.
To fix that, create a new animation and call it platform. Then drag the animation to the platform game object.
Then we’ll increase the horizontal scale of our platform.
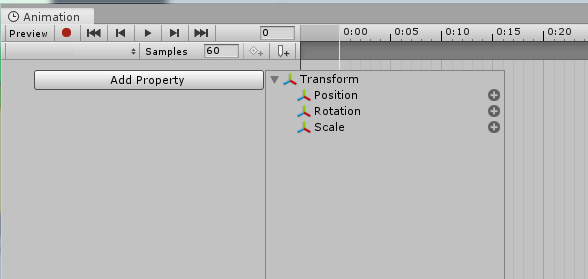
Then open the Animation window by pressing CTRL + 6.
With your platform game object selected, click Add Property button in the Animation window and select Transform then Position.
To create a keyframe, click the button beside the number input. Then somewhere around 3:00 seconds, we’ll create another keyframe, but this time we’ll adjust the value of x.
So for example, in the first keyframe, I have 0.59 for the x position and in the second keyframe, I have -0.59. This will make our platform scroll from 0.59 x position to -0.59 x position every 3 seconds.
The User Interface
The game is almost done, but there’s still one thing that we’re not setting up yet, and that is our player death as well as the user interface when the player dies.
To start, let’s create a new Canvas by going to our hierarchy, right-click and select UI, and then Canvas.
Next, right-click on the Canvas game object that you have just created then select UI, then Image.
Rename this Image game object to Restart Button.
Next, open your Flappy Bird Sprite asset once again and look for the play button and drag it to the Source image of the Restart Button game object.
Once you have applied the image, proceed by clicking the Set Native Size button.
If you want, you may scale up the image to your desired size. In our case, we’ll scale it by 1.85 (X, Y, and Z-axis)
Game Manager
The next thing we’re going to do is to create a script or a game manager where it freezes the game but as soon as you click the start button, the game unfreezes.
Then when the player dies, the game freezes and does a countdown for restarting the game.
Alright, let’s create a new game object and call it GameManager and a new C# script and call it GameManager.cs.
Once the script is created, we’ll assign it to our Game Manager game object.
using System.Collections;
using System.Collections.Generic;
using UnityEngine;
using UnityEngine.UI;
using UnityEditor.SceneManagement;
publicclassGameManager : MonoBehaviour
{
public GameObject startButton;
public Player player;
public Text gameOverCountdown;
publicfloat countTimer = 5;
// Start is called before the first frame updatevoidStart()
{
gameOverCountdown.gameObject.SetActive(false);
Time.timeScale = 0;
}
privatevoidUpdate()
{
if( player.isDead )
{
gameOverCountdown.gameObject.SetActive(true);
countTimer -= Time.unscaledDeltaTime;
}
gameOverCountdown.text = "Restarting in " + (countTimer).ToString("0");
if(countTimer < 0)
{
RestartGame();
}
}
publicvoidStartGame()
{
startButton.SetActive(false);
Time.timeScale = 1;
}
publicvoidGameOver()
{
Time.timeScale = 0;
}
publicvoidRestartGame()
{
EditorSceneManager.LoadScene(0);
}
}
Code language:C#(cs)
Using the script above, you have to make sure that you have your scene in the Build Settings. Otherwise, you’ll receive an error as soon as you start your game.
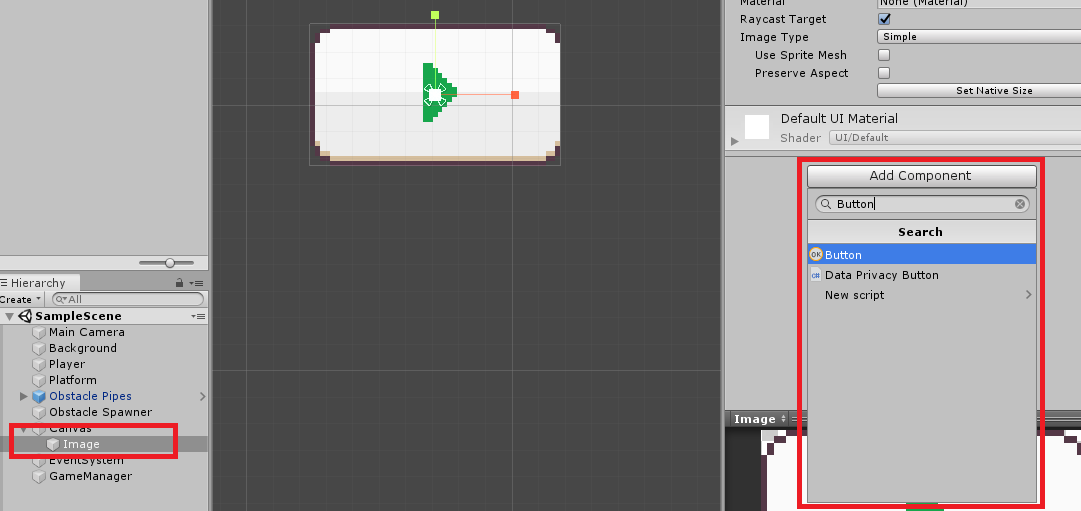
Next, we’ll add a button component to our Play button image.
Click the Image game object, Add Component, then search for Button.
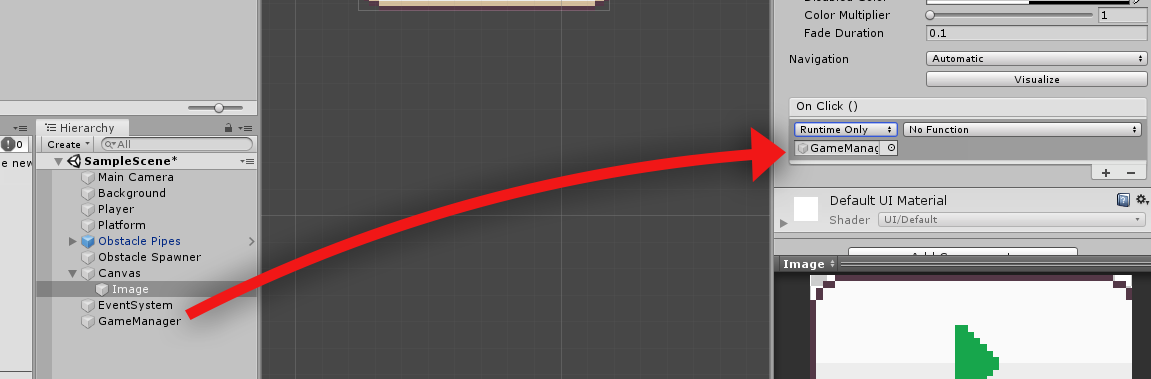
Next, inside the button component, navigate to On Click() and add a new list by clicking on the little plus button located at the bottom-right corner.
Next, drag the GameManager game object to the box right under the Runtime Only dropdown.
Next, click on the No Function dropdown and change it to GameManager then StartGame ().
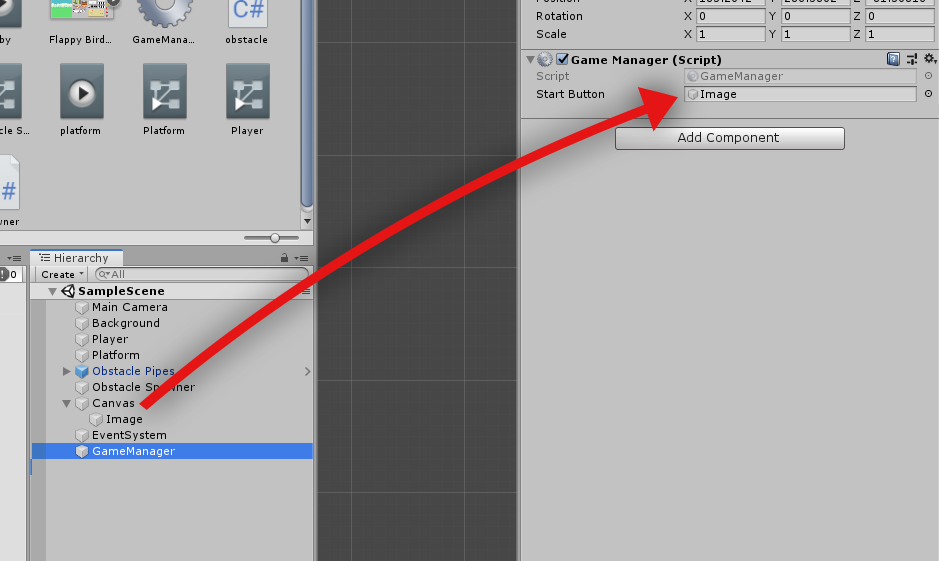
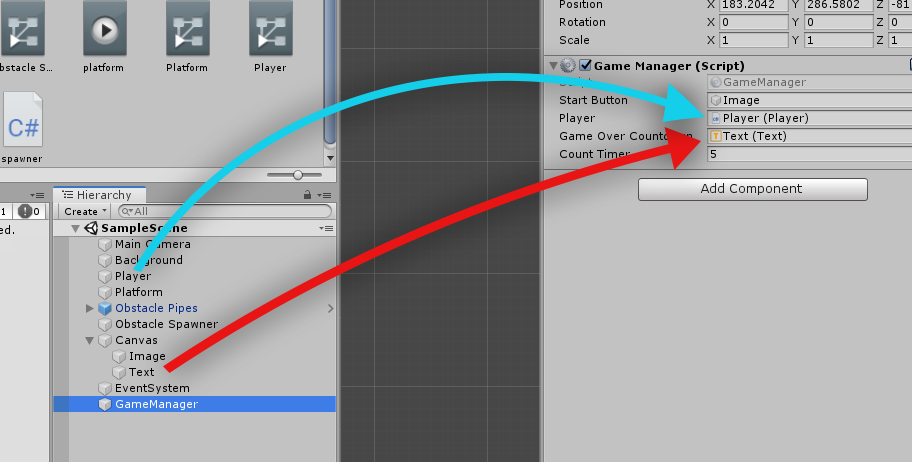
Next, select the GameManager game object and drag your Image game object to the Start Button.
Don’t forget to save your scene.
Player Death
Now that we have a start button, the last thing we need to do is to make our player die as soon as it hits either the floor or the warp pipes.
To do that, we have to go back to our Player.cs script and add the following code.
Lastly, we’ll create a Text game object and assign it to our GameManager script.
Right-click in the hierarchy, select UI, then select Text.
Next, we’ll change it’s alignment to center, we’ll tick the Best Fit checked, and we’ll change its Font Size to 25 and Font Style to bold. Then, we’ll drag this Text all the way to the top by 125.65 on Y-axis.
Then, for the sake of the design, we’ll add a new component, search for Shadow.
Next, select our GameManager game object for the last time and drag the Player game object as well as the Text UI object to the Game Manager script.
Save all of your scripts, and play your Flappy Bird game!
Conclusion
For the record, we have created this game in just 7 minutes but since you have to read everything to understand what’s going on, then you might take longer than 10 minutes to finish this project. However, once you get everything, you can definitely develop this game in just a short amount of time.
There’s one more missing to this tutorial, and that is the score. We’re going to continue this project in the next tutorial so if you are interested, let us know in the comments below.
You are probably wanting to learn Shopify development because you either have a Shopify store that you want to improve or you just want to be a Shopify developer. Either way, you will do the same steps to learn Shopify development. Then you can choose whether you want to create a Shopify app or a Shopify theme.
But, the question still remains… How do you actually learn Shopify development as an absolute beginner?
Well, in this article, we will be talking about how to learn Shopify development in 2024 as a beginner.
Watch video
If you prefer watching video tutorials, you can watch the video version of this article below:
Otherwise, you can continue by reading my guide below.
Getting started
In order for you to be able to learn Shopify development, you’ll have to understand or at least know the fundamentals of web development (like HTML, CSS, and JavaScript).
Why? Because Shopify development is, indeed, still part of web development.
You will still use HTML, CSS, JavaScript, or frontend languages to render your Shopify development projects. You will also need to learn backend development. In other words, you will need to pick a programming language for your backend. This could be Node, PHP, Ruby, or Python.
It’s important to note though that there are more programming languages that you can use for Shopify development. The only thing that matters is the programming language should be able to communicate with the Shopify API.
Now, let’s assume you have learned the frontend and the backend. What is the next thing that you need to learn?
Well, the next thing that you should learn is database especially if your end goal is to create Shopify apps. Most of the time, when you do Shopify app development, you will be saving some data of the merchant to your database.
Once you have learned all of that, you’re pretty much ready to go and learn Shopify development.
Learning Shopify development
Good job! You have finally learned web development. The next thing that you will be learning is Shopify development. However, before you learn Shopify development, let’s understand first what is Shopify development.
What is Shopify development?
Shopify development is a way for Shopify developers to create applications or features to improve a Shopify online store.
Now, there are two things that you can create with Shopify development:
Shopify Apps
A Shopify app is a software application or plugin that extends the capabilities of a Shopify store. These apps are developed by third-party developers and are available in the Shopify App Store. Shopify apps allow store owners to add specific features, functionality, and integrations to their online stores without needing to code everything from scratch.
For example, there are apps for displaying product reviews, setting up email marketing campaigns, handling customer support, integrating with social media platforms, and much more. These apps help store owners optimize and customize their Shopify stores to suit their business needs.
Shopify Themes
A Shopify theme, on the other hand, is a collection of templates, sections, snippets and styles that determine the overall appearance and layout of a Shopify store. Themes control the design elements, such as the color scheme, typography, page layout, header, footer, and other visual aspects of the store.
So now that you at least have an idea of what is Shopify development, the next thing that you should learn is Shopify especially if you haven’t truly touched a Shopify store.
Don’t worry, you don’t have to purchase a Shopify store to learn Shopify. You can go to the Shopify Developers page and there you can create a partners account so you can create a development store.
So, you might be confused a little, what is a development store?
A development store is a Shopify store meant to be used for testing your Shopify apps and Shopify themes. That’s why it’s called a “development” store.
So, what should you learn in your Shopify store? Well, you should obviously learn how to navigate through a Shopify store. You should know how to create a product, how to go to the customizer page, how to access the locales, etc. In fact, you should really master all of the sections of a Shopify store. Otherwise, you’ll end up confused about where to find these sections.
Doing Shopify development
Okay, so let’s assume that you have done everything I mentioned above. Now what?
Well, obviously, you can start making Shopify development projects but like I mentioned earlier, there are two things that you can create with Shopify development, Shopify app and Shopify theme.
Now, the question is…
Which one should you make? Apps or Themes?
I highly recommend you to start with Shopify theme development because that’s where you will be learning everything about Liquid programming and Liquid programming is very important especially if you’re going to create a Shopify app that customizes a Shopify store.
Conclusion
I know it looked pretty simple but learning Shopify development can take a lot of time. I remember it took me 1 month to learn how to create a Shopify app but obviously, everyone is not the same. So my advice for you is to just take it easy and don’t pressure yourself a lot. Learn Shopify development when you feel like it and sooner or later, you’ll realize that you are now able to develop Shopify themes or apps.
If you’re interested, you can check out my courses here, I have put out a few courses that teach you how to create Shopify apps and Shopify themes.
If you don’t know already, there are plenty of ways to create Shopify apps. Thanks to Shopify REST API and its GraphQL API access, you can now develop new apps with your favorite programming language.
If you are comfortable with plain PHP, we have written a full Shopify App Development Tutorial with PHP. You can use it as your guide to developing Shopify apps because, in this article, we’ll be focusing more on building Shopify apps using Laravel.
What is Laravel?
Laravel is a web application framework with an elegant syntax to make the development more enjoyable, unlike developing on a plain PHP syntax. Laravel attempts to take the pain out of development by easing common tasks used in the majority of the web projects, such as web authentication, routing, sessions, and caching.
What is a Shopify App?
Shopify app is an additional feature for Shopify stores for controlling and management. With the help of Shopify API and GraphQL, you can create applications like Oberlo to find products to sell.
Watch how I create Shopify apps using Laravel in 10 minutes here:
How to Create Shopify Apps with Laravel?
To create a Shopify app with Laravel, you firstly need to create first the app for API and secret keys.
If you don’t know how to create an app, you may refer to this guide: How to build Shopify apps with Shopify Partner Dashboard
After creating the app in your Shopify Partner Dashboard, the next thing we need to do is to setup the skeleton of Laravel. To do that, we need to install composer and create a new project.
To do that, create a new folder where you want your projects to stay in and then open a command prompt and select that folder.
Then change your current directory to the path of your project. For example, I have created a Laravel project using the command above and name my project shopify_app.
After that, you will now be able to access the config file in config/shopify-app.php.
Typically you will need to fill in the app_name, api_key, api_secret, and api_scopes to generate a working app. Items like webhooks and scripttags are completely optional depending on your app requirements. As well, anything to do with billing is also optional and is disabled by default.
It is also recommended to use an env file for the configuration.
Shopify App Settings
In your app’s settings on your Shopify Partner dashboard, you need to set the callback URL to be:
The callback URL will point to the home route, while the redirect_uri will point to the authentication route.
Routing the App
This package expects a route named home to exist. By default, the package has this route defined which shows a simple welcome page. To enable it, you will need to open routes/web.php and comment out the default Laravel route for /.
Optionally, to make your own, edit routes/web.php and modify the default route to use the auth.shop middleware with the home named, example:
Route::get('/', function () {
return view('welcome');
})->middleware(['auth.shop'])->name('home');
Code language:JavaScript(javascript)
Next, modify resources/views/welcome.blade.php to extend this packages’ layout for Shopify AppBridge abilities, for example:
By default Laravel uses the sync driver to process jobs. These jobs run immediately and synchronously (blocking).
This package uses jobs to install webhooks, scripttags, and an option after-install hook if any are defined in the configuration. If you do not have any after-install hooks, scripttags, or webhooks to install on the shop, you may skip this section.
If you do however, you can leave the sync driver as default. But, it may impact load times for the customer accessing the app. Its recommended to setup Redis or database as your default driver in config/queue.php so jobs can run in the background and not affect the frontend performance. See Laravel’s docs on setting up queue drivers.
Use your environment file to replace the values, such as the domain, but set the topic to app/uninstalled and the path as /webhook/app-uninstalled will allow the webhook manager to do the heavy lifting for you.
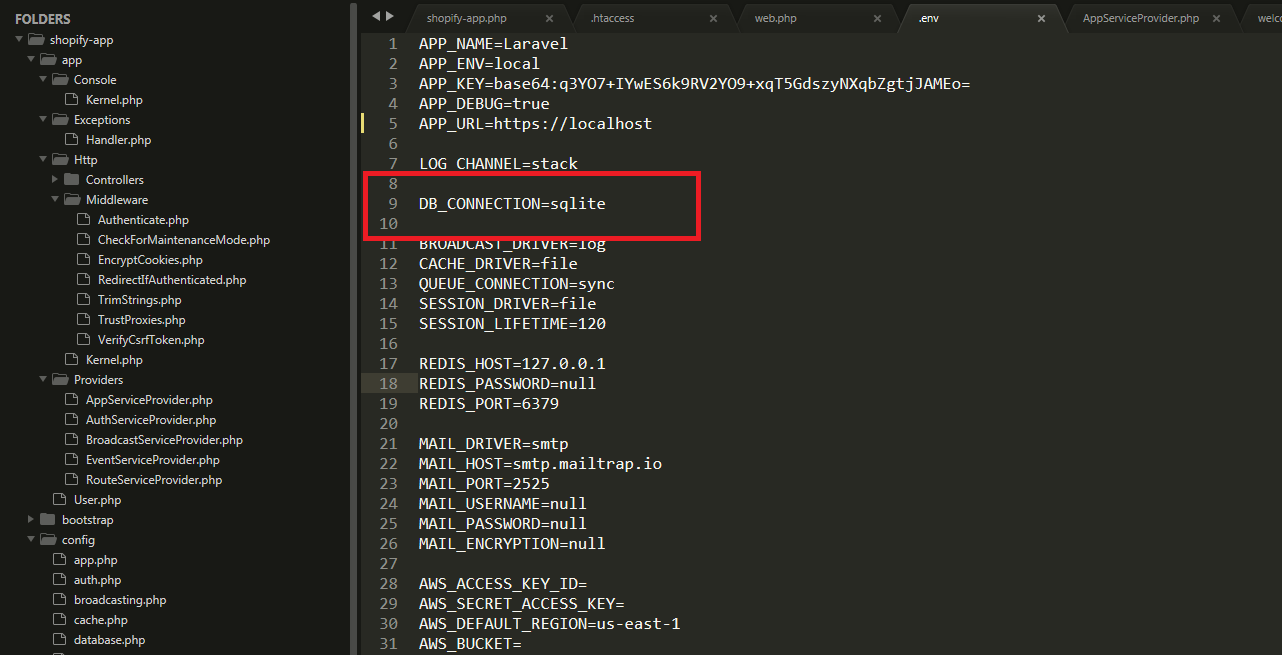
If you have encountered an error after using the commands above. Chances are, you haven’t configured your php.ini file and Laravel and trying to access the database module.
In your Laravel project, open the .env file and get rid of the lines starting with DB_ but keep the DB_CONNECTION and change the value to sqlite.
That’s the database that we’re going to use.
Next, find your php.ini file and look for the lines starting with ;extension and remove the semi-colon for these two modules.
extension=pdo_mysql
extension=pdo_sqlite
Once you’re done with everything, try to run the command again
By default, Laravel is only being served through HTTP and as you might already know, Shopify requires your application to be served with SSL and Laravel can’t help you with this at all.
There has been a lot of solutions out there, that you should modify this or add this code to your code. None of them will work.
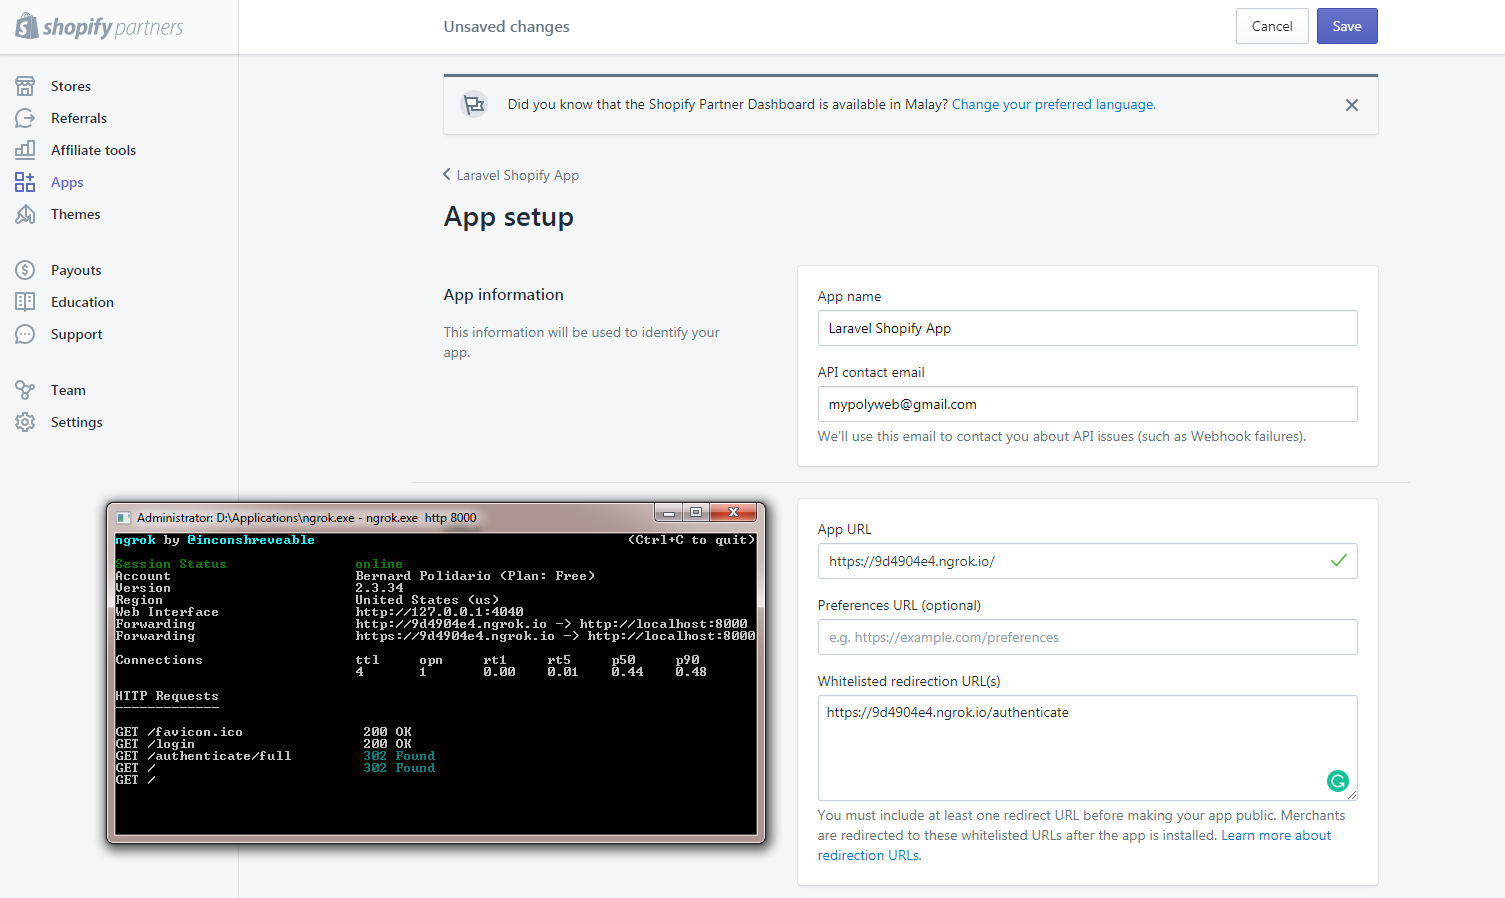
I suggest you run your own server or use ngrok to expose local servers behind NATs and firewalls to the public internet over secure tunnels.
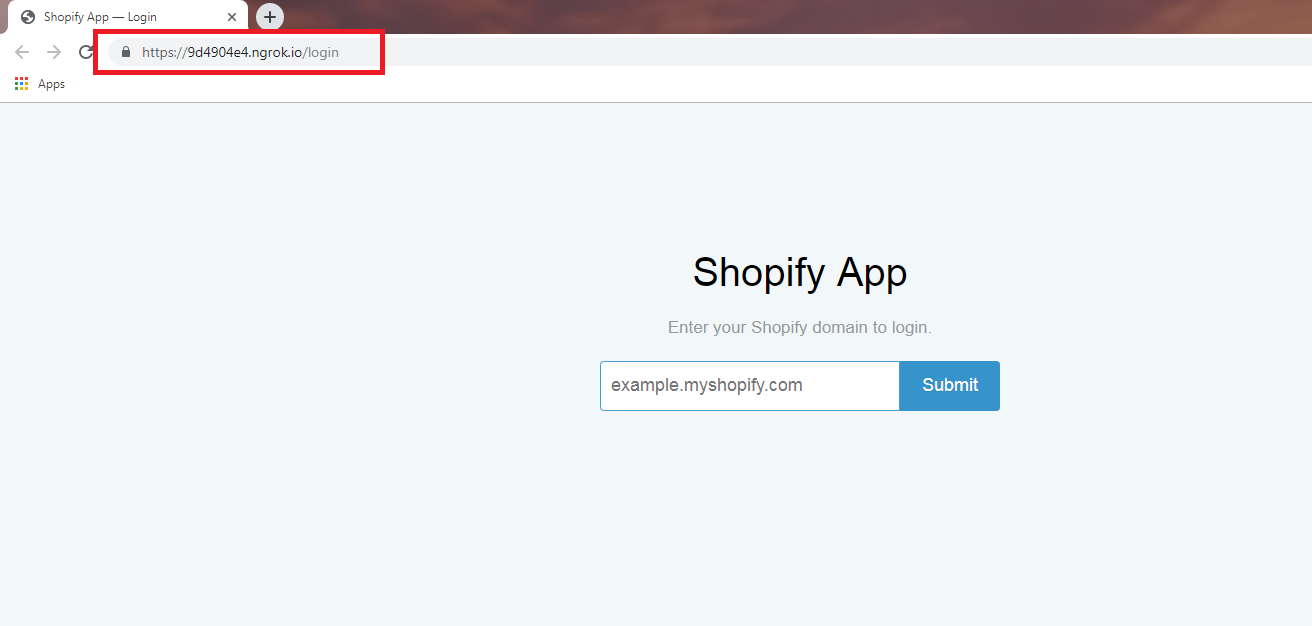
After you get the URL from ngrok, replace the URLs in your Shopify Partner App Dashboard and there you can access your app.
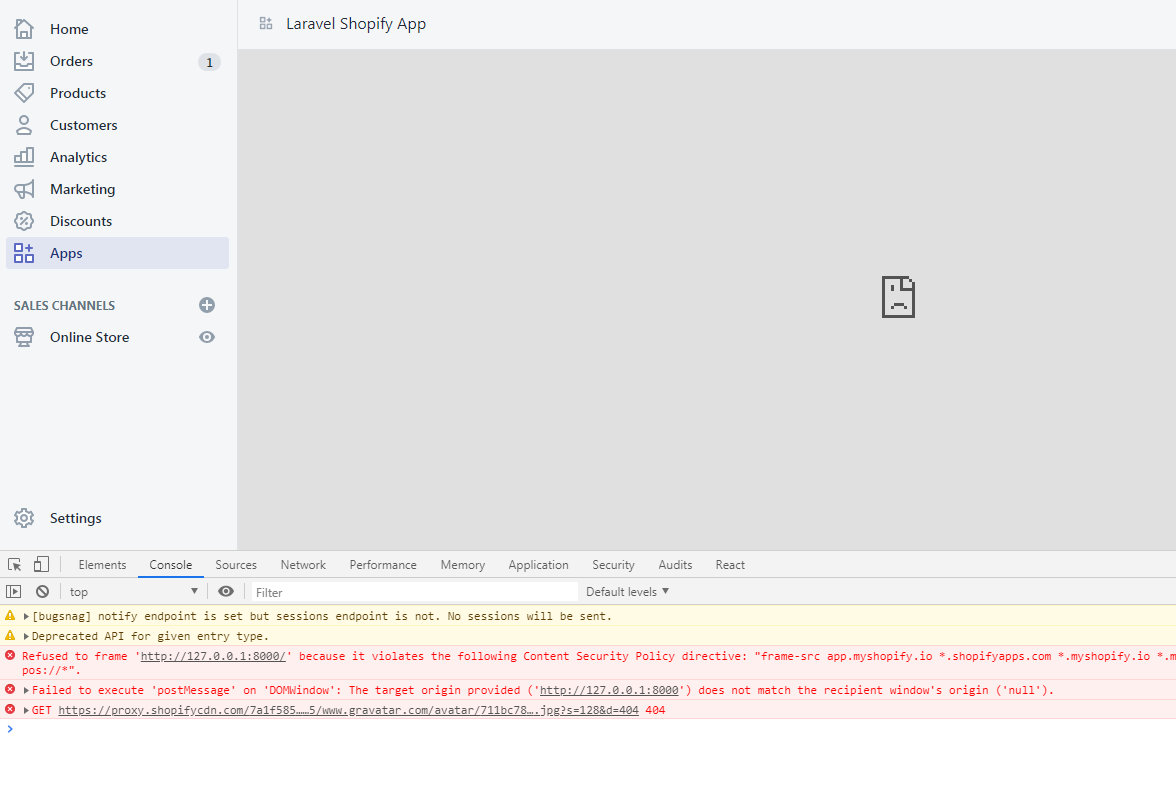
After that, you’ll be able to access your Shopify app using the URL provided by ngrok.
And here it is, you may now be redirected to the Shopify app created with Laravel. Lovely!
The ‘Loop’ Problem
If you are using Webhooks to listen for changes, such as a new customer, and then using the API to update this customer, you can create an inadvertent loop. As an example:
Laravel App listens for a customer update Shopify webhook.
Laravel App receives this webhook from Shopify and processes it.
Laravel App then makes a Shopify API call to update this same customer.
Shopify then triggers another webhook to your Laravel App as the customer was updated.
And thus an infinite loop is created.
To combat this, it is recommended to implement some mechanism to avoid a loop. For example, don’t perform a customer update on the same customer within 60 seconds. The Shopify Dev forums have a number of solutions to this problem but you must implement logic to avoid a loop or you risk hitting API limits, in addition to annoying your App users.
App Bridge & Legacy
By default, Appbridge is enabled, the embeddable mode for Shopify Apps. If you wish to disable this, set SHOPIFY_APPBRIDGE_ENABLED=0 for your environment variable. This will enabled legacy mode and skip any AppBridge modes.
Please note, X-Frame-Options header must be removed for AppBridge to function. This package attempts to remove this header through the responses in Laravel, but this does not work for all cases. For Nginx, and Laravel Forge, you must specifically comment-out or remove the line below from the Nginx configuration:
The Nginx configuration is found in Laravel Forge at the very bottom of the page for the site in question: Files->Edit Nginx Configuration
Conclusion
Special thanks to the developers who developed the packages for building Shopify apps easier.
Creating Shopify apps with Laravel and Composer can be a little bit complex to some but it wouldn’t be that much hard if you know a little bit of Laravel and Shopify API. If in case you don’t know any of these, you may refer to their documentation.
Do you want to learn Liquid programming so that you can customize or understand the codes of your Shopify theme? If yes, then you have come to the right place!
Welcome to the Shopify Liquid Programming course! In this course, my goal is to help you understand what is Liquid in Shopify: what it does, and how to use it.
In this course, I’m going to cover the following features of Liquid:
Objects: Global objects & content objects
Tags: Making conditions & looping statements
Filters
Metafields & Metaobjects
If you are a Shopify store owner, and you’d like to understand how a Shopify store is running, then learning Liquid can be extremely helpful.
In this course, I will also give you as many examples as possible to make Shopify Liquid easy to understand and how it blends with markup languages like HTML.
You will learn:
How to create navigations / menu links
How to create paginations
How to create custom sections
How to use metafields
and more!
🤔 Why Take This Course?
One of the biggest mistakes that people make is that they customize their Shopify theme aimlessly. What newbies usually do is Google the features that they’re looking for, then they will copy a code from someone else and apply it to their Shopify store without understanding the code that they copied and pasted. This can be an issue since they don’t understand the objects, tags, and filters.
That’s why I’m here to help you avoid making that mistake!
📌 Before Taking This Course
Now, what are the things that you need to know before taking this course? To get the best experience out of this course, it’s highly recommended that you know how to use Shopify. What I mean is, you should know your way around Shopify from admin, to settings, code editor and to the theme editor.
Next, it’s important that you know at least the fundamentals of programming (Like the operators, data structures or data types). Though I will do my best to explain what is going on in each lesson so that even if you have less knowledge about programming, you’ll be able to understand the code. In addition, for each lesson, I will provide resources related to the lessons (e.g. PDFs or articles) so that you can use those resources to learn more about Liquid.
Another thing that you can do is post questions in the Q&A section. So if you have questions, you can post them in the Q&A. I will also include in this course, quizzes or questionnaires so that you can test yourself if you can finally use Liquid.
So are you ready to learn Liquid? If yes, join me and I will see you on the other side.
Do you want to learn Liquid programming so that you can customize or understand the codes of your Shopify theme? If yes, then you have come to the right place!
Welcome to the Shopify Liquid Programming course! In this course, my goal is to help you understand what is Liquid like what it does, and how to use it.
We’re going to cover the following features of Liquid:
Objects
Tags
Filters
If you are a Shopify store owner, and you’d like to understand how a Shopify store is running, then learning Liquid can be extremely helpful.
One of the biggest mistakes that people make is that they customize their Shopify theme aimlessly. What they usually do is Google the features that they’re looking for, then they will copy a code from someone else and apply it to their Shopify store without understanding the code that they copied and pasted.
This can be an issue since they don’t understand the objects, tags, and filters.
That’s why I’m here to help you avoid making that mistake!
Now, what are the things that you need to know before taking this course?
To get the best experience out of this course, it’s highly recommended that you know how to use Shopify.
What I mean is, you should know your way around Shopify from admin, to settings and to storefront.
Next, it’s important that you know at least the basics of programming (Like the operators, or data types). Though I will do my best to explain what is going on in each lessons so that even if you have less knowledge about programming, you’ll be able to understand the code.
In addition, for each lessons, I will provide resources related to the lessons (e.g. PDFs or articles) so that you can use those resources to learn more about Liquid.
Another thing that you can do is to post questions in the QnA section. So if you have questions, you can post them in the QnA.
I will also include in this course, quizzes or questionnaires so that you can test yourself if you can finally use Liquid.
So are you ready to learn Liquid? If yes, join me and I will see you on the other side.


