One of the most commonly used effects in Unity is glow. Adding glow effect to your game levels is an alternative way to not only light up your scenes but also spice up your scenes.
It’s also known in the game development community that adding a glow effect can be hassling. That’s why in this tutorial, we’re gonna be guiding you on how to create a 2D glow in unity using shader graph and 2D lights.
Video Tutorial
The following tutorial will only cover the basics and installation of URP. If you prefer watching video tutorials, feel free to watch this video:
The above video tutorial did not cover how to create emission lights and so if you want to learn that, the guide is provided in this article.
Getting Started
Before we can successfully create a glow effect in any of our scenes. We have to make sure that our project is set up to use the Universal Render Pipeline (also known as URP)
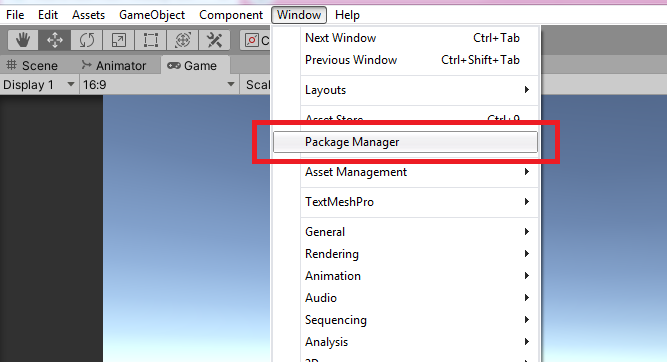
To set up, go to your Package Manager (Window > Package Manager).
Then, you can search for Universal RP and click install.
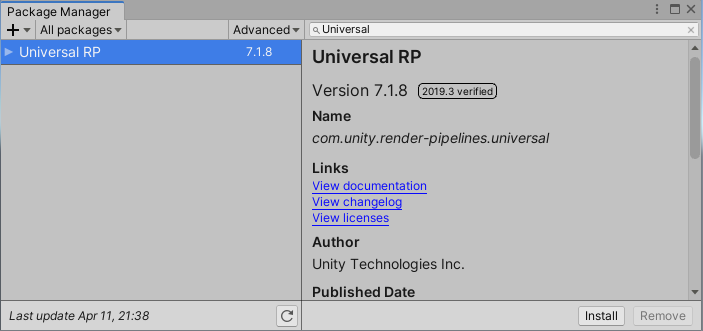
This will download and install all packages related to URP including Core RP Library and Shader Graph.
Note
If in any case that your package manager stopped loading all of the packages, just restart your unity and try re-opening the package manager window. It’s also important to note that package manager is only available for Unity 2019.3 and beyond.
Pipeline Assets
After installing URP, we need to create a pipeline asset and assign the asset in the graphic settings. The pipeline asset will control most of the graphical features and quality settings for the Universal Render Pipeline.
Once you have imported this asset to your settings, Unity will switch from the built-in render to URP.
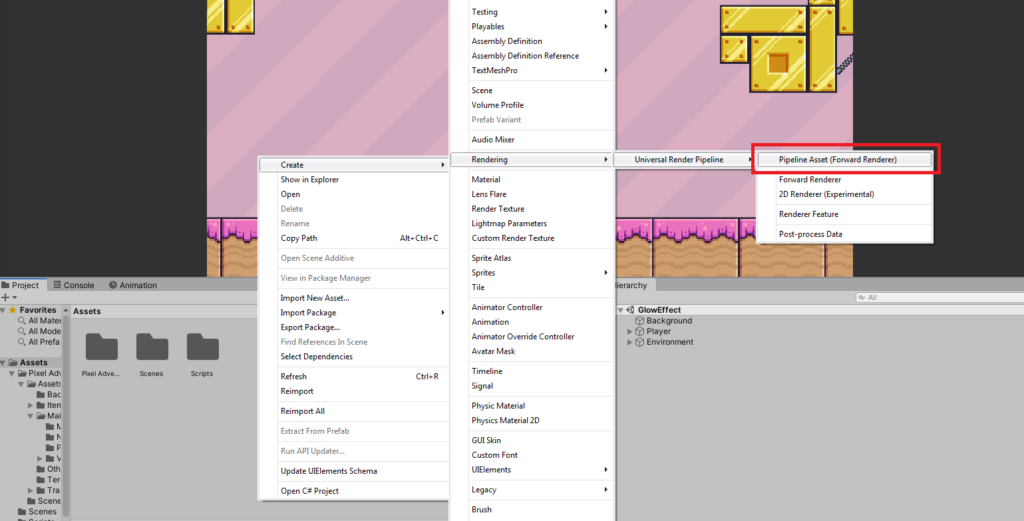
To do all of that, let’s go to our Project Window.
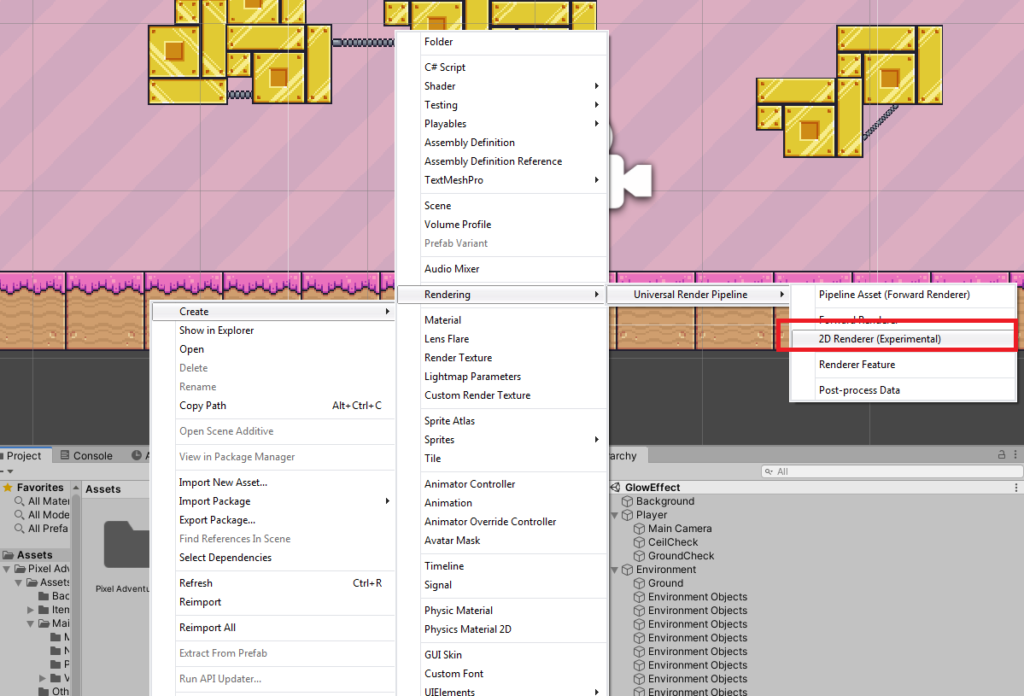
Hit right-click. Then look for Create > Rendering > Universal Render Pipeline > Pipeline Asset.
Name the asset 2D Render Pipeline.
Once renamed, the asset will create a new renderer with the name of 2D Render Pipeline_Renderer.
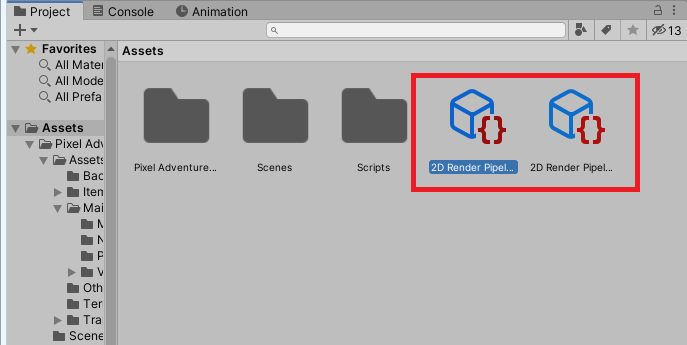
You may leave or delete the 2D Render Pipeline_Renderer because we’re going to create a 2D Renderer.
So in your project window again, right-click and look for Create > Rendering > Universal Render Pipeline > 2D Renderer.
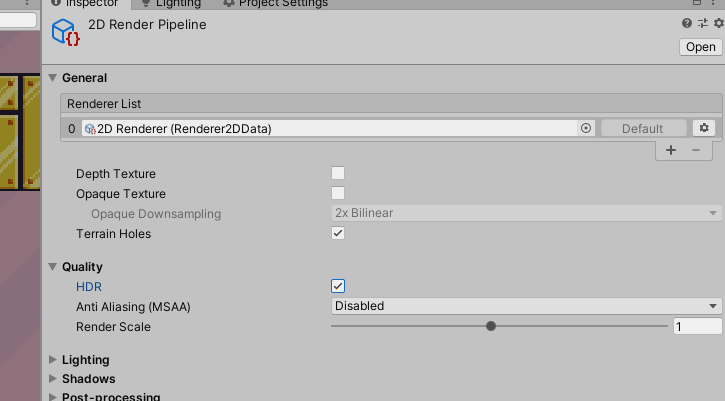
Next, select the 2D Render Pipeline and go to your inspector.
Under the General, there is a Renderer List with a Missing Default Renderer.
Simply drag the 2D Renderer that we just made into the Renderer List like below.
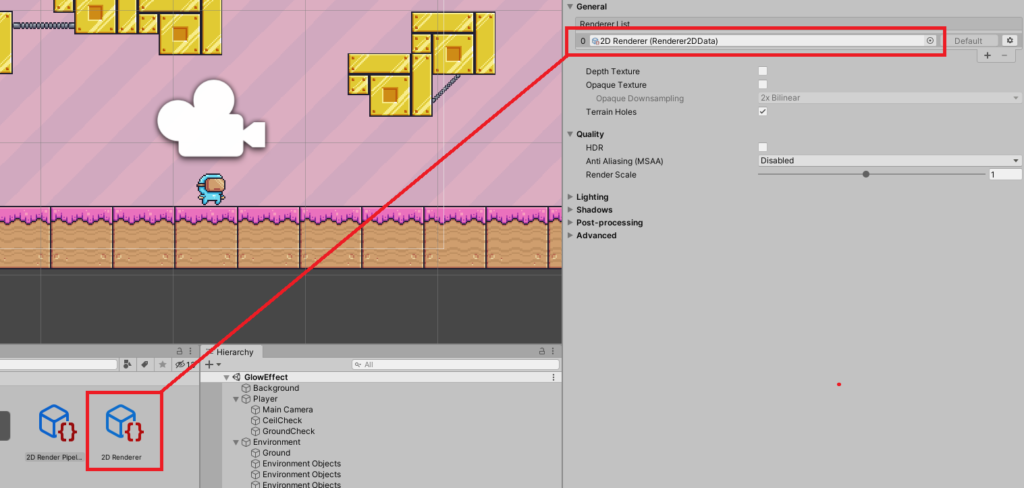
Next, under the Quality dropdown, make sure the HDR is enabled.
This will allow us to change the HDR values later to let the bloom effect know which objects to light up.
Camera Settings
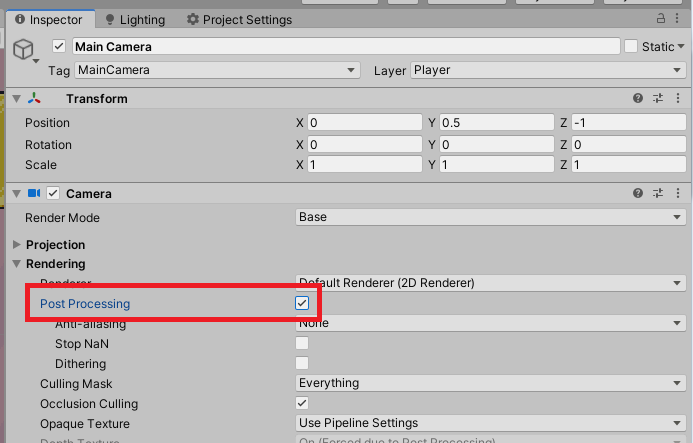
In order to see the effects that we’re going to create in this lesson, we will have to enable the post-processing in our camera.
To do this, go to your hierarchy, select the Camera and enable the post-processing.
Awesome! Now we’re almost done setting up our URP. Let’s continue.
Project Settings
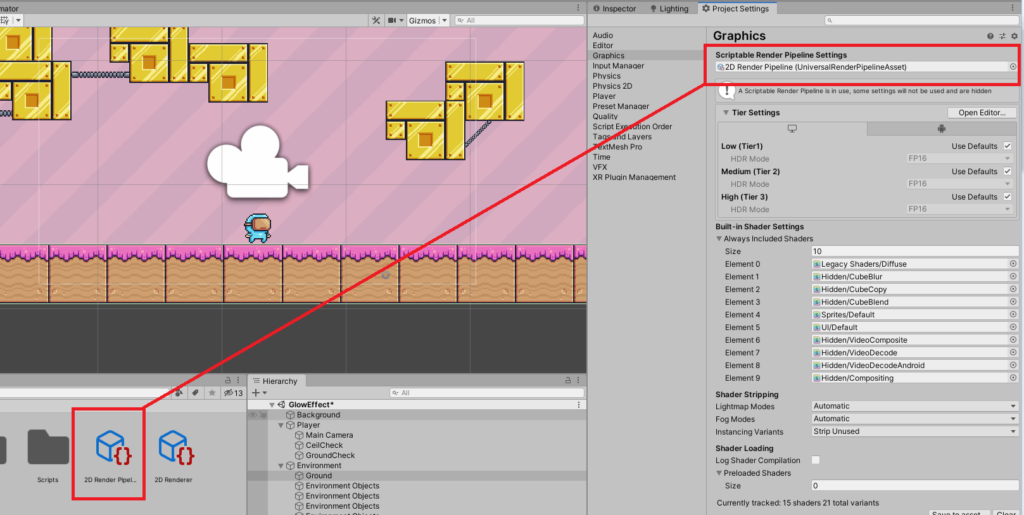
Once we created our Render Pipeline Asset, we can now proceed to our graphics settings to assign the pipeline asset that we just created.
To do that, open your project settings by going to Edit > Project Settings…
Then, navigate to the Graphics section to open the Graphics Settings.
And then, under the Scriptable Render Pipeline Settings… Simply drag the 2D Render Pipeline that we created into the input box like below.
Sprite Lit Shader
Tthe next thing that we need to do is to ensure that our environment will get affected by the glow effect that we’re about to create. To do this, we need to change all of the sprites in our game level (except the player).
So go ahead to hierarchy, select all of the game objects with sprites. In our case, that’ll be the environment.
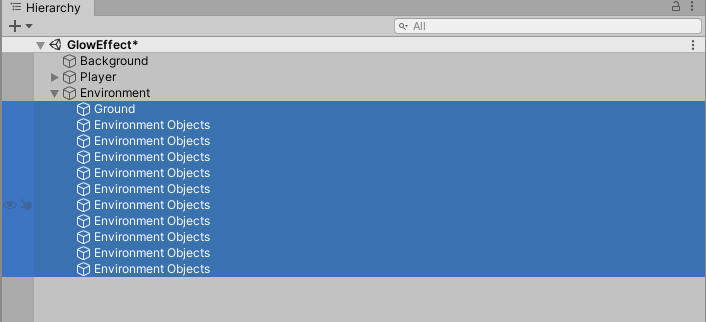
Then, go to your inspector.
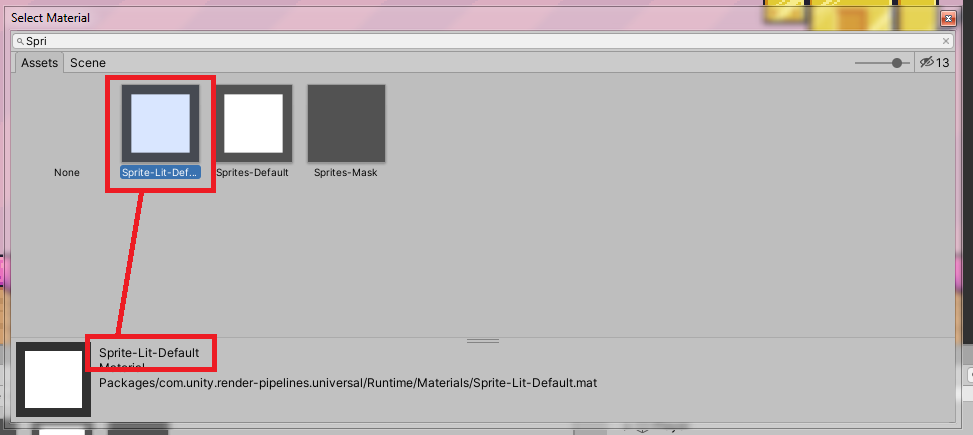
Under the Sprite Renderer component, change the Material by clicking on the button highlighted below.

A new window will pop up.
Then, click the cross-eyed button to show more options.
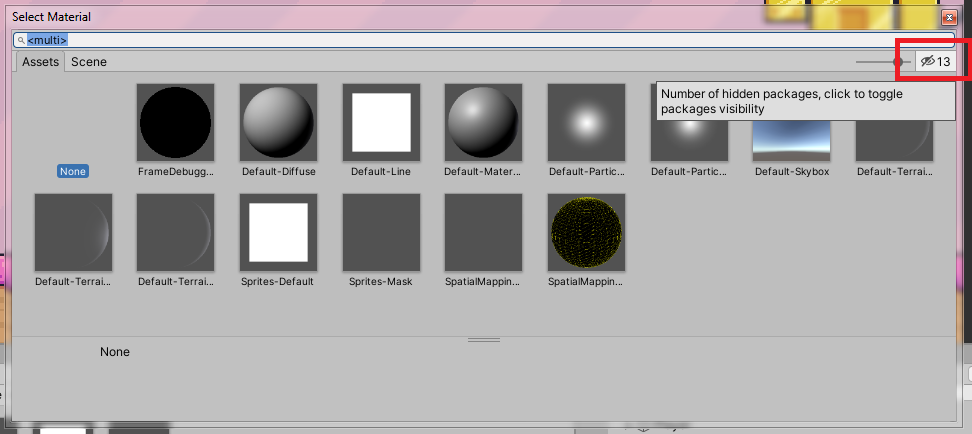
Then search for the Sprite-Lit-Default material and select it.
There are instances that after you selected the material, all of the sprites will turn to black. This is normal.
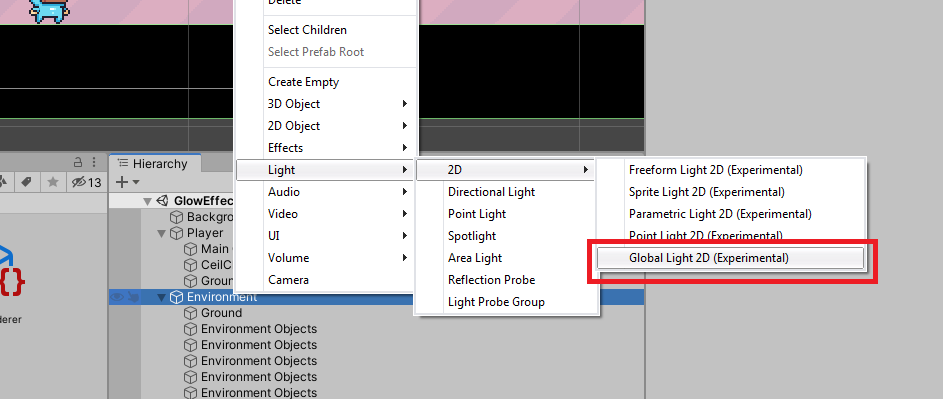
The main reason why this happens is that there are no lights in our scene yet. So, let’s create one by going to our hierarchy, right-click and select Light > 2D > Global Light 2D.
Once added, the scene will go back the sprites being normally displayed.
If you want to darken your level, you can do so by selecting your Global Light 2D and adjusting the intensity down. We will set ours to something like 0.65.
Now that we have our global light set up, we can start working on giving our player the glow that he needs.
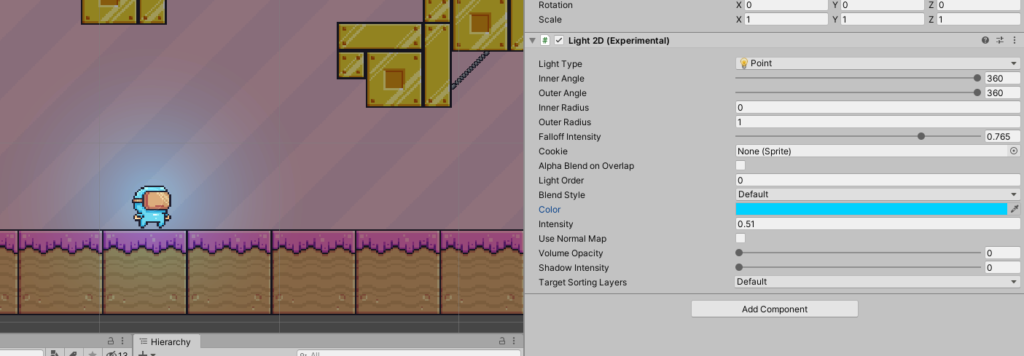
First, let’s add a point light to our player. To do that, select your player, right-click and select Light > 2D > Point Light 2D.
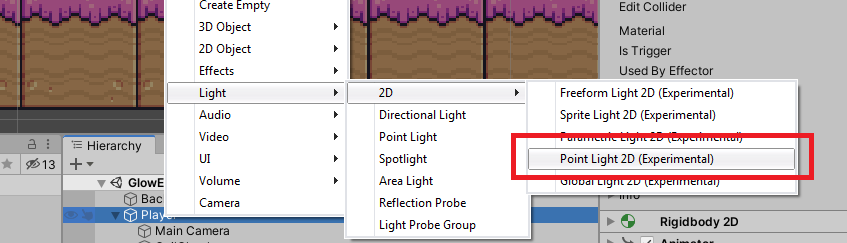
This will give our player the halo glow effect that we want.

If you want, you can always adjust the intensity of the point light so it won’t blow out too much brightness in your scene. We’ll set ours to 0.51.
We’ll also set its Falloff intensity to somewhere around 0.765 and change its color to #00D1FF.
Awesome! Now we’re almost done.
Bloom Effect
The next thing that we need to add is the bloom effect or bloom post-processing effect (can be also interpreted as glow effect).
If you’re not aware, bloom is an effect that only happens within the lens of the camera and when a large amount of light gets focused on a single object, the camera’s sensor will eventually create a charge that bleeds out from pixel to pixel until it spreads out.
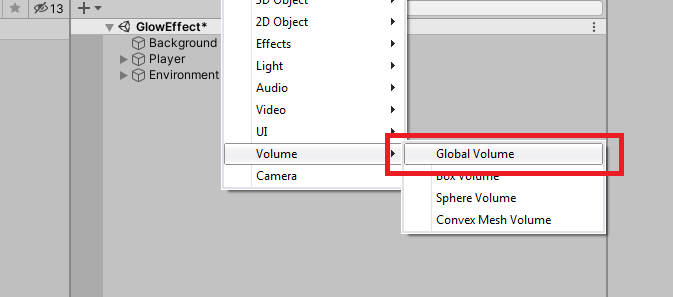
With all that being said, let’s add a new volume into our scene by going to the hierarchy, right-click and select Volume > Global Volume.
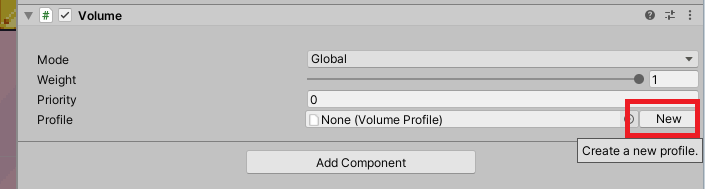
Next, go to your inspector, under the Volume component, click the New button to create a new profile.
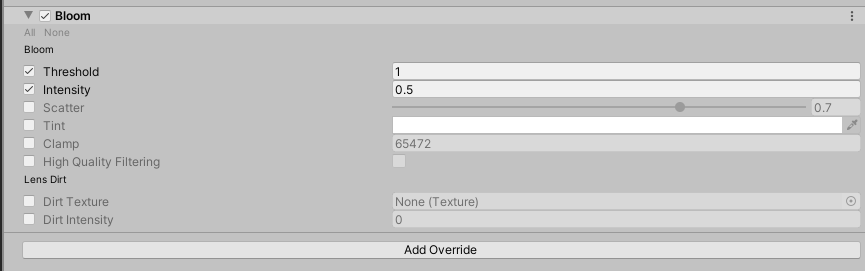
Once a new profile is created, click the Add Override button and select Post-processing > Bloom.
Under the bloom effect, enable the threshold and intensity and set their value to 1 and 0.5. Although you can always set their values to your liking.
Emission Map
Now that we have our bloom effect, the next thing that we need to do is to tell our post-processing effect which area should light up. To do this, we need to create an emission map.
Creating emission maps can be hard depending on how much sprites you have and how much detail the sprites are. But thankfully, Photoshop can pretty much help you how to create the map.
Say for instance that we have the following sprites.
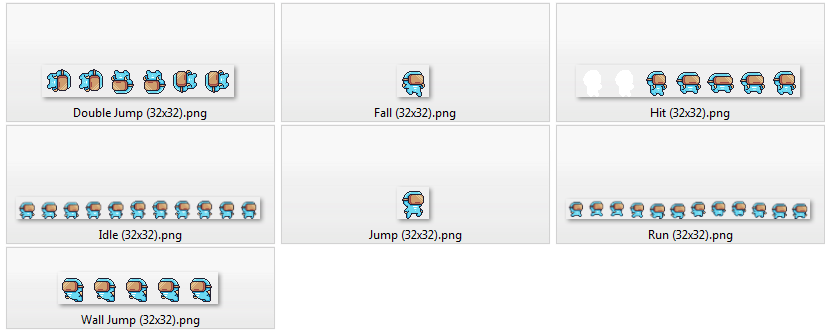
Our goal for these sprites is to convert it into emission maps.. But… which part of its body do we want to emit lights?
In our case, we want its body to emit lights.
If you noticed, the color of this character is only blue, brown, and black.
Extracting blue from the rest of the colors is very easy.
Let’s open these sprites using Photoshop.
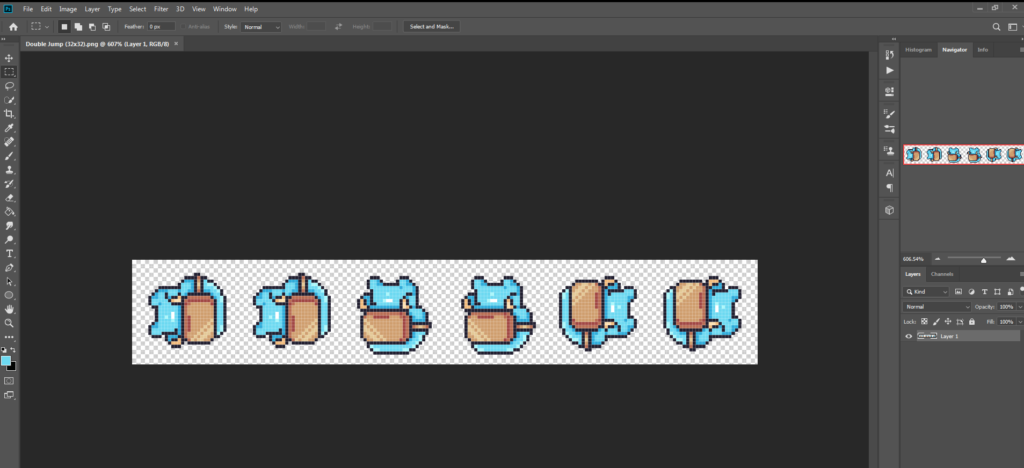
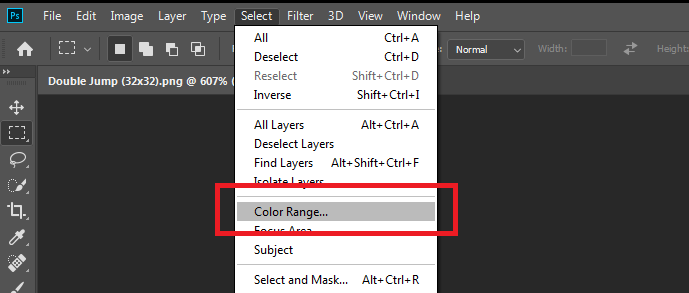
Then, select the Layer and go to Select tab > Color Range.
The color range window will pop up.
Next, make sure you select the Sampled Colors.

This will allow you to use the droplet tool.
Next, click on the color that you want your character to glow. In our case, it’s the cyan color.
Once clicked, the preview window in color range will show you which part of the image is selected.
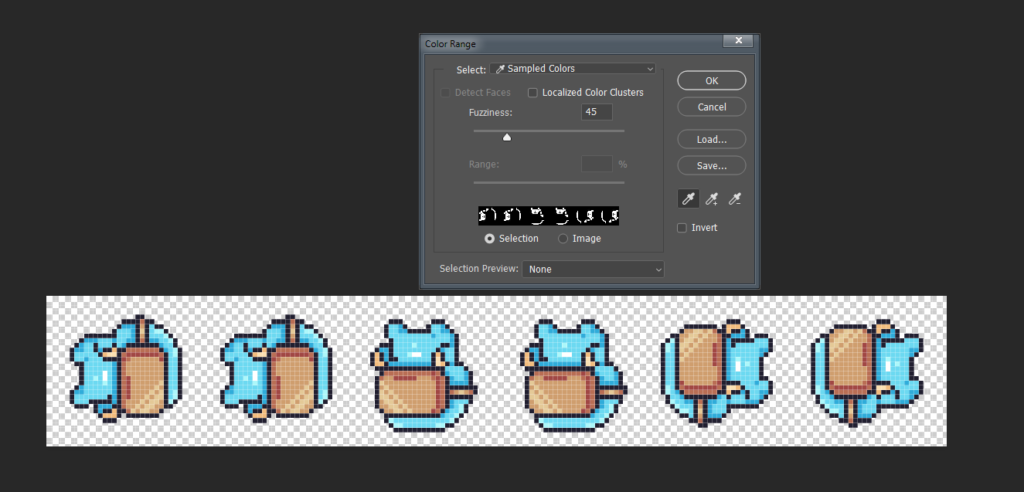
Click OK.

This should select the parts of the character that you want to glow.
Press CTRL + J to create it as a new layer.
Next, go to your Layers window and disable Layer 1.
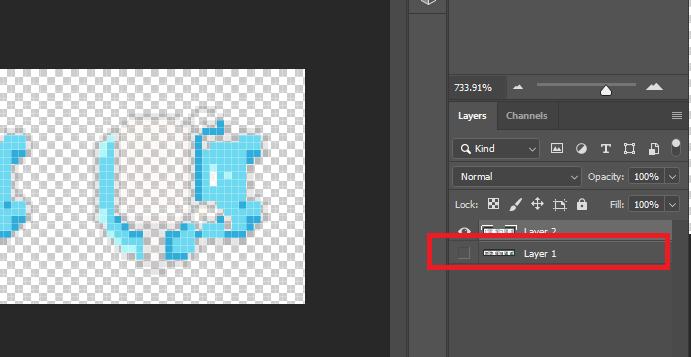
This time, it will only show the blue parts of the character.
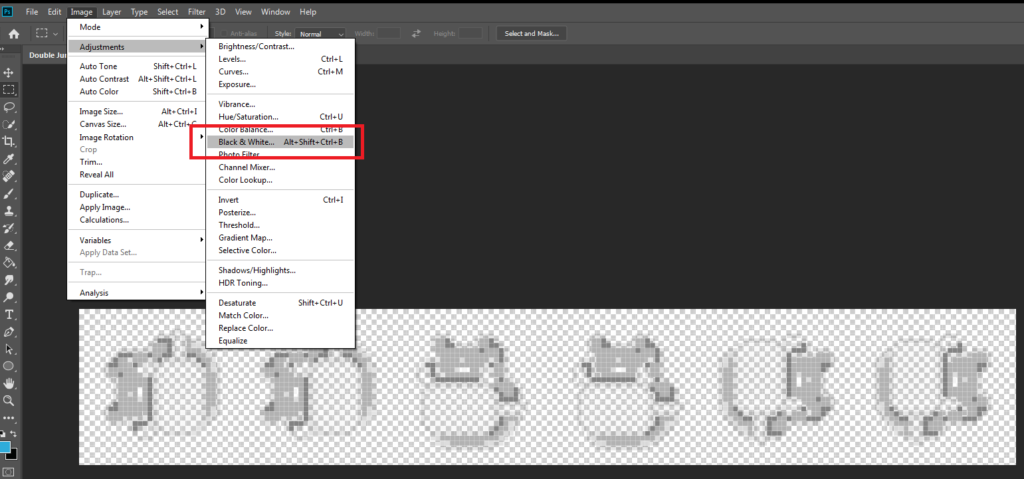
Now, the last thing we need to do is to make sure that this image is black and white.
If you are not aware, emission maps only accepts black and white (like layer masks).
White means emit lights while black means don’t emit lights.
With all that being said, let’s turn our sprite into black and white by going to Image tab > Adjustments > Black and White or by simply pressing ALT + SHIFT + CTRL + B.
You can already save this image and use this as the emission map.
However, if you want to increase the intensity of the emission, you can always use RGB curves to increase the brightness of the image.
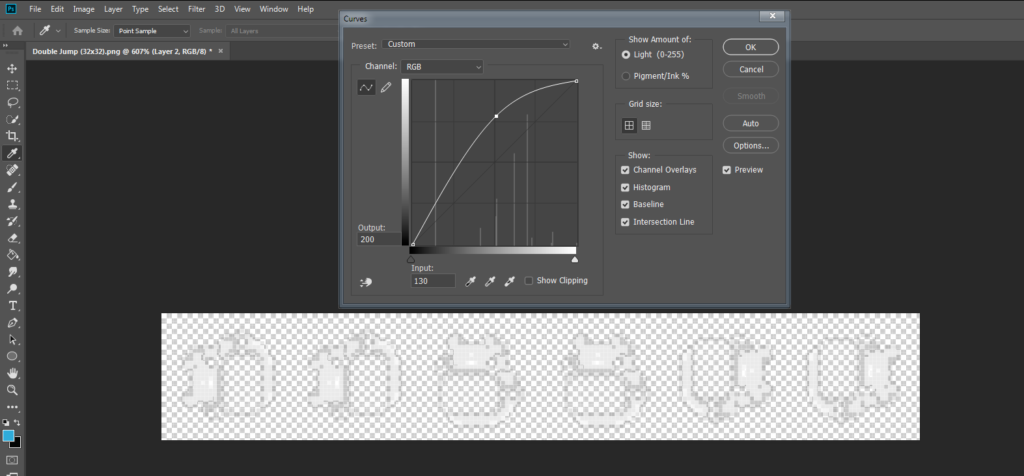
Save the image as PNG and make sure to name the file the same as before but with _emission at the end. (e.g. Double Jump_emission.png)
Then, do the same thing to the rest of the sprites you have.
Once you’re done making emission maps, go back to Unity and import all the emission maps you have created.
Then select all the emission maps, go to the inspector and change its Texture type to Default.
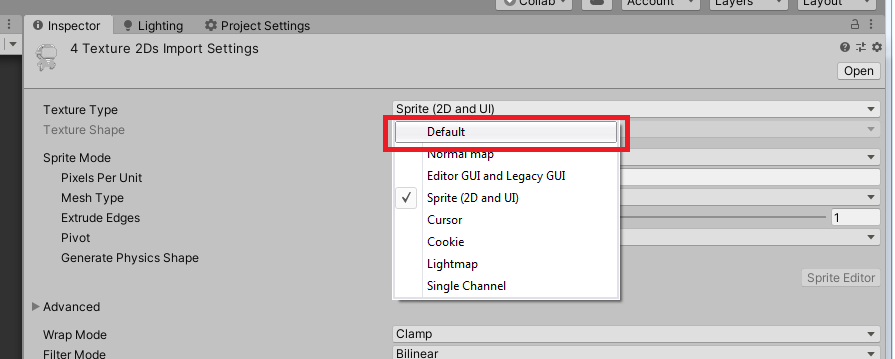
Make sure that Alpha is transparent is also enabled and set the filter mode to Point.
Now the next thing that we’re going to do is to use these emission maps as the secondary texture of the sprites of our character.
To do that, go to your project window.
Select the sprite of your character and open the Sprite Editor.
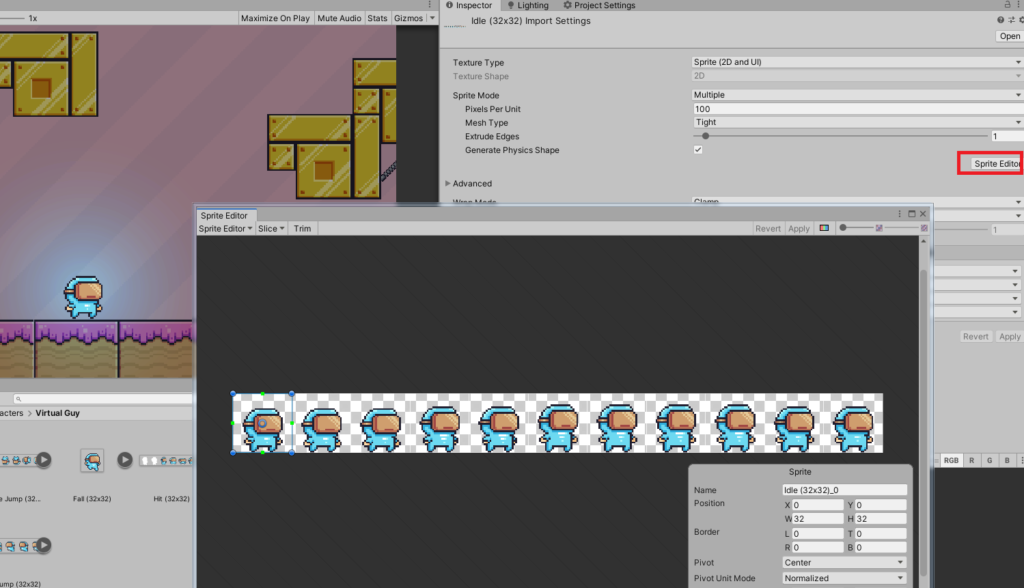
Next, click on the Sprite Editor dropdown and change it to Secondary Textures.
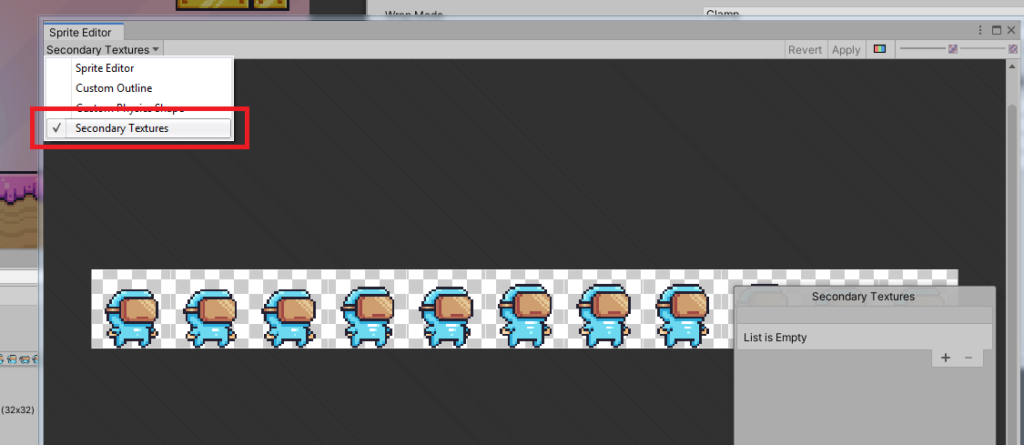
This will allow you to add list of your secondary textures which can be use later for shader graphs.
So click on the plus sign button to add a new texture.
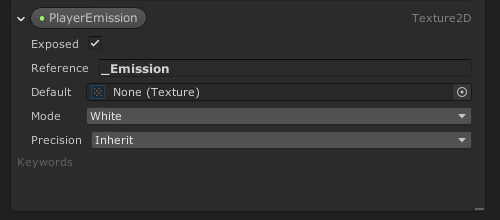
Name the texture _Emission.
Then, drag the emission map that we created before. If the current sprite is Idle.png then we should add the Idle_Emission.png as the secondary texture and so on.

Now, click Apply.

Do the same process to the other sprites with its respective emission maps.
Shader Graph
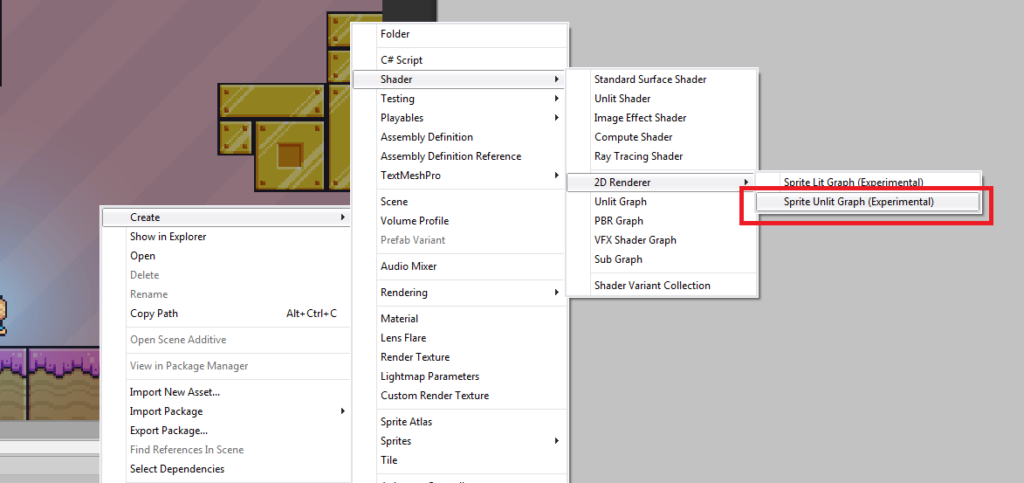
Now that we have everything finally set up, let’s finish this by creating the shader for our player.
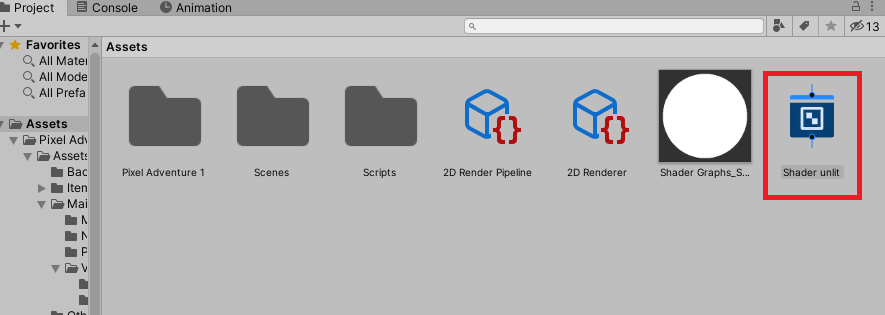
Inside our project window, hit right-click, and select Shader > 2D Renderer > Sprite Unlit Graph.
You can name it Shader unlit.
And immediately after creating the shader, hit right-click on the shader and select Create > Material.
This will create a new material with the shader that we just created.
Then, select your player and change the player’s sprite material to the material that we just created.
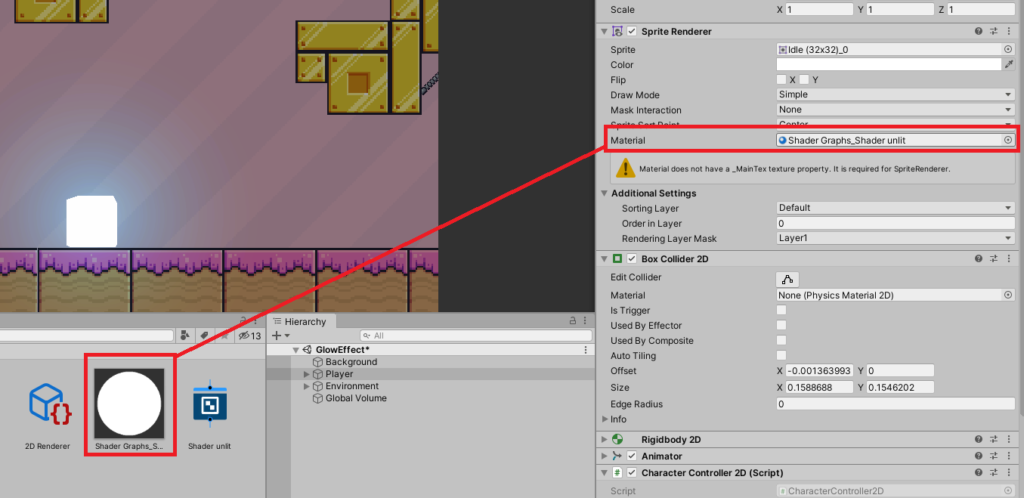
Once the material is changed, the player sprite will turn to blank, this is normal.
To show the player sprite, all we needed to do is go to our shader graph.
Double-click it and this will open the shader editor.
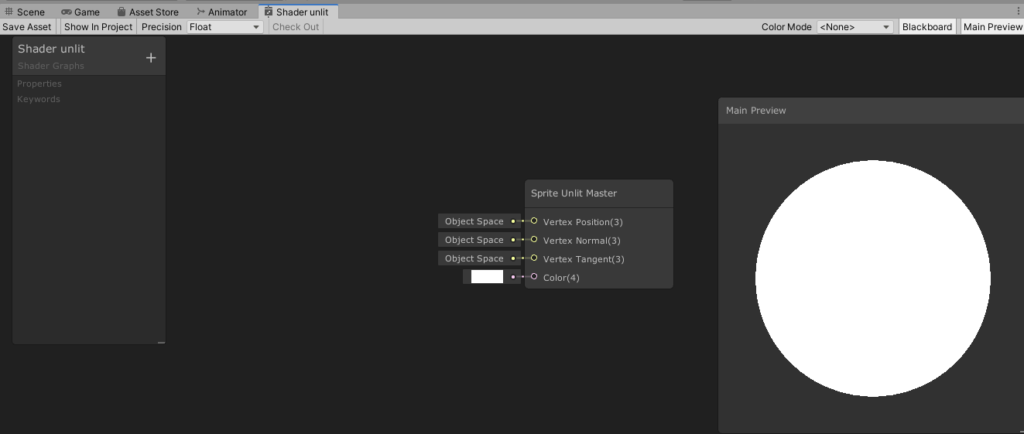
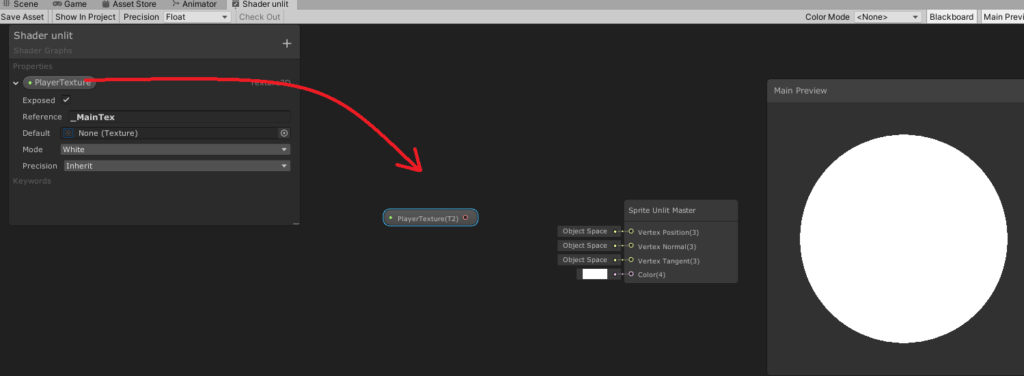
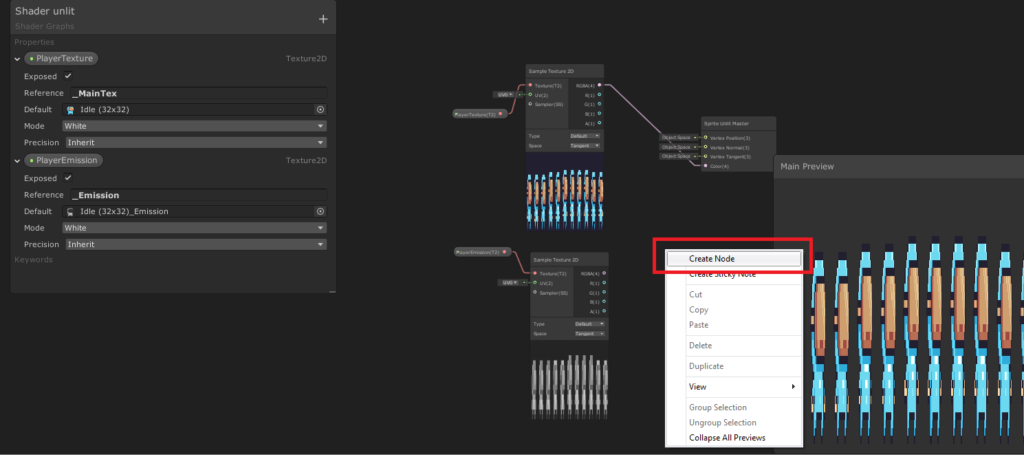
To display our sprite, all we need to do is to create a new texture 2D property.
To do this, click on the plus-sign icon and select Texture2D.
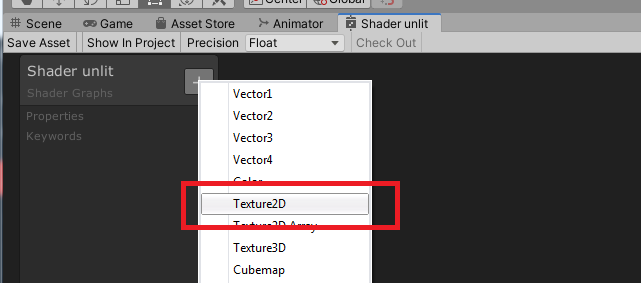
You can name it whatever you want.
Then, in reference, change its value to _MainTex.
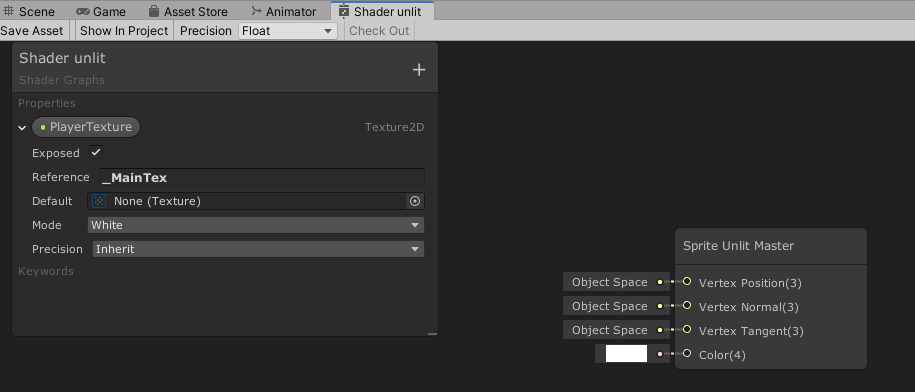
Next, drag the PlayerTexture on the field.
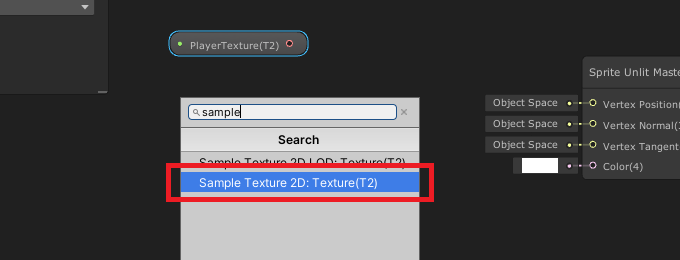
Next, drag the pink cirle on the field as well. This should display a new window.

Search for sample texture 2D.
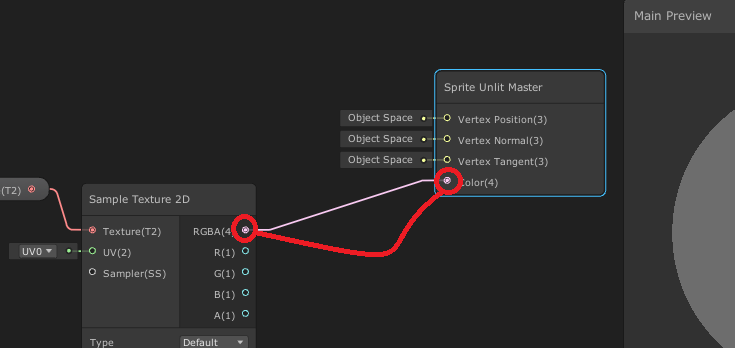
Next, connect the RGBA(4) to the Color(4) of the Sprite Unlit Master.
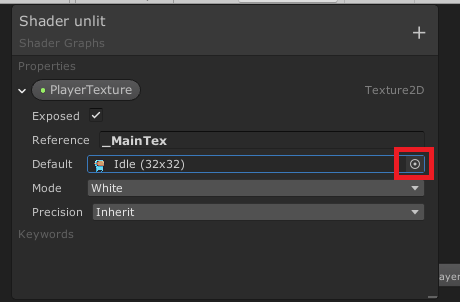
Then, go to the PlayerTexture property and change the Default texture from None to Idle or default sprite of your character.
Next, let’s add the emission texture. So go ahead and click the plus-sign icon once again and select Texture2D again.
Now for the reference, we’ll type the same value that we typed in the name of our secondary texture which is _Emission.
Change the Default from None to the Idle_Emission.png.
Then, do the same thing, drag the PlayerEmission onto the node field and create a new Sample Texture 2D by dragging the pink circle onto the node field.
Next, right-click onto the node field and select Create Node.
Then, look for the Add node.
Once Add node is created, mix the PlayerTexture with the PlayerEmission by dragging their RGBA to the A and B like below.
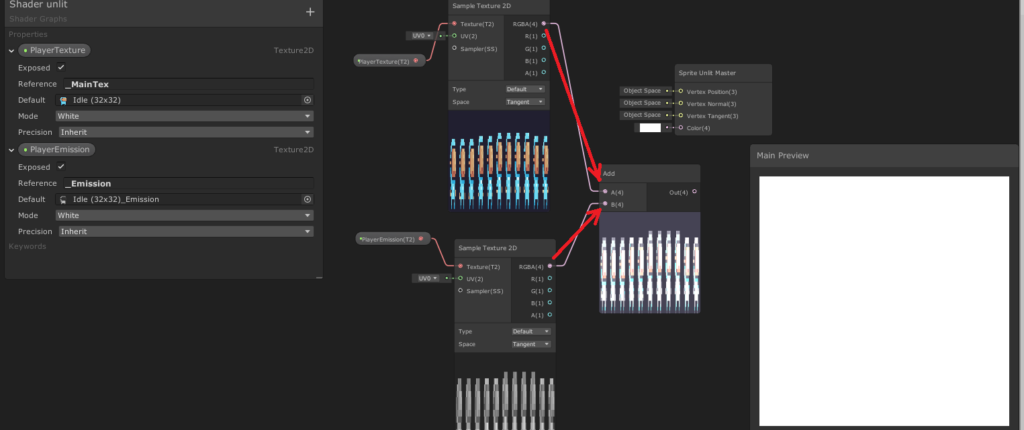
And for the output of Add node, drag it to the Sprite Unlit Master.
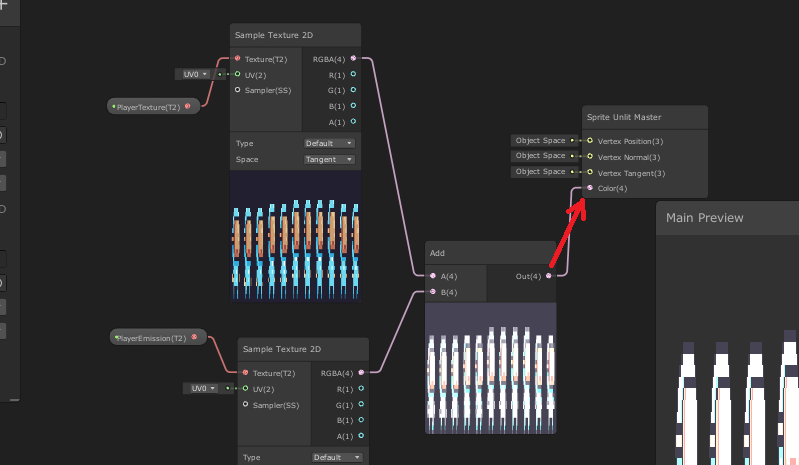
And if we save the shader. You should see that the player starts glowing. Awesome!
Now technically, we’re done making out player glow. But we can still make this look better by changing its glow color to something else like red, blue, or yellow.
To do that, all we need to do is to create a color property in our shader.
So go back to your Shader Editor. Click the plus-sign icon, and select Color.
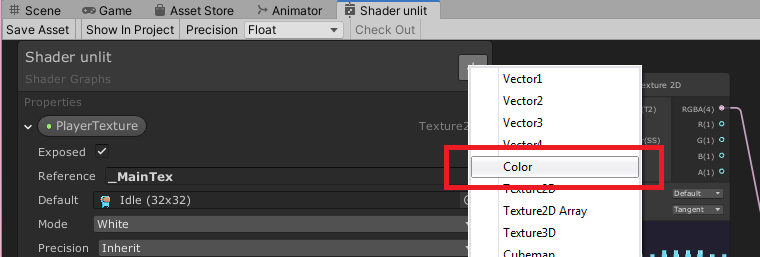
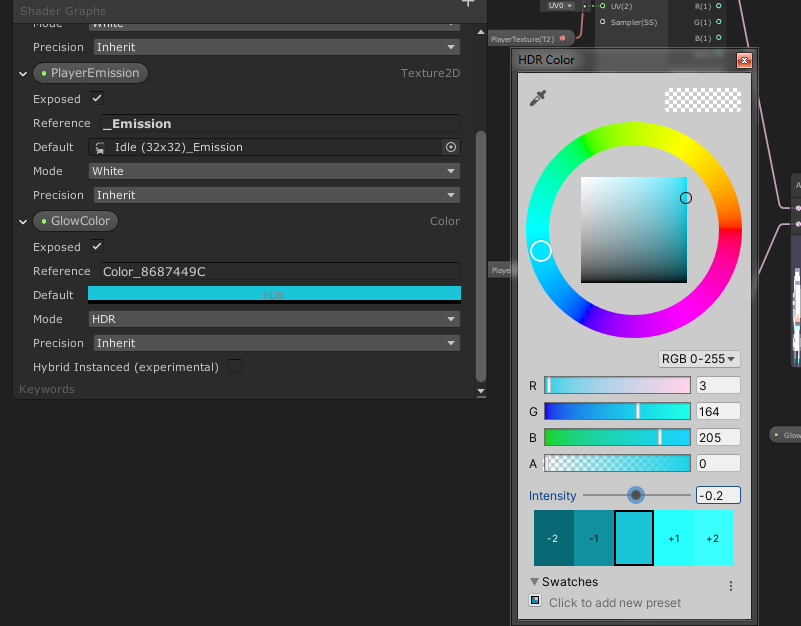
You can name it GlowColor. Then under the GlowColor property, set its Mode from Default to HDR.
Next, change its color by clicking on the Default value. In our case, we’ll set its value to the following.
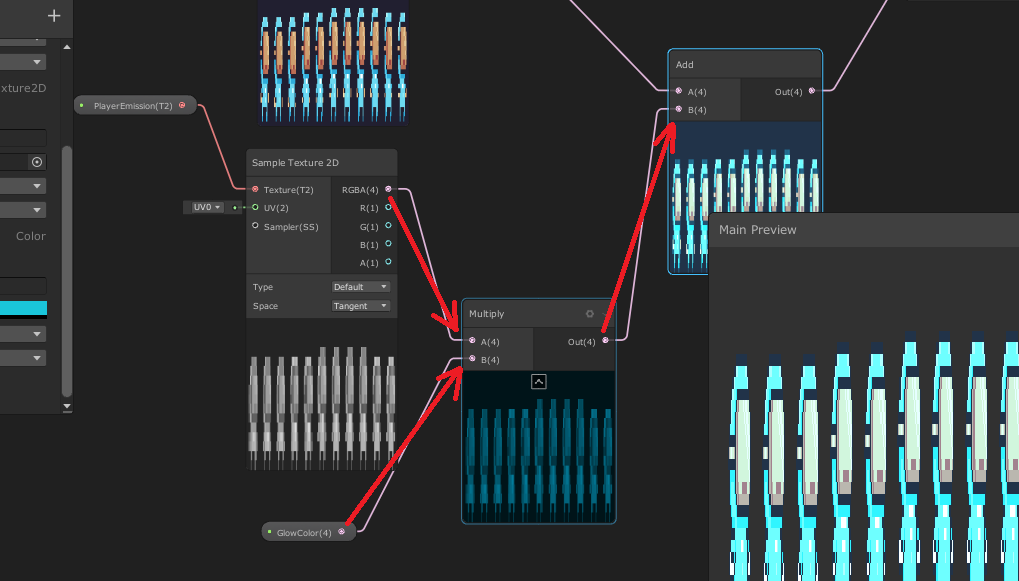
Then, drag the GlowColor onto the Node field.
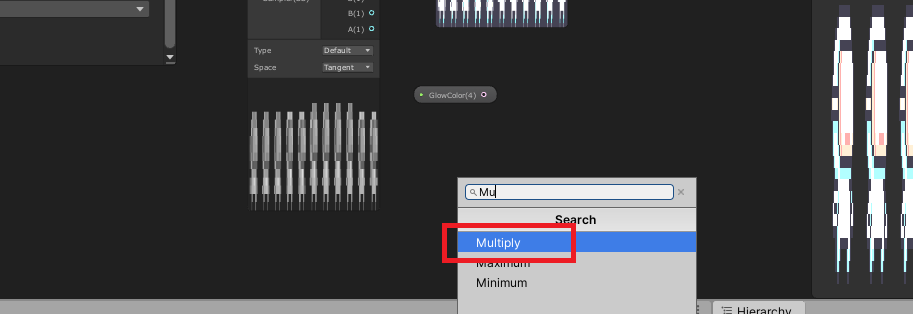
Next, create a new Node by right-clicking on the Node field. Then look for Multiply.
Then apply the output of the PlayerEmission’s Sample Texture 2D and GlowColor to the Multiply nodes’s input. Then the output of the Multiply Node, apply it to the Add node’s B like below.
Save your shader and you should have the following output.
As you can see, you can also change its color and intensity.
So, if you want to make a glow animation out of shader graph, you can perfectly do that and easily.
Wait before you go! You’ve come a long way and I’m very proud of what you have accomplished. If you are interested to learn more about 2D unity development and game designs, I suggest you take these books and learn how to develop 2D games from start to finish.
Conclusion
You may be thinking that making a character glow takes a lot of time but this way of making sprites glow is by far the most easiest. Not only that, after doing everything here in your scene, it will be much easier for you to customize other characters
Disclosure: This article may contain affiliate links, which means we may receive a commission if you click a link and purchase something that we have recommended.
So the bloom effect will only affect the colors that are marked as HDR? that part was not very clear to me, and also, I wanted to ask if it is possible to apply this effect to a trail renderer.
Hello, thank you for this. Works very nicely. The only issue for me is that it glows everything in the scene, even sprites that have the standard material applied. Have I done something wrong or missed something? Thx!!