The thing that is so popular in the gaming community is the top-down gaming style (also known as isometric games). This type of perspective is often used by games like RPGs.
In this tutorial, we’re going to learn how to create unity top-down movement without writing the actual player movement script just pure animation and a little code. That’s right! We’re going to use Unity Animation to make solid movements for our Player.
Let’s get started!
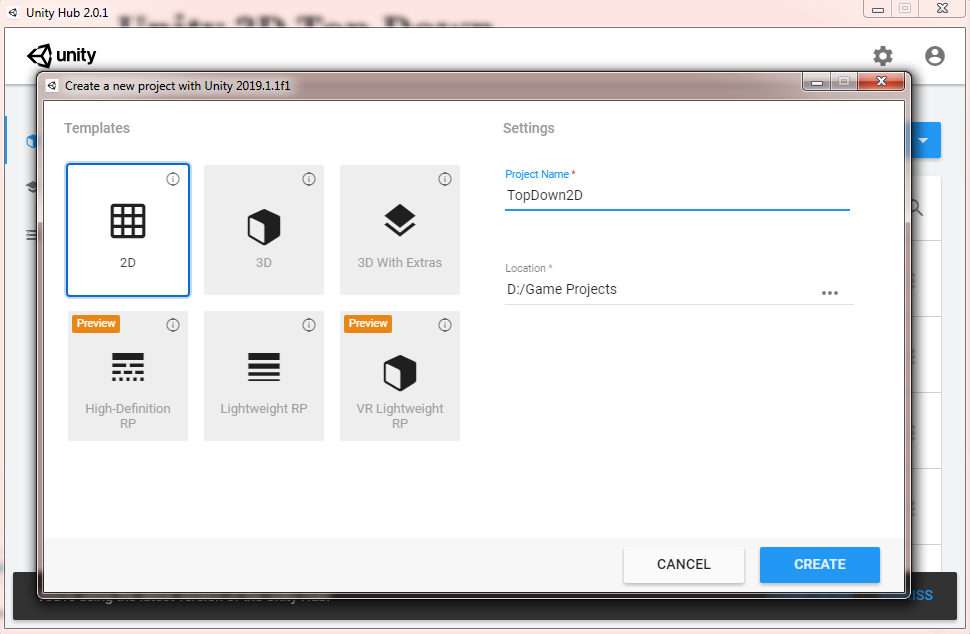
Open Unity and create a new project. (Make sure it is a 2D game project.)
Video Tutorial
If you prefer watching video tutorials, you may watch the video version of this lesson below:
Getting Started
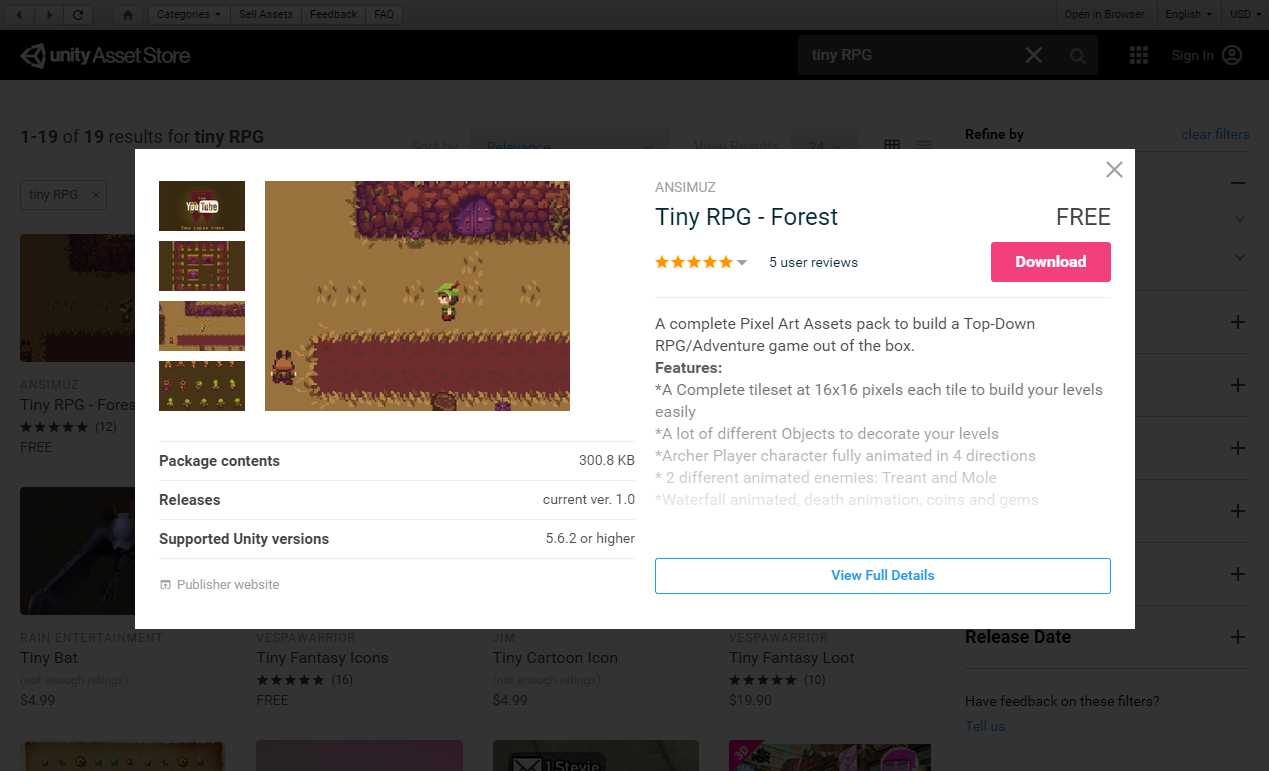
Before we proceed, we need to download the 2D assets that we can use for this project. If you have your own assets like 2D characters and platform backgrounds, you may skip this step. However, we encourage you to follow along so you’ll understand how we made it to the final output.
Press CTRL + 9 to open the asset store or Window tab > Asset Store
Search for Tiny RPG and download the asset.
If you’re looking for more 2D characters, we highly recommend using these retro characters as they all have the complete animations for most game needs.
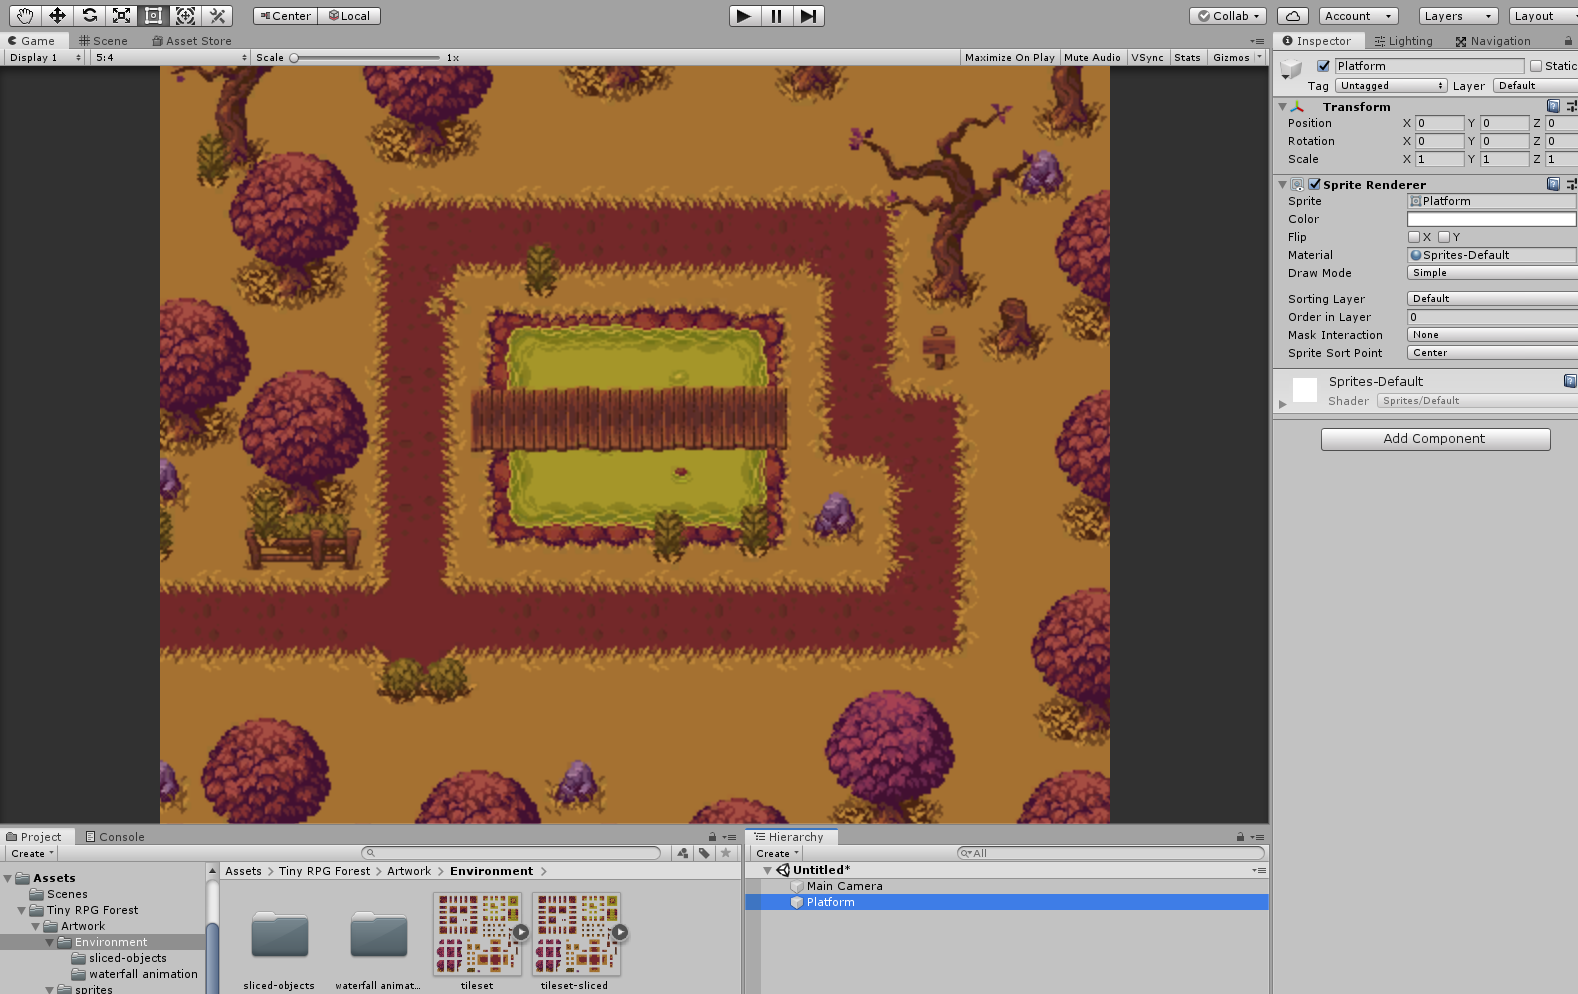
After importing the assets, design your own platform using the sprites inside the folder Environment or you may download the following image and use it as a sprite.
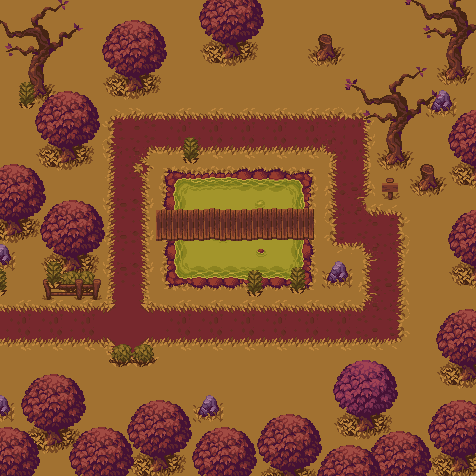
And here’s how it looks like in the editor:
Bringing in the 2D Character
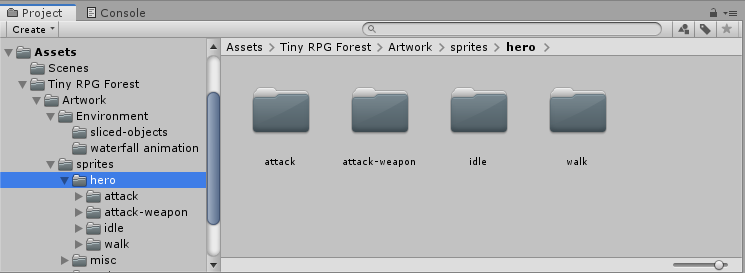
The next thing that we want to do is, of course, bring in our player. To do that, go to Tiny RPG Forest folder, and then Artwork folder, and then the sprites.
Inside the sprites folder, select the hero folder.
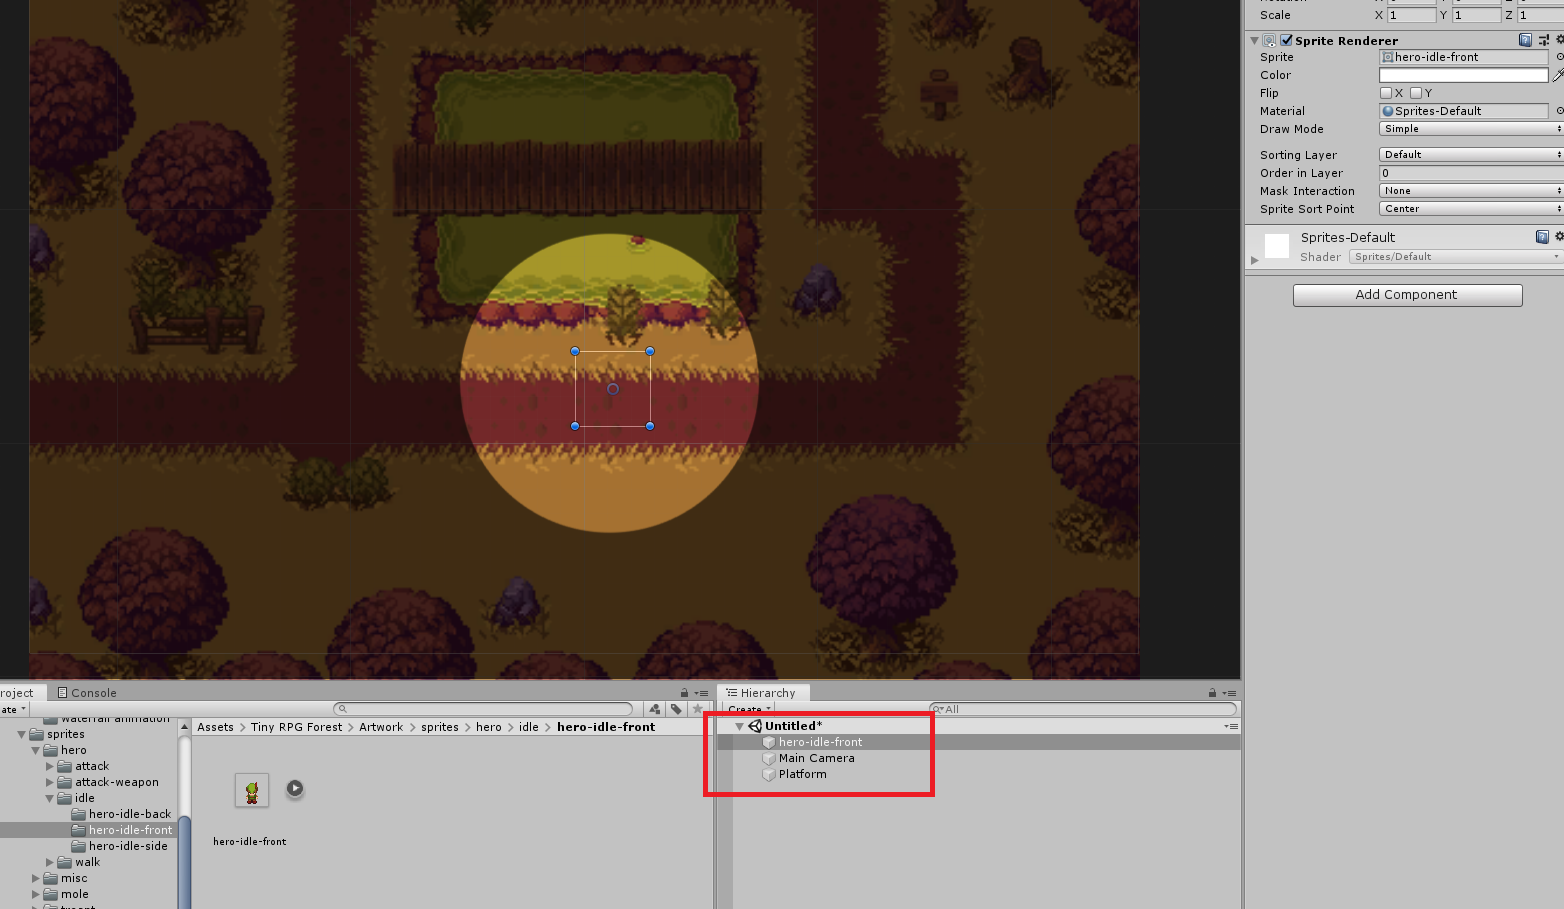
Notice the content of the hero folder. There you will see all of the action sprites for the player such as attack, idle, and walk. First, let’s open the Idle folder.
Inside the folder, you will see another three different folders for the different directions our player can be facing (front, back, and sides).
We’re going to select the hero-idle-front sprite and let’s drag it into our scene.
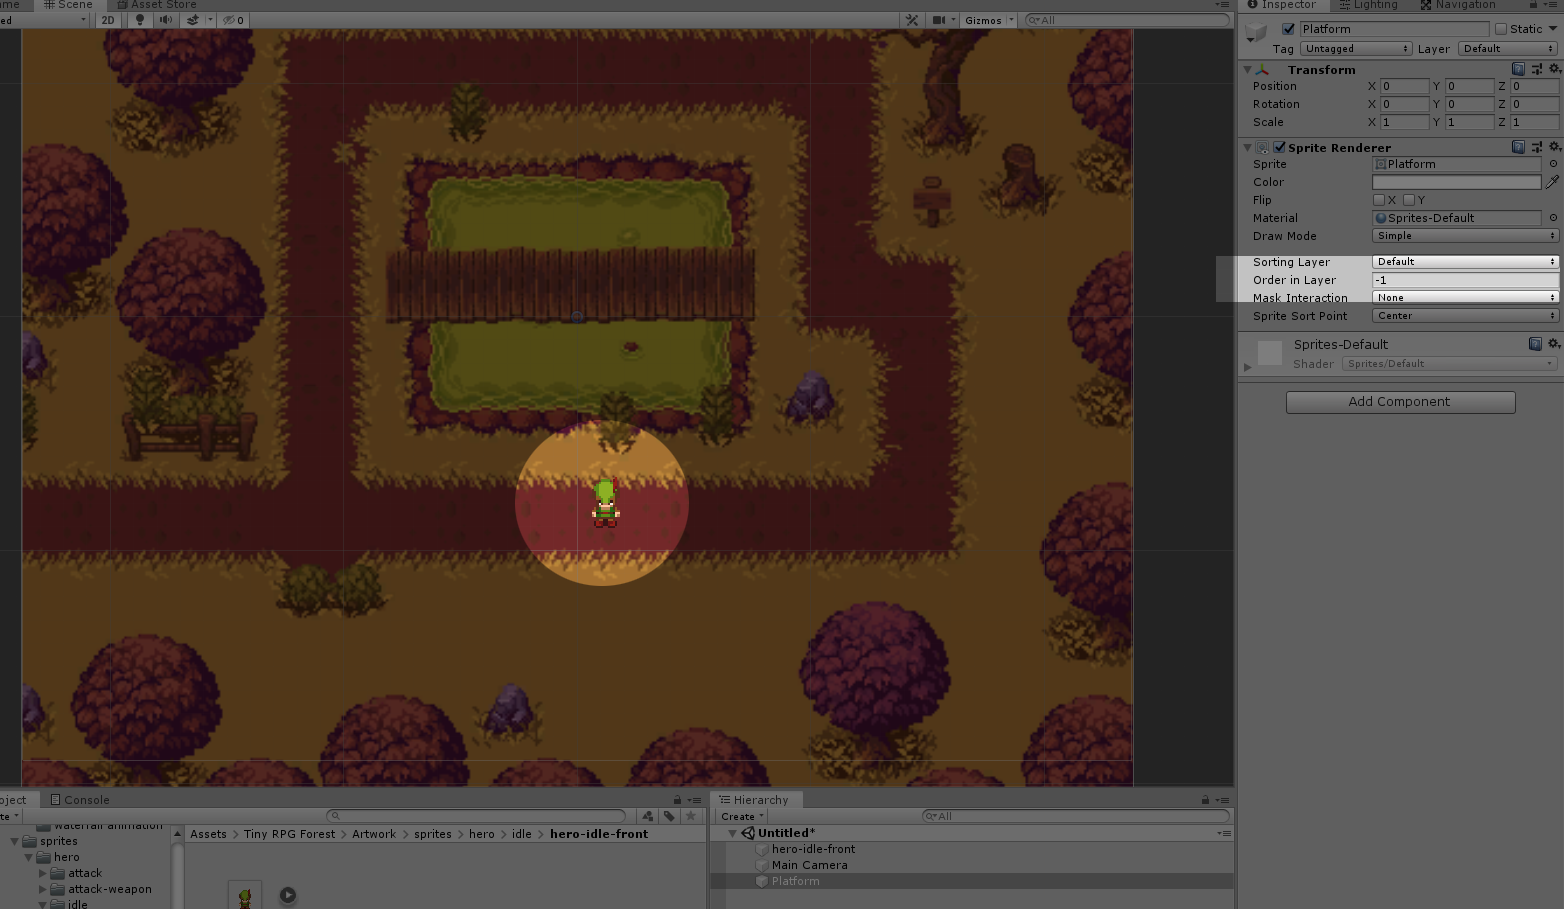
Sprite not showing up error
If somehow you encounter this type of error after you drag your sprite into your scene. Just make sure that your background or platform has an Order in Layer value of -1.
Awesome! Now that the character is in the scene, let’s rename it to Player so we know that he is the player that we’re going to control.
Now that everything is set up, let’s start making our player move around.
There are two ways to control our player. The first option is to add the actual movement to our player and the second option is to add Animation based on that movement. Both are equally possible but the first option will require too much programming and we don’t want that in this tutorial. We want to control our player with little programming possible.
Now, let’s begin by adding Rigidbody 2D to our player. Select your Player, go to the Inspector and click Add Component. Scroll down until you find Physics 2D and then, select Rigidbody 2D.
You may also use the search bar and type Rigidbody 2D instead.
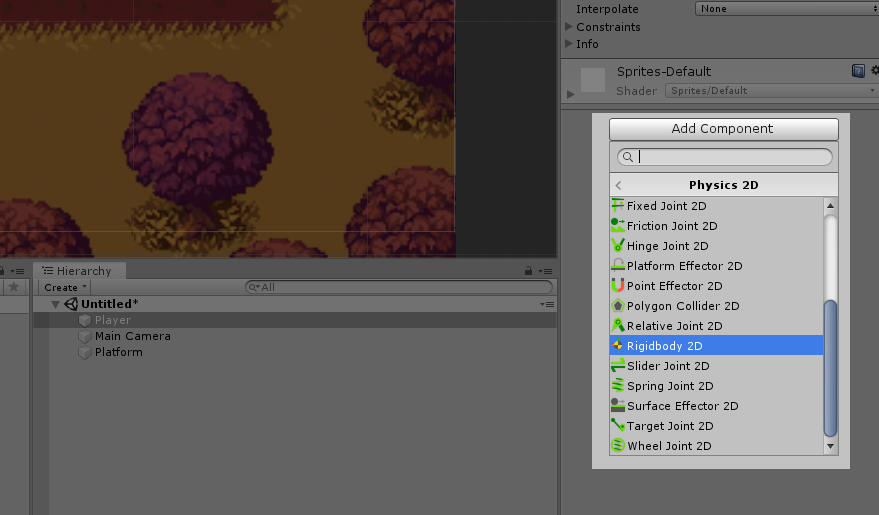
In the Rigidbody 2D component, set the value of Gravity Scale to 0 and under the constraints variable check the Freeze Rotation Z.
Player Movement
Create a new C# script and name it PlayerMovement.cs.
To start the code, let’s declare the first three variables.
public float movementSpeed = 1f;   //Movement Speed of the Player
public Vector2 movement;           //Movement Axis
public Rigidbody2D rigidbody;      //Player Rigidbody Component
Code language: C# (cs)
The next thing that we’re going to do is to give our player’s rigidbody component to the rigidbody variable that we’ve created. To do that, use the GetComponent function.
// Start is called before the first frame update
void Start()
{
    rigidbody = this.GetComponent<Rigidbody2D>();
}
Code language: C# (cs)
Don’t forget to save your code.
Now, what the code above does is, it initialize the rigidbody variable as soon as we start our game. Because of that, we can access the physics to control our player.
If you look at your code, you will see that there is an Update function. If we use the update function, we can control the character in every frame possible. However, update function can be unreliable due to its constantly changing frame rate and we don’t want that for our player but instead, we’re going to use the FixedUpdate function.
Inside your PlayerMovement script, add the fixed update function just underneath the update function.
void FixedUpdate() {}
Code language: C# (cs)
The reason why we’re doing it like this is because we have to make sure that there won’t be any delays to our player movement. FixedUpdate works exactly the same thing as the update function. The only difference is, the update function is depending on the frame rate. So for example, the frame rate goes down to 10 frames per second, expect the player to have a little choppiness to its animation.
FixedUpdate function, however, is by default, called 50 frames per second which are recommended especially if you’re working with Physics.
We’re still going to use the update function for registering the player input.
Let’s work on that.
The next thing that we’re going to do is to find out what exactly our player is currently pressing. Is it WASD? Arrow keys? Touch pad? etc.
In that case, we’re going to use Input.GetAxisRaw() function.
To simply explain what the function above does. Try to imagine the cartesian plane. Both axes will have a range of value between negative one and positive one. If the player presses the left arrow key, the function will return a value of negative one. If the player presses the up key, the function will return a value of positive one. The same goes to the rest of the keys, the function will return you a value depending on which keys your pressing.
Now, to retrieve the value for the x-axis, we’re going to use the horizontal input and to retrieve the value for the y-axis, we’re going to use the vertical input.
// Update is called once per frame
void Update()
{
    movement.x = Input.GetAxisRaw("Horizontal");
    movement.y = Input.GetAxisRaw("Vertical");
}
Code language: C# (cs)
Now that we have the value of our inputs, we can now control the position of our player.
To do that, copy the following code for the FixedUpdate function.
private void FixedUpdate()
{
    rigidbody.MovePosition(rigidbody.position + movement * movementSpeed * Time.fixedDeltaTime);
}
Code language: C# (cs)
What is happening in that code? Simple, we will move our player depending on its current position and then add the value of our input multiplied to the movement speed and fixedDeltaTime.
What is fixedDeltaTime? The interval in seconds at which physics and other fixed frame rate updates.
Save your code and go back to your editor.
If you try to run your game you will see that you can now actually move your player. However, there is no animation yet. Our player moves around but facing towards us. Creepy!
Let’s fix that.
Player Animation
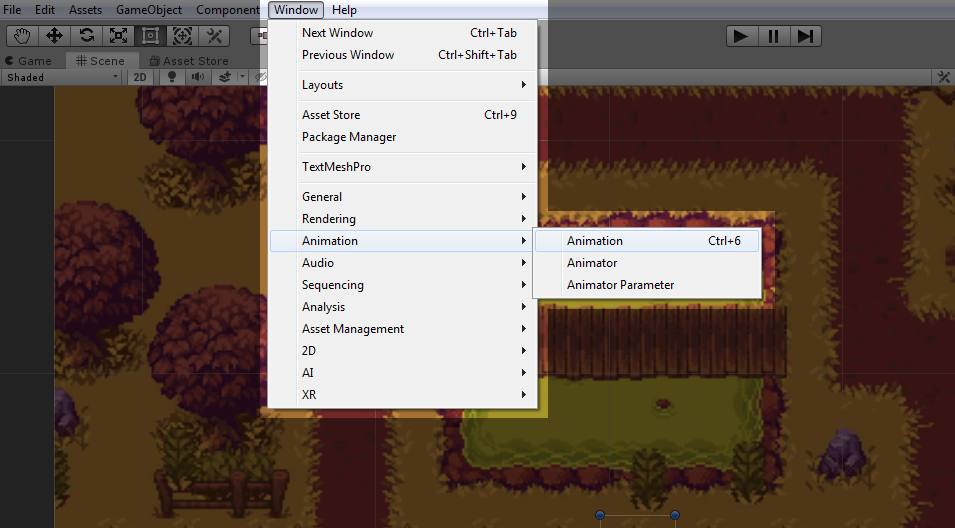
To start animating your player, go to Window tab, Animation, and select Animation. You may also just press CTRL + 6 for a shortcut.
Make sure it is Animation and not Animator, some people get confused by that.
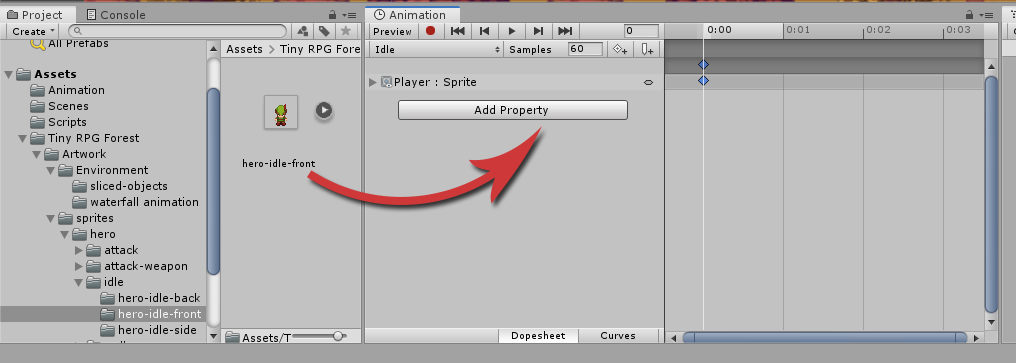
Now, with your player game object selected, click create.
You may go to your project root folder and create a new folder for the Animations, just for the sake of file structure.
Name the animation Idle.anim.
Next, go back to the hero folder that contains all the idle sprites and drag the hero-idle-front sprite in the animation window.
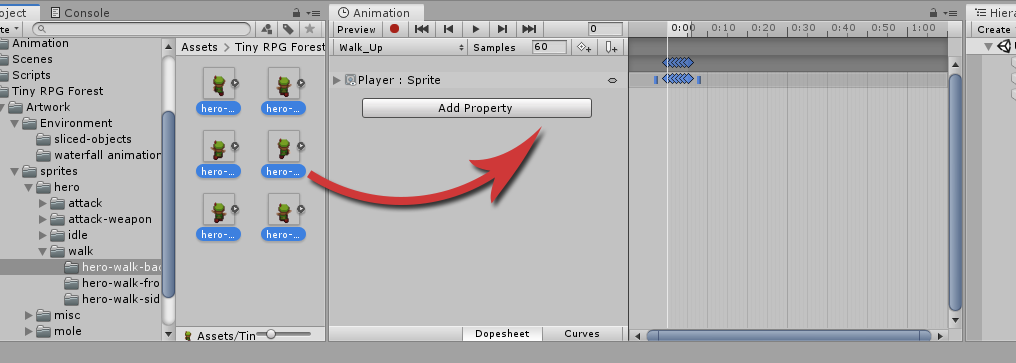
Next, create a new Animation clip by clicking the dropdown with the name of your current animation and click Create New Clip…
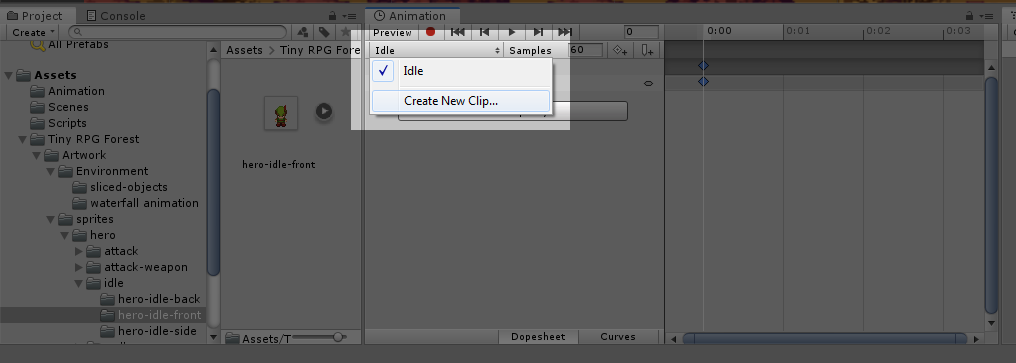
Name your new animation clip Walk_Up.anim and then go to the hero-walk-back folder and drag all the sprites into the animation window.
To select multiple sprites, simply click the first sprite, hold the shift key, and then click the last sprite.
If you try to play the animation, you will see that the animation is playing very fast. To fix that, change the value of Samples to a lower value like 15.
Now, create the animation clips and do the same process for the Walk_Down and Walk_Side animation clips.
If you have noticed, we only have animations for walking right and we don’t have animations for walking left. Now, there are many ways to solve this issue. First is to use Photoshop and manually flip all the sprites so it will face the left axis. Cool! But we’re not going to do that, but instead, we’re going to use our PlayerMovement script to flip the animation so it will look like he’s moving to the left.
Animation Component
After we’ve created all the animations, our player got a new component and that is the Animation.
If you go to Window tab, then Animation, and Animator, you will see something like this.
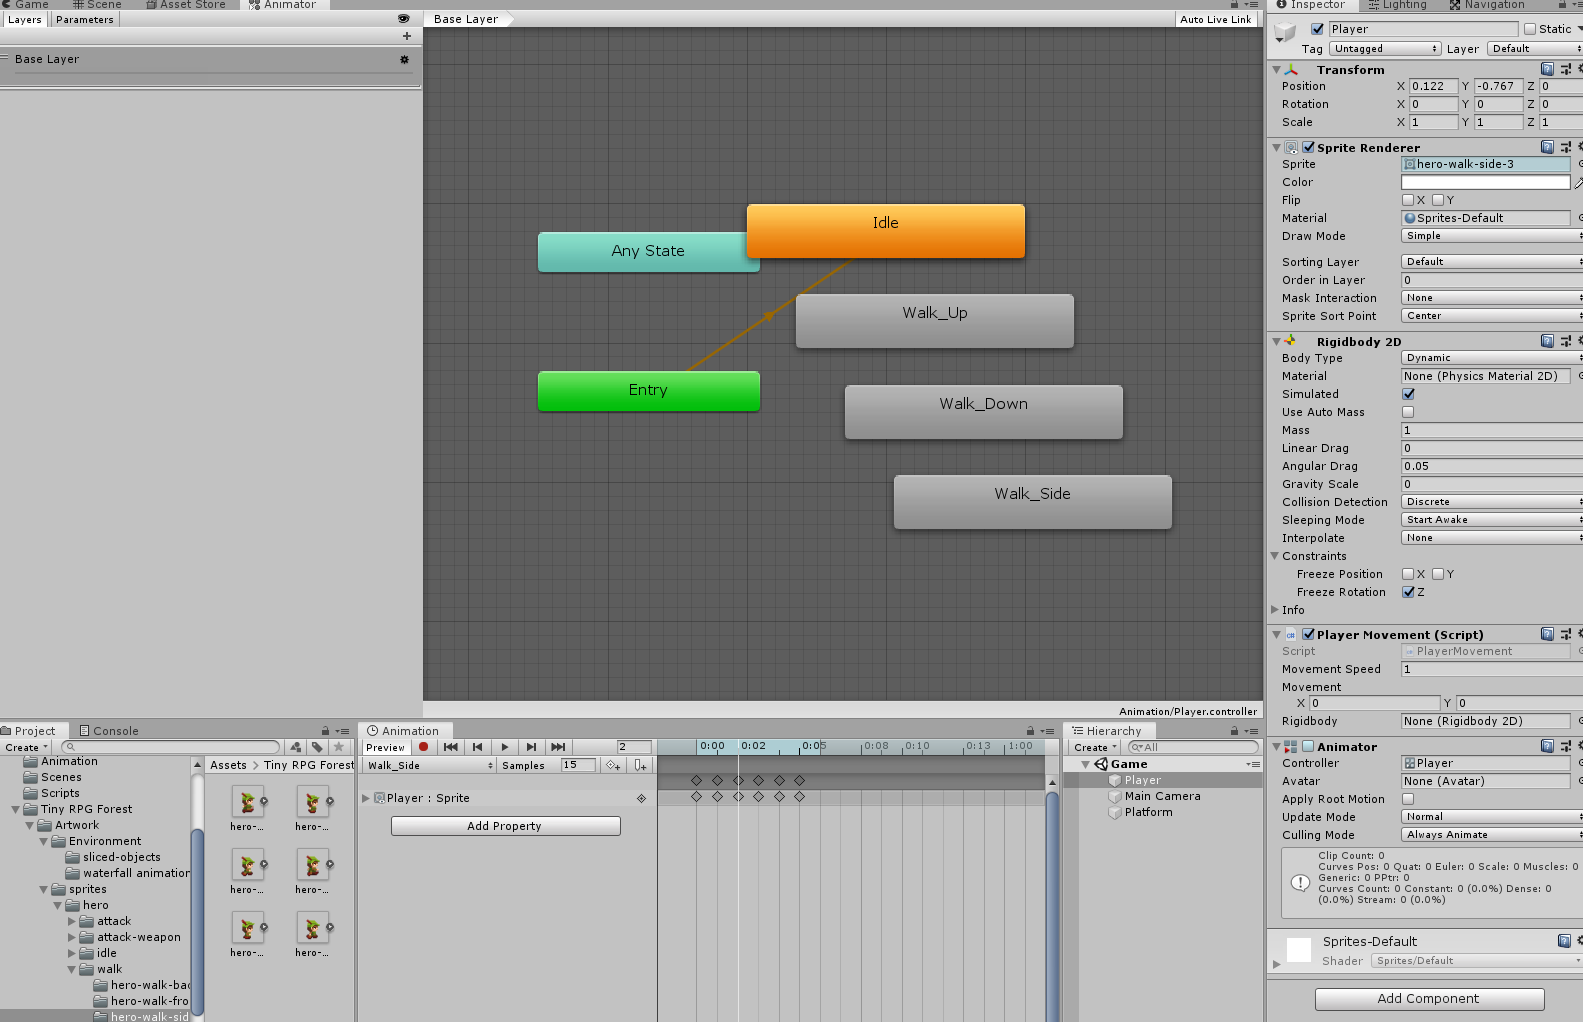
As you can see, there is our Idle animation, walk_up, walk_down, and walk_side animation. Think of this as a playlist of animations but in order for us to play them, we need to create a certain rule for each animation. For example, if the player is not pressing any keys, then play the idle animation. If the player is pressing the arrow keys or WASD keys then play the walking animation.
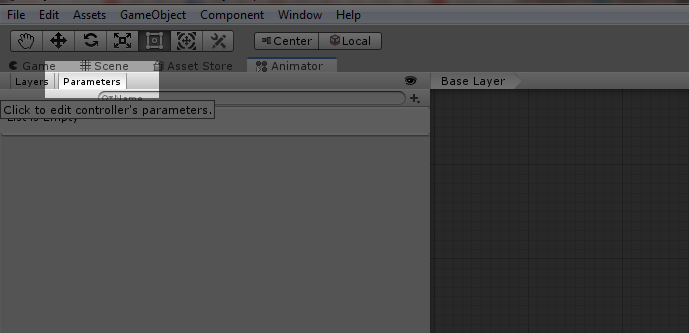
In order for us to do that, we need to create a parameter. Go to the top-left corner of the Animator window and click Parameters.
Right beside the search bar, there is a plus button. Press that and select float. Let’s name it Horizontal.
Again, do the same thing. Create a new parameter and select float and name it Vertical this time.
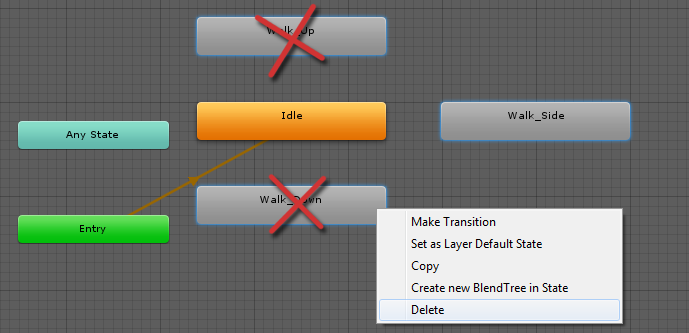
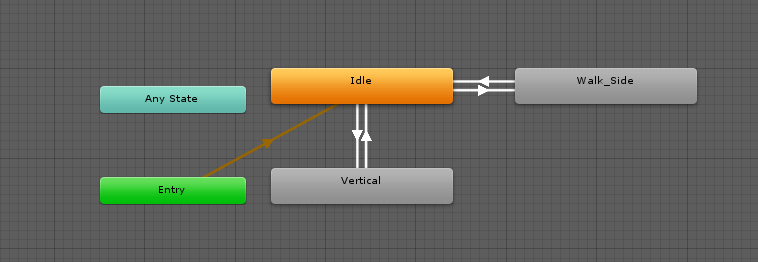
Next, delete all the animations in the Animator except the idle and walk-side animation.
Animator: Blend Tree
Now that we have the parameters ready, we can now use them to control a blend tree. Blend trees are used to smoothly transition from one animation state to another.
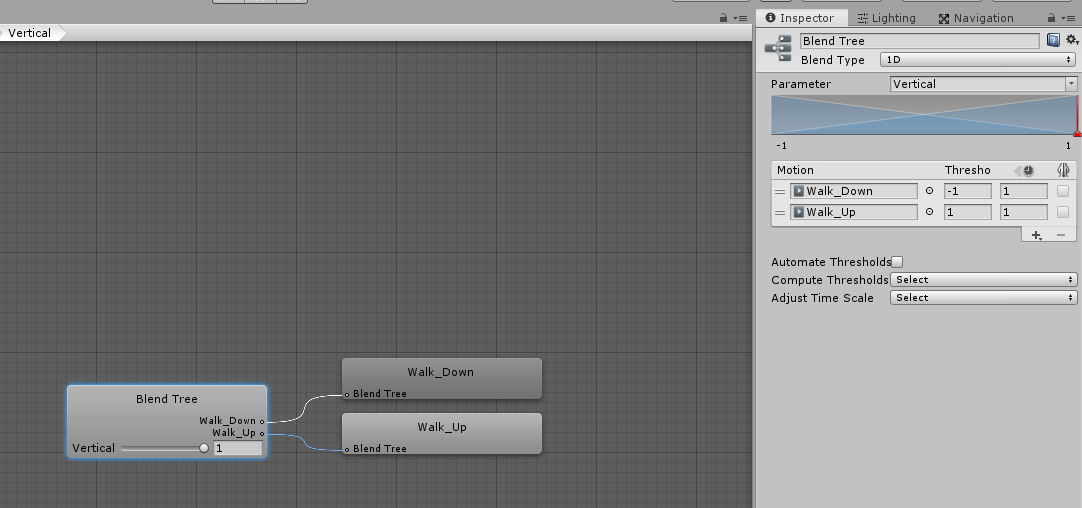
To create a blend tree, go to Animator, right-click, create state and select From New Blend Tree. Go to the inspector and rename it to Vertical.
Next, double click the blend tree and select the node (Blend Tree).
Go to the inspector, make sure the parameter used is vertical.
Then add a new motion field.
Next, find your walk-down animation and drag it to the motion field.
Create another motion field but this time for the walk-up animation.
Awesome! Let’s uncheck the Automate Thresholds in the inspector and modify the thresholds of our animations.
For walk-up animation, the threshold would be 1 and the threshold for the walk-down animation would be -1. We’re doing this because we’re following the values that are given by our input.
Next, go back to the base layer and create a new parameter and call it speed.
Now, we’re going to create a transition between our animations so go ahead and right-click to the idle animation and select make transition. Then select the Vertical blend tree node.
We’re going to do this as well to our Vertical blend tree and walk-side animation, right-click, select make transition and choose the idle animation and vice versa. Awesome!
Transition: Idle to Vertical Blend Tree
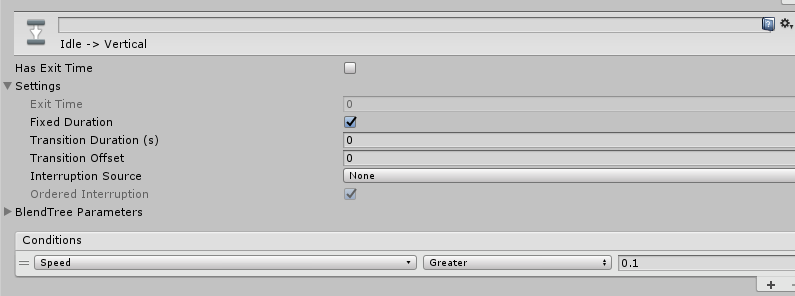
Now, click on the transition that points to our vertical blend tree.
In the inspector, make sure that the Has exit time is unchecked and inside the settings, the transition duration is set to 0.
Next, In the conditions section, click the plus button and select speed and then choose Greater than the value 0.01
Transition: Vertical Blend Tree to Idle
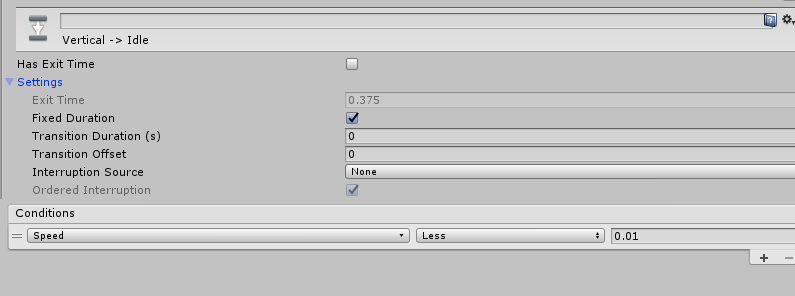
Click on the transition that points to our idle animation.
In the inspector, make sure that the Has exit time is unchecked as well and inside the settings, the transition duration is set to 0.
In the conditions section, click the plus button and select speed and then choose Less than the value 0.01
Transition: Idle to Walk-side Animation
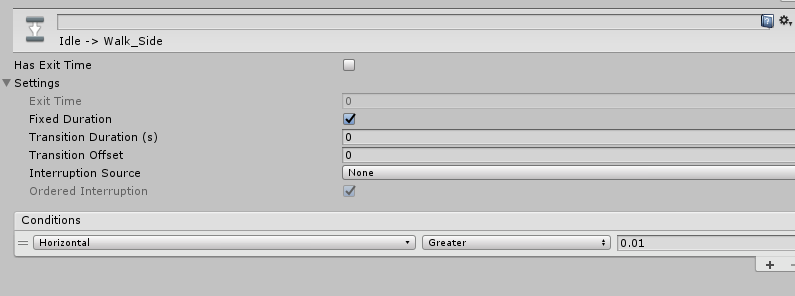
Click on the transition that points to our walk-side animation.
In the inspector, make sure that the Has exit time is unchecked as well and inside the settings, the transition duration is set to 0.
In the conditions section, click the plus button and select horizontal and then choose Greater than the value 0.01
Transition: Walk-side Animation to Idle
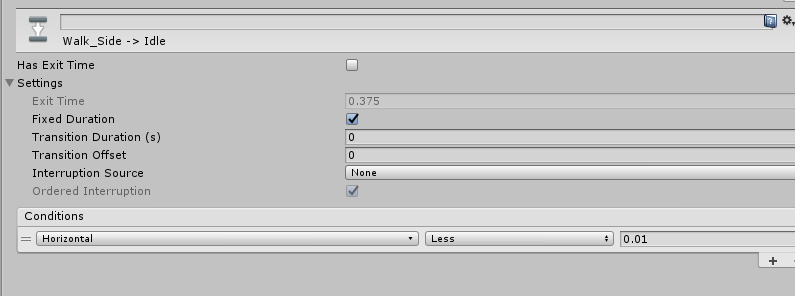
Click on the transition that points from walk-side animation to our idle animation.
In the inspector, make sure that the Has exit time is unchecked and inside the settings, the transition duration is set to 0.
In the conditions section, click the plus button and select horizontal and then choose Less than the value 0.01
Scripting Animator Controller
After setting up your animator component, we can now send the value of our input into our animator’s parameters and control our animation state.
To do that, we need to create a new variable.
Go back to your PlayerMovement.cs and add the following variable.
public Animator anim;
public float hf = 0.0f;
public float vf = 0.0f;
Code language: C# (cs)
And inside the start function, add the following code.
anim = this.GetComponent<Animator>();
Code language: C# (cs)
And here’s the new code for the update function
// Update is called once per frame
void Update()
{
    movement.x = Input.GetAxisRaw("Horizontal");
    movement.y = Input.GetAxisRaw("Vertical");

    hf = movement.x > 0.01f ? movement.x : movement.x < -0.01f ? 1 : 0;
    vf = movement.y > 0.01f ? movement.y : movement.y < -0.01f ? 1 : 0;
    if (movement.x < -0.01f)
    {
        this.gameObject.transform.localScale = new Vector3(-1, 1, 1);
    } else
    {
        this.gameObject.transform.localScale = new Vector3(1, 1, 1);
    }

    anim.SetFloat("Horizontal", hf);
    anim.SetFloat("Vertical", movement.y);
    anim.SetFloat("Speed", vf);
}
Code language: C# (cs)
Save your script and go back to your editor and see the results!
Normalizing Player Movement
There are instances that when you move your player up and right at the same time, the movement speed multiplies by two.
To ensure that all movement speeds are equally balanced, add the following code just below where we used the Input.GetAxisRaw();
movement = movement.normalized;
Code language: C# (cs)
Closing Line
Congratulations! You just made your top-down player movement.
Do you have questions or suggestions? Let us know in the comments below and we’ll try our best to communicate with you.
If you’re looking for the next step, then we have already published a new tutorial on how to make this player character attack with animation.
Read next: How To Do 2D Melee Combat in Unity 2019
Disclosure: This article may contain affiliate links, which means we may receive a commission if you click a link and purchase something that we have recommended.
Hey, this tutorial was really helpful for getting me off the ground with player animation and movement. One issue, in Unity 2019.2.3f1 I’ve got the Rigidbody 2D setup but collisions don’t work due to it being kinematic (which is the only way that the “MovePosition” function can work properly)… How do you usually deal with collisions using this animation method?