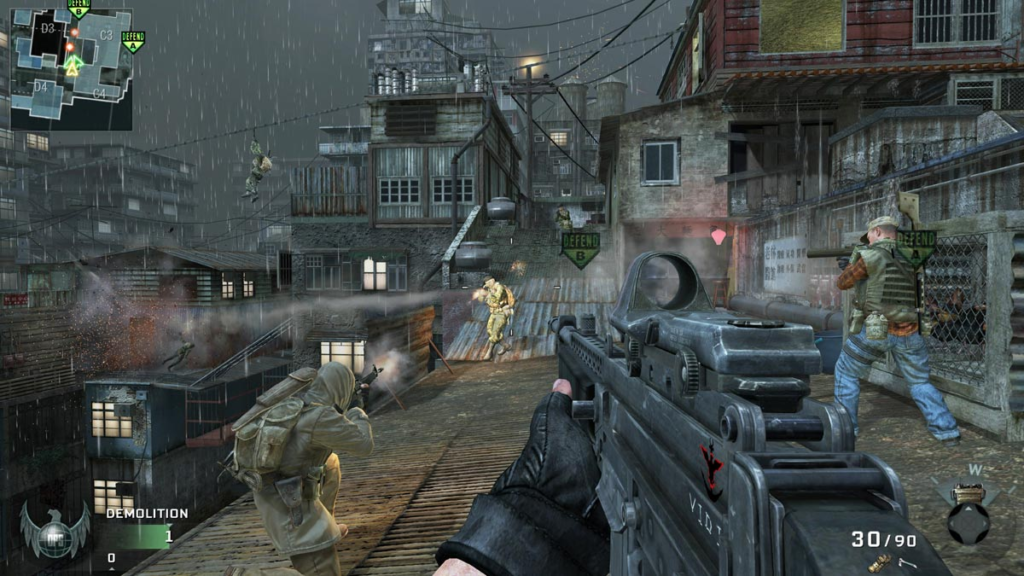
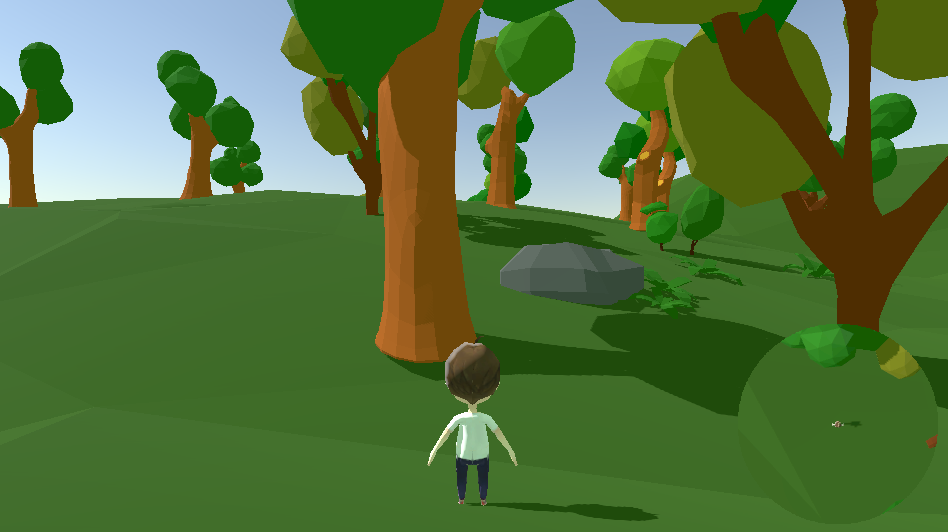
Most games like role-playing games provide a feature where players can identify their current location or the NPC’s location. This feature is known as a minimap. Most minimaps are circular like in the image below:
Now that begs the question, how do you actually create a minimap?
In this tutorial, we will learn how to create a circular minimap that displays the player’s position in just 10 minutes.
WHAT? 10 minutes?!
Well, to be fair, creating a minimap does NOT actually take that much time. In fact, you can create a minimap system in less than 10 minutes. However, time depends on how much information you wish your minimap to be displaying. Some minimaps provide coordinates, some minimaps provide a button to change the theme of the minimap.
So to make things fast and easy, we’ll create a very simple minimap like below.
But before we proceed, we just want to mention that starting today, we’re pleased to announce a new sale featuring assets by Unity Asset Store publisher, NatureManufacture!

All assets from NatureManufacture will be on sale for 50% off from January 18, 2021, through January 22, 2021. In addition, the L.V.E 2019 – Lava & Volcano Environment 2019 asset will be offered for FREE during the sale with the coupon listed below.
LAVAFREE2021
L.V.E 2019 – Lava & Volcano Environment 2019 is free with code LAVAFREE2021 through 1/22/21.
No additional purchase required. One use per customer, unlimited users, no minimum spend requirement, cannot be combined with any other offer.
Video Tutorial
If you prefer watching a video tutorial, the following video is the video version of this guide.
Getting Started
We’ll start this project with the following scene.
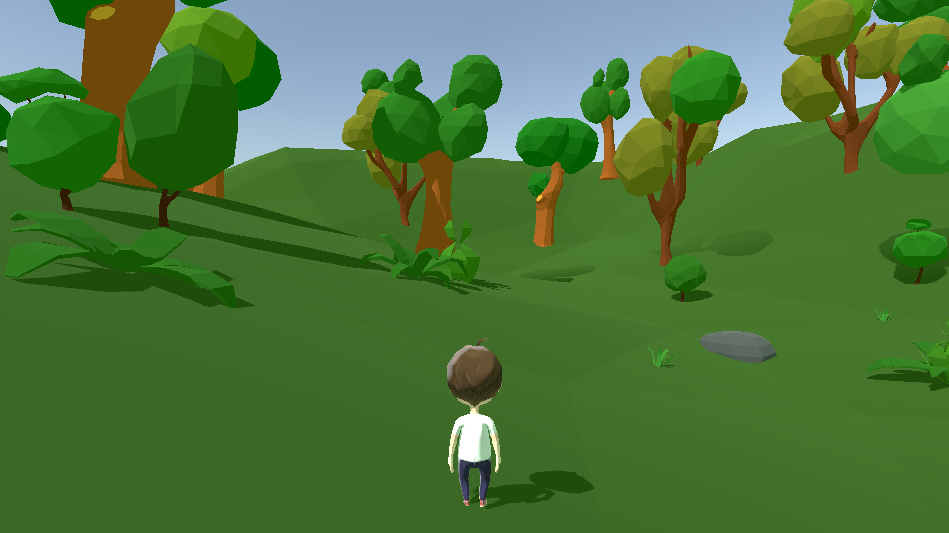
Feel free to use your pre-made scene but we highly recommend that your scene contains a player character that can move around so you know that the minimap is working.
Setting up the camera
Most minimaps are created using two cameras. One is for the player which could be like what the character above is using (Third person camera) or a first-person camera.
The second camera is for the minimap which is mostly placed above the player and pointing towards the player from an orthographic projection. This is what we’re going to do as it is much faster and easier to customize.
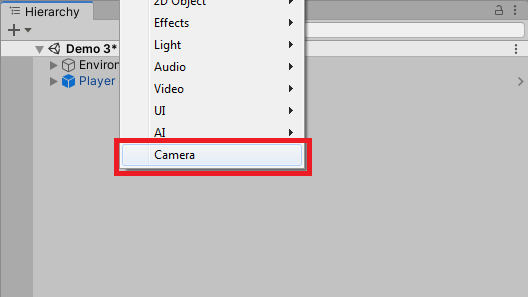
Navigate to your hierarchy and create a new camera.
Now, the next thing we need to do is to make sure that the position of this camera is the same as our player.
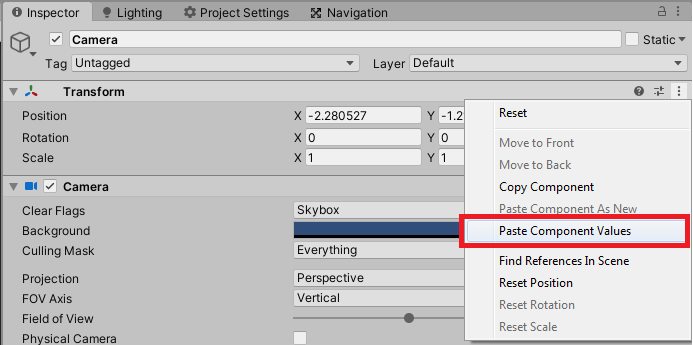
So go ahead and select your player, navigate to its inspector, and copy its transform position by clicking on the 3-dotted button and selecting Copy Component.

Next, let’s apply the copied values to our camera.
To do that, select the camera that we created earlier. Go to its inspector, click again the 3-dotted button and select Paste Component Values.
The next is to make the camera placed above our player and pointed towards our player.
So go to your scene view and drag the camera in Y-axis and rotate its X-axis to 90 degrees.

And this is our minimap camera looks like in the game view.
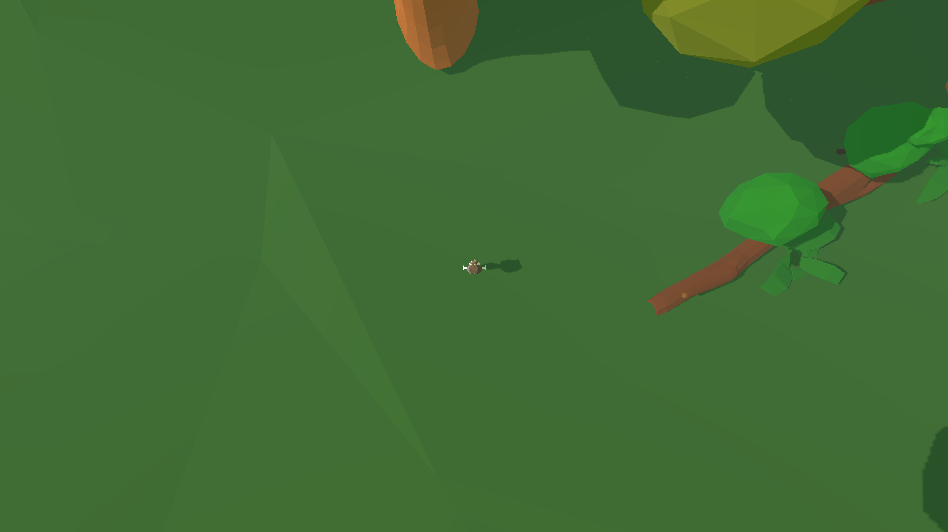
Now, it’s starting to look like a minimap but not yet.
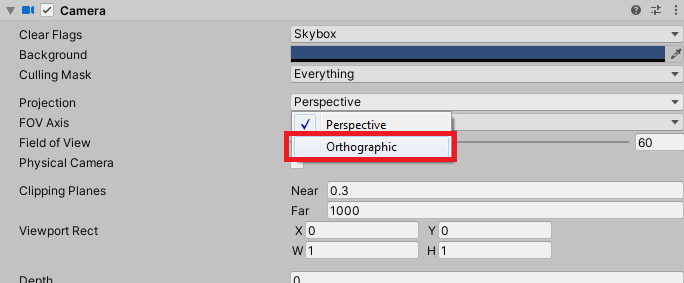
Let’s set our camera’s projection to orthographic instead of perspective so it will look more flat than a 3D perspective.
Awesome! Now it’s time for us to use this camera for our minimap.
Setting up the minimap
Now that we have our camera, it’s time for us to create the minimap. We’ll start by creating the heads-up display (also known as HUD).
Navigate to your hierarchy and create Raw Image by selecting UI > Raw Image.

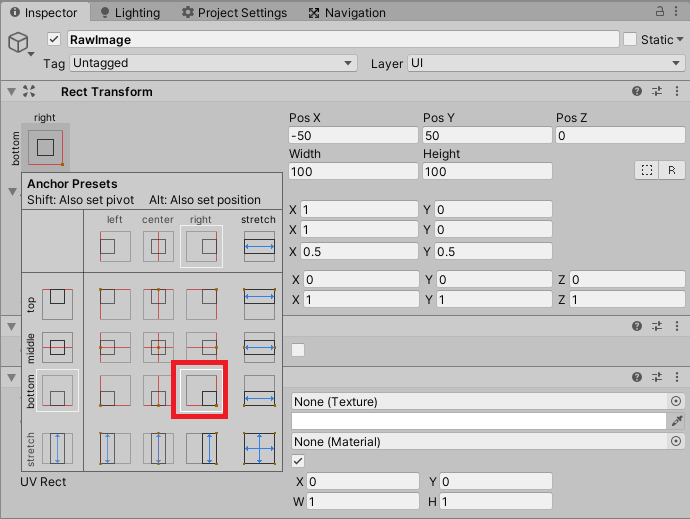
Next, let’s position our Raw Image somewhere in the bottom-right corner of our game screen. To do that, select the Raw Image and select an Anchor Preset in the inspector. Don’t forget to HOLD ALT key before selecting the preset.
Now, if you’re wondering why we chose the Raw Image instead of the Image, it is because Image UI can NOT accept render textures.
Render Textures are special types of Textures that are created and updated at run time. To use them, you first create a new Render Texture and designate one of your Cameras to render into it.
In other words, render textures will display what the camera is looking at.
With all that being said, let’s create a render texture by going to your Project window and selecting Create > Render Texture and we’ll name it Minimap.
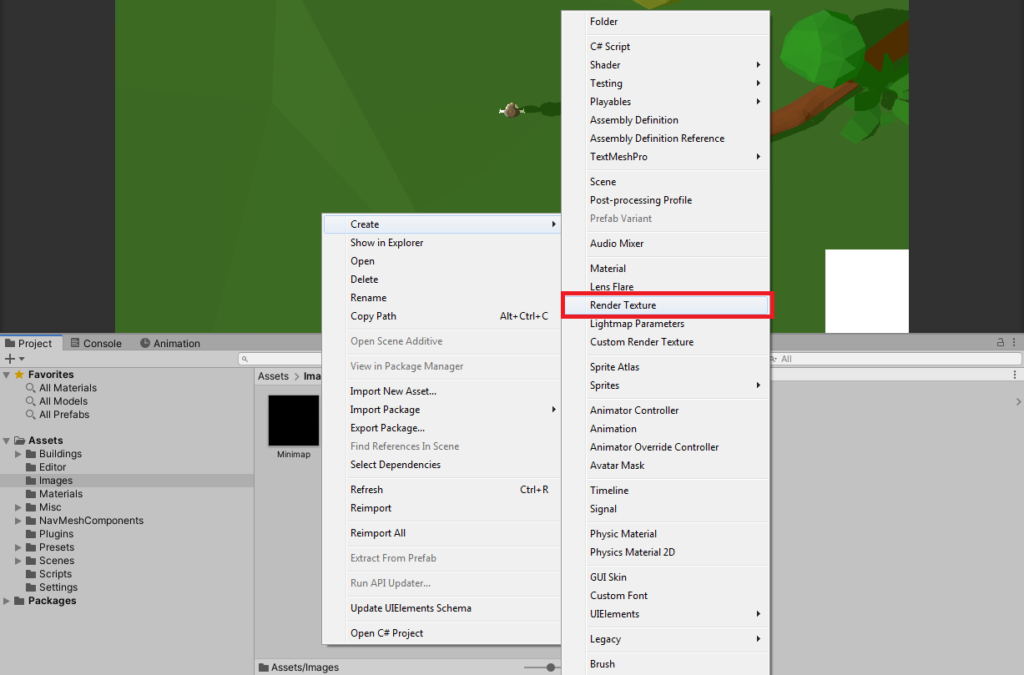
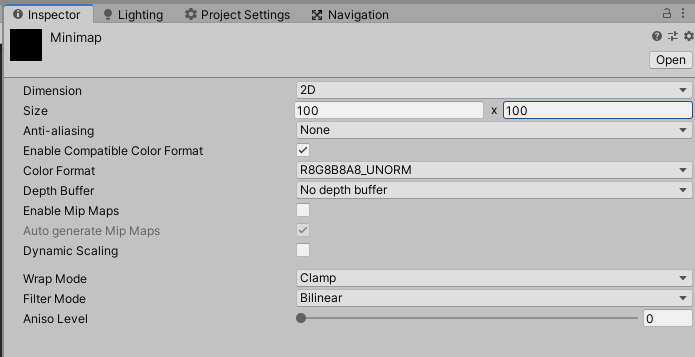
Next, select the render texture and navigate to the inspector, and set the render texture size to 100×100.
Don’t forget to set the Depth Buffer to No Depth Buffer.
Now that we have our render texture, it’s time for us to pass the data from our camera to this render texture.
To do that, simply select the Camera in the hierarchy and drag the Minimap render texture to Camera’s target texture variable.

Now, if we apply the Minimap render texture to our Raw Image, we should be able to see what the camera is looking at.
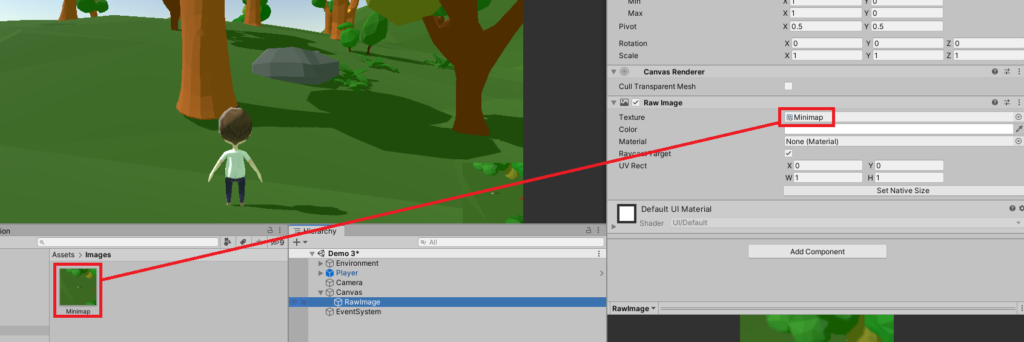
And as you can see, the raw image object is finally showing us what the camera is looking at.

There you go! Now we have the minimap.
However, there’s a bit of an issue with our minimap. If you run the game and walk around the environment, our minimap camera will not follow our player.
Technically, this is alright when your minimap is supposed to show the entire map. However, if you want to make a minimap where the player is always at the center of the map then you have to make sure that the camera is following the player.
To make this work, we’ll have to create a minimap script.
Create a new C# script and name it Minimap.cs and copy the following code:
using System.Collections;
using System.Collections.Generic;
using UnityEngine;

public class Minimap : MonoBehaviour
{
    private Transform _player;

    void Start()
    {
        _player = GameObject.FindGameObjectWithTag("Player").transform;
    }

    void LateUpdate()
    {
        Vector3 playerPosition = _player.position;
        playerPosition.y = transform.position.y;
        transform.position = playerPosition;
    }
}
Code language: C# (cs)
For the code above, all we wanted to do is to get the position of our player and apply it to our minimap camera without changing its Y-axis value.
Save the script and apply this script to the minimap camera.
Make sure your player tag is set to Player.

And if you try the game, you should see that our minimap is following our player.
Designing the minimap
Our minimap looks really boring! Let’s make it look awesome.
First off, let’s select our Raw Image object and rename it to Minimap. Then resize its width and height to 200.
Don’t forget to resize the Minimap render texture too!

If the raw image started to move outside the game screen, just re-select the bottom-right anchor preset and that should fix its position.
Now we have a much bigger map.

Next, let’s make our minimap circle. To do that, we’ll need to use a mask.
Download the following asset as we’ll use this as our mask texture.
Once the package is imported, double-check that the image has the following settings applied.
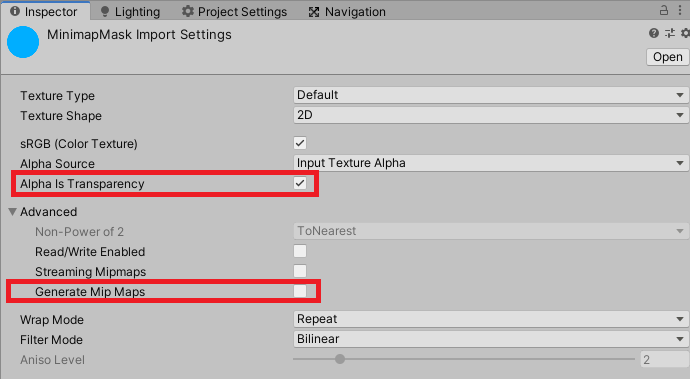
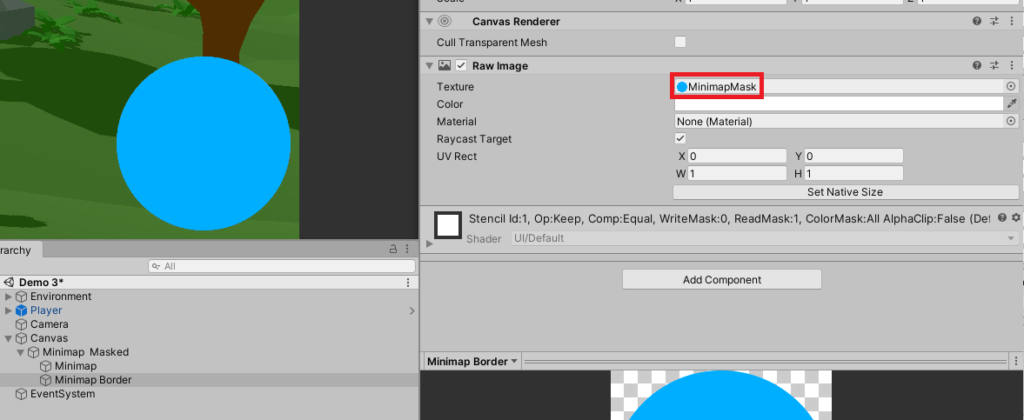
Next, select the Minimap (Raw Image) game object and duplicate it. Rename the duplicate Minimap Mask.
Then, select the Minimap Mask game object and apply the MinimapMask texture to the Texture variable.

Next, click the Add Component button and look for Mask.

Then, drag the Minimap game object to the Minimap Mask game object to make it as its parent object.

By doing so, you should see that the map became circle.
How about a border? How can we add a border to our minimap?
That’s actually pretty simple.
All we need to do is to just duplicate the Minimap game object. Let’s rename it Minimap Border.
Then, replace the texture with any texture you want. We’ll just use the same texture we used for our mask.
Then, drag the Minimap Border out of the Minimap Masked game object. This will make our Minimap Border game object independent.

Also, make sure that the Minimap Border in the hierarchy is above the Minimap Masked game object. This way, our border will be displayed behind our minimap.
Next, let’s resize our border to 210 for width and height.
This should give us the following

Conclusion
So there you have it. You have finally created a very simple minimap in less than 10 minutes. Obviously, there are still too many things to work on for this minimap. That’s why in our next lesson, we’ll be taking a deeper look at how to create an advance minimap where you can change the player’s icon, change the ground, and more.
But for now, we hope that you learn from us and got the idea of how to create a very simple minimap.
If you have encountered any issues, don’t hesitate to let us know in the comments below.
Disclosure: This article may contain affiliate links, which means we may receive a commission if you click a link and purchase something that we have recommended.