
Greetings! Welcome to another part of the Premium WordPress Theme development tutorial series. In this lesson, we’re going to learn how to create the header for our premium WordPress theme.
If you remember, last time we have set up our Premium WordPress theme using Local by Flywheel. We have created the basic boilerplate HTML for our index, header, and footer. We have also added a screenshot for our theme so it will display in our dashboard how the theme will look like once activated.
Join FlyWheel for FREE and get a free SSL Certificate to keep your site secure!
If in case you haven’t followed our first tutorial, we highly recommend you to catch up first before proceeding to this part.
Read: Getting Started for Premium WordPress Theme 101
Getting Started
In this second part of our Premium WordPress tutorial series, we’re going to start taking a look at how we can implement custom CSS and JavaScript, and properly include them in our theme.
We’re going to learn how to use the functions.php file on WordPress, which is one of the most powerful files in WordPress.
Custom CSS & JavaScript
Let’s start by making two new folders inside our project, and name it css and js. This is where we’re going to store our CSS files and JavaScript files.

Then inside the css folder, create a new CSS file and name it style.css.
html, body {
	margin: 0;
	padding: 0;
}Code language: CSS (css)
And then inside the js folder, create a new JavaScript file and name it script.js.
//Let's make our script.js empty for nowCode language: JSON / JSON with Comments (json)Our file structure should look something like this.

Save all your scripts.
The Functions File
Now, let’s create the functions.php file so go back to your code editor, if you’re using Sublime, just press CTRL + N and CTRL + S to save, and name it functions.php.
Keep in mind that the file name is plural, with an s.
Inside the functions.php file, we want to create a function or at least use a function that will allow us to include our CSS file in our header and JavaScript file in our footer.
For now, let’s create a function that will load all of the scripts required by our theme like jQuery, Bootstrap, our script, etc.
<?php

function esquela_scripts_enqueue() {

}

?>Code language: HTML, XML (xml)
If you look at your footer.php file, you will see that there are scripts that are being referenced by our footer.

What we’re going to do is to remove all the scripts from our footer, but copy all the URLs and paste it in our functions.php file. However, we’re going to change the URL for the jQuery since bootstrap is only using the slim version of jQuery.
We’ll end up with something like this:
<?php

function esquela_scripts_enqueue() {
	//https://code.jquery.com/jquery-3.4.1.min.js
	//https://cdnjs.cloudflare.com/ajax/libs/popper.js/1.14.7/umd/popper.min.js
	//https://stackpath.bootstrapcdn.com/bootstrap/4.3.1/js/bootstrap.min.js
}

?>Code language: HTML, XML (xml)
Next, we’re going to register all the links using the WordPress function wp_register_script() and then we’ll enqueue them next using wp_enqueue_script().
We should end up with something like this by now:
<?php

function esquela_scripts_enqueue() {
	wp_register_script( 'jQuery', 'https://code.jquery.com/jquery-3.4.1.min.js', array(), 1, true );
	wp_enqueue_script( 'jQuery' );

	wp_register_script( 'Popper', 'https://cdnjs.cloudflare.com/ajax/libs/popper.js/1.14.7/umd/popper.min.js', array(), 1, true );
	wp_enqueue_script( 'Popper' );

	wp_register_script( 'Bootstrap', 'https://stackpath.bootstrapcdn.com/bootstrap/4.3.1/js/bootstrap.min.js', array(), 1, true );
	wp_enqueue_script( 'Bootstrap' );

	wp_register_script( 'Esquela', get_template_directory_uri() . '/js/script.js', array(), 1, true );
	wp_enqueue_script( 'Esquela' );
}

?>Code language: HTML, XML (xml)
Coding Reference
If in case you don’t know the functions that we used above, you can always refer to the following.
wp_register_script()
Description: A WordPress function that registers a script to be enqueued later by another WordPress function wp_enqueue_script().
Parameters:
$handle | (string) (Required) The name of the script and should always be unique. |
$src | (string|bool) (Required) The full URL of the script, or path of the script relative to the WordPress root directory. If the source is set to false, the script is an alias of other scripts it depends on. |
$deps | (array) (Optional) An array of registered script handles this script depends on. Default value: array() |
$ver | (string|bool|null) (Optional) A string specifying the script version number, if it has one, which is added to the URL as a query string for cache busting purposes. If version is set to false, a version number is automatically added equal to current installed WordPress version. If set to null, no version is added. Default value: false |
$in_footer | (bool) (Optional) Whether to enqueue the script before </body> instead of in the <head>. Default ‘false’. Default value: false |
wp_enqueue_script()
Description: Registers the script if the $src is provided (does NOT overwrite), and enqueues it.
Parameters:
$handle | (string) (Required) The name of the script and should always be unique. |
$src | (string|bool) (Required) The full URL of the script, or path of the script relative to the WordPress root directory. If the source is set to false, the script is an alias of other scripts it depends on. |
$deps | (array) (Optional) An array of registered script handles this script depends on. Default value: array() |
$ver | (string|bool|null) (Optional) A string specifying the script version number, if it has one, which is added to the URL as a query string for cache busting purposes. If version is set to false, a version number is automatically added equal to current installed WordPress version. If set to null, no version is added. Default value: false |
$in_footer | (bool) (Optional) Whether to enqueue the script before </body> instead of in the <head>. Default ‘false’. Default value: false |
Awesome! Now that we have created a dedicated function for our scripts, let’s actually enqueue our scripts using the add_action() function.
So right underneath our esquela_scripts_enqueue() function, type in, add_action('wp_enqueue_scripts', 'esquela_scripts_enqueue');
Our functions.php file should have the following:
<?php

function esquela_scripts_enqueue() {
	wp_register_script( 'jQuery', 'https://code.jquery.com/jquery-3.4.1.min.js', array(), 1, true );
	wp_enqueue_script( 'jQuery' );

	wp_register_script( 'Popper', 'https://cdnjs.cloudflare.com/ajax/libs/popper.js/1.14.7/umd/popper.min.js', array(), 1, true );
	wp_enqueue_script( 'Popper' );

	wp_register_script( 'Bootstrap', 'https://stackpath.bootstrapcdn.com/bootstrap/4.3.1/js/bootstrap.min.js', array(), 1, true );
	wp_enqueue_script( 'Bootstrap' );

	wp_register_script( 'Esquela', get_template_directory_uri() . '/js/script.js', array(), 1, true );
	wp_enqueue_script( 'Esquela' );
}

add_action('wp_enqueue_scripts', 'esquela_scripts_enqueue');

?>Code language: HTML, XML (xml)
Next, let’s open our header.php file once again and add the following code inside the <head> tag.
<?php wp_head(); ?>Code language: HTML, XML (xml)Then, let’s open our footer.php file and add the following code just before the closing body tag.
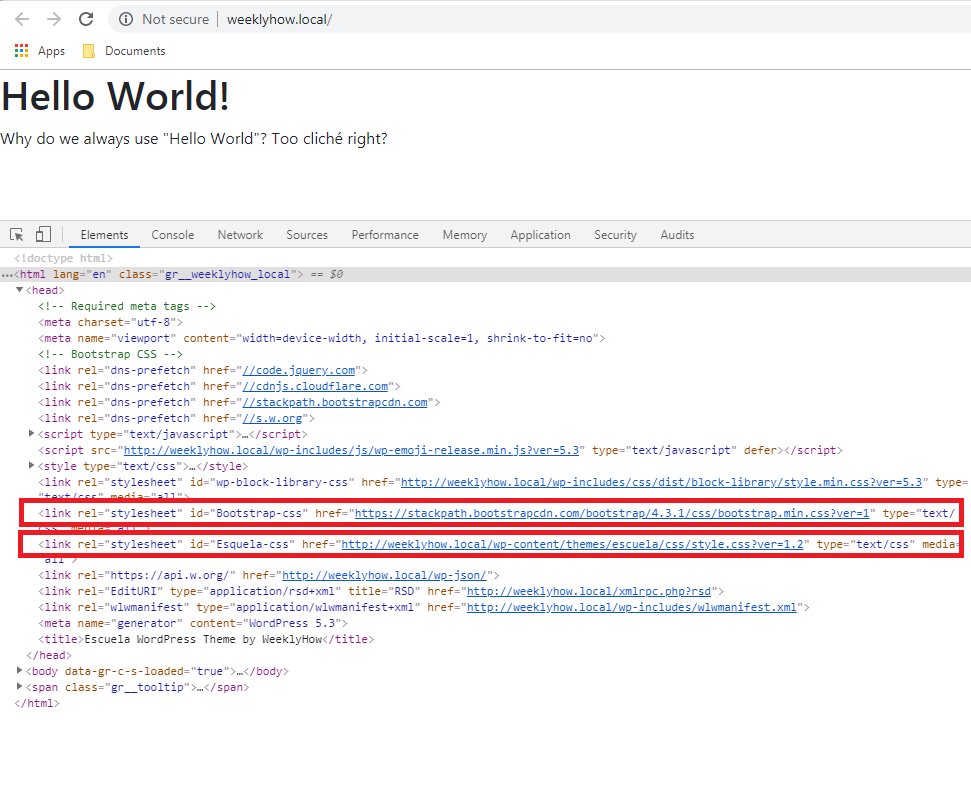
<?php wp_footer(); ?>Code language: HTML, XML (xml)Save all of your scripts and head to your website. You should see the following results in your browser inspector.

As you can see, our theme started including the scripts that we listed in our functions.php file. Not only that, but it also added the meta tags that are required for every WordPress theme which is great!
That’s how you load your javascript in WordPress.
Now.
What about CSS stylesheets? How do you import them?
The answer is fairly easy and the way you do that is quite similar to how you import your scripts. The only difference is the functions that we’re going to use and that is the wp_register_style() function and wp_enqueue_style() function.
Let’s create a new function and we’ll name it esquela_style_enqueue().
function esquela_style_enqueue() {

}Code language: JavaScript (javascript)
Go to your header.php file and remove the Bootstrap CSS file that is being referenced.
Then, go back to functions.php file and update your esquela_style_enqueue() function to the following:
function esquela_style_enqueue() {
	wp_register_style('Bootstrap', 'https://stackpath.bootstrapcdn.com/bootstrap/4.3.1/css/bootstrap.min.css', array(), 1, 'all');
	wp_enqueue_style('Bootstrap');

	wp_register_style('Esquela', get_template_directory_uri() . '/css/style.css', array(), 1.2, 'all');
	wp_enqueue_style('Esquela');
}

add_action('wp_enqueue_scripts', 'esquela_style_enqueue');Code language: PHP (php)
Save all your scripts and you should have the following results.
Great! now all of our files are being loaded.
Now that we finally understand how the functions work, let’s add another resource to our theme. Since we need icons, we’re gonna need Font Awesome.

So go ahead to Font Awesome, login to your account, go to your kit, and copy the URL of the script.

Next, go back to your functions.php file and add the following code inside your esquela_scripts_enqueue() function.
wp_register_script( 'FontAwesome', 'https://kit.fontawesome.com/YOUR_FONTAWESOME_KIT_NAME.js', array(), 1, true );
wp_enqueue_script( 'FontAwesome' );Code language: PHP (php)
Save all your scripts!
WordPress Theme Header
Now that we’re done with the functions, let’s proceed to our theme and design our header.
Open your header.php file once again, and add the following code just below the opening body tag.
<header id="es-header">
	<div class="logo" id="logo">Esquela</div>
	<nav>
		<ul class="menu">
			<li><a class="nav-links" href="#">Home</a></li>
			<li><a class="nav-links" href="#">About</a></li>
			<li><a class="nav-links" href="#">Menu</a></li>
			<li><a class="nav-links" href="#">Contact</a></li>
		</ul>
		<ul class="social">
			<li><a href="#"><i class="fab fa-instagram"></i></a></li>
			<li><a href="#"><i class="fab fa-facebook-f"></i></a></li>
			<li><a href="#"><i class="fab fa-twitter"></i></a></li>
			<li><a href="#"><i class="fab fa-whatsapp"></i></a></li>
		</ul>
	</nav>
	<div class="menu-toggle" id="toggle"><i class="fas fa-bars"></i></div>
</header>Code language: HTML, XML (xml)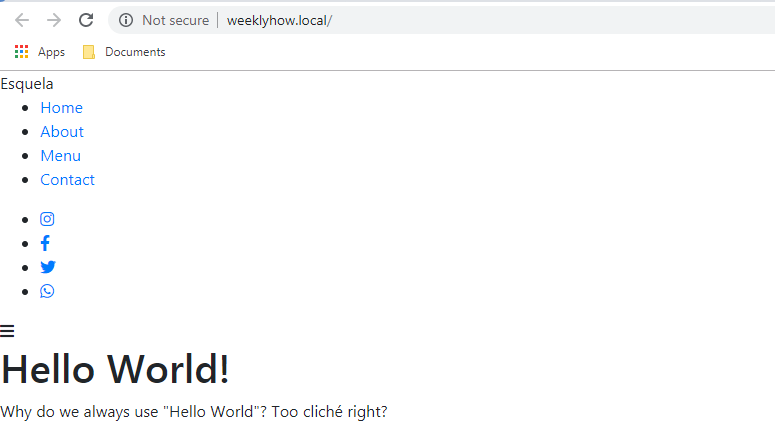
Awesome! Now let’s style our header with CSS.
Open your main.css file inside the css folder and copy the following CSS code.
header {
	padding: 25px 100px;
	background: #3952a6;
	width: 100%;
	box-sizing: border-box;
	z-index: 99;
	transition: .5s;
	height: 100px;
}

header .logo {
	color: #fff;
	height: 50px;
	line-height: 50px;
	float: left;
	font-size: 25px;
	font-weight: bold;
	transition: .5s;
}

header nav {
	float: right;
}

header nav ul {
	margin: 0 50px;
	padding: 0;
	display: inline-flex;
}

header nav ul li {
	list-style: none;
}

header nav ul li a {
	position: relative;
	font-size: 15px;
	height: 50px;
	line-height: 50px;
	padding: 0 20px;
	color: #fff;
	text-decoration: none;
	display: block;
	transition: .5s;
	text-transform: uppercase;
}

.social li {
	background: #fff;
	border-radius: 50%;
	margin: 0 5px;
}

.social li a {
	position: relative;
	color: #3952a6;
	font-size: 15px;
	width: 25px;
	height: 25px;
	padding: 5px;
	line-height: 5px;
	text-decoration: none;
	display: block;
	transition: .5s;
	text-align: center;
}

.menu-toggle {
	color: #fff;
	float: right;
	line-height: 50px;
	font-size: 25px;
	cursor: pointer;
	display: none;
	transition: 0.5s;
}
@media screen and (max-width: 1027px) {
	header {
		padding: 20px 40px;
	}
}

@media screen and (max-width: 991px) {
	.menu-toggle {
		display: block;
	}

	header nav {
		position: absolute;
		width: 100%;
		height: calc(100vh - 50px);
		background: #333;
		top: 90px;
		left: -100%;
		transition: 0.5s;
	}

	header nav.active {
		left: 0;
	}

	header nav ul {
		display: block;
		text-align: center;
	}

	.social {
		margin-top: 20px;
		display: inline;
	}

	.social li {
		margin: 20px 0;
		background: none;
	}

	.social li a {
		width: 100%;
		font-size: 50px;
		text-align: center;
		border: none;
		height: auto;
		color: #1f1e1e;
	}

	header nav ul a {
		border-bottom: 1px solid rgba(0,0,0, .2);
	}
}

@media screen and (max-width: 580px) {
	header {
		padding: 20px 30px;
	}

	.body-m {
		padding-top: 110px;
		padding-left: 10px;
		padding-right: 10px;
	}
}Code language: CSS (css)
Save your files! You should have the following results for desktop.

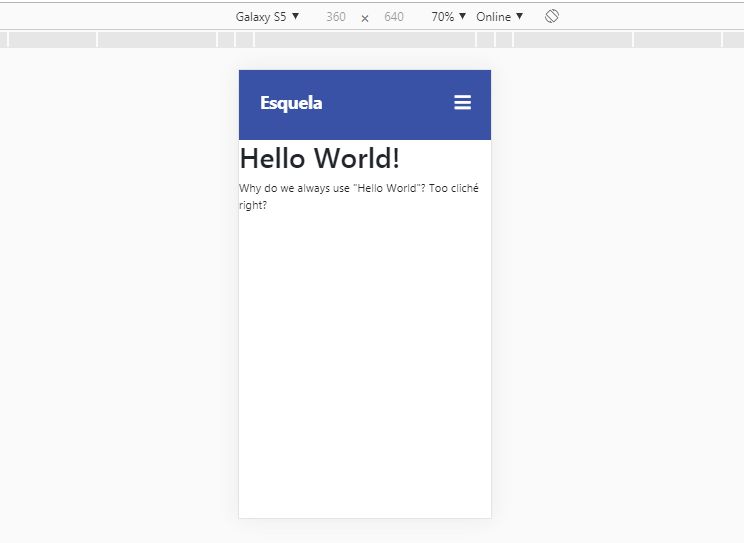
And for mobile, you should end up with the following.
Awesome! But we’re not done yet! If you try to click the menu bar, our links and socials will never show up.
So what do we do? Of course, we’ll use JavaScript to display our menu.
So go ahead to your files, open your js folder and open the script.js file.
Then copy the following code:
$(document).ready(function() {
    $('.menu-toggle').on('click', function(e) {
        $('nav').toggleClass('active');
    });
});Code language: JavaScript (javascript)
Save all your files.
You should end up with the following result when you click the menu button.

Conclusion
Congratulations! You have successfully learned not only how to use functions.php file but also how to create a responsive premium theme header for WordPress.
In the next tutorial, we’re going to learn how to create a hero banner with image and header texts.
For now, we would like to thank you for reading this post. If you think you have learned something from us, let us know below in the comments, we really love hearing from you!
If you have questions or maybe a request, contact us or comment below and we’ll reply to you as soon as we can.