You finally created a game with players, enemies, geometries, sound effects, and more but whenever you played your game… your game looks really boring especially when your game loads up a new scene.
Wouldn’t be nice if your game can load up a new scene without making the players feel like it is loading? Well…
In this tutorial, we’re gonna be teaching you how to create awesome unity transitions that you can use between your scenes.
So without further ado, let’s begin!
Getting Started
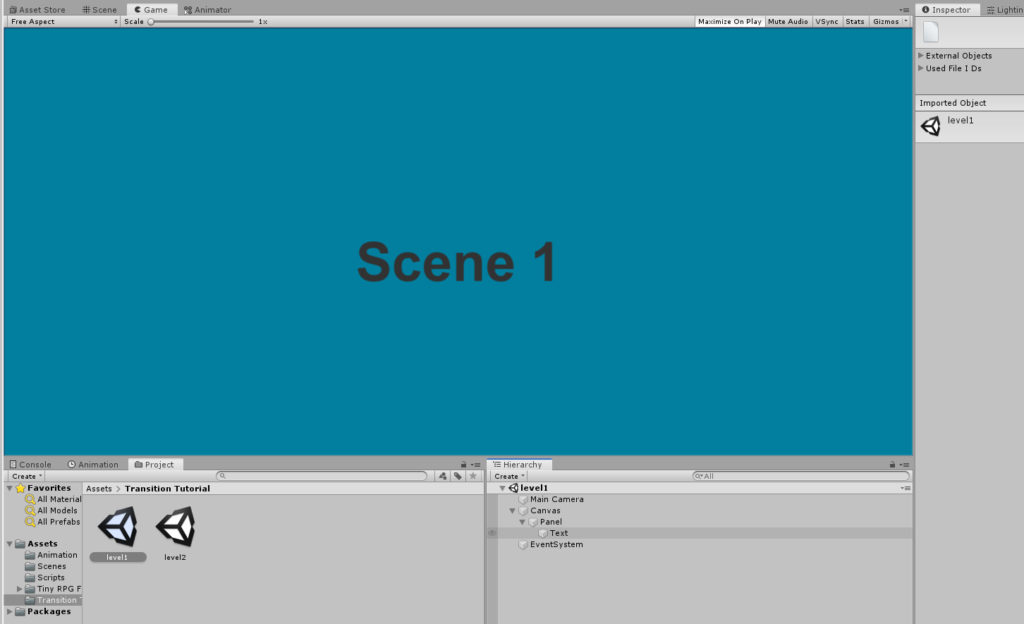
For this tutorial, we’re gonna be requiring you to have at least two game scenes that we’re gonna be using for the transitioning.
As an example, here is our level1 scene which only contains a panel and a text UI.
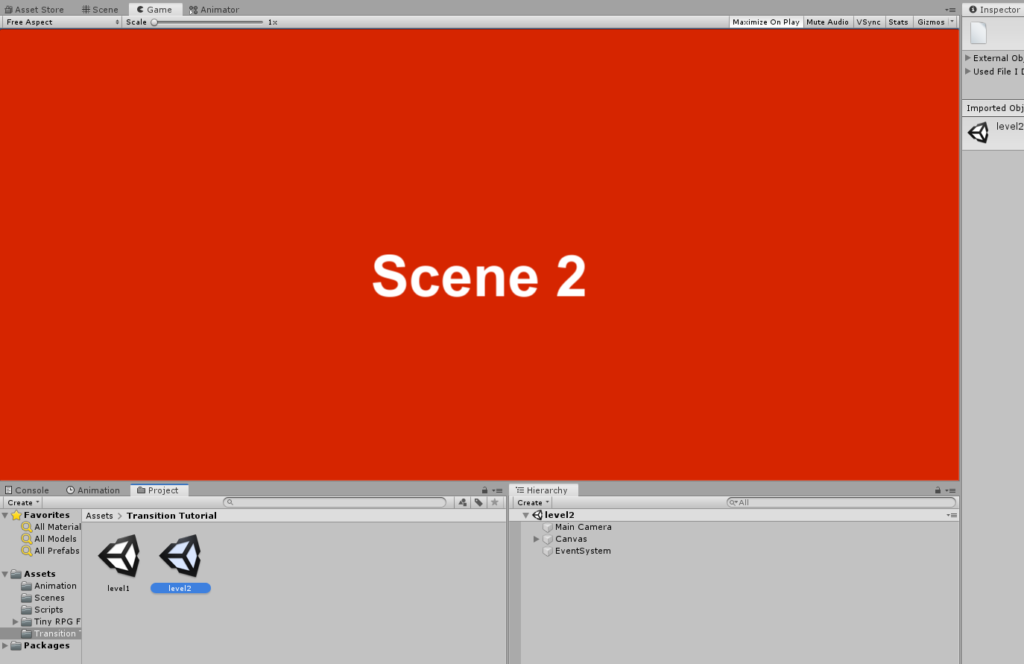
And here’s our level2 scene.
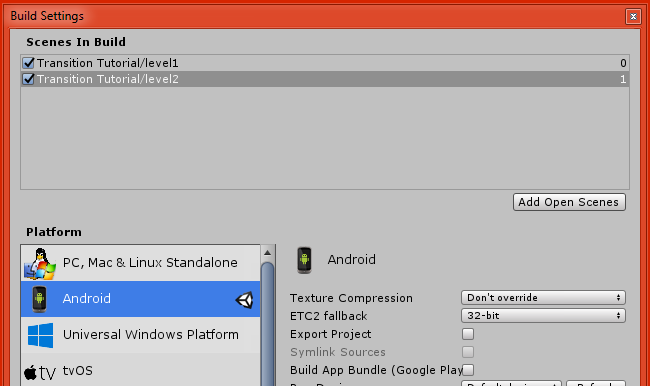
Once you’re okay with your game scenes, go to your Build settings to make sure that your scenes are added otherwise we’ll encounter an error between changing scenes.
You can navigate to your Build settings by pressing the shortcut key CTRL + SHIFT + B or you can just navigate to File > Build settings.
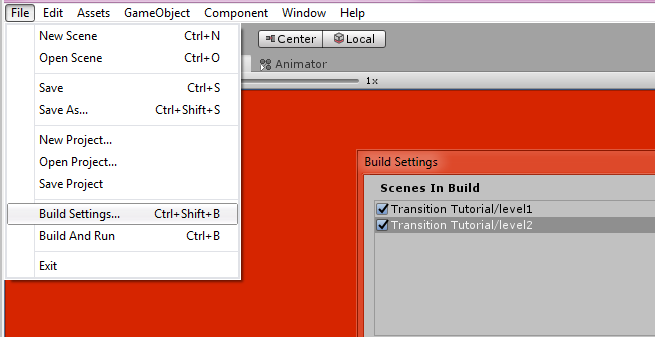
Make sure that all of the scenes that you want to transition from and to are added to the Scenes in Build.
For our case, we have level1 scene and level2 scene added.
Creating the in-game transitions
By the end of this tutorial, you should be able to create any kind of transitions you want to accomplish.
As you know there are hundreds of different transitions. There is the fade to black transition, swipe transition, door transition, etc.
We’re gonna be doing all of that one by one but first… let’s begin with the basics and make the fade in and out transition.
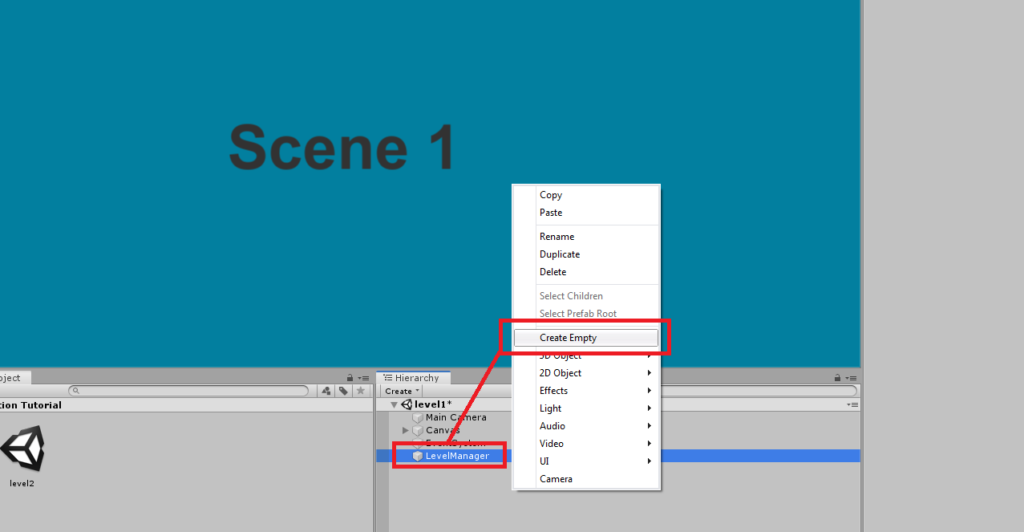
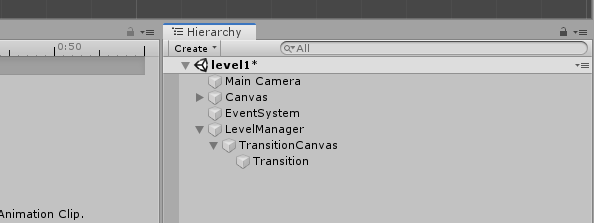
First, go to your hierarchy and create an empty game object.
Then name the empty game object to LevelManager.
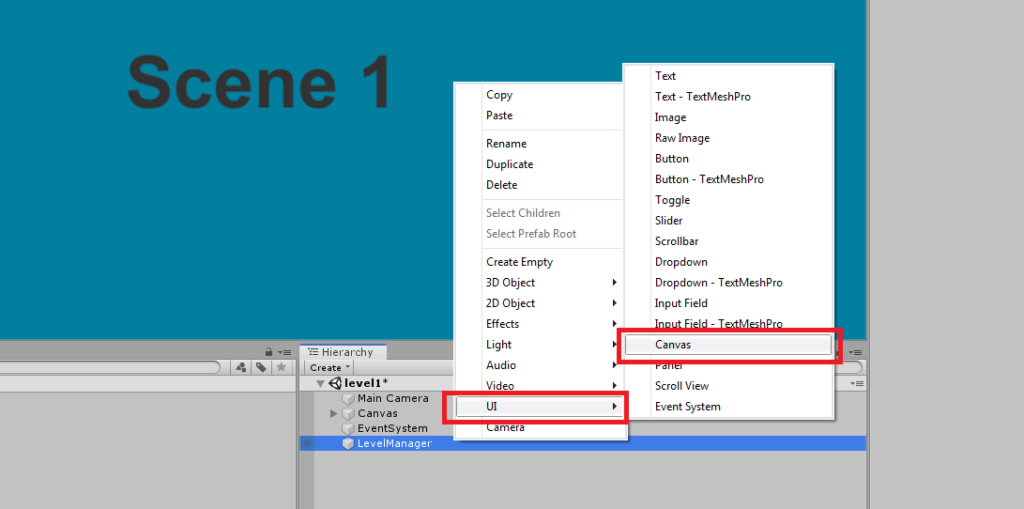
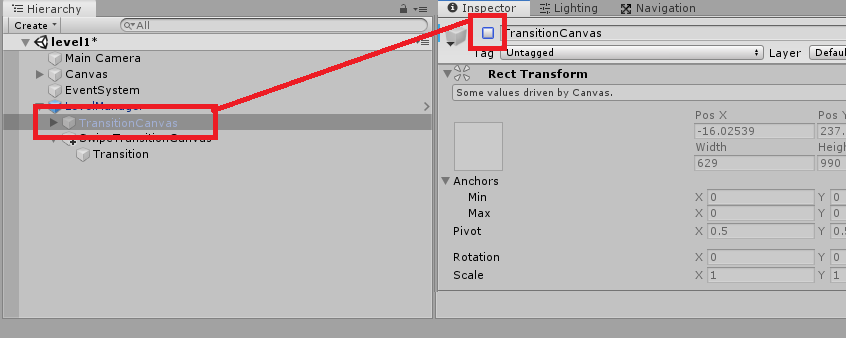
In the hierarchy, select the LevelManager game object and right-click to create a UI canvas and name it TransitionCanvas.
Next, select the canvas that you have just created and navigate to the inspector.
Look for the Canvas Scaler and change the UI Scale Mode from Constant Pixel Size to Scale With Screen Size.
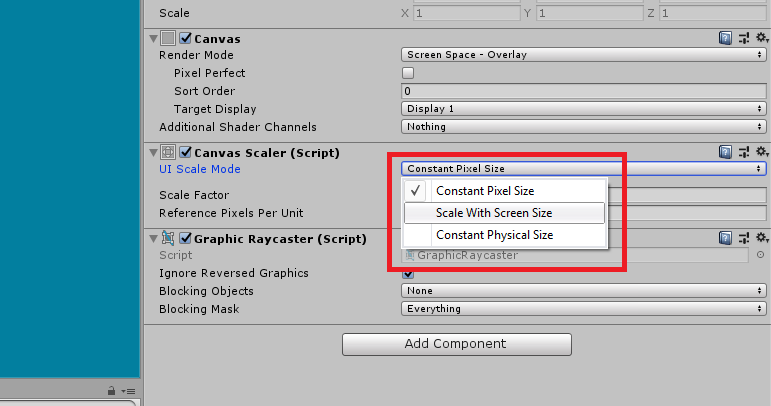
This will ensure that the UI elements within this canvas are scaled up or down properly.
To continue, press right-click on your TransitionCanvas game object and navigate to UI then select Image.
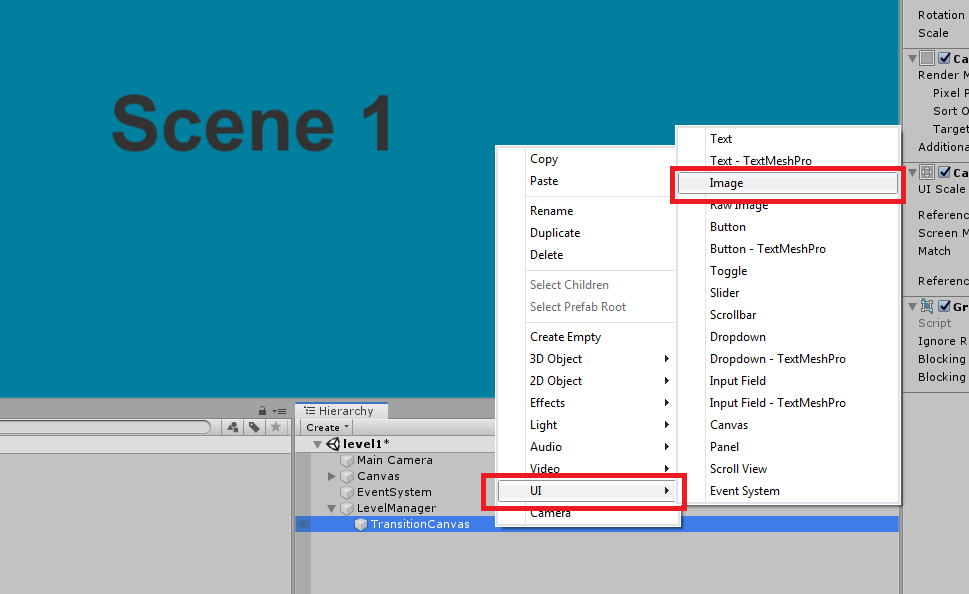
This will give you a small white box in the middle of your canvas.
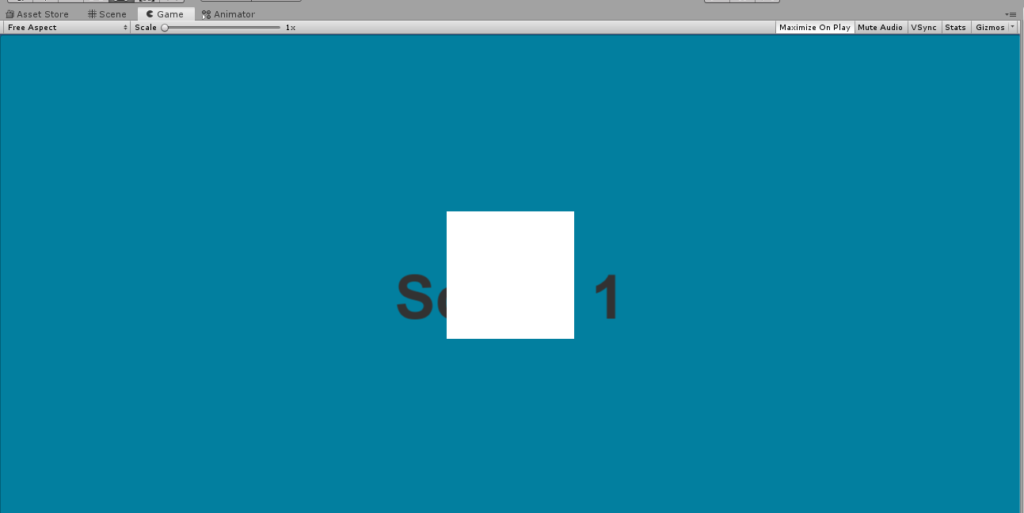
We’re gonna be using this Image as the main game object for the transition so we have to make sure that this UI element fills the entirety of the player’s screen.
So, to do that, click the Image game object, go to the inspector and click on the anchor presets.
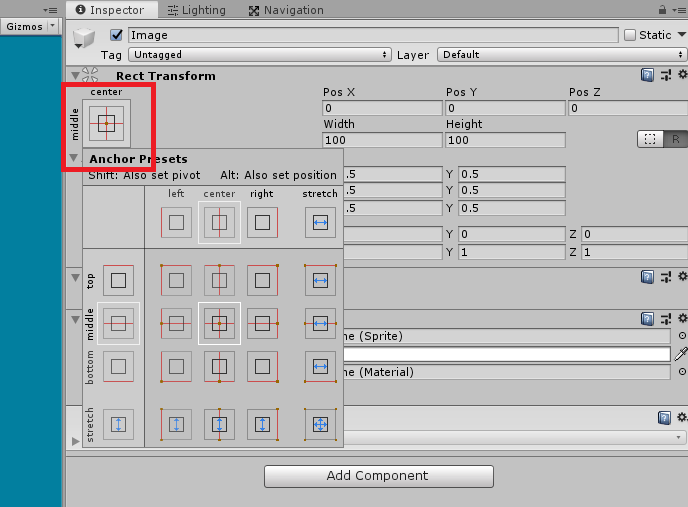
Once the anchor preset window is on, hold the ALT key and select the stretch in all direction option which is placed at the bottom-right corner of the window.
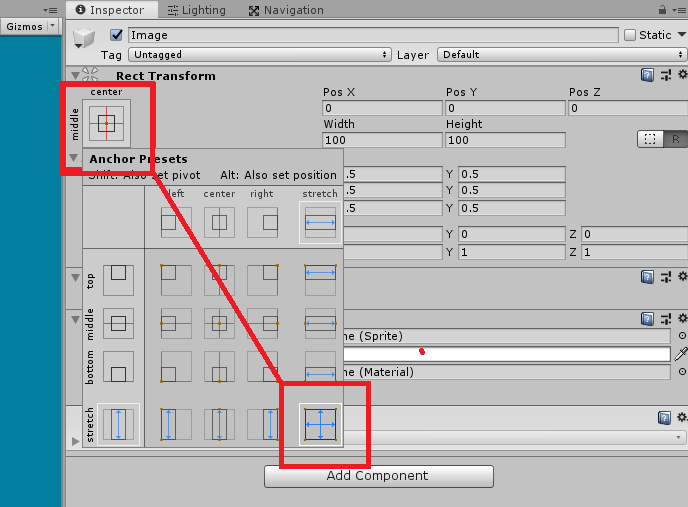
This will make the image stretched to the entirety of the canvas.
Next, let’s change the color of the image to black. (unless you want your scene to fade in white.)
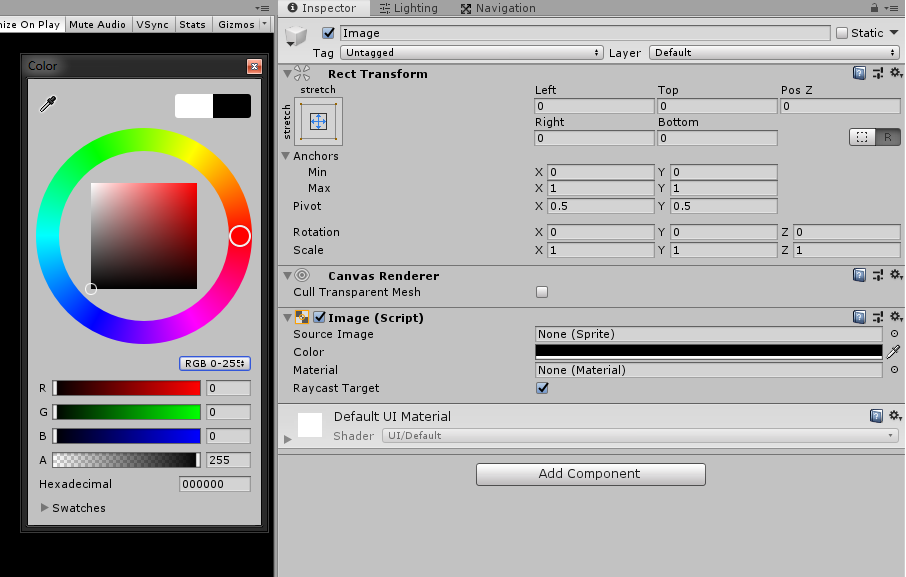
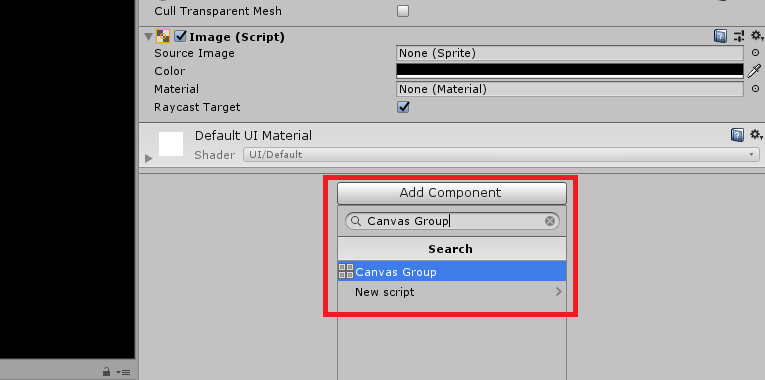
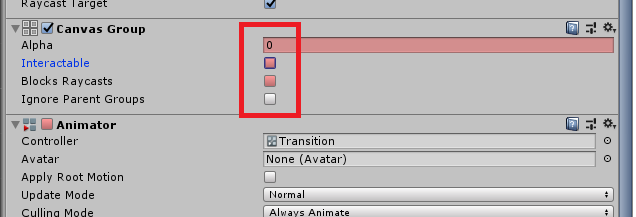
The next thing that we’re going to do is add a Canvas Group component to our Image game object.
To do that, select the Image game object in the hierarchy, go to the inspector, click Add component and look for Canvas Group using the search bar.
This will allow us to change the opacity of… not just the Image but also what’s inside the Image game object.
So let’s say we have a text inside the Image game object. And, this text could say that the game is loading.
Like this.

With the help of the Canvas Group component, we will be able to actually fade out all the objects inside our Image. Which is pretty amazing!
Obviously, there are other ways to fade in the image such as animating the opacity of the Image component. However, this will cause you a lot of work especially if you have more elements inside the canvas.
We’ll remove the text inside the Image.
Animating the Transition
Now that we have everything set up, let’s start animating the actual transition.
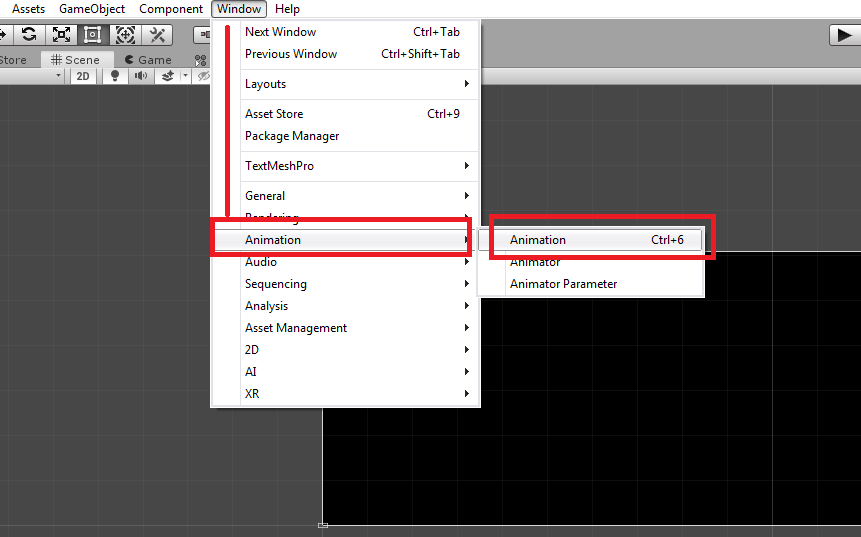
To start, open your Animation window.
You can do that by going to the Window tab and selecting Animation > Animation or you can simply press CTRL + 6.
Next, select your Image game object.
Actually, let’s rename our Image game object to Transition. (Just to be organized :P)
Okay, now with your Transition game object selected, navigate to your Animation window and press the Create button.
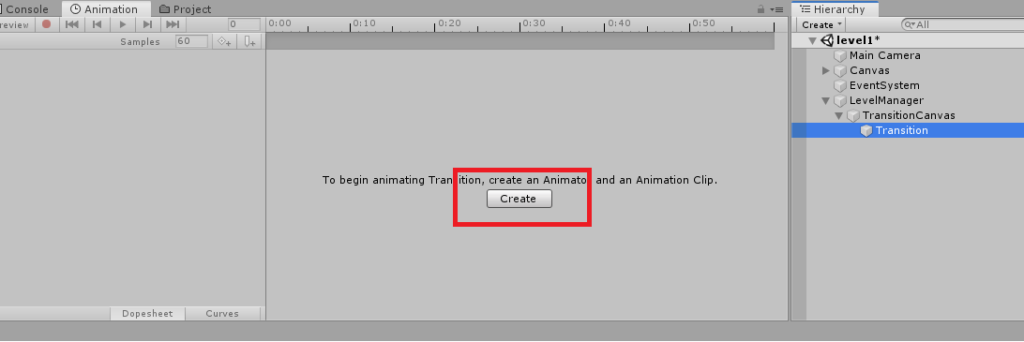
You can name the animation to whatever you want but make sure you indicate that the animation is either an in or an out. (i.e. Scroll_in.anim)
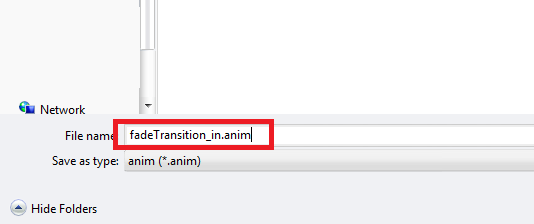
For this tutorial, we’ll call it fadeTransition_in.anim
Next, in the Animation window, click the Add property button and click the dropdown for the Canvas Group component and select Alpha by pressing the plus icon.
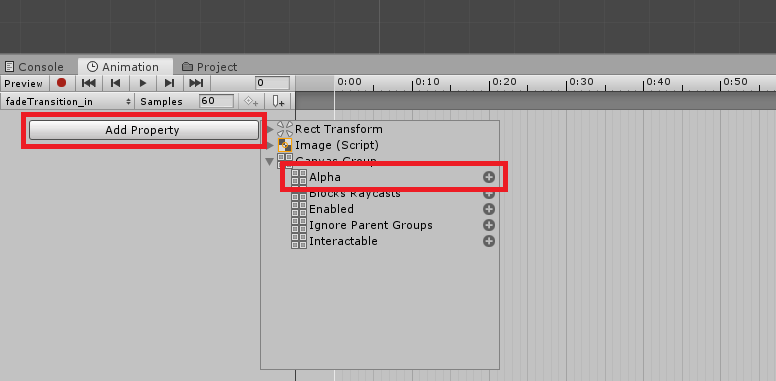
That should create the property alpha for the animation.
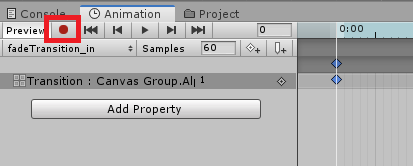
Next, click on the ![]() record button which is located right beside the Preview button of the Animation window.
record button which is located right beside the Preview button of the Animation window.
Now, go to the timeline and make sure the white line is pointed at the last keyframes.
Next, go to the inspector and change the value of the Alpha to 0 under the Canvas Group as well as uncheck the Interactable and Blocks Raycasts.
With that being set, you should be able to ![]() play the animation and see the fade animation in action.
play the animation and see the fade animation in action.
Next, we’ll create another animation but this time it’s for the fade-out transition.
So go to the Animation window and click on the animation list dropdown menu ![]() which is located under the action buttons
which is located under the action buttons ![]() and select Create New Clip…
and select Create New Clip…
This time, we’ll call the animation fadeTransition_out.anim
We’ll do the very same process that we did for the previous animation.
Click Add Property.
Select Canvas Group’s Alpha.
Enable the ![]() record animation.
record animation.
But this time, the first keyframes should have the Alpha value set to 0 and Interactable and Blocks Raycasts is unchecked.
And this time, the last keyframes should have the Alpha value set to 1 and Interactable and Blocks Raycasts is checked.

That should give us the complete transition.
Avoiding the loop
One of the issues we’re encountering whenever we implement this transition is the animation loop.
Fixing this is not that really hard.
Navigate to your Project window and look for the animations that we created. In our case, we named the animation fadeTransition_in and fadeTransition_out.
Select one animation and navigate to the inspector and uncheck the Loop Time.
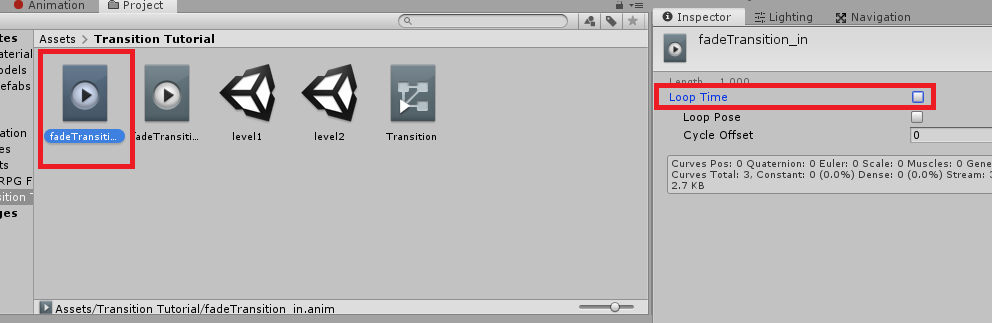
Do the same to the other animation.
The Transition Animator
Now that we have almost everything set up, let’s start to end this by setting up the Animator for the animations.
For this, we will have to decide which animation will go first and which animation will play last and that is actually pretty easy to determine since the transition begins in fading in and ends with fading out.
So let’s open up our Animator window by going to Window tab and selecting Animation > Animator.
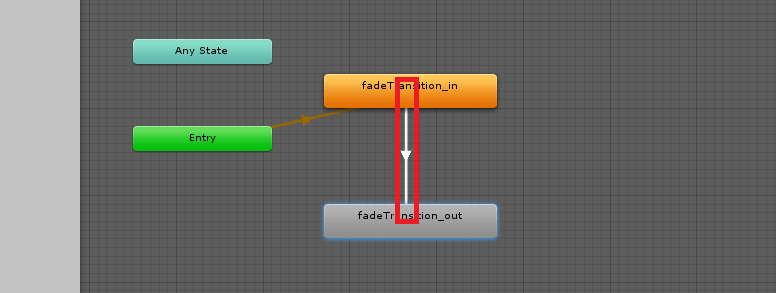
With our Transition game object select, you should be able to see in the Animator window all of the animations that we have just created.
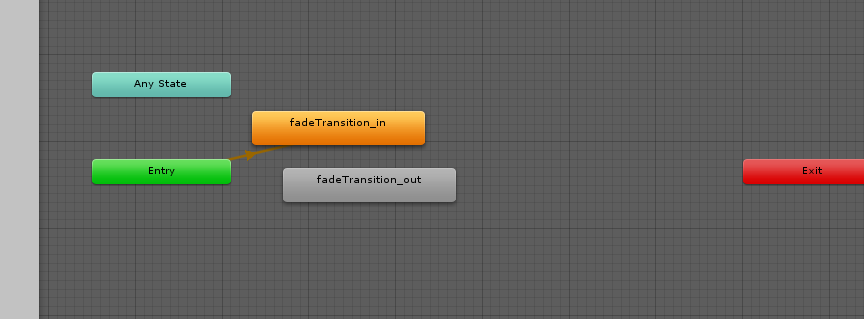
By default, it should select the fadeTransition_in as its default animation since that’s the first animation that we created.
Keep in mind that as soon as we created the animation, Unity will automatically create an animator component to our Transition game object.
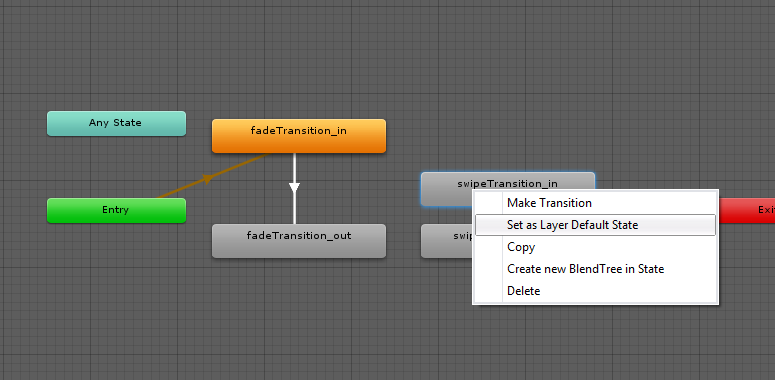
If in any case that the animator sets up the wrong animation as its default animation, you can always change it by right-clicking on the animation that you want to be the default animation and selecting Set as Layer Default State.
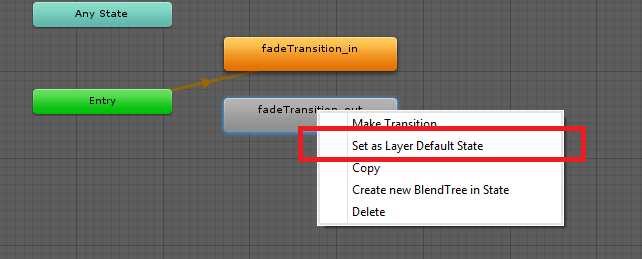
In our case, we’re NOT going to do that because we already have the fadeTransition_in set as its default animation state which is what we wanted.
However, we need to create a transition from our fadeTransition_in to fadeTransition_out so to do that, right-click on fadeTransition_in and select Make Transition.
That should give you an arrow to point to, so go ahead and click on the fadeTransition_out.
The next thing that we’re going to do is to trigger this transition so to do that go to the parameters window ![]() and click on the plus sign
and click on the plus sign ![]() and select Trigger.
and select Trigger.
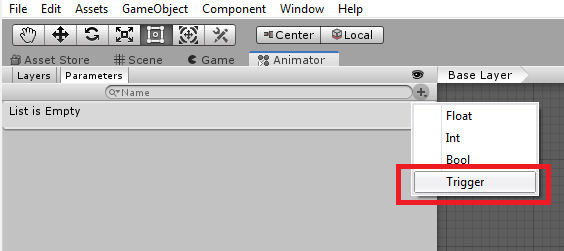
Name it TriggerTransition.
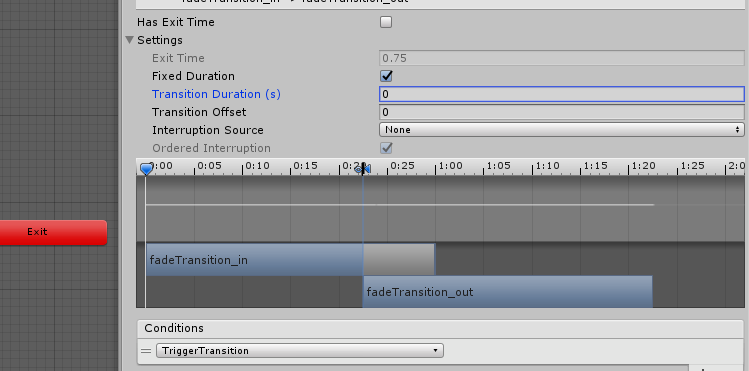
Next, select the animation transition that we created (white arrow) between our animations.
Then go to the inspector.
Disable the Has Exit Time.
Open the Settings dropdown and set the Transition duration to 0.
Under the conditions section, click the plus sign button.
That should create the condition for our animation transition. Make sure that the dropdown is set to the TriggerTransition parameter.
Game Scene Transition Script
Finally! After all of setting up, we’re finally about to write the script to successfully transition between game scenes.
Navigate back to your hierarchy and select the LevelManager game object, then go to the inspector and click the Add Component button.
Select New Script and name it Transition.
Once created, open it up with your visual studio and copy the following code.
using System.Collections;
using System.Collections.Generic;
using UnityEngine;
using UnityEngine.SceneManagement;

public class Transition : MonoBehaviour
{
    public Animator animator;
    public float transitionDelayTime = 1.0f;

    void Awake()
    {
        animator = GameObject.Find("Transition").GetComponent<Animator>();
    }

    // Update is called once per frame
    void Update()
    {
        //As an example, we'll be using GetKey() to test out the transition
        //between game scenes, so if you are implementing this with this code
        //make sure to modify the code according to your needs.
        if(Input.GetKey(KeyCode.Space))
        {
            LoadLevel();
        }
    }

    public void LoadLevel()
    {
        StartCoroutine(DelayLoadLevel(SceneManager.GetActiveScene().buildIndex + 1));
    }

    IEnumerator DelayLoadLevel(int index)
    {
        animator.SetTrigger("TriggerTransition");
        yield return new WaitForSeconds(transitionDelayTime);
        SceneManager.LoadScene(index);
    }
}

Code language: C# (cs)
Thank goodness! Everything is finally done but there’s one last thing we need to do and that is to save our LevelManager game object into a prefab.
To do that, navigate to your hierarchy and drag the LevelManager game object to your Project window.
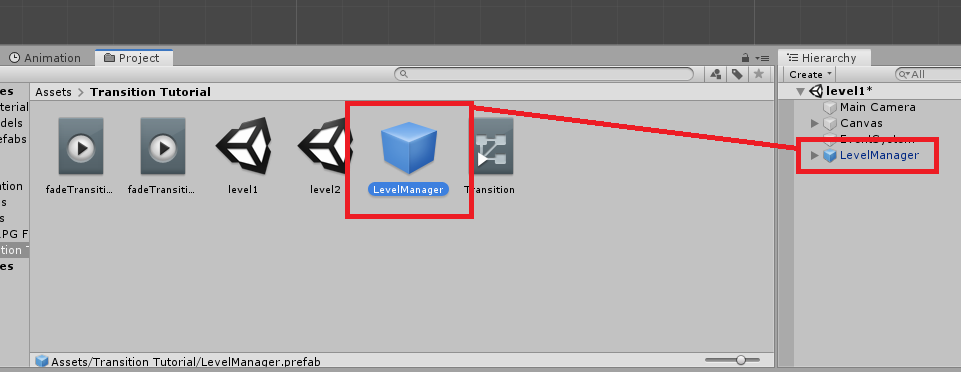
Then, open your next game scene (in our case it’s level2) then drag the LevelManager prefab into the hierarchy.
With everything we have done, you should be able to load your scene like this.
Different Animation Styles
You might be thinking that we’ve done so much just to create a very simple fade to black transition BUT to tell you honestly, we just created the base of more animations that we can create and to do that, all we needed to do is to duplicate the TransitionCanvas inside our LevelManager, rename it to any type of transition you want it to call and customize it to whatever you want it to be.
For example, let’s create a new animation.
Swipe In/Out Transition
Let’s duplicate our TransitionCanvas by selecting it and by pressing CTRL + D.
Then disable the old TransitionCanvas by selecting it and going to the inspector and uncheck the checkbox.
Let’s rename our new Canvas to something like SwipeTransitionCanvas.
Open SwipeTransitionCanvas and select the Transition
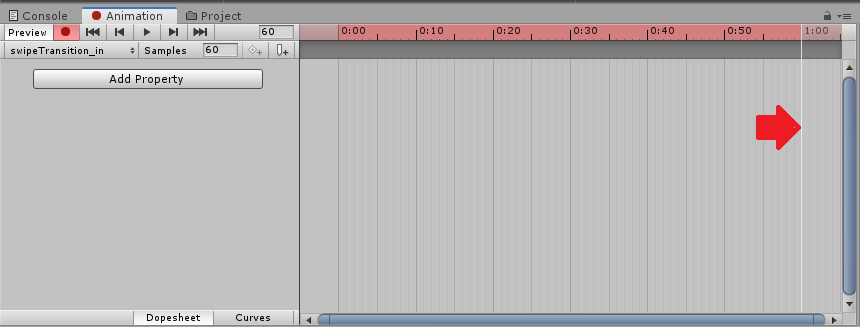
Go to the Animation window and then select Create New Clip…
Name the animation swipeTransition_in
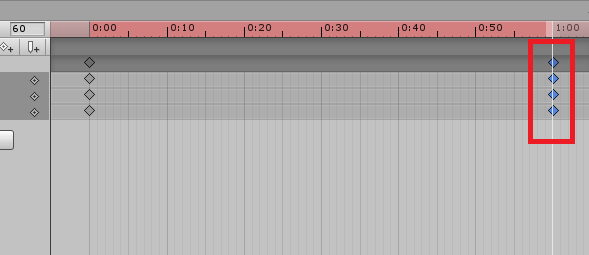
Then, enable the ![]() record animation button and go to the animation timeline and drag the white line over the 1:00 time mark.
record animation button and go to the animation timeline and drag the white line over the 1:00 time mark.
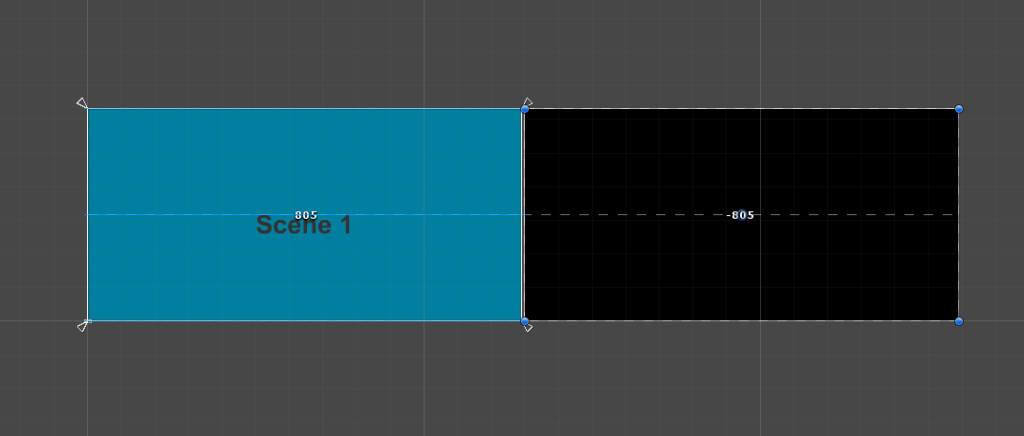
Then proceed to your scene and drag the image all the way to the right. Like so.
Go back to your Animation window.
There should be two keyframes placed. If so, select all by pressing CTRL + A or by using your mouse drag to select both keyframes.
And then, copy the keyframes CTRL + C.
Then, create a new Animation clip then name it swipeTransition_out.
Go to the animation timeline and press CTRL + V to paste in the keyframes.
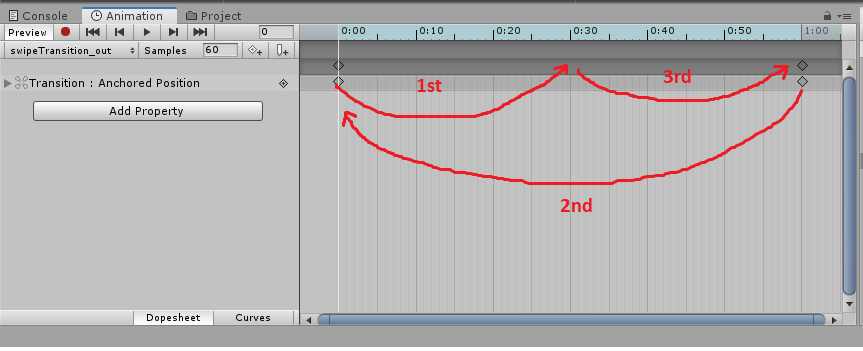
And then, here’s the awesome part. Reverse the keyframes by selecting the first keyframe and placing it somewhere around 0:30 and select the last keyframe and drag it all the way to the 0:00 and lastly drag the keyframe placed in 0:30 to 1:00.
Sounds confusing? here’s how it’s done.
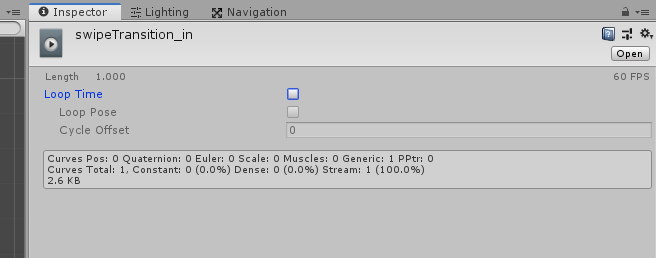
Just like before, we need to stop the animation from looping so go ahead to your project window and select the animation and uncheck the loop time.
Let’s go back to our Animator window and as you can see below, we have new states of animation.
We can use these new animations by right-clicking on swipeTransition_in and selecting Set as Layer Default State.
And then, we can just do the same thing as before and create a transition from swipeTransition_in to swipeTransition_out and adjust the transition by removing once again the Has Exit Time and setting the Transition Duration to 0.
So if you hit play, you should have the same results as below.
Conclusion
Congratulations! You’ve finally learned how to implement a transition effect for your game scenes. Obviously, there are other ways to implement this feature.
However, the purpose of this course is just to show you how to actually make it work for any kind of project you have. We totally agree that the work is super tedious just for the simple transitions so if you’re working on a super huge game we highly recommend using a different way of transitioning to your game scenes like adding an actual loading screen with progress bar.
We hope that you learned from this tutorial, if you have questions, don’t hesitate to ask it out in the comments below.
Hi, thank you for this!
I have a question, the fade in and fade out works without i invoke the LoadLevel method. Why does this happen?