
Welcome back to another tutorial on how to create a multiplayer game using Unity3D and Photon Unity Network also known as PUN2.
In the previous tutorial, we’ve created the lobby where the players can either join in a room or create a room themselves and they can name it so other players will know which room was created by their friends or whatnot.
So yes, in this article, we’re going to be focusing on displaying the rooms that were created by the players so obviously we’re gonna be needing to export this project each time we made a progress.
If you are interested to learn more about unity networking or multiplayer systems, we recommend following their lessons as they are all updated and accurate.
So without further ado, open your unity project and let’s begin!
Connecting to Photon Network
Before we continue with the functionality of the lobby. Let’s create a script first where we connect to Photon Network.
So to do that, go to your project view and create a new C# script and call it PlayerGameNetwork.cs.
PlayerGameNetwork.cs
Open that script using visual studio and copy the following code:
using UnityEngine;

public class PlayerGameNetwork : MonoBehaviour
{
    public static PlayerGameNetwork Instance;
    public string Name { get; private set; }

    // Update is called once per frame
    private void Awake()
    {
        DontDestroyOnLoad(this);

        Instance = this;

        Name = "Player #" + Random.Range(0, 9999);
    }
}

Code language: C# (cs)
What the code above does is, it stop the object from being destroyed using the function DontDestroyOnLoad() and then we give ourselves a random name (Player #0000)
Now save the script and go back to Unity Editor.
Next, create an empty Game Object and call it PlayerNetwork and then assign the PlayerGameNetwork script into this game object.
LobbyGameNetwork.cs
Go back to your project view and create a new C# script and call it LobbyGameNetwork.cs and open that script with visual studio editor and copy the following code:
using UnityEngine;
using Photon.Pun;
using Photon.Realtime;

public class LobbyGameNetwork : MonoBehaviourPunCallbacks
{
    // Start is called before the first frame update
    void Start()
    {
        if (!PhotonNetwork.IsConnected)
        {
            PhotonNetwork.OfflineMode = false;
            PhotonNetwork.GameVersion = "0.0.0";
            PhotonNetwork.ConnectUsingSettings();
        }
        else
        {
            Debug.Log("We are connected already.");
        }
    }

    public override void OnConnectedToMaster()
    {
        PhotonNetwork.AutomaticallySyncScene = false;
        PhotonNetwork.NickName = PlayerGameNetwork.Instance.Name;

        PhotonNetwork.JoinLobby(TypedLobby.Default);
    }

    public override void OnJoinedLobby()
    {
        print("Joined Lobby");
        if (!PhotonNetwork.InRoom)
        {
            CanvasManager.Instance.LobbyFunction.transform.SetAsLastSibling();
        }
    }
}

Code language: C# (cs)
The code above will connect us to the Photon Network and then check if we’re actually connected.
And once we’re connected, we’ll be given a name generated from the PlayerGameNetwork script.
And then, we will join the lobby.
Save the script and go back to Unity editor.
Create a new empty game object and call it LobbyNetwork. Then drag the script LobbyGameNetwork into its inspector.
CreateNewRoom.cs
Now, go to your project view once again and create a new C# script and call it CreateNewRoom.cs.
Open that script using visual studio editor and inside the script, copy the following code:
Programming Tip: I highly recommend you though to type the code instead so it’ll be much easier for you to understand what code that you have written instead of copy pasting the code.
using Photon.Pun;
using Photon.Realtime;
using UnityEngine;
using UnityEngine.UI;

public class CreateNewRoom : MonoBehaviourPun
{
    [SerializeField]
    private Text _roomName;
    private Text RoomName
    {
        get { return _roomName; }
    }

    public void OnClick_CreateRoom()
    {
        RoomOptions roomOptions = new RoomOptions() { IsVisible = true, IsOpen = true, MaxPlayers = 4 };

        if (PhotonNetwork.CreateRoom(RoomName.text, roomOptions, TypedLobby.Default))
        {
            print("Create room successfully");
        } else
        {
            print("Create room failed");
        }
    }

    private void OnPhotonCreateRoomFailed(object[] codeAndMessage)
    {
        print("Create Room Failed: " + codeAndMessage[1]);

    }

    private void OnCreatedRoom(short returnCode, string message)
    {
        print("Room Created Successfully");
    }
}

Code language: C# (cs)
In the code above, we used two namespaces from Photon Unity Network which is the Photon.Pun and Photon.Realtime and we change the MonoBehaviour to MonoBehaviourPun.
So make sure, you’re using the right namespaces and MonoBehaviour to avoid errors later on.
Quick explanation, what the code above does is nothing but check if the player has created a room. Check if it is a success or a failure.
However, we’ve created a function OnClick_CreateRoom() where it allows us to create a room using the UI button. So later, we’re going to assign this function to the button in our scene.
So go ahead and save the script and go back to Unity Editor.
Next, add CreateNewRoom.cs script into the CreateRoomButton.
And then, drag the text from the RoomInput game object into the value of CreateNewRoom component script.
Everything should look like this:
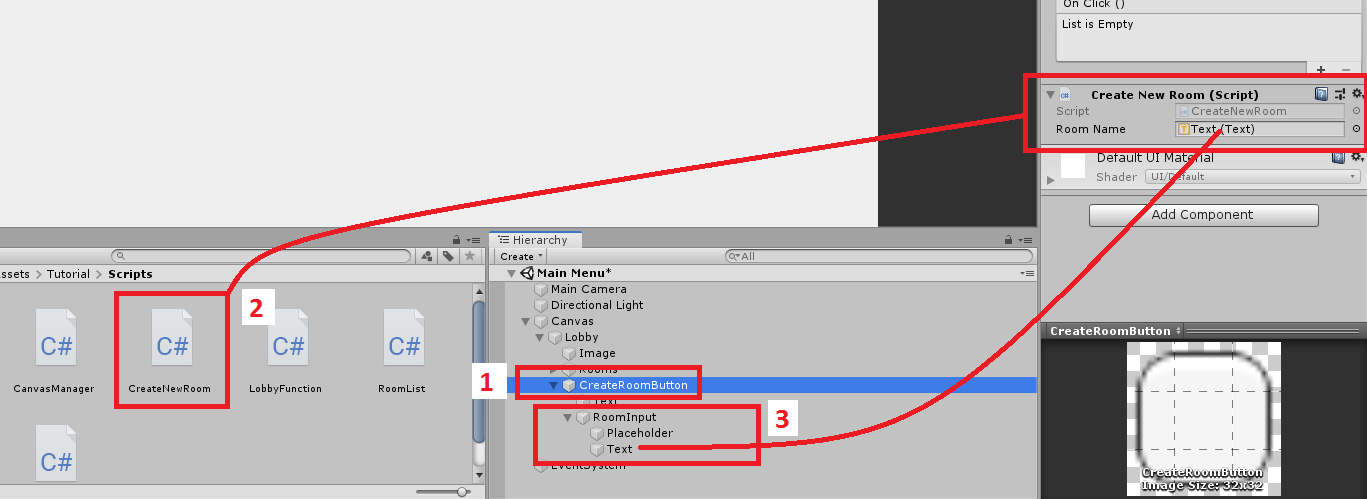
Again:
- Select the
CreateRoomButtongame object - Drag the script into its inspector
- Drag the text (which is the child of RoomInput game object) into the Room Name variable of the Create New Room script.
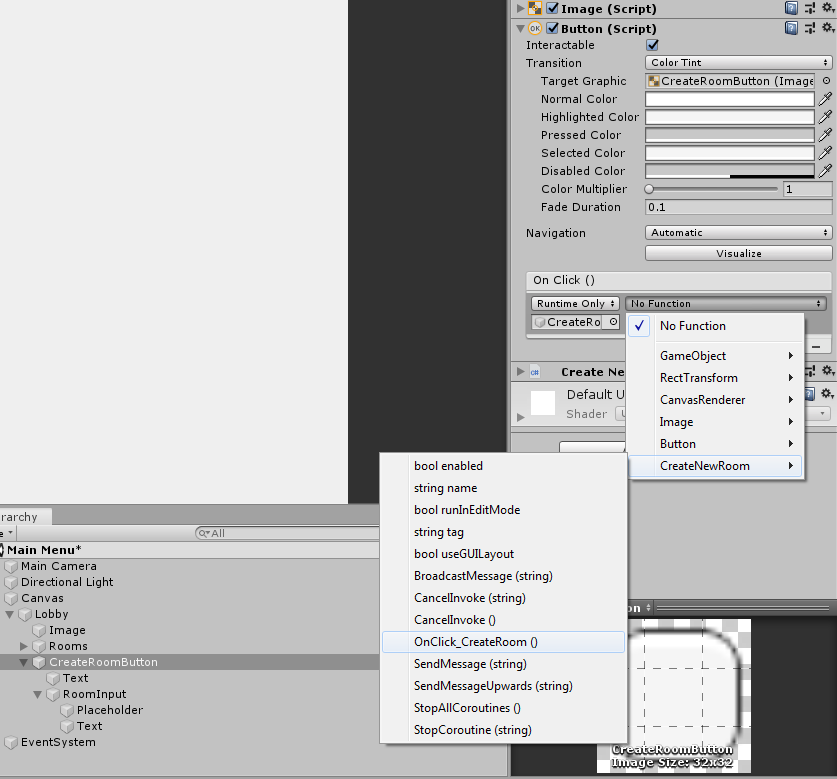
Next, you see that little plus button above the Create New Script component?
Click that.
That’ll create an onClick function for the button.
Next, drag the CreateRoomButton game object into that little box underneath the option that says Runtime Only
Next, click No Function and change it to CreateNewRoom > OnClick_CreateRoom()
Like this:
RoomListDisplay.cs
On your project folder, create a new C# script and call it RoomListDisplay.cs
Inside the script, copy and paste the following code:
using Photon.Pun;
using Photon.Realtime;
using System.Collections.Generic;
using UnityEngine;
public class RoomListDisplay : MonoBehaviourPunCallbacks
{
[SerializeField]
private GameObject _roomPrefab;
private GameObject RoomPrefab
{
get { return _roomPrefab; }
}
}
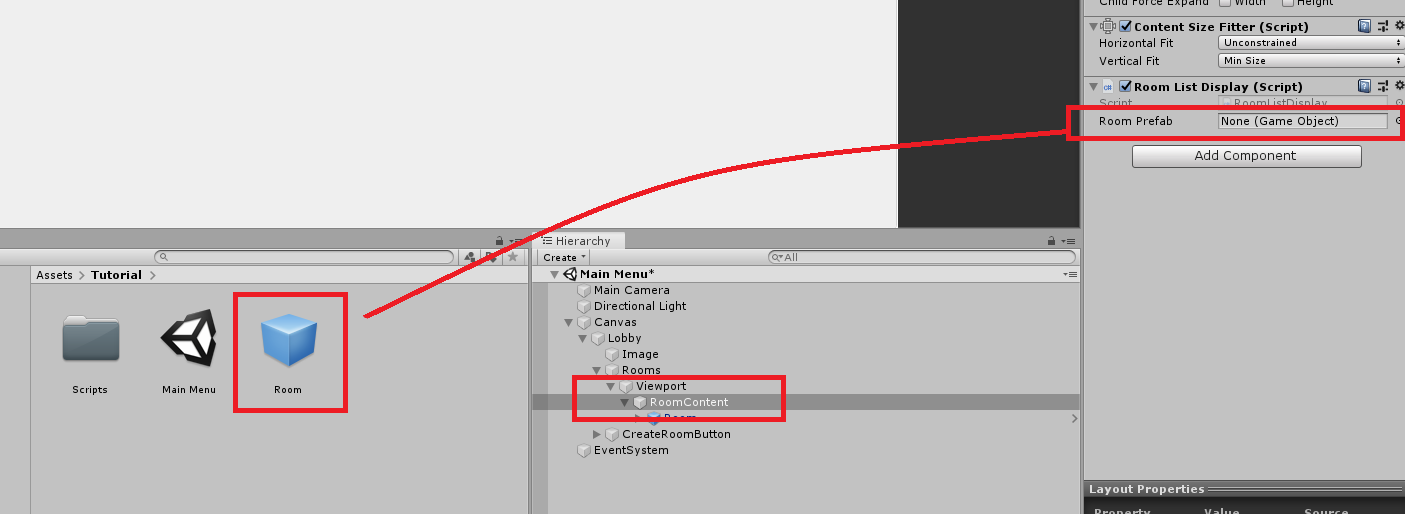
Code language: C# (cs)Save your script and after that, go back to your unity editor and select RoomContent game object on your hierarchy and drag the script (RoomListDisplay.cs) onto its inspector.
RoomList.cs
Next, we’re going to create another C# script and we’re gonna call it RoomList.cs. Open it with your visual studio and copy the following code:
using UnityEngine;
using UnityEngine.UI;

public class RoomList : MonoBehaviour
{
    [SerializeField]
    private Text _roomNameText;
    private Text RoomNameText
    {
        get { return _roomNameText; }
    }

    private void Start()
    {

    }

    public bool Updated { get; set; }
}

Code language: C# (cs)
Save your script and go back to Unity Editor.
The next thing we’re gonna do is to apply the script to the Room game object that we have created in the last tutorial.
So go ahead select Room game object and apply the RoomList.cs script.
Like below:
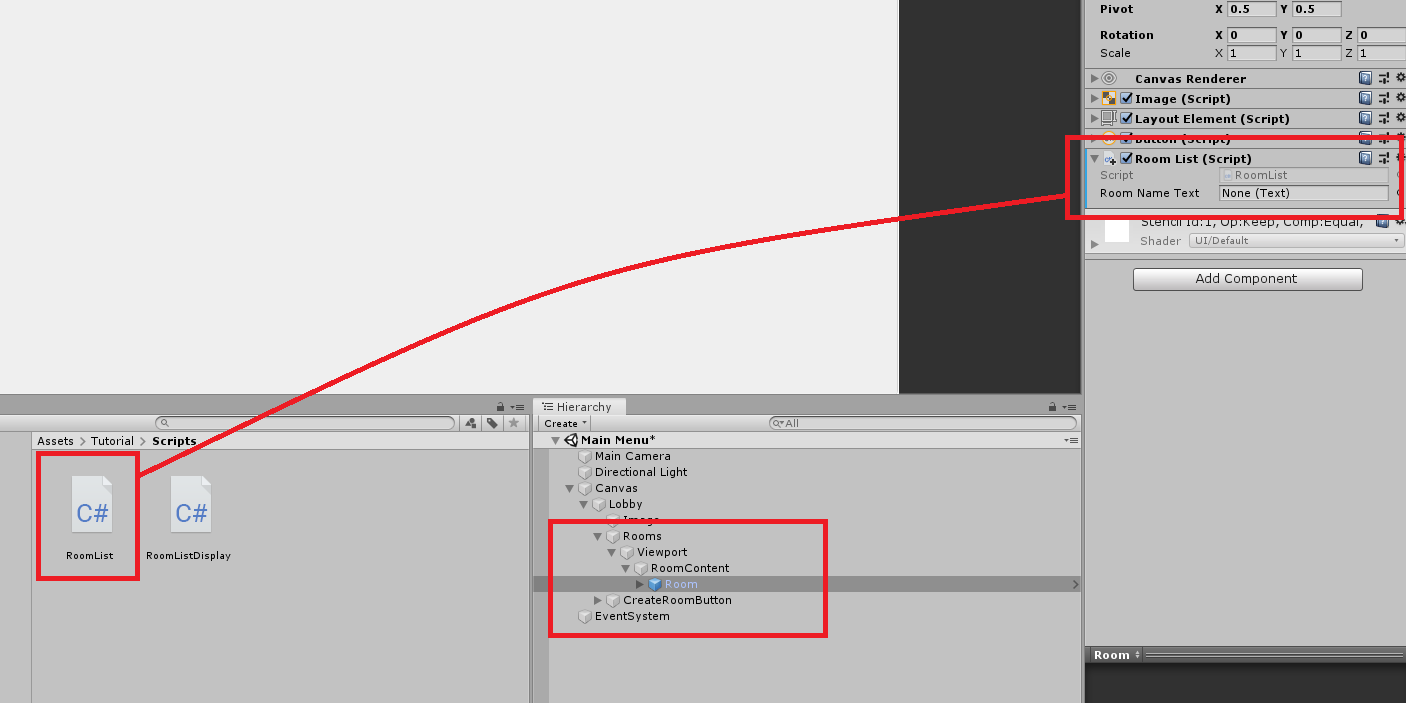
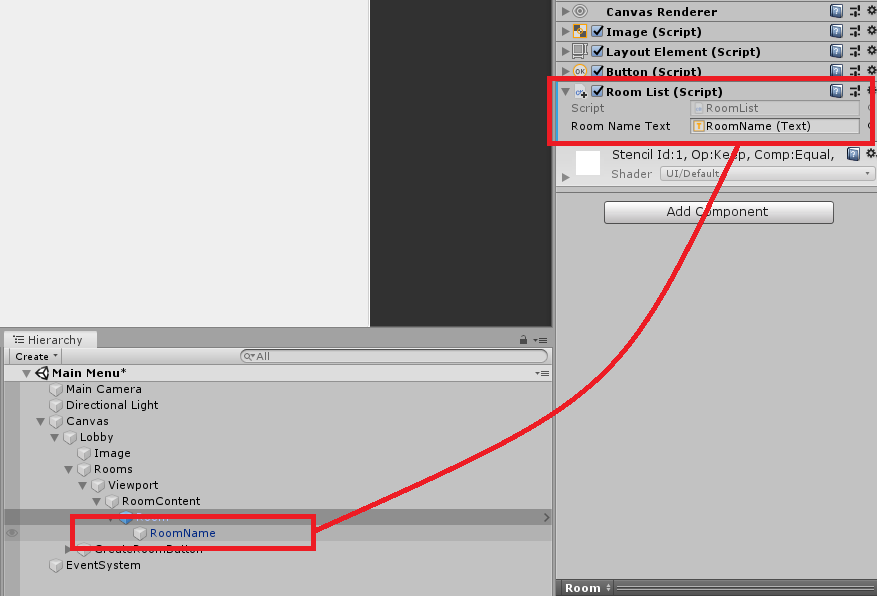
Next, open the Room game object in the hierarchy and assign the value of Room Name Text with the RoomName game object.
Like below:
Join Room Button Function
Now that we have a lobby and a button where players can click on. The next thing we’re gonna do is to give it a function so whenever the player clicks on the room button, they will be redirected to the room and leave the lobby.
In order to do that, we need to create a function script and assign it to the onclick function of the UI Button component.
So go ahead to your Project Folder and create a new script and call it LobbyFunction.cs
LobbyFunction.cs
using Photon.Pun;
using UnityEngine;

public class LobbyFunction : MonoBehaviour
{
    [SerializeField]
    private RoomListDisplay _roomListDisplay;
    private RoomListDisplay RoomListDisplay
    {
        get { return _roomListDisplay; }
    }

    public void OnClickRoom(string roomName)
    {
        if (PhotonNetwork.JoinRoom(roomName))
        {
            Debug.Log("Player Joined in the Room");
        }
        else
        {
            Debug.Log("Failed to join in the room, please fix the error!");
        }
    }
}

Code language: C# (cs)
Next, create another C# script and call it CanvasManager.cs
CanvasManager.cs
This script will manage all the canvas available in your hierarchy both room canvas and lobby canvas.
We don’t have Room canvas yet in the project so let’s leave it like this for now. But we’re going to work on that later on.
The room canvas will display the list of players available in the room whereas the lobby canvas will display the list of rooms available for players.
So copy this code and paste it into the CanvasManager script:
using UnityEngine;
public class CanvasManager : MonoBehaviour
{
public static CanvasManager Instance;
[SerializeField]
private LobbyFunction _lobbyFunction;
public LobbyFunction LobbyFunction
{
get { return _lobbyFunction; }
}
private void Awake()
{
Instance = this;
}
}
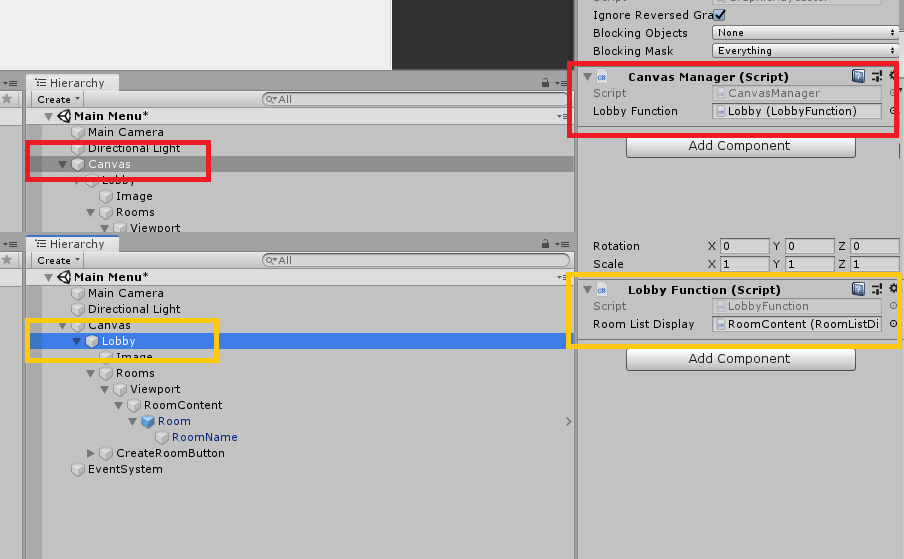
Code language: C# (cs)Now save your scripts and go ahead back to the Unity Editor and drag the CanvasManager script onto the main canvas in your hierarchy.
Next, drag the LobbyFunction script into the Lobby game object, underneath the Canvas game object.
Everything should look like this:
Updating RoomList.cs
Remember we have created a RoomList script? We’re going to update that script and add this code inside its Start function.
GameObject lobbyCanvasGO = CanvasManager.Instance.LobbyFunction.gameObject;
if (lobbyCanvasGO == null) return;
Code language: C# (cs)
Note: I’m going to do it this way so you will understand which code you need to edit instead of just copy and pasting the entire code without actually understanding what’s what.
PS: You need to read too 😉
Now to explain the above code, we need to check if there is a Lobby canvas in the scene. If there’s none, then return. Which means it will not proceed to its next process which is this:
LobbyFunction lobbyFunction = lobbyCanvasGO.GetComponent<LobbyFunction>();

Button button = GetComponent<Button>();
button.onClick.AddListener(() => lobbyFunction.OnClickRoom(RoomNameText.text));
Code language: C# (cs)
Copy the code above and paste it under the if condition.
Next, underneath the Start function, we’re gonna need to call the function OnDestroy()
So go ahead and copy this code underneath the Start() function:
private void OnDestroy()
{
        Button button = GetComponent<Button>();
        button.onClick.RemoveAllListeners();
}
Code language: C# (cs)
What the code above does is when the game object (which is the parent of this script) gets destroyed. Unity will call this function and get the component button and remove all the listeners assigned to it.
Next, underneath the OnDestroy function, copy the following code:
public string RoomName { get; private set; }
public void SetRoomNameText(string text)
{
        RoomName = text;
        RoomNameText.text = RoomName;
}
Code language: C# (cs)
The code above will set the name of the room, so whenever the player creates a room, the value of the input field will be assigned into this function thus renaming the room.
Then save your script.
Updating RoomListDisplay.cs
Now let’s update the script RoomListDisplay.
Since we have already the RoomList script, let’s create these list variables.
private List<RoomList> _roomListButtons = new List<RoomList>();
private List<RoomList> RoomListButtons
{
    get { return _roomListingButtons; }
}
Code language: C# (cs)
At the very bottom of the script (inside the class) copy the following code:
public override void OnRoomListUpdate(List<RoomInfo> roomList)
{
        foreach (RoomInfo room in roomList)
        {
            RoomReceived(room);
        }

        RemoveOldRooms();
}

private void RoomReceived(RoomInfo room)
{

}

[PunRPC]
public void RemoveOldRooms()
{

}
Code language: C# (cs)
In the code above, we have used the function OnRoomListUpdate() it is a function from Photon Unity Network and used to get the list of rooms available in the network.
So let’s say, a player created a room. Photon will call this function and update us about that room. So as you can see, we have a foreach loop that will check the list of rooms available in the network.
And then, if there’s an available room, we’re going to call the function RoomReceived(). Which is the function underneath the OnRoomListUpdate().
Underneath that, we have declared another function which is RemoveOldRooms(). This is called to remove the old rooms which don’t really exist.
RoomReceived() {}
Inside the RoomReceived() funtion, copy the following code:
int index = RoomListButtons.FindIndex(x => x.RoomName == room.Name);

if (index == -1)
{
    if (room.IsVisible && room.PlayerCount < room.MaxPlayers)
    {
        GameObject roomListingObj = Instantiate(RoomPrefab);
        roomListingObj.transform.SetParent(transform, false);

        RoomList roomListing = roomListingObj.GetComponent<RoomList>();
        RoomListButtons.Add(roomListing);

        index = (RoomListButtons.Count - 1);

    }
}

if (index != -1)
{
    RoomList roomListing = RoomListButtons[index];
    roomListing.SetRoomNameText(room.Name);
    roomListing.Updated = true;
}
Code language: C# (cs)
What the code above does, is it checks if the “room name” in the network is equal to the “room name” of the button.
if it’s equal then the value of index is going to be the index of the RoomListButtons.
However, in the next line, we need to check if index is equal to -1.
If it is, then that means the room does not exist and we need to check again if the room is visible and if the room is not full.
If it is visible and not full, then we’re going to instantiate a RoomPrefab and assign it to the RoomList gameobject and give it all the components it needs.
However, if the index is not equal to -1, then we’re going to create a RoomList and set its name.
RemoveOldRooms() {}
Before we proceed, if you have noticed, we added [PunRPC] above the function.
What is PunRPC?
PunRPC or RPC also known as Remote Procedure Calls are exactly what the name implies: Method-calls on remote clients (that are in the same room).
Now, Inside the RemoveOldRooms() funtion, copy the following code:
List<RoomList> removeRooms = new List<RoomList>();

foreach (RoomList roomListing in RoomListButtons)
{
    if (!roomListing.Updated)
    {
        removeRooms.Add(roomListing);
    }
    else
    {
        roomListing.Updated = false;
    }
}

foreach (RoomList roomListing in removeRooms)
{
    GameObject roomListingObj = roomListing.gameObject;
    RoomListButtons.Remove(roomListing);
    Destroy(roomListingObj);
    Debug.Log(roomListingObj.name + " is Destroyed");
}
Code language: C# (cs)
What the code above does, is it’s gonna go through all the rooms available in the RoomList and then check if the room is updated or not.
If you noticed in the RoomReceived function, each loop we set the value of the variable updated to true, so if that variable is set to false, that means that this room must be destroyed.
Test the Game!
Now we’re done with the code. Compile your game by going to File > Build Settings.
And make sure your scene is in open scenes.
Also, make sure that your game is in the window mode instead of full screen. Because we need to test run this game using two windows so we can see what’s happening in the background.
Once everything is setup, go ahead and click Build.
And after building, run your exported game.
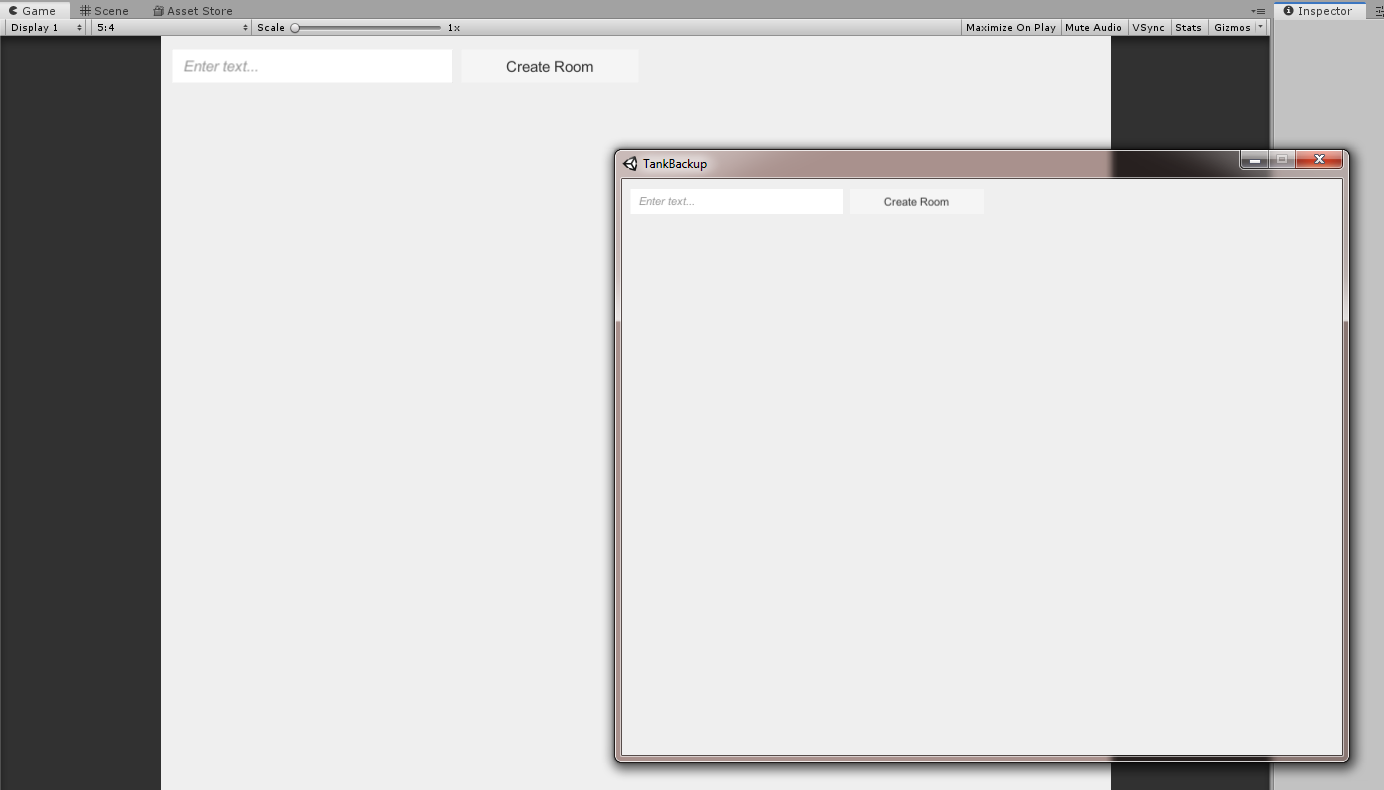
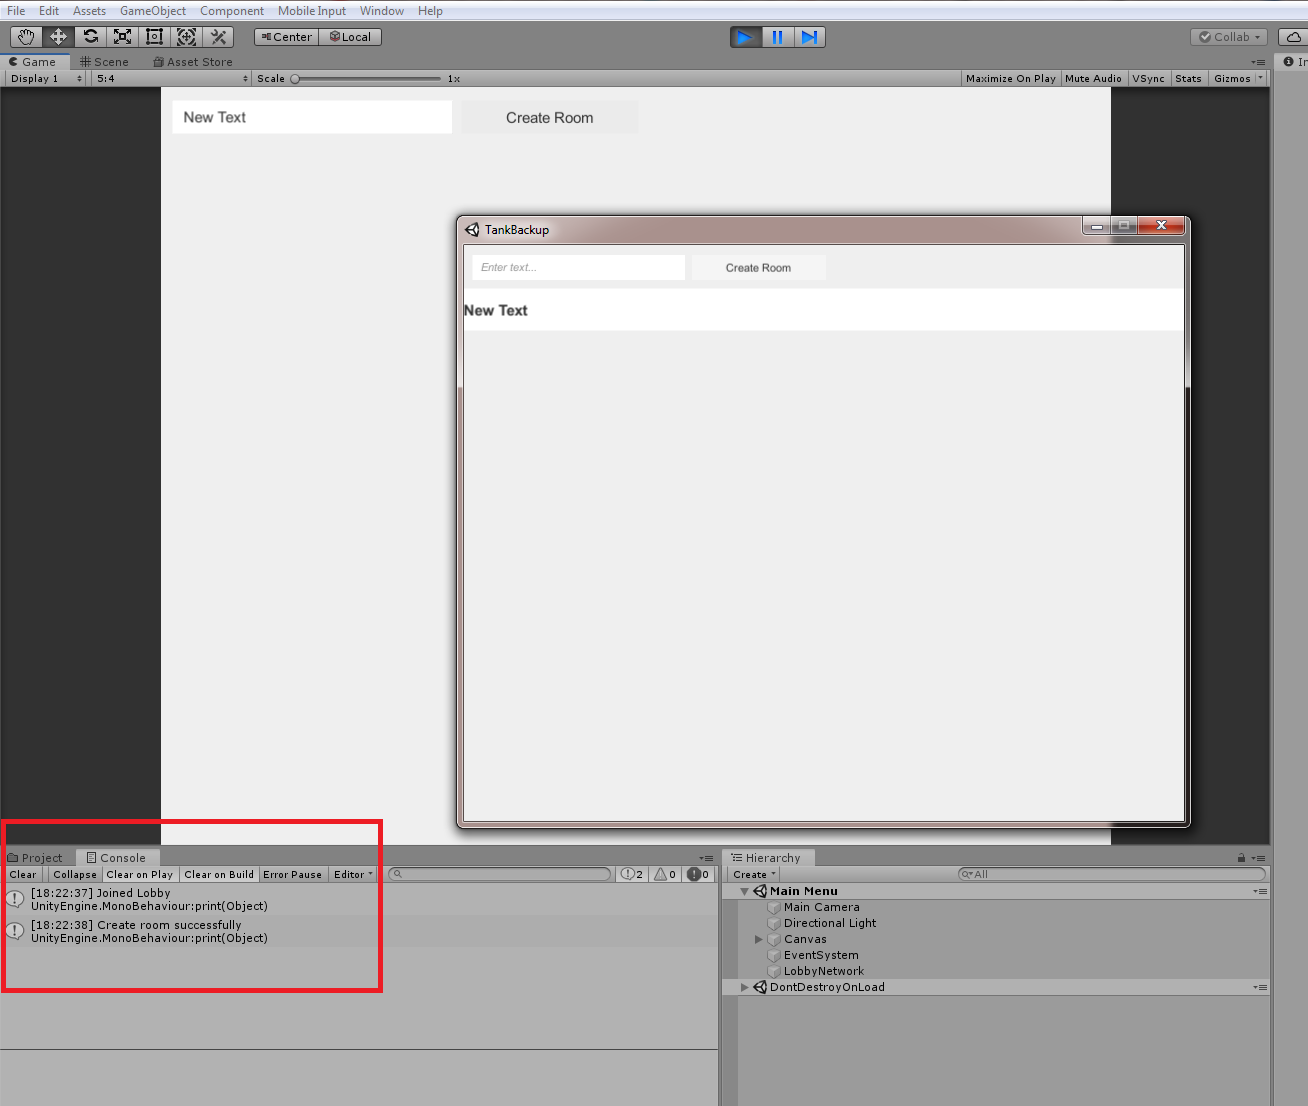
Go ahead and play your game and try to create a room. Then double-check if another game is responding to what’s happening to the other player.
Like this:
Conclusion
We have successfully created a functioning lobby where we are able to not only connect to the Photon Network but also able to create a room where other players can join.
In the next tutorial, we are going to create the room canvas and then program it so players are now able to gather inside a room.
error CS0103: The name `RoomListButtons’ does not exist in the current context
hello where can i get the rest of the tutorial; i need to finish the lobby for my game
I loved this tutorial, it was very useful for me, but I need complete my project and I want keep with your method. Please who can tell me were to find the rest of the tutorial. Thanks.