Hello! Welcome to WeeklyHow. This will be our very first tutorial for the year 2020 and we’re super excited to start this year by giving you a set of lessons that you can use to produce awesome games in the future.
For this tutorial series, we’ll be creating a replica of the game that you have probably played already, and that is the color switch game.
Have you heard of that game before?
If not, then let’s introduce this game before we proceed to the lesson.
What is Color Switch Game?
The color switch game is an obstacle-course game that is very easy to understand but very challenging to play. This game is a little bit similar to the game Flappy Bird, you tap your mobile screen and the ball will jump.
For this game, you will have to match the color of your ball to the color of the specific section of the rotating shape.
Sounds confusing?
Well, the rotating shape is divided into four sections. Each section has a different color.
For example, the first section is red, the second is yellow, the third is green, and the fourth section is blue. In this case, the color of your ball could be green.
You can only pass through this shape if you jump through the section where the color is green.
For this tutorial, we’ll be starting off the setting up our project so go ahead to your Unity game engine and create a new project.
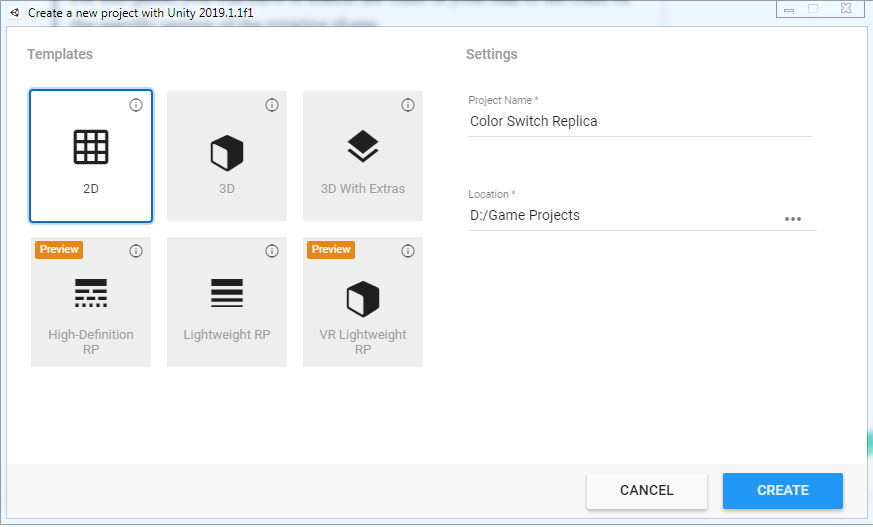
Make sure you have set your project to a 2D template and project name to whatever you want to call your project. In our case, we’ll call it Color Switch Replica.
Hit create.
Setting The Camera
Since our game will have multiple colors, our camera background should be set to a color like black because you don’t want to make your game so bright with colors that’ll make the player go crazy.
So go ahead and select your camera game object.
Proceed to your inspector and set the background to something like #353535.

Save your scene.
The Player
The next thing that we need to do is to set up our player. We’ll be using a 2D sprite for our player so it will be much easier for us to change its color to whatever color is possible.
So go ahead to your hierarchy, right-click, and select 2D Object and then select sprite.
Let’s rename our New Sprite to Player.
Next, navigate to your inspector and change the sprite to knob.

Player Script
Create a new C# script and open that with your code editor and copy the following code.
using System.Collections;
using System.Collections.Generic;
using UnityEngine;

public class Player : MonoBehaviour
{
    public float jumpHeight = 6f;

    public Rigidbody2D rigidbody;

    void Start()
    {
        rigidbody = GetComponent<Rigidbody2D>();
    }

    void Update()
    {
        if( Input.GetButtonDown("Jump") || Input.GetMouseButton(0) )
        {
            rigidbody.velocity = Vector2.up * jumpHeight;
        }
    }
}
Code language: HTML, XML (xml)
In the code above, we have declared two variables, one float, and one Rigidbody 2D.
Inside the update function, we simply added a condition that will make the player go upwards once the button jump is pressed or if the left mouse button is clicked.
We have mentioned that we added a Rigidbody to our script which means we’re going to require to add a Rigidbody component to our player.
So save your script and go back to Unity.
Select your player game object and in the inspector, click add component and look for Rigidbody 2D under the Physics 2D.
Change the value of the gravitational scale to 3. Then go to Constraints and check the Freeze Position for X and Freeze Rotation for Z.

Next, since we’ve added physics to our player, obviously, we’re gonna need to add a collider. So select add component once again and look for Circle Collider 2D under the Physics 2D.
Change the value of Is Trigger to checked and the value of radius to 0.08.

Make sure your Player script is assigned to your Player game object.

Save your scene.
By running the game, you should be able to make the player jump by pressing the spacebar key or the left mouse button.
The Rotating Color Wheel
Now that we have our player ready, let’s work on the obstacles for our player.
There are many shapes that you can use for the obstacles. You can make a square, a triangle, or any polygon shape that you can think of but for this tutorial, we’ll make it very simple, we’re going to create a rotating color wheel or circle where our player can stay inside the circle while waiting for his color.
To create your own shapes, you’re going to need a photo editor like Photoshop.
Any editor is fine but we highly recommend you use Photoshop since Unity editor can read PSD files.
You can skip this step by downloading the PSD file below but if you’re interested to know how to create a shape from scratch then you may proceed to read.
Creating the shape
To start, open your photoshop and set its size by 512 pixels in width and 512 pixels in height.

Next, press U to use the shape tool, then right-click to its icon and change from Rectangle shape tool to the ellipse tool.

Next, click on the canvas to open the create ellipse window.
Set the width to 450px and height to 450px.

That should create a new ellipse in your canvas.

Next, press C to select the crop tool, right-click to its icon and change it to slice tool.

Set its style to fixed aspect ratio and its width to 1 and height to 1.

Next, right-click onto your canvas and select Divide Slice.

Check the divide horizontally into and divide vertically into.
Then, set its slices down to 2 and slice across to 2 as well.

Press OK.
You should have your canvas divided into four squares.
Next, navigate to your layers and click the eye icon beside your background layer to disable it.

Next, select your ellipse layer and press CTRL + T to transform the layer.
Then, drag the shape to the center.
Make sure that the pivot point in the center of your shape is placed in the center of your canvas.

Next, with your ellipse layer selected, press CTRL + J three times to duplicate the layer.
By doing so, we should have 4 layers of ellipses.
Name the ellipse layers by the following:

Next, with your Red layer selected, press the M key to select the rectangular marquee tool.
Then, select the first square on the canvas. Make sure that your marquee selection covers the first square without exceeding.
And then, navigate to your Layers and press the box with a circle icon to create a mask or you may navigate to Layer > Layer Mask > Reveal Selection.

Do the same process to the rest of the ellipses but use the other corner of the slices. For example, for the blue layer, you use the top-right of the slice. For the yellow, use the bottom-left, and Green is for the bottom-right.
You should have the following.

Next, change the color of the shapes based on its layer name.
Make sure you take note of the hex value of each color. You will need them in Unity later on.
To change the color of the shape, just double-click on the layer thumbnail.
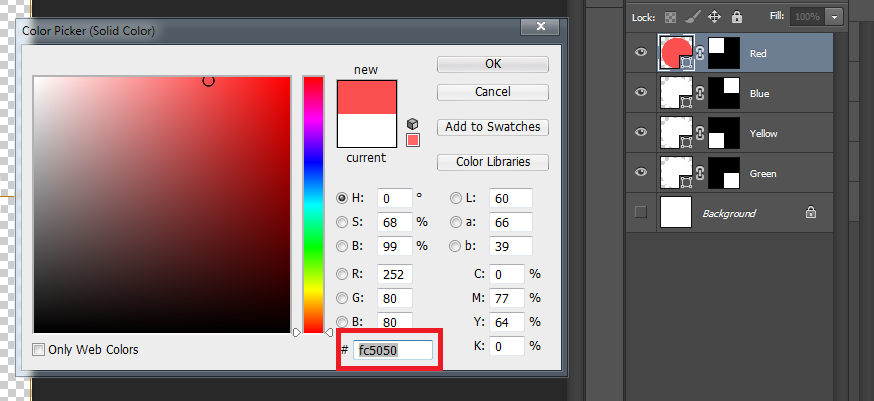
Once again, save the hex value of the color. In our case, the layer red gave us a hex value of fc5050.
Do the same process to the rest of the shape.
As a result, we have the following hex values:

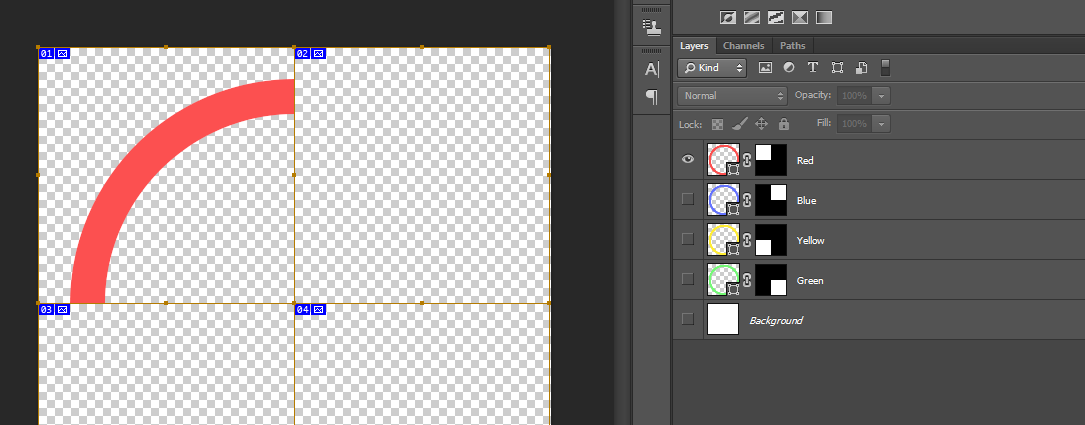
Next, we’ll reshape our ellipses to make it a ring instead of a full circle.
With your Red layer selected, press U to select the ellipses tool once again.
Then, navigate to the toolbar and change the Fill to transparent.

Next, change the stroke it from transparent to color wheel and paste the hex value that we had for the color red.

Press OK.
Next, change the value of the stroke’s width to 35 pt.

Do the same process to the rest of the layers.
You should have the following results:

Now that’s finished, let’s save the layer one by one because we’re going to use these colors as a sprite in Unity.
In your layers section, click on the eye icon to make them all invisible except for the layer Red.
Next, save the image by pressing CTRL + Shift + S and name the file red.psd
Next, enable the Blue layer and disable the Red layer, then save the file as blue.psd.
Same with the Yellow and Green.
What we’re doing here is we’re separating all the shapes into different PSD files because we’re going to use each file as a sprite.

Next, we’re going to import these PSD files so go back to Unity editor and create a new folder in your assets.
Name the folder Sprites.
Inside the Sprites folder, right-click and select Import New Asset…
Then navigate to the PSD files, in our case, we saved them in our Pictures libraries.

Select all and press Import.
You should see them in your sprites folder.

Creating the color wheel game object
That that we have the sprites, let’s drag all of them into our hierarchy one by one.

Next, create a new empty game object and name it color wheel.
Then drag all the colors game object into the color wheel game object.

With your Color Wheel game object selected, you should be able to rotate it in the Z-axis just like below:
Next up!
We’ll end up this tutorial here for now. In the next tutorial, we’ll begin setting up the obstacles and make it rotate seamlessly.
We’ll also write a script that will trigger a function once the player hits the wrong color.
For now, let us know in the comments below if you encountered any errors and we’ll try to help you.
How to rotate the circle? do we need to press down/up/right/left arrows? But i have an obstracle here. Even if i press those arrows there is no rotation. The circle i have created is not being rotated.