Real-time Strategy games (also known as RTS games) is one of the most popular game genres in history. In fact, there are hundreds upon hundreds of RTS games out there that are loved by millions of people.
One of the best features of any RTS games is the building system where players are allowed to create or to upgrade buildings. Creating this system is not that hard. In fact, you can do this with just a few lines of codes!
In this tutorial, we’re gonna be looking at how to create a building system that allows you to place buildings in an RTS way. We’ll also make things here interesting and fun as we’ll add features like building progress, selecting buildings, and destroying buildings.
We highly recommended reading the entire tutorial. However, if you don’t have that much time to read then we would like to suggest getting the following asset from the asset store which allows you to create a building system fast and easy.
Getting Started
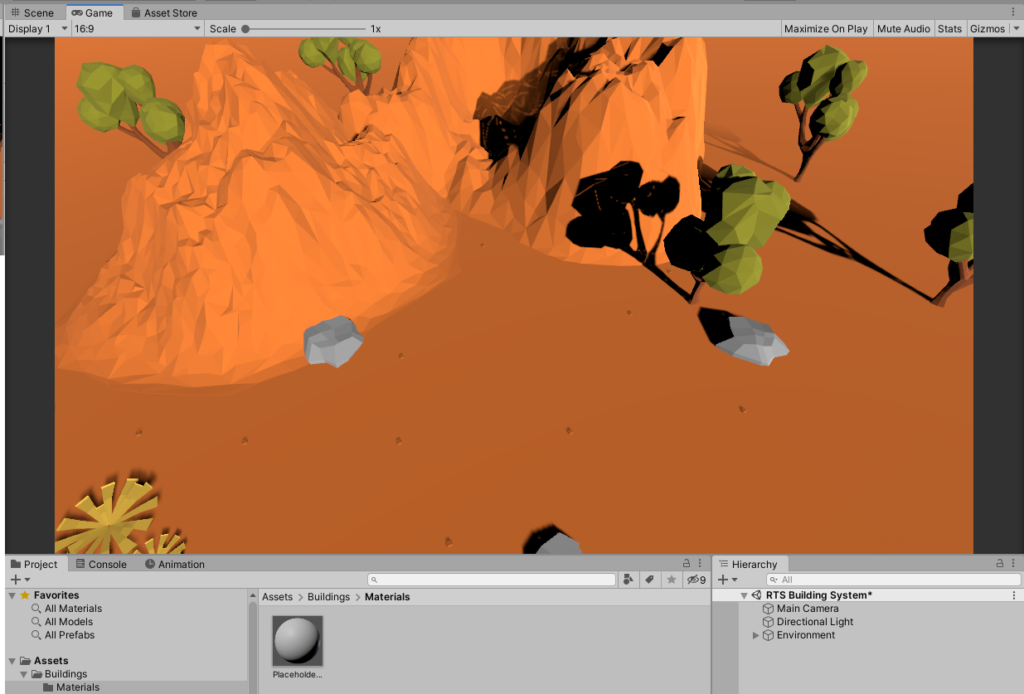
We’ll start this tutorial by creating a very simple scene like below.
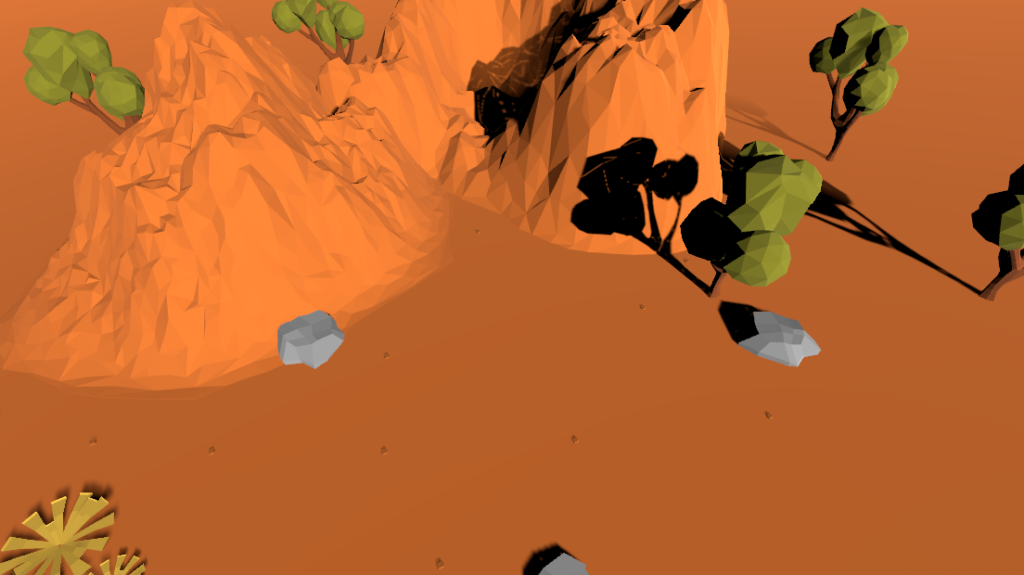
Don’t worry, you don’t have to copy the exact scene. All we need is a platform where our buildings will stand and of course, the buildings that we’re going to place on the platform.
If you don’t have buildings, we suggest looking at the asset store as there are hundreds of free assets out there.
For this tutorial, we’ve used the free assets like Low Poly Environment Pack and the Low Poly Fantasy House.
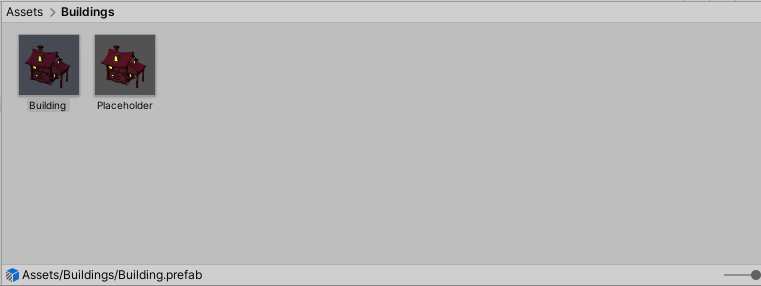
The Building
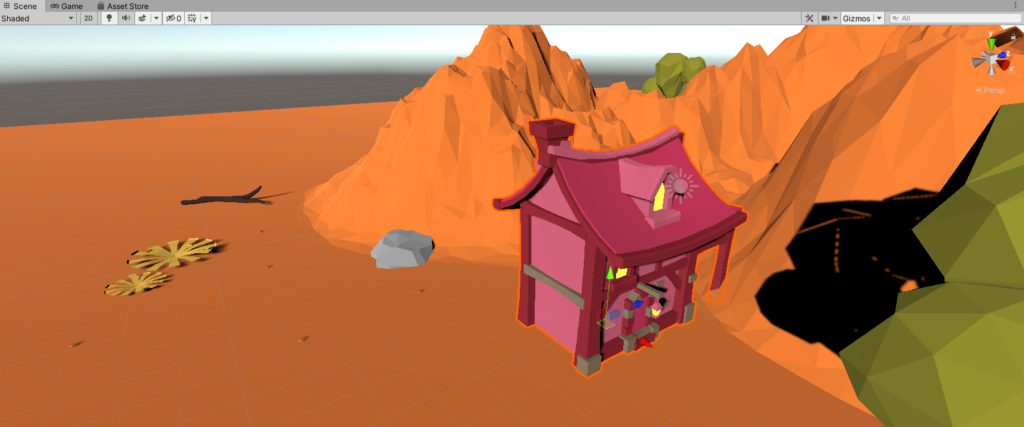
Once you have your assets imported, go ahead and place them into your scene like below.
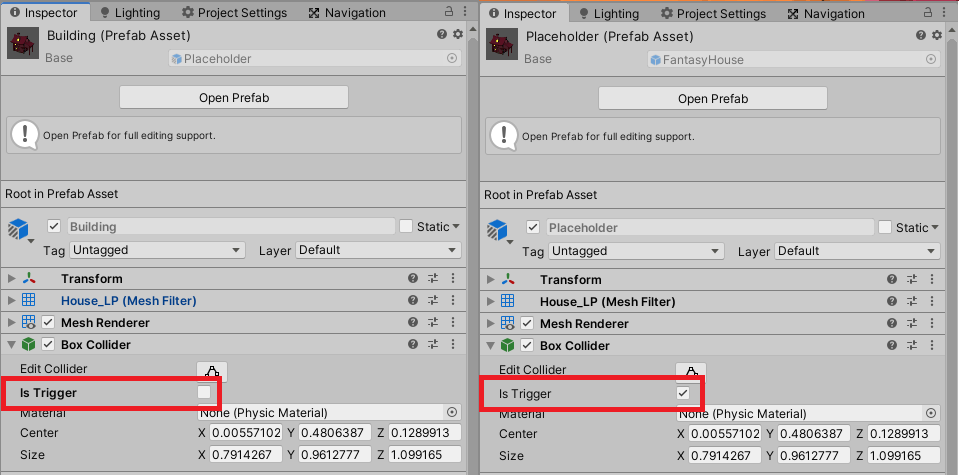
Then, with that building game object selected, navigate to its inspector and add a Box Collider component and set its trigger on.
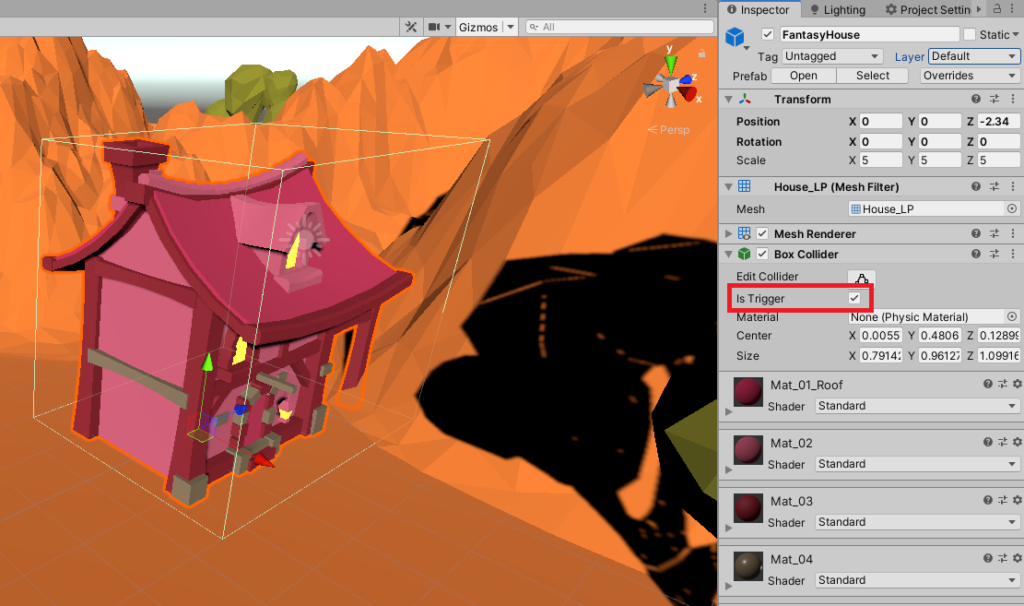
This will help us later on if this game object is colliding with other game objects and so make sure your environment (especially the trees, rocks, and other game objects) have colliders.
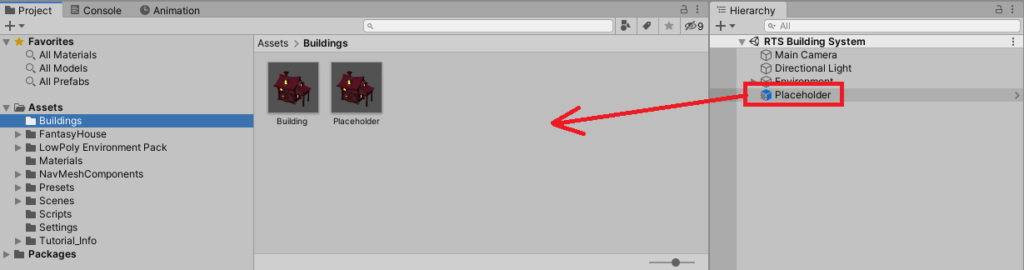
Next, we need to save this transform into two separate prefabs. One is for the placeholder and the second is for the actual building.
If you don’t know how to create a prefab then all you need to do is to drag the game object from the hierarchy to your project window.
For creating the prefab, make sure you create it as original and not as a variant. Otherwise, what you change to the Placeholder will also overwrite the Building prefab.
The difference between these two prefabs is their Box Collider‘s trigger value. The placeholder’s trigger is set to true and the actual building is set to false.
Awesome! Now we’re done with the building and its placeholder. However, if you have more than one buildings then feel free to do the same process to the rest of your buildings.
Now, the next thing that we’re going to do is to use both of these prefabs into our scene.
RTS Building System
Now that we’re done setting up our game objects, let’s proceed by creating the script for our building system.
Go ahead and create a new C# script and name it RTSBuildingSystem.cs and copy the following code.
using System.Collections;
using System.Collections.Generic;
using UnityEngine;

public class RTSBuildingSystem : MonoBehaviour
{
    private Vector3 _mousePosition;

    private void Start()
    {

    }

    private void Update()
    {
        _mousePosition = Input.mousePosition;

        Ray ray = Camera.main.ScreenPointToRay(_mousePosition);
        RaycastHit hit;

        if(Physics.Raycast(ray, out hit, Mathf.Infinity))
        {
            float positionX = hit.point.x;
            float positionZ = hit.point.z;

            Debug.Log(positionX + " / " + positionZ);

        }
    }
}
To explain the written code above, all we did first is we created a Vector3 variable then inside the Update() function we used this variable to get the current position of our mouse which we’ll use to create a ray. Then, we created a RaycastHit and check if it’s hitting something. If it does, then we get its point position both horizontal and forward axes.
Save the script and head back to Unity.
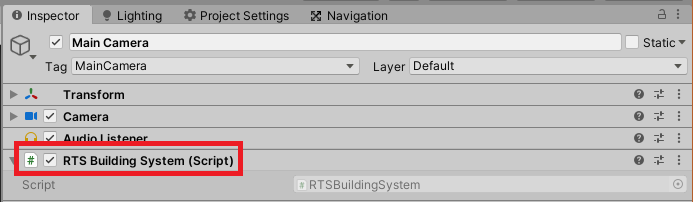
Select the Main Camera and apply the script that we just created.
Run the game and you should be able to see in the console our current mouse position.
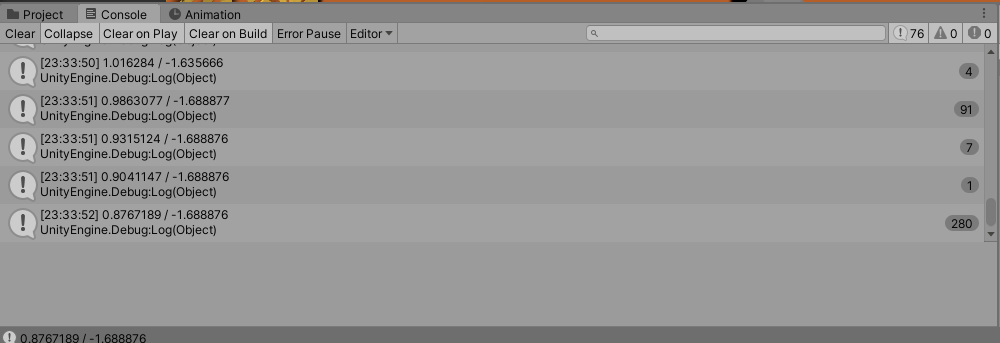
However, you may have noticed that our game becomes a bit slow. This is because we are getting and checking our mouse position in every frame per second which is really unnecessary.
We can fix this by assigning our current mouse position into a variable. Then, we should check if the current mouse position is not equal to the previous mouse position. Therefore, it will stop checking and getting the position again and again which will save us memory. Easy.
So with that being said, head back to your script and update its code to the following:
using System.Collections;
using System.Collections.Generic;
using UnityEngine;

public class RTSBuildingSystem : MonoBehaviour
{
    private Vector3 _mousePosition;
    private float _previousX;
    private float _previousZ;

    private void Start()
    {

    }

    private void Update()
    {
        _mousePosition = Input.mousePosition;

        Ray ray = Camera.main.ScreenPointToRay(_mousePosition);
        RaycastHit hit;

        if(Physics.Raycast(ray, out hit, Mathf.Infinity))
        {
            float positionX = hit.point.x;
            float positionZ = hit.point.z;

            if(_previousX != positionX || _previousZ != positionZ)
            {
                _previousX = positionX;
                _previousZ = positionZ;

                Debug.Log(_previousX + " / " + _previousZ);
            }
        }
    }
}
Save the script and if you run the game once again, you should be able to see that the game is running much smoother than the previous run.
Applying The Placeholder
Now that we have our mouse position, let’s start displaying our placeholder building in our game.
Doing this is super easy. All we need to do is to get our placeholder prefab, then instantiate this prefab in our scene, then update its position to our current mouse position.
Head back to our building system script and update its code to the following.
using System.Collections;
using System.Collections.Generic;
using UnityEngine;

public class RTSBuildingSystem : MonoBehaviour
{
    [SerializeField]
    private GameObject _placeholderBuilding;
    private GameObject _placeholder;

    private Vector3 _mousePosition;
    private float _previousX;
    private float _previousZ;

    private void Start()
    {
        _placeholder = Instantiate(_placeholderBuilding);
    }

    private void Update()
    {
        _mousePosition = Input.mousePosition;

        Ray ray = Camera.main.ScreenPointToRay(_mousePosition);
        RaycastHit hit;

        if(Physics.Raycast(ray, out hit, Mathf.Infinity))
        {
            float positionX = hit.point.x;
            float positionZ = hit.point.z;

            if(_previousX != positionX || _previousZ != positionZ)
            {
                _previousX = positionX;
                _previousZ = positionZ;

                _placeholder.transform.position = new Vector3(positionX, 0f, positionZ);
            }
        }
    }
}
In the updated code above, we created two new private variables. One is the _placeholderBuilding and the second is the _placeholder.
If you noticed, we’re always using private variables. This is a good practice especially if you’re not planning on sharing these variables with other scripts. Not only that, setting your variables to private will prevent you from seeing these variables in your inspector.
However, we want one of these variables to be present in our inspector, that’s why we added a [SerializeField] attribute into our _placeholderBuilding variable.
If you want to learn more about [SerializeField] attribute, feel free to check Unity’s official documentation.
Going back to the explanation.
After we declared the two variables, we added a line of code inside our Start() function. In the start function, we instantiated a game object and then assign it into our _placeholder variable.
Notice that we didn’t apply any position or rotation in our instantiated game object. The reason why we didn’t apply position and rotation value in our clone game object is because, as soon as it gets instantiated, it will immediately snap into our mouse position. Thanks to the update function.
Speaking of the update function, we added a line of code which is the:
_placeholder.transform.position = new Vector3(positionX, 0f, positionZ);Code language: JavaScript (javascript)With this line of code, our placeholder will always move with our mouse position.
Also, we kept its vertical position with a zero value. This is because we never intended to place it over a mountain or over a game object. However, I know you’re thinking that there will be instances that our platform can have levels or heights.
Which is true! But for now, let’s just keep it simple. We’ll talk about that in the future :).
Now with everything explained, save the script and head back to Unity.
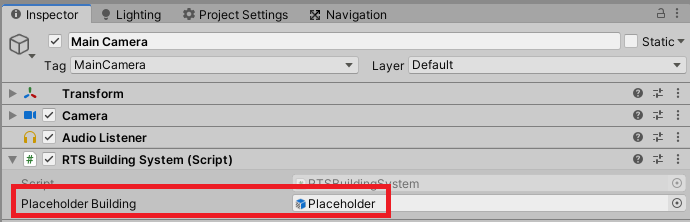
After the script is refreshed, select your Main Camera and apply the Placeholder prefab into the Placeholder Building variable.
Now, if you run the game, you should be able to see the building in your cursor like below.
It looks awesome right?
Now, let’s try and place this building in our environment.
Doing this is very easy. All we need to do is to just instantiate the building and just use the current position of our mouse for the position of our building.
Open your building system script once again and update its code to the following:
using System.Collections;
using System.Collections.Generic;
using UnityEngine;

public class RTSBuildingSystem : MonoBehaviour
{
    [SerializeField]
    private GameObject _placeholderBuilding;
    private GameObject _placeholder;

    [SerializeField]
    private GameObject _building;

    private Vector3 _mousePosition;
    private float _previousX;
    private float _previousZ;

    private void Start()
    {
        _placeholder = Instantiate(_placeholderBuilding);
    }

    private void Update()
    {
        _mousePosition = Input.mousePosition;

        Ray ray = Camera.main.ScreenPointToRay(_mousePosition);
        RaycastHit hit;

        if(Physics.Raycast(ray, out hit, Mathf.Infinity))
        {
            float positionX = hit.point.x;
            float positionZ = hit.point.z;

            if(_previousX != positionX || _previousZ != positionZ)
            {
                _previousX = positionX;
                _previousZ = positionZ;

                _placeholder.transform.position = new Vector3(positionX, 0f, positionZ);
            }

            if (Input.GetMouseButtonUp(0))
            {
                Instantiate(_building, _placeholder.transform.position, Quaternion.identity);
            }
        }
    }
}
For the update above, all we did is we just created one private variable which references our building prefab. Then inside our Update() function we added an if statement that checks our Player input.
If the player presses the left mouse button, then we instantiate the building and use the vector position of our placeholder. Therefore the building will be planted in the position where our player wanted it to be in.
If you save the script and try it, you should be able to build the building like an RTS.
However, there is an issue.
If you try to keep firing the left mouse button, our script will keep on building without considering that there’s already a building placed on the same position. Bad.
To fix this, we’ll have to create a new script that checks if our placeholder is colliding with other game objects.
This is where our box collider’s trigger will come in handy *winks*
Building Placeholder Script
Now, navigate to your assets folder and create a new C# script. Name it Building.cs and copy the following code.
using System.Collections;
using System.Collections.Generic;
using UnityEngine;

[RequireComponent(typeof(BoxCollider))]
[RequireComponent(typeof(Rigidbody))]
public class Building : MonoBehaviour
{
    public bool isBuildable = true;

    private int _collisionHit = 0;
}
For the code above, we need to make sure that our placeholder prefab have a rigidbody and a box collider. Thanks to RequireComponent, we can strictly check if the prefab contains both components otherwise add them automatically.
Then, we create two variables. One is a boolean variable which we’ll use later to check if the building is placable in the ground or not. Second is the _collisionHit variable, we’ll use this variable to count how many objects are currently touching our placeholder building.
Now the next thing that we need to do is to check if the placeholder building is colliding with other objects/buildings. If it is, then we need to set the value of isBuildable to false. Otherwise, set it to yes.
To do this, we’ll have to use methods like OnTriggerEnter and OnTriggerExit. If you remember moments ago, we set the trigger collider of our placeholder to true. We can use that to check if there are game objects entered the collider.
Let’s do that, open the Building.cs script and update its code to the following:
using System.Collections;
using System.Collections.Generic;
using UnityEngine;

public class Building : MonoBehaviour
{
    public bool isBuildable = true;

    private int _collisionHit = 0;

    private void FixedUpdate()
    {
        if(_collisionHit > 0)
        {
            isBuildable = false;
        } else
        {
            isBuildable = true;
        }
    }

    private void OnTriggerEnter(Collider other)
    {
        if(other.gameObject.tag != "Platform") _collisionHit++;
    }

    private void OnTriggerExit(Collider other)
    {
        if (other.gameObject.tag != "Platform") _collisionHit--;
    }
}
For the code update above, all we added are the two functions that we mentioned earlier, inside these two functions we check if the game object that entered the trigger is not a platform. In other words, the _collisionHit variable will only update its value if the game object is a tree, a rock, a building, etc.
Also, we added a FixedUpdate function to check if the value of the _collisionHit variable is more than 0 or less. If it is more than 0 then we set the isBuildable to false. Otherwise, set it to true.
We mentioned earlier that the trigger functions check if the game object tag is not equal to platform. The reason why we’re doing this, it’s because the placeholder will keep on touching the platform, therefore, the value of the _collisionHit variable will always become 1 and so it’s important to exclude the platform from the trigger.
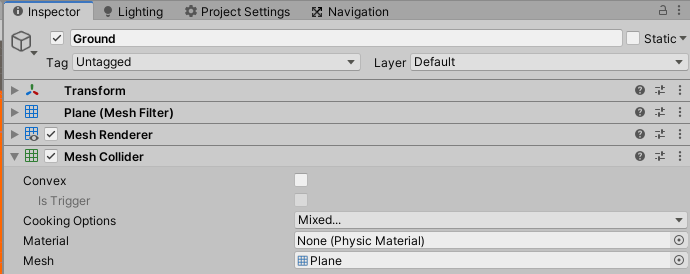
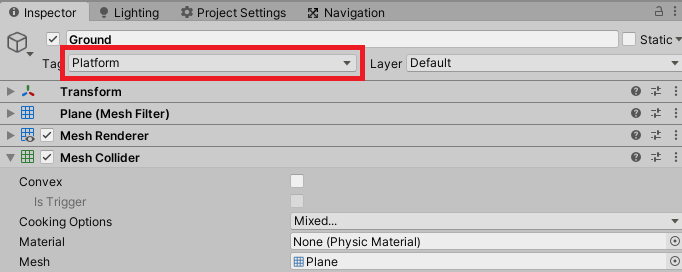
With that being said, save the script and head back to Unity and select the terrain/platform/ground or whatever you have in your scene that represents the ground.
In our case, we have this Ground game object.
We need this prefab to have a new tag and so underneath its name, click the Untagged dropdown and select Add Tag.
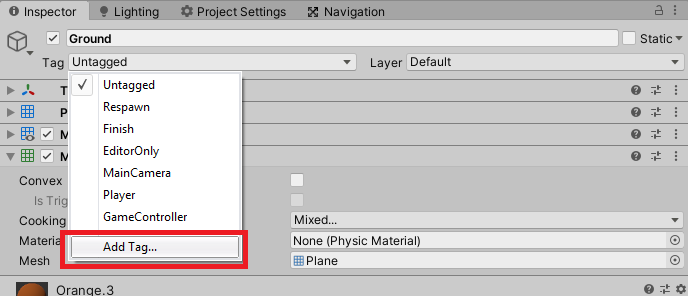
Then, click the plus button and name the new tag “Platform” like below.
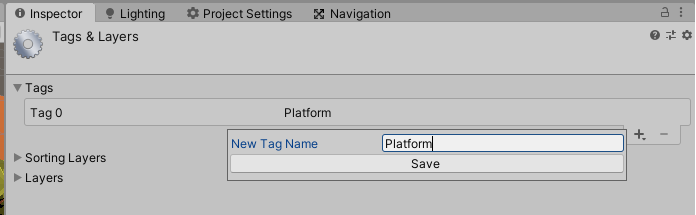
Hit Save and select the Ground game object once again and change its tag from Untagged to Platform.
Awesome! Now we’re almost set.
Now, the next thing we need to do is to use the isBuildable variable in our building system script.
Open the RTS building system script and update its code to the following:
using System.Collections;
using System.Collections.Generic;
using UnityEngine;

public class RTSBuildingSystem : MonoBehaviour
{
    [SerializeField]
    private GameObject _placeholderBuilding;
    private GameObject _placeholder;

    [SerializeField]
    private GameObject _building;

    private Vector3 _mousePosition;
    private float _previousX;
    private float _previousZ;

    private Building _buildingScript;

    private void Start()
    {
        _placeholder = Instantiate(_placeholderBuilding);
        _buildingScript = _placeholder.GetComponent<Building>();
    }

    private void Update()
    {
        _mousePosition = Input.mousePosition;

        Ray ray = Camera.main.ScreenPointToRay(_mousePosition);
        RaycastHit hit;

        if(Physics.Raycast(ray, out hit, Mathf.Infinity))
        {
            float positionX = hit.point.x;
            float positionZ = hit.point.z;

            if(_previousX != positionX || _previousZ != positionZ)
            {
                _previousX = positionX;
                _previousZ = positionZ;

                _placeholder.transform.position = new Vector3(positionX, 0f, positionZ);
            }

            if (Input.GetMouseButtonUp(0))
            {
                if(_buildingScript.isBuildable)
                    Instantiate(_building, _placeholder.transform.position, Quaternion.identity);
            }
        }
    }
}
Code language: HTML, XML (xml)
For the code update above, all we did is we created a variable to reference our placeholder’s script Building (We should’ve named this script “Placeholder” instead.. dumb.. let’s just do that later.)
Then, inside the Start() function, we get the placeholder’s script with GetComponent<>(). Then, inside the if statement where we check if the player pressed the left mouse button, we added a nest if statement to check if the isBuildable is true. If it is, then we build. Otherwise, the building will not be placed on the platform.
Save the script and head back to Unity.
Make sure the Building.cs script is applied to the Placeholder prefab.

Now, if you try to run the game, you should be able to build only on the ground with no rocks, trees, mountains, etc.
Awesome! Now we’re done!
Actually, not yet.
Building Placeholder Checker
Let’s make this a little bit more interesting. Let’s give our placeholder something that could tell the player if the building is placeable or not. You know? like in most RTS games, there is a plane underneath the building that changes colors from green to red or back and forth.
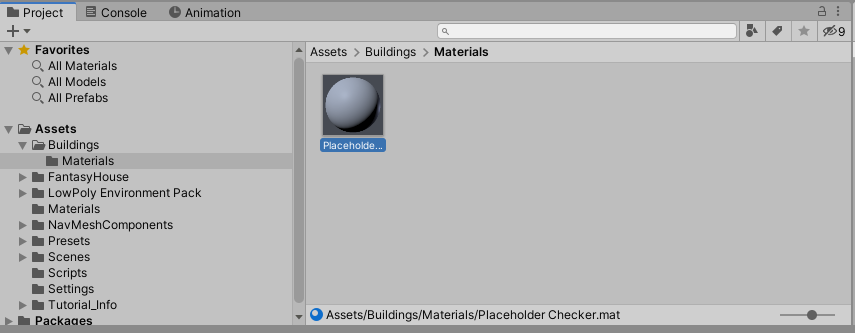
Head back to Unity and create a new folder for the material.
Then, create new material and name it Placeholder Checker.
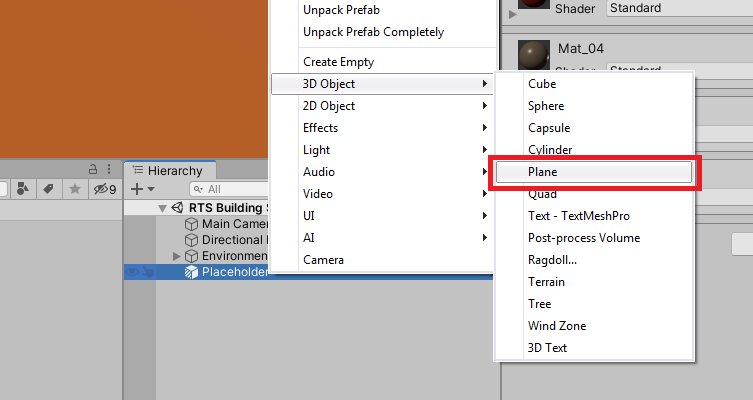
Next, select the Placeholder game object in the hierarchy and create a 3D game object by right-clicking onto it and select Plane.
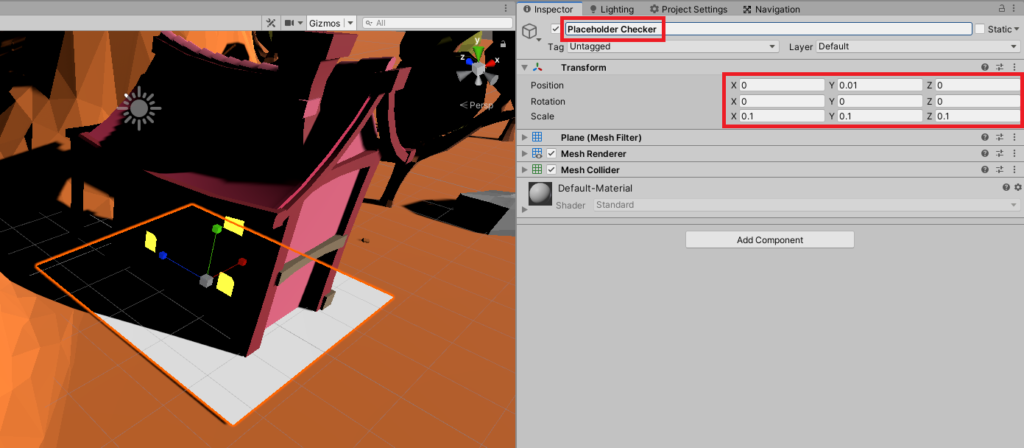
Next, rename the Plane to Placeholder Checker and scale it down to where it fits with the building. Also, make sure you raise it a little bit so it won’t go below the platform.
Like this.
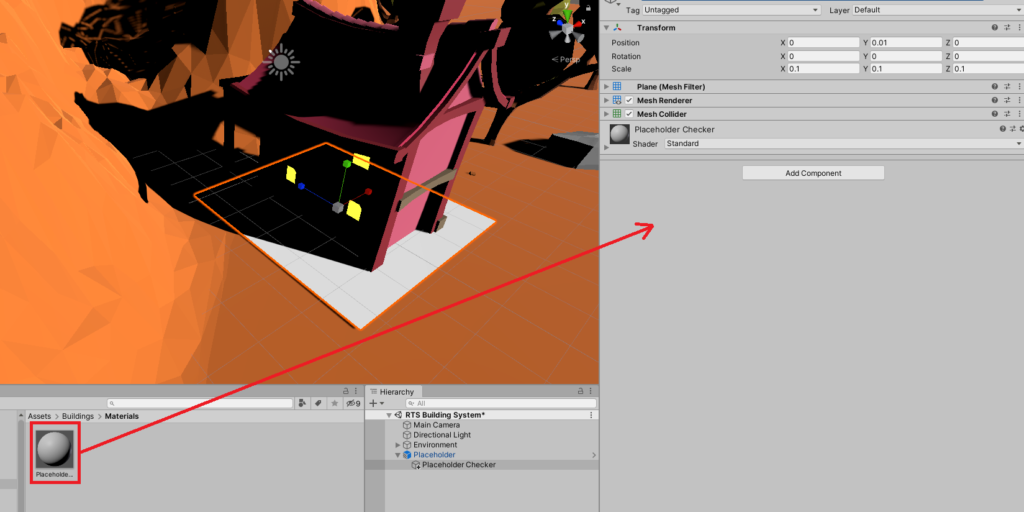
Next, apply the material we created a while ago by dragging the material to the Placeholder Checker or to its inspector.
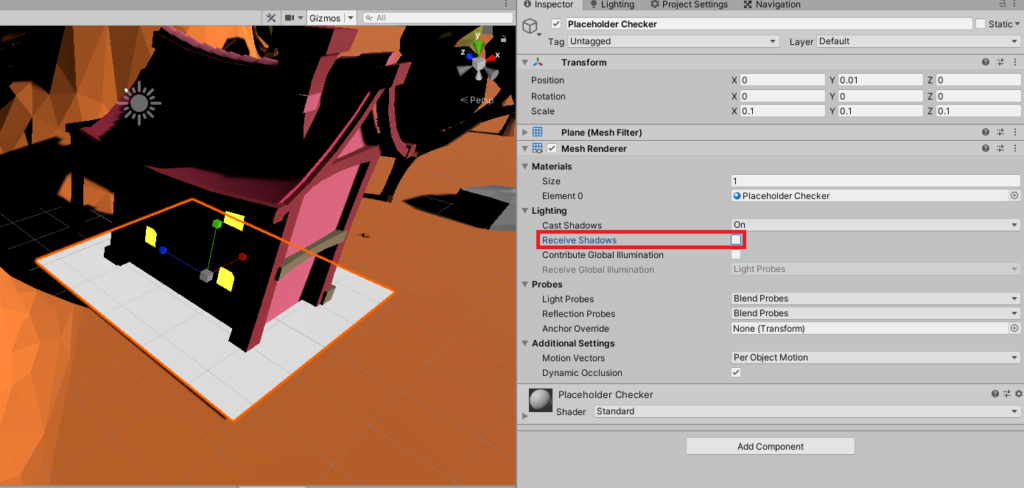
We don’t want this plane to receive shadows and to collide with other game objects so just remove the Mesh Collider and uncheck its Receive Shadow in the Mesh Renderer.
Done! Now, before we proceed, make sure you overwrite the changes you made in the Placeholder game object. To save the changes to the prefab, click the Overrides button, and select Apply All. This will update the Placeholder prefab.

Awesome! Now that we have everything set up. You can just remove the Placeholder in the hierarchy.
Now, let’s proceed and update our Building script.
Open the Building.cs script and update its code to the following.
using System.Collections;
using System.Collections.Generic;
using UnityEngine;

public class Building : MonoBehaviour
{
    public bool isBuildable = true;

    private int _collisionHit = 0;
    private Renderer _placeholderChecker;

    private void Start()
    {
        _placeholderChecker = transform.Find("Placeholder Checker").GetComponent<Renderer>();
    }

    private void FixedUpdate()
    {
        if(_collisionHit > 0)
        {
            isBuildable = false;
            _placeholderChecker.material.SetColor("_Color", Color.red);
        } else
        {
            isBuildable = true;
            _placeholderChecker.material.SetColor("_Color", Color.green);
        }
    }

    private void OnTriggerEnter(Collider other)
    {
        if(other.gameObject.tag != "Platform") _collisionHit++;
    }

    private void OnTriggerExit(Collider other)
    {
        if (other.gameObject.tag != "Platform") _collisionHit--;
    }
}

Code language: HTML, XML (xml)
For the update above, we created a Renderer variable to access the material of our Placeholder Checker. Then, we added the Start() function to get the component from our Placeholder Checker. It’s important to do it this way instead of getting the material inside the update function. GetComponent is a really expensive function and can quickly slow down your game if you don’t use it correctly.
Now that we have our material, we can use it to change the color of the Placeholder Checker game object. Inside the FixedUpdate() function, we used the SetColor() function to change the color of the game object to red and to green depending on the value of the _collisionHit.
Now if you save the script and run the game, you should see that the placeholder can tell you if it’s buildable or not. Pretty awesome.
Conclusion
There you have it! You have finally created an RTS type of building system which is customizable and easy to use. We’ll continue this tutorial next week! Next week, we’ll add a building time progress once you have placed the building and then, when the progress bar is fully loaded the building will be built.
If you have encountered any errors or issues, let us know in the comments below and we’ll help you out as fast as we can. For the moment, we thank you for reading and for learning with us. See you soon!
Disclosure: This article may contain affiliate links, which means we may receive a commission if you click a link and purchase something that we have recommended.
Instead of using:
_placeholderChecker.material.SetColor(“_Color”, Color.red);
you should change this line to:
_placeholderChecker.material.color = Color.red;