
Most web application nowadays uses what is called the “REST API” to make a call from a client to a server through HTTP to get feedback. The concept of REST API is actually the same as AJAX. You ask a web client for a response depending on the data that you have in a variable (if you have).
But what if you’re using React? How do you use REST API?

In this tutorial, we’re going to take a look at how to use a REST API in ReactJS using a lightweight HTTP library called Axios.
What is Axios
Axios is a promised-based HTTP request library that allows you to interface with REST API in a much simpler way (and cool way). You may check their official repository here.
In comparison with AJAX or getJSON, Axios is much more readable and easier to manage.
Take a look at the example below:
axios.get(`https://weeklyhow.com/codes/examples/json/person_data.json`).then((response) => {
      displayData(response.data);
});
Code language: JavaScript (javascript)
Notice that it is much more straightforward compared to AJAX.
In the code above, we simply used the get function from the axios library and passed the URL of where the data is coming from. This is called an endpoint.
Then, the feedback will be passed to the response variable and there we can create a function of what we can do to the response.
How to install and use Axios to make HTTP requests

In this section, you will install Axios to the React project that you created following the How to Create a React App with Node.js.
1. Adding Axios to the project
To add Axios to your project, simply open your terminal and run the following command:
npm install axios
Code language: Bash (bash)
Once the installation for Axios is finished, we can then create a new component to display a list of products.
2. Create a new component
To create a new component, navigate to your project folder and inside the src folder, create a new folder, and name it Components.
Then, inside this new folder, create a new file and name it ProductList.js

Open ProductList.js and copy the following code:
import React from 'react';
import axios from 'axios';

export default class ProductList extends React.Component {
    state = {
        products: [],
    };

    componentDidMount() {
        axios.get(`https://jsonplaceholder.typicode.com/photos`).then((response) => {
            const productsResponse = response.data;
            this.setState({ products: productsResponse });
        });
    }

    render() {
        return (
            <div className="grid-container">
                {
                    this.state.products.map (
                        product => <div key={product.id} className="grid-item">
                                        <img src={product.url} width="200px"/><br/>
                                        <h3>{product.title}</h3>
                                    </div>
                    )
                }
            </div>
        )
    }
}
Code language: JavaScript (javascript)
In the code above, we firstly import React to access componentDidMount() and render() functions. We also need to import axios to access the functions like get(), put(), and delete().
As an example in the code above, we’ll be using the image resource from jsonplaceholder to display a list of images. Let’s just pretend that all of these images are the product images.
Now, inside the render() function, we’ll loop through the response using the map() function.
Since we’re using map() function, we’ll have to provide a unique key for each loop. Otherwise, we’ll get an error. So, just right beside the div tag, add a key attribute and pass the value of id from the product variable.
Let’s use this component in our App.js file.
3. Using the ProductList component
To use the component that we just created, copy the following highlighted code onto your App.js file.
import React from 'react';
import logo from './logo.svg';
import './App.css';

import ProductList from './Components/ProductList';

function App() {
  return (
    <div className="App">
      <ProductList></ProductList>
    </div>
  );
}

export default App;

Code language: JavaScript (javascript)
In the code above, we simply just imported the ProductList component and call it inside our App() and return function.
Now, since we have applied some styling to our elements, let’s open our App.css file and replace its entire stylesheet code with the following:
.grid-container {
  display: grid;
  grid-template-columns: auto auto auto;
  padding: 10px;
}
.grid-item {
  background-color: rgba(255, 255, 255, 0.8);
  padding: 20px;
  font-size: 30px;
  text-align: center;
}
Code language: CSS (css)
Save all of the script and open your terminal and run the following command to test your web application.
yarn start
Code language: Bash (bash)
Or if you don’t have yarn installed, use the following:
npm start
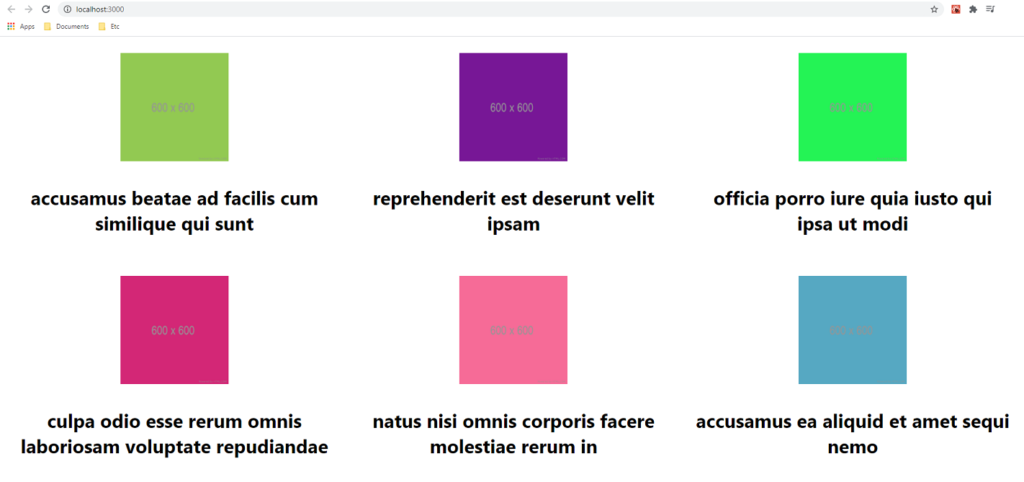
Code language: Bash (bash)This should give you the following output:
How to make POST requests with Axios
Using Axios to make a POST request is actually quite similar to making a GET request. The only difference is we need to send a data object and pass it as the second argument in the post() method.
Let’s use the very same component. Open the ProductList.js and update its code to the following:
import React from 'react';
import axios from 'axios';

export default class ProductList extends React.Component {
    componentDidMount() {
        axios.post(`https://jsonplaceholder.typicode.com/photos`, {
            albumId: 1,
            title: "Hello World!",
            url: "https://weeklyhow.com/",
            thumbnailUrl: "https://weeklyhow.com/"
        }).then((response) => {
            console.log(response);
        });
    }

    render() {
        return (
            <div className="grid-container"></div>
        )
    }
}
Code language: JavaScript (javascript)
In the code above, we simply used the same endpoint for the post method and sent a data object containing an albumId, title, url, and thumbnailUrl.
All of these data are for example purposes only. Feel free to customize it and see what you will be getting.
In our case, saving the script will give us the following output in the inspector’s console.

How to make DELETE requests with Axios
Using Axios to make a delete request is as easy as making GET requests. All you need to do is to use an endpoint and specify which data you wish to be deleted and that’s it.
However, like most HTTP requests, there are instances that you need to pass the data (like id) through the header or through the direct endpoint URL.
Let’s say we have the following endpoint:
https://jsonplaceholder.typicode.com/photos/{id}Code language: JavaScript (javascript)Notice that the endpoint requires us to provide an id at the end of the URL.
Some endpoints are like this. Some are not.
So you’ll have to always remember where you should be passing your data.
If in case that the endpoint does not specify an id or anything. Then all it means is you have to use the header like the post() method.
Open ProductList.js once again and let’s try the following code:
import React from 'react';
import axios from 'axios';

export default class ProductList extends React.Component {
    componentDidMount() {
        const id = 1;

        axios.delete(`https://jsonplaceholder.typicode.com/photos/` + id).then((response) => {
            console.log(response);
        });
    }

    render() {
        return (
            <div className="grid-container"></div>
        )
    }
}
Code language: JavaScript (javascript)
In the code above, the endpoint is asking us to pass an id at the end of its URL and so we created a const variable and gave it a value of 1 as an example.
Then, in the first argument for the delete() method, all we need to do is to concatenate the id variable at the end.
Saving the script will give us the following output in the console.

Now what about if the endpoint doesn’t have a data variable like for example:
https://httpbin.org/deleteCode language: JavaScript (javascript)Then, in that case, we’ll have to use the params option to send a data to the API.
Open the ProductList.js and update its code to the following:
import React from 'react';
import axios from 'axios';

export default class ProductList extends React.Component {
    componentDidMount() {
        const id = 1;

        axios.delete(`https://httpbin.org/delete`, { params: { id: id } }).then((response) => {
            console.log(response);
        });
    }

    render() {
        return (
            <div className="grid-container"></div>
        )
    }
}
Code language: JavaScript (javascript)
In the code above, we will be providing a data object in the second argument. However, this data object should always start with the params option before the data that you will be sending.
Note that you can also use the data option instead of params to pass data to the header.
Saving the script will give us the following output in the console:

And there you have it. You have deleted a data with an ID of 1 from the API.
Conclusion
Axios is a great library for making HTTP requests. If you have used jQuery before, then you must have noticed that it’s quite similar.
In this article, we have learned how to install Axios to a React project and use Axios to get, create, and delete data from the API.
Do you have any tips that you wish to share? Let us know in the comments below.