You have finally developed your game and you’re planning on publishing it on Google Play Store. However, you realized that you missed something and that is saving the progress of your players.
Saving and loading data using Unity is very easy.

One way to do this is by using PlayerPrefs. However, this could also ruin your game since the data inside the player prefs are pretty much not secure.
In this tutorial, we’re gonna be looking at how you can implement a save/load system using your own file type so you will have more control over the data that the player is saving. We’ll also use some encryption to ensure that the data is secure. That way players won’t be able to modify the save file that the game is making.
Getting Started
Like what we mentioned above, one of the quickest ways to save and load data is by using PlayerPrefs which is one of the built-in functions of Unity. PlayerPrefs is usually used for saving small data like high scores and names.
But, if your game requires more data to be saved then you’re gonna need more than just player prefs. A good example of this is by using XML or JSON. However, both of these are also not very secured.
If the players are familiar with web programming, chances are they can also modify or read what’s inside the XML/JSON file.
The best way to save and load data is by creating your own binary files.
It may sound very complicated but creating your own binary files is actually very easy to do. Not only that, this works not only for Windows platform but also for other platforms such as Android and iOS.
To get started with creating your own save file, all you need to do is to create first a class that can contain the data that you want to save. This can be an integer, boolean, float, and array.
If you want to save positions or better known as Vector3 data, unfortunately, you can’t directly save it as a single variable. However, there’s one trick that you can do to safely save Vector3 data and that is by using an array of float.
Working with data files and such can be super tiresome and annoying especially if your game is huge and contains a lot of data to retrieve. If you think your game needs to save hundreds of data, we HIGHLY recommend you download Easy Save – The Complete Save & Load Asset.
With all that being said, let’s head to Unity and start saving our gam
Saving Character Data
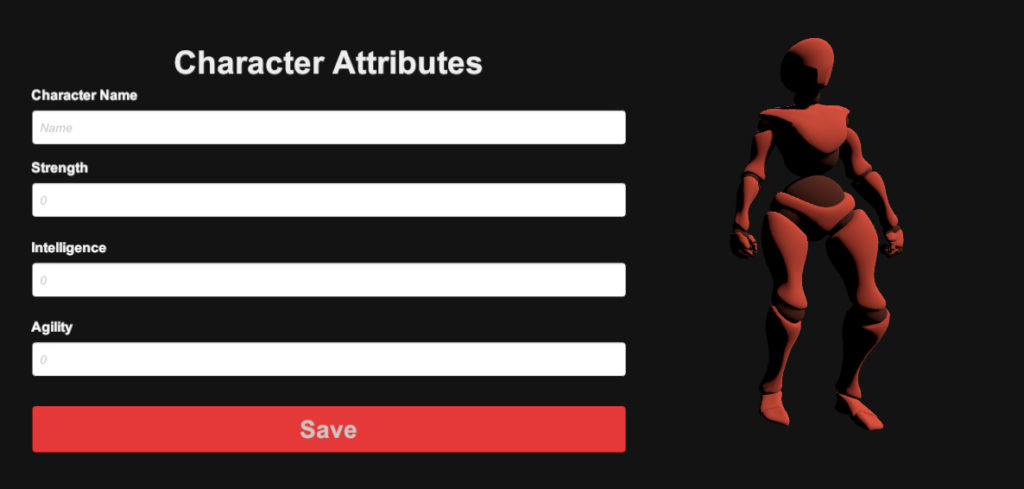
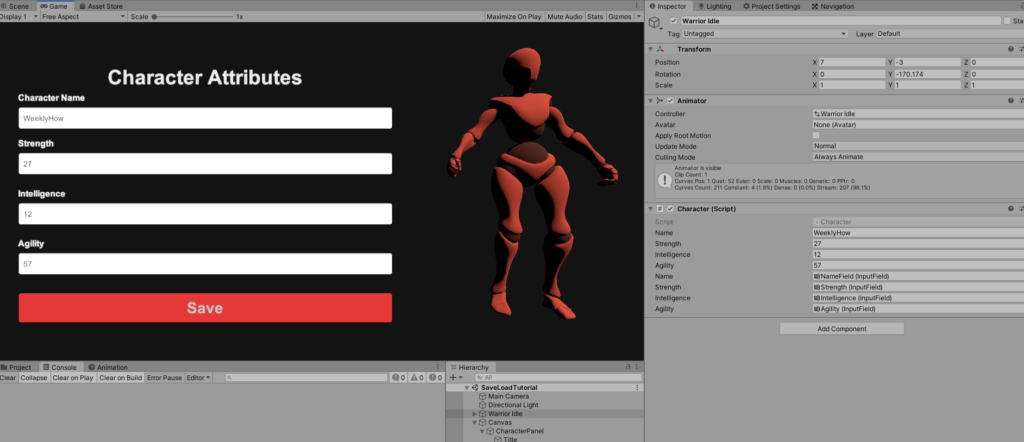
Let’s say we have this scene above where the player can save his character.
In the example image above, we have an input box for the Player’s name and another set of input boxes for the character’s statistics.
Our goal for this is once we hit the save button, the game should create a save file into our device. Then, if we re-run the game again, the game should load the data that we saved in our device. Simple as that.
Character Script
Before we can successfully create a functioning save/load system with Unity, we need to make sure that we have the source of data for our class.
We’ll be creating our own character script which we are going to use for our CharacterData class later on.
The purpose of this script is to allow the UI elements to update the character’s data on an update. For example, if we type a name for our character, the value of the string in the character script will also be updated. Same with the other variables.
So if you don’t have a character script yet, head back to Unity and create a new C# script and name it Character.cs and copy the following code.
using System.Collections;
using System.Collections.Generic;
using UnityEngine;
using UnityEngine.UI;

public class Character : MonoBehaviour
{
    public string name;
    public int strength;
    public int intelligence;
    public int agility;

    public void UpdateName(InputField inputField)
    {
        name = inputField.text;
    }

    public void UpdateStrength(InputField inputField)
    {
        strength = int.Parse(inputField.text);
    }

    public void UpdateIntelligence(InputField inputField)
    {
        intelligence = int.Parse(inputField.text);
    }

    public void UpdateAgility(InputField inputField)
    {
        agility = int.Parse(inputField.text);
    }

}
As you can see in the code above, all we did is to create a set of variables and set of functions that we’re going to reference for our UI elements. If you also noticed, we intentionally created an integer variable because most UI elements give you a string value. That’s why we have to parse it from string to int using int.Parse() function.
For that, save the script and head back to Unity.
Once everything is saved, apply the Character.cs to your player game object or any game object that represents your player. In our case, that’ll be our Warrior Idle game object.
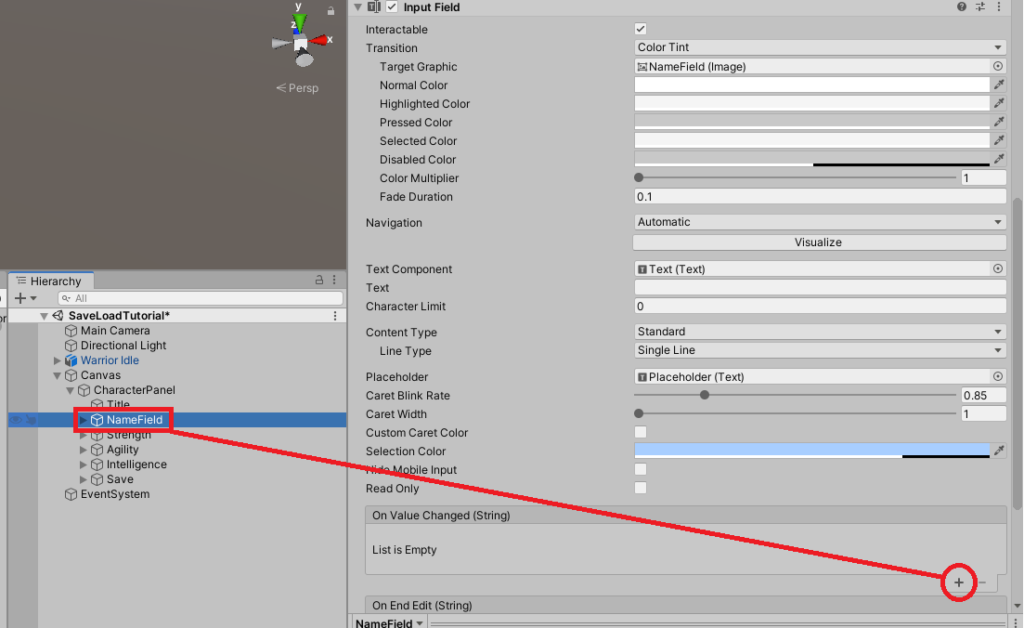
Next, we will add one event to each of our input fields so that the variables that we created above will have the values of the input fields we have on our scene.
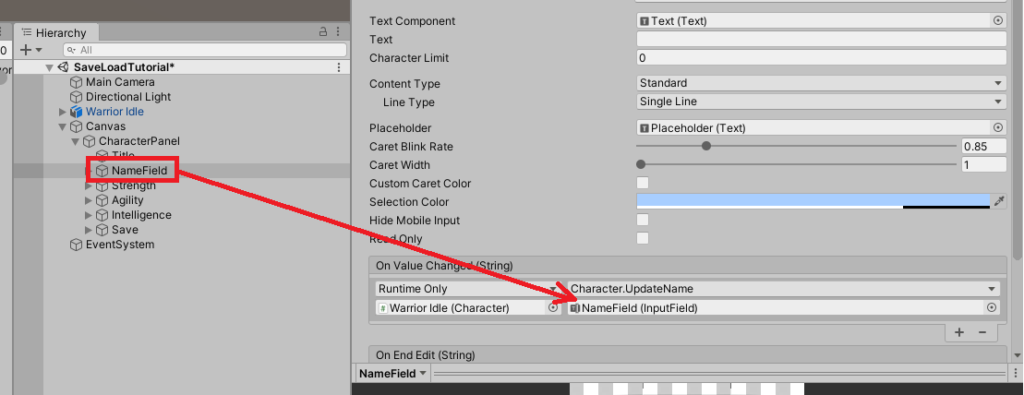
With that being said, select NameField game object and navigate to its Input Field component and click the plus button right under the On Value Changed event.
Next, drag the character game object (which contains the Character.cs script that we created earlier) onto the Object input.
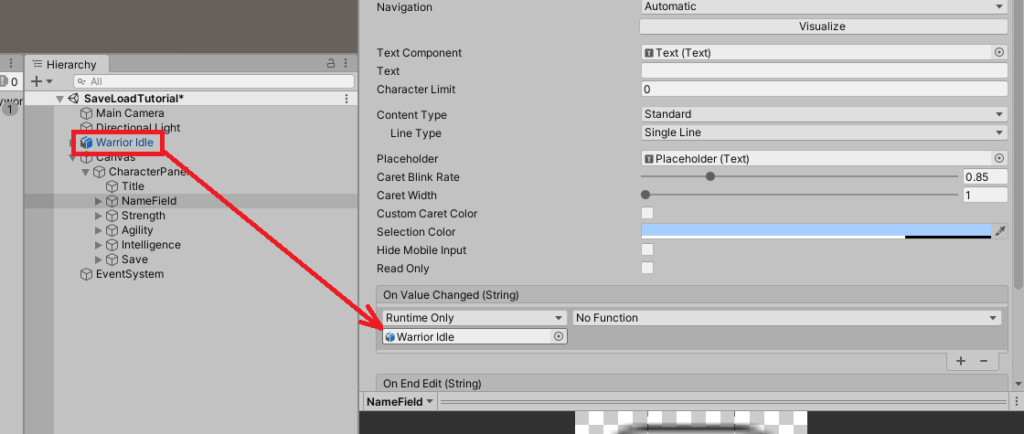
Next, select the dropdown No Function and look for Character > UpdateName

And lastly, drag the NameField game object onto the blank InputField.
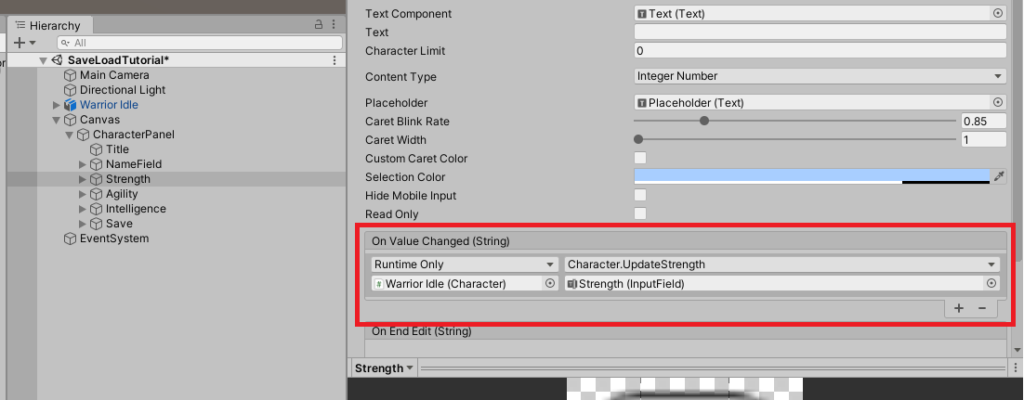
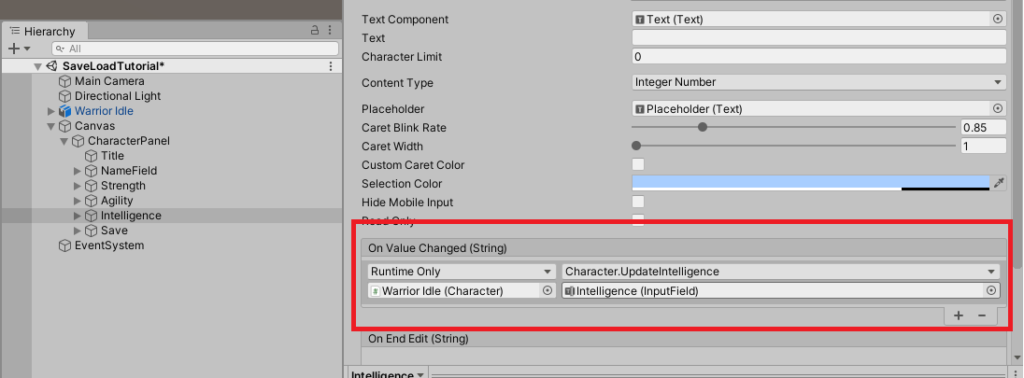
After that, just do the same process for the other input fields but the only difference is the functions that you need to apply for the rest input fields. Use the following as your guide.

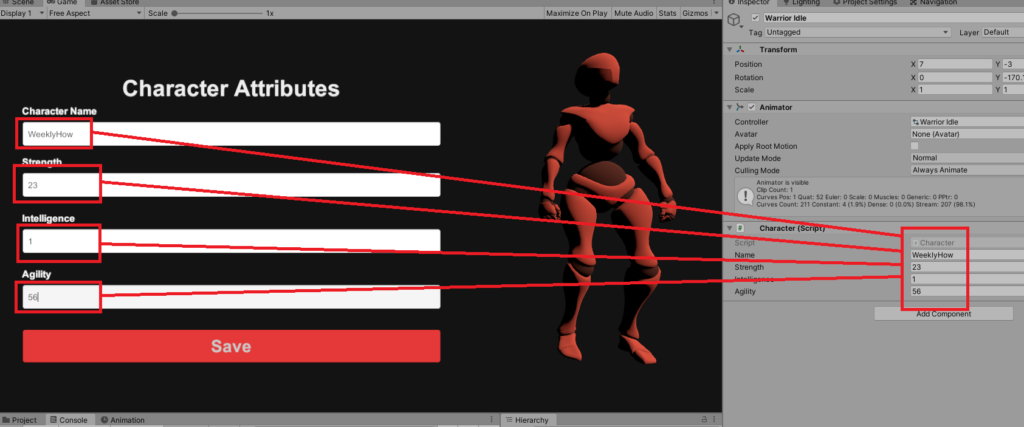
With all that being done. Run the game and you should be able to see all the variables updates when you change the values of the input fields.
Awesome! Now we can actually start creating the class for our save/load game feature.
Creating the Class
Now that we know which data we wanted to save, let’s start creating the class that we’re going to be using for saving.
Go to your Assets folder and create a new C# script and call it CharacterData.cs and copy the following code.
using System.Collections;
using System.Collections.Generic;
using UnityEngine;

[System.Serializable]
public class CharacterData
{
    public string characterName;
    public int strength;
    public int intelligence;
    public int agility;

    public CharacterData(Character character)
    {
        characterName = character.name;
        strength = character.strength;
        intelligence = character.intelligence;
        agility = character.agility;
    }
}

Code language: PHP (php)
As you can see in the code above, this script is never going to be used as MonoBehaviour. Instead, we’ll use this script as the source of the data for our save script.
Save/Load Script
Now that we have our data accessible, let’s start creating the functions for our saving and loading feature.
Head back to our assets folder and create a new C# script and call it SaveLoad.cs and copy the following code.
using System.Runtime.Serialization.Formatters.Binary;
using System.IO;
using UnityEngine;

public static class SaveLoad
{
    public static void SaveData(Character character)
    {
        BinaryFormatter formatter = new BinaryFormatter();
        string path = Application.persistentDataPath + "/Game.weeklyhow";

        FileStream stream = new FileStream(path, FileMode.Create);

        CharacterData charData = new CharacterData(character);

        formatter.Serialize(stream, charData);
        stream.Close();
    }

    public static CharacterData LoadData()
    {
        string path = Application.persistentDataPath + "/Game.weeklyhow";

        if(File.Exists(path))
        {
            BinaryFormatter formatter = new BinaryFormatter();
            FileStream stream = new FileStream(path, FileMode.Open);

            CharacterData data = formatter.Deserialize(stream) as CharacterData;

            stream.Close();

            return data;
        } else
        {
            Debug.LogError("Error: Save file not found in " + path);
            return null;
        }
    }
}

Code language: PHP (php)
To explain the code above, all we did is to firstly make sure that we’re using the right namespaces, this includes the UnityEngine, System.IO, and the System.Runtime.Serialization.Formatters.Binary.
UnityEngine namespace will be used obviously for UnityEngine’s built-in functions. System.IO namespace will be used for accessing Input and Output files in our system. Lastly, System Binary Formatter is used to format our data from our game into binary data.
Secondly, we have to make sure that our SaveLoad script is not a MonoBehaviour script and it must be a static class. That way our SaveLoad class can still be accessed even without having it being instantiated.
Thirdly, we create two functions for saving and loading data.
Inside these two functions, we used the binary formatter to ensure that our data is secured and cannot be easily read by players. Then, we created a file stream that we’re going to use for creating and opening the files that we saved onto our system. Then finally, we close the stream.
With all that being said, save the script and head back to Unity and we’ll start using these functions to save and load our game.
Saving the Game
Like what we showed you at the beginning of this tutorial, we have a save button which we are going to use for calling the SaveData function of our SaveLoad.cs script.
Before we can do that, we need to create a function that will call the SaveData function. We do this by either creating a new script or by just adding a new function in our Character.cs script.
So for the sake of simplicity of this tutorial, we’ll just open our Character.cs script and update its code to:
using System.Collections;
using System.Collections.Generic;
using UnityEngine;
using UnityEngine.UI;

public class Character : MonoBehaviour
{
    public string name;
    public int strength;
    public int intelligence;
    public int agility;

    public void UpdateName(InputField inputField)
    {
        name = inputField.text;
    }

    public void UpdateStrength(InputField inputField)
    {
        strength = int.Parse(inputField.text);
    }

    public void UpdateIntelligence(InputField inputField)
    {
        intelligence = int.Parse(inputField.text);
    }

    public void UpdateAgility(InputField inputField)
    {
        agility = int.Parse(inputField.text);
    }


    public void SaveGame()
    {
        SaveLoad.SaveData(this);
    }

}
Well, in the code above, all we did is to add one function called SaveGame(). Then, we simply just use our SaveLoad class and call the SaveData() function and apply the character component.
So with that, save the script and head back once again to Unity.
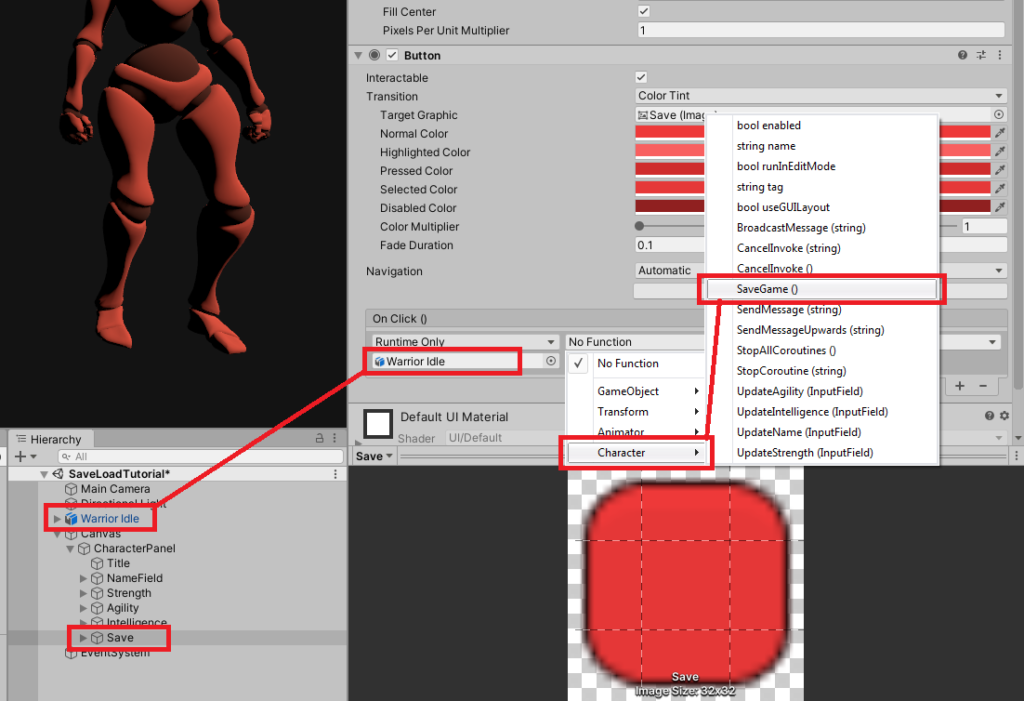
The next thing that we’re going to do is to use this function for our Save button.
So select the Save game object, navigate to its Button component and add a new event and simply apply the Warrior Idle game object and use its Character function SaveGame().
Loading the Game
Now that we are able to save our game, let’s load the data that we saved onto our system.
There are many ways to do this as well, one is to make a load game button, and second is to call the LoadData on start.
What we’re going to do here is to actually load the data at the start of the game. So for that, we’ll have to update our Character.cs script once again and add a Start() function.
using System.Collections;
using System.Collections.Generic;
using UnityEngine;
using UnityEngine.UI;

public class Character : MonoBehaviour
{
    public string name;
    public int strength;
    public int intelligence;
    public int agility;

    [SerializeField]
    private InputField _name;

    [SerializeField]
    private InputField _strength;

    [SerializeField]
    private InputField _intelligence;

    [SerializeField]
    private InputField _agility;

    void Start()
    {
        CharacterData data = SaveLoad.LoadData();

        name = data.characterName;
        strength = data.strength;
        intelligence = data.intelligence;
        agility = data.agility;

        _name.text = name;
        _strength.text = strength.ToString();
        _intelligence.text = intelligence.ToString();
        _agility.text = agility.ToString();
    }

    public void UpdateName(InputField inputField)
    {
        name = inputField.text;
    }

    public void UpdateStrength(InputField inputField)
    {
        strength = int.Parse(inputField.text);
    }

    public void UpdateIntelligence(InputField inputField)
    {
        intelligence = int.Parse(inputField.text);
    }

    public void UpdateAgility(InputField inputField)
    {
        agility = int.Parse(inputField.text);
    }


    public void SaveGame()
    {
        SaveLoad.SaveData(this);
    }

}
For the update above, super simple, we created a set of new variables for accessing the InputFields in our level. Then, add the start function and use the SaveLoad class to get the data from our save file and assign it to a new CharacterData variable. Then, we’ll just simply replace the values of our Character’s name, strength, intelligence, and agility variable.
That’s all.
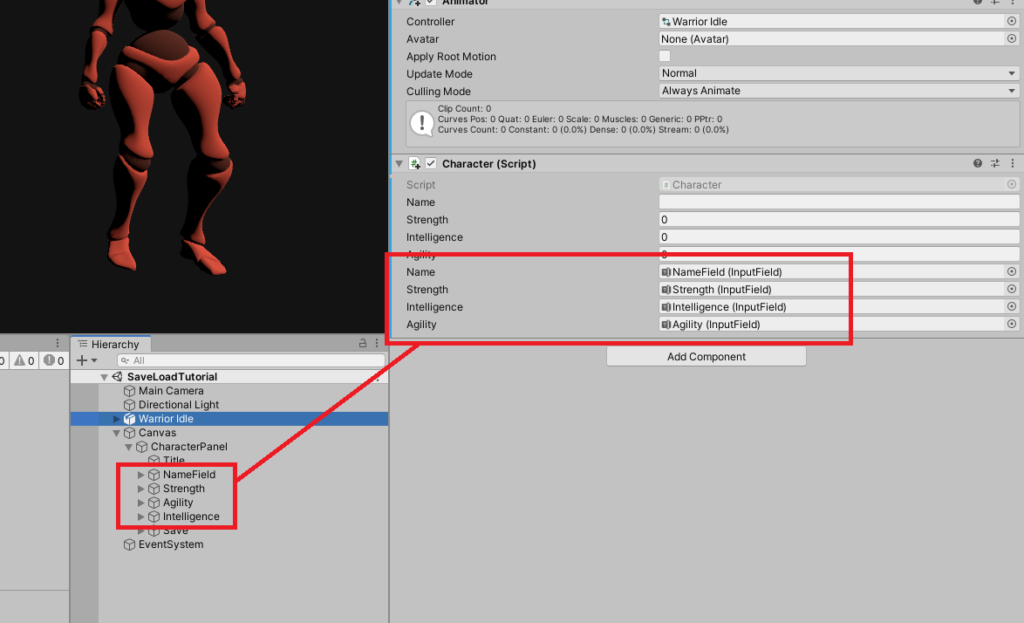
If we save our script and head back to Unity and assign the InputFields in our Character script. Like below.
Then if we try our game, we should see an error that says that our game can’t find the save file.

This is because we haven’t actually saved our game. So let’s do that. We’ll type some random values on our input fields and click save.
Then after that, we’ll unload the game and reload the game.
We should be able to load the data that we entered in our previous run.
Conclusion
And there you have it! You can now save and load your game data using your own binary file. If you are curious about where you can find your save file. You can simply just debug log the persistentDataPath of your game and it will show you the complete path to your file.
Debug.Log(Application.persistentDataPath);Code language: CSS (css)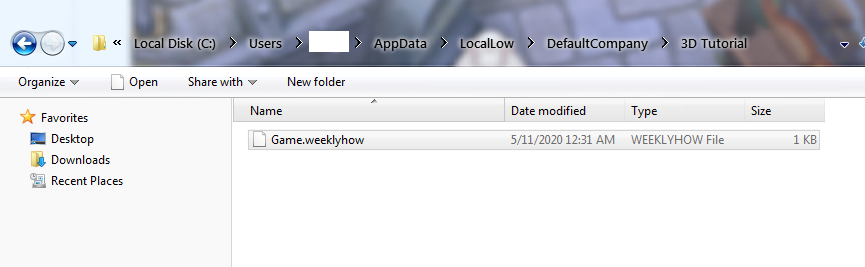
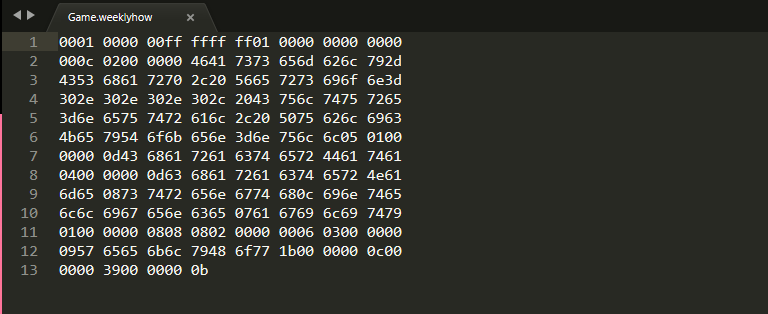
What’s amazing about this is that, if you try to open the file, the file will only give you a set of binary codes, which is not easy to parse using other software.
If in any case, you encountered an error through your reading, please don’t hesitate to let us know in the comments below and we’ll try our best to give you answers to your questions.
If you successfully implemented the system, let us know how you feel about it by using the following emoticons. 🙂
Disclosure: This article may contain affiliate links, which means we may receive a commission if you click a link and purchase something that we have recommended.
This is a great tutorial! However, how could it be applied with the easy save asset you recommend? Could you go over that for me a little bit?? I bought the asset but I think I missed something with this tutorial and also the asset documentation