So you’re building a web application where users can signup to your website and access your web application but then, you realized that your web application can bring you hundreds if not, thousands of revenue.
However, you don’t really know exactly where to start.
In this tutorial, we will learn how to create monthly subscription plans using Laravel 7 and Cashier to get payments from users through Stripe (or their credit cards)
What is Laravel Cashier

Laravel cashier is a package from Laravel that provides an expressive and fluent interface to Stripe’s subscription billing services. With Laravel Cashier, you can create coupons, subscription plans, and even generate invoice PDFs.
It’s safe to say that almost everything you need to create a flawless subscription system is in Laravel cashier.
How to install Laravel Cashier
To install Cashier in Laravel, all you need to do is to use the following command in your terminal:
composer require laravel/cashierCode language: JavaScript (javascript)
It’s important to note that we will be using a pre-setup project for this tutorial. If you don’t know how to create a project in Laravel, you may check out our guide here.
After installation, you will then have to use the following command to create the database for the cashier:
php migrate artisanThe command should give you the following in the terminal.

After the migration, you can see in your database that there are two new tables which are for subscriptions and other items.

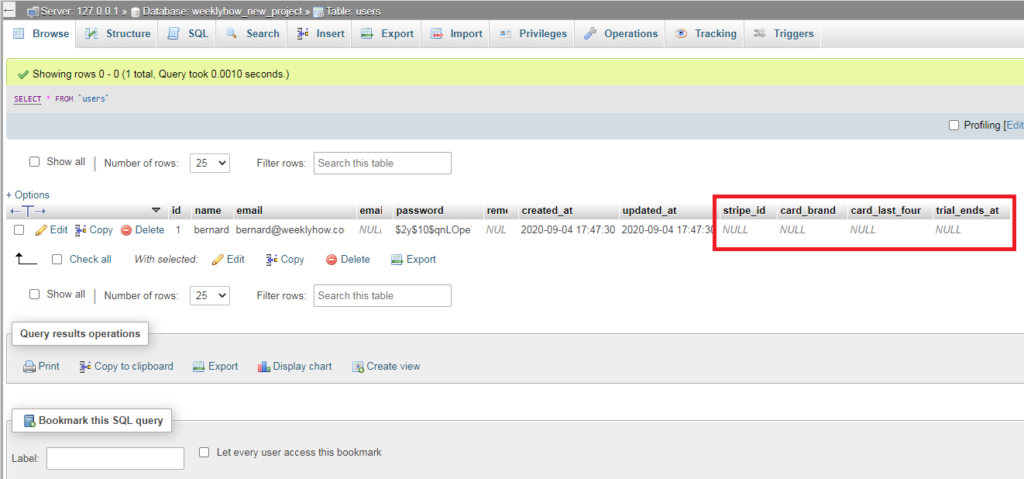
Cashier will also add 4 columns inside the users table. These columns are for the card details and for when the trial will end (if any).

Stripe API
Before we begin using Laravel Cashier, we need to create an account from Stripe to get API keys and secret keys for Cashier.
If you already have an account, you may skip this step. Otherwise, you may register using the button below:
After the registration and email verification for your account.
Go to Developers tab and select the API keys page.

Since our account is not activated, we can only use the standard keys.
Under the standard keys section, you can copy the following keys. The publishable key is your API key and the secret key is your secret key.
Now let’s apply these keys to our application.
Open your .env file and copy the following code:
STRIPE_KEY=pk_test_xxxxxxxxxxxxxxxxxxxxxxxxxx
STRIPE_SECRET=sk_test_xxxxxxxxxxxxxxxxxxxxxxxxx
Make sure to replace the value with your API key and secret key.
Don’t forget to save the .env file.
User’s Billable
For us to be able to perform common billing tasks such as subscriptions, we will have to add the Billable trait to our User model.
Let’s open User.php
Go to your project folder > app > User.php

Then, just underneath the line of use Illuminate\Notifications\Notifiable;, apply the following code:
use Laravel\Cashier\Billable;
Code language: PHP (php)
Then, just beside the Notifiable, you can just add Billable.
The updated code should have the following:

Save the script.
And there we have it, we have finally installed and setup Cashier to our Laravel application.
Creating a subscription
Now that we have installed Cashier in our Laravel application, we can now start creating subscription plans for our users.
Create products with Stripe
Luckily, we can all do this with our Stripe account so login to our Stripe dashboard and navigate to the products page and click the Add Product button.

A form should pop up as soon as you press the add product button.
Fill up the form.
| Name | This will be the name of the subscription plan. Note that this is visible to customers at checkout and in their receipts or invoices. |
| Description * | To describe what the plan can do for users. Note that this is also visible to users at checkout. |
| Image * | You may upload an image to describe the subscription plan. Totally optional |
| Statement descriptor * | Statement descriptor is what will be shown to your customer’s bank statement. |
| Unit label * | This is used to describe how you sell your product. For example, if you sell a product by its weight, then you can enter either kg or any unit. Since we’re creating a plan, you can just leave this empty. |
| Metadata * | If you want to store additional data, you can create it here. |
| Pricing model | Choose standard pricing if your selling subscription plans or one time payment items. Change to package pricing if you are selling products by units. Select graduated pricing if you use pricing tiers that changes the price for some units in an order. Select volume pricing if you want to charge your customers based on the quantity or units. |
| Price | Enter the amount that you want to charge your customers. You can also select if you want to charge your customers monthly or one time only. |
| Billing period | Here you can select if you want to charge your customers daily, weekly, monthly or yearly (and so on). |
| Add free trial * | If you want to give your customers a trial, you can set how many days before they will be charged. |
| Usage is metered * | Metered billing lets you charge your customers based on their usage. |
| Price description * | Something you can use to describe the price. |
Once you’re done filling up the form, you can save by clicking the Save button at the top-right of the page.
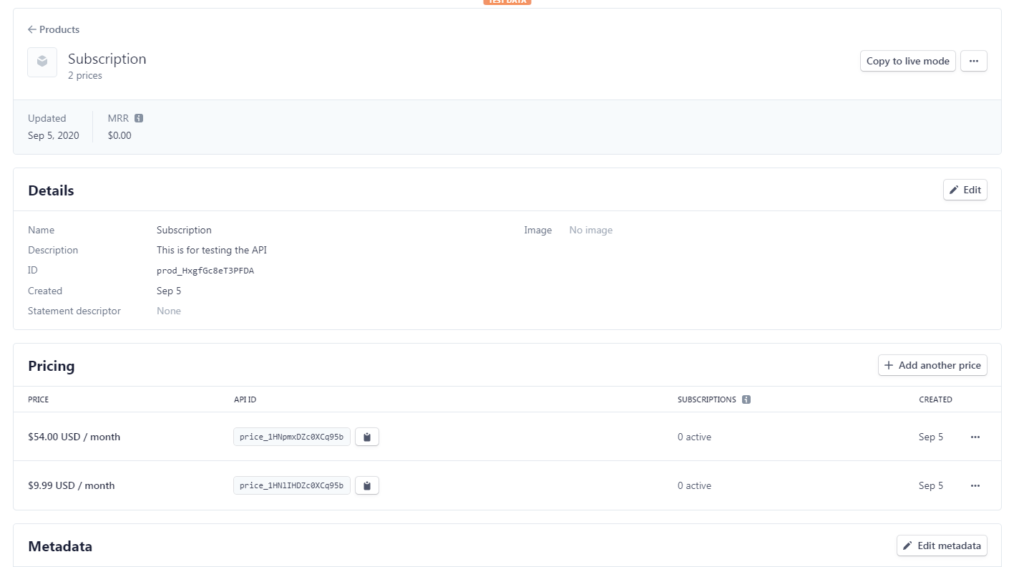
After saving, you will be redirected to the product’s page.

In the image above, we have created only two pricing. If you want to add more, feel free to do so.
So what we really need here is the API ID beside each of the pricing. We’re going store them in our database so it will be much easier to access them rather than going back to stripe.
Creating the model
Open your terminal and run the following code:
php artisan make:model Plans -mCode language: CSS (css)This will create a migration file for us which we’ll then edit for our subscription plans.
So open the file which is located inside the migrations folder of the database folder.

Once you have accessed the file, copy the following code:
<?php

use Illuminate\Database\Migrations\Migration;
use Illuminate\Database\Schema\Blueprint;
use Illuminate\Support\Facades\Schema;

class CreatePlansTable extends Migration
{
    /**
     * Run the migrations.
     *
     * @return void
     */
    public function up()
    {
        Schema::create('plans', function (Blueprint $table) {
            $table->id();
            $table->string('title');
            $table->string('identifier')->unique;
            $table->string('stripe_id')->unique;
            $table->timestamps();
        });
    }

    /**
     * Reverse the migrations.
     *
     * @return void
     */
    public function down()
    {
        Schema::dropIfExists('plans');
    }
}

Code language: PHP (php)
Save the file and open your terminal once again and run the following command
php artisan migrateThis will create the table in your database.

Now click the plans table.
We will have to insert two rows in this table or depending on how many plans you have created in your Stripe account.
So we’ll just go over the SQL page and use the following SQL query to insert our first row.
INSERT INTO plans(`title`,`identifier`,`stripe_id`,`created_at`,`updated_at`) VALUES ('Premium Plan','premium','ENTER YOUR API ID HERE',NOW(),NOW())Code language: JavaScript (javascript)Make sure you enter your API ID which you can find beside the pricing of your Stripe product.

Then, another SQL query:
INSERT INTO plans(`title`,`identifier`,`stripe_id`,`created_at`,`updated_at`) VALUES ('Basic Plan','basic','ENTER YOUR API ID HERE',NOW(),NOW())Code language: JavaScript (javascript)Your table should look like this:

Creating the subscription controller
The next thing that we need to create is the controller for our subscription plans. So open your terminal again and run the following command:
php artisan make:controller Subscriptions\SubscriptionControllerCode language: CSS (css)This will create Subscriptions folder and a new file named SubscriptionController.php
You can access them under app > Http > Controllers

Open SubscriptionController.php and update its code to the following:
<?php

namespace App\Http\Controllers\Subscriptions;

use App\Plans;
use App\Http\Controllers\Controller;
use Illuminate\Http\Request;

class SubscriptionController extends Controller
{
    public function index() {
        $plans = Plans::get();

        return view('subscriptions.plans', compact('plans'));
    }
}

Code language: PHP (php)
Creating the subscription plans view
Navigate to your views folder which is located inside the resources folder.
Then, create a new folder and name it subscriptions.
Then, inside the subscriptions folder, create a new file and name it plans.blade.php.

Open the plans.blade.php and copy the following code:
@extends('layouts.app')

@section('content')
<div class="container">
    <div class="row justify-content-center">
        <div class="col-md-8">
            <div class="card">
                <div class="card-header">{{ __('Subscription Plans') }}</div>

                <div class="card-body">
                    @foreach($plans as $plan)
                        <div>
                            <a href="{{ route('payments', ['plan' => $plan->identifier]) }}">{{$plan->title}}</a>
                        </div>
                    @endforeach
                </div>
            </div>
        </div>
    </div>
</div>
@endsection


Code language: PHP (php)
Adding routes
Open web.php which located inside the routes folder and update its code to the following:
<?php

use Illuminate\Support\Facades\Route;

/*
|--------------------------------------------------------------------------
| Web Routes
|--------------------------------------------------------------------------
|
| Here is where you can register web routes for your application. These
| routes are loaded by the RouteServiceProvider within a group which
| contains the "web" middleware group. Now create something great!
|
*/

Route::group(['namespace' => 'Subscriptions'], function() {
    Route::get('plans', 'SubscriptionController@index')->name('plans');
});

Route::get('/', function () {
    return view('welcome');
});

Auth::routes();

Route::get('/home', 'HomeController@index')->name('home');

Code language: PHP (php)
This should allow you to access the plans page like below

Creating payment controller
Open your terminal once again and use the following command to create the PaymentController.
php artisan make:controller Subscriptions\PaymentControllerCode language: CSS (css)After that, navigate to your project folder > app > Http > Controllers > Subscription and open PaymentController.php and copy the following code:
<?php

namespace App\Http\Controllers\Subscriptions;

use App\Http\Controllers\Controller;
use Illuminate\Http\Request;

class PaymentController extends Controller
{
    public function index() {
        $data = [
            'intent' => auth()->user()->createSetupIntent()
        ];

        return view('subscriptions.payment')->with($data);
    }

    public function store(Request $request) {

    }
}

Code language: PHP (php)
So, what we’re doing here is we’re just passing to our payment view the intent value from the createSetupIntent() function.
Since we still don’t have the said view, let’s go and create that file.
Creating the payment view
Go to your resources folder and open the views folder and inside the subscriptions, create a new file and name it payment.blade.php.
Then copy the following code:
@extends('layouts.app')

@section('content')
<div class="container">
    <div class="row justify-content-center">
        <div class="col-md-8">
            <div class="card">
                <div class="card-header">{{ __('Checkout page') }}</div>

                <div class="card-body">
                    <form id="payment-form" action="{{ route('payments.store') }}" method="POST">
                        @csrf
                        <input type="hidden" name="plan" id="plan" value="{{ request('plan') }}">
                        <div class="form-group">
                            <label for="">Name</label>
                            <input type="text" name="name" id="card-holder-name" class="form-control" value="" placeholder="Name on the card">
                        </div>
                        <div class="form-group">
                            <label for="">Card details</label>
                            <div id="card-element"></div>
                        </div>

                        <button type="submit" class="btn btn-primary w-100" id="card-button" data-secret="{{ $intent->client_secret }}">Pay</button>
                    </form>
                </div>
            </div>
        </div>
    </div>
</div>

<script>
    const stripe = Stripe('{{ config('cashier.key') }}')

    const elements = stripe.elements()
    const cardElement = elements.create('card')

    cardElement.mount('#card-element')

    const form = document.getElementById('payment-form')
    const cardBtn = document.getElementById('card-button')
    const cardHolderName = document.getElementById('card-holder-name')

    form.addEventListener('submit', async (e) => {
        e.preventDefault()

        cardBtn.disabled = true
        const { setupIntent, error } = await stripe.confirmCardSetup(
            cardBtn.dataset.secret, {
                payment_method: {
                    card: cardElement,
                    billing_details: {
                        name: cardHolderName.value
                    }
                }
            }
        )

        if(error) {
            cardBtn.disable = false
        } else {
            let token = document.createElement('input')

            token.setAttribute('type', 'hidden')
            token.setAttribute('name', 'token')
            token.setAttribute('value', setupIntent.payment_method)

            form.appendChild(token)

            form.submit();
        }
    })
</script>
@endsection

Code language: PHP (php)
Next, go to your routes folder again and open the web.php file and update its code to the following:
<?php

use Illuminate\Support\Facades\Route;

/*
|--------------------------------------------------------------------------
| Web Routes
|--------------------------------------------------------------------------
|
| Here is where you can register web routes for your application. These
| routes are loaded by the RouteServiceProvider within a group which
| contains the "web" middleware group. Now create something great!
|
*/

Route::group(['namespace' => 'Subscriptions'], function() {
    Route::get('plans', 'SubscriptionController@index')->name('plans');
    Route::get('/payments', 'PaymentController@index')->name('payments');
    Route::post('/payments', 'PaymentController@store')->name('payments.store');
});

Route::get('/', function () {
    return view('welcome');
});

Auth::routes();

Route::get('/home', 'HomeController@index')->name('home');

Code language: PHP (php)
Now the next thing that we need to do is to make sure that we’re referencing the JavaScript file of Stripe so go and open the app.blade.php and add the following script tag inside the head tags.
<script src="https://js.stripe.com/v3/"></script>Code language: HTML, XML (xml)After adding the script tag, you should then be able to run your app like below.

Awesome!
Creating the subscription
Now the last thing that we need to do is to create the subscription and store the result into our database.
Let’s go and open the PaymentController.php for the very last time and update its code to the following:
<?php

namespace App\Http\Controllers\Subscriptions;

use App\Plans;
use App\Http\Controllers\Controller;
use Illuminate\Http\Request;

class PaymentController extends Controller
{
    public function index() {
        $data = [
            'intent' => auth()->user()->createSetupIntent()
        ];

        return view('subscriptions.payment')->with($data);
    }

    public function store(Request $request) {
        $this->validate($request, [
            'token' => 'required'
        ]);

        $plan = Plans::where('identifier', $request->plan)
            ->orWhere('identifier', 'basic')
            ->first();

        $request->user()->newSubscription('default', $plan->stripe_id)->create($request->token);

        return back();
    }
}

Code language: PHP (php)
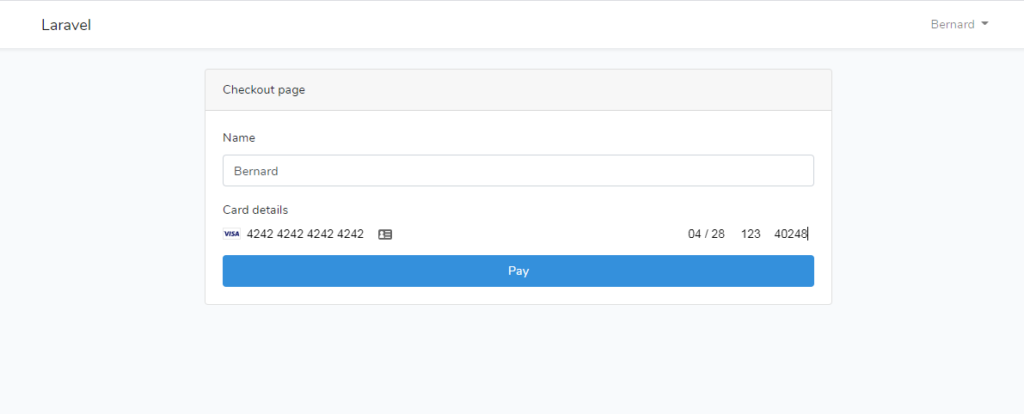
Save the script and enter your test credit card details like below.

It should redirect you back to the payment page and if you check your database, you should see that a new row was created for the table subscriptions and subscriptions_items.

And if you check your Stripe dashboard, you should see that you’ve got the payment.

Conclusion
Adding subscription plans to your web applications can be intimidating but with Laravel cashier and Stripe, creating subscription plans will never be hard anymore.
We’re hoping that this guide helped you to create subscriptions in Laravel. If you have encountered any issues, you may let us know in the comments below and we’ll do our best to help you out.

What a helpful post! But I think one thing missed.
createSetupIntent()
What do you think?
Thanks for this clear tutorials that helps figure out how to implement it. You should consider updating the model namespace for Laravel 8 App\Models\Plans,
Also the stripe keys are not loaded, I had them in PaymentController \Stripe\Stripe::setApiKey(‘sk_key’) in index and store methods
Please I follow your steps and I keep getting this error when I submitted the form
I don’t know why please help.
Unrecognized request URL (GET: /v1/customers/). If you are trying to list objects, remove the trailing slash. If you are trying to retrieve an object, make sure you passed a valid (non-empty) identifier in your code. Please see https://stripe.com/docs or we can help at https://support.stripe.com/.
Hi, that is because in your user table, the stripe_id is BLANK (“”) not NULL.
Thanks for your great tutorials. I followed the same but unfortunately getting ‘The payment attempt failed because of an invalid payment method.’
can you please help me to sort out above
Hello. The best tutorial
I have one question. How to get error like ‘You haven’t money in account bank’ or ‘data error’
hi i get this error when i click on both premium plan and basic plan
i need help thanks
Error
Call to a member function createSetupIntent() on null
(FIXED) Call to a member function createSetupIntent() on null
This error comes because you are logged out
try
@if (Auth::check() && !$user->subscribed())
(FIXED) Call to a member function createSetupIntent() on null
This error comes because you are logged out
try this
@if (Auth::check() && !$user->subscribed())