
One of the advantages of Shopify development is being able to customize your theme without programming. However, there are instances that you may want to make your store look a certain way. Now here’s the problem. Your theme doesn’t allow you to customize it. Because of that, your only option is to build the theme features yourself.
As an example, you may want to add social links under your products so customers can either bookmark the product or share it with their friends.
In this tutorial, we’re going to learn about Shopify theme development to customize or create a custom Shopify theme with Slate, all from scratch.
Getting Started
To start building a custom theme for Shopify, you need to create a partner account. You can do this by going to their official partner page and by clicking the “join now” button.
After you create a partner account, you can create a free development store to test your custom themes as you build it.

After creating a development store, Shopify will redirect you to your store admin page. There you can start adding products, collections, etc.
Now, to make this tutorial short but handy, I will assume that you already have products and collections. Why? because we want to focus on theme development. Besides, adding products and collections is very easy. You can do that by yourself 😉
Theme Development Tools
The next step in building Shopify themes is to select which theme development tools you’d want to use. Currently, there are three theme development tools for creating Shopify themes:
Slate
If you have experience with command prompt then Slate might be a good option for you. Slate is more of a command-line tool for developing Shopify themes. It works to help you speed up the process of your development, testing, and deployment to Shopify.
Shopify Theme Kit
Another tool for theme development is the Shopify Theme Kit. It is also a command-line tool that allows you to upload themes into multiple environments.
Now, what is the difference between Shopify Theme Kit and Slate?
Slate is a tool built on top of ThemeKit whereas ThemeKit is just a client with the themes API which is why it allows you to use whatever tools you need on top.
Shopify Online Code Editor
If you’re lazy downloading tools or anything, this is the tool that you may want to use. A very basic code editor for developing Shopify themes. The only disadvantage with this tool is that it doesn’t allow you to create the actual files.
Which Shopify theme development tool do you think is the best? I would say, Slate.
Why? because I believe with Slate, you have more control over your projects compared to the rest of the tools.
With that being said, we’re going to create a custom Shopify theme using Slate.
Create a New Theme with Slate
Creating a new theme with Slate is very simple. All you need to run a single command and command prompt will do all the job for you.
npx create-slate-theme name-of-my-themenpx | A tool for using packages from npm registry |
create-slate-theme | A package that allows users to create a new Slate project with a single command. |
name-of-my-theme | Name of your project. (must be lowercased and no use of spaces. If so, use a dash instead) |
We highly recommend using either yarn create or npx to create a new Slate project. If you don’t know any of these, we suggest you learn NodeJS.
If you already have node installed on your computer, run the following command with command prompt.
mkdir WeeklyHowCustomTheme && cd WeeklyHowCustomThemeAnd then use the command
npx create-slate-theme weeklyhow-theme
Once the command-line finished processing. Use the following command to select your project:
cd weeklyhow-themeCreate a Private App
In your Shopify Admin Dashboard, navigate to apps and select Manage apps.

Then select Create a new app.

Fill up the form and make sure to change the value of theme templates and theme assets to “Read and write”
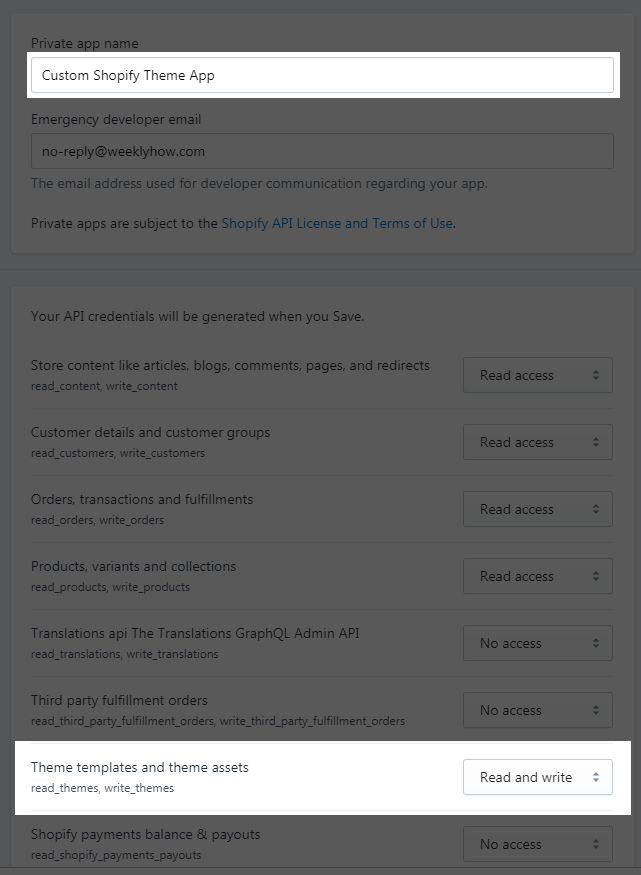
Hit “Save” and click “I understand, create the app“
Connecting to your Store
Now that you have created your Slate project and your Shopify private app. You may proceed to your project folder and open and modify the .env file.
# The myshopify.com URL to your Shopify store
SLATE_STORE={store-name}.myshopify.com

# The API password generated from a Private App
SLATE_PASSWORD=

# The ID of the theme you wish to upload files to
SLATE_THEME_ID=

# A list of file patterns to ignore, with each list item separated by ':' (optional)
SLATE_IGNORE_FILES=config/settings_data.json

# The timeout for upload theme (optional)
SLATE_TIMEOUT=2mCode language: PHP (php)
SLATE_STORE
The URL of your Shopify store. Keep in mind that https:// or anything is not necessary.
SLATE_PASSWORD
Your password is located at the Admin API section of your private app. https://{store-name}.myshopify.com/admin/apps/private
SLATE_THEME_ID
Slate theme ID is the identification number of the theme you wish to upload your files into. You can find your theme ID by navigating to https://{store-name}.myshopify.com/admin/themes.xml

Again the value between the id tag is your SLATE_THEME_ID.
SLATE_IGNORE_FILES
This setting allows you to ignore files from being uploaded to your Shopify store. By default, we want this setting to have a value of config/settings_data.json. This JSON file contains all the data for our theme development but we don’t want this file to overwrite what’s on our Shopify store.
SLATE_TIMEOUT
Setting for request timeout. If you have large files in your project that may take longer than a few seconds to upload then you may want to increase this value. We’ll leave this to 2m (2 minutes) at the moment.
Creating a self-signed SSL Certificate
As you may have guessed it already, Shopify must be served via https. Even if we are under development, installing an SSL certificate is a must.
To create a self-signed SSL certificate, we have to install brew. Now, since we are using Windows PC, we will install chocolatey instead.
Open another command prompt and run the following command
@"%SystemRoot%\System32\WindowsPowerShell\v1.0\powershell.exe" -NoProfile -InputFormat None -ExecutionPolicy Bypass -Command "iex ((New-Object System.Net.WebClient).DownloadString('https://chocolatey.org/install.ps1'))" && SET "PATH=%PATH%;%ALLUSERSPROFILE%\chocolatey\bin"Code language: JavaScript (javascript)Results should be something like this.

After that, run the following command
choco install mkcert
Next, run
mkcert -install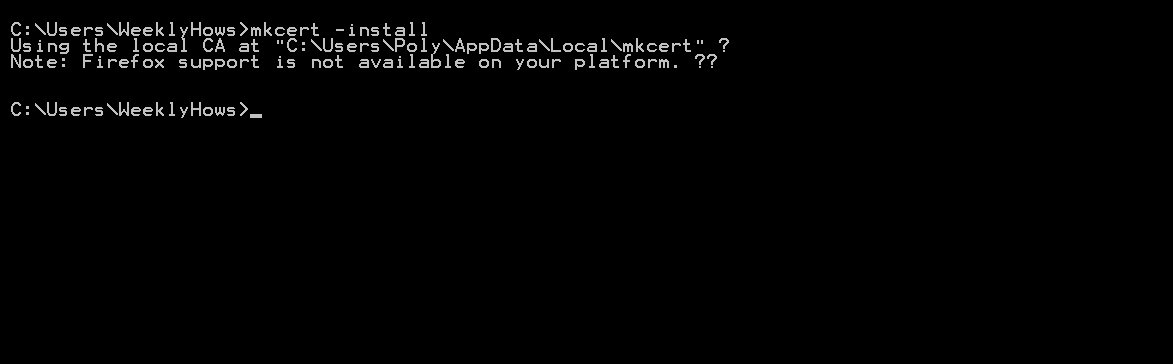
Then
mkcert example.com "*.example.com" example.test localhost 127.0.0.1 ::1Code language: CSS (css)
Deploying the Theme to Shopify
Deploying your custom theme is very easy. All you need to do is to type the following code to your command-prompt and just say yes to the prompt.
npm startThat’s it! You can now start developing your custom theme for Shopify stores.