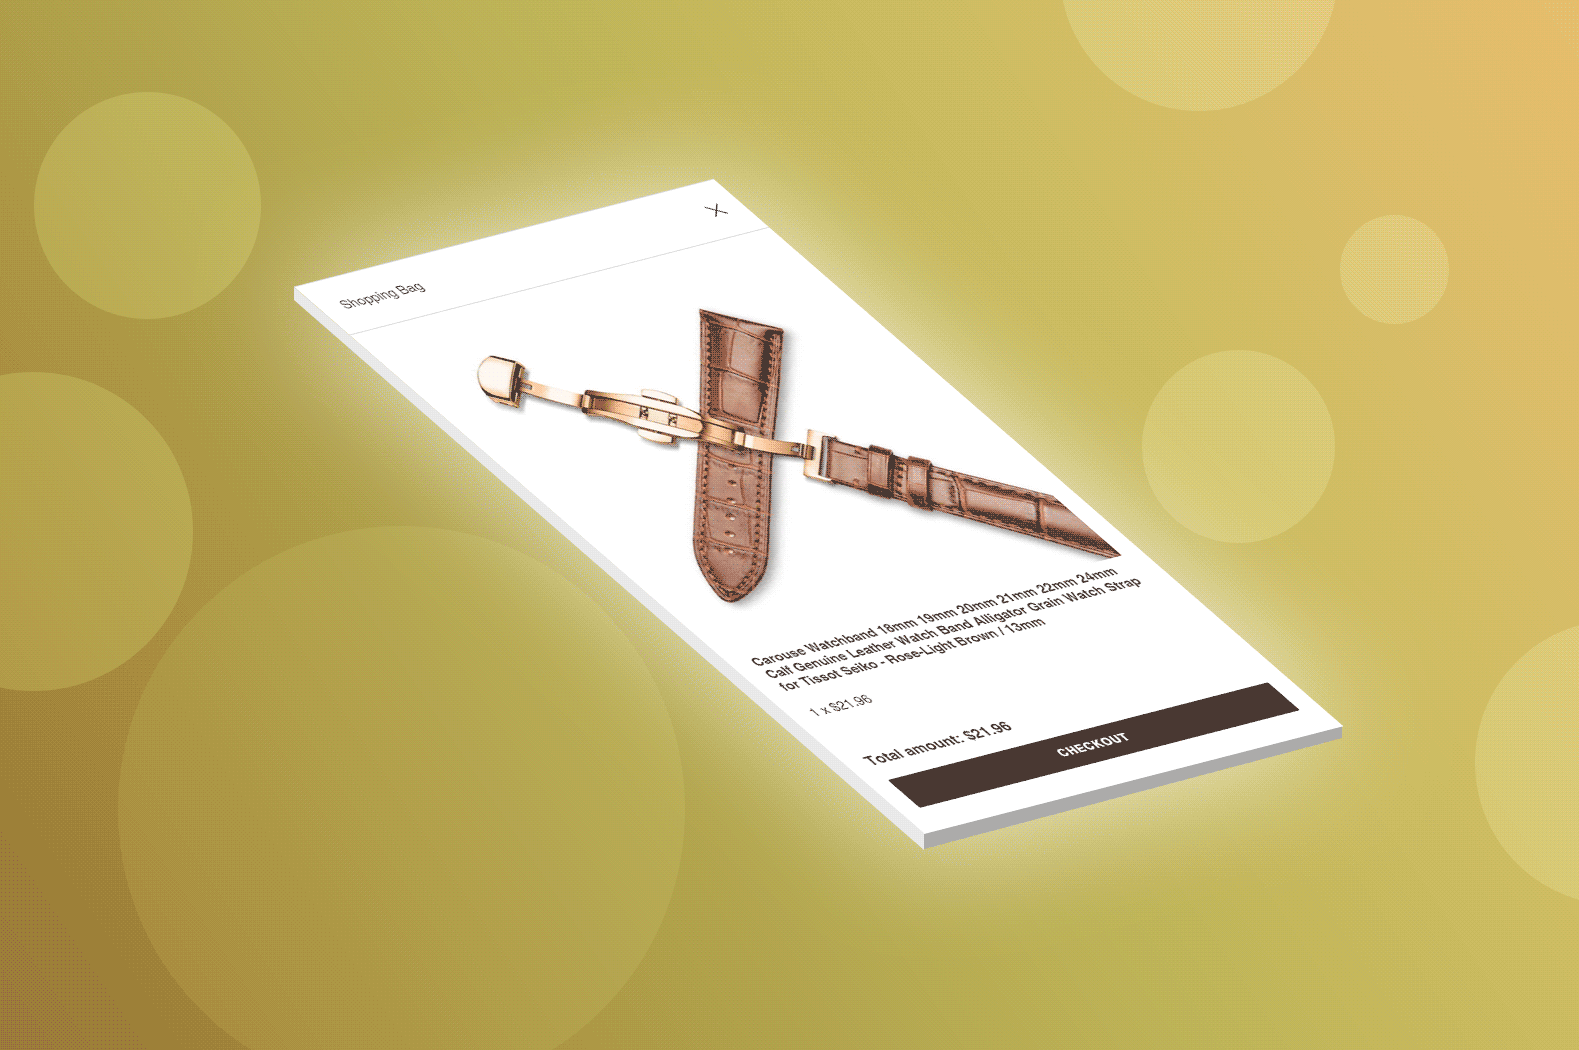
So you have a Shopify store but you personally don’t like how you have to visit the cart page just to see the total amount you need to pay or to proceed to the checkout page. Well, in this article, we will be learning how to create an offset canvas or a cart drawer that displays the items inside of a Shopify store cart without installing Shopify apps.
Video Tutorial
If you prefer watching video tutorials rather than reading, then you can watch the video version of this article below:
Getting Started
Before we can start displaying the items from our cart, we, obviously, need to create the offset canvas or the drawer first. Now, I just want to make a shoutout to Tomasz Bujnowicz for making this amazing easy sliding drawer. So credits to him for making this lesson easier to accomplish.
Anyway, let’s begin! Open your Shopify store admin page and access your code editor.
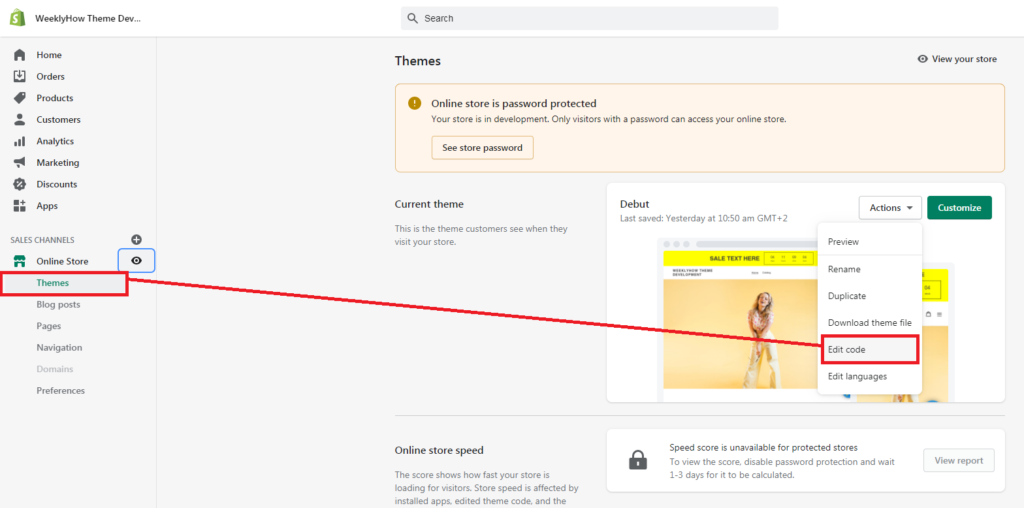
Then, go to the assets folder and create two asset files:
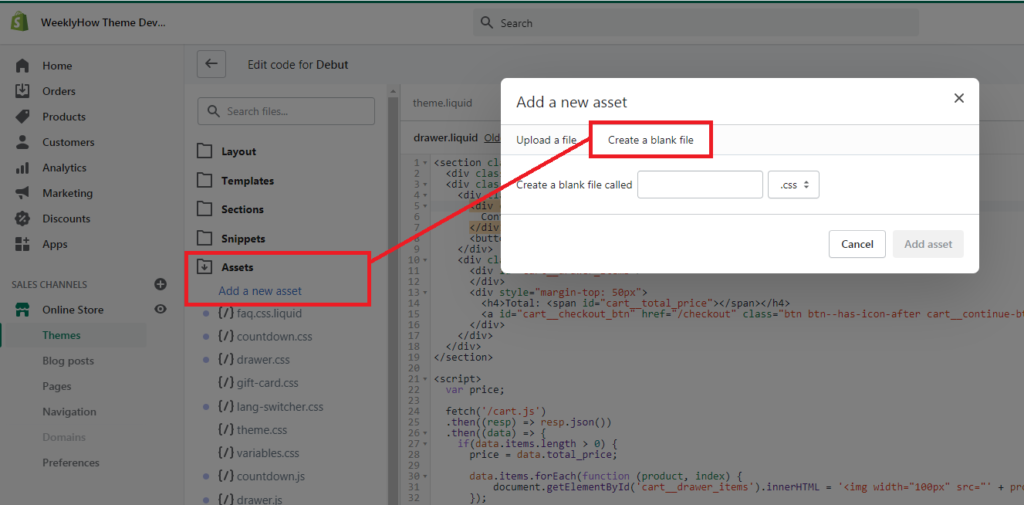
Once you have created the two files, open them and apply the following codes:
Drawer.css
For the styles of the drawer, copy the following code:
.drawer {
  display: none;
}

.drawer__header {
  padding: 1.5rem;
  display: flex;
  justify-content: space-between;
  align-items: center;
  border-bottom: 1px solid #ddd;
}

.drawer__close {
  margin: 0;
  padding: 0;
  border: none;
  background-color: transparent;
  cursor: pointer;
  background-image: url("data:image/svg+xml,%0A%3Csvg width='15px' height='16px' viewBox='0 0 15 16' version='1.1' xmlns='http://www.w3.org/2000/svg' xmlns:xlink='http://www.w3.org/1999/xlink'%3E%3Cg id='Page-1' stroke='none' stroke-width='1' fill='none' fill-rule='evenodd'%3E%3Cg id='2.-Menu' transform='translate(-15.000000, -13.000000)' stroke='%23000000'%3E%3Cg id='Group' transform='translate(15.000000, 13.521000)'%3E%3Cpath d='M0,0.479000129 L15,14.2971819' id='Path-3'%3E%3C/path%3E%3Cpath d='M0,14.7761821 L15,-1.24344979e-14' id='Path-3'%3E%3C/path%3E%3C/g%3E%3C/g%3E%3C/g%3E%3C/svg%3E");
  width: 15px;
  height: 15px;
}

.drawer__wrapper {
  position: fixed;
  top: 0;
  right: 0;
  bottom: 0;
  height: 100%;
  width: 100%;
  max-width: 500px;
  z-index: 9999;
  overflow: auto;
  transition: transform 0.3s;
  will-change: transform;
  background-color: #fff;
  display: flex;
  flex-direction: column;
  -webkit-transform: translateX(103%);
  transform: translateX(103%);
  -webkit-overflow-scrolling: touch;
  box-shadow: 0 2px 6px #777;
}

.drawer__content {
  position: relative;
  overflow-x: hidden;
  overflow-y: auto;
  height: 100%;
  flex-grow: 1;
  padding: 1.5rem;
}

.drawer.is-active {
  display: block;
}

.drawer.is-visible .drawer__wrapper {
  -webkit-transform: translateX(0);
  transform: translateX(0);
}

.drawer.is-visible .drawer__overlay {
  opacity: 0.5;
}

.drawer__overlay {
  position: fixed;
  top: 0;
  right: 0;
  bottom: 0;
  left: 0;
  width: 100%;
  z-index: 200;
  opacity: 0;
  transition: opacity 0.3s;
  will-change: opacity;
  background-color: #000;
  -webkit-user-select: none;
  -moz-user-select: none;
  -ms-user-select: none;
  user-select: none;
}
Code language: CSS (css)
Drawer.js
For the JavaScript of the drawer, copy the following code:
var drawer = function () {
    if (!Element.prototype.closest) {
      if (!Element.prototype.matches) {
        Element.prototype.matches = Element.prototype.msMatchesSelector || Element.prototype.webkitMatchesSelector;
      }
      Element.prototype.closest = function (s) {
        var el = this;
        var ancestor = this;
        if (!document.documentElement.contains(el)) return null;
        do {
          if (ancestor.matches(s)) return ancestor;
          ancestor = ancestor.parentElement;
        } while (ancestor !== null);
        return null;
      };
    }
    var settings = {
      speedOpen: 50,
      speedClose: 350,
      activeClass: 'is-active',
      visibleClass: 'is-visible',
      selectorTarget: '[data-drawer-target]',
      selectorTrigger: '[data-drawer-trigger]',
      selectorClose: '[data-drawer-close]',

    };


    var toggleccessibility = function (event) {
      if (event.getAttribute('aria-expanded') === 'true') {
        event.setAttribute('aria-expanded', false);
      } else {
        event.setAttribute('aria-expanded', true);
      }
    };


    var openDrawer = function (trigger) {
      var target = document.getElementById(trigger.getAttribute('aria-controls'));
      target.classList.add(settings.activeClass);
      document.documentElement.style.overflow = 'hidden';
      toggleccessibility(trigger);


      setTimeout(function () {
        target.classList.add(settings.visibleClass);
      }, settings.speedOpen);
    };

    var closeDrawer = function (event) {
      var closestParent = event.closest(settings.selectorTarget),
        childrenTrigger = document.querySelector('[aria-controls="' + closestParent.id + '"');
      closestParent.classList.remove(settings.visibleClass);
      document.documentElement.style.overflow = '';
      toggleccessibility(childrenTrigger);
      setTimeout(function () {
        closestParent.classList.remove(settings.activeClass);
      }, settings.speedClose);
    };
    var clickHandler = function (event) {
      var toggle = event.target,
        open = toggle.closest(settings.selectorTrigger),
        close = toggle.closest(settings.selectorClose);


      if (open) { openDrawer(open); }
      if (close) { closeDrawer(close); }
      if (open || close) { event.preventDefault(); }
    };


    var keydownHandler = function (event) {
      if (event.key === 'Escape' || event.keyCode === 27) {
        var drawers = document.querySelectorAll(settings.selectorTarget),
          i;
        for (i = 0; i < drawers.length; ++i) {
          if (drawers[i].classList.contains(settings.activeClass)) {
            closeDrawer(drawers[i]);
          }
        }
      }
    };

    document.addEventListener('click', clickHandler, false);
    document.addEventListener('keydown', keydownHandler, false);
};

drawer();
Code language: JavaScript (javascript)
Creating the cart drawer
Now that we finally have the style and the JavaScript code for our cart drawer, we can now create the HTML of the drawer.
Open your Shopify code editor once again and in the sections folder, create a new section file and name it drawer.liquid and apply the following code:
<section class="drawer" id="drawer-name" data-drawer-target>
  <div class="drawer__overlay" data-drawer-close tabindex="-1"></div>
  <div class="drawer__wrapper">
    <div class="drawer__header">
      <div class="drawer__title">
        Continue Shopping
      </div>
      <button class="drawer__close" data-drawer-close aria-label="Close Drawer"></button>
    </div>
    <div class="drawer__content" id="cart__drawer">
      <div id="cart__drawer_items">
      </div>
      <div style="margin-top: 50px">
        <h4>Total: <span id="cart__total_price"></span></h4>
        <a id="cart__checkout_btn" href="/checkout" class="btn btn--has-icon-after cart__continue-btn" style="width:100%;">Proceed Checkout</a>
      </div>
    </div>
  </div>
</section>


<script>
  fetch('/cart.js')
  .then((resp) => resp.json())
  .then((data) => {

    if(data.items.length > 0) {
        data.items.forEach(function(product, index) {
          document.getElementById('drawer_cart_items').innerHTML = '<img src="' + product.featured_image.url + '" alt="' + product.featured_image.alt + '"><h5>' + product.title + '</h5><p>' + product.quantity + ' x ' + theme.Currency.formatMoney(product.line_price, theme.moneyFormat) + '</p>';
      	});
    } else {
      document.getElementById('drawer_cart_items').innerHTML = '<p>Cart is empty</p>';
      document.getElementById('drawer_checkout_btn').setAttribute('disabled', 'disabled');
      document.getElementById('drawer_checkout_btn').style.pointerEvents = 'none';
    }

    document.getElementById('drawer_total_amount').innerHTML = theme.Currency.formatMoney(data.total_price, theme.moneyFormat);

  });
</script>
Code language: HTML, XML (xml)
Awesome! Now that we have all of the codes that we need, we can finally reference all of them in our theme.liquid. So open your theme.liquid and add the following objects inside of the head tag of your theme.liquid:
{{ 'drawer.css' | asset_url | stylesheet_tag }}
{{ 'drawer.js' | asset_url | script_tag }}Code language: JavaScript (javascript)
Next, reference your drawer.liquid using the section tag inside of the body tag of your theme.liquid.
{% section 'drawer' %}Code language: JavaScript (javascript)Awesome! Now, the last thing that we need to do is to customize our header.liquid to trigger the drawer.
Go to your sections folder and open the header.liquid. Once opened, look for the anchor tag ( <a></a> ) that uses either of the following href attribute values:
For example, I have the following:
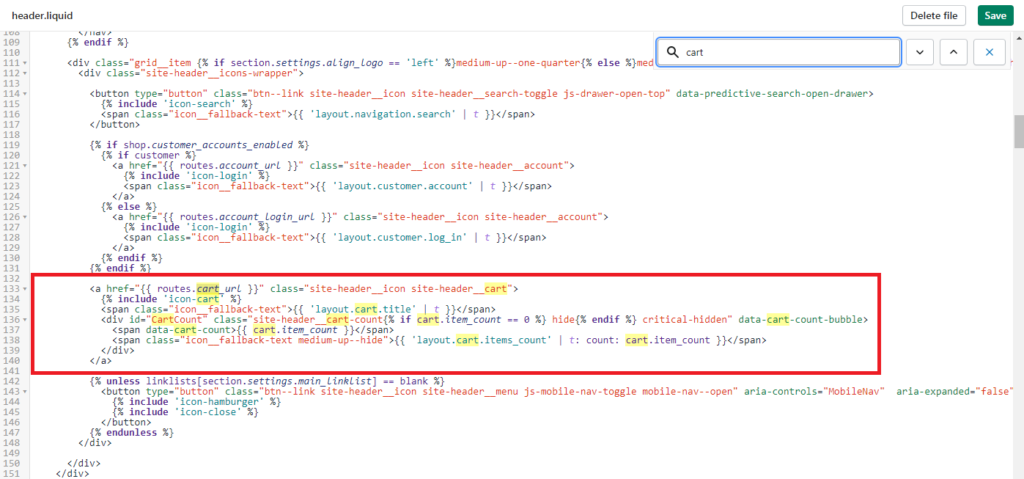
You can always find these elements using the search box ( CTRL + F ).
Once you have found it, replace the value of href attribute with a number sign symbol ( # ).
Then, we’ll apply the following attributes to this anchor tag.
data-drawer-trigger aria-controls="drawer-name" aria-expanded="false"Code language: HTML, XML (xml)So, it should look like this now:
<a href="#" class="site-header__icon site-header__cart" data-drawer-trigger aria-controls="drawer-name" aria-expanded="false">
  {% include 'icon-cart' %}
  <span class="icon__fallback-text">{{ 'layout.cart.title' | t }}</span>
  <div id="CartCount" class="site-header__cart-count{% if cart.item_count == 0 %} hide{% endif %} critical-hidden" data-cart-count-bubble>
    <span data-cart-count>{{ cart.item_count }}</span>
    <span class="icon__fallback-text medium-up--hide">{{ 'layout.cart.items_count' | t: count: cart.item_count }}</span>
  </div>
</a>Code language: HTML, XML (xml)
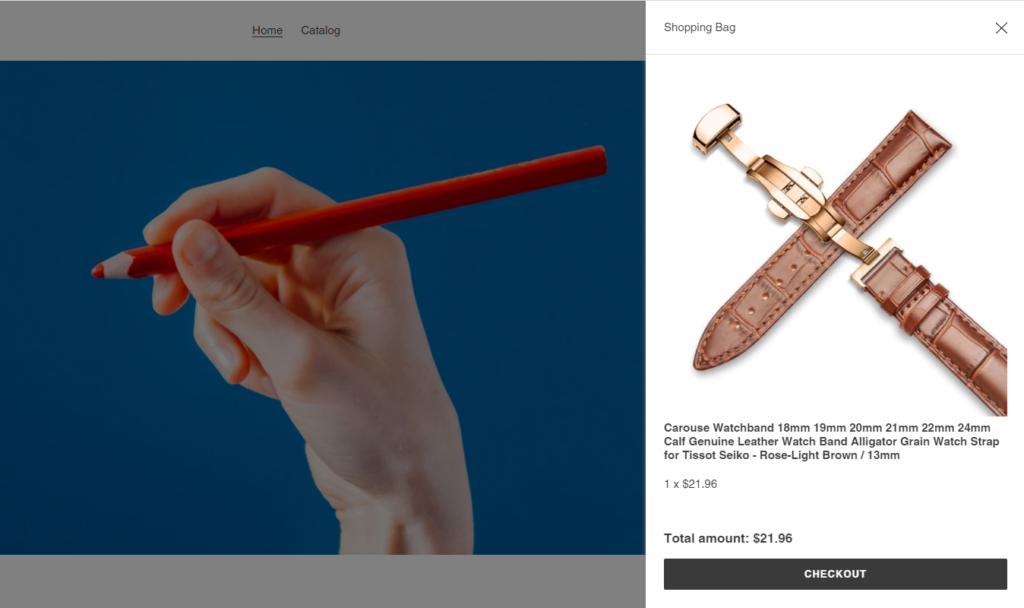
Save the file. Now, that should allow you to display/hide the drawer whenever you click the Shopping bag button.
Conclusion
There you have it! That’s how simple it is to create a drawer for your Shopify stores. Now, for simplicity reasons, this is still not the best way to create a drawer for your Shopify stores. I don’t know if you noticed but the content of the cart will only show once you have either refreshed the page or opened another page. That’s not effective right? So how do you fixed that? Well, that’s when you’ll have to use events for your Shopify theme.
Its no working for me showing many errors and need to fix js code.
why is the bag icon missing
the main issue with this is that you can’t edit the cart which is horrible ux